
carb tune help/procedure
- SWest
-

- Offline
- Sustaining Member
-

Registered
- 10 22 2014
- Posts: 23575
- Thanks: 2954
Re: carb tune help/procedure
17 Jul 2015 19:49
The head of the screws. They did that to cars and trucks in the 70/80's. WARNING, IT IS UNLAWFUL TO REMOVE THESE CAPS. BS. We did it anyway and they ran better and got better mileage.
Steve
Steve
Z1b1000 1975 Z1b
kzrider.com/forum/11-projects/598262-kz-...-will-it-live#672882
kzrider.com/forum/2-engine/597654-poser?start=240#704229
kzrider.com/forum/11-projects/598262-kz-...-will-it-live#672882
kzrider.com/forum/2-engine/597654-poser?start=240#704229
Please Log in or Create an account to join the conversation.
- blink543
-
 Topic Author
- Offline
- User
-

Registered
- Posts: 285
- Thanks: 2
Re: carb tune help/procedure
17 Jul 2015 21:08
So basically what should I do to these carbs to make them run better?
Adam james
Please Log in or Create an account to join the conversation.
- SWest
-
- Offline
- Sustaining Member
-
Registered
- 10 22 2014
- Posts: 23575
- Thanks: 2954
Re: carb tune help/procedure
17 Jul 2015 21:49 - 17 Jul 2015 21:50
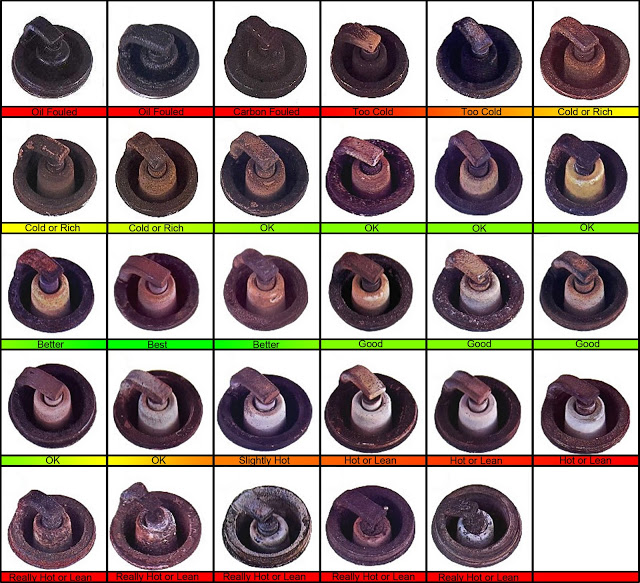
Sync them and check your plugs.
Steve
Steve
Z1b1000 1975 Z1b
kzrider.com/forum/11-projects/598262-kz-...-will-it-live#672882
kzrider.com/forum/2-engine/597654-poser?start=240#704229
kzrider.com/forum/11-projects/598262-kz-...-will-it-live#672882
kzrider.com/forum/2-engine/597654-poser?start=240#704229
Attachments:
Last edit: 17 Jul 2015 21:50 by SWest.
Please Log in or Create an account to join the conversation.
- KZB2 650
-

- Offline
- User
-
Registered
- Posts: 1475
- Thanks: 265
Re: carb tune help/procedure
18 Jul 2015 06:08 - 18 Jul 2015 06:12Patton wrote:blink543 wrote: I've been wondering why when I accelerate its kinda laggy and kinda sounds boggy when I open it all the way up.I was told it's probably the carbs. I've tuned them before but I probably did more bad than good. The gauges I used were in inches hg not cm hg like noted in the manual. I went online and converted the cm needed to inches and it said a little over 8 inches hg. So I did that but it's hard to keep it from revving and dealing with the idle screw too. What's the procedure in trying to balance them? Do I go in order carb 1-4?
boggy when I open it all the way up -- bogging at wot is likely not related to carb sync and not related to pilot air screw adjustments.
If not already done, would perform clear tube test.
Make sure when you hit the throttle you are at at least 4,500 rpm ........ at 5,000 they really start getting on the pipe..... I can see if you hit it at 3,000 or 3,500 in third or 4th you wouldn't be that impressed........... in 3rd and 4th mine always likes to go a good 2-300 in the red too..... 5-600 now with the "slightly" bigger cams...........
Also although the Clymer does a good job explaining the pilot screws and sync the factory manual does a better job and has much better pictures.
Good Fortune!
")
1978 KZ650 b-2
700cc Wiseco kit 10 to 1.
1980 KZ750 cam, ape springs, stock clutch/ Barnett springs.
Vance and Hines Header w/ comp baffle and Ape pods, Dyna S and green coils, copper wires.
29MM smooth bores W/ 17.5 pilots, 0-6s and 117.5 main
16/42 gearing X ring chain and alum rear JT sprocket.
700cc Wiseco kit 10 to 1.
1980 KZ750 cam, ape springs, stock clutch/ Barnett springs.
Vance and Hines Header w/ comp baffle and Ape pods, Dyna S and green coils, copper wires.
29MM smooth bores W/ 17.5 pilots, 0-6s and 117.5 main
16/42 gearing X ring chain and alum rear JT sprocket.
Last edit: 18 Jul 2015 06:12 by KZB2 650.
Please Log in or Create an account to join the conversation.
- blink543
-
Topic Author
- Offline
- User
-
Registered
- Posts: 285
- Thanks: 2
Re: carb tune help/procedure
18 Jul 2015 06:50swest wrote: Sync them and check your plugs.
Steve
I mean how should I sync them since I'm not supposed to touch certain things on the carbs. What parts on the carbs am I syncing?
Adam james
Please Log in or Create an account to join the conversation.
- blink543
-
Topic Author
- Offline
- User
-
Registered
- Posts: 285
- Thanks: 2
Re: carb tune help/procedure
18 Jul 2015 06:53swest wrote: Sync them and check your plugs.
Steve
Adam james
Attachments:
Please Log in or Create an account to join the conversation.
- SWest
-
- Offline
- Sustaining Member
-
Registered
- 10 22 2014
- Posts: 23575
- Thanks: 2954
Re: carb tune help/procedure
18 Jul 2015 07:06
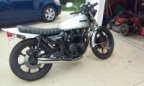
Might be a bit lean. Need a good pic of the bike.
Steve
Steve
Z1b1000 1975 Z1b
kzrider.com/forum/11-projects/598262-kz-...-will-it-live#672882
kzrider.com/forum/2-engine/597654-poser?start=240#704229
kzrider.com/forum/11-projects/598262-kz-...-will-it-live#672882
kzrider.com/forum/2-engine/597654-poser?start=240#704229
Please Log in or Create an account to join the conversation.
- blink543
-
Topic Author
- Offline
- User
-
Registered
- Posts: 285
- Thanks: 2
Re: carb tune help/procedure
18 Jul 2015 08:00swest wrote: Might be a bit lean. Need a good pic of the bike.
Steve
Of the bike the whole thing?
Adam james
Please Log in or Create an account to join the conversation.
- TexasKZ
-

- Offline
- Platinum Member
-
Registered
- Posts: 8074
- Thanks: 2594
Re: carb tune help/procedure
18 Jul 2015 08:23
The basic procedure goes like this----
1. After a thorough cleaning and before reinstalling the carburetors, do an initial synchronization on the bench.
Set the idle adjustment screw near the middle of its range.
Get two round things that are the same diameter. They can be drills, paper clips or anything smooth, round and the same diameter. One eighth of an inch or less is fine, as long as both are the same diameter.
From the throttle plate (engine) side of the carburetors, open the throttle plates just enough to slide one of the round things under one of the throttle plates (it does not matter which) and gently let go of the throttle plates. The plate should hold the round thing in place. If not, you will need to pick a different carburetor in which the throttle plate is closing far enough to hold the round thing, or get a larger pair of round things.
Now use the other round thing as a feeler guage to set the other throttle plates to the same height as the one holding the first round thing. The adjustments are made using the screw and locknut under the cap on top of each carburetor.
Adjust the low speed mixture screws according to the fsm. This adjustment varies quite a bit depending on the exact year and model.
2. Reinstall the carburetors carefully to insure that each one is completely seated in its manifold and carefully clamped to insure a good seal. Install the air box boots or pod filters. Connect the throttle cables and insure that they work smoothly. Connect a remote fuel supply.
3. Start and warm up the engine.
4. once warm, and while still running, it is time to adjust the low speed mixture. Set the idle speed as directed in the fsm. Pick a carburetor (it does not matter which) and slowly turn the mixture adjustment screw 1/4 turn in either direction. If the idle speed increases, turn it another 1/4 turn in the same direction. Repeat this until the rpm no longer increase. Blip the throttle a couple of times. If it seems to respond slowly, turn the screw in the opposite direction 1/8 turn and blip again. If on the very first turn, the rpm decreased, follow this procedure turning the screw in yhe opposite direction.
If all is well, do this again on each of the other carburetors.
5. Reset the idle speed to factory specification and turn the engine off. You are now ready to do the final synchronization.
6. Remove the rubber caps from the vacuum ports and connect the tubes from your manometer to them.
7. Note the readings on the manometer. The goal is to get the readings to match. It really does not matter what the reading is as long as all four are the same.
8. It is probably best to start with the carburetor that is farthest off from the others. Loosen the lock nut (yes, the one under the top cap that you did not reinstall, right?). Slowly turn the adjustment screw until the reading on that carburetor is more in line with the others. Tighten the lock nut without moving the adjustment screw. It is not as easy as it might seem. Do the same for the other carburetors. Until you have some Experience, you may have to do this part more than once.
9. Once all the manometer readings are as close as you can get them, button things up and go for a test ride.
If your carburetors have a master, the procedures will need to be modified a bit.
Keep looking for a fsm. There is no substitute.
1982 KZ1000 LTD parts donor
1981 KZ1000 LTD awaiting resurrection
2000 ZRX1100 not ridden enough
www.kzrider.com/11-projects/620336-anoth...uild-thread?start=24
1981 KZ1000 LTD awaiting resurrection
2000 ZRX1100 not ridden enough
www.kzrider.com/11-projects/620336-anoth...uild-thread?start=24
The following user(s) said Thank You: TheForumTroll
Please Log in or Create an account to join the conversation.
- KZB2 650
-
- Offline
- User
-
Registered
- Posts: 1475
- Thanks: 265
Re: carb tune help/procedure
18 Jul 2015 08:45
By looking at your 3 weeks of posts and problems........Did you ever replace the battery ?
How about the tentioner bolt and make sure cams are correct? Did you adjust the clutch by the manual.
Is the bike stock....... header, stock air box with good filter? Size of jets.
You were syncing the carbs right maybe just need to get em closer............ pilot screw we were talking about "maybe" not messing with but could be off if they were removed to clean or in the past.
1978 KZ650 b-2
700cc Wiseco kit 10 to 1.
1980 KZ750 cam, ape springs, stock clutch/ Barnett springs.
Vance and Hines Header w/ comp baffle and Ape pods, Dyna S and green coils, copper wires.
29MM smooth bores W/ 17.5 pilots, 0-6s and 117.5 main
16/42 gearing X ring chain and alum rear JT sprocket.
700cc Wiseco kit 10 to 1.
1980 KZ750 cam, ape springs, stock clutch/ Barnett springs.
Vance and Hines Header w/ comp baffle and Ape pods, Dyna S and green coils, copper wires.
29MM smooth bores W/ 17.5 pilots, 0-6s and 117.5 main
16/42 gearing X ring chain and alum rear JT sprocket.
Please Log in or Create an account to join the conversation.
- SWest
-
- Offline
- Sustaining Member
-
Registered
- 10 22 2014
- Posts: 23575
- Thanks: 2954
Re: carb tune help/procedure
18 Jul 2015 09:39blink543 wrote:swest wrote: Might be a bit lean. Need a good pic of the bike.
Steve
Of the bike the whole thing?
Yes, I'd like to see the whole thing. That way I can see what you may be dealing with. Can't work on something blind.
Steve
Z1b1000 1975 Z1b
kzrider.com/forum/11-projects/598262-kz-...-will-it-live#672882
kzrider.com/forum/2-engine/597654-poser?start=240#704229
kzrider.com/forum/11-projects/598262-kz-...-will-it-live#672882
kzrider.com/forum/2-engine/597654-poser?start=240#704229
Please Log in or Create an account to join the conversation.
- TexasKZ
-
- Offline
- Platinum Member
-
Registered
- Posts: 8074
- Thanks: 2594
Re: carb tune help/procedure
18 Jul 2015 09:49
I doubt if anybody around here would have said this already, so here goes :blink:
Unless you have owned this motorcycle since the day it first rolled out of the dealership AND you have done all the maintenance and repairs yourself, there is no way to know with certainty what has been done or left undone.
Get a genuine Kawasaki Heavy Industries Factory Service Manual. Not Clymer's, not Uncle Bob's, the real deal from Kawasaki.
Read it. Yes, the whole thing.
Then go to the chapter on Routine Maintenance. Perform each and every procedure exactly as listed in the order listed.
If problems remain, they will be much easier to diagnose.
1982 KZ1000 LTD parts donor
1981 KZ1000 LTD awaiting resurrection
2000 ZRX1100 not ridden enough
www.kzrider.com/11-projects/620336-anoth...uild-thread?start=24
1981 KZ1000 LTD awaiting resurrection
2000 ZRX1100 not ridden enough
www.kzrider.com/11-projects/620336-anoth...uild-thread?start=24
The following user(s) said Thank You: 650ed
Please Log in or Create an account to join the conversation.
Moderators: Street Fighter LTD