
1980 750H bare bones for mattylight
- rift.sawn
-

- Offline
- User
-

Registered
- Posts: 4
- Thanks: 0
Re: 1980 750H bare bones for mattylight
05 Jul 2016 14:28
Thanks again. As I look for parts to piece this diagram together, I see regulator rectifiers for the '80 KZ750G twin that have only four wires: two from the dynamo/stator, a black to ground, and a red/yellow. The brown seems to be missing. Since we'd be splicing the brown into the red/yellow in the diagram, is it safe to go with one of these 4-wire regulator/rectifiers?
Please Log in or Create an account to join the conversation.
- loudhvx
-
 Topic Author
- Offline
- KZr Legend
-

Registered
- Posts: 10863
- Thanks: 1622
Re: 1980 750H bare bones for mattylight
06 Jul 2016 08:00 - 06 Jul 2016 08:02Yes, but get a new one, or a very recent used one. 35 year old reg/recs might not have much life left in them. They can fail in a gradual way, which means it can strand you miles from home with no battery to get you back.rift.sawn wrote: Thanks again. As I look for parts to piece this diagram together, I see regulator rectifiers for the '80 KZ750G twin that have only four wires: two from the dynamo/stator, a black to ground, and a red/yellow. The brown seems to be missing. Since we'd be splicing the brown into the red/yellow in the diagram, is it safe to go with one of these 4-wire regulator/rectifiers?
Most Kaw factory reg/recs, that I have looked into, have the brown wire. So if you want a new-ish 4-wire one, it will probably be aftermarket.
Make sure it is a regulator & rectifier, and not just a rectifier. And make sure it is for a permanent magnet alternator.
1981 KZ550 D1 gpz.
Kz550 valve train warning.
Other links.
Kz550 valve train warning.
Other links.
Last edit: 06 Jul 2016 08:02 by loudhvx.
Please Log in or Create an account to join the conversation.
- loudhvx
-
Topic Author
- Offline
- KZr Legend
-
Registered
- Posts: 10863
- Thanks: 1622
Re: 1980 750H bare bones for mattylight
07 Jul 2016 08:35 - 15 Jan 2019 18:39
1977 Kawasaki Kz1000 for AssemblyRequired
EDIT 1/15/2019:
Mattylight Barebones Bare Bones Wiring Diagram
1977 Kawasaki Kz1000 for AssemblyRequired
Kz 1000
EDIT 1/15/2019:
Mattylight Barebones Bare Bones Wiring Diagram
1977 Kawasaki Kz1000 for AssemblyRequired
Kz 1000
1981 KZ550 D1 gpz.
Kz550 valve train warning.
Other links.
Kz550 valve train warning.
Other links.
Last edit: 15 Jan 2019 18:39 by loudhvx.
Please Log in or Create an account to join the conversation.
- loudhvx
-
Topic Author
- Offline
- KZr Legend
-
Registered
- Posts: 10863
- Thanks: 1622
Re: 1980 750H bare bones for mattylight
26 Jul 2016 08:05 - 26 Jul 2016 09:32
1984 Kawasaki Zn1100B1 Ltd. for Badmonk, with corrected coil wiring.
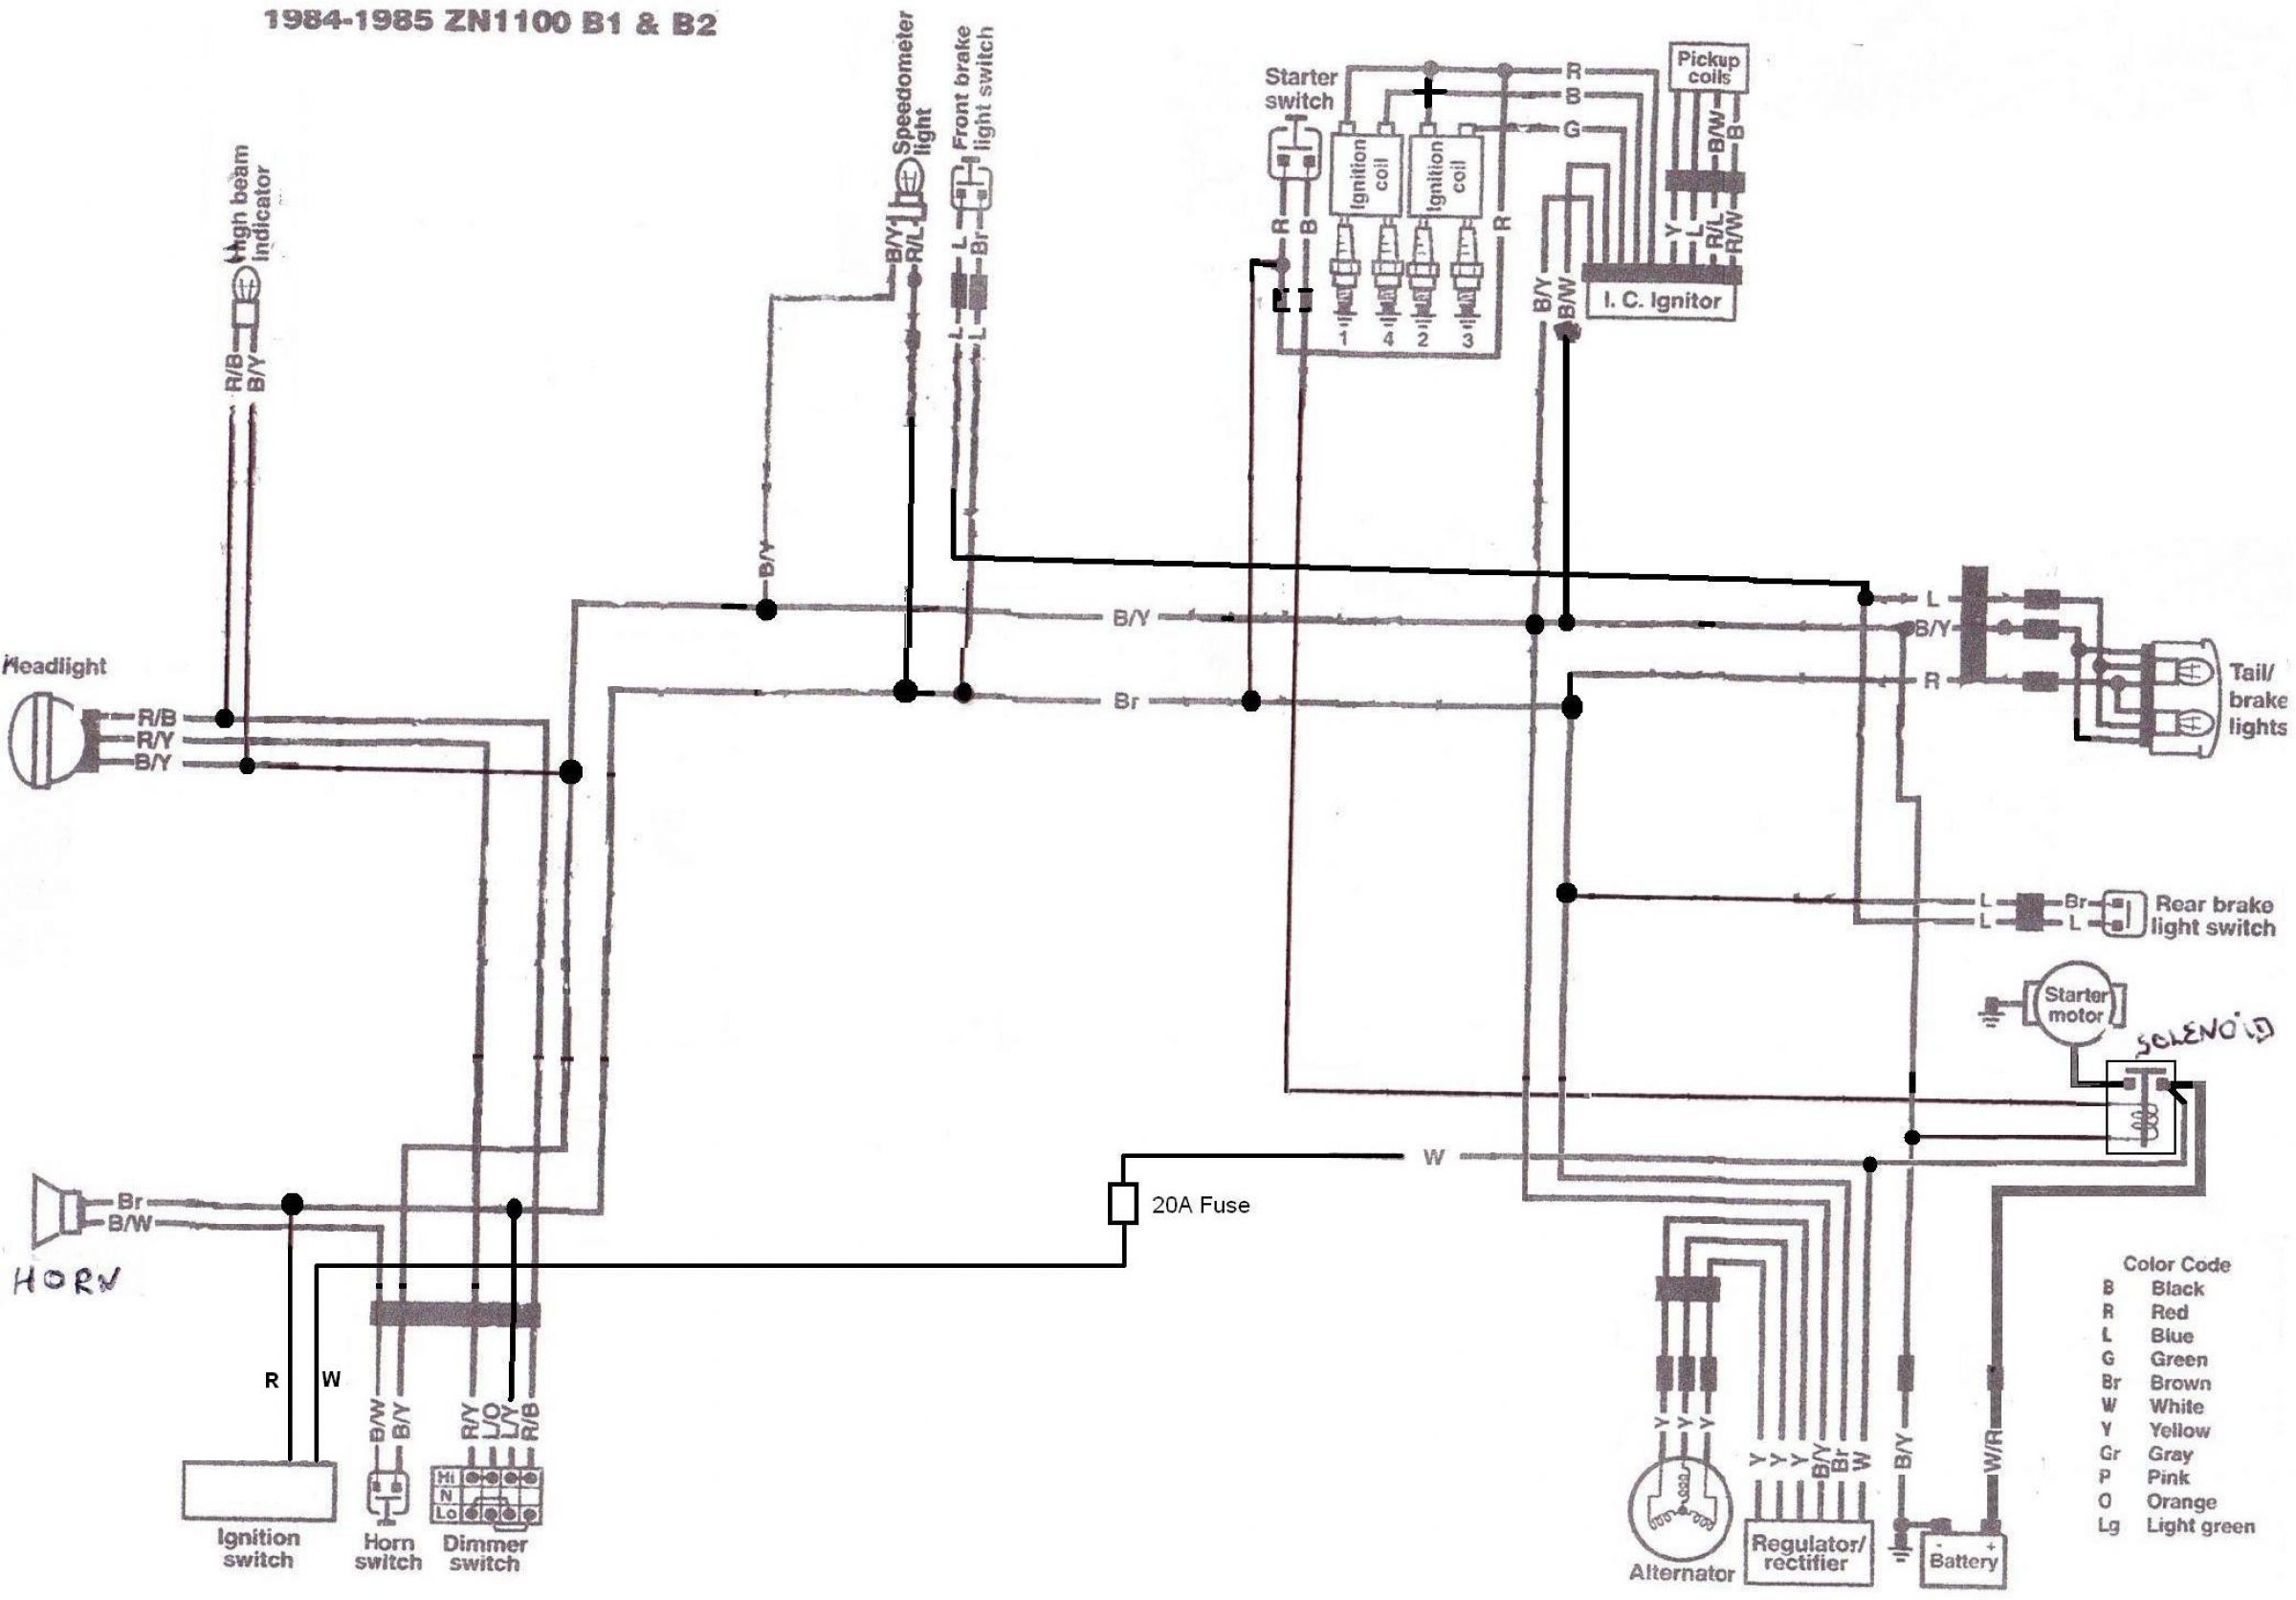
I have removed the original diagram and substituted this corrected diagram in the original post. Please do not edit this post else the attachment will be lost. Thanks Bill KZQ
I have removed the original diagram and substituted this corrected diagram in the original post. Please do not edit this post else the attachment will be lost. Thanks Bill KZQ
1981 KZ550 D1 gpz.
Kz550 valve train warning.
Other links.
Kz550 valve train warning.
Other links.
Last edit: 26 Jul 2016 09:32 by KZQ.
Please Log in or Create an account to join the conversation.
- loudhvx
-
Topic Author
- Offline
- KZr Legend
-
Registered
- Posts: 10863
- Thanks: 1622
Re: 1980 750H bare bones for mattylight
13 Oct 2016 11:23 - 15 Jan 2019 18:40
1982 Kawasaki KZ1000P police bike for MDSBLCK
Due to its width, you may have to download it first, and open it on your computer to see it full size.
Or open it in a new window.
EDIT 1/15/2019:
Mattylight Barebones Bare Bones Wiring Diagram
1982 Kawasaki Kz1000P for MDSBLCK
Kz1000 P Kz 1000 1000P
Due to its width, you may have to download it first, and open it on your computer to see it full size.
Or open it in a new window.
EDIT 1/15/2019:
Mattylight Barebones Bare Bones Wiring Diagram
1982 Kawasaki Kz1000P for MDSBLCK
Kz1000 P Kz 1000 1000P
1981 KZ550 D1 gpz.
Kz550 valve train warning.
Other links.
Kz550 valve train warning.
Other links.
Last edit: 15 Jan 2019 18:40 by loudhvx.
The following user(s) said Thank You: MDSBLCK
Please Log in or Create an account to join the conversation.
- MDSBLCK
-
- Offline
- User
-
Registered
- Posts: 24
- Thanks: 1
Re: 1980 750H bare bones for mattylight
13 Oct 2016 13:13
loudhvx, you're a beast. So fast. Thanks so much. This looks waaaay simpler than what I was tinkering with myself. I'll head to the garage in a minute and try to make sense of it all, so I can start ordering wire and connectors and stuff.
Anyone have a preferred vendor for all the supplies? I was recommended Cycle Terminal for terminals and connectors, and Rhode Island Wire for the wire...
Anyone have a preferred vendor for all the supplies? I was recommended Cycle Terminal for terminals and connectors, and Rhode Island Wire for the wire...
Currently:
1982 KZ1000 Police
Previously:
Triumph Thruxton 900
Honda CX650 Sport
1982 KZ1000 Police
Previously:
Triumph Thruxton 900
Honda CX650 Sport
Please Log in or Create an account to join the conversation.
- loudhvx
-
Topic Author
- Offline
- KZr Legend
-
Registered
- Posts: 10863
- Thanks: 1622
Re: 1980 750H bare bones for mattylight
13 Oct 2016 13:45
I use point-to-point wiring rather than the sectioned harness from the factory. So basically the whole bike is one big harness, with a couple subharnesses, like for the pickup plate, and handlebar area.
I use generic, 1/4" crimp spade terminals. This greatly reduces the supplies I need to carry when I go to rewire a bike. Large connectors are needed if you have a more complex wiring. I usually do bare-bones stuff so it's pretty easy to just memorize it.
Crimped connectors seem to last longer, in my experience. Soldering weakens the copper and sometimes promotes corrosion. I will solder a T joint in the harness as long as I know it's going to be supported by other continuous wires, and will be taped over to keep out moisture.
I use a really good, ratcheting crimper, and try to get decent Panduit connectors.
www.harborfreight.com/ratcheting-crimping-tool-97420.html
I think I up the crimp pressure one notch from normal.
This is the stripper I use, but there should be a decent cheaper one available,
www.amazon.com/Ideal-Industries-Stripmas...ripper/dp/B000RFSWF8
So with all that, I just use automotive wire available at auto parts stores. Pep-Boys had a pretty good selection of sizes and colors.
Basically, I keep things simple and make sure my supplies are easily available, since I will often end up rewiring a bike on the fly. It's often faster than trying to troubleshoot a hundred other wiring problems. And usually, when I pull and old harness, and dissect it, I find many places where the harness has failed is is about to fail.
1981 KZ550 D1 gpz.
Kz550 valve train warning.
Other links.
Kz550 valve train warning.
Other links.
Please Log in or Create an account to join the conversation.
- SWest
-

- Offline
- Sustaining Member
-

Registered
- 10 22 2014
- Posts: 23687
- Thanks: 3000
Re: 1980 750H bare bones for mattylight
13 Oct 2016 14:04
You can get the stripper from Depot. Excellent tool. I've used it for years "roping houses". Unlike other strippers, it doesn't nick the wire. With solid wire, that can cause it to break while pushing the receptacle into the boxes thus avoiding opening them all up to find one broken wire. 
I wouldn't use anything else.")
Steve
I wouldn't use anything else.
Steve
Z1b1000 1975 Z1b
kzrider.com/forum/11-projects/598262-kz-...-will-it-live#672882
kzrider.com/forum/2-engine/597654-poser?start=240#704229
kzrider.com/forum/11-projects/598262-kz-...-will-it-live#672882
kzrider.com/forum/2-engine/597654-poser?start=240#704229
Please Log in or Create an account to join the conversation.
- MDSBLCK
-
- Offline
- User
-
Registered
- Posts: 24
- Thanks: 1
Re: 1980 750H bare bones for mattylight
13 Oct 2016 14:34 - 13 Oct 2016 16:18loudhvx wrote: I use point-to-point wiring rather than the sectioned harness from the factory. So basically the whole bike is one big harness, with a couple subharnesses, like for the pickup plate, and handlebar area.
I use generic, 1/4" crimp spade terminals. This greatly reduces the supplies I need to carry when I go to rewire a bike. Large connectors are needed if you have a more complex wiring. I usually do bare-bones stuff so it's pretty easy to just memorize it.
Crimped connectors seem to last longer, in my experience. Soldering weakens the copper and sometimes promotes corrosion. I will solder a T joint in the harness as long as I know it's going to be supported by other continuous wires, and will be taped over to keep out moisture.
So with all that, I just use automotive wire available at auto parts stores. Pep-Boys had a pretty good selection of sizes and colors.
Basically, I keep things simple and make sure my supplies are easily available, since I will often end up rewiring a bike on the fly. It's often faster than trying to troubleshoot a hundred other wiring problems. And usually, when I pull and old harness, and dissect it, I find many places where the harness has failed is is about to fail.
Just so I'm sure I understand correctly... You just run the individual wires where they need to go, instead of bunching everything up neatly and wrapping it in tape or tube? Or do you still have the thick "core" harness of cables running the length of the bike, the difference being that you run the wire for each individual part to where it needs to go, rather than connect it to a main harness via a multitude of connectors? looking at the original harness from this bike and all the different connectors gave me an instant headache...
And when you just use the generic spade terminals, how do you waterproof it? Do you use marine shrink wrap around the connections or is there a trick to it, so you can still "unplug" the individual connections without cutting anything?
Also - just one fuse? The original harness had, I think, 8 fuses, and most other diagrams I've seen has one 30amp fuse for the wire going to the ignition switch and back + one 10amp fuse for each circuit for lights, ignition and aux. Is that just making things more complicated? One 20amp is enough? Does it need to be a different wire gauge when doing it that way?
Currently:
1982 KZ1000 Police
Previously:
Triumph Thruxton 900
Honda CX650 Sport
1982 KZ1000 Police
Previously:
Triumph Thruxton 900
Honda CX650 Sport
Last edit: 13 Oct 2016 16:18 by MDSBLCK. Reason: Added question about fuses
Please Log in or Create an account to join the conversation.
- loudhvx
-
Topic Author
- Offline
- KZr Legend
-
Registered
- Posts: 10863
- Thanks: 1622
Re: 1980 750H bare bones for mattylight
13 Oct 2016 20:14
When all is said and done, I end up with a main harness trunk running the length of the bike, and just branch out wires as needed to the various components. It's much simpler than the factory harness and far less redunadant. Having fewer wires makes it much easier to hide the wires behind frame tubing. The harness should be supported everywhere, and only the bare minimum allowed to "float". The most difficult spot is between the frame and fork area. Keep the harness as close to the pivot as possible so it moves as little as possible when the steering is moved. In that area, you will have to let the harness have a little more freedom.
I forgot to mention, make sure to get some non-adhesive tape (which is what the factory used). That is the best thing to wrap the final harness when it's all laid out and in place on the bike. You can get it on ebay as a large roll. It costs more than adhesive electrical tape, but adhesive tape soon becomes a huge mess if you ever have to work on the harness again. You will use small bits of adhesive tape to hold the harness together before you wrap it, and that's fine, but the main wrap should be non-adhesive. If you have a wire junction in the harness, (you will have several for the power wire) the actual exposed junction on that wire should get a bit of adhesive tape so it stays in place.
By having only one fuse, you reduce the redundant wires used for power, so you greatly reduce the total number of wires running back and forth. The factory system is designed for ease of assembly allowing large sections of bike to be put together quickly using the big multi-pin connectors. With a simplified system, being wired by hand, you can eliminate a lot of the redundancy.
The factory system is a zoned power distribution, whereas the bare-bones wiring is more of a bus system. That is, the power is distributed on a switched 12v bus wire. This means you can branch the power wire off to where it needs to go instead of running multiple wires from the fuse box. The schematic I made is drawn as a bus-system. Notice the top line of the diagram is switched 12v, and the bottom line is ground. All other devices basically connect between those two wires.
However, your diagram is not exactly bare bones, so you could make an argument for a separate lighting fuse. Fuses are to protect the wiring from a dead short. A single main fuse does that. Having separate fuses are more for troubleshooting, and in some cases may let you limp home without lights or other accessories. If the main fuse blows, in a one-fuse setup, you would disconnect all of the lighting, and non-essential devices and try to start the bike. If it still blows, then the bike would be dead regardless of how many systems were fused. If you carry spare fuses it should be fine to go with one fuse, but if you are nervous about shorts, then you might want to install a couple other fuses.
Since you are not running all of the police accessories, you won't need a 30A fuse. 20A is pretty standard for most KZ's, which have the same basic lighting and gauges you will have.
The basic spade terminals are not waterproof, but neither were the factory connectors. If you want to go waterproof, you will need to go to expensive, sealed automotive connectors, with rubber seals for each wire. That is the only way I've seen successful water-tight connections. The factory used boots over the connectors, and I'm sure they helped, but they were not really waterproof. You can do much the same by wrapping the junction with the non-adhesive tape. I don't tend to ride in rain as much as I drive cars in the rain so it has never been an issue for me.
1981 KZ550 D1 gpz.
Kz550 valve train warning.
Other links.
Kz550 valve train warning.
Other links.
Please Log in or Create an account to join the conversation.
- MDSBLCK
-
- Offline
- User
-
Registered
- Posts: 24
- Thanks: 1
Re: 1980 750H bare bones for mattylight
13 Oct 2016 23:06
This is great. Thanks so much! I actually think I'm ready to give it a go ")
Currently:
1982 KZ1000 Police
Previously:
Triumph Thruxton 900
Honda CX650 Sport
1982 KZ1000 Police
Previously:
Triumph Thruxton 900
Honda CX650 Sport
Please Log in or Create an account to join the conversation.
- MDSBLCK
-
- Offline
- User
-
Registered
- Posts: 24
- Thanks: 1
Re: 1980 750H bare bones for mattylight
14 Oct 2016 23:00
Oh, was just thinking - will the odometer work as-is or would that need some sort of wiring? I took apart the gauges to look at the wiring and currently it looks like a light green and a red wire goes to my odometer, is that right?
Also, where would be the best place for a light circuit fuse on this diagram, if I were to decide to do that?
Thanks again. Really appreciate all the help here!
Also, where would be the best place for a light circuit fuse on this diagram, if I were to decide to do that?
Thanks again. Really appreciate all the help here!
Currently:
1982 KZ1000 Police
Previously:
Triumph Thruxton 900
Honda CX650 Sport
1982 KZ1000 Police
Previously:
Triumph Thruxton 900
Honda CX650 Sport
Please Log in or Create an account to join the conversation.
Moderators: Street Fighter LTD