
Valve Noise/No compression
- LarryC
-
- Offline
- User
-

Registered
- Posts: 1241
- Thanks: 309
Re: Valve Noise/No compression
19 Mar 2014 16:52
For starters, the pictures show a KZ engine, There is NO GUIDE IN THE CAM COVER. Only J motors with hyvo cam chains have that :blink:
Larry C.
Please Log in or Create an account to join the conversation.
- LarryC
-
- Offline
- User
-
Registered
- Posts: 1241
- Thanks: 309
Re: Valve Noise/No compression
19 Mar 2014 17:00BIGKEVIN wrote: Getting frustrated with trying to get the cams timed. Can someone tell me if they look like they are timed correctly ?
In this pic, the position of the intake lobe looks like it may be late by 1 pin. Verify your pin count to the 28 mark. Don't forget to start the count with the first pin above the mark on the exhaust cam.
If you are in fact off 1 pin:
Remove the top idler [should already be off to verify pin count but who knows what anyone else might do]
Remove the cam chain tensioner completely.
Unbolt the intake cam caps.
Reposition the intake cam to correct position for 28th pin and install caps. 8ft.lbs and oil the threads and dowel pins before you put the caps on.
Install the top idler.
Reset the tensioner to full compressed and lock it down.
Install tensioner and release the plunger bolt. Then lock it back down and tighten the lock nut.
With the plugs out, turn the engine over two complete revolutions and check your marks again.
If it's all good, turn the motor over several more times, ending back at TDC on 1&4 where you can see timing marks. Back off the tensioner bolt one more time to take up any additional cam chain slack. Lock it back down, tighten the lock nut...YOU'RE DONE.
Larry C.
Please Log in or Create an account to join the conversation.
- daveo
-

- Offline
- Premium Member
-

Registered
- Posts: 2924
- Thanks: 750
Re: Valve Noise/No compression
19 Mar 2014 17:32BIGKEVIN wrote: Getting frustrated with trying to get the cams timed. Can someone tell me if they look like they are timed correctly ?
Oops, somehow I was thinking your motor was a J-model. I have zip experience with other engines.
")
1982 KZ1100-A2
Please Log in or Create an account to join the conversation.
- BIGKEVIN
-
 Topic Author
- Offline
- User
-
Registered
- Posts: 419
- Thanks: 1
Re: Valve Noise/No compression
20 Mar 2014 15:10
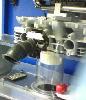
Larry, I just checked on this and starting with the pin just after the carrot on the exhaust cam is on the 28th mark on the intake cam. I verified the pin count numerous times. I put the 27th pin on the 28th pin mark and the picture below is how they look after turning the motor over with the 17 mm bolt. What could cause this issue ?
1976 KZ900
2006 ZX6R
2006 ZX6R
Attachments:
Please Log in or Create an account to join the conversation.
- LarryC
-
- Offline
- User
-
Registered
- Posts: 1241
- Thanks: 309
Re: Valve Noise/No compression
22 Mar 2014 04:17 - 22 Mar 2014 04:45
You're probably good to go then. What can cause that is a stretched chain or the crankshaft is not truly at TDC.
I looked at several of the pictures you posted. There is one with the top idler removed. In that photo I was able to count the pins and they were in fact correct to the 28th mark. So, if the index mark on the timing advancer is in fact aligned with the index mark on the ignition cover for Cyl 1&4 at top dead center, then as far as the index marks go, you would be correctly timed.
If you rotated the crank CW [forward from the ignition side of the engine] just slightly until the valve cover surface splits the lobes evenly....then snap a pic of the index marks on crank and post it, it may be helpful.
With a good chain & everything timed correctly, the valve cover surface just about splits the lobes in half.
Larry C.
Last edit: 22 Mar 2014 04:45 by LarryC.
Please Log in or Create an account to join the conversation.
- BIGKEVIN
-
Topic Author
- Offline
- User
-
Registered
- Posts: 419
- Thanks: 1
Re: Valve Noise/No compression
24 Mar 2014 16:18
I removed the chain tensioner and the top chain guide. Put the timing mark on the T for the 1&4 cylinders and installed the cams. I did notice that with everything put back together and before turning the crank, the chain did not make contact with the sprocket of the top chain guide. Is that normal ? Should I be able to spin the sprocket freely :
I believe what is happening is that the exhaust is moving when the crank is turned, but the intake cam does not move until all of the slack is removed between the 2 cams. The following pictures shows the exhaust cam lobe split in half by the top of the head and the positioning of the timing mark. The second set of pictures showing the intake cam lobe split in half by the top of the head and the position of the timing marks as LarryC requested.
I believe what is happening is that the exhaust is moving when the crank is turned, but the intake cam does not move until all of the slack is removed between the 2 cams. The following pictures shows the exhaust cam lobe split in half by the top of the head and the positioning of the timing mark. The second set of pictures showing the intake cam lobe split in half by the top of the head and the position of the timing marks as LarryC requested.
1976 KZ900
2006 ZX6R
2006 ZX6R
Attachments:
Please Log in or Create an account to join the conversation.
- LarryC
-
- Offline
- User
-
Registered
- Posts: 1241
- Thanks: 309
Re: Valve Noise/No compression
24 Mar 2014 17:10BIGKEVIN wrote: I removed the chain tensioner and the top chain guide. Put the timing mark on the T for the 1&4 cylinders and installed the cams. I did notice that with everything put back together and before turning the crank, the chain did not make contact with the sprocket of the top chain guide. Is that normal ? Should I be able to spin the sprocket freely :
I believe what is happening is that the exhaust is moving when the crank is turned, but the intake cam does not move until all of the slack is removed between the 2 cams. The following pictures shows the exhaust cam lobe split in half by the top of the head and the positioning of the timing mark. The second set of pictures showing the intake cam lobe split in half by the top of the head and the position of the timing marks as LarryC requested.
I haven't looked at the pics yet Kevin. When what you describe is happening, the cam chain is usually stretched pretty good.
When you run into that situation, it's good practice to mark a chain like with a paint stick. Then turn the motor over several times while you watch the chain at the top idler sprocket. You're looking for areas where it goes slack right at the top idler. The paint mark is a reference point so you know when you've completed the chain.
It should take roughly 7 cycles to complete the entire chain.
A work around that might get you by for a while is to bring each pair of cylinders to TDC and let the chain tensioner take up any available slack [loosen lock bolt, then tighten it again before moving the crank]. Do this until you have all the possible slack you can get adjusted out of it.
If, after doing that, you still have sections where you see excessive slack at the top idler sprocket then it's cam chain time. You can get a master link chain with peen over master link. I'm sure Z1E has them right on the shelf. They will be slightly different links than the OEM chain style. You get the chain and link as a set and tell them what you are up to so you get the correct parts.
It's not a difficult job. Wire the new chain to one end of the old one and simply work it through the motor with the cams removed. Peen the new link & reinstall the cams, top idler and tensioner. Make sure you reset the tensioner plunger to fully compressed before installing it with the new chain.
You might find it easiest to remove the carburetors so you can get the the chain back over to that side of the motor when you peen the link because you'll have a little more room to work.
Larry C.
Please Log in or Create an account to join the conversation.
- LarryC
-
- Offline
- User
-
Registered
- Posts: 1241
- Thanks: 309
Re: Valve Noise/No compression
24 Mar 2014 17:15 - 24 Mar 2014 17:18
I think I get the gist of what the pictures are telling. Looks to me like the chain is probably whipped. Even if the procedure I told you about to take as much slack as possible out is a success, you may well be headed for a miserable headache with that chain. If it were me [and if I were there so I could physically turn the motor over and see everything with my own eyes...and it proved to be as I suspect things are] I would just do the chain now and be done with it....
There is one more little trick to taking up slack that involves the dowel pins between the top idler pillow blocks but I'm not going down that road...... It's an absolute last resort in the most dire of situations... Your situation is FIX IT RIGHT")
There is one more little trick to taking up slack that involves the dowel pins between the top idler pillow blocks but I'm not going down that road...... It's an absolute last resort in the most dire of situations... Your situation is FIX IT RIGHT
Larry C.
Last edit: 24 Mar 2014 17:18 by LarryC.
Please Log in or Create an account to join the conversation.
- BIGKEVIN
-
Topic Author
- Offline
- User
-
Registered
- Posts: 419
- Thanks: 1
Re: Valve Noise/No compression
25 Mar 2014 14:30
So you recommend that I order a new 122 link chain from Z1 ? Do you suggest that I get the master link also ? Should I order the chain breaker also ? The engine is still in the bike. Is there any else that you think that I will need ? I appreciate all of your help.
1976 KZ900
2006 ZX6R
2006 ZX6R
Please Log in or Create an account to join the conversation.
- LarryC
-
- Offline
- User
-
Registered
- Posts: 1241
- Thanks: 309
Re: Valve Noise/No compression
25 Mar 2014 14:38BIGKEVIN wrote: So you recommend that I order a new 122 link chain from Z1 ? Do you suggest that I get the master link also ? Should I order the chain breaker also ? The engine is still in the bike. Is there any else that you think that I will need ? I appreciate all of your help.
It's that or split the cases to do it Kevin. You can grind the link pin ends off the old one. The new master link must have the end of the pins peened over. They're usually soft and not difficult to do. At least they used to be. I haven't done one that way in a long time and don't know what the master links are like now. With all the things coming from China...who knows?
Larry C.
Please Log in or Create an account to join the conversation.
- BIGKEVIN
-
Topic Author
- Offline
- User
-
Registered
- Posts: 419
- Thanks: 1
Re: Valve Noise/No compression
25 Mar 2014 15:58
I see that Z1 offers 2 different cam chains. Which is the correct chain for a 1976 KZ900 ?
1976 KZ900
2006 ZX6R
2006 ZX6R
Please Log in or Create an account to join the conversation.
- Patton
-

- Offline
- KZr Legend
-

Registered
- Posts: 18568
- Thanks: 2101
Re: Valve Noise/No compression
25 Mar 2014 16:50BIGKEVIN wrote: I see that Z1 offers 2 different cam chains. Which is the correct chain for a 1976 KZ900 ?
Found these listings:
OEM equivalent
www.z1enterprises.com/ItemDetails.aspx?i...+link&item=KL12-8098
Heavy Duty
www.z1enterprises.com/ItemDetails.aspx?i...+link&item=TU25-9722
Important to get the correct master link that goes with whichever cam is selected (see info in each listing).
Good Fortune!
1973 Z1
KZ900 LTD
KZ900 LTD
Please Log in or Create an account to join the conversation.
Moderators: Street Fighter LTD