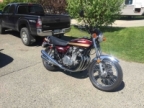
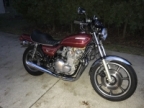
Trying to Rescue a Late 1970s (1977??) Kawasaki KZ1000
- wdhewson
-
 Topic Author
- Offline
- User
-

Registered
- Posts: 162
- Thanks: 58
Re: Trying to Rescue a Late 1970s (1977??) Kawasaki KZ1000
27 Aug 2023 06:26
Swingarm installation went well with a very "cool" fit in the frame at the pivot.
I used a heavy assembly oil, but then pumped her full of EP grease until it came out the ends. Lotta space in there as it took a lot of pumping.
The check valve in the grease nipple allowed some back flow, but there's nothing unusual about that.
I used a heavy assembly oil, but then pumped her full of EP grease until it came out the ends. Lotta space in there as it took a lot of pumping.
The check valve in the grease nipple allowed some back flow, but there's nothing unusual about that.
Nothing quite like the rip of a Big KZ
Please Log in or Create an account to join the conversation.
- wdhewson
-
 Topic Author
- Offline
- User
-

Registered
- Posts: 162
- Thanks: 58
Re: Trying to Rescue a Late 1970s (1977??) Kawasaki KZ1000
30 Aug 2023 15:52
On with the triple clamps today.
Worked a bunch of EP NLGI 2 grease into the tapered rollers and raceways, and a smear of grease on anything inside the headtube that might rust.
It all came together sweetly.
Tapered rollers are very sensitive to pre-load, and since these are aftermarket, I couldn't find a specification. So I just tightened them to the point of incipient drag.
Nothing quite like the rip of a Big KZ
Please Log in or Create an account to join the conversation.
- hardrockminer
-

- Offline
- Sustaining Member
-

Registered
- Posts: 3106
- Thanks: 1217
Re: Trying to Rescue a Late 1970s (1977??) Kawasaki KZ1000
31 Aug 2023 04:07
Convention for the swingarm is to have the bolt on the left side. Is that a 900 engine? The valve cover looks like it came from a 900.
I have several restored bikes along with a 2006 Goldwing with a sidecar.
The following user(s) said Thank You: wdhewson
Please Log in or Create an account to join the conversation.
- wdhewson
-
 Topic Author
- Offline
- User
-

Registered
- Posts: 162
- Thanks: 58
Re: Trying to Rescue a Late 1970s (1977??) Kawasaki KZ1000
31 Aug 2023 05:16
Thanks HardRock.
I would like to knit the old KZ1000 back together appropriately....... and safely!
The valve cover gasket I purchased from Z1E is for the early KZ1000, and their ad says "900 and 1000 1977-1978", so maybe they used the same cover. Good eye!
The bike came to me with the S/A pivot bolt head on the left, but the parts diagram showed it on the right, which I followed. Not the first time that an early parts diagram might be incorrect.
The bolt is well lubed should I undertake to reverse it.
Thanks again.
Nothing quite like the rip of a Big KZ
Please Log in or Create an account to join the conversation.
- gd4now
-

- Offline
- User
-

Registered
- Denco where did you go?
- Posts: 1621
- Thanks: 639
Re: Trying to Rescue a Late 1970s (1977??) Kawasaki KZ1000
31 Aug 2023 10:11
It would appear that you have been successful in your attempt to rescue this machine. Nice work is all I can say!
1977 KZ650 B1
Pods and Denco header
OLD KAW OWNERS SMILE ALOT
Pods and Denco header
OLD KAW OWNERS SMILE ALOT
The following user(s) said Thank You: wdhewson
Please Log in or Create an account to join the conversation.
- wdhewson
-
 Topic Author
- Offline
- User
-

Registered
- Posts: 162
- Thanks: 58
Re: Trying to Rescue a Late 1970s (1977??) Kawasaki KZ1000
31 Aug 2023 16:01
Thanks gd4now.
It's a big project that is now coming together, but she's a long way from making heat.
Forks installed nicely this morning with just the right fit into the triple clamps.
Now how do I get her on the wheels? Enlist the strong neighbours again and have a box of ice cream cones on hand!
It's a big project that is now coming together, but she's a long way from making heat.
Forks installed nicely this morning with just the right fit into the triple clamps.
Now how do I get her on the wheels? Enlist the strong neighbours again and have a box of ice cream cones on hand!
Nothing quite like the rip of a Big KZ
The following user(s) said Thank You: howardhb
Please Log in or Create an account to join the conversation.
- Kelly E
-

- Offline
- User
-

Registered
- Never Give Up. Never Surrender
- Posts: 485
- Thanks: 376
Re: Trying to Rescue a Late 1970s (1977??) Kawasaki KZ1000
31 Aug 2023 17:13Thanks gd4now.
It's a big project that is now coming together, but she's a long way from making heat.
Forks installed nicely this morning with just the right fit into the triple clamps.
Now how do I get her on the wheels? Enlist the strong neighbours again and have a box of ice cream cones on hand!
Bribery is probably the cheapest and quickest way. Just make sure to get the right flavor and a big enough box.
The Rust Bros. Garage Collection
1974 Honda CB 550 K0
1975 Honda CB 400F Super Sport
1977 Kawasaki KZ 1000 LTD
1978 Kawasaki KL 250
1980 Suzuki GS 1100E
1983 Honda CB 1100F
1984 Honda Sabre 700
1984 Honda Interceptor 1000
1990 Moto Guzzi 1000
1994 Kawasaki ZG 1000 Concours
And more
1974 Honda CB 550 K0
1975 Honda CB 400F Super Sport
1977 Kawasaki KZ 1000 LTD
1978 Kawasaki KL 250
1980 Suzuki GS 1100E
1983 Honda CB 1100F
1984 Honda Sabre 700
1984 Honda Interceptor 1000
1990 Moto Guzzi 1000
1994 Kawasaki ZG 1000 Concours
And more
The following user(s) said Thank You: wdhewson
Please Log in or Create an account to join the conversation.
- hardrockminer
-

- Offline
- Sustaining Member
-

Registered
- Posts: 3106
- Thanks: 1217
Re: Trying to Rescue a Late 1970s (1977??) Kawasaki KZ1000
01 Sep 2023 04:11
Apologies! The parts diagram is correct. What I meant to say was the NUT should be on the left. I don't know why I wrote BOLT. The valve covers are similar but the ends on a 900 are smooth. On KZ1000 they have a ring. It's one way to quickly tell a 900 from a 1000.
I have several restored bikes along with a 2006 Goldwing with a sidecar.
The following user(s) said Thank You: wdhewson
Please Log in or Create an account to join the conversation.
- Mikaw
-

- Offline
- Sustaining Member
-

Registered
- Posts: 4826
- Thanks: 1851
Re: Trying to Rescue a Late 1970s (1977??) Kawasaki KZ1000
02 Sep 2023 18:25 - 02 Sep 2023 18:32
Do you have a factory service manual? If so please do not drive that bike till you properly set the triple trees. There is a sequence that you completely circumvented. If you need pages copied please ask and I’d be more then happy to post.
EDIT
Here is the correct manual. www.kzrider.com/modules/ServiceManuals/K...Service%20Manual.pdf
Triple and fork assembly starts on page 124
EDIT
Here is the correct manual. www.kzrider.com/modules/ServiceManuals/K...Service%20Manual.pdf
Triple and fork assembly starts on page 124
1976 KZ 900 A4
kzrider.com/forum/11-projects/613548-1976-kz-900-a4
1976 KZ 900 B1 LTD
1978 KZ 1000 B2 LTD
1980 KZ 750 E1
Kowledge Speaks, But Wisdom Listens.
Jimi Hendrix.
1976 KZ 900 B1 LTD
1978 KZ 1000 B2 LTD
1980 KZ 750 E1
Kowledge Speaks, But Wisdom Listens.
Jimi Hendrix.
Last edit: 02 Sep 2023 18:32 by Mikaw.
The following user(s) said Thank You: wdhewson, Wookie58
Please Log in or Create an account to join the conversation.
- wdhewson
-
 Topic Author
- Offline
- User
-

Registered
- Posts: 162
- Thanks: 58
Re: Trying to Rescue a Late 1970s (1977??) Kawasaki KZ1000
05 Sep 2023 08:01 - 05 Sep 2023 08:13Do you have a factory service manual? If so please do not drive that bike till you properly set the triple trees. There is a sequence that you completely circumvented. If you need pages copied please ask and I’d be more then happy to post.
EDIT
Here is the correct manual. www.kzrider.com/modules/ServiceManuals/K...Service%20Manual.pdf
Triple and fork assembly starts on page 124
Thanks Mikaw,
It's always good to make sure that the "big hinge" at the front of the motorcycle is in good working order, otherwise your path may deviate from the intended !!
This old girl was fitted with aftermarket tapered rollers, and the preload on these bearings might be quite different than the factory free balls in the factory manual you've kindly provided. With tapered rollers, I take up the play, then nudge it a bit tighter, but not to the point that the bearing feels granular when rotated.
The only difference that I can find between what I did and the FM procedure is the 2 mm clearance recommended between the top surfaces in the inner tube (stanchion) and the top plate. My target was flush for these two surfaces. Frankly, I'd opt for full use of the top clamp by having it flush rather than partially inserted.
This 2 mm would be easy to achieve if there's a convincing reason to do so.
Thanks guys............
Front wheel is next to try and get a rolling chassis so I can move this "lump" around more easily.
Nothing quite like the rip of a Big KZ
Last edit: 05 Sep 2023 08:13 by wdhewson.
Please Log in or Create an account to join the conversation.
- wdhewson
-
 Topic Author
- Offline
- User
-

Registered
- Posts: 162
- Thanks: 58
Re: Trying to Rescue a Late 1970s (1977??) Kawasaki KZ1000
05 Sep 2023 14:14 - 05 Sep 2023 14:17
The engine/chassis assembly is sitting on some thick corrugated cardboard and rugs, so I had a helper press down on the rear frame loop and seesaw the front forks upwards. The forks came up high enough to slip in the front wheel/axle assembly, taking care to position the speedo drive nub against the little nub on the left fork slider. Then on with the axle caps.
I'll need some more help to hoist the rear up and let the center stand swing down, which should allow the rear wheel to be fitted, and twin shocks.
Then I'll have a rolling chassis and be able to positioned things into more favorable work locations.
Thanks guys.............
I'll need some more help to hoist the rear up and let the center stand swing down, which should allow the rear wheel to be fitted, and twin shocks.
Then I'll have a rolling chassis and be able to positioned things into more favorable work locations.
Thanks guys.............
Nothing quite like the rip of a Big KZ
Last edit: 05 Sep 2023 14:17 by wdhewson.
Please Log in or Create an account to join the conversation.
- Mikaw
-

- Offline
- Sustaining Member
-

Registered
- Posts: 4826
- Thanks: 1851
Re: Trying to Rescue a Late 1970s (1977??) Kawasaki KZ1000
05 Sep 2023 14:45
It’s more than the stem bearing preload. It’s the correct sequence of item tightening and torquing. There is a reason it’s called out. Also I see a gap to the front of your axle clamps which is incorrect. When properly sequenced and tightened the gap will be toward the rear. Also the axle nut should sit firm against the fork lower and cap. I see distance between them. Please heed my observations.
1976 KZ 900 A4
kzrider.com/forum/11-projects/613548-1976-kz-900-a4
1976 KZ 900 B1 LTD
1978 KZ 1000 B2 LTD
1980 KZ 750 E1
Kowledge Speaks, But Wisdom Listens.
Jimi Hendrix.
1976 KZ 900 B1 LTD
1978 KZ 1000 B2 LTD
1980 KZ 750 E1
Kowledge Speaks, But Wisdom Listens.
Jimi Hendrix.
The following user(s) said Thank You: wdhewson
Please Log in or Create an account to join the conversation.
Moderators: Street Fighter LTD
