
CSR1000 Project Build
- 750 R1
-

- Offline
- User
-

Registered
- Posts: 1150
- Thanks: 389
Re: CSR1000 Project Build
05 Apr 2022 15:32
www.talkcomposites.com/21218/Which-resin-for-fuel-tank
theepoxyexperts.com/shop/adhesives/chemi...assing-carbon-fiber/
theepoxyexperts.com/shop/adhesives/chemi...assing-carbon-fiber/
The following user(s) said Thank You: davido
Please Log in or Create an account to join the conversation.
- Wookie58
-

- Away
- Moderator
-

Registered
- Posts: 6482
- Thanks: 4081
Re: CSR1000 Project Build
06 Apr 2022 15:41If the carbon doesn't work out there is another alternative. The below cafe kit for later model triumphs uses a dummy fibreglass shell bonded over an alloy tank (a lot cheaper than a bespoke alloy copy of the original tank)Not interested in the look. Never really liked it (and a mess if you don't get the weave sitting right).I was planning on a gel coat first to give a solid black finish. (Though the Rex does look great.) Im in it to be done with rust in the fuel system. No steel,no rust. 'Its the only way to be sure' (as Cpl Hicks once said.)

1982 KZ1000 Ltd
www.kzrider.com/forum/11-projects/617631...-82-begins?start=192
kzrider.com/forum/faq-wiki/616810-electr...-fault-finding-guide
www.kzrider.com/forum/11-projects/617631...-82-begins?start=192
kzrider.com/forum/faq-wiki/616810-electr...-fault-finding-guide
The following user(s) said Thank You: davido
Please Log in or Create an account to join the conversation.
- davido
-
 Topic Author
- Offline
- User
-
Registered
- Posts: 1580
- Thanks: 291
Re: CSR1000 Project Build
18 Apr 2022 00:16
Thanks for the tips. Very interesting. Ive put the resin question on the back boiler for now and Ive been concentrating on the molds.What a lot of work. Someone more experienced with this would have done a better job preparing the tank for molding and not have to go through all this filling,sanding,filling,sanding ad nauseam!
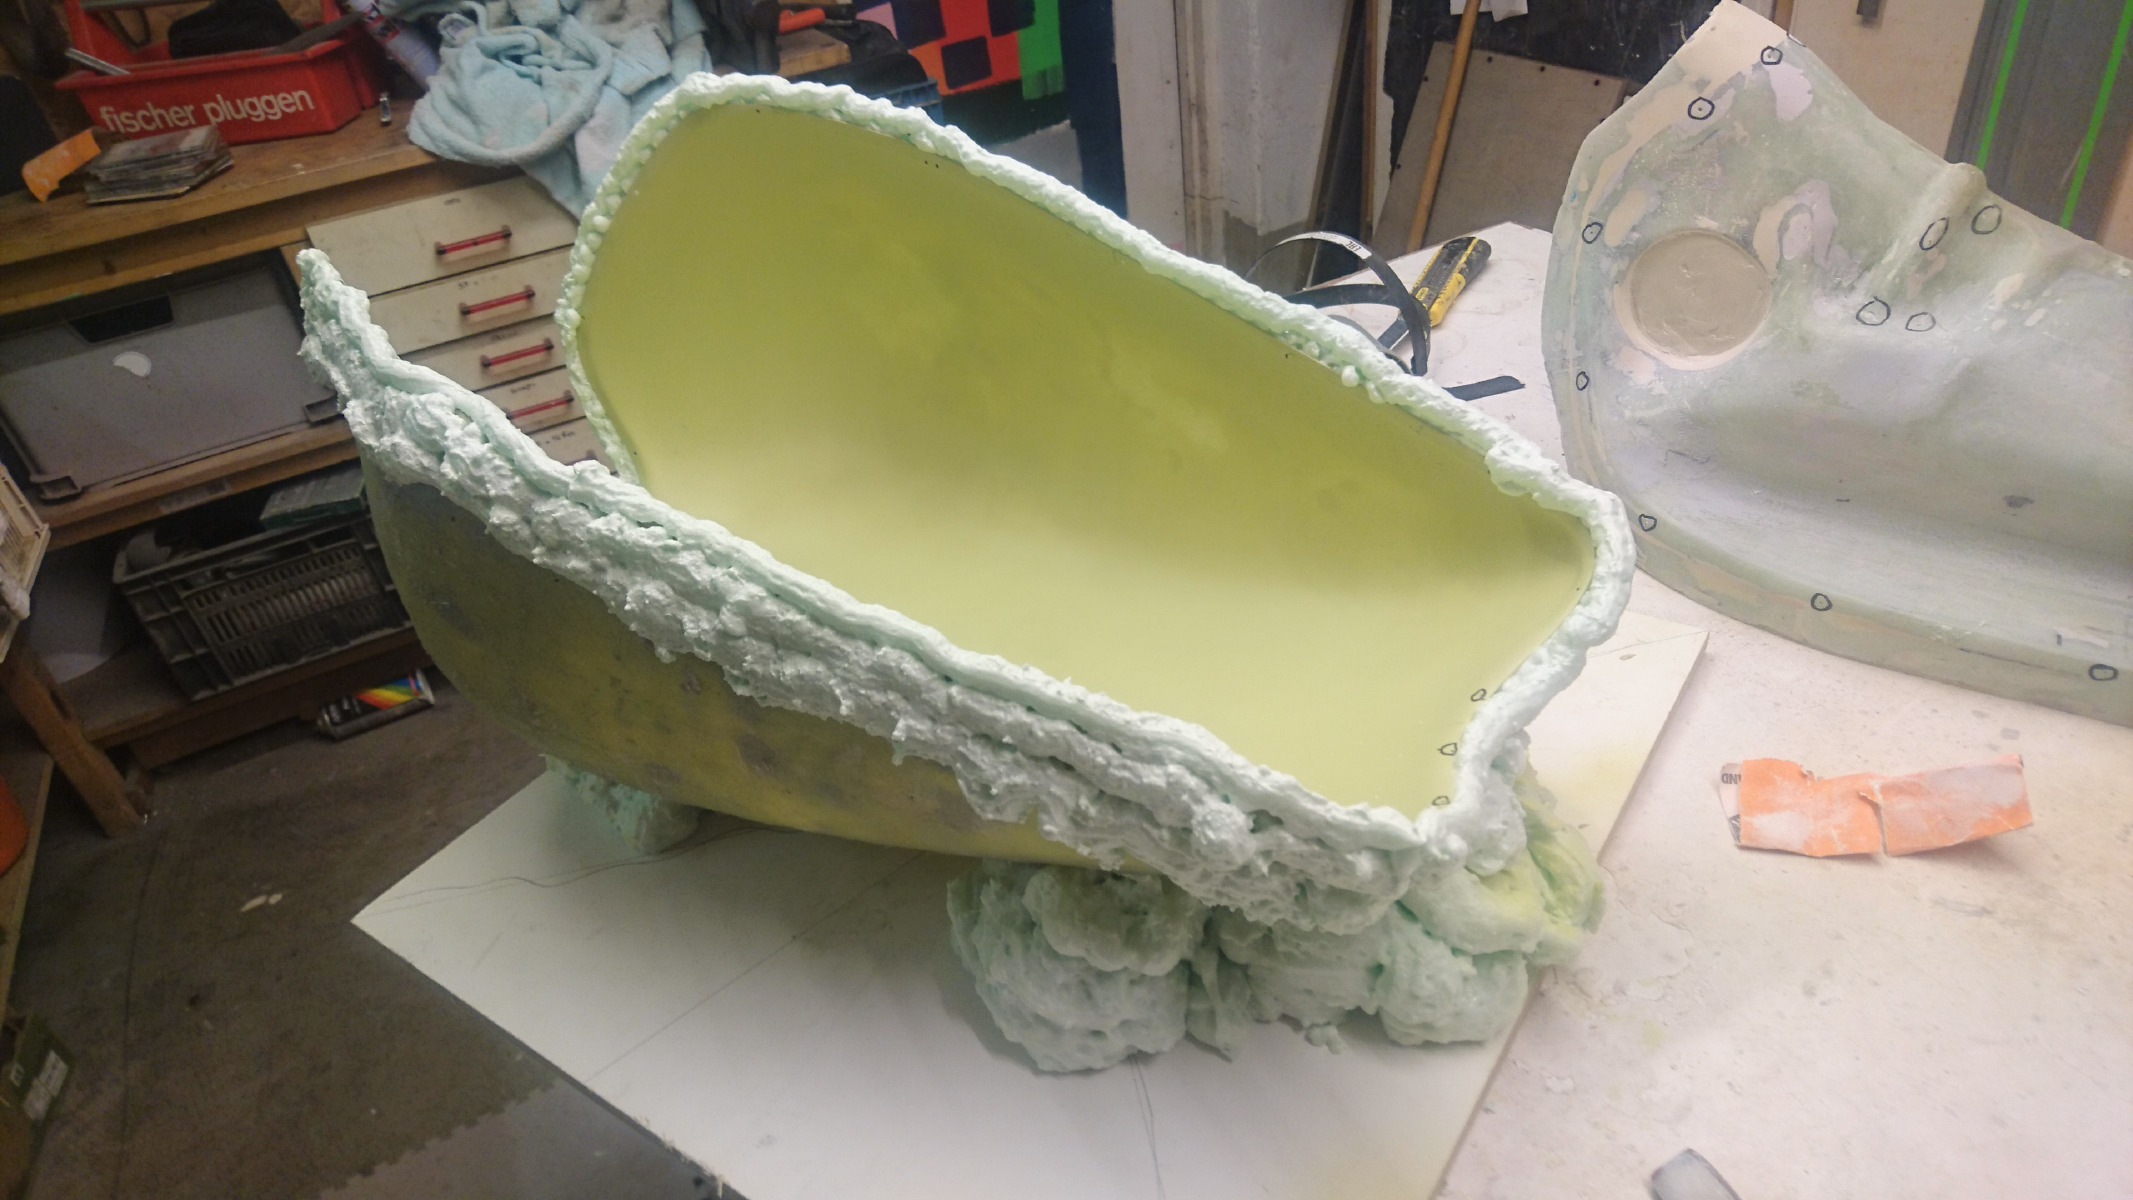
The bottom mold doesn't need to be as perfect as the top. It wont be seen. I do need to get rid of the worse bubble holes and other faults though. Also, preparing two bases for the front engine mounts and getting them lined up properly has also been a bit of a challenge.
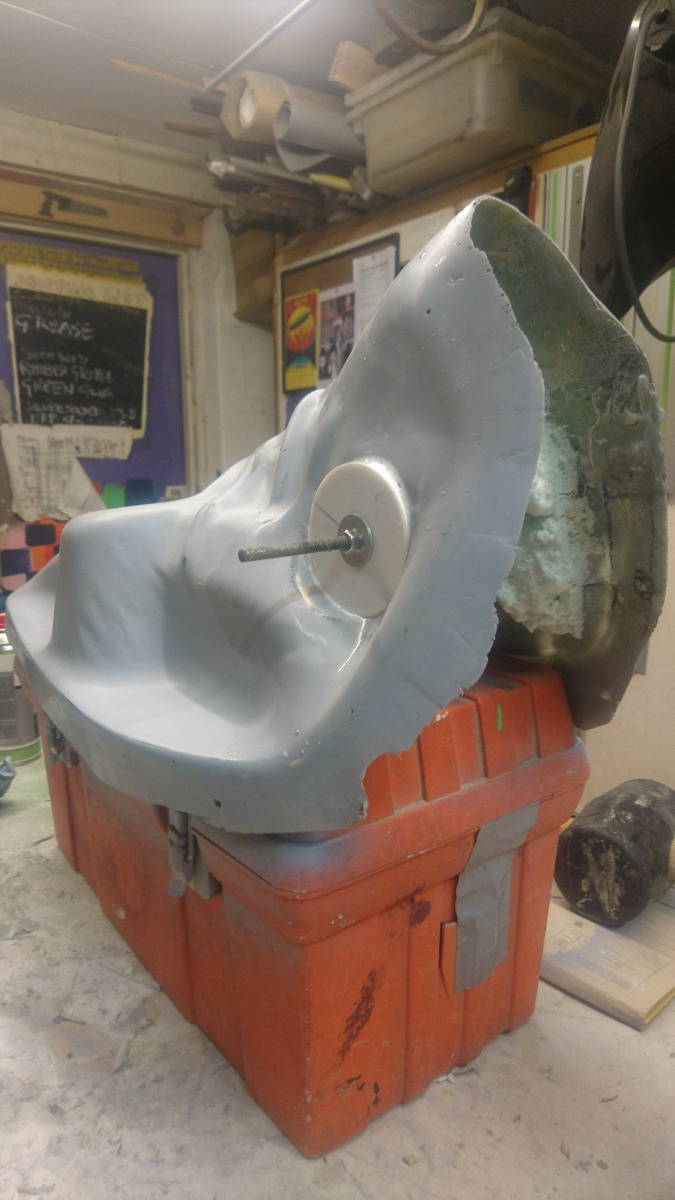
The top part of the mold has to be perfect,or as near as I can get it. Not sure how much filling and sanding I've done on this one but its a lot.Its now got a coat of filler spray on it so its nearly ready for painting.
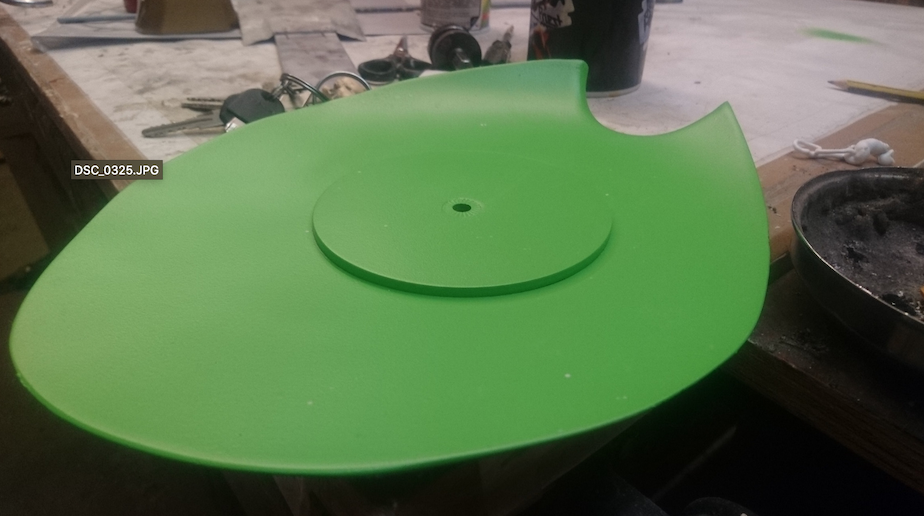
I want to have the filler cap set in flush with the top of the tank,so I have to add a spacer of the right diameter and thickness for that. If I get it wrong, it'll mess the whole thing up so I made a second mold of the top of the tank as a test piece.This is ready to go.
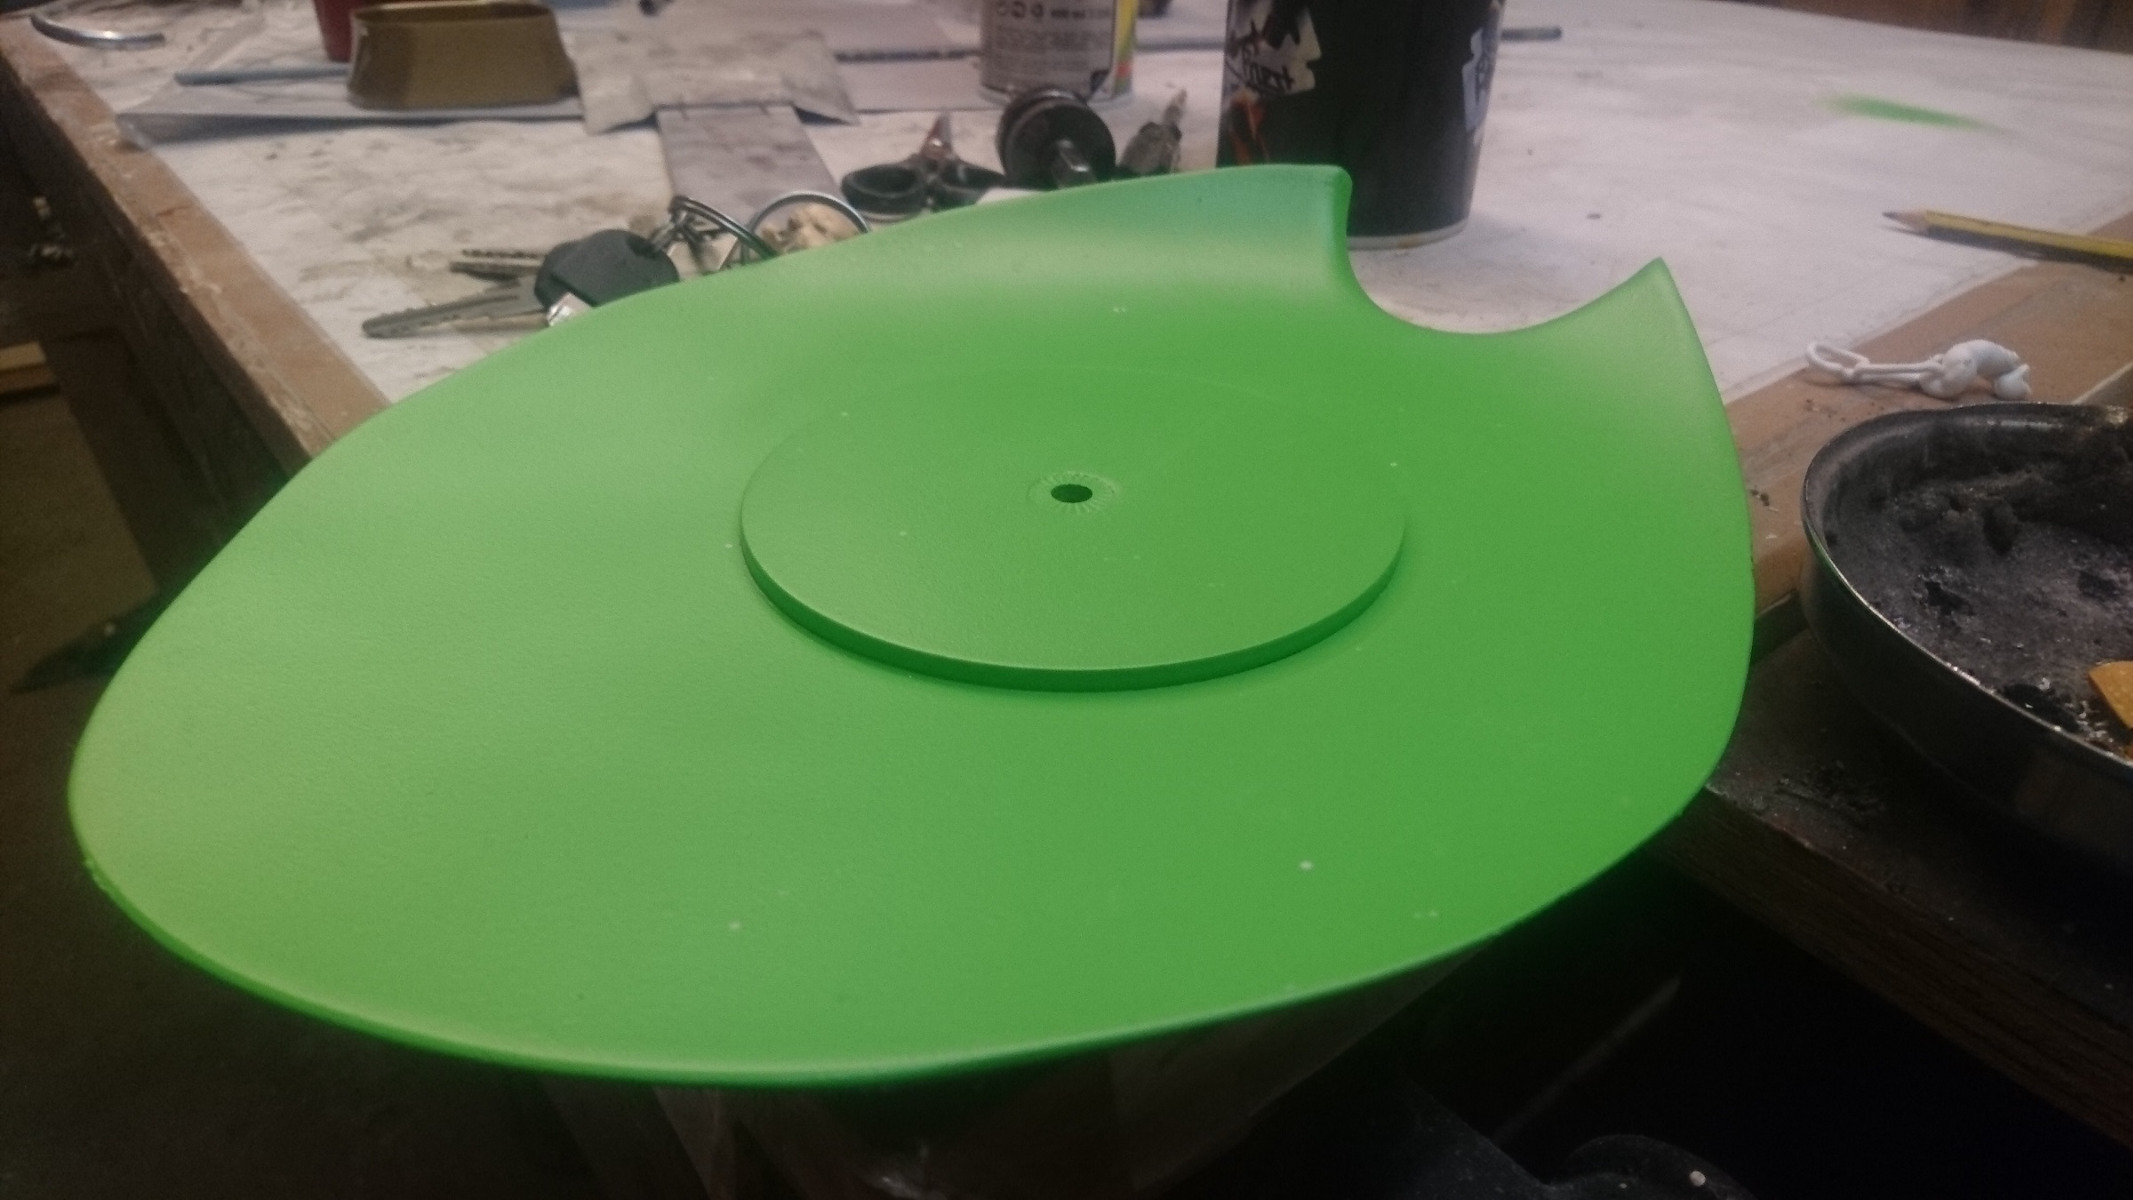
The idea now is to finish the molds and get them painted, then do a trial run with fiberglass. I'll do the fuel cap piece first to make sure it fits.If that works out,I will fit another spacer into the top part mold,get that painted,then cast the whole lot. I need to see how well(or NOT well) the top and bottom fit together and how the joint is going to work out.That's a big concern and another thing that I didn't fully consider when I started.
The bottom mold doesn't need to be as perfect as the top. It wont be seen. I do need to get rid of the worse bubble holes and other faults though. Also, preparing two bases for the front engine mounts and getting them lined up properly has also been a bit of a challenge.
The top part of the mold has to be perfect,or as near as I can get it. Not sure how much filling and sanding I've done on this one but its a lot.Its now got a coat of filler spray on it so its nearly ready for painting.
I want to have the filler cap set in flush with the top of the tank,so I have to add a spacer of the right diameter and thickness for that. If I get it wrong, it'll mess the whole thing up so I made a second mold of the top of the tank as a test piece.This is ready to go.
The idea now is to finish the molds and get them painted, then do a trial run with fiberglass. I'll do the fuel cap piece first to make sure it fits.If that works out,I will fit another spacer into the top part mold,get that painted,then cast the whole lot. I need to see how well(or NOT well) the top and bottom fit together and how the joint is going to work out.That's a big concern and another thing that I didn't fully consider when I started.
www.kzrider.com/forum/11-projects/594313-csr1000-project-build
CB550 (1978)
CB500/4 (1972)*
KZ1000CSR (1981)
XT 600E (1999)
TDM900 (2003)
CB550 (1978)
CB500/4 (1972)*
KZ1000CSR (1981)
XT 600E (1999)
TDM900 (2003)
Please Log in or Create an account to join the conversation.
- davido
-
Topic Author
- Offline
- User
-
Registered
- Posts: 1580
- Thanks: 291
Re: CSR1000 Project Build
19 Apr 2022 12:11
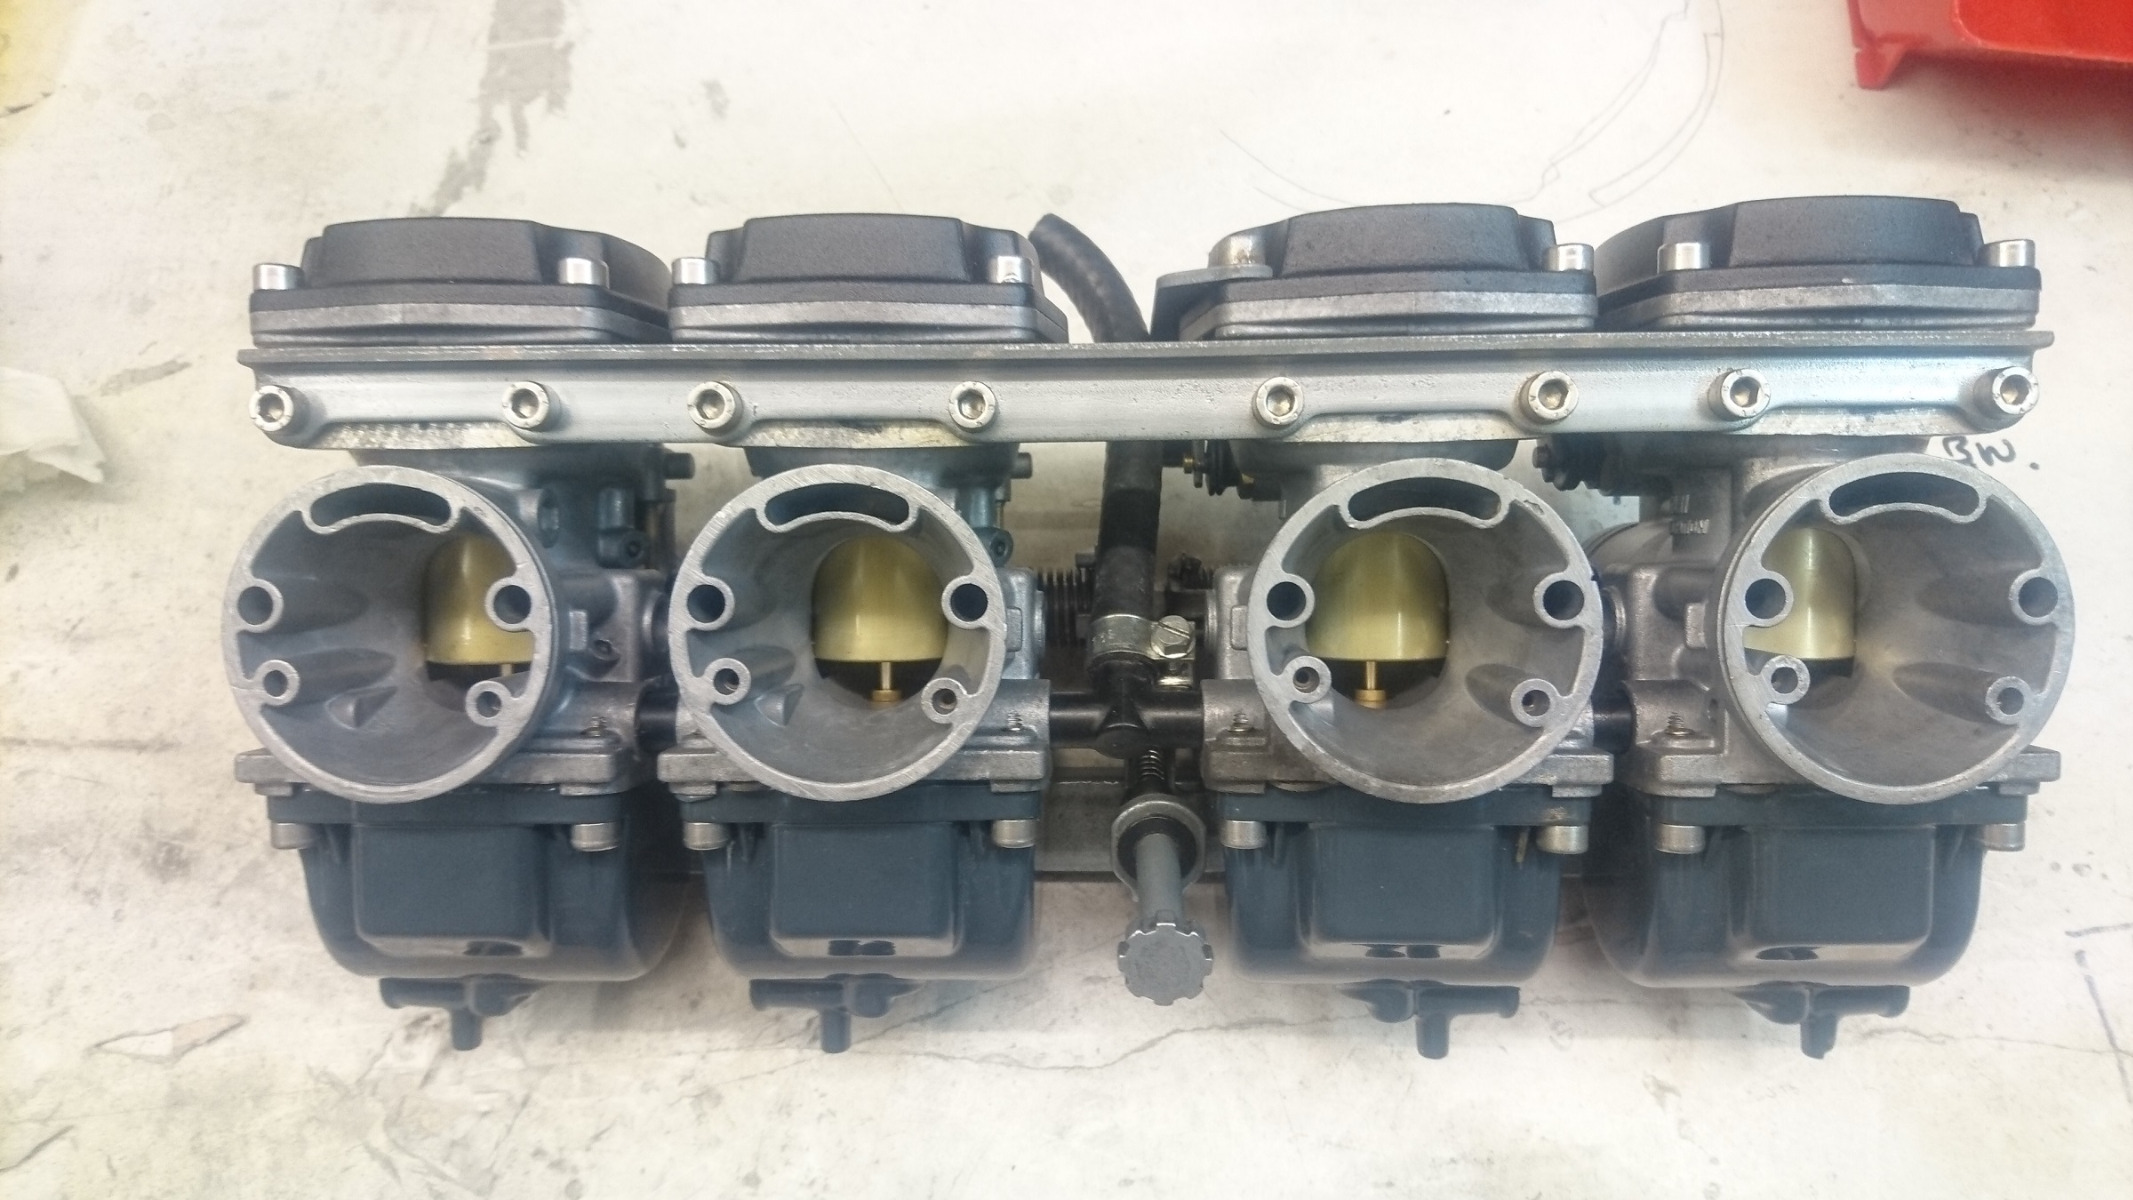
A mega bike day in the basement yesterday. Worked on parts for the CB550, the XT600 (serious problems with that at the moment), more work on the molds for the tank,(NO...still not finished! ) and finally got the carbs put back together. Very happy with the result.


(And Very happy that I bought a blast cabinet and a powdercoating gun!!)
(And Very happy that I bought a blast cabinet and a powdercoating gun!!)
www.kzrider.com/forum/11-projects/594313-csr1000-project-build
CB550 (1978)
CB500/4 (1972)*
KZ1000CSR (1981)
XT 600E (1999)
TDM900 (2003)
CB550 (1978)
CB500/4 (1972)*
KZ1000CSR (1981)
XT 600E (1999)
TDM900 (2003)
Please Log in or Create an account to join the conversation.
- davido
-
Topic Author
- Offline
- User
-
Registered
- Posts: 1580
- Thanks: 291
Re: CSR1000 Project Build
17 May 2022 05:40
.....and again,things grind to a halt! Since I last posted,I've had to strip the XT and have been busy with trying to get that back together and on the road (so I can get it off road over the summer). I knew it was going to have to be done,I just didnt want to have to do it now. So, the carbon tank is on hold. Until...? Until its not,I suppose.
In the meantime;
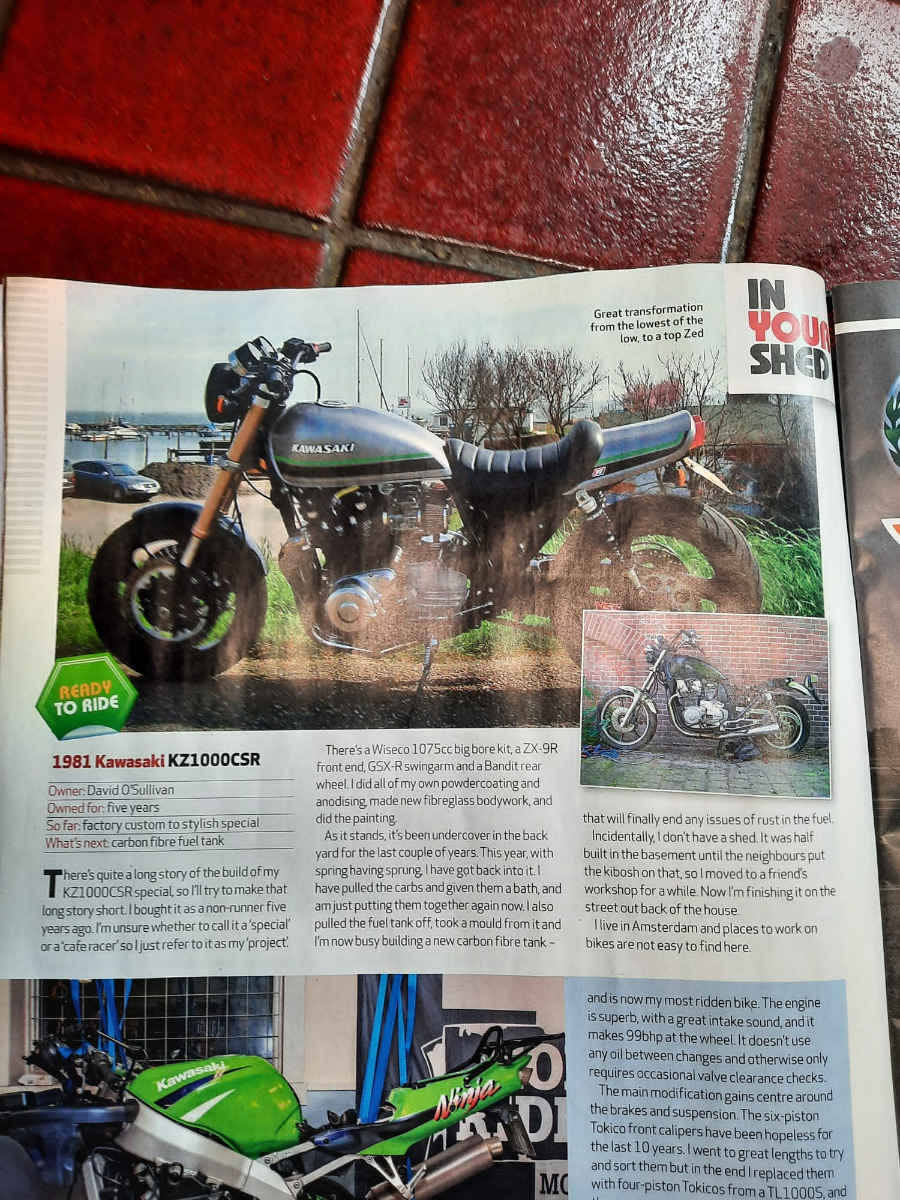
This appeared in the latest issue of 'Practical Sportsbikes' magazine.
Well chuffed! Fame at last!
In the meantime;
This appeared in the latest issue of 'Practical Sportsbikes' magazine.
Well chuffed! Fame at last!
www.kzrider.com/forum/11-projects/594313-csr1000-project-build
CB550 (1978)
CB500/4 (1972)*
KZ1000CSR (1981)
XT 600E (1999)
TDM900 (2003)
CB550 (1978)
CB500/4 (1972)*
KZ1000CSR (1981)
XT 600E (1999)
TDM900 (2003)
The following user(s) said Thank You: rstnick, ThatGPzGuy, DoctoRot, Street Fighter LTD
Please Log in or Create an account to join the conversation.
- Wookie58
-
- Away
- Moderator
-
Registered
- Posts: 6482
- Thanks: 4081
Re: CSR1000 Project Build
17 May 2022 05:55
Nothing wrong with a bit of recognition for your efforts, Davido how long are your forks now from top of the top yolk to axle centre (I like the stance)
1982 KZ1000 Ltd
www.kzrider.com/forum/11-projects/617631...-82-begins?start=192
kzrider.com/forum/faq-wiki/616810-electr...-fault-finding-guide
www.kzrider.com/forum/11-projects/617631...-82-begins?start=192
kzrider.com/forum/faq-wiki/616810-electr...-fault-finding-guide
Please Log in or Create an account to join the conversation.
- davido
-
Topic Author
- Offline
- User
-
Registered
- Posts: 1580
- Thanks: 291
Re: CSR1000 Project Build
18 May 2022 03:46
Not sure of the final length but I reckon its still a bit low. You've got to go slow over bumps etc or the downpipes scrape. They're the standard ZX9R forks with homemade extensions. I got the extensions made a bit over length so I would have something to play with but the height is ultimately limited by the dimples in the forks, just below the bottom yoke.
www.kzrider.com/forum/11-projects/594313-csr1000-project-build
CB550 (1978)
CB500/4 (1972)*
KZ1000CSR (1981)
XT 600E (1999)
TDM900 (2003)
CB550 (1978)
CB500/4 (1972)*
KZ1000CSR (1981)
XT 600E (1999)
TDM900 (2003)
The following user(s) said Thank You: Wookie58
Please Log in or Create an account to join the conversation.
- Wookie58
-
- Away
- Moderator
-
Registered
- Posts: 6482
- Thanks: 4081
Re: CSR1000 Project Build
18 May 2022 05:26 - 18 May 2022 05:28
Thanks, I don't have the dimple issue (I do have a Harris pipe though) as I am using "RWU" 46mm ZX9R C1 forks (I prefer the look of RWU for the overall "stock plus" theme I am going for)
1982 KZ1000 Ltd
www.kzrider.com/forum/11-projects/617631...-82-begins?start=192
kzrider.com/forum/faq-wiki/616810-electr...-fault-finding-guide
www.kzrider.com/forum/11-projects/617631...-82-begins?start=192
kzrider.com/forum/faq-wiki/616810-electr...-fault-finding-guide
Last edit: 18 May 2022 05:28 by Wookie58.
Please Log in or Create an account to join the conversation.
- DoctoRot
-
- Offline
- Sustaining Member
-

Registered
- Oh, the usual... I bowl, I drive around...
- Posts: 2621
- Thanks: 784
Re: CSR1000 Project Build
18 May 2022 11:02 - 18 May 2022 11:10
FYI This raised boss will likely be a point that traps air bubbles and has exclusions. a small radius on the top edge and a small fillet in the corner will drastically improve the textiles ability to drape over this feature, I usually shoot for about a 4-6mm radius at a minimum, but bigger is always better here. Also this will make it much easier to release from the mold. Molding the top half of the tank in 2-3 parts will allow you to to add a flange around the bottom perimeter that the bottom half can land on and will give you wider range of manufacturing tolerance. Plus it will give additional surface area for glueing them together, much in the same way the factory tanks had a seam at the bottom edge. however in your application this flange can be done perpendicular to the tank exterior so its hidden under the tank. just my .02. keep up the work - one off composites are a labor of love.
Last edit: 18 May 2022 11:10 by DoctoRot.
Please Log in or Create an account to join the conversation.
- davido
-
Topic Author
- Offline
- User
-
Registered
- Posts: 1580
- Thanks: 291
Re: CSR1000 Project Build
19 May 2022 06:56
Aha! Advice.That's just what I need. When you talk about radius and flange,what do you mean.I have thought about the problem of casting on such a small tight bend,that's why I made this piece as a test mold.
As for the flange around the edge,Ive put a lot of thought into that and plan to cast in 2 pieces.Top of the tank and bottom of the tank.Same as the factory steel.Retaining the flange around the bottom edge,though as I took the mold from the 'outside' of the tank,I have the full 3 to 4mm(+-) steel thickness of the flange to make up for. That's a lot of layers of carbon fiber methinks, so I reckon there is going to be a gap where the 2 pieces should join (the whole way around the flange) which I would have to stuff with small strips/offcuts/I don't know yet. but hopefully it will give some body and extra strength around the flange.
Another thing I'm considering after reading the ZRX post, is the fact that if I keep the edge flange at the same height as the original tank,that is not a lot of surface to be holding the 2 pieces together. I'm thinking of putting rivets in it for extra security.
www.kzrider.com/forum/11-projects/594313-csr1000-project-build
CB550 (1978)
CB500/4 (1972)*
KZ1000CSR (1981)
XT 600E (1999)
TDM900 (2003)
CB550 (1978)
CB500/4 (1972)*
KZ1000CSR (1981)
XT 600E (1999)
TDM900 (2003)
Please Log in or Create an account to join the conversation.
- DoctoRot
-
- Offline
- Sustaining Member
-
Registered
- Oh, the usual... I bowl, I drive around...
- Posts: 2621
- Thanks: 784
Re: CSR1000 Project Build
19 May 2022 15:15 - 19 May 2022 17:05
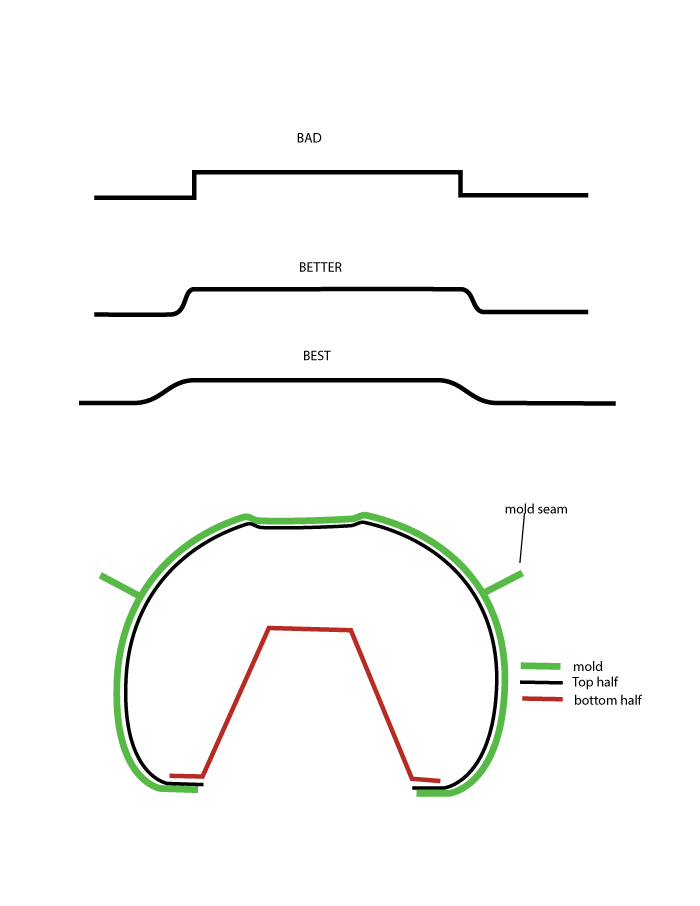
When i refer to radius I am referring the the hard corners that are present in that boss feature. transitions need to be as smooth as possible to allow the textile to drape. You’re going to want to use a 2x2 twill as it drapes better and is still somewhat easy to handle.
I would turn the factory flange at the bottom of the tank 90 degrees in and extend it to 10-12 mm so that the bottom part has sufficient overlap for bonding. This will also give you more flexibility in part tolerances. Things have a tendency to move as they cure unless your mold is extremely rigid.
Im not familiar with the CSR tank but most Kawasaki tanks cannot be a single piece mold, but will need a 2-3 part mold at the minimum (to achieve a single finished top half). I drew a crude cut away of the gas tank to illustrate this. You need about 2-3 degrees of draft to be able to demold on a part of this size otherwise it can be extremely difficult or impossible to remove it, if you try a two piece with that gas cap feature it will lock the part in. I would not hesitate to scrap the bottom half of the tank and drastically simplify the shape. That is going to be extremely difficult for the textile to drape over and is going to do weird things, not to mention be a nightmare to finish properly.
How are you planning on laying the final part up? Wet layup? Resin infusion? prepreg?
Last edit: 19 May 2022 17:05 by DoctoRot.
Please Log in or Create an account to join the conversation.
- davido
-
Topic Author
- Offline
- User
-
Registered
- Posts: 1580
- Thanks: 291
Re: CSR1000 Project Build
20 May 2022 01:27
Doctorot, Great,I see what you're talking about now. Gives me a lot to think about.Though I have put a lot of thought into it already,I have no experience with carbon fiber (some with fiberglass) and I'm working in the dark,so to speak.
I've planned the fuel cap recess as it is because I want the actual cap (its a flat aviation style cap) to fit in nice and snug.Though there is a rubber gasket,I planned to finish it with some silicone kit to avoid rain water collecting in the recess and finding its way into the tank. I understand your thinking and will have to find a compromise.
For the tank itself, I was hoping to have the mold as 2 pieces. Yes the bottom is a complex shape but there are no sharp edges and no acute angles to cause a mechanical lock.Also the finish of the bottom does not need to be fancy as it will never be seen.So long as its solid,without and bubbles or areas of delamination and the flange lines up, I'll be happy.
The top half of the tank, I think/hope that one piece is possible. The mold is reasonably thin,supported and stiffened by builders foam for rigidity. The foam can be broken away leaving,hopefully, the mold flexible enough to bend out and pull off.
The flange is the big question. This has been banging around my brain for a while. I understand what you mean from your drawing and this is also how the ZRX guy approached it.But I'm pretty sure that there is no room for the flange to turn inwards. I will check on this before I commit but I do know that the CSR tank comes down pretty close to the engine in places.
This is why I was hoping to keep the original flange shape and put some rivits in it for security.
Like I said,no experience with carbon fiber so I'm going for a simple wet layup. (without a vacuum bag). Another point,I think I mentioned before,Is that I'm not interested in the carbon fiber look. I plan a solid colour, using a gel coat and maybe paint later, so, i don't care about the weave look. This should make things a bit easier.
www.kzrider.com/forum/11-projects/594313-csr1000-project-build
CB550 (1978)
CB500/4 (1972)*
KZ1000CSR (1981)
XT 600E (1999)
TDM900 (2003)
CB550 (1978)
CB500/4 (1972)*
KZ1000CSR (1981)
XT 600E (1999)
TDM900 (2003)
Please Log in or Create an account to join the conversation.
Moderators: Street Fighter LTD