
1981 KZ1000 J-to-K build
- 531blackbanshee
-
- Offline
- Vendor
-

Vendors
- Posts: 7442
- Thanks: 796
Re: 1981 KZ1000 J-to-K build
03 Sep 2015 06:07
hey man you are making progress despite the setbacks.when you get done and look back you won't hardly remember all the lil bs deals.
it'll all seem worth it :evil: .
leon
it'll all seem worth it :evil: .
leon
skiatook,oklahoma 1980 z1r,1978 kz 1000 z1r x 3,
1976 kz 900 x 3
i make what i can,and save the rest!
billybiltit.blogspot.com/
www.kzrider.com/forum/5-chassis/325862-triple-tree-custom-work
kzrider.com/forum/5-chassis/294594-frame-bracing?limitstart=0
1976 kz 900 x 3
i make what i can,and save the rest!
billybiltit.blogspot.com/
www.kzrider.com/forum/5-chassis/325862-triple-tree-custom-work
kzrider.com/forum/5-chassis/294594-frame-bracing?limitstart=0
Please Log in or Create an account to join the conversation.
- Shdwdrgn
-
 Topic Author
- Offline
- User
-

Registered
- Posts: 614
- Thanks: 24
Re: 1981 KZ1000 J-to-K build
03 Sep 2015 07:52
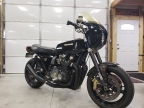
Haha true enough. But I've actually been wanting to completely rebuild a bike for years, so I knew what I was getting in to. Just didn't expect to not have any time last Summer, and my first bike died so it's been awhile since I've been able to go for a nice ride. Making me antsy to actually get things finished up!
1981 KZ1000-JK1
She's a beautiful mess, and I've made her all mine
She's a beautiful mess, and I've made her all mine
Please Log in or Create an account to join the conversation.
- Shdwdrgn
-
Topic Author
- Offline
- User
-
Registered
- Posts: 614
- Thanks: 24
Re: 1981 KZ1000 J-to-K build
08 Sep 2015 09:40
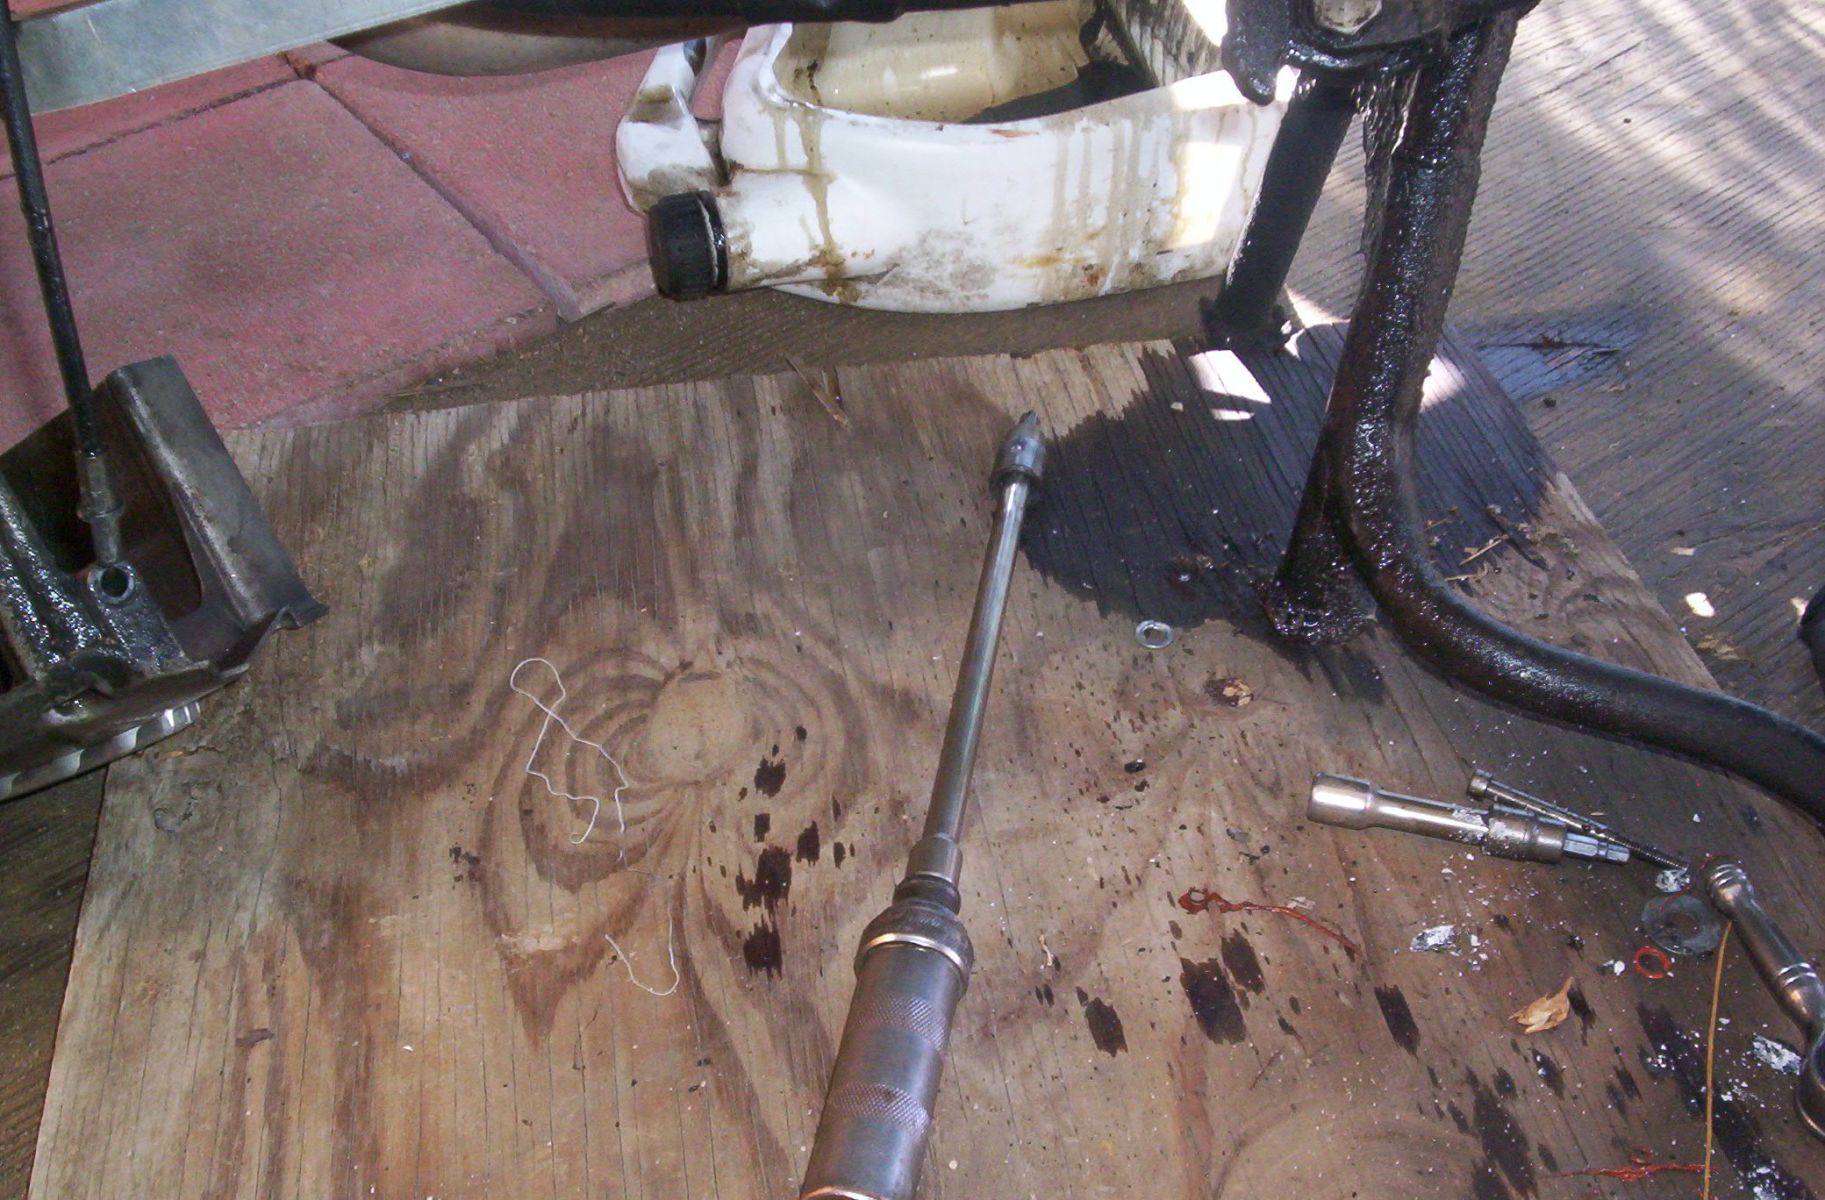
I pulled the top cap on the forks over the weekend to dump out the old oil and get them cleaned. What I found was a horrible mess... this black lumpy sludge that couldn't have been useful for anything. I dumped in some gas for an initial rinse, then pulled out the springs and cleaned the by hand. I finished up the tubes with a couple rinses of denatured alcohol. I know this bike has been sitting for a number of years, but ugh! At least I'm not feeling any play when working them by hand.
So I finished blasting the triple-trees and the second fork, plus some other small parts, and got everything in primer. It looks like my clearcoat arrived at the store this morning, and tomorrow's weather forecast looks promising, so I'm hoping to get all the pieces coated in black and clear and let them set up until next weekend, then maybe I can start re-assembling. Once the forks are mounted back on the frame I'll fill them with some new oil and set the air pressure, then they'll have all Winter to sit and see if any leaks appear.
Hmm, I still need to do a final printout of the frame sticker, get that added on, and do some clearcoat over the top of it to seal it in. Then I'll be ready to do a wax coat on the frame before I start putting all the brackets and accessories back on.
1981 KZ1000-JK1
She's a beautiful mess, and I've made her all mine
She's a beautiful mess, and I've made her all mine
Please Log in or Create an account to join the conversation.
- Shdwdrgn
-
Topic Author
- Offline
- User
-
Registered
- Posts: 614
- Thanks: 24
Re: 1981 KZ1000 J-to-K build
09 Sep 2015 09:23
Ah cool -- I found some large weatherproof mailing labels at work today and printed off two copies of the frame VIN sticker. The labels are larger than I need, so I can cut them down to the exact size and slap one on the frame. Some clearcoat over the top, and it should be a perfectly acceptable replacement for the factory sticker.
Picked up the new cans of clearcoat last night, and the weather is looking good for painting after work. Get the forks finished up, then I'll have to figure out how to get the brake discs off of the wheels... that should be entertaining. I have a small 3/8" impact wrench, maybe I can find a metric hex bit to fit it.
Picked up the new cans of clearcoat last night, and the weather is looking good for painting after work. Get the forks finished up, then I'll have to figure out how to get the brake discs off of the wheels... that should be entertaining. I have a small 3/8" impact wrench, maybe I can find a metric hex bit to fit it.
1981 KZ1000-JK1
She's a beautiful mess, and I've made her all mine
She's a beautiful mess, and I've made her all mine
Please Log in or Create an account to join the conversation.
- SWest
-

- Offline
- Sustaining Member
-
Registered
- 10 22 2014
- Posts: 23733
- Thanks: 3016
Re: 1981 KZ1000 J-to-K build
09 Sep 2015 11:55
I use this.
Steve
Steve
Z1b1000 1975 Z1b
kzrider.com/forum/11-projects/598262-kz-...-will-it-live#672882
kzrider.com/forum/2-engine/597654-poser?start=240#704229
kzrider.com/forum/11-projects/598262-kz-...-will-it-live#672882
kzrider.com/forum/2-engine/597654-poser?start=240#704229
Please Log in or Create an account to join the conversation.
- Shdwdrgn
-
Topic Author
- Offline
- User
-
Registered
- Posts: 614
- Thanks: 24
Re: 1981 KZ1000 J-to-K build
09 Sep 2015 12:08
What is "this"?
1981 KZ1000-JK1
She's a beautiful mess, and I've made her all mine
She's a beautiful mess, and I've made her all mine
Please Log in or Create an account to join the conversation.
- SWest
-
- Offline
- Sustaining Member
-
Registered
- 10 22 2014
- Posts: 23733
- Thanks: 3016
Re: 1981 KZ1000 J-to-K build
09 Sep 2015 12:14
3/8" Hand impact driver. Can be used with sockets, Phillips/JIS screws, Allen sockets, etc. I used it to remove the screws on my tranny cover under the clutch cover. A must have for every tool box. ") Did you figure out your center stand. It shouldn't hit the swing arm.
Did you figure out your center stand. It shouldn't hit the swing arm.
Steve
Did you figure out your center stand. It shouldn't hit the swing arm.Steve
Z1b1000 1975 Z1b
kzrider.com/forum/11-projects/598262-kz-...-will-it-live#672882
kzrider.com/forum/2-engine/597654-poser?start=240#704229
kzrider.com/forum/11-projects/598262-kz-...-will-it-live#672882
kzrider.com/forum/2-engine/597654-poser?start=240#704229
Please Log in or Create an account to join the conversation.
- Shdwdrgn
-
Topic Author
- Offline
- User
-
Registered
- Posts: 614
- Thanks: 24
Re: 1981 KZ1000 J-to-K build
09 Sep 2015 12:22
Ah that makes sense now! I have a 1/2" impact driver, they didn't have a 3/8" last time I needed one, but will definitely be added to my toolbox some day. I hadn't though of that for the discs, but sounds like a great idea.
No I haven't had a chance to look at the center stand again. I slipped the rear shocks in place so the swingarm is up in position now, but it looks like the center stand will still hit it. Is there supposed to be some kind of stopper, or does the spring limit how far the stand will swing?
No I haven't had a chance to look at the center stand again. I slipped the rear shocks in place so the swingarm is up in position now, but it looks like the center stand will still hit it. Is there supposed to be some kind of stopper, or does the spring limit how far the stand will swing?
1981 KZ1000-JK1
She's a beautiful mess, and I've made her all mine
She's a beautiful mess, and I've made her all mine
Please Log in or Create an account to join the conversation.
- 650ed
-

- Offline
- User
-
Registered
- Posts: 15334
- Thanks: 2831
Re: 1981 KZ1000 J-to-K build
09 Sep 2015 13:14
1977 KZ650-C1 Original Owner - Stock (with additional invisible FIAMM horn)
Please Log in or Create an account to join the conversation.
- Shdwdrgn
-
Topic Author
- Offline
- User
-
Registered
- Posts: 614
- Thanks: 24
Re: 1981 KZ1000 J-to-K build
10 Sep 2015 07:06
Painting didn't quite go as planned last night. Guess it was hotter than I realized, the paint ended up going on thick and sagged in a few places. At least I realized it before I got to the forks. And then I managed to knock over one of the triple-trees after painting. I'll see if the paint is dry enough this weekend, but will probably have to wait for the following weekend to sand out the thick spots.
In the mean time, I hosed down the frame before work this morning and left it to dry in the sun. This evening I should be able to get the VIN sticker put on and shoot some clearcoat over it. And tomorrow after work it will be cooler, so I can finish spraying the forks and get some clearcoat put on. Guess I'll be starting on the wheels this weekend since the triple-trees have to be put aside for a bit.
In the mean time, I hosed down the frame before work this morning and left it to dry in the sun. This evening I should be able to get the VIN sticker put on and shoot some clearcoat over it. And tomorrow after work it will be cooler, so I can finish spraying the forks and get some clearcoat put on. Guess I'll be starting on the wheels this weekend since the triple-trees have to be put aside for a bit.
1981 KZ1000-JK1
She's a beautiful mess, and I've made her all mine
She's a beautiful mess, and I've made her all mine
Please Log in or Create an account to join the conversation.
- Shdwdrgn
-
Topic Author
- Offline
- User
-
Registered
- Posts: 614
- Thanks: 24
Re: 1981 KZ1000 J-to-K build
10 Sep 2015 17:02
Well at least something worked out... I got my VIN sticker put on the frame and clear-coated this afternoon. Had a little breeze, bugs were flying around, and I did it in the middle of the yard, and I still managed to get it done without anything being blown into the clear. I gotta get lucky once in awhile.
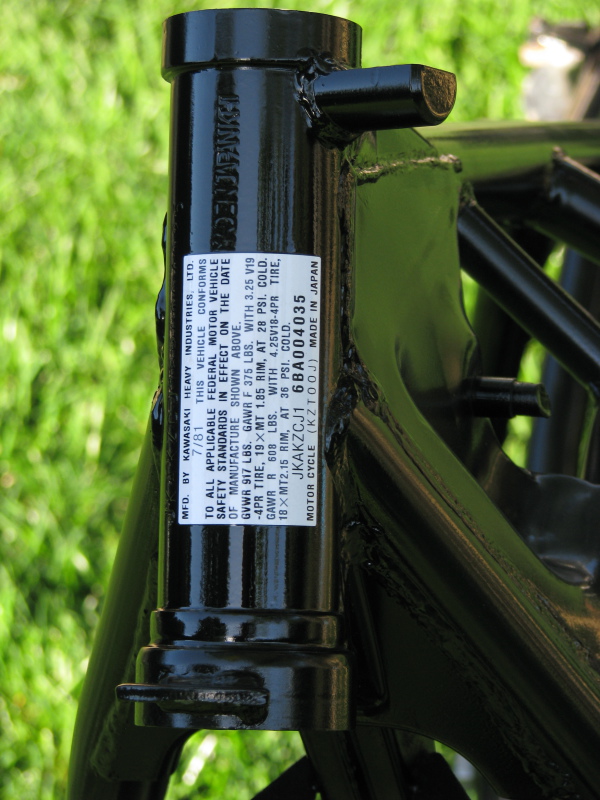
Yeah it's not much, but I like the little details.
I checked the triple-trees this evening and got a little sanding done. Not sure how the paint is solid enough to sand already, especially considering the thickness, but I started to get the flaws cleaned up. Should be no problem getting them finished this weekend.
1981 KZ1000-JK1
She's a beautiful mess, and I've made her all mine
She's a beautiful mess, and I've made her all mine
Please Log in or Create an account to join the conversation.
- Shdwdrgn
-
Topic Author
- Offline
- User
-
Registered
- Posts: 614
- Thanks: 24
Re: 1981 KZ1000 J-to-K build
12 Sep 2015 15:13
Home from work sick yesterday, still in bad shape today. Throat gunk, pounding head, sweating buckets... but I couldn't stand it any longer, and had to go try to do some finally coats of paint on the fork parts. The original paint hardens up really fast, so I sanding the bad spots smooth with some 100-grit, cleaned up the pieces, and got a final coat of paint followed by some clearcoat. Both of the triple-trees are done. I also did final coats on the forks, and on the speedometer bracket. Just need to let everything sit for a couple days, then I can clean up the screw thread holes.
While doing the forks, I have been using the fender bolts as stand-offs so I could set the forks on the workbench to dry. In a couple days I can remove the bolts, and then see what it takes to clean them back up with the sand blaster. I'm leaving most of the bolts clean, with the satin finish from the blaster, because they stand out nicely against the gloss black. Hopefully it will take a lot to get the paint stripped from the bolts I painted over, which will mean the paint will be very durable on the bike.
With the painting done, maybe tomorrow I'll have enough ambition to try and put a coat of wax on the frame. It probably won't last through the Winter, but should help protect the finish while the paint is fully curing, and give an added layer of protection while I'm bolting on other parts.
1981 KZ1000-JK1
She's a beautiful mess, and I've made her all mine
She's a beautiful mess, and I've made her all mine
Please Log in or Create an account to join the conversation.
Moderators: Street Fighter LTD