
1981 KZ1000 J-to-K build
- Shdwdrgn
-
 Topic Author
- Offline
- User
-

Registered
- Posts: 614
- Thanks: 24
Re: 1981 KZ1000 J-to-K build
26 Jun 2016 14:49 - 26 Jun 2016 15:22
All right, let's start out with the triple-tree itself. In looking through various pictures of the 81's, it looks like there were two different style of the lower triple. I think the name plate I got goes with the one which is more straight across, while mine has a very definite V-shape to it...
(Son of a.... trying to insert pictures, it submits the message instead of inserting when I hit the enter key. Not only that, but I just spent the last 20 minutes to finish typing my update, only to be told my message had too many links AND the entire new message was completely lost. So here I go again...)
OK, the pic of the lower triple-tree:
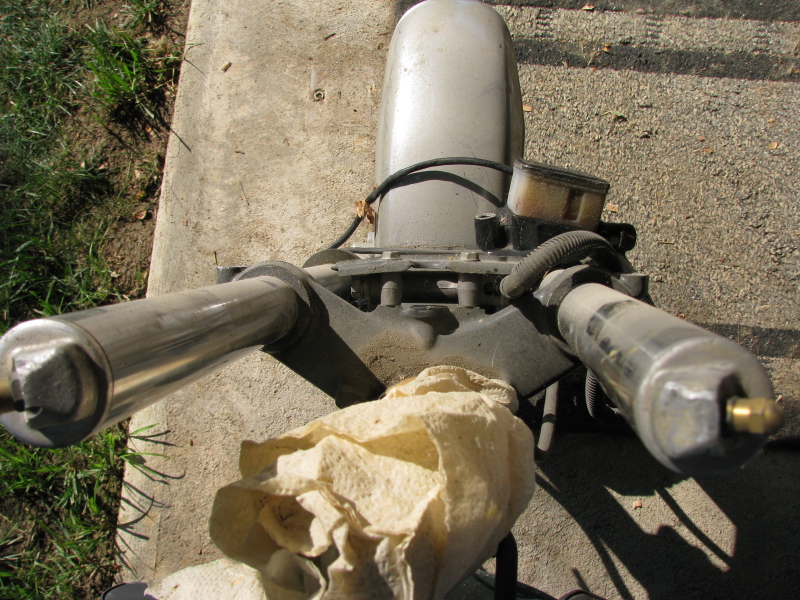
Now, the space behind my nameplate where you can see the screw threads. It's not a huge deal, I can get nylon spacers to take up the gap, however someone has obviously placed LTD forks on a J frame, so it would be nice to identify all the frankenstein parts in case I need to do repairs down the road...
OK I'll start a new message for the rest of the updates.
(Son of a.... trying to insert pictures, it submits the message instead of inserting when I hit the enter key. Not only that, but I just spent the last 20 minutes to finish typing my update, only to be told my message had too many links AND the entire new message was completely lost. So here I go again...)
OK, the pic of the lower triple-tree:
Now, the space behind my nameplate where you can see the screw threads. It's not a huge deal, I can get nylon spacers to take up the gap, however someone has obviously placed LTD forks on a J frame, so it would be nice to identify all the frankenstein parts in case I need to do repairs down the road...
OK I'll start a new message for the rest of the updates.
1981 KZ1000-JK1
She's a beautiful mess, and I've made her all mine
She's a beautiful mess, and I've made her all mine
Last edit: 26 Jun 2016 15:22 by Shdwdrgn.
Please Log in or Create an account to join the conversation.
- Shdwdrgn
-
Topic Author
- Offline
- User
-
Registered
- Posts: 614
- Thanks: 24
Re: 1981 KZ1000 J-to-K build
26 Jun 2016 15:37
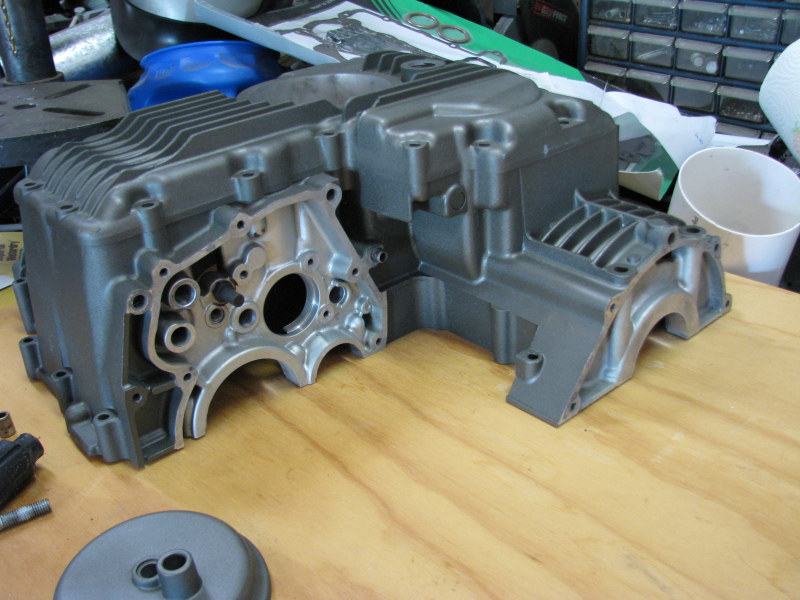
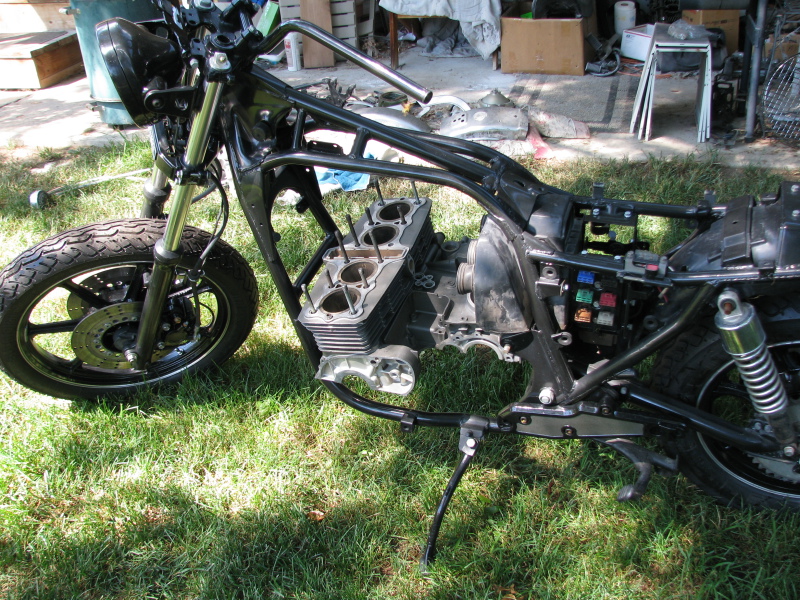
Next up today, I finished baking the engine case pieces. A bit of wet-sanding took down the 'dry' areas, leaving a nice clean finish.
The outdoor shots kind of washed out the color contrast, so here's an indoor shot that better represents the actual color, and you can clearly see the difference between the original aluminum and the cast-iron paint color:
First shot on the bike:
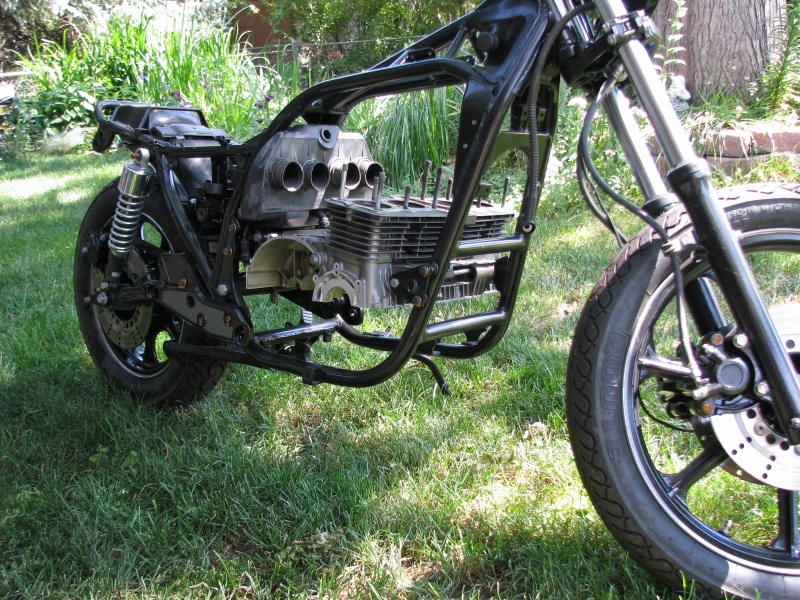
And even with the colors washed out in the sun, I still really like the contrast with the black. Plus it blends nicely with the little bit of chrome still showing.
This shot shows why I really liked this color. The cast-iron looks like it has silver metal-flake in it, and it sparkles in the sun, however if you look at the full-size image below, you'll see it is actually reflecting red, yellow, and blue colors across the surface, giving it a nice rich color outside.
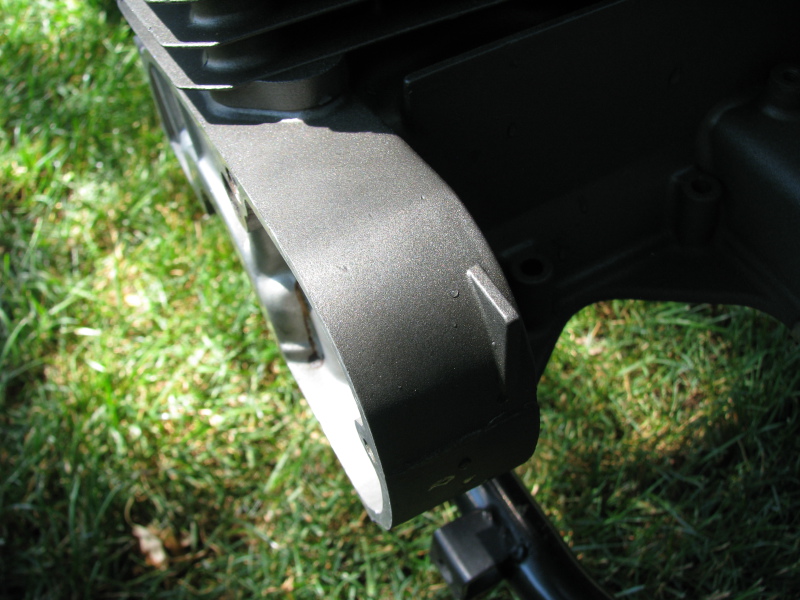
( Here's the full-size image if you want to see it )
Unfortunately I'm not quite done yet. While finishing the wet-sanding, I noticed the top half of the crank case has some areas where I didn't get the primer covered in paint. These are spots that will show when the engine is fully assembled, so I need to wait until later in the week, mask off and paint that piece again, then wait a few more days and bake it. It will probably be another couple weeks before I can start putting the engine back together again, but it would suck to leave it looking like this. Guess it'll give me some time to start working on those other pieces that will take a long time to paint.
I tried playing with the air brush today. I failed. I found this paint yesterday that was a nice antique-copper color, which I thought would go well over the black for making scales. Well the color is a bit too coppery, needs more yellow to it. Maybe I can make use of the burnt-orange spray paint? But the worst of it was in trying to actually paint. The paint was thinned to 50%, but it came out gummy, and made a mess in the air brush. Apparently this is why some people strain their paint before using it in an air brush. Oh well lesson learned. I've had this brush for more than 25 years, and never really did much with it, so now I need to really start reading up on it and figure out what I can do to make various paint work properly through it. Sorry, no pics unless you want to see something on the ground that looks like copper snot, but I'll get it figured out here soon.
The outdoor shots kind of washed out the color contrast, so here's an indoor shot that better represents the actual color, and you can clearly see the difference between the original aluminum and the cast-iron paint color:
First shot on the bike:
And even with the colors washed out in the sun, I still really like the contrast with the black. Plus it blends nicely with the little bit of chrome still showing.
This shot shows why I really liked this color. The cast-iron looks like it has silver metal-flake in it, and it sparkles in the sun, however if you look at the full-size image below, you'll see it is actually reflecting red, yellow, and blue colors across the surface, giving it a nice rich color outside.
( Here's the full-size image if you want to see it )
Unfortunately I'm not quite done yet. While finishing the wet-sanding, I noticed the top half of the crank case has some areas where I didn't get the primer covered in paint. These are spots that will show when the engine is fully assembled, so I need to wait until later in the week, mask off and paint that piece again, then wait a few more days and bake it. It will probably be another couple weeks before I can start putting the engine back together again, but it would suck to leave it looking like this. Guess it'll give me some time to start working on those other pieces that will take a long time to paint.
I tried playing with the air brush today. I failed. I found this paint yesterday that was a nice antique-copper color, which I thought would go well over the black for making scales. Well the color is a bit too coppery, needs more yellow to it. Maybe I can make use of the burnt-orange spray paint? But the worst of it was in trying to actually paint. The paint was thinned to 50%, but it came out gummy, and made a mess in the air brush. Apparently this is why some people strain their paint before using it in an air brush. Oh well lesson learned. I've had this brush for more than 25 years, and never really did much with it, so now I need to really start reading up on it and figure out what I can do to make various paint work properly through it. Sorry, no pics unless you want to see something on the ground that looks like copper snot, but I'll get it figured out here soon.
1981 KZ1000-JK1
She's a beautiful mess, and I've made her all mine
She's a beautiful mess, and I've made her all mine
Please Log in or Create an account to join the conversation.
- Shdwdrgn
-
Topic Author
- Offline
- User
-
Registered
- Posts: 614
- Thanks: 24
Re: 1981 KZ1000 J-to-K build
26 Jun 2016 15:45
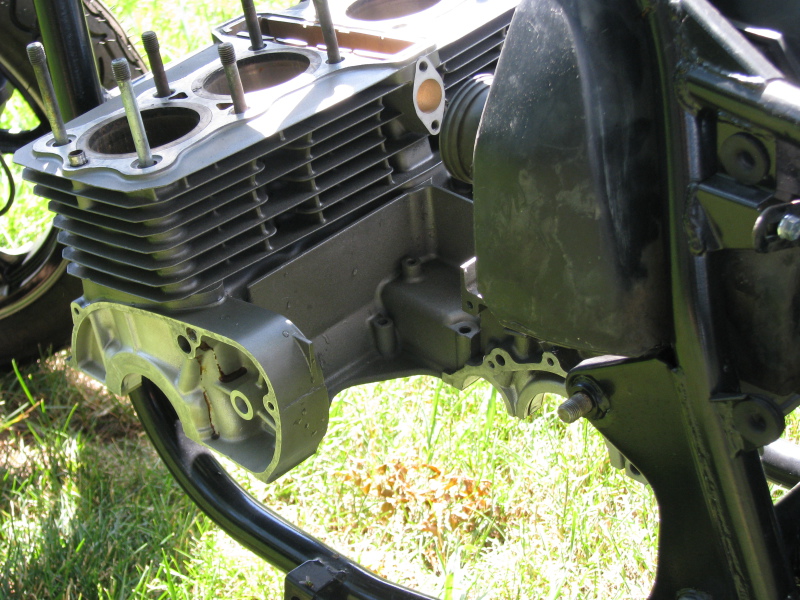
Checking through the various photos I took, this one came out good too and does a better job of contrasting the colors. At the moment the bike is looking very monochromatic ")
1981 KZ1000-JK1
She's a beautiful mess, and I've made her all mine
She's a beautiful mess, and I've made her all mine
Please Log in or Create an account to join the conversation.
- Shdwdrgn
-
Topic Author
- Offline
- User
-
Registered
- Posts: 614
- Thanks: 24
Re: 1981 KZ1000 J-to-K build
26 Jun 2016 17:02
And yet another update... Trying to slip that rubber gasket back around the speedo housing really sucks, but I finally got it. Then I tried washing down the glass with alcohol -- that's not going very well. There's a foggy area around the outside edge I can't seem to make any progress on, and it feels like there's two small chips on the inside of the glass. With my luck, I'll probably get the thing reassembled and the crimp ring back in place, only to discover a cat hair inside the glass.
1981 KZ1000-JK1
She's a beautiful mess, and I've made her all mine
She's a beautiful mess, and I've made her all mine
Please Log in or Create an account to join the conversation.
- SWest
-

- Offline
- Sustaining Member
-

Registered
- 10 22 2014
- Posts: 23733
- Thanks: 3016
Re: 1981 KZ1000 J-to-K build
26 Jun 2016 17:09
I only crimp in three places. Good thing, I'm opening them up again.
Steve
Steve
Z1b1000 1975 Z1b
kzrider.com/forum/11-projects/598262-kz-...-will-it-live#672882
kzrider.com/forum/2-engine/597654-poser?start=240#704229
kzrider.com/forum/11-projects/598262-kz-...-will-it-live#672882
kzrider.com/forum/2-engine/597654-poser?start=240#704229
Please Log in or Create an account to join the conversation.
- Shdwdrgn
-
Topic Author
- Offline
- User
-
Registered
- Posts: 614
- Thanks: 24
Re: 1981 KZ1000 J-to-K build
26 Jun 2016 19:24
I was just going to use some pliers to fold the crimp ring back over again. Seems like if I didn't crimp over the whole thing, it would show? Ugh, and I just realized I never found a replacement for that rubber piece between the two case halves, guess I'll have to figure this out soon.
1981 KZ1000-JK1
She's a beautiful mess, and I've made her all mine
She's a beautiful mess, and I've made her all mine
Please Log in or Create an account to join the conversation.
- wrenchmonkey
-
- Offline
- User
-
Registered
- Posts: 568
- Thanks: 75
Re: 1981 KZ1000 J-to-K build
26 Jun 2016 22:27
Shadow,
That engine case painting looks fabulous! Nice work!")
That engine case painting looks fabulous! Nice work!
Please Log in or Create an account to join the conversation.
- Shdwdrgn
-
Topic Author
- Offline
- User
-
Registered
- Posts: 614
- Thanks: 24
Re: 1981 KZ1000 J-to-K build
03 Jul 2016 16:37
What a miserable week. Started having an ear ache last Sunday which exploded into a full-blown infection by Monday night. After a couple days of the medicated ear drops not helping, I had to go to the doc on Wednesday. Was off work most of the week, and today is the first day I can actually hear in that side again... Needless to say, I haven't been able to get much done on the engine. :sick:
I *did* manage to touch up those missed spots on the engine case earlier in the week, and got it baked again today. Meanwhile I tackled the scariest-looking piece of converting to the new case -- the shifter linkage. There's a lot of springs and C-clips and other uglies in there, but once it started coming apart, I got all the pieces transferred to the new case without any problem. What actually took me some time was trying to remember where the oil pump was supposed to be located, but I finally found the mounting holes. And I've been dealing with sand in several bolt holes. For that, I've been hosing down the various case pieces, then using the air compressor to blow out the holes. I *should* have all the loose sand cleaned out now.
I also ran the hone down the cylinder walls. I just wanted to keep it light, break the glaze and knock off the lip if there was one. The walls are still somewhat shiny, but they're not glossy any more so I think it should seal up nicely now.
Now I just have to transfer the crank and transmission into the top half of the case, go get a fresh bottle of gasket sealer, and finally crack open that set of gaskets I got for christmas. Maybe tomorrow I'll be able to start transferring those parts, I'm already beat for today (I also mowed the yard and we went out and bought a new mattress).
I *did* manage to touch up those missed spots on the engine case earlier in the week, and got it baked again today. Meanwhile I tackled the scariest-looking piece of converting to the new case -- the shifter linkage. There's a lot of springs and C-clips and other uglies in there, but once it started coming apart, I got all the pieces transferred to the new case without any problem. What actually took me some time was trying to remember where the oil pump was supposed to be located, but I finally found the mounting holes. And I've been dealing with sand in several bolt holes. For that, I've been hosing down the various case pieces, then using the air compressor to blow out the holes. I *should* have all the loose sand cleaned out now.
I also ran the hone down the cylinder walls. I just wanted to keep it light, break the glaze and knock off the lip if there was one. The walls are still somewhat shiny, but they're not glossy any more so I think it should seal up nicely now.
Now I just have to transfer the crank and transmission into the top half of the case, go get a fresh bottle of gasket sealer, and finally crack open that set of gaskets I got for christmas.
Maybe tomorrow I'll be able to start transferring those parts, I'm already beat for today (I also mowed the yard and we went out and bought a new mattress).
1981 KZ1000-JK1
She's a beautiful mess, and I've made her all mine
She's a beautiful mess, and I've made her all mine
Please Log in or Create an account to join the conversation.
- Shdwdrgn
-
Topic Author
- Offline
- User
-
Registered
- Posts: 614
- Thanks: 24
Re: 1981 KZ1000 J-to-K build
05 Jul 2016 21:25
Yeah this week isn't looking any better. The furnace blower motor went out yesterday morning, so no AC in the house, and of course nobody open because of the holiday. Took today off to take care of that and other things, and managed to get a little time on the engine... So all of the major components have been transferred to the new case, including the set pins and those half-rings for positioning the transmission shafts. I also picked up a new oil filter and some permatex gasket glue. The stuff worked good for the last engine I did, so why change now? If I have time this weekend, I'm hoping to grab an inch-pound wrench so I can tighten the crankshaft bolts and start sealing up the new motor.
Oh yeah, and I'm missing one of the long bolts that goes through the jugs. Anyone know how to get one loose from the old case?
Oh yeah, and I'm missing one of the long bolts that goes through the jugs. Anyone know how to get one loose from the old case?
1981 KZ1000-JK1
She's a beautiful mess, and I've made her all mine
She's a beautiful mess, and I've made her all mine
The following user(s) said Thank You: aquaholic
Please Log in or Create an account to join the conversation.
- aquaholic
-

- Offline
- User
-
Registered
- 1981 KZ1000 J1
- Posts: 175
- Thanks: 36
Re: 1981 KZ1000 J-to-K build
07 Jul 2016 20:54
Hello,
Read all your posts and I am just starting a 1981 KZ1000J rebuild. First a little bit about me and the bike I am working on. I got the bike from a friend who passed away and purchased the bike new from a dealer. 16,000 miles and well maintained until his passing in 2000. He and I were mechanics at a power plant for 20 years together so we both know about specifications and tooling lol. I have some questions and suggestions (maybe) for you. Obviously the bike is not pristine and I am trying to bring it back in its original condition and paint scheme so I can turn it over to his son when I am done. Your work on the bike(s) you have done is outstanding and I can't wait to see the finished product. Thank you for taking the time tos share this experience with us. Hope you can help me out here. Questions first lol:
1) what grit blasting media are you using? 2) Why did you pick Rust-o-leum instead of a faster drying paint like Krylon ? 3) Did the baking the paint help ? 4) What blasting media do you recommend for the aluminum pieces so I can bring them back to the "Chrome like shine" after polishing of course. I have been sanding and buffing the side engine chrome pieces but have not tried the sandblaster yet. YES I'm scared lol. I have Soda Blast, Glass Beads and Garnite to try but need some guidance. I have many more questions for you but we'll leave it at that for now.
Suggestions: 1) Krylon paint dries almost in 1/4 of the time that Rust-o-leum does (available at Walmart). I personally HATE Rust-o-leum just for that reason. 2) NAPA makes a high temperature primer for engines. I'm not sure what temp it is good for and you will have to order it. it's not stocked in most stores. 3) I have an aerosol can of NAPA gasket remover, I'm not sure how old it is but it works so well it is probably outlawed.
I'm not sure where you live but if it is snowing there, you need to move south. I moved to southeastern NC 10 years ago from Syracuse NY. Best thing I ever did. Be well, be safe and most of all be happy. Thank you again for all the information you have provided. Like I said, I'm new here but appreciate all the members and want to share knowledge with them. jon
Please Log in or Create an account to join the conversation.
- aquaholic
-
- Offline
- User
-
Registered
- 1981 KZ1000 J1
- Posts: 175
- Thanks: 36
Re: 1981 KZ1000 J-to-K build
07 Jul 2016 21:00
Try a bit of heat with some PB Blaster. Take 2 nuts on the end, tighten them together and give them an easy rap with a hammer. If you don't have a stud puller, than try the bottom nut to loosen. It may take a few tries with the heat but it will come loose. I just read your post tonight and I don't mean to talk to you like you don't know your way around tools. Forgive me as I am just trying to help. I took mine out with a stud removal tool and some heat. Good luck and let me know how you make out.
Please Log in or Create an account to join the conversation.
- Shdwdrgn
-
Topic Author
- Offline
- User
-
Registered
- Posts: 614
- Thanks: 24
Re: 1981 KZ1000 J-to-K build
07 Jul 2016 21:55
Thanks for the suggestions, I've actually been looking for some regular nuts that might fit, and I should probably spray it down with the pb blaster or at least some wd40 so see if it loosens up, I just haven't had time to get back to it again.
First, a disclaimer... this is the first project I've ever done sandblasting on. In fact I bought all the equipment JUST to work on the bike, so I am by no means an expert. Second, you'll probably get better answers if you start a new thread in one of the main groups (where everybody will see it).
For chrome... if it has rust, I've heard of soaking in vinegar, but never tried it. Unfortunately if the chrome finish is marred, there may not be a way to save it without re-coating.
For the rest of the bike... the sand is just marked as 'medium' grit. It comes as white or light tan colored, and I think it's a quartz? I would guestimate somewhere around 120 grit. If you're stripping paint, just use the chemical stripper to take off most of it, lot faster than sandblasting the whole thing. This sand does leave a great surface for the paint to stick to, however.
I used soda on my carbs because of the more delicate parts, but I've used the sand on the engine and other aluminum parts with good success (again, these are all parts that are being painted). For the parts you want to shine up, definitely stick with the soda.
And finally, the paint. The appliance paint seemed like a good idea, but it is brittle. I've seen it flake off when I tighten down bolts. I've used rustoleum for years. The bike frame has some spots that looked like surface rust, I figured it wouldn't hurt to have the added protection. Yes rustoleum takes a long time to dry -- it is also MUCH thicker than krylon, hopefully that means it will take more abuse. The rustoleum also has UV protection so the color won't fade. And the engine paint has good reviews for holding up to oil and gas over time. Considering how long this project has been going, I'm not in a hurry for the paint to dry, as long as it lasts. There are better options if you get away from spray cans, but I have no experience with that and didn't want to jump into it.
Naw I won't move. I come from further North, I LIKE my snow, even the little bit we get here, and it gives me a chance to enjoy my 4WD.
1981 KZ1000-JK1
She's a beautiful mess, and I've made her all mine
She's a beautiful mess, and I've made her all mine
Please Log in or Create an account to join the conversation.
Moderators: Street Fighter LTD