
1981 KZ1000 J-to-K build
- Shdwdrgn
-
 Topic Author
- Offline
- User
-

Registered
- Posts: 614
- Thanks: 24
1981 KZ1000 J-to-K build
05 Sep 2013 00:16
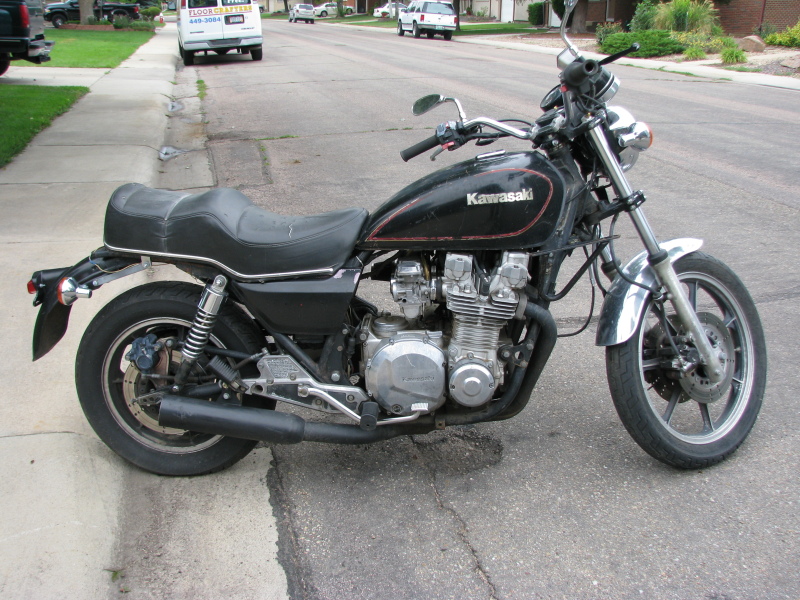
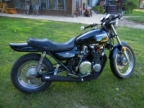
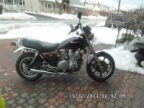
Over the last few years I've been wanting to do a full tear-down and rebuild of a motorcycle. My old Yamaha 650 is slowly dying, but others convinced me the bike wasn't worth the effort to salvage. Recently a friend told me to look in to the KZ900. Loved the bike, but finding something to work with seemed a bit out of my price range, not to mention the parts are harder to find. No problem, the KZ1000 still has the same look and will work just fine for me. I prefer the older bikes, but wanted to do a little refresh on the look.
After searching around for a few weeks, I ran across a potential deal on craigslist. The seller said the starter was shot, but the engine had recently ran. Good deal for me, I looked it over and talked him down to $500 for what I thought was a complete bike. After getting it home and really starting to tear into it, I realize the starter doesn't work because the step-down gear pin has torn out the holes in the case. The seat and gas tank, and forks are wrong for this model, and all of the seat and rear fender brackets have been cut off. Half of the wire harness has been cut and spliced at some point, there are brackets missing or badly chopped and rigged... But hey, it appears to have a new battery in it! :sick:
OK, I can salvage this. I have a good starting point, let's see what can be done. I started hitting up Ebay for parts, and get a crankcase from a police bike sent to me, which appears in great condition. I also manage to pick up the correct rear fender (inner and outer), and a starter cover.
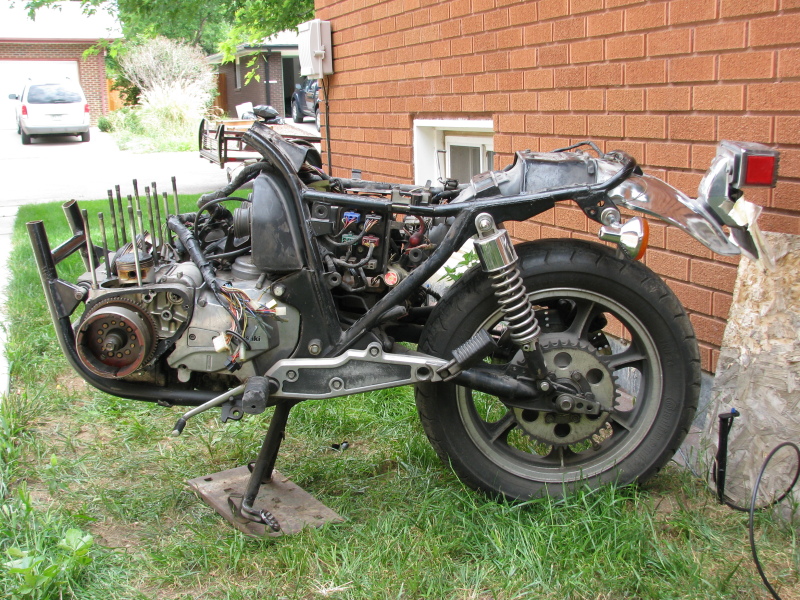
In the meantime back on craigslist again, and a couple weeks later I can't believe what I've found -- someone has chopped the front end off another '81 KZ and is selling the remainder. I pick this up for $250, and now I have a second complete engine, a rear frame with all the brackets, other brackets which were missing, and a nearly pristine LTD wiring harness. Of course this now means that I have duplicates of ALL of the ebay parts I had previously picked up. Ah well, I'll pick out the best of the lot and sell the rest.
Now I have a plan... I will cut and splice the two frames together, salvaging what I need from each. The fuel tank on the original bike is banged up quite a bit, but I now have the frame mounting tabs from the J and K models, broadening my choices for finding a replacement tank.
I also discover that there are several differences in the wiring harness between models, mostly in the turn-signal cancelling circuits. Surprisingly, the parts that need changed out are also parts I already need to replace -- the left side handlebar switches, and the odometer. I find there is one part of the new wiring harness that has been chopped and spliced, but again luck is with me and I have that same section on the original bike without any cuts. So my completed electrical system will be completely intact.")
At this point, I have acquired quite a pile of ebay parts to replace pieces that are broken or missing -- horns, front fork crosspiece trim, handlebars, left-side switches, front master cylinder, odometer, a spring for the center-stand, gas tank cushions, and some after-market smoked turn signals... I also found an LTD seat in excellent condition, and just today I received a fuel tank that is far more than I had hoped for -- not a dent on it and barely a hint of rust inside. I also have a lead on a pair of side covers, which will complete all of my major purchases. I received a set of 4-to-2 pipes recently from another member here to replace the 4-to-1 that was on the bike. I also need to find a new meter bracket, and I'm trying to find a style of mirrors that I like.
Total spent on the project so far... around $1700 (and I might be able to recoup about half that when selling the extra engine and other parts). Considering everything except the turn signals are original parts and not reproductions, I'm pretty happy with the price.
I have been playing with paints, and found a candy color I like. Using a metal-flake undercoat, I am using a burnt-orange color that really shines in the sun! I would like to paint the tank, side covers, and both fenders with this color. The engine and pipes will be either flat- or satin-black, and the rest of the frame and wheels will be gloss black. There will still be some silver showing -- the forks, brake rotors and chain, possibly the covers on the carbs.
My plan is to get started next week tearing down the first bike, then cutting and re-welding the frame pieces. Hopefully I can get the frame cleaned up and powder-coated before the cold weather sets in. The engine will be a project for this Winter, taking my time and getting advice on any upgrades that should be done while it's apart. Once the warm weather hits next Spring, I can work on painting the candy color parts, then get everything put together and start learning how to tune this engine.
After searching around for a few weeks, I ran across a potential deal on craigslist. The seller said the starter was shot, but the engine had recently ran. Good deal for me, I looked it over and talked him down to $500 for what I thought was a complete bike. After getting it home and really starting to tear into it, I realize the starter doesn't work because the step-down gear pin has torn out the holes in the case. The seat and gas tank, and forks are wrong for this model, and all of the seat and rear fender brackets have been cut off. Half of the wire harness has been cut and spliced at some point, there are brackets missing or badly chopped and rigged... But hey, it appears to have a new battery in it! :sick:
OK, I can salvage this. I have a good starting point, let's see what can be done. I started hitting up Ebay for parts, and get a crankcase from a police bike sent to me, which appears in great condition. I also manage to pick up the correct rear fender (inner and outer), and a starter cover.
In the meantime back on craigslist again, and a couple weeks later I can't believe what I've found -- someone has chopped the front end off another '81 KZ and is selling the remainder. I pick this up for $250, and now I have a second complete engine, a rear frame with all the brackets, other brackets which were missing, and a nearly pristine LTD wiring harness. Of course this now means that I have duplicates of ALL of the ebay parts I had previously picked up. Ah well, I'll pick out the best of the lot and sell the rest.
Now I have a plan... I will cut and splice the two frames together, salvaging what I need from each. The fuel tank on the original bike is banged up quite a bit, but I now have the frame mounting tabs from the J and K models, broadening my choices for finding a replacement tank.
I also discover that there are several differences in the wiring harness between models, mostly in the turn-signal cancelling circuits. Surprisingly, the parts that need changed out are also parts I already need to replace -- the left side handlebar switches, and the odometer. I find there is one part of the new wiring harness that has been chopped and spliced, but again luck is with me and I have that same section on the original bike without any cuts. So my completed electrical system will be completely intact.
At this point, I have acquired quite a pile of ebay parts to replace pieces that are broken or missing -- horns, front fork crosspiece trim, handlebars, left-side switches, front master cylinder, odometer, a spring for the center-stand, gas tank cushions, and some after-market smoked turn signals... I also found an LTD seat in excellent condition, and just today I received a fuel tank that is far more than I had hoped for -- not a dent on it and barely a hint of rust inside. I also have a lead on a pair of side covers, which will complete all of my major purchases. I received a set of 4-to-2 pipes recently from another member here to replace the 4-to-1 that was on the bike. I also need to find a new meter bracket, and I'm trying to find a style of mirrors that I like.
Total spent on the project so far... around $1700 (and I might be able to recoup about half that when selling the extra engine and other parts). Considering everything except the turn signals are original parts and not reproductions, I'm pretty happy with the price.
I have been playing with paints, and found a candy color I like. Using a metal-flake undercoat, I am using a burnt-orange color that really shines in the sun! I would like to paint the tank, side covers, and both fenders with this color. The engine and pipes will be either flat- or satin-black, and the rest of the frame and wheels will be gloss black. There will still be some silver showing -- the forks, brake rotors and chain, possibly the covers on the carbs.
My plan is to get started next week tearing down the first bike, then cutting and re-welding the frame pieces. Hopefully I can get the frame cleaned up and powder-coated before the cold weather sets in. The engine will be a project for this Winter, taking my time and getting advice on any upgrades that should be done while it's apart. Once the warm weather hits next Spring, I can work on painting the candy color parts, then get everything put together and start learning how to tune this engine.
1981 KZ1000-JK1
She's a beautiful mess, and I've made her all mine
She's a beautiful mess, and I've made her all mine
Please Log in or Create an account to join the conversation.
- Beaner242
-
- Offline
- User
-
Registered
- Posts: 247
- Thanks: 16
Re: 1981 KZ1000 J-to-K build
05 Sep 2013 00:31
Good luck with your build. I will be following. I am in the middle of a 82 build.
1982 KZ1000K LTD Chopper
Please Log in or Create an account to join the conversation.
- Shdwdrgn
-
Topic Author
- Offline
- User
-
Registered
- Posts: 614
- Thanks: 24
Re: 1981 KZ1000 J-to-K build
14 Sep 2013 19:47
We've had severe flooding all around us the past few days, fortunately nothing that has affected me. Finally had a nice clear day today and was able to get outside to start tearing down the J frame and grab some pictures.
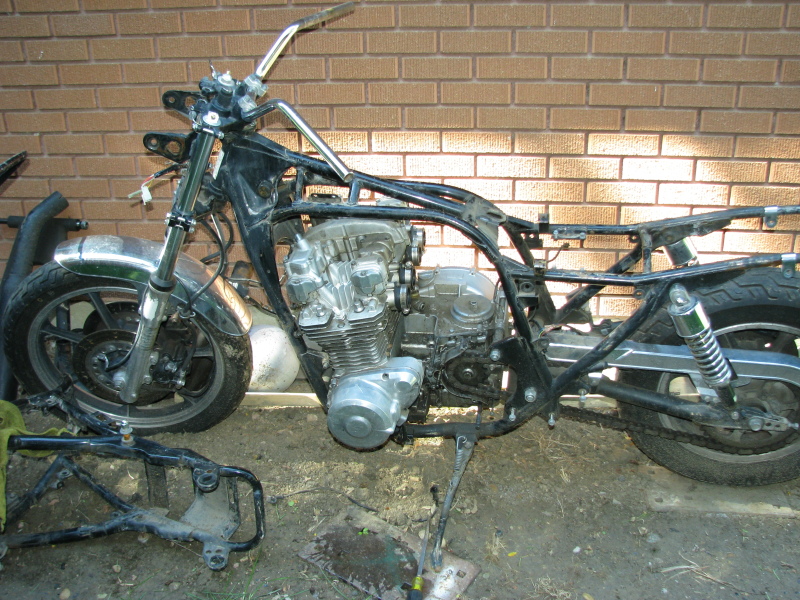
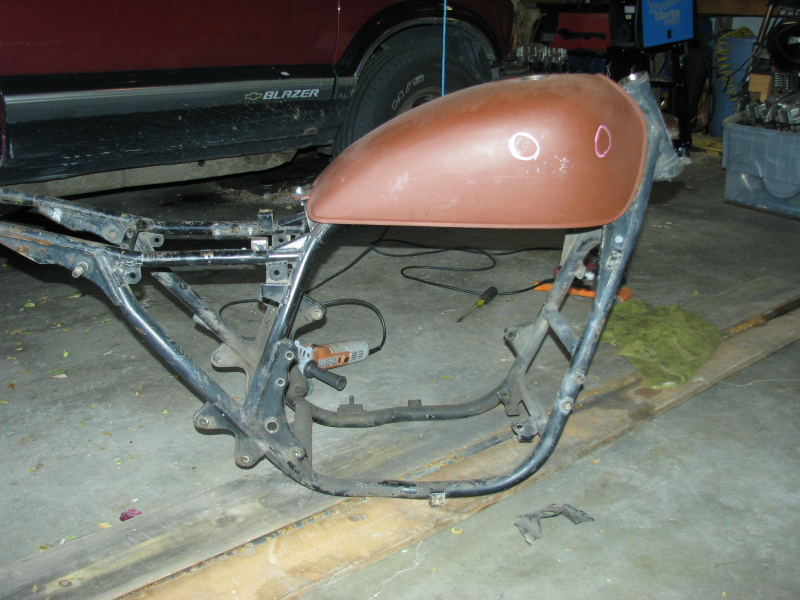
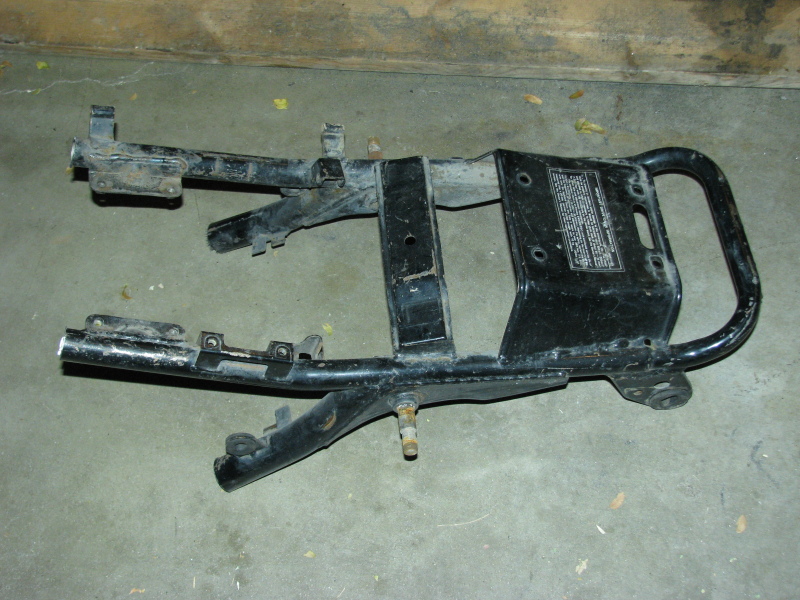
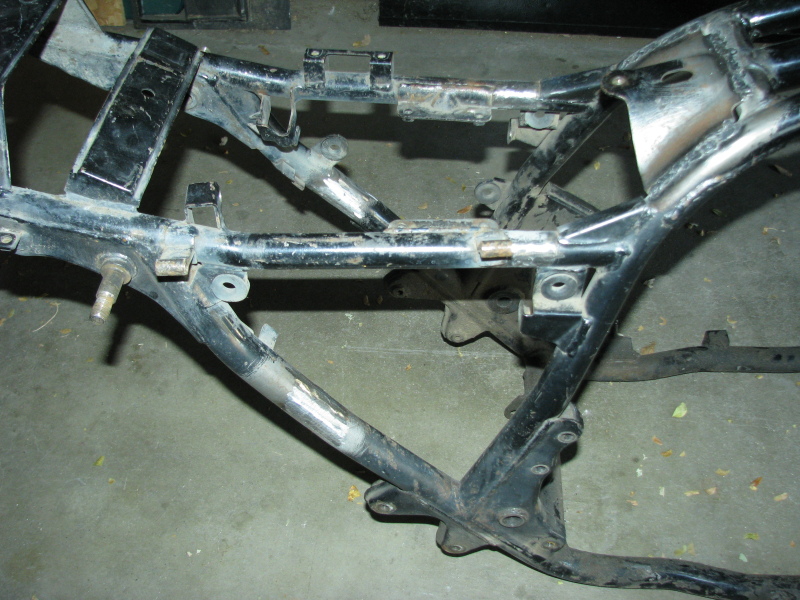
Here's a shot of the mostly-stripped J frame, and the half K frame I will be combining together.
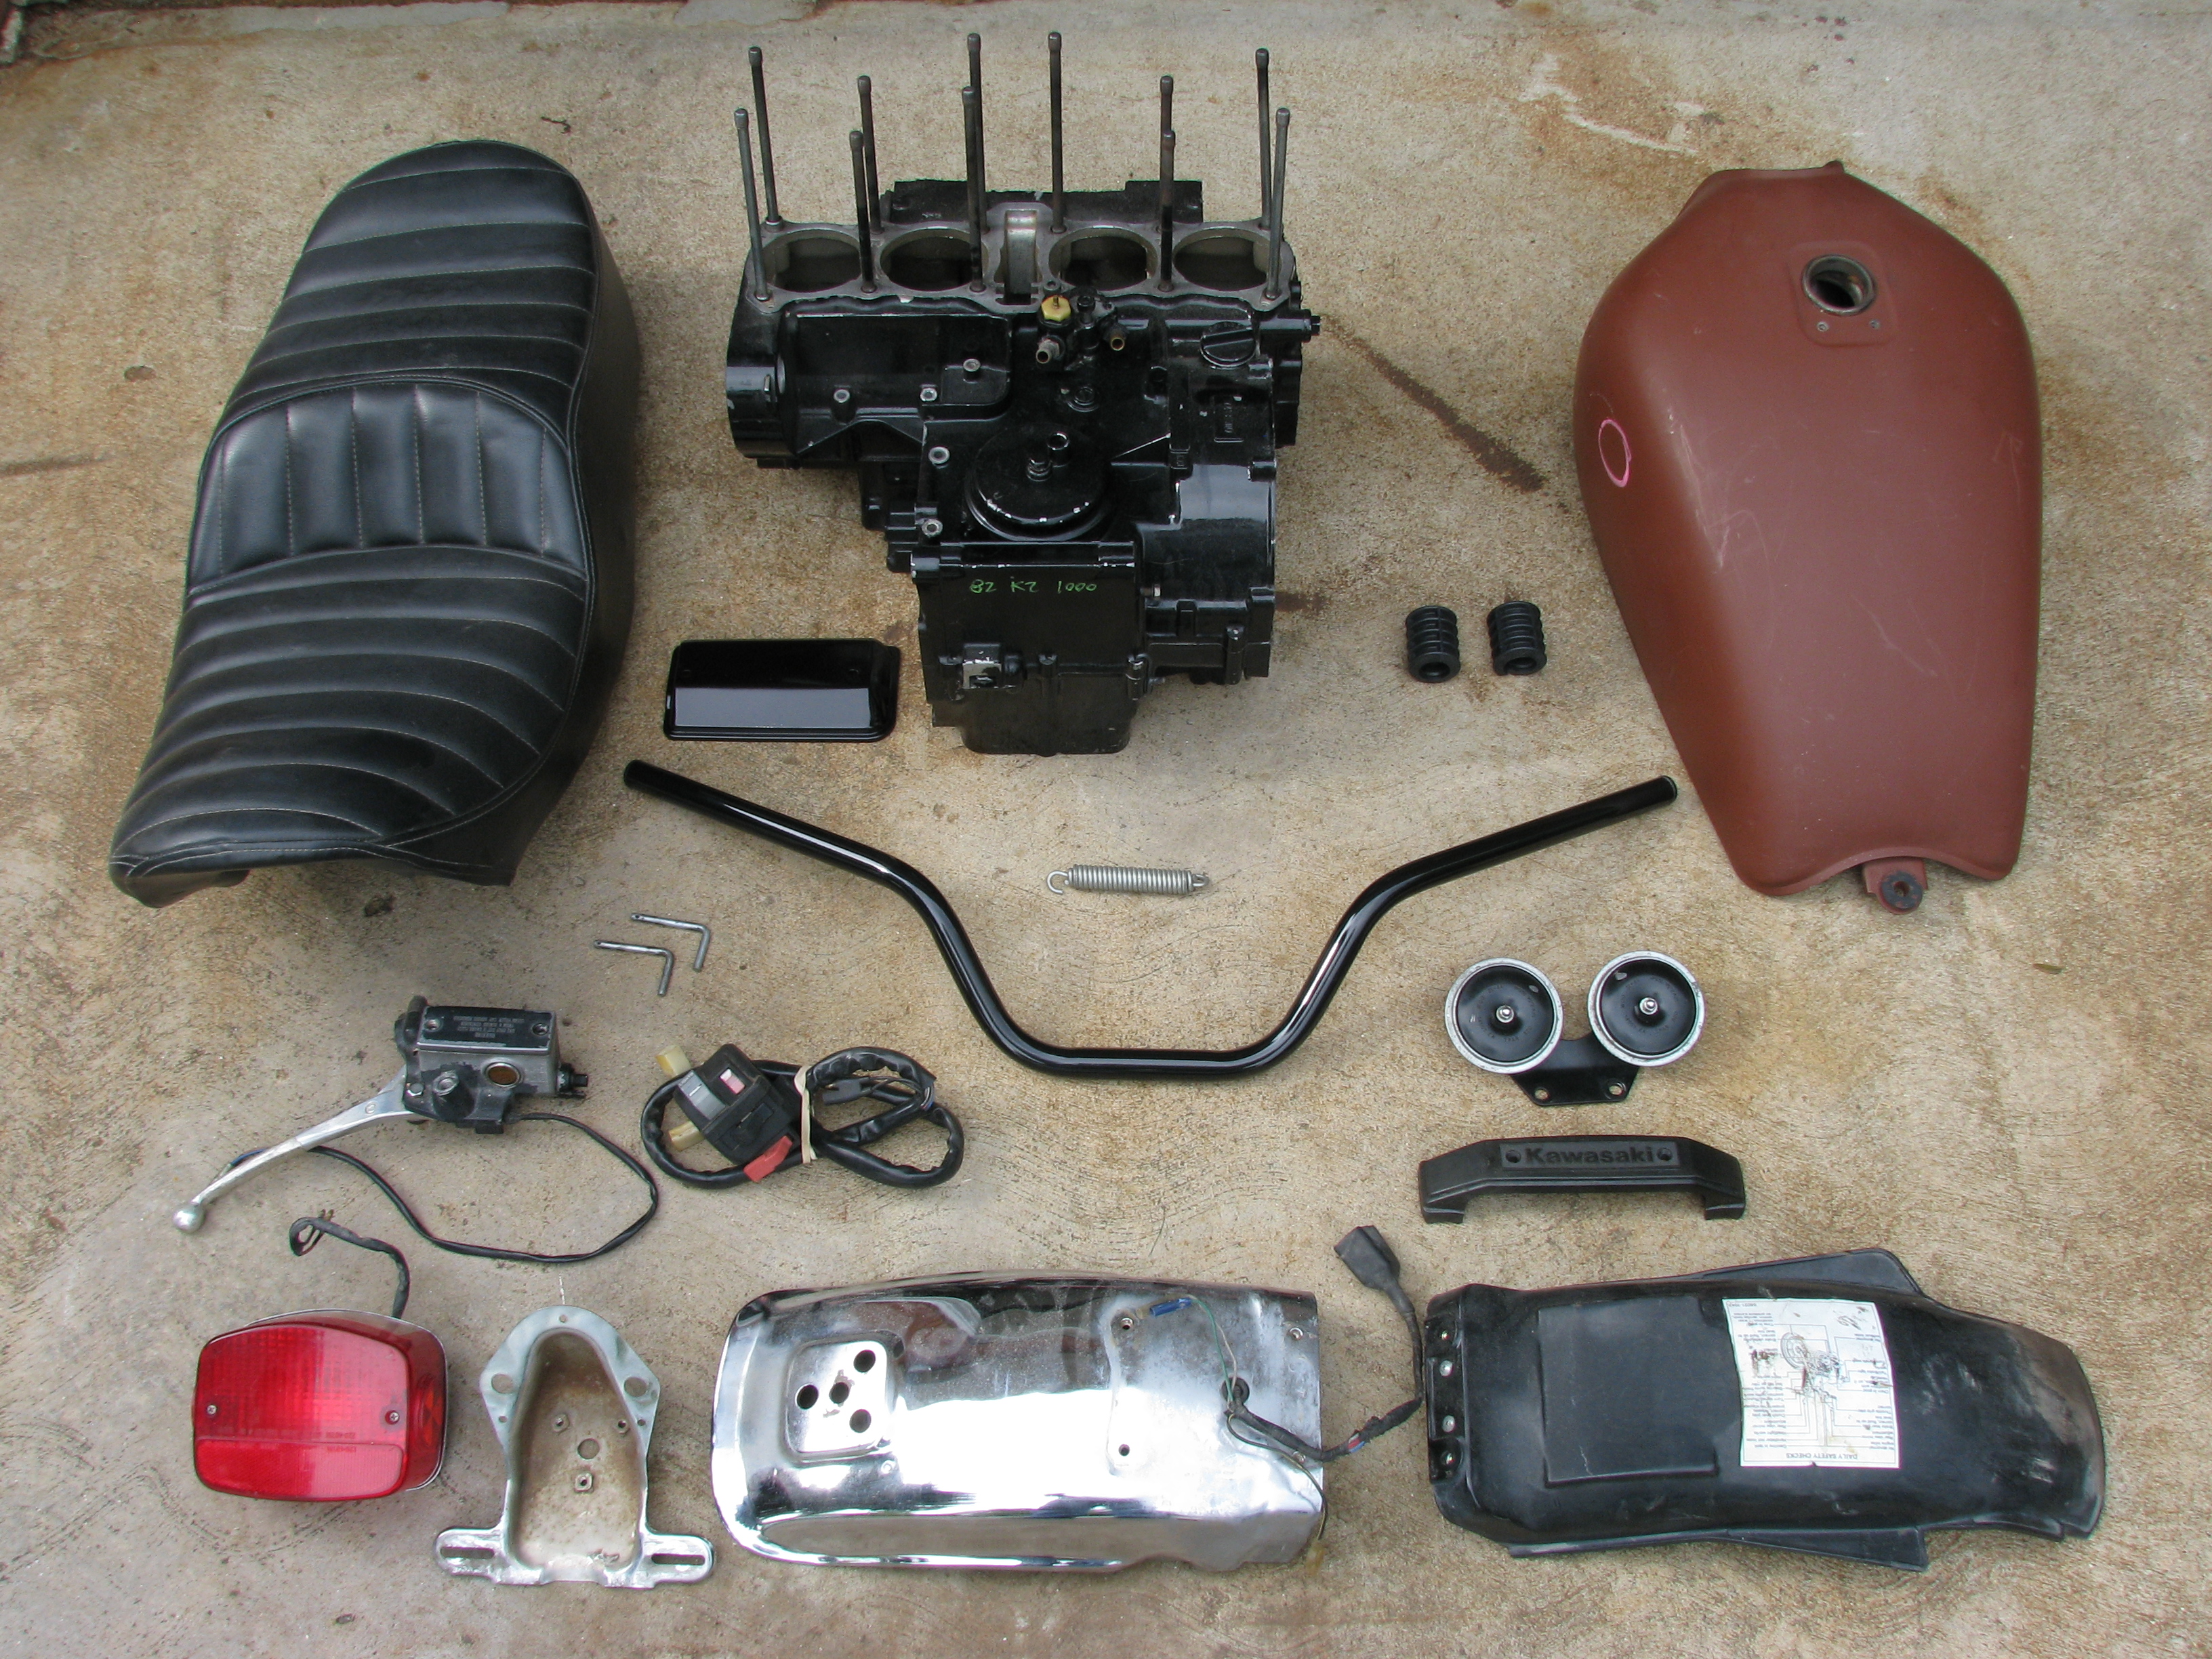
And here's the collection of parts I have acquired from ebay over the past month (except for the turn signals and odometer):
Although I don't actually need the extra case now, I've been looking over the two I have, and there seem to be some flaws in the second engine around the starter gear that tore out of the first engine. On the other hand, the police case appears pristine everywhere I can see. It makes me wonder if the higher-quality castings were kept aside to use in the police bikes back then?
So as it stands now, I have a collection of parts coming from '81 and '82, models J, K, and P. The only pieces NOT original equipment are my turn signals and handlebars, although I may consider getting some remanufactured side panels if I can't find a good deal on some original ones.
Here's a shot of the mostly-stripped J frame, and the half K frame I will be combining together.
And here's the collection of parts I have acquired from ebay over the past month (except for the turn signals and odometer):
Although I don't actually need the extra case now, I've been looking over the two I have, and there seem to be some flaws in the second engine around the starter gear that tore out of the first engine. On the other hand, the police case appears pristine everywhere I can see. It makes me wonder if the higher-quality castings were kept aside to use in the police bikes back then?
So as it stands now, I have a collection of parts coming from '81 and '82, models J, K, and P. The only pieces NOT original equipment are my turn signals and handlebars, although I may consider getting some remanufactured side panels if I can't find a good deal on some original ones.
1981 KZ1000-JK1
She's a beautiful mess, and I've made her all mine
She's a beautiful mess, and I've made her all mine
Please Log in or Create an account to join the conversation.
- Shdwdrgn
-
Topic Author
- Offline
- User
-
Registered
- Posts: 614
- Thanks: 24
Re: 1981 KZ1000 J-to-K build
29 Sep 2013 00:37
Moving pretty slowly at this point. I have another project in the works -- swapping the 3.42 gears for some 4.10s in my Chevy Trailblazer. I swapped the rear axle (upgraded to a heavier-duty model) last weekend, and loving the difference. Had a party this weekend, so next weekend comes the big headache -- changing out the front differential (which requires practically removing the wheels and engine). As soon as that is finished up, I can start working on the bike in earnest...
I did, however, manage to get finished stripping most of the bike down this week. Wiring and instruments are out. I just need to drop the chain, and I can pull the engine and get it in the garage. Then its just wheels and forks, and I'll be ready to clean up the frame and start cutting and welding.
I did, however, manage to get finished stripping most of the bike down this week. Wiring and instruments are out. I just need to drop the chain, and I can pull the engine and get it in the garage. Then its just wheels and forks, and I'll be ready to clean up the frame and start cutting and welding.
1981 KZ1000-JK1
She's a beautiful mess, and I've made her all mine
She's a beautiful mess, and I've made her all mine
Please Log in or Create an account to join the conversation.
- elfmagic17
-

- Offline
- User
-
Registered
- Posts: 334
- Thanks: 24
Re: 1981 KZ1000 J-to-K build
29 Sep 2013 22:33 - 29 Sep 2013 22:35Shdwdrgn wrote: Moving pretty slowly at this point. I have another project in the works -- swapping the 3.42 gears for some 4.10s in my Chevy Trailblazer. I swapped the rear axle (upgraded to a heavier-duty model) last weekend, and loving the difference. Had a party this weekend, so next weekend comes the big headache -- changing out the front differential (which requires practically removing the wheels and engine). As soon as that is finished up, I can start working on the bike in earnest...
I did, however, manage to get finished stripping most of the bike down this week. Wiring and instruments are out. I just need to drop the chain, and I can pull the engine and get it in the garage. Then its just wheels and forks, and I'll be ready to clean up the frame and start cutting and welding.
I have split those Diffs in the vehicle and taken out in pieces rebuilt and set-up then reassemebled in the vehicle with no problems at least three times. I know if you take the rear cross member(under the gear) and steering gear out you can loosen the motor mounts and jack the engine up and move over enough to get it (Complete Diff) out without dropping the oilpan like GM says.
Kenny Hicks
74 Honda CB550
75 Honda CB360 (runs and rides good but not a show bike)
77 KZ650B1 (Runs Great, but needs painted and a little work.)
74 Honda CB550
75 Honda CB360 (runs and rides good but not a show bike)
77 KZ650B1 (Runs Great, but needs painted and a little work.)
Last edit: 29 Sep 2013 22:35 by elfmagic17. Reason: Added more information.
Please Log in or Create an account to join the conversation.
- Shdwdrgn
-
Topic Author
- Offline
- User
-
Registered
- Posts: 614
- Thanks: 24
Re: 1981 KZ1000 J-to-K build
29 Sep 2013 22:44
Thanks... Most folks say dropping the oil pan is the worst way to do it. Had another guy tell me he got his out by moving the AC and alternator, pulling out the fan, and lifting the engine, then he was able to just fish the whole assembly out the front. Sounds like there are multiple paths, I just have to see what works for me. I'll be happy to get this done and out of the way, but I still can't seem to resolve the programming issue (local shops and dealers can't figure out how to reprogram computer for the new gears, even though I'm still using a stock gear ratio).
1981 KZ1000-JK1
She's a beautiful mess, and I've made her all mine
She's a beautiful mess, and I've made her all mine
Please Log in or Create an account to join the conversation.
- Shdwdrgn
-
Topic Author
- Offline
- User
-
Registered
- Posts: 614
- Thanks: 24
Re: 1981 KZ1000 J-to-K build
02 Nov 2013 16:29
The gear change on the truck has turned out to be a nightmare. I thought the worst part was going to be in swapping the front differential... That was two days of #3!! but we finally got it swapped (18 hours of disassembly and 3 hours to put it all back together again). Then the hard part began. I have spent the last month chasing leads online and through local shops and dealerships, and I STILL can't find anyone able to update my computer for the new gears. GM says it can't be done, despite the fact that these new gears came as an available option for my model.
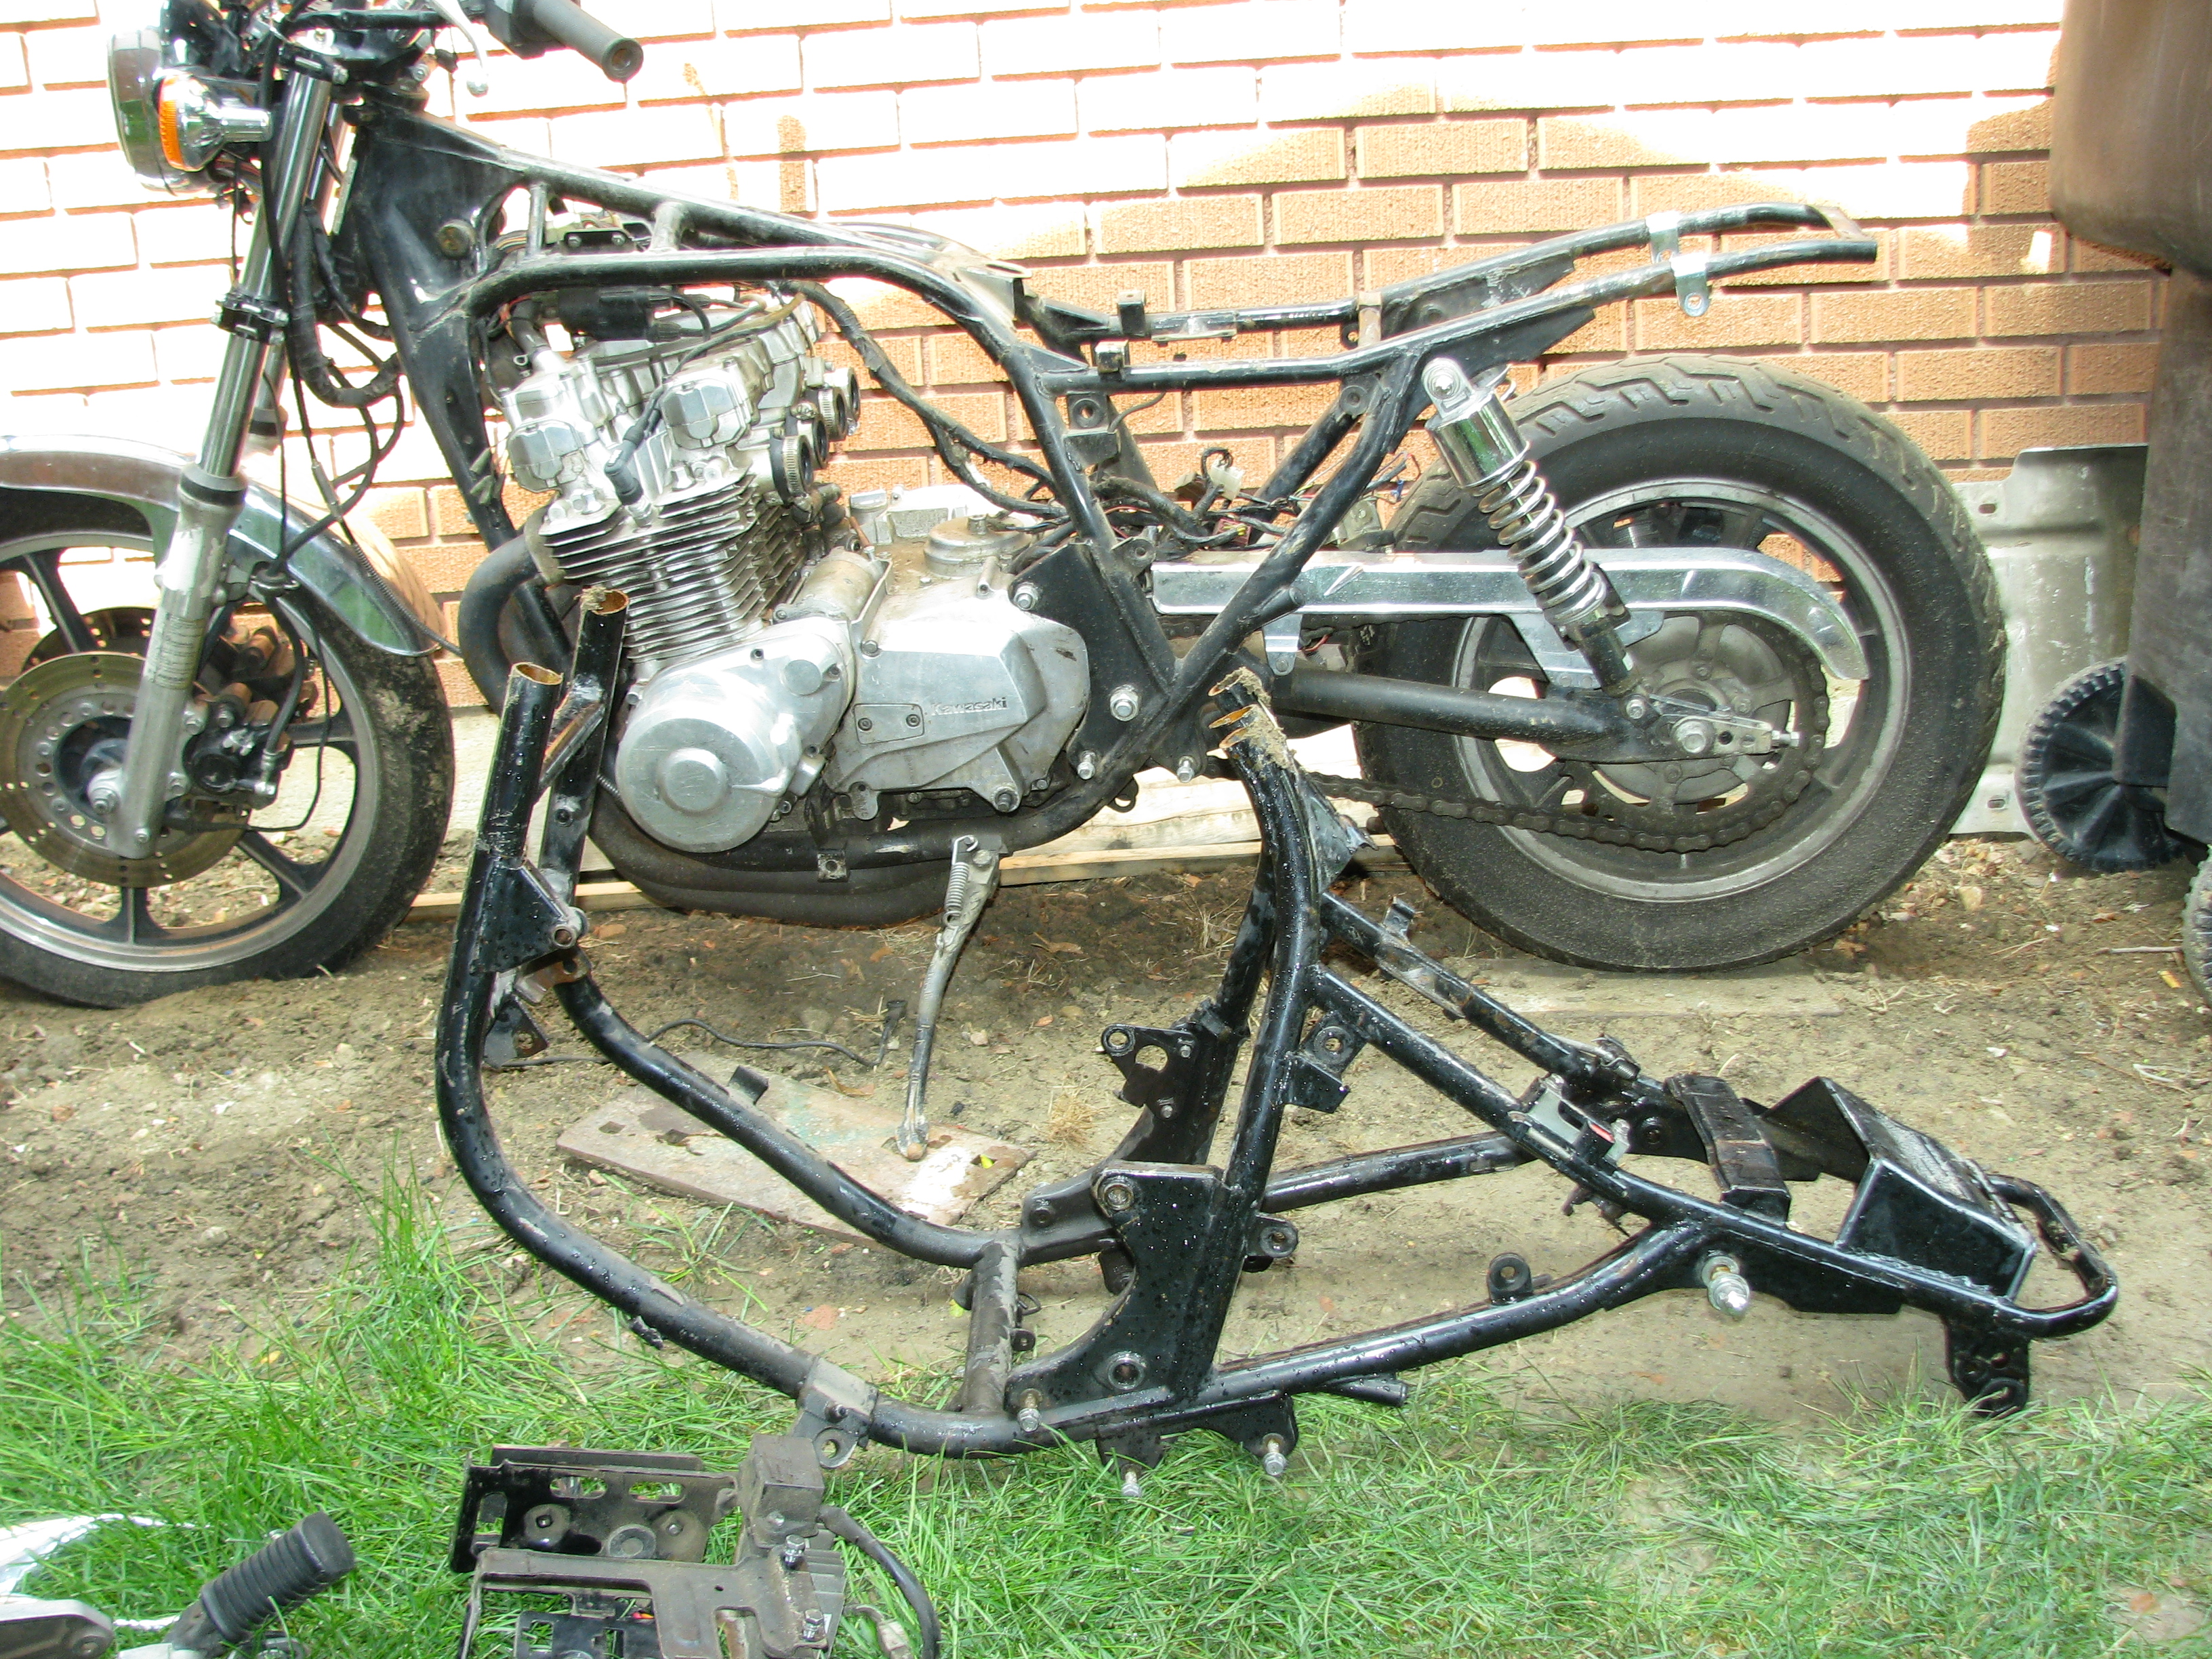
I'm still fighting that, but I had to get away from it and do something else, so I finally turned my attention back to the bike this week. Thursday I sort of 'poured' the motor out of the frame. The low center-of-gravity on these things still amazes me. Despite the size of the engine, I can lay the bike down on the floor and pick it right back up again with no problem. Sure can't do that with my Yamaha 650!!! So I got a rolling cart under the engine, laid the bike over on the cart, and moved the engine off the frame. Its obvious, however, that once I get a new paint job on the frame, I'll want to just rebuild the engine in place to keep from scraping up the new paint. I'm thinking the worst headache is going to be trying to figure out how to lay the wire harness back through the frame, though. I took quite a few pictures as I pulled that stuff apart, hopefully it will be enough.
Today I finally finished stripping down the frame. The front forks were pulled off as on unit, but otherwise everything else has been pulled completely apart. I'll tackle the forks at a later date, but there's no reason to pull the apart until I have the frame rebuilt and ready for the forks to be attached.
The next step will be going through both frames and taking very careful measurements around the areas where I intend to cut them apart. I think if I use the rear shock bolts as a centerpoint, I can measure forward and down to specific points on the frame. As long as those measurements agree on both bikes, it should be enough to let me square up the pieces when I weld the pieces of frame back together again. I've also pinpointed some scrap pieces of frame tubing in the bits that will be cut off, which I can use as inside tubes to keep the framework lined up during welding.
So in my considerations for the new paint scheme, I'm wondering if powder-coating the fork tubes would interfere with their operation? I suppose alternatively I could get some of that stuff to do gunmetal bluing, which I don't believe will have any reaction to the fork oil. I'm not sure which option is the better alternative -- any suggestions?
1981 KZ1000-JK1
She's a beautiful mess, and I've made her all mine
She's a beautiful mess, and I've made her all mine
The following user(s) said Thank You: aquaholic
Please Log in or Create an account to join the conversation.
- Shdwdrgn
-
Topic Author
- Offline
- User
-
Registered
- Posts: 614
- Thanks: 24
Re: 1981 KZ1000 J-to-K build
16 Nov 2013 18:13 - 16 Nov 2013 18:32
I've been thinking more about the paint scheme, and decided I'm going to leave a bit of chrome showing here and there... but that comes later.
Today I finally had a free day to start in on the frame. I figured I would start easy and see how it went, so I began by cutting out the mounting plate for the gas tank. A bit of cutting and cleaning, and I just used my new tank as a guide for positioning the plate, the a tape measure to center it.
Old plate cut and ready to pry off...
New plate welded in place...
And I can finally bolt down my tank.
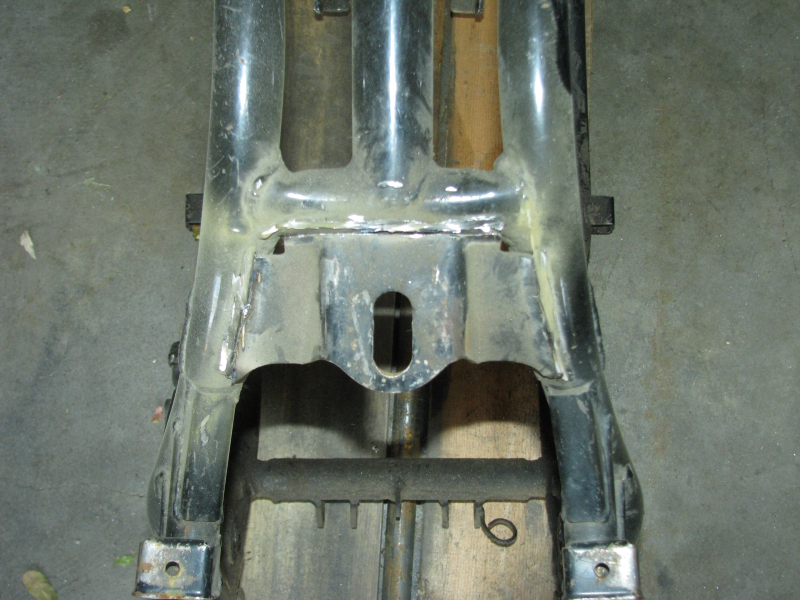
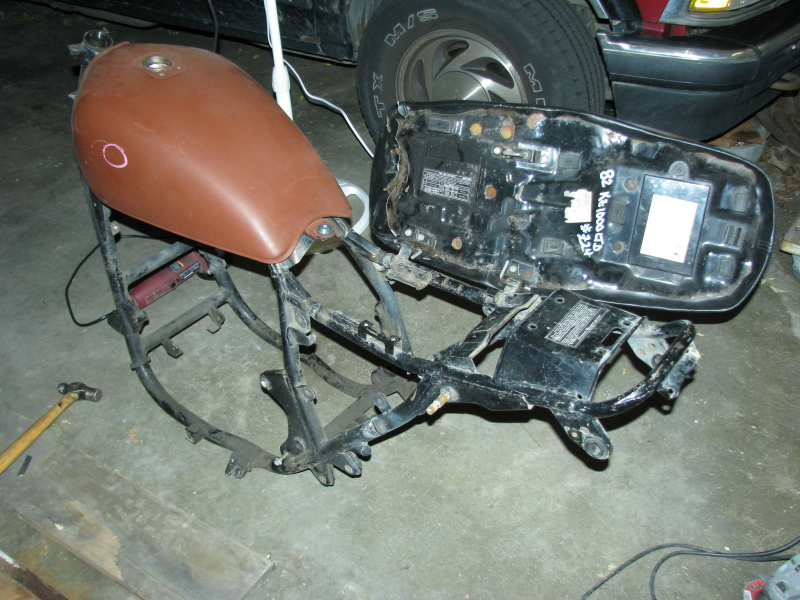
So after a huge amount of measuring and checking clearances, I finally took the plunge and starting cutting apart the frames. Here's the tail section that I need to keep from the partial frame...
And here's the (was complete) frame from the original bike I bought...

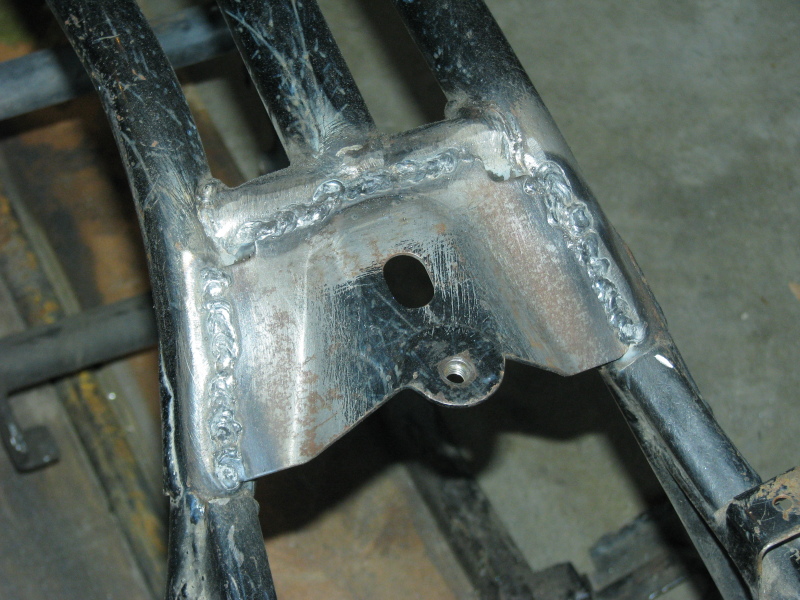
As advised, I used some leftover pieces to make tubing pins to slip inside the cut frame and reinforce the welds. What I hadn't counted on was that because of the angles of the frame and the location of my cuts, it wasn't a simple matter of sliding the pieces back together again. Not sure what I didn't think of that ahead of time!

So after scratching my head and beating on the frame with a hammer, I finally got the bright idea of using a pipe clamp to draw the pieces back in line. Once they were close, a few smacks with a dead-blow and each side slipped into place. I had used some chalk to mark the centerline of each internal pin, so a bit of work with a hammer and screwdriver and the pins were re-centered back under the cut line between each frame.

Once I got everything mostly aligned, I went through all four seams, adjusting until the pieces matched my original measurements, and tacking with the welder. I now have about 75% of the welding done, then I'll go through and clean up each seam with the grinder, and weld back over them once more to over-fill each seam so I can grind them off flush. Once I'm done painting, you shouldn't even be able to see the welds.
Then it was finally time to test my work. The frame appears square by eyeball, so I mounted up the tank and seat. First time I've actually been able to put these parts together!
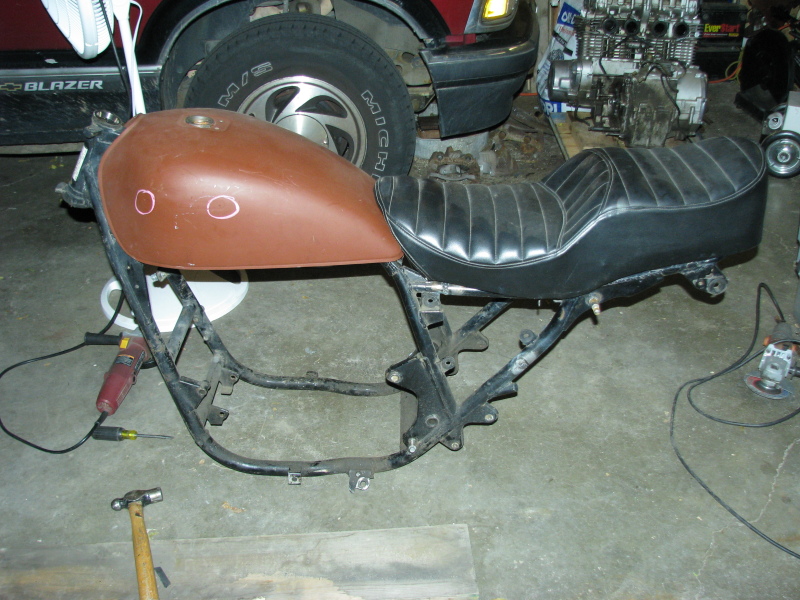
Yeah, it doesn't look all that impressive yet, but I'm excited because I finally have a working frame to start building with!
Hopefully tomorrow the weather will still be good enough to finish up my welding and get everything cleaned up. The finish removing all the rubber grommets and the frame will be ready for cleaning and painting.
Today I finally had a free day to start in on the frame. I figured I would start easy and see how it went, so I began by cutting out the mounting plate for the gas tank. A bit of cutting and cleaning, and I just used my new tank as a guide for positioning the plate, the a tape measure to center it.
Old plate cut and ready to pry off...
New plate welded in place...
And I can finally bolt down my tank.
So after a huge amount of measuring and checking clearances, I finally took the plunge and starting cutting apart the frames. Here's the tail section that I need to keep from the partial frame...
And here's the (was complete) frame from the original bike I bought...
As advised, I used some leftover pieces to make tubing pins to slip inside the cut frame and reinforce the welds. What I hadn't counted on was that because of the angles of the frame and the location of my cuts, it wasn't a simple matter of sliding the pieces back together again. Not sure what I didn't think of that ahead of time!
So after scratching my head and beating on the frame with a hammer, I finally got the bright idea of using a pipe clamp to draw the pieces back in line. Once they were close, a few smacks with a dead-blow and each side slipped into place. I had used some chalk to mark the centerline of each internal pin, so a bit of work with a hammer and screwdriver and the pins were re-centered back under the cut line between each frame.
Once I got everything mostly aligned, I went through all four seams, adjusting until the pieces matched my original measurements, and tacking with the welder. I now have about 75% of the welding done, then I'll go through and clean up each seam with the grinder, and weld back over them once more to over-fill each seam so I can grind them off flush. Once I'm done painting, you shouldn't even be able to see the welds.
Then it was finally time to test my work. The frame appears square by eyeball, so I mounted up the tank and seat. First time I've actually been able to put these parts together!
Yeah, it doesn't look all that impressive yet, but I'm excited because I finally have a working frame to start building with!
Hopefully tomorrow the weather will still be good enough to finish up my welding and get everything cleaned up. The finish removing all the rubber grommets and the frame will be ready for cleaning and painting.
1981 KZ1000-JK1
She's a beautiful mess, and I've made her all mine
She's a beautiful mess, and I've made her all mine
Last edit: 16 Nov 2013 18:32 by Shdwdrgn.
Please Log in or Create an account to join the conversation.
- kzz1king
-
- Offline
- User
-
Registered
- Posts: 821
- Thanks: 52
Re: 1981 KZ1000 J-to-K build
16 Nov 2013 19:23
A bunch of hard work does not always look impressive! Looks nicely done and the extra effort pinning it looks like it paid off.
Wayne
Wayne
74 Z1 1075, 29 smoothbores, owned and ridden since 1976
Home built KZ1000 turbo setup
www.kzrider.com/forum/11-projects/532476...s-budget-turbo-build
www.kzrider.com/forum/11-projects/532489-74-z-makeover
Home built KZ1000 turbo setup
www.kzrider.com/forum/11-projects/532476...s-budget-turbo-build
www.kzrider.com/forum/11-projects/532489-74-z-makeover
Please Log in or Create an account to join the conversation.
- Shdwdrgn
-
Topic Author
- Offline
- User
-
Registered
- Posts: 614
- Thanks: 24
Re: 1981 KZ1000 J-to-K build
17 Nov 2013 15:17
Aaaaaaaannnnnnddddd finished!
Thanks. Yeah pinning it was definitely a great idea, helped make sure everything was in alignment when I welded it, and should make a big difference in long-term strength. I made sure the welder was cranked up enough to fuse together both layers of pipe, so it shouldn't cause any problems, but since all four joints are out in the open, I will be able to keep an eye on them when I start riding, make sure no cracks appear.
I'll be getting the steering bearings pulled out and the rubber grommets taken off, then I need to clean up the swingarm and a pair of rims, and I should probably go ahead and pull the lower tubes from the front forks... All of those parts will be getting powder-coated (probably satin black). The rest I'll be doing myself with rattle-can, but I figure these parts will have the most exposure to road debris.
1981 KZ1000-JK1
She's a beautiful mess, and I've made her all mine
She's a beautiful mess, and I've made her all mine
Please Log in or Create an account to join the conversation.
- mopguy
-
- Offline
- Sustaining Member
-

Registered
- Posts: 727
- Thanks: 167
Re: 1981 KZ1000 J-to-K build
17 Nov 2013 17:37
Great welding, keep up the great work, it will be one beauty of a bike when finished. I restored an 81 LTD as well, but I was still missing the airbox, and I finally got one, from Jeff Saunders, he is a member here, gave me a great deal, and I could not have done the restoration without the help of the members on this site. Looking forward to seeing the finished bike.
I have a 1980 Kawasaki KZ750 Ltd. I bought new. I recently managed to get it out of my garage after 28 years and put it on the road again (2010). I feel like a kid all over again. Since I have acquired 3 78 KZ1000 Ltd, 1 1981 KZ1000 Ltd, and another 1980 KZ750 Ltd. Love the LTD's.
Please Log in or Create an account to join the conversation.
- Shdwdrgn
-
Topic Author
- Offline
- User
-
Registered
- Posts: 614
- Thanks: 24
Re: 1981 KZ1000 J-to-K build
17 Nov 2013 18:41
I really lucked out finding that partial bike... Between both I have a stock airbox and a set of new pods, plus I have a complete wiring harness with all the LTD options. I'm still reading through other projects here, looking for ideas. I really prefer more of a factory look over some of the crazy mods being done, but on the other hand if I'm going to put this much effort into a full rebuild, I really need to add some custom touches that make it stand out as my own. One look that has stood out to me is simply turning up the end of the exhaust pipes in more of a dirt-bike fashion -- however I have to keep the clearance for passenger legs. My wife would kill me if she burnt her legs (and I'd never get her to ride with me again). I'm also wanting to make some low-profile saddle bags, and I'm still not quite sure how to make the two items work together... Once I get things cleaned up I'll start playing around with how it will fit back together.
1981 KZ1000-JK1
She's a beautiful mess, and I've made her all mine
She's a beautiful mess, and I've made her all mine
Please Log in or Create an account to join the conversation.
Moderators: Street Fighter LTD