
1981 KZ1000 J-to-K build
- Shdwdrgn
-
 Topic Author
- Offline
- User
-

Registered
- Posts: 614
- Thanks: 24
Re: 1981 KZ1000 J-to-K build
11 Jun 2015 06:01
Yeah chances are I would have gotten better results with something like gunkote, but at this point all I can really do is wait and see. I guess if I really wanted to check, I could soak one of the brackets in gas and see if it held up. Re-doing the carbs wouldn't be too much work, but re-doing the entire engine would be.
1981 KZ1000-JK1
She's a beautiful mess, and I've made her all mine
She's a beautiful mess, and I've made her all mine
Please Log in or Create an account to join the conversation.
- Shdwdrgn
-
Topic Author
- Offline
- User
-
Registered
- Posts: 614
- Thanks: 24
Re: 1981 KZ1000 J-to-K build
15 Jun 2015 11:55
Finally got the bearings knocked out of the swing arm yesterday, finished cleaning it up and primered again where I banged it up. There is a collar (part 92027-1561) that goes in between the bearings. There was a twisted piece of thin washer on one end that got mangled during removal. Looking at pictures of the part, I see it's just to help keep the collar centered inside the swing-arm, however it appears there was supposed to be one of these on each end. Anyone know if it would be practical just to tack on new washers to maintain the spacing? And if so, how much clearance should there be between the outside of the washers and the inside of the swing arm wall?
1981 KZ1000-JK1
She's a beautiful mess, and I've made her all mine
She's a beautiful mess, and I've made her all mine
Please Log in or Create an account to join the conversation.
- Shdwdrgn
-
Topic Author
- Offline
- User
-
Registered
- Posts: 614
- Thanks: 24
Re: 1981 KZ1000 J-to-K build
18 Jul 2015 20:20
So after spending more time than expected to sandblast the swing-arm, I was reading around about ideas for knocking off the factory powder coat. I've had really poor experience with paint strippers in the past so I didn't have much hope, but I found some info suggesting that a methanol-based stripper will chew through the powder. At Walmart I found this stuff called Kleen-Strip Premium for just under $10 which included a spray bottle to apply it. Seemed promising so I picked up a quart. Well this stuff worked a miracle! Within the first minute of applying, the paint was already wrinkled and peeling. I did half the frame and let it sit for about 20 minutes, then wiped it down with paper towles and finished up by hosing off the rest. The first application knocked off about 95% of the paint without a fuss, and without even any heavy fumes. I did a coat on the other half of the frame, then finished with another light coat on the stubborn areas.
I would say over 99% of the frame is completely paint-free without doing any real work. Of course hosing down the freshly-exposed metal caused some surface rust to form, but I've seen mention of rubbing the frame with a vinegar mix to take care of that (will have to do some reading on the subject).
Here's a shot as I was waiting for the final coat to work through. The bright yellow spots are where I welded the frame pieces together, and has been sitting in the garage exposed for the last couple years.
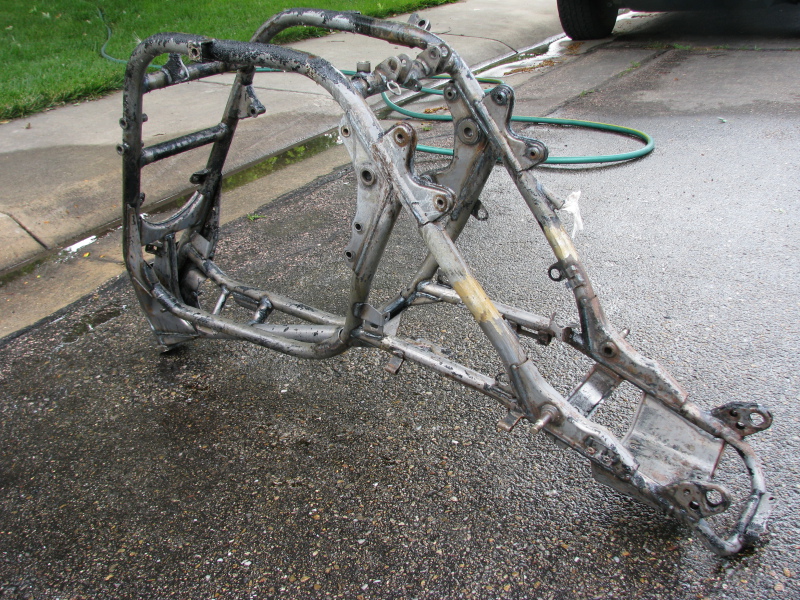
Tomorrow I'll start going over the entire frame with the sandblaster to smooth out any remaining paint spots and clean up the rust. I should be able to finish that up by next weekend, then hose it down with the brake cleaner and get a coat of self-etching primer on the whole thing. I'm really excited to finally get the frame prepped, hopefully I can get it standing back on its wheels before Winter hits.
I would say over 99% of the frame is completely paint-free without doing any real work. Of course hosing down the freshly-exposed metal caused some surface rust to form, but I've seen mention of rubbing the frame with a vinegar mix to take care of that (will have to do some reading on the subject).
Here's a shot as I was waiting for the final coat to work through. The bright yellow spots are where I welded the frame pieces together, and has been sitting in the garage exposed for the last couple years.
Tomorrow I'll start going over the entire frame with the sandblaster to smooth out any remaining paint spots and clean up the rust. I should be able to finish that up by next weekend, then hose it down with the brake cleaner and get a coat of self-etching primer on the whole thing. I'm really excited to finally get the frame prepped, hopefully I can get it standing back on its wheels before Winter hits.
1981 KZ1000-JK1
She's a beautiful mess, and I've made her all mine
She's a beautiful mess, and I've made her all mine
Please Log in or Create an account to join the conversation.
- Shdwdrgn
-
Topic Author
- Offline
- User
-
Registered
- Posts: 614
- Thanks: 24
Re: 1981 KZ1000 J-to-K build
20 Jul 2015 12:06
I managed to get several small pieces from the rear wheel assembly blasted, primered, and painted yesterday. The swingarm has also been painted, but the large plate ended up having a rough texture so I'll have to sand that smooth and paint over it again. I also got a section of the frame blasted and primered. Slowly working from one end to the other so I can get the whole frame in primer before finishing up work on the tail. I did discover one of the brackets has been torn away from the frame slightly, so will need to tack it back down.
I think I mentioned previously, but I'm testing the use of an industrial appliance spray paint for the frame. I checked some of the smaller pieces this morning, and so far am pleased with what I see, Now that the paint is drying, they have that sort of plastic feel that you get from a good paint. I have a rod I was hanging some parts on, so in a couple days I'll smack it around a bit and see how the paint holds up. And of course I'll have to dip it in some brake fluid to see how that works out. Might as well abuse the test pieces.
I think I mentioned previously, but I'm testing the use of an industrial appliance spray paint for the frame. I checked some of the smaller pieces this morning, and so far am pleased with what I see, Now that the paint is drying, they have that sort of plastic feel that you get from a good paint. I have a rod I was hanging some parts on, so in a couple days I'll smack it around a bit and see how the paint holds up. And of course I'll have to dip it in some brake fluid to see how that works out. Might as well abuse the test pieces.
1981 KZ1000-JK1
She's a beautiful mess, and I've made her all mine
She's a beautiful mess, and I've made her all mine
Please Log in or Create an account to join the conversation.
- Shdwdrgn
-
Topic Author
- Offline
- User
-
Registered
- Posts: 614
- Thanks: 24
Re: 1981 KZ1000 J-to-K build
03 Aug 2015 08:44
Well, as mentioned in another thread I tried to assemble the bearings into the swingarm this weekend, and failed miserably. I got the spacer tube repaired last week, had it sitting right there, and still managed to forget to drop it in place before putting the second bearing in. Destroyed one of the new bearings while removing it, so a new one has been ordered...
In the meantime, I finished cleaning up and primering the frame yesterday. I also got the center stand completely cleaned, and ready for primer and paint. Once I get all these pieces painted, the next step will be the front forks (not looking forward to that, the forks are one of those black-magic pieces you're not supposed to touch), followed by the wheels. I'll have to get new bearings and tires for both wheels, but then I'll have a rolling chassis to start bolting things on. Looking promising to reach that point well before Winter.
One piece that is going to slow me down for a bit is the addition of the tail. I was trying to eyeball it for bracket placement this weekend, but that's not going to work. Once I get the bearings finished in the swingarm, I plan to put together the frame, swingarm, and rear wheel, then I'll have something to judge the placement of the tail against. When that is done I can patch up the primer and get the frame painted (finally).
1981 KZ1000-JK1
She's a beautiful mess, and I've made her all mine
She's a beautiful mess, and I've made her all mine
Please Log in or Create an account to join the conversation.
- Shdwdrgn
-
Topic Author
- Offline
- User
-
Registered
- Posts: 614
- Thanks: 24
Re: 1981 KZ1000 J-to-K build
04 Aug 2015 21:09
Had a bit of time after getting off work tonight, so I hung up the center stand and got it primered and then painted. Ended up with a couple extra layers of paint though. Got the first round done (about 3 coats) and finished off a can of paint, let it sit for a bit, then grabbed a new can and did a couple more coats, expecting to finish it off. Except that when I stopped and looked it over, I realized the whole thing was going to a flat color rather than gloss. Checked the new can, and discovered I had grabbed the wrong paint last weekend.  Ah well, let it dry for a couple minutes while I dug around, and found I still had one more can of gloss left, so another generous coat of that, and it's finally looking right. It will have 5 days to dry, then I'll bake it for a bit on Sunday while I get started putting together the frame and rear wheel so I can figure out the position of the tail fin.
Ah well, let it dry for a couple minutes while I dug around, and found I still had one more can of gloss left, so another generous coat of that, and it's finally looking right. It will have 5 days to dry, then I'll bake it for a bit on Sunday while I get started putting together the frame and rear wheel so I can figure out the position of the tail fin.
1981 KZ1000-JK1
She's a beautiful mess, and I've made her all mine
She's a beautiful mess, and I've made her all mine
Please Log in or Create an account to join the conversation.
- Shdwdrgn
-
Topic Author
- Offline
- User
-
Registered
- Posts: 614
- Thanks: 24
Re: 1981 KZ1000 J-to-K build
08 Aug 2015 17:05
Did some temporary assembly today, It looks like the center stand has been twisted, because it does not contact the swingarm on both sides when raised up. Guess I'll have to see if I can wrench that around a bit at some point.
In the meantime, it looks like I was on the right track for the position of the tail fin, however I decided I don't need to get too crazy for mounting brackets. Tomorrow I'll find some strips of steel to make brackets for the front posts of the tail, which will be hidden under the seat. However on the back side, there is already a small bracket in place )which supports the stock fender) that I could use to bolt another bracket for holding the rear of the tail. This way I can swap between different styles (tailfin, fender, both) without having large brackets sticking out if I decide I really don't like the tail later on...
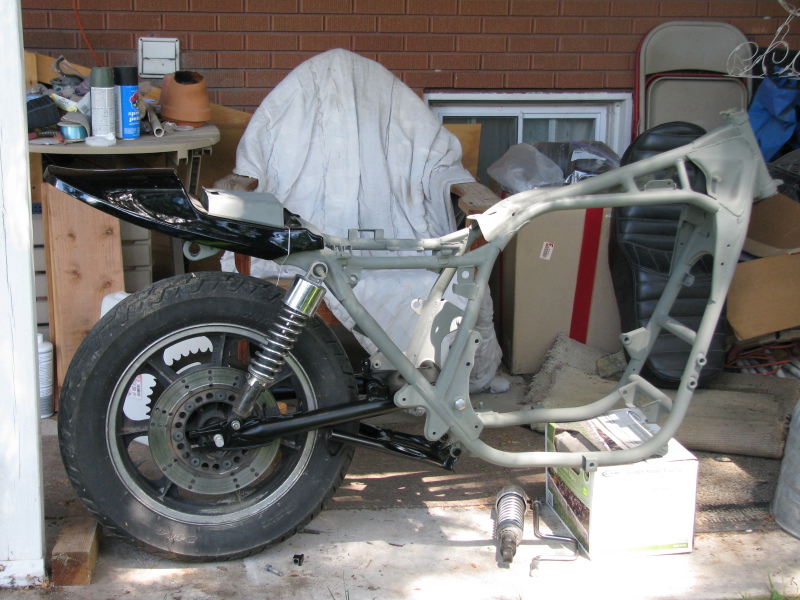
The line of the underside of the tail makes a nice definition for an upward flow at the rear. That will be enhanced by the angle of the pipes once I'm finished, which will be coming up at a similar slope, although I'll have to chop and reshape the pipes a little to get the length and angle that I'm looking for. Luckily I'm going to black out the pipes anyway, so I don't have to worry about messing up the chrome.
In the meantime, it looks like I was on the right track for the position of the tail fin, however I decided I don't need to get too crazy for mounting brackets. Tomorrow I'll find some strips of steel to make brackets for the front posts of the tail, which will be hidden under the seat. However on the back side, there is already a small bracket in place )which supports the stock fender) that I could use to bolt another bracket for holding the rear of the tail. This way I can swap between different styles (tailfin, fender, both) without having large brackets sticking out if I decide I really don't like the tail later on...
The line of the underside of the tail makes a nice definition for an upward flow at the rear. That will be enhanced by the angle of the pipes once I'm finished, which will be coming up at a similar slope, although I'll have to chop and reshape the pipes a little to get the length and angle that I'm looking for. Luckily I'm going to black out the pipes anyway, so I don't have to worry about messing up the chrome.
1981 KZ1000-JK1
She's a beautiful mess, and I've made her all mine
She's a beautiful mess, and I've made her all mine
Please Log in or Create an account to join the conversation.
- Shdwdrgn
-
Topic Author
- Offline
- User
-
Registered
- Posts: 614
- Thanks: 24
Re: 1981 KZ1000 J-to-K build
09 Aug 2015 21:38
Just a quick update tonight... I got the brackets made for the front of the tailfin today. Used some scrap steel about 1/16" thick and 1" wide. Hammered it into a square U about 3/4" wide, drilled a hole through the top and welded a nut to the inside. They don't interfere with the stock seat, as planned. I cleaned up the frame and put down a coat of primer to cover the exposed metal, so I'll plan on cleaning the frame once more next weekend and getting it painted.
I also need to find somebody that has really fine wet/dry paper. I haven't been able to find anything higher than 600 grit, but I know I picked up some 2000 somewhere around here awhile back. Baking the paint in the oven seems to dull it, so I need to polish up the swingarm again before I start putting everything back together.
I also need to find somebody that has really fine wet/dry paper. I haven't been able to find anything higher than 600 grit, but I know I picked up some 2000 somewhere around here awhile back. Baking the paint in the oven seems to dull it, so I need to polish up the swingarm again before I start putting everything back together.
1981 KZ1000-JK1
She's a beautiful mess, and I've made her all mine
She's a beautiful mess, and I've made her all mine
Please Log in or Create an account to join the conversation.
- Shdwdrgn
-
Topic Author
- Offline
- User
-
Registered
- Posts: 614
- Thanks: 24
Re: 1981 KZ1000 J-to-K build
16 Aug 2015 20:05
Yesterday I had to cut off and rework one of the new brackets, the hole wasn't quite square and I didn't want any long-term stress on the tail from trying to force it into position. Looks a lot closer now.
Once that was finished I got the first coat of paint on the frame. Well actually several coats. Had the frame upside-down and got everything covered from that angle. I've found there are three different ways I can set the frame and have it stable, so I'm going to do a coat from each angle to make sure I get everything that might be seen. I'll probably try to get the next coat down Tuesday or Wednesday to give the first coat time to harden a bit, then I can do the last coat next weekend. And once that has set up for a few days, I can start the process of trying to remember where all of those rubber grommets and miscellaneous bolts were all supposed to go.
I'll be happy when the frame is on the wheels and I can start on all the small stuff. The problem with the big pieces is that it takes so long to get each one done, it doesn't feel like anything at all is getting done. But small pieces go fast, and give the feeling of more progress. Plus there's a good deal of work yet that doesn't involve sandblasting and painting. That gets old after awhile, but you gotta take the time on each piece or the whole thing looks shoddy. And yet by next Spring I'll be itching for the warm weather so I can get started painting again... I'll be finishing up the engine, then detailing the tank, side covers, and fenders, before finally being able to start her up.
1981 KZ1000-JK1
She's a beautiful mess, and I've made her all mine
She's a beautiful mess, and I've made her all mine
Please Log in or Create an account to join the conversation.
- Shdwdrgn
-
Topic Author
- Offline
- User
-
Registered
- Posts: 614
- Thanks: 24
Re: 1981 KZ1000 J-to-K build
22 Aug 2015 18:14
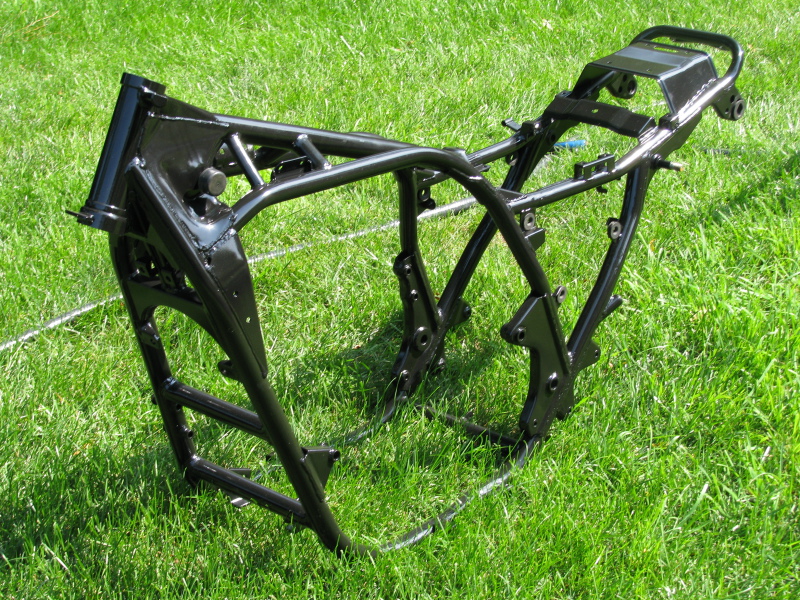
Last coat of paint went on the frame this afternoon. Took a chance with some clearcoat (I've had bad luck in the past) to add UV protection, plus some oil/gas resistance. I coated both the frame and swingarm, and they came out looking real nice, very glossy. Not sure how many weeks I should let it set before polishing it up with a coat of wax, but I may have to wait until next Spring if we don't get any more of those 90-degree days to really bake the paint.
Regardless, I'll be letting it set until next weekend before doing much else to it. Then I can clean out the screw threads and put the rubber grommets back on. In the meantime, I'll start prepping the front forks and rims for paint. Probably need to let the rims sit for at least a couple weeks before I have them put on new tires, or maybe I'll mount the tires before I start to paint. And I guess it's about time to get some new bearings ordered for the wheels. Primary goal is to get the frame standing back on its wheels again before it gets too cold to paint. I *should* still have at least a month before I need to worry.
Regardless, I'll be letting it set until next weekend before doing much else to it. Then I can clean out the screw threads and put the rubber grommets back on. In the meantime, I'll start prepping the front forks and rims for paint. Probably need to let the rims sit for at least a couple weeks before I have them put on new tires, or maybe I'll mount the tires before I start to paint. And I guess it's about time to get some new bearings ordered for the wheels. Primary goal is to get the frame standing back on its wheels again before it gets too cold to paint. I *should* still have at least a month before I need to worry.
1981 KZ1000-JK1
She's a beautiful mess, and I've made her all mine
She's a beautiful mess, and I've made her all mine
Please Log in or Create an account to join the conversation.
- Shdwdrgn
-
Topic Author
- Offline
- User
-
Registered
- Posts: 614
- Thanks: 24
Re: 1981 KZ1000 J-to-K build
26 Aug 2015 09:51
Finally found someone else who had a can (and ONLY one can) of the clear rustoleum, so I got some more finish coats done yesterday. The swingarm got two more coats of clear, and I also coated the bar that braces the rear brake to the swingarm. I finished up with a coat on the center stand. I guess one of these days I should also pull out the kickstand and get it cleaned and painted. Anyway, figured it was time for some pics...
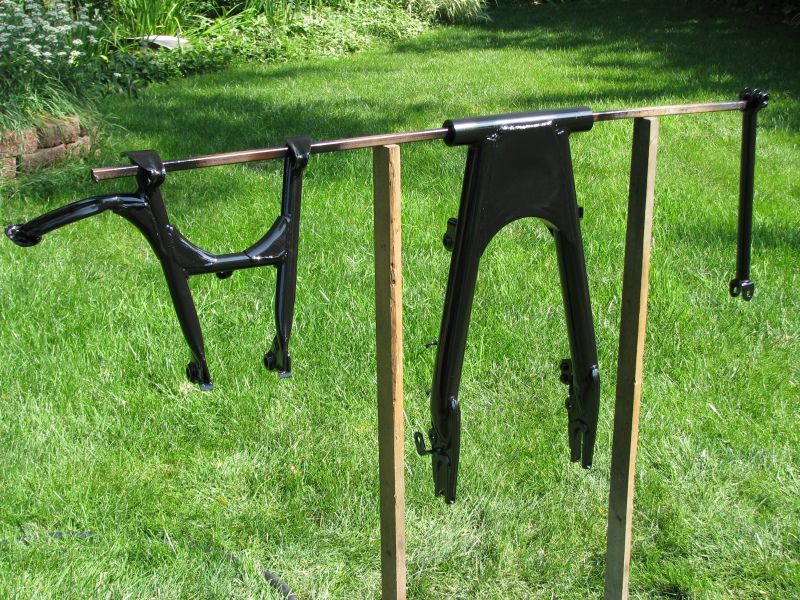
I'm leaving the pieces out on the back patio to bake in the afternoon sun -- we're supposed to be in the 90's for another couple weeks. Should be able to grease up the swingarm bearings and get it bolted into the frame this weekend. I got the front forks torn down a couple nights ago, and started sandblasting some of the smaller pieces. The tough one will be the triple-tree. Lots of old grease buildup under the bearings, so the whole thing will get hosed in brake cleaner before getting taped up so I can blast and paint the bits that need it. I'll finish up with the lower part of the forks, then try to figure out how it all goes back together again.
I'm leaving the pieces out on the back patio to bake in the afternoon sun -- we're supposed to be in the 90's for another couple weeks. Should be able to grease up the swingarm bearings and get it bolted into the frame this weekend. I got the front forks torn down a couple nights ago, and started sandblasting some of the smaller pieces. The tough one will be the triple-tree. Lots of old grease buildup under the bearings, so the whole thing will get hosed in brake cleaner before getting taped up so I can blast and paint the bits that need it. I'll finish up with the lower part of the forks, then try to figure out how it all goes back together again.
1981 KZ1000-JK1
She's a beautiful mess, and I've made her all mine
She's a beautiful mess, and I've made her all mine
Please Log in or Create an account to join the conversation.
- Shdwdrgn
-
Topic Author
- Offline
- User
-
Registered
- Posts: 614
- Thanks: 24
Re: 1981 KZ1000 J-to-K build
02 Sep 2015 12:04
Got the swingarm bearings lubed up and bolted into the frame this weekend. Made some more progress on the front forks, getting some of the smaller brackets done and one of the forks sandblasted and primered. That was the one with all the stickers, so it took a bit of work to clean up. I also didn't realize there was a clearcoat on them until I started blasting. A little scrubbing with 100-grit sandpaper opened up the clearcoat enough for the sand to make quick work of it. The other fork should go faster, just have to clean some grease off of it first.
Long weekend coming up, planning on diving back in. Once I finish the other fork, I'll tackle the top and bottom triple-trees. It's been a pain finding another source of that clearcoat. We have two Walmarts in town, and I wiped out supplies from both (for a total of only two cans ). I tried placing an order online with them today, and their website collected all my info, took me through to the last step, then said sorry, your local store is out of stock... Well no shit, that's why I'm trying to ORDER more. Had to call them up to get the order placed. Maybe I'll get lucky and the new cans will arrive by the weekend. If so, I can paint and clearcoat the rest of the parts on the forks and get them back together next week.
I don't think I mentioned, but I took a look at the ignition switch the other day, and the back side plastic was completely busted up. Found a replacement on ebay though, and the tracking page says it's out for delivery to the house now. Over the Winter I'll have to work on re-keying at least one lock so I can have a matching set. Should be entertaining.
Long weekend coming up, planning on diving back in. Once I finish the other fork, I'll tackle the top and bottom triple-trees. It's been a pain finding another source of that clearcoat. We have two Walmarts in town, and I wiped out supplies from both (for a total of only two cans
). I tried placing an order online with them today, and their website collected all my info, took me through to the last step, then said sorry, your local store is out of stock... Well no shit, that's why I'm trying to ORDER more. Had to call them up to get the order placed. Maybe I'll get lucky and the new cans will arrive by the weekend. If so, I can paint and clearcoat the rest of the parts on the forks and get them back together next week.I don't think I mentioned, but I took a look at the ignition switch the other day, and the back side plastic was completely busted up. Found a replacement on ebay though, and the tracking page says it's out for delivery to the house now. Over the Winter I'll have to work on re-keying at least one lock so I can have a matching set. Should be entertaining.
1981 KZ1000-JK1
She's a beautiful mess, and I've made her all mine
She's a beautiful mess, and I've made her all mine
Please Log in or Create an account to join the conversation.
Moderators: Street Fighter LTD