
'76 KZ900 (ZRX1200R) Build
- DoctoRot
-
- Offline
- Sustaining Member
-

Registered
- Oh, the usual... I bowl, I drive around...
- Posts: 2621
- Thanks: 784
Re: '76 KZ900 (ZRX1200R) Build
19 Feb 2018 22:47 - 19 Feb 2018 22:50NakedFun wrote: Note I did not use the copper crush washers because frankly I forgot to get them.....The RTV was setting up, so I went forward and torque the main nuts to the factory 25 lb/ft and the outer bolts to 104 in/lbs. Also added my cam drive blanking plug.
Factory head bolts are torqued to 29lb/ft, the APE nuts on the APE studs can be torqued to 42. You need a copper washer on the outermost rear studs as this provides a seal for the oil passage to the head from the crank case.
Last edit: 19 Feb 2018 22:50 by DoctoRot.
Please Log in or Create an account to join the conversation.
- Scirocco
-

- Offline
- Premium Member
-

Registered
- Never change a running system
- Posts: 4397
- Thanks: 2260
Re: '76 KZ900 (ZRX1200R) Build
20 Feb 2018 00:34 - 20 Feb 2018 00:35
You have to use the copper washer like DoctoRot said, otherwise you will get oil leaks.
You can re-use the old washers, grind them flat with fine sandpaper and annealing them with a hand torch for a good sealing result.
Michael
You can re-use the old washers, grind them flat with fine sandpaper and annealing them with a hand torch for a good sealing result.
Michael
My 1975 Z 1 B 900 Project
www.kzrider.com/forum/11-projects/605133...ears-deep-sleep-mode
www.kzrider.com/forum/11-projects/605133...ears-deep-sleep-mode
Last edit: 20 Feb 2018 00:35 by Scirocco.
Please Log in or Create an account to join the conversation.
- NakedFun
-
 Topic Author
- Offline
- User
-

Registered
- Posts: 1129
- Thanks: 121
Re: '76 KZ900 (ZRX1200R) Build
20 Feb 2018 04:35 - 20 Feb 2018 04:40
I know guys I was planning on using them all along, but I had to order them, hopefully they will be on their way soon from Z1 Enterprises.
In addition I did torque the APE nuts to 38lb/ft per their instructions, but I could not edit the post to correct which is why I separately posted my correction. BTW my factory service manual stated 25lb/ft for the head nuts, but it is an early addition and I have found lots of little details that apply to the older Z1 rather than the KZ900. Whatever, either way it is done....
Thanks,
Cory
2008 Kawasaki Concours 14
1999 Kawasaki ZRX1100
1976 Kawasaki KZ900
1999 Kawasaki ZRX1100
1976 Kawasaki KZ900
Last edit: 20 Feb 2018 04:40 by NakedFun.
Please Log in or Create an account to join the conversation.
- NakedFun
-
Topic Author
- Offline
- User
-
Registered
- Posts: 1129
- Thanks: 121
Re: '76 KZ900 (ZRX1200R) Build
21 Feb 2018 18:29
Soooo..... it was time to make some tools. A quick trip to the motorcycle salvage yard and Harbor Freight and we begin. First was to make a way to turn the engine over easily and precisely either direction. Using an old sprocket a welder and a deep well 1/2" socket and Viola! Please note I had to use flux core wire as I did not have my shielding gas......so no picking on my welds! :bruce:


2008 Kawasaki Concours 14
1999 Kawasaki ZRX1100
1976 Kawasaki KZ900
1999 Kawasaki ZRX1100
1976 Kawasaki KZ900
Please Log in or Create an account to join the conversation.
- NakedFun
-
Topic Author
- Offline
- User
-
Registered
- Posts: 1129
- Thanks: 121
Re: '76 KZ900 (ZRX1200R) Build
21 Feb 2018 18:29
Then I needed a piston stop. A modded spark plug, a coupling nut turned down on the drill press, and a brass turned bolt. There you go......


IMPORTANT to use soft materials.... as you can see didn't QUITE turn down the brass enough and the exhaust valve touched and knicked the brass... LOL, no blooc, no foul. Turn it down a bit more and done.

IMPORTANT to use soft materials.... as you can see didn't QUITE turn down the brass enough and the exhaust valve touched and knicked the brass... LOL, no blooc, no foul. Turn it down a bit more and done.
2008 Kawasaki Concours 14
1999 Kawasaki ZRX1100
1976 Kawasaki KZ900
1999 Kawasaki ZRX1100
1976 Kawasaki KZ900
Please Log in or Create an account to join the conversation.
- NakedFun
-
Topic Author
- Offline
- User
-
Registered
- Posts: 1129
- Thanks: 121
Re: '76 KZ900 (ZRX1200R) Build
21 Feb 2018 18:29
Then I decided to just verify my readings with the dial indicator on the piston itself. Worked out well, adjusted my wheel and now we have true TDC.


Lastly, while trying to verify the initial timing, noticed when I was checking everything over closely that it appeared the pitch of the chain did not match with the cam gears from APE? Well noticed with them removed they meshed properly with the chain and low and behold......


So tomorrow I will "fix" this by clearancing the bolt flanges to make room for the chain links.....:doh "Bolt On" adapters.......sure.... Lastly I found that the shims I have are too large for the fresh components and will need to get more. Some valves just "cracked" off the seat when on the base circle. Ugh.... shims kits for these 29mm shims are 'spensive........
More to come....
Cory
Lastly, while trying to verify the initial timing, noticed when I was checking everything over closely that it appeared the pitch of the chain did not match with the cam gears from APE? Well noticed with them removed they meshed properly with the chain and low and behold......
So tomorrow I will "fix" this by clearancing the bolt flanges to make room for the chain links.....:doh "Bolt On" adapters.......sure.... Lastly I found that the shims I have are too large for the fresh components and will need to get more. Some valves just "cracked" off the seat when on the base circle. Ugh.... shims kits for these 29mm shims are 'spensive........
More to come....
Cory
2008 Kawasaki Concours 14
1999 Kawasaki ZRX1100
1976 Kawasaki KZ900
1999 Kawasaki ZRX1100
1976 Kawasaki KZ900
Please Log in or Create an account to join the conversation.
- NakedFun
-
Topic Author
- Offline
- User
-
Registered
- Posts: 1129
- Thanks: 121
Re: '76 KZ900 (ZRX1200R) Build
28 Mar 2018 17:52
So moving next week, thus needed my a$$ is gear. Finished dialing in the cams to 110 LCA each. Going to start there and try it out.

Then it was time to get the engine in the frame once again. Converted it to 1/2" mounts using the D&G Chassis components but changed out their hardware for SS Allen button heads. Since I am home alone.... had to get creative to get it together without damaging the PC and killing myself. Well took the bike down from the table, then with some "C" Clamps, some straps, protective foam sheets, and pipe insulation I used my hydraulic lift table into a fork lift....pictures tell the tale.


Cory
Then it was time to get the engine in the frame once again. Converted it to 1/2" mounts using the D&G Chassis components but changed out their hardware for SS Allen button heads. Since I am home alone.... had to get creative to get it together without damaging the PC and killing myself. Well took the bike down from the table, then with some "C" Clamps, some straps, protective foam sheets, and pipe insulation I used my hydraulic lift table into a fork lift....pictures tell the tale.
Cory
2008 Kawasaki Concours 14
1999 Kawasaki ZRX1100
1976 Kawasaki KZ900
1999 Kawasaki ZRX1100
1976 Kawasaki KZ900
Please Log in or Create an account to join the conversation.
- NakedFun
-
Topic Author
- Offline
- User
-
Registered
- Posts: 1129
- Thanks: 121
Re: '76 KZ900 (ZRX1200R) Build
28 Mar 2018 17:52
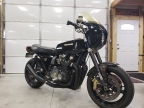
Picked it up off the engine stand and began the install.


Then put the exhaust on....

Then the painted parts.....


Ready for transport to Savannah!
Cory
Then put the exhaust on....
Then the painted parts.....
Ready for transport to Savannah!
Cory
2008 Kawasaki Concours 14
1999 Kawasaki ZRX1100
1976 Kawasaki KZ900
1999 Kawasaki ZRX1100
1976 Kawasaki KZ900
Please Log in or Create an account to join the conversation.
- 531blackbanshee
-
- Offline
- Vendor
-
Vendors
- Posts: 7442
- Thanks: 796
Re: '76 KZ900 (ZRX1200R) Build
03 Apr 2018 14:24
seeing it all together has got to get you excited !
leon
leon
skiatook,oklahoma 1980 z1r,1978 kz 1000 z1r x 3,
1976 kz 900 x 3
i make what i can,and save the rest!
billybiltit.blogspot.com/
www.kzrider.com/forum/5-chassis/325862-triple-tree-custom-work
kzrider.com/forum/5-chassis/294594-frame-bracing?limitstart=0
1976 kz 900 x 3
i make what i can,and save the rest!
billybiltit.blogspot.com/
www.kzrider.com/forum/5-chassis/325862-triple-tree-custom-work
kzrider.com/forum/5-chassis/294594-frame-bracing?limitstart=0
Please Log in or Create an account to join the conversation.
- NakedFun
-
Topic Author
- Offline
- User
-
Registered
- Posts: 1129
- Thanks: 121
Re: '76 KZ900 (ZRX1200R) Build
07 Apr 2018 18:20
2008 Kawasaki Concours 14
1999 Kawasaki ZRX1100
1976 Kawasaki KZ900
1999 Kawasaki ZRX1100
1976 Kawasaki KZ900
Please Log in or Create an account to join the conversation.
- Wiers
-

- Offline
- User
-
Registered
- Posts: 256
- Thanks: 28
Re: '76 KZ900 (ZRX1200R) Build
08 Apr 2018 03:28
Those two and a couch, what more do you need?
Please Log in or Create an account to join the conversation.
- 531blackbanshee
-
- Offline
- Vendor
-
Vendors
- Posts: 7442
- Thanks: 796
Re: '76 KZ900 (ZRX1200R) Build
09 Apr 2018 13:16
where are you living now?
leon
leon
skiatook,oklahoma 1980 z1r,1978 kz 1000 z1r x 3,
1976 kz 900 x 3
i make what i can,and save the rest!
billybiltit.blogspot.com/
www.kzrider.com/forum/5-chassis/325862-triple-tree-custom-work
kzrider.com/forum/5-chassis/294594-frame-bracing?limitstart=0
1976 kz 900 x 3
i make what i can,and save the rest!
billybiltit.blogspot.com/
www.kzrider.com/forum/5-chassis/325862-triple-tree-custom-work
kzrider.com/forum/5-chassis/294594-frame-bracing?limitstart=0
Please Log in or Create an account to join the conversation.
Moderators: Street Fighter LTD