
Search Results (Searched for: gs swing arm)
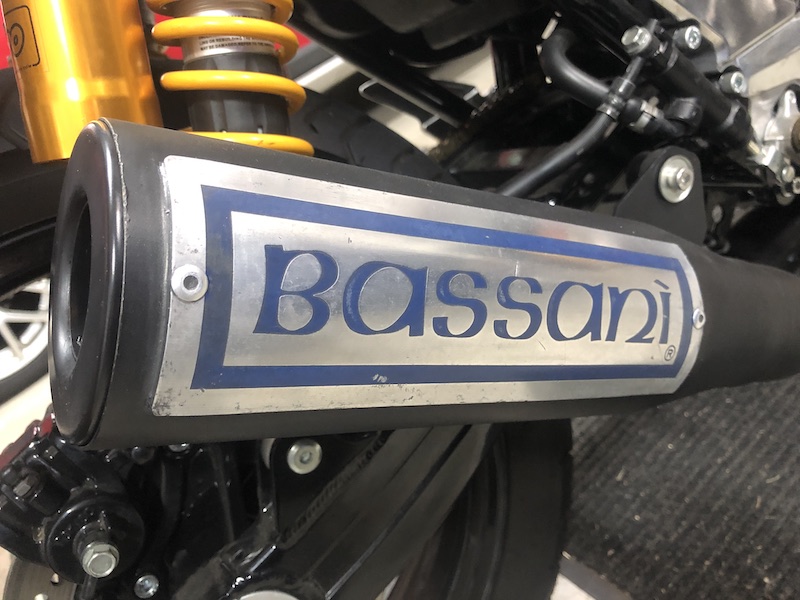
The Bassani exhaust system was a trial in patience to restore. As shown in my previous posts, I did cut the exhaust and added more upsweep and more importantly had to move the muffler outboard a bit in order to clear the swingarm. After the fabrication was done, it left huge spots of the original plasma coating missing and it looked really weird. So I had to have the entire system blasted with a very aggressive media to strip the remaining plasma coating off to give it an even finish after paint.
I had to use a blind-hole puller and tons of heat to get the spigots off the header.

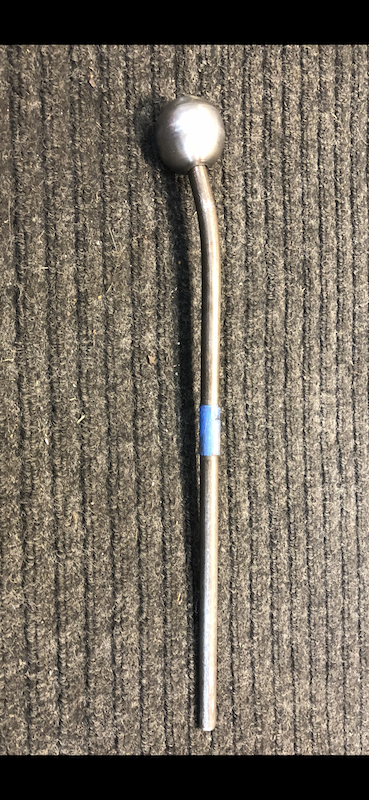
Some of the header pipes were dented from someone hammering on them to try to remove the header while it was on a bike. So I found a soft steel ball in the same size as the inner diameter as the pipes and attached it to a steel rod and pounded it down the tubes to push out the dents.
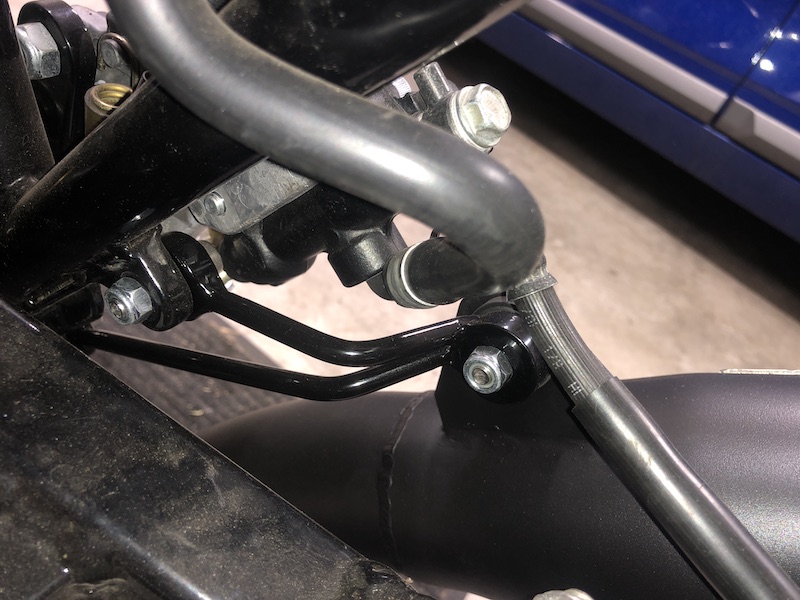
I then had to fabricate a new exhaust hanger to support it all. I used the two bosses on the frame that originally held the rear foorpeg/rear brake bracket. I am very glad I decided not to shave those bosses off the frame as I initially wanted too.
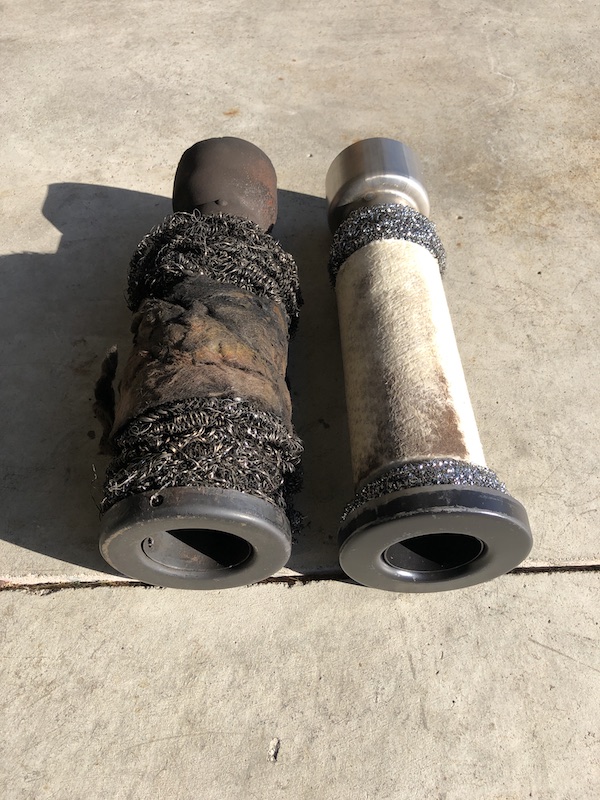
I then made a replica baffle out of stainless steel using miscellanies muffler parts and pieces from the internet. The factory baffle for the gs1100 is 2.25” ID and my new one is 2.00” ID. The baffle that came with the destroyed gpz750 Bassani muffler was only 1.5” in diameter, so that what I have to go on as far as the tuning Bassani did to the match the exhaust to the gpz750 .
I wanted to make it 1.5” but I couldn’t find the correct components to make it happen. I now work next to a motorcycle shop that has a dyno, so I plan to use that to rejet the carbs now that the new baffle is completed but when the weather is warmer.
Factory baffle compared to replica. I have since repainted the new baffle since this picture.
I also acquired a vintage Bassani emblem/plate as well. It has embossed lettering which is neat, but it was drilled for screws to attach it to the muffler. I do not like the idea of drilling holes, so I added faux rivets to the emblem and used high heat silicone to affix it instead of screws. I decided not to polish the plate and am just leaving it with its scratches and dings intact.
I had to use a blind-hole puller and tons of heat to get the spigots off the header.
Some of the header pipes were dented from someone hammering on them to try to remove the header while it was on a bike. So I found a soft steel ball in the same size as the inner diameter as the pipes and attached it to a steel rod and pounded it down the tubes to push out the dents.
I then had to fabricate a new exhaust hanger to support it all. I used the two bosses on the frame that originally held the rear foorpeg/rear brake bracket. I am very glad I decided not to shave those bosses off the frame as I initially wanted too.
I then made a replica baffle out of stainless steel using miscellanies muffler parts and pieces from the internet. The factory baffle for the gs1100 is 2.25” ID and my new one is 2.00” ID. The baffle that came with the destroyed gpz750 Bassani muffler was only 1.5” in diameter, so that what I have to go on as far as the tuning Bassani did to the match the exhaust to the gpz750 .
I wanted to make it 1.5” but I couldn’t find the correct components to make it happen. I now work next to a motorcycle shop that has a dyno, so I plan to use that to rejet the carbs now that the new baffle is completed but when the weather is warmer.
Factory baffle compared to replica. I have since repainted the new baffle since this picture.
I also acquired a vintage Bassani emblem/plate as well. It has embossed lettering which is neat, but it was drilled for screws to attach it to the muffler. I do not like the idea of drilling holes, so I added faux rivets to the emblem and used high heat silicone to affix it instead of screws. I decided not to polish the plate and am just leaving it with its scratches and dings intact.
Replied by Pagala on topic Very stubborn swingarm spindle - KZ550 LTD
26 Oct 2019 18:16 Pagala
Thanks for the tips and advice guys.
Just to give a brief update: after a bit of trial and error, I haven't removed the spindle but I now know exactly where I stand. It isn't sensible to apply tremendous force to dislodge the spindle, as this risks frame damage. The spindle is galvanically corroded to the inner sleeve/spacer, which means that penetrant and rust remover (whether vinegar or other) wouldn't be effective. However, I know how to remove it. Because of one of the washer-spacers being missing on one side, the swingarm can be shifted slightly to the right or left, and this is just enough room to fit a hand-held mini jigsaw. I started to saw through the spindle and inner spacer, but then reconsidered. If I cut away the spindle, knock out the remains from either side, I can then procure another spindle, and a set of swingarm bearings and dust seals, and be done. However, where's the fun in that? It's a bit too chequebook-restoration for me. Besides, I could have bought a complete original bike if that's what I wanted, and have saved money. I started to lose enthusiasm when sawing, and figured, I may as well make this the hardtail bobber that's been on my mind for some time now, so that's the plan now. The spindle is going to stay in place.
Just to give a brief update: after a bit of trial and error, I haven't removed the spindle but I now know exactly where I stand. It isn't sensible to apply tremendous force to dislodge the spindle, as this risks frame damage. The spindle is galvanically corroded to the inner sleeve/spacer, which means that penetrant and rust remover (whether vinegar or other) wouldn't be effective. However, I know how to remove it. Because of one of the washer-spacers being missing on one side, the swingarm can be shifted slightly to the right or left, and this is just enough room to fit a hand-held mini jigsaw. I started to saw through the spindle and inner spacer, but then reconsidered. If I cut away the spindle, knock out the remains from either side, I can then procure another spindle, and a set of swingarm bearings and dust seals, and be done. However, where's the fun in that? It's a bit too chequebook-restoration for me. Besides, I could have bought a complete original bike if that's what I wanted, and have saved money. I started to lose enthusiasm when sawing, and figured, I may as well make this the hardtail bobber that's been on my mind for some time now, so that's the plan now. The spindle is going to stay in place.
Replied by TexasKZ on topic Very stubborn swingarm spindle - KZ550 LTD
21 Oct 2019 11:58
Getting penetrant between the spacer and bolt is going to be a challenge. Pouring it in the grease fitting hole will certainly lube up the outside of the spacer, and pouring it from each end will douse the bearings, but a great deal of patience and a lot of penetrant will be needed to get to the problem.
Replied by Rick H. on topic Very stubborn swingarm spindle - KZ550 LTD
21 Oct 2019 09:14 - 21 Oct 2019 09:21
Rick H.
I am a bit late to the show, but there is a penetrant called KROIL that is bar none the best there is. It has saved me untold grief working on vintage firearms and older vehicles. The problem comes when people expect it to work quickly...it doesn't. It can take several days to do it's job. I spray it on the part I want to loosen and if the part has some movement, I move it back and forth trying to exceed the movement limit little by little both ways at first. Perhaps I may even "shock" the saturated part with a dead blow hammer all the while continually soaking the part and moving it little by little if I can. I will do this several times a day if needed and the part is really stuck. I have removed barrels from 80 and 90 year old firearms using these methods and rarely has KROIL let me down, but sometimes I have continued this process for over a week. You can't rush what may have taken Mother Nature and man many years to screw up. Heat is a final resort in some instances, but only a last resort. It can do strange things to metal that you want to save. I think in your case I would have done the KROIL process first and got things freed up as much as possible and with some assistance put the frame/swingarm in a hydraulic press and pushed the pivot out. You may have to use an arbor on top of the bolt. Just remember, a frame will only take so much force before it begins to bend and or twist. Good luck....
Rick H.
Rick H.
Replied by Pagala on topic Very stubborn swingarm spindle - KZ550 LTD
21 Oct 2019 08:49 - 21 Oct 2019 08:50
Pagala
Ah, lucked out. Tried a rig with a car jack on top and a bike stand below, pressing up on my workbench. The spindle bolt didn't give, but the workbench started to lift. LOL
Lots of penetrating oil didn't seem to make any difference. The 2 x G-clamp method didn't work - even started to bend a heavy duty CrV spanner I laid over the threaded end. All that's left now is to try to spin the bolt so fast that it breaks free of the inner spacer that's corroded itself to it. At the moment, I've put lots of penetrating oil down the grease nipple hole, and am leaving it overnight to try again tomorrow.
Realistically, it isn't going to come out. So my choices will be:
1) Buy a new swingarm, and cut out the existing one in the meantime. Will also need a new pivot bolt and swingarm bearings and seals.
2) Struts (lazy hardtail)...
Building a custom bike is on my bucket list. However, I've never ridden a hard tail before, and I've heard lots of bad things about them. They do look cool, though. This could be the frame to make it happen. Don't know yet. At least I got the headrace bearing races out.
Replied by richard_oxon on topic Time to turn my kz1000 into a resto mod.
20 Oct 2019 19:44
Hi how you doing .. this is my kz build . how it more or less was when I got it altho, I had taken the four foot high sissy bar off and the vetter fairing before that pic . i built mine with zx9r 1995 front end and zx9r wheels . I also fitted a gsxr 600 swing arm from 2003 .. of Couse a lot more mods then listed .. one thing people make the mistake on with kz resto mods is not enough ground clearance so watch that esp if you like to ride hard .. im looking forward to seeing more of your project as you move on with it .. im just starting another one .. I bought a bare frame from a breakers yard and just fitted a zrx1100 front end in the process of finding all my other bits .. keep us updated with your project ")
Replied by Pagala on topic Very stubborn swingarm spindle - KZ550 LTD
20 Oct 2019 12:35
Pagala
Thanks for the tips guys.
Plenty of things to try then! Got lots of time to work it out, and part of the fun in projects is thinking of creative solutions, so I'll work something out. Worse comes to the worst, I'll get another swingarm and cut out the existing one. Seems a bit last-resort, but if needs must, no big deal.
Plenty of things to try then! Got lots of time to work it out, and part of the fun in projects is thinking of creative solutions, so I'll work something out. Worse comes to the worst, I'll get another swingarm and cut out the existing one. Seems a bit last-resort, but if needs must, no big deal.
Replied by Nessism on topic Very stubborn swingarm spindle - KZ550 LTD
19 Oct 2019 17:54
There is a tubular sleeve between the bearings that's likely corroded and stuck to the shaft. That's why you can rotate the shaft but can't get it out. If the swingarm has a grease fitting I'd pull that out and squirt some PB Blaster or similar in there and give it a chance to work. Worst case cut off the swingarm and buy a replacement from ebay. They seem reasonably cheap.
Very stubborn swingarm spindle - KZ550 LTD was created by Pagala
18 Oct 2019 09:35
Pagala
I've just got hold of a KZ550 LTD frame, with the swingarm still attached. I noticed that there is a swingarm shim missing (going between the swingarm and the frame) on one side, and as a result when you grab the swingarm, it can be rocked a bit. So the swingarm has to come off, to put a new shim in there, and (now) to replace the swingarm bearings.
I've looked at the blowup diagram and it's a standard, very simple swingarm pivot. The nut comes off on one side, and then there's nothing to stop it from being drifted out. However, I've run into a problem. This pivot absolutely defies me, and doesn't want to move. I guess this is probably because a lack of grease has caused it to rust to one or both of the bearings. I've hit it with lots of PlusGas (a good UK equivalent of PB Blaster) and with the blowtorch on both sides. So I moved to the hammer and started bashing away, with a block of wood to protect the threaded end of the spindle. Didn't work. I didn't have a bigger hammer, so I moved over to a big brick, and have been bashing away with all the strength I can muster, and also trying to squat while hitting it (moving body weight vertically to add force to the blows).
I've stopped because I'm now pretty scared, with the amount of force I'm using. The swingarm now creaks (it didn't before) when moved up and down, so I suppose a bearing is damaged. What worries me is damage to the swingarm and the frame. At the end of the day, if I destroy the spindle it doesn't matter, I can get another. But I don't want to damage the frame or swingarm - that would be stupidity.
Any suggestions on how to proceed? Am I good to go, with even more brute force and ignorance until it comes out? What do you think about a little dab of arc-welder to both ends, to heat-shock some of the rust free?
Replied by davido on topic Time to turn my kz1000 into a resto mod.
17 Oct 2019 12:54 - 18 Oct 2019 02:12
GSXR 600 swingarm dropped right into my frame.
In fact,this is a list Leon made when I was looking for a suitable swingarm;
97-03 gsxr 600 (no upper brace)
92 gsxr 1100 (no upper or lower brace)
those should install much like the gs arm.
these will take some modification but have been used on kz's in the past (and present)
99-07 busa needs upper brace removed(possibly lower brace added)
03-04 zx6/636 needs the pivot machined narrower
01-05 fz1 needs the pivot machined narrower
Displaying 531 - 540 out of 7255 results.