
KZ440 LTD Carburettor Tear-down
- Jimbo68
-
 Topic Author
- Offline
- User
-

Registered
- Posts: 103
- Thanks: 7
KZ440 LTD Carburettor Tear-down
07 Aug 2023 06:18
Hi there folks.
I'm back, with an aspiration to get the carbs out my KZ440 LTD and tear down, clean, straighten the bent choke plate, then re-assemble.
My last carb adventure on this forum is here .
First, gather everything I need...
@nessism, you mentioned in my last topic you have a replacement o ring kit for my pair of carbs. Is that still the case please?
Other pre-tear down questions I have. If you have any thoughts, I would appreciate hearing them please.
Can anyone recommend a carb soak product please? I have an aerosol but I'm guessing the soak comes in a large pouring vessel? I'm UK-based.
Any step by step guides you know of for tearing down my specific carbs?
I recall reading/seeing somewhere there is a specific item on the carb to screw down until tight, counting the turns hence knowing how much to back it out when re-assembling. Any more information please?
Is it wise to replace the rubber hoses?
I'd appreciate info about any possible gotchas for both the internal disassembly and the disconnecting/reconnecting of the carb pair, including the spring assembly for the throttle.
Is there any part of the carb I SHOULDN'T disassemble?
Suggestions for compressed air? I can get aerosols but with previous purchases of such things, I've noticed liquid dribble out and mix with the jet of air. Might that liquid be detrimental to the target holes?
FYI I have the maintenance manual.
Thanks a million.
1981 Kawasaki KZ440-A2
Please Log in or Create an account to join the conversation.
- Nessism
-

- Away
- Sustaining Member
-

Registered
- Posts: 8098
- Thanks: 3481
Re: KZ440 LTD Carburettor Tear-down
07 Aug 2023 09:58 - 07 Aug 2023 10:05
Yes, I have O-ring kits for your carbs. email is (remove underlines and spaces) ness_ism_AT_ sbc global DOT net
Take photos as you dissemble.
The pilot screws should be 2.5 turns out from lightly seated.
The pilot screws have a spring, washer, and O-ring, which often times stay down into the carb passage when removing the screw. Bend a small hook tool and fish out all the parts. Reuse the spring and washer, replace the O-ring.
Use red loctite on the choke plate screws, when reinstalling them.
Replacing hard/stiff rubber hoses is a must.
I don't know what to say about cleaning solvent in the UK. Don't soak any soft parts in strong chemicals, or it will destroy them. An ultrasonic cleaner will work in a pinch, just degrease first.
Be sure to remove the pilot jets, and bleed pipes; two metering jets with tiny passages. Hold them up to a light and make sure the orifice is open before installing after cleaning.
Spray carb cleaner through all the various passages, and make sure the spray comes out where it's supposed to. Study the passage diagram in the service manual, and make sure both carbs have the same open passages.
Ed
Carb O-ring Kits : www.kzrider.com/forum/14-vendor-forum/62...rburetor-o-ring-kits
www.kzrider.com/forum/faq-wiki/618026-new-owner-things-to-know
1981 KZ750E2
www.kzrider.com/forum/11-projects/604901...z750e-project-thread
Carb O-ring Kits : www.kzrider.com/forum/14-vendor-forum/62...rburetor-o-ring-kits
www.kzrider.com/forum/faq-wiki/618026-new-owner-things-to-know
1981 KZ750E2
www.kzrider.com/forum/11-projects/604901...z750e-project-thread
Last edit: 07 Aug 2023 10:05 by Nessism.
The following user(s) said Thank You: Jimbo68
Please Log in or Create an account to join the conversation.
- Nerdy
-

- Away
- Sustaining Member
-
Registered
- Posts: 1158
- Thanks: 484
Re: KZ440 LTD Carburettor Tear-down
07 Aug 2023 16:43
See if you can find Berryman Chem-Dip at a local auto parts shop; Amazon.co.uk has it as well.
They offer aerosol cans but there is also a dipping version about the size of a paint tin - a little under three liters. It includes a dipping/soaking basket and works pretty well.
They offer aerosol cans but there is also a dipping version about the size of a paint tin - a little under three liters. It includes a dipping/soaking basket and works pretty well.
1967 Yamaha YCS1 Bonanza
1980 KZ440B
1981 Yamaha XT250H
1981 KZ440 LTD project bike
1981 GPz550
2013 Yamaha FZ6R
The following user(s) said Thank You: Nessism, sf4t7, Jimbo68
Please Log in or Create an account to join the conversation.
- Dr. Frankenstein
-

- Offline
- User
-
Registered
- Posts: 134
- Thanks: 26
Re: KZ440 LTD Carburettor Tear-down
09 Aug 2023 18:08
Re: the compressed air, go to Staples or any other office supply company and get some compressed air dusters, like they use for cleaning off computer keyboards. It usually comes in a spray can with a little plastic tube attached to the side. Three cans run about $15 US, so that's what...12 pounds sterling? Worth it though, and they last for quite a while. If you want to get fancy, hold that little plastic tube over a candle flame (not too close!) until it gets soft enough to stretch...when that happens(and be careful, it happens fast!), stretch it out gently so the plastic tubing thins out and take it off the flame and wait for it to cool; then take an Xacto knife or scissors or a razor blade and cut it clean where you want it and stick the plastic tube back in the can's nozzle. The resulting stretched plastic tubing should now be like a pipette that you can insert into tiny orifices to blow the compressed air through.
For the carb cleaner soak, I use Gunk carburetor cleaner in the one gallon can, Berryman's will work too; pricey, but it still works even after it gets dark (the color, that is). Like Nessism says, don't use that on any soft parts, like rubber, because it will eat it.
There's also a guy on your side of the pond that makes rubber diaphragm reproductions for hard-to-find carbs if yours takes them; I ordered some for my '79 KZ400H LTD and they were awesome, I was even able to replace them on the original slides without too much effort.
The following user(s) said Thank You: Jimbo68
Please Log in or Create an account to join the conversation.
- Jimbo68
-
Topic Author
- Offline
- User
-
Registered
- Posts: 103
- Thanks: 7
Re: KZ440 LTD Carburettor Tear-down
23 Aug 2023 07:46
Thanks Doc. I’m compiling what I need now. I’ll be in touch on this topic thread later this month or early next.
1981 Kawasaki KZ440-A2
Please Log in or Create an account to join the conversation.
- Jimbo68
-
Topic Author
- Offline
- User
-
Registered
- Posts: 103
- Thanks: 7
Re: KZ440 LTD Carburettor Tear-down
23 Aug 2023 07:48
“There's also a guy on your side of the pond that makes rubber diaphragm reproductions for hard-to-find carbs if yours takes them; I ordered some for my '79 KZ400H LTD and they were awesome, I was even able to replace them on the original slides without too much effort. ”
So you have his contact details please?
So you have his contact details please?
1981 Kawasaki KZ440-A2
Please Log in or Create an account to join the conversation.
- Dr. Frankenstein
-
- Offline
- User
-
Registered
- Posts: 134
- Thanks: 26
Re: KZ440 LTD Carburettor Tear-down
11 Sep 2023 12:44 - 11 Sep 2023 12:47
Actually, I found these on Amazon, and cheaper than what I paid! These are from Damineding, which I've bought a bunch of stuff from. They have some really good and inexpensive carb kits too! I've used them in my GL1000's and even this KZ400H I'm rebuilding. Good stuff.
Amazon.com: 2 X fit for CB350 CL350 SL350 KZ400 KZ250 CARBURETOR SLIDE DIAPHRAGMS: Automotive
Here's the guy I got mine from, I'm pretty sure he's in London - there are some good step-by-step tutorials in here on how to change the diaphragms.
Carb Diaphragms Keihin Mikuni Hitachi | CDI Moto Parts ® (carburetordiaphragms.com)
And here's another video on how to replace the diaphragms without damaging them. It's for a Z1000, but the principle is the same.
How To: Replace Carburetor Diaphragm on Kawasaki Concours ZG1000 - YouTube
Last edit: 11 Sep 2023 12:47 by Dr. Frankenstein.
The following user(s) said Thank You: Jimbo68
Please Log in or Create an account to join the conversation.
- Jimbo68
-
Topic Author
- Offline
- User
-
Registered
- Posts: 103
- Thanks: 7
Re: KZ440 LTD Carburettor Tear-down
11 Sep 2023 13:53
Hi Nessism.
the spares arrived a few days ago. Thank you.
the spares arrived a few days ago. Thank you.
1981 Kawasaki KZ440-A2
The following user(s) said Thank You: Nessism
Please Log in or Create an account to join the conversation.
- Jimbo68
-
Topic Author
- Offline
- User
-
Registered
- Posts: 103
- Thanks: 7
Re: KZ440 LTD Carburettor Tear-down
26 Sep 2023 02:54 - 26 Sep 2023 03:18
Carbs now on my workbench. I’ve noticed 2 things and I’m wondering whether I should address them before I separate the carbs:
I noticed there was a difference in the gap between one of the throttle butterfly valves and the carburettor bore compared with the other and, per service manual, corrected the difference by loosening the lock nut, turning the screw, then retightening the lock nut. If you have any follow up comments on that correction, please let me know.
*I’ve tried to add a video of the throttle valve movement, and add a YouTube link to the same video- not joy. Any advice appreciated please.
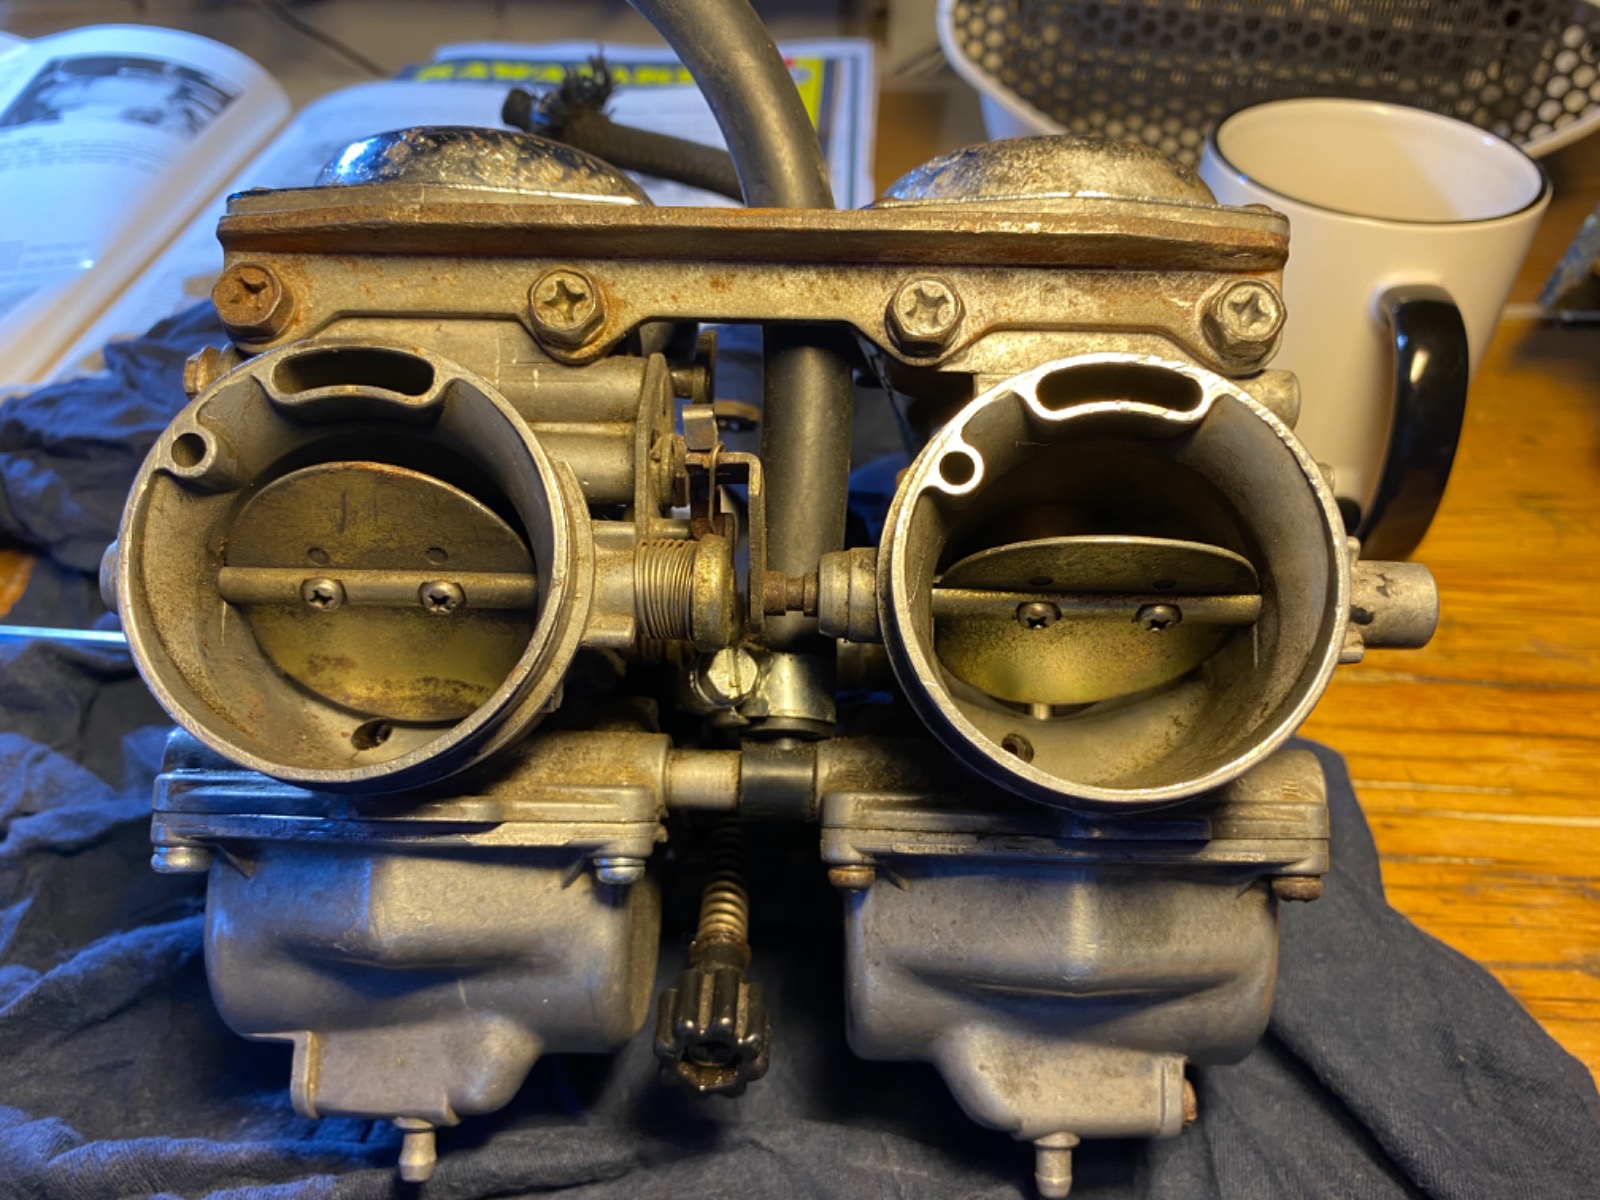
- A rotational offset in the spindle of the RHS choke plate. It appears to be rotated a few degrees differently to its LHS mate. I can’t see any means to adjust it. Any ideas how to correct it and is it worth addressing it now, or during reassembly? (I intend to straighten the bent valve).
- The throttle butterfly valves shift a tiny bit as the choke is pulled fully up. Is that correct?
I noticed there was a difference in the gap between one of the throttle butterfly valves and the carburettor bore compared with the other and, per service manual, corrected the difference by loosening the lock nut, turning the screw, then retightening the lock nut. If you have any follow up comments on that correction, please let me know.
*I’ve tried to add a video of the throttle valve movement, and add a YouTube link to the same video- not joy. Any advice appreciated please.
1981 Kawasaki KZ440-A2
Last edit: 26 Sep 2023 03:18 by Jimbo68. Reason: Add video
Please Log in or Create an account to join the conversation.
- TexasKZ
-

- Offline
- Platinum Member
-
Registered
- Posts: 8212
- Thanks: 2688
Re: KZ440 LTD Carburettor Tear-down
26 Sep 2023 04:34
What that picture shows is the choke plates, not the throttle plates. It looks like the mechanism has been assembled incorrectly and one of the choke plates is quite bent. Reassembling the mechanism correctly will not be a challenge, but getting that choke plate flat again may test your patience.
1982 KZ1000 LTD parts donor
1981 KZ1000 LTD awaiting resurrection
2000 ZRX1100 not ridden enough
www.kzrider.com/11-projects/620336-anoth...uild-thread?start=24
1981 KZ1000 LTD awaiting resurrection
2000 ZRX1100 not ridden enough
www.kzrider.com/11-projects/620336-anoth...uild-thread?start=24
The following user(s) said Thank You: Jimbo68
Please Log in or Create an account to join the conversation.
- Jimbo68
-
Topic Author
- Offline
- User
-
Registered
- Posts: 103
- Thanks: 7
Re: KZ440 LTD Carburettor Tear-down
26 Sep 2023 04:42 - 26 Sep 2023 04:43
Thanks TexasKZ. The photo refers to point #1. I couldn’t insert it under that paragraph.
do you know how I can correct the rotational shift in the rhs choke valve?
do you know how I can correct the rotational shift in the rhs choke valve?
1981 Kawasaki KZ440-A2
Last edit: 26 Sep 2023 04:43 by Jimbo68. Reason: Name
Please Log in or Create an account to join the conversation.
- Nessism
-
- Away
- Sustaining Member
-
Registered
- Posts: 8098
- Thanks: 3481
Re: KZ440 LTD Carburettor Tear-down
26 Sep 2023 05:56
The shafts are most likely fine. You need to remove the butterflies and straighten them. A soft hammer, pounding the butterflies on a flat surface should work.
And needless to say, the carbs should come all the way apart, unganging them, in order to do a proper clean job.
Regarding setting the throttle butterflies even with each other, that's called a mechanical sync. When the bike is up and running, a vacuum sync is then needed to get a running sync.
And needless to say, the carbs should come all the way apart, unganging them, in order to do a proper clean job.
Regarding setting the throttle butterflies even with each other, that's called a mechanical sync. When the bike is up and running, a vacuum sync is then needed to get a running sync.
Ed
Carb O-ring Kits : www.kzrider.com/forum/14-vendor-forum/62...rburetor-o-ring-kits
www.kzrider.com/forum/faq-wiki/618026-new-owner-things-to-know
1981 KZ750E2
www.kzrider.com/forum/11-projects/604901...z750e-project-thread
Carb O-ring Kits : www.kzrider.com/forum/14-vendor-forum/62...rburetor-o-ring-kits
www.kzrider.com/forum/faq-wiki/618026-new-owner-things-to-know
1981 KZ750E2
www.kzrider.com/forum/11-projects/604901...z750e-project-thread
The following user(s) said Thank You: Jimbo68
Please Log in or Create an account to join the conversation.
Moderators: Street Fighter LTD