
intake boots symbols and installation order
- shamal
-
 Topic Author
- Offline
- User
-

Registered
- Posts: 255
- Thanks: 4
intake boots symbols and installation order
09 Mar 2016 02:32
i bought 4 new OEM new ,intake boots for the 550. alot of money. :side:
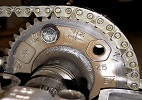
i see on the boots there is a symbol printed. (pic below)
two questions:
have i to fit the boots on the head in a specific sequence? or they are ''interchangeable''?
should i use some sealant?
")
i see on the boots there is a symbol printed. (pic below)
Attachment collettore.jpg not found
two questions:
have i to fit the boots on the head in a specific sequence? or they are ''interchangeable''?
should i use some sealant?
1983 kz 550 h
Attachments:
Please Log in or Create an account to join the conversation.
- martin_csr
-

- Offline
- User
-
Registered
- Posts: 8018
- Thanks: 1645
Re: intake boots symbols and installation order
09 Mar 2016 05:27
If the diagrams show that there are 4 of the same carb holders, then they will be identical. I don't know what 550 you have, but if they are off-set, then you may have to orient them properly.
The new rubber ought to seal just fine without anything. If the factory service manual specifies a sealant, then use whatever is recommended. otherwise, don't use anything, but clean the cylinder head thoroughly prior to installation --- don't gouge the surfaces.
The new rubber ought to seal just fine without anything. If the factory service manual specifies a sealant, then use whatever is recommended. otherwise, don't use anything, but clean the cylinder head thoroughly prior to installation --- don't gouge the surfaces.
The following user(s) said Thank You: shamal
Please Log in or Create an account to join the conversation.
- shamal
-
Topic Author
- Offline
- User
-
Registered
- Posts: 255
- Thanks: 4
Re: intake boots symbols and installation order
09 Mar 2016 05:41
thank you martin, is a kz550h , the boots are not offset, looking all the same.
my manual doesn't mention anything about using sealant or boots orientation..
my manual doesn't mention anything about using sealant or boots orientation..
1983 kz 550 h
Please Log in or Create an account to join the conversation.
- SWest
-

- Offline
- Sustaining Member
-

Registered
- 10 22 2014
- Posts: 23571
- Thanks: 2953
Re: intake boots symbols and installation order
09 Mar 2016 06:44
They are made to be used without sealant. The rubber compresses to form a tight seal around the the intake ports.
Steve
Steve
Z1b1000 1975 Z1b
kzrider.com/forum/11-projects/598262-kz-...-will-it-live#672882
kzrider.com/forum/2-engine/597654-poser?start=240#704229
kzrider.com/forum/11-projects/598262-kz-...-will-it-live#672882
kzrider.com/forum/2-engine/597654-poser?start=240#704229
The following user(s) said Thank You: shamal
Please Log in or Create an account to join the conversation.
- shamal
-
Topic Author
- Offline
- User
-
Registered
- Posts: 255
- Thanks: 4
Re: intake boots symbols and installation order
10 Mar 2016 03:16
in the manual i can't find the correct torque for the boots bolts.
any advice about boots collar? how thight?
i cleaned well the surface on the head
any advice about boots collar? how thight?
i cleaned well the surface on the head
1983 kz 550 h
Please Log in or Create an account to join the conversation.
- KZB2 650
-

- Offline
- User
-
Registered
- Posts: 1475
- Thanks: 265
Re: intake boots symbols and installation order
10 Mar 2016 07:34 - 10 Mar 2016 07:35
I was surprised no torgue listed in my factory manual either ...... I use allen heads on mine and I think I went around 60 "inch lbs" (checking by hand to be sure they were good and snug but not super tight) be sure to use blue loctite on the screws.
1978 KZ650 b-2
700cc Wiseco kit 10 to 1.
1980 KZ750 cam, ape springs, stock clutch/ Barnett springs.
Vance and Hines Header w/ comp baffle and Ape pods, Dyna S and green coils, copper wires.
29MM smooth bores W/ 17.5 pilots, 0-6s and 117.5 main
16/42 gearing X ring chain and alum rear JT sprocket.
700cc Wiseco kit 10 to 1.
1980 KZ750 cam, ape springs, stock clutch/ Barnett springs.
Vance and Hines Header w/ comp baffle and Ape pods, Dyna S and green coils, copper wires.
29MM smooth bores W/ 17.5 pilots, 0-6s and 117.5 main
16/42 gearing X ring chain and alum rear JT sprocket.
Last edit: 10 Mar 2016 07:35 by KZB2 650.
The following user(s) said Thank You: shamal
Please Log in or Create an account to join the conversation.
- SWest
-
- Offline
- Sustaining Member
-
Registered
- 10 22 2014
- Posts: 23571
- Thanks: 2953
Re: intake boots symbols and installation order
10 Mar 2016 07:44
I had to retighten them after a few days.
Steve
Steve
Z1b1000 1975 Z1b
kzrider.com/forum/11-projects/598262-kz-...-will-it-live#672882
kzrider.com/forum/2-engine/597654-poser?start=240#704229
kzrider.com/forum/11-projects/598262-kz-...-will-it-live#672882
kzrider.com/forum/2-engine/597654-poser?start=240#704229
Please Log in or Create an account to join the conversation.
- shamal
-
Topic Author
- Offline
- User
-
Registered
- Posts: 255
- Thanks: 4
Re: intake boots symbols and installation order
11 Mar 2016 02:52
the last thing i need to understand is, should i use some washer under the bolts? i
1983 kz 550 h
Please Log in or Create an account to join the conversation.
- wrenchmonkey
-
- Offline
- User
-
Registered
- Posts: 568
- Thanks: 75
Re: intake boots symbols and installation order
11 Mar 2016 06:02
I just went through this last night and wondered about the same thing - a washer... but it appears there's no room for one that would be even slightly larger in diameter than the screw head without cutting into the shoulder area. So other than providing a thrust surface I reckoned the manufacturer used the rubber of the mount to be the locking washing for the screw...
For torque, I had to go with my old, clicking torque-wrist method :laugh: since I couldn't find anything either. I mean ultimately, the limiting factor here would be the alloy head. So, I figured it shouldn't be more than 6-8 ft/lbs which you can easily generate with ur short 1/4" drive socket set.
Since I had all the mounts off I dropped all the P3 screws into a cup filled with PB Blaster and one by one cleaned them with a wire brush and then ran them in and out of their respective bores to remove rust etc in the threads. I noticed on my '82 550a that the lower threaded bores were not as deep as the upper's which you can almost bury the screw into. I only used my fingers holding the long-reach P3 bit to chase the threads with the oil so I would not strip the threads in the head should it run into trouble.
Another thing I found was the vacuum ports on these new mounts. The brass tube sticks out roughly 3/4" and it's closer to the head-side versus the carb-side, so this meant the #2 cylinder had to have that mount rotated to put the port downward or it was bound-up against the camshaft chain guide bulge in the case. I mean it would "fit" in the upward position but forget about ever getting to it or removing the rubber cap. So I chose to install all the mounts with their vacuum ports downward. Hope that was not a mistake...
Please Log in or Create an account to join the conversation.
- SWest
-
- Offline
- Sustaining Member
-
Registered
- 10 22 2014
- Posts: 23571
- Thanks: 2953
Re: intake boots symbols and installation order
11 Mar 2016 06:18
I used lock washers on the top ones only because the bolts are Allens and slightly longer. The bottoms are Allens too but not plated. Can't see them. I use a stubby wrench and have a "feel" for the right torque. I don't trust click wrenches on small screws.
Steve
Steve
Z1b1000 1975 Z1b
kzrider.com/forum/11-projects/598262-kz-...-will-it-live#672882
kzrider.com/forum/2-engine/597654-poser?start=240#704229
kzrider.com/forum/11-projects/598262-kz-...-will-it-live#672882
kzrider.com/forum/2-engine/597654-poser?start=240#704229
Please Log in or Create an account to join the conversation.
- martin_csr
-
- Offline
- User
-
Registered
- Posts: 8018
- Thanks: 1645
Re: intake boots symbols and installation order
11 Mar 2016 06:26 - 11 Mar 2016 08:29That's not a problem --- it doesn't matter how the vacuum ports are oriented. As a matter of fact in the 81 650 manual, it specifies two different ways, depending upon whether or not the bike is a US model. 2 up, 2 down on US models, all pointing downward on non-US models. the 2 up on the US models is because of the Kawasaki clean air system which was not used in other parts of the world.By wrenchmonkey. So I chose to install all the mounts with their vacuum ports downward. Hope that was not a mistake...
As for the torque, the "before servicing" section has a note about using common sense to dictate how much to tighten anything & the manual has a table with torque ranges depending upon the size of the fastener. An M6 bolt being tightened against rubber shouldn't require much force. 60-INCH/lbs or so & a non-permanent locking agent should be sufficient. I would use an INCH/lbs torque wrench or just tighten by hand without deforming the rubber. the cylinder head should be clean clean clean at the mating surfaces.
Last edit: 11 Mar 2016 08:29 by martin_csr.
Please Log in or Create an account to join the conversation.
- 650ed
-

- Offline
- User
-
Registered
- Posts: 15339
- Thanks: 2833
Re: intake boots symbols and installation order
11 Mar 2016 06:45shamal wrote: in the manual i can't find the correct torque for the boots bolts.
any advice about boots collar? how thight?
i cleaned well the surface on the head
You need to throw your manual (probably Clymer or Haynes) in the trash can and buy a Kawasaki Service Manual. If you do that you will be able to find the torque values for your bike. Below is an image from the manual. The dot in the "Remark" column indicates that a non-permanent locking agent should be applied to the screws. You do not use washers. Ed
Attachment 00003a-2-3-4-5.jpg not found
1977 KZ650-C1 Original Owner - Stock (with additional invisible FIAMM horn)
Attachments:
Please Log in or Create an account to join the conversation.
Moderators: Street Fighter LTD