
Starting issues! Need help diagnosing KZ650B1
- lakshan
-
 Topic Author
- Offline
- User
-

Registered
- Posts: 82
- Thanks: 7
Starting issues! Need help diagnosing KZ650B1
02 Nov 2019 09:39
Hey guys. So I was able to start my bike for the first time over the weekend. Took a few tries on the electric starter but it came to life eventually.
A few days later I'm trying to get it going and I am running into a few problems.
First thing was my battery was too weak to start it as I tried a bunch of times, so I charged it. Now I can hear the starter motor trying to turn it over but nothing happens. I held onto the starter for a bit and then heard a clunking sound. I stopped right away, then tried again a bit later. Eventually if I held it long enough I stop hearing the starter trying and I hear a sliding sound, what is this? Bad starter motor? Bad starter clutch?
When I used to try the kick starter, I would feel resistance and the engine turning over. But now there's no resistance at all, it just spins. I opened the ignition cover to see if the crank was moving at all while moving the kick starter and nothing happens! What happened here?
I can still try the electric start and it still tries to start it but now I stop holding the start button right when I hear the clunking sound.
I tried pulling the plugs and they look like this:
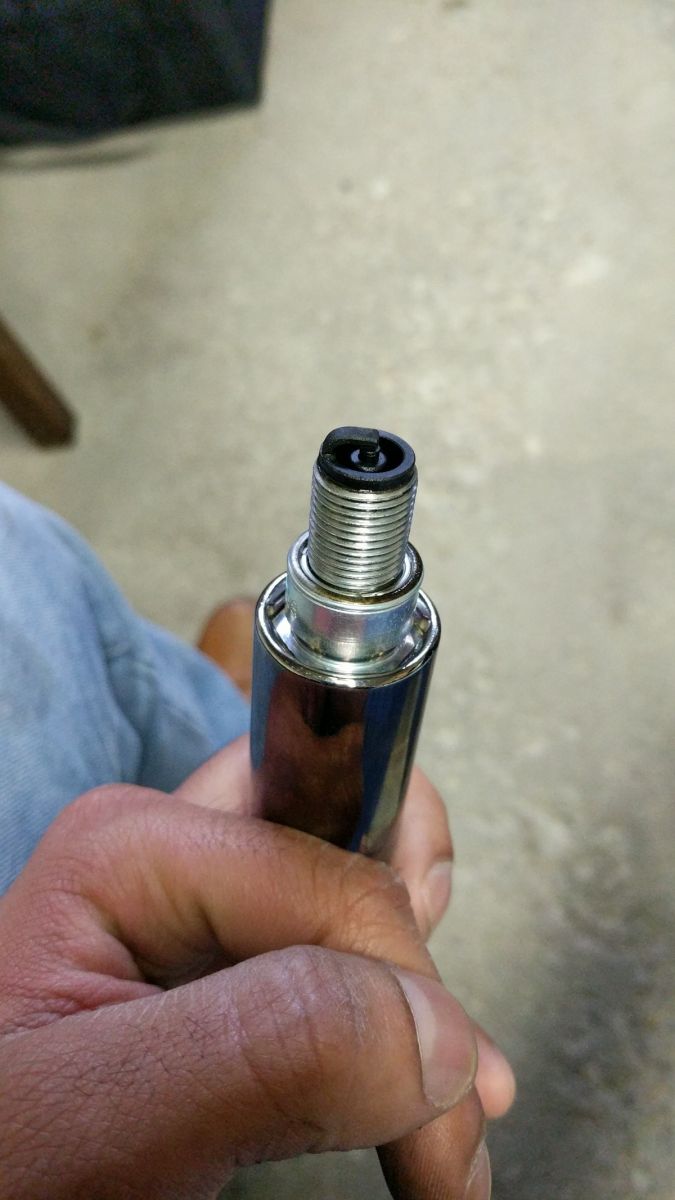
It's not caked on, I can clean off the black but I think this usually means I'm running too rich? But its only been running a few minutes total since 2 years ago so is this normal visually on the spark?
Any other ideas? I made sure my fuel line is clear and open, choke full, gas in tank, battery is charged. Any quick help and advice would be greatly appreciated.
Thanks!
A few days later I'm trying to get it going and I am running into a few problems.
First thing was my battery was too weak to start it as I tried a bunch of times, so I charged it. Now I can hear the starter motor trying to turn it over but nothing happens. I held onto the starter for a bit and then heard a clunking sound. I stopped right away, then tried again a bit later. Eventually if I held it long enough I stop hearing the starter trying and I hear a sliding sound, what is this? Bad starter motor? Bad starter clutch?
When I used to try the kick starter, I would feel resistance and the engine turning over. But now there's no resistance at all, it just spins. I opened the ignition cover to see if the crank was moving at all while moving the kick starter and nothing happens! What happened here?
I can still try the electric start and it still tries to start it but now I stop holding the start button right when I hear the clunking sound.
I tried pulling the plugs and they look like this:
It's not caked on, I can clean off the black but I think this usually means I'm running too rich? But its only been running a few minutes total since 2 years ago so is this normal visually on the spark?
Any other ideas? I made sure my fuel line is clear and open, choke full, gas in tank, battery is charged. Any quick help and advice would be greatly appreciated.
Thanks!
'77 KZ650B1 in progress...
Please Log in or Create an account to join the conversation.
- lakshan
-
Topic Author
- Offline
- User
-
Registered
- Posts: 82
- Thanks: 7
Re: Starting issues! Need help diagnosing KZ650B1
02 Nov 2019 10:17
Note, I adjusted the clutch so maybe that's why the kick is just spinning? Adjusted too far?
'77 KZ650B1 in progress...
Please Log in or Create an account to join the conversation.
- lakshan
-
Topic Author
- Offline
- User
-
Registered
- Posts: 82
- Thanks: 7
Re: Starting issues! Need help diagnosing KZ650B1
02 Nov 2019 12:08
I adjusted the clutch for the cable to be looser and the Kickstarter feel is back. I tried continuously kicking it, about 8-10 times and I started hearing exhaust sounds but it went away. Still stuck.
'77 KZ650B1 in progress...
Please Log in or Create an account to join the conversation.
- Scirocco
-

- Offline
- Premium Member
-

Registered
- Never change a running system
- Posts: 4397
- Thanks: 2260
Re: Starting issues! Need help diagnosing KZ650B1
02 Nov 2019 14:16
Your spark plug(s) are totally wet with fuel and your carbs are on the fat site. Don´t use the choke on bike start. Try the throttle full open (more air) on start up the engine. Check the carb float Level is in spec.
My 1975 Z 1 B 900 Project
www.kzrider.com/forum/11-projects/605133...ears-deep-sleep-mode
www.kzrider.com/forum/11-projects/605133...ears-deep-sleep-mode
Please Log in or Create an account to join the conversation.
- lakshan
-
Topic Author
- Offline
- User
-
Registered
- Posts: 82
- Thanks: 7
Re: Starting issues! Need help diagnosing KZ650B1
02 Nov 2019 15:17
My issue was my points. There were way under spec. I adjusted the right side point fairly easily, but the previous owner apparently didn't know what JIS screws were, so many of the screws I found on the bike so far have been damaged. The left point screws that adjust it are shot, I'm going to get an extract kit, replace all the bad ones and put in new screws.
After I adjusted the right one, it started up pretty quickly! I let it idle for a bit. I noticed uneven idle, but I guess that might be because carbs are out of sync? I'll get that sorted out next week. Anyway I thought I was okay with the start issue by just adjusting that one point but after some time it didn't want to start anymore.
Will try adjusting both again tomorrow after extracting the damaged screws and see where that gets me.
'77 KZ650B1 in progress...
Please Log in or Create an account to join the conversation.
- Scirocco
-
- Offline
- Premium Member
-
Registered
- Never change a running system
- Posts: 4397
- Thanks: 2260
Re: Starting issues! Need help diagnosing KZ650B1
02 Nov 2019 15:31 - 02 Nov 2019 15:43
Get some Phillips head screws for your points and ignition mounting plate, they will last longer.
In long term think about a electronic ignition.

In long term think about a electronic ignition.
My 1975 Z 1 B 900 Project
www.kzrider.com/forum/11-projects/605133...ears-deep-sleep-mode
www.kzrider.com/forum/11-projects/605133...ears-deep-sleep-mode
Last edit: 02 Nov 2019 15:43 by Scirocco.
The following user(s) said Thank You: lakshan
Please Log in or Create an account to join the conversation.
- SWest
-

- Offline
- Sustaining Member
-

Registered
- 10 22 2014
- Posts: 23724
- Thanks: 3013
Re: Starting issues! Need help diagnosing KZ650B1
02 Nov 2019 16:03
Get a new battery
Z1b1000 1975 Z1b
kzrider.com/forum/11-projects/598262-kz-...-will-it-live#672882
kzrider.com/forum/2-engine/597654-poser?start=240#704229
kzrider.com/forum/11-projects/598262-kz-...-will-it-live#672882
kzrider.com/forum/2-engine/597654-poser?start=240#704229
Please Log in or Create an account to join the conversation.
- lakshan
-
Topic Author
- Offline
- User
-
Registered
- Posts: 82
- Thanks: 7
Re: Starting issues! Need help diagnosing KZ650B1
02 Nov 2019 17:38SWest wrote: Get a new battery
It's a brand new battery :pinch: albeit sat around for a month not being used.
'77 KZ650B1 in progress...
Please Log in or Create an account to join the conversation.
- lakshan
-
Topic Author
- Offline
- User
-
Registered
- Posts: 82
- Thanks: 7
Re: Starting issues! Need help diagnosing KZ650B1
03 Nov 2019 16:02 - 03 Nov 2019 16:05
Hey guys, so I got new screws and replaced all 8 of them. I then re-gapped both points. Noticed they aren't 100% smooth and flat. There's definitely some pitting but it didn't seem terrible (to be fair my idea of 'terrible' might be misinformed). I sanded down the points with some 1000 grit paper and a light file but you could still see it wasn't smooth.
I pulled plug 3 and 4 separately and laid them on the engine to check for spark. I don't have an external battery charger yet so for now I used the kick starter to see if I was getting any spark. I didn't see spark in either plug, which might indicate something wrong with the points ?
My question is how badly does it have to be pitting for no spark and no start at all? I see that both points make contact, and both points gap at max 0.4 mm.
Trying to figure out my next step. Before I go get new points should I try a more aggressive file and really get it completely smooth before trying again? What would you guys try next?
'77 KZ650B1 in progress...
Last edit: 03 Nov 2019 16:05 by lakshan.
Please Log in or Create an account to join the conversation.
- lakshan
-
Topic Author
- Offline
- User
-
Registered
- Posts: 82
- Thanks: 7
Re: Starting issues! Need help diagnosing KZ650B1
03 Nov 2019 16:31
Considering just opting for that electronic ignition at this point. One less point of failure and maintenance.
'77 KZ650B1 in progress...
Please Log in or Create an account to join the conversation.
- 650ed
-

- Offline
- User
-
Registered
- Posts: 15334
- Thanks: 2831
Re: Starting issues! Need help diagnosing KZ650B1
03 Nov 2019 16:33
All the polishing in the world will not return the points to their original condition; keep in mind that not only the contact points wear but also the rubbing blocks that ride on the points cam wear - you need to replace the points and condenser.
Also, you mentioned that you gapped the points. That's fine, but it won't help the bike run any better if the points timing is not set properly. The info below may help.
The manual has several pages of instructions, pictures, etc. on how to set the timing using the static method plus timing light, plus dwell meter. Here's a fairly easy way that will get you in a pretty close ballpark without a timing light or dwell meter, but you will need a 0.35 mm feeler gauge and a multi-meter or other device to test continuity. To be very precise, the timing light and dwell meter will be needed.
Before attempting to replace or adjust the points the following is important to understand; timing is comprised of two separate components, and BOTH of these components MUST be set properly if the engine is to run well:
--- The GAP - this is the distance the points spread apart when fully open. The GAP is the element that determines the DWELL. In essence, the DWELL is the number of degrees of points cam rotation that the points are closed and this controls the amount of time the coils receive a charge before firing the spark plugs.
--- The TIMING of the initial opening of the points (the point at which the continuity across the points breaks). This controls the precise instant that the coils receive the signal to fire the spark plugs.
Remove the points cover on the right side of engine. Under it you will see 2 sets of points. The set on the left fires cylinders 1 & 4; the set on the right fires 2 & 3. When replacing points observe carefully how the little bits and pieces are arranged where the wires attach. Some of those pieces are actually insulators and if you leave any of them out or put them back in the wrong place the points will be grounded and won't work. Take a very close look at the contact surfaces of the points. If they are pitted you really should replace them. You can sand down pitted points, but they will quickly pit again. Replace one set of points at a time so you can look at the other set in case you get the little bits confused.
Use a 17 mm wrench to turn the nut NEAR the end of the crankshaft clockwise while looking in the hole above that nut. (Do NOT use a wrench on the smaller bolt on the very end of the crankshaft to turn the engine.) Inside that hole you will see a vertical pointer cast into the casing. As you turn the 17 mm nut you will see a 1 & 4 and F and T roll by and then you'll see a 2 & 3 and F and T roll by. Each F and T has a line next to it.
Here's the method I use for static timing. I turn OFF the ignition. I disconnect the green wire near one coil and the black wire near the other coil. (This is not in the book, but it makes checking continuity much easier for me.) After installing the new points or cleaning up the old ones, turn the 17 mm nut while watching the points. When points set 1&4 are at their widest gap adjust them (by loosening the 2 screws that hold the points to the backplate) so the gap equals 0.35 mm. Turn the 17 mm nut clockwise through a full revolution again and double check this gap. Then repeat this for points set 2&3. Now set your meter to test continuity and clip one wire to the leaf spring on points set 1&4 and clip the other wire to ground. Turn the 17 mm nut clockwise until the 1&4 "F" mark aligns with the pointer mentioned above. You want the continuity across point set 1&4 to just break when the F mark aligns with the pointer. The idea is that when the continuity just fails is when the points will fire their respective coil and cylinders. In order to adjust the point at which continuity fails you loosen the 3 screws that hold the backplate to the engine and slightly turn the backplate until the meter shows a break in continuity. Once you have the 1&4 set timed properly you can check the 2&3 set to make sure they break when the 2&3 F mark aligns with the pointer (they should or something is not right). Don't forget to plug in the green and black coil wires when you are done, and put a little grease on the rubbing block felt. Assuming you are using new points of the correct type this should enable you to get the timing very close. Trying this with old points may give poor results, especially if the points are pitted and/or the rubbing blocks are worn.
After you have set the gap (which in effect sets the dwell) and the timing using the method above you can use a dwell meter and timing light to fine tune dwell and timing. If you have followed the above procedure carefully, very little if any fine tuning will be needed.
Sorry this is so long. It's not as difficult as it sounds. Ed
1977 KZ650-C1 Original Owner - Stock (with additional invisible FIAMM horn)
The following user(s) said Thank You: lakshan
Please Log in or Create an account to join the conversation.
- lakshan
-
Topic Author
- Offline
- User
-
Registered
- Posts: 82
- Thanks: 7
Re: Starting issues! Need help diagnosing KZ650B1
03 Nov 2019 16:44 - 03 Nov 2019 16:45
Thanks Ed. I did find the above in some other threads as I was researching but now after getting my hands dirty and more used to the system the above post makes a lot more sense. There is some pitting and cleaning them as you say is temporary. I am going to compare the costs/drawbacks of replacing points vs just switching to electronic ignition. Ive read reviews where it apparently takes under an hr with the Dyna-S instructions. Even though the cost is higher it may be the way to go. I don't have local access to the points replacement hardware so if I have to order and wait anyway, I'm thinking of just ordering the electronic set.
'77 KZ650B1 in progress...
Last edit: 03 Nov 2019 16:45 by lakshan.
Please Log in or Create an account to join the conversation.
Moderators: Street Fighter LTD