
KZ650 cafe-racer
- gazzz
-
 Topic Author
- Offline
- Sustaining Member
-

Registered
- Posts: 563
- Thanks: 319
Re: KZ650 cafe-racer
11 Mar 2020 12:59
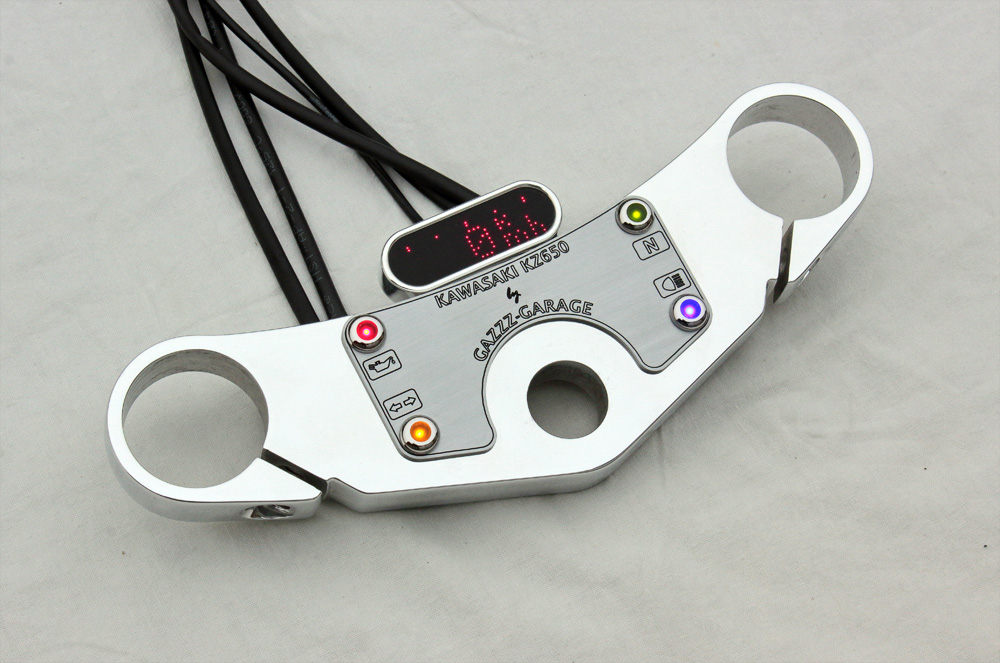
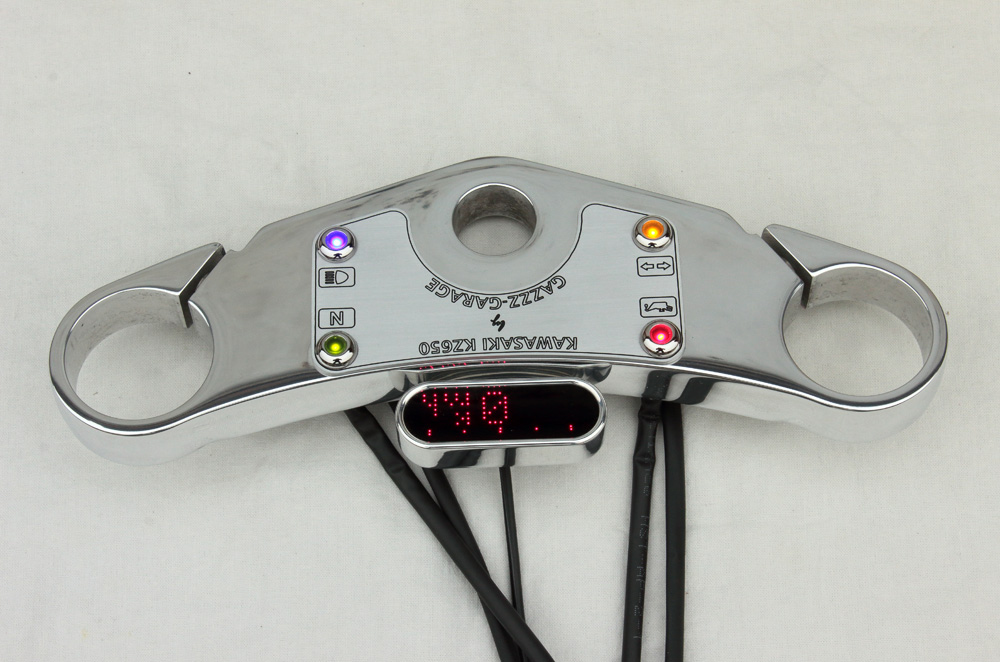
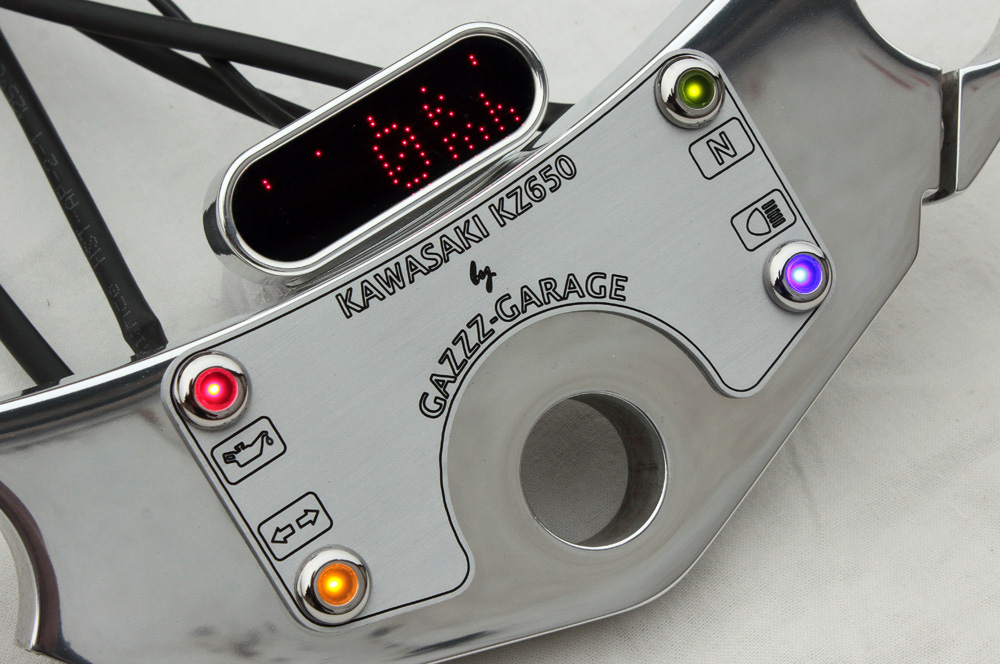
And sure, I couldn’t resist desire to see how all indicators and speedometer look when power is on, therefore some part of these photos are of dashboard with all lights put alight. No photo could convey how it looks in real life, but I did my best. So here we go, just imagine that colours of central points of indicator are more even to their edges (especially for blue light, it’s just blue, without high-pitched magenta tone).

Kawasaki KZ650 cafe-racer: in progress
Kawasaki Zephyr 750 (810ccm, 4in4, spoked wheels)
Honda CB815 "Eight Fifteen" cafe-racer
Yamaha XJ "Eight Ball" cafe-racer
www.gazzz-garage.com
Kawasaki Zephyr 750 (810ccm, 4in4, spoked wheels)
Honda CB815 "Eight Fifteen" cafe-racer
Yamaha XJ "Eight Ball" cafe-racer
www.gazzz-garage.com
Please Log in or Create an account to join the conversation.
- Skidmark
-
- Offline
- User
-

Registered
- Posts: 1087
- Thanks: 312
Re: KZ650 cafe-racer
11 Mar 2020 15:41
That came out really cool!
Retired gearhead
'81 KZ-750 E2
'87 Suzuki Savage 650 Street Tracker (lost in the shop fire)
'81 KZ-750 E2
'87 Suzuki Savage 650 Street Tracker (lost in the shop fire)
The following user(s) said Thank You: gazzz
Please Log in or Create an account to join the conversation.
- TexasKZ
-

- Offline
- Platinum Member
-
Registered
- Posts: 8177
- Thanks: 2668
Re: KZ650 cafe-racer
11 Mar 2020 17:37
Sexy
1982 KZ1000 LTD parts donor
1981 KZ1000 LTD awaiting resurrection
2000 ZRX1100 not ridden enough
www.kzrider.com/11-projects/620336-anoth...uild-thread?start=24
1981 KZ1000 LTD awaiting resurrection
2000 ZRX1100 not ridden enough
www.kzrider.com/11-projects/620336-anoth...uild-thread?start=24
The following user(s) said Thank You: gazzz
Please Log in or Create an account to join the conversation.
- calum
-

- Offline
- User
-
Registered
- Posts: 1144
- Thanks: 415
Re: KZ650 cafe-racer
11 Mar 2020 22:50 - 11 Mar 2020 22:51
That's some very nice work! Looking forward to seeing the finished product.
What do you use for polishing? How fine do you go with sanding and how many stages do you do with polishing wheels/paste?
What do you use for polishing? How fine do you go with sanding and how many stages do you do with polishing wheels/paste?
KZ1000 Restomod (
www.kzrider.com/forum/11-projects/614517-1977-kz1000-restomod
)
1977 KZ1000A1 ( www.kzrider.com/forum/11-projects/616901...-spare-parts-project )
1980 KZ750H ( kzrider.com/forum/11-projects/612054-kz750h-restoration )
2000 BMW F650GS
1977 KZ1000A1 ( www.kzrider.com/forum/11-projects/616901...-spare-parts-project )
1980 KZ750H ( kzrider.com/forum/11-projects/612054-kz750h-restoration )
2000 BMW F650GS
Last edit: 11 Mar 2020 22:51 by calum.
The following user(s) said Thank You: gazzz
Please Log in or Create an account to join the conversation.
- gazzz
-
Topic Author
- Offline
- Sustaining Member
-
Registered
- Posts: 563
- Thanks: 319
Re: KZ650 cafe-racer
12 Mar 2020 13:23
Thank you!
Kawasaki KZ650 cafe-racer: in progress
Kawasaki Zephyr 750 (810ccm, 4in4, spoked wheels)
Honda CB815 "Eight Fifteen" cafe-racer
Yamaha XJ "Eight Ball" cafe-racer
www.gazzz-garage.com
Kawasaki Zephyr 750 (810ccm, 4in4, spoked wheels)
Honda CB815 "Eight Fifteen" cafe-racer
Yamaha XJ "Eight Ball" cafe-racer
www.gazzz-garage.com
Please Log in or Create an account to join the conversation.
- gazzz
-
Topic Author
- Offline
- Sustaining Member
-
Registered
- Posts: 563
- Thanks: 319
Re: KZ650 cafe-racer
12 Mar 2020 15:23That's some very nice work! Looking forward to seeing the finished product.
What do you use for polishing? How fine do you go with sanding and how many stages do you do with polishing wheels/paste?
Usually I do it in this way: firstly I remove cast defects, seams and so on where it's possible. This work I do with help of sandpaper wrapped around rubber blocks, delta sanders (have two of them) and Dremel. Then I sandpaper dry with sandpaper up to 800 grit with delta sanders and Dremel. Then I use 3M Trizact or its analogues of different manufacturers to remove traces of 800 grit sanpaper. These products are to be used wet. They are of different grit too, I use grits from 800 to 3000. Then it's time for first polishing. I use various headpieces for Dremel for hard to reach places. For other cases I mostly use buffing cloth wheels installed on bench grinder. Once surface polished all defects (traces of sandpaper and so on) became visible. I remove those of them that could be removed and do second polishing. Some aluminum parts need to be polished long and in all directions to became perfect, while for other parts long polishing makes no good, as it exhibits tiny defects (like pores). Of polishing compounds I use two: mostly liquid Doctor Wax Metal Polish and solid past (supposed to be Diamond polishing compound , dunno of what concentration, but it works just good ).
Kawasaki KZ650 cafe-racer: in progress
Kawasaki Zephyr 750 (810ccm, 4in4, spoked wheels)
Honda CB815 "Eight Fifteen" cafe-racer
Yamaha XJ "Eight Ball" cafe-racer
www.gazzz-garage.com
Kawasaki Zephyr 750 (810ccm, 4in4, spoked wheels)
Honda CB815 "Eight Fifteen" cafe-racer
Yamaha XJ "Eight Ball" cafe-racer
www.gazzz-garage.com
The following user(s) said Thank You: calum
Please Log in or Create an account to join the conversation.
- gazzz
-
Topic Author
- Offline
- Sustaining Member
-
Registered
- Posts: 563
- Thanks: 319
Re: KZ650 cafe-racer
21 Mar 2020 10:48
Since I’ve bought NOS (New Old Stock) Anderson-Kittelson mufflers for Kawasaki KZ650 cafe-racer I’ve been wondering about how they might sound. This winter my Kawasaki Zephyr 750 spent in workshop, and couple of days ago I decided to warm it up and make a little ride. Once I finished with this task I decided to check what works should be done on motorcycle. Thus I noticed that its 4ini4 exhaust needs good cleaning. To achieve best I decided to remove exhaust and that was a moment when something clicked in my mind: downpipes I chose for KZ650 is in fact stainless steel exhaust manifold made by Black Widow Exhausts for Zephyr 750, and I still has some original Zephyr 750 manifold holders , so there is nothing that could hold me from installing that exhaust on my Zephyr.
So soon I’ve done exactly this: installed 4in2 downpipes on Zephyr and after I found how to fix mufflers, everything was ready to start. Jetting in Zephyr 750 I set to fit quite free flow 4in4 exhaust, so there were no issues of lean fuel mix. It rather could be reach. So I fired engine and warmed it. Then I throttled and Wow! It was THE SOUND!
I had my camera at hand (pity I haven’t external mike for it) so we decided to shoot some video. In fact we made two short clips, one with Oksana throttling Zephyr more gently and another with me, opening throttle less softly. We decided it would be funny to post both clips.
Kawasaki KZ650 cafe-racer: in progress
Kawasaki Zephyr 750 (810ccm, 4in4, spoked wheels)
Honda CB815 "Eight Fifteen" cafe-racer
Yamaha XJ "Eight Ball" cafe-racer
www.gazzz-garage.com
Kawasaki Zephyr 750 (810ccm, 4in4, spoked wheels)
Honda CB815 "Eight Fifteen" cafe-racer
Yamaha XJ "Eight Ball" cafe-racer
www.gazzz-garage.com
Please Log in or Create an account to join the conversation.
- calum
-
- Offline
- User
-
Registered
- Posts: 1144
- Thanks: 415
Re: KZ650 cafe-racer
21 Mar 2020 11:43
Thanks for the reply about polishing, for some reason I didn't get a notification and I completely missed it! Will try your process on the engine covers next winter - I'll survive one season without a mirror finish ")
Exhaust sounds nice!
Exhaust sounds nice!
KZ1000 Restomod (
www.kzrider.com/forum/11-projects/614517-1977-kz1000-restomod
)
1977 KZ1000A1 ( www.kzrider.com/forum/11-projects/616901...-spare-parts-project )
1980 KZ750H ( kzrider.com/forum/11-projects/612054-kz750h-restoration )
2000 BMW F650GS
1977 KZ1000A1 ( www.kzrider.com/forum/11-projects/616901...-spare-parts-project )
1980 KZ750H ( kzrider.com/forum/11-projects/612054-kz750h-restoration )
2000 BMW F650GS
Please Log in or Create an account to join the conversation.
- gazzz
-
Topic Author
- Offline
- Sustaining Member
-
Registered
- Posts: 563
- Thanks: 319
Re: KZ650 cafe-racer
14 Apr 2020 10:56
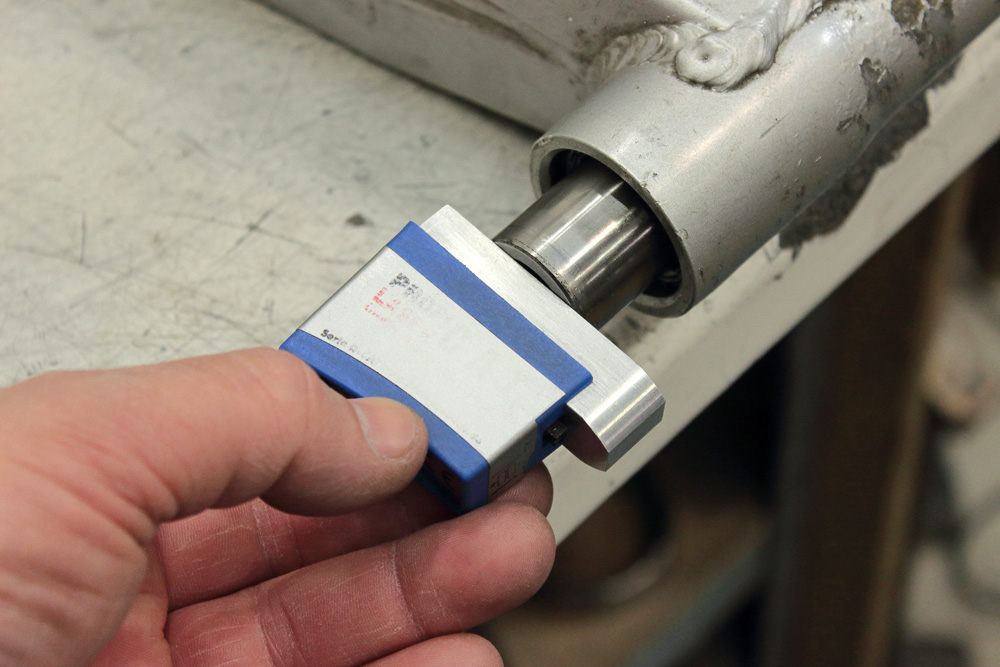
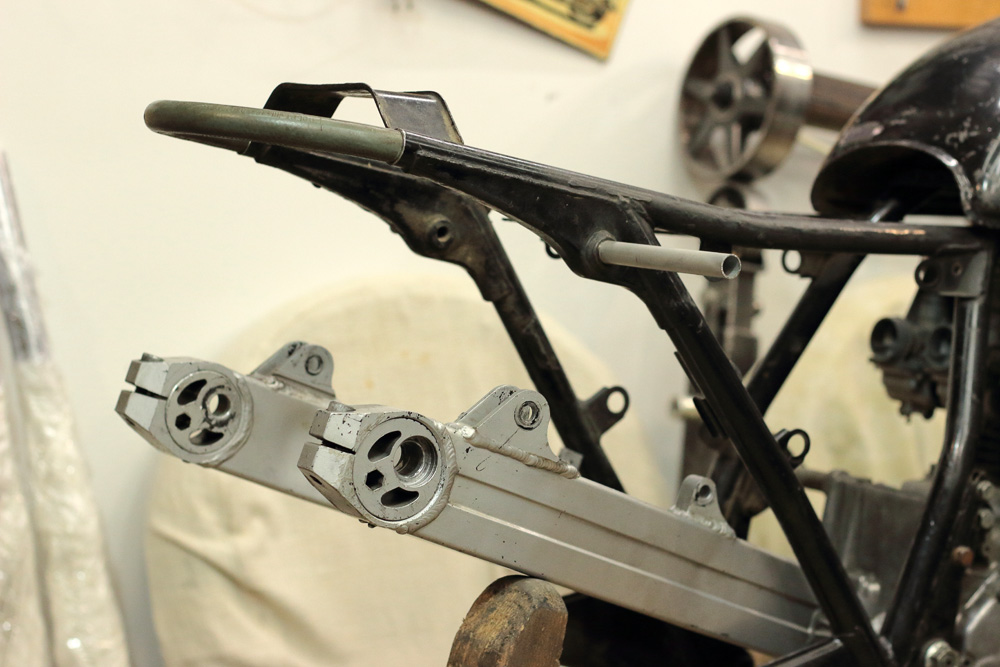
This post is about work on KZ650 chassis: modifying some parts, and calculating, and drawing all adapters I have to order to be made: for Zephyr 550 swingarm, for shocks, and so on. This work needs some concentration, and it’s result doesn’t looks impressive. However, it has some interesting moments. For example, I decided to check, if Zephyr 550 swingarm has symmetrically positioned shock mounts. One may say: what might be easier, just put straight rod to shock mount and check if distance between rod and sleeve housing is similar on both sides. But nope, it wouldn’t work. The only parts that really must be straight and leveled in Zephyr 550 swingarm are: sleeve, its housing, and chain tension eccentrics. Swingarm mounts might be completely in place, but slightly angled to longitude axle. And even one degree of deviation on length of swingarm would end up as 9.5mm of difference. So the best idea is to make measuring depending on things that are straight for sure. So as base for my measuring I used swingarm sleeve being pulled on some fixed distance from bearings.
And sure, I used laser tool instead of rod. I put it to sleeve and pull sleeve to the level where laser beam is aimed to center of left inner shock mount.
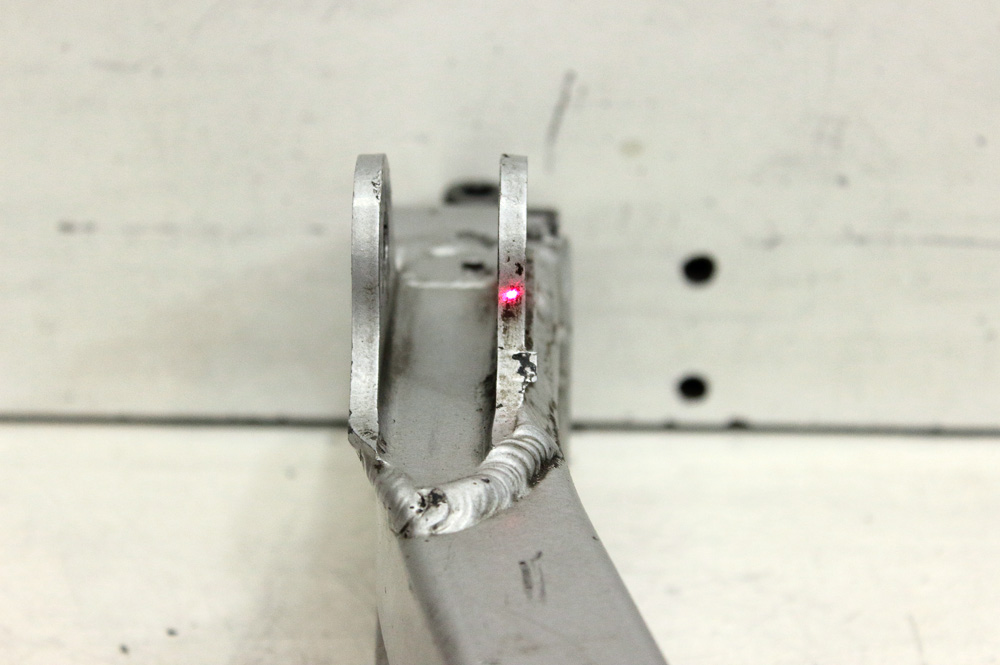
Then I measured distance from end of sleeve to sleeve housing and pulled sleeve from other side of housing on same distance. Beam of laser tool, that I put on sleeve, was aimed completely in same point of right shock mount.

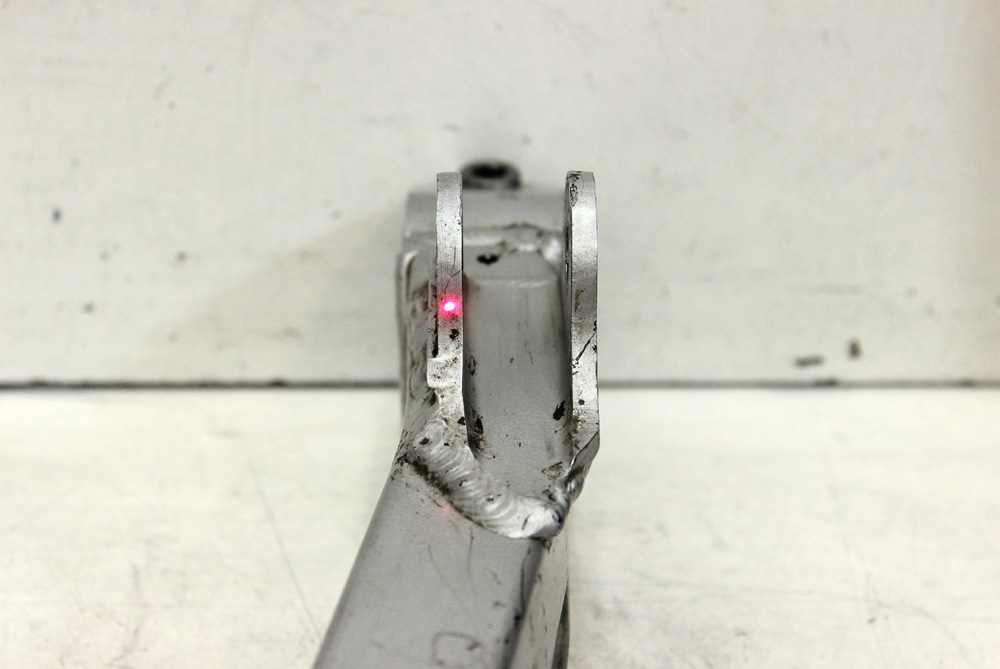
This means that shock mount of Zephyr 550 swingarm positioned symmetrically to sleeve and its housing. To make sure that there was no mistake I put some leveled part (like wheel spacer) to sleeve housing and repeated measuring. Result was the same, thus symmetrical position of shock mounts was confirmed.
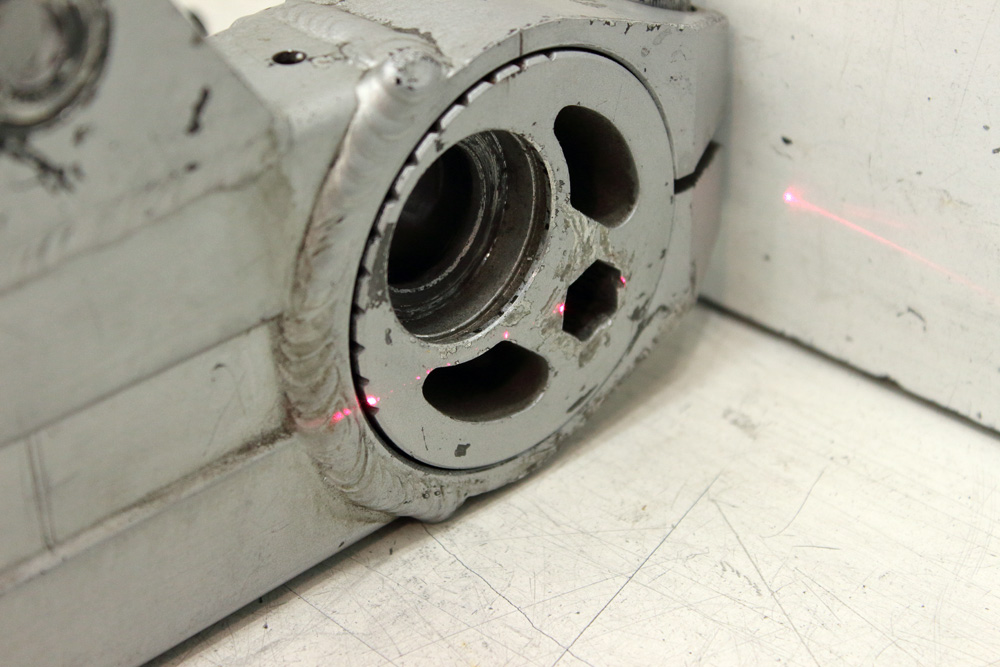
Little illustration of fact that eccentric’ end and sleeve/housing’ ends are in parallel planes:
And sure, I used laser tool instead of rod. I put it to sleeve and pull sleeve to the level where laser beam is aimed to center of left inner shock mount.
Then I measured distance from end of sleeve to sleeve housing and pulled sleeve from other side of housing on same distance. Beam of laser tool, that I put on sleeve, was aimed completely in same point of right shock mount.
This means that shock mount of Zephyr 550 swingarm positioned symmetrically to sleeve and its housing. To make sure that there was no mistake I put some leveled part (like wheel spacer) to sleeve housing and repeated measuring. Result was the same, thus symmetrical position of shock mounts was confirmed.
Little illustration of fact that eccentric’ end and sleeve/housing’ ends are in parallel planes:
Kawasaki KZ650 cafe-racer: in progress
Kawasaki Zephyr 750 (810ccm, 4in4, spoked wheels)
Honda CB815 "Eight Fifteen" cafe-racer
Yamaha XJ "Eight Ball" cafe-racer
www.gazzz-garage.com
Kawasaki Zephyr 750 (810ccm, 4in4, spoked wheels)
Honda CB815 "Eight Fifteen" cafe-racer
Yamaha XJ "Eight Ball" cafe-racer
www.gazzz-garage.com
Please Log in or Create an account to join the conversation.
- gazzz
-
Topic Author
- Offline
- Sustaining Member
-
Registered
- Posts: 563
- Thanks: 319
Re: KZ650 cafe-racer
14 Apr 2020 10:57
My next task was to check how shocks’ mounts on swingarm match shocks’ mounts on frame. Here I had no choice, but use shock mounts on swingarm as base for laser tool. To decrease influence of fact that mounts might be not strictly perpendicular to swingarm’ sleeve I decreased distance between upper and lower mounts:
Measuring itself looked like this:
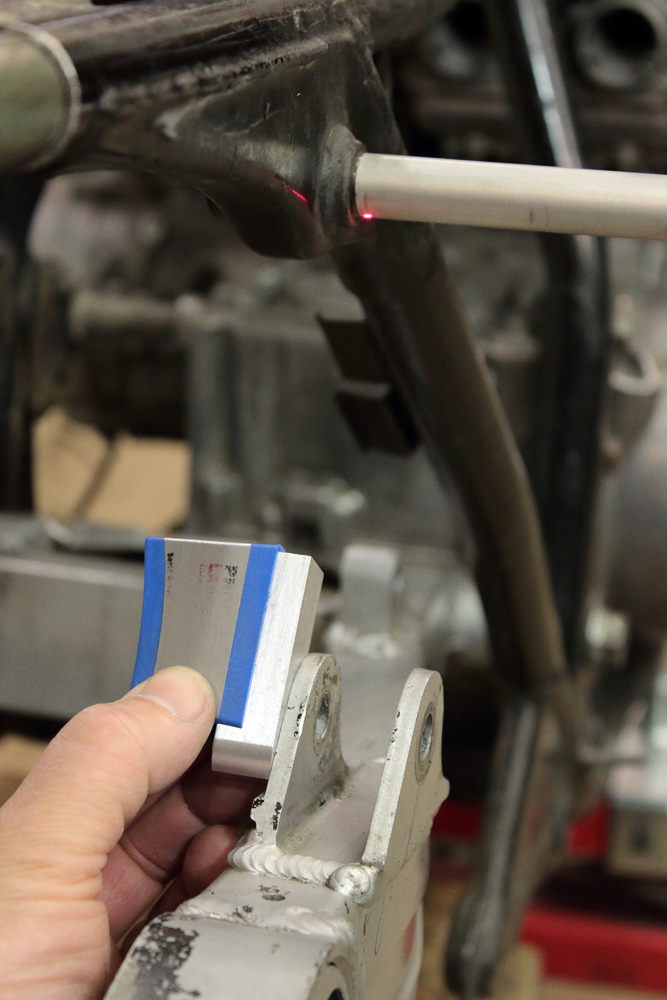
It shows that the difference between right and left pairs of shock’ mounts is around 1.5mm. This means less than 1mm of deviance from potential center of motorcycle. Really it’s nothing for frame made more than forty years ago. This even couldn’t be called an issue, as solution is built into shocks themselves: the rubbers that are placed in their lower and upper heads diminish effect of non-parallel shocks or some difference in width between upper and lower shock heads. Moreover, these rubbers could be moved to either side of shock’ head for a couple of millimeters, so position of both shocks might be adjusted to perfect

Measuring itself looked like this:
It shows that the difference between right and left pairs of shock’ mounts is around 1.5mm. This means less than 1mm of deviance from potential center of motorcycle. Really it’s nothing for frame made more than forty years ago. This even couldn’t be called an issue, as solution is built into shocks themselves: the rubbers that are placed in their lower and upper heads diminish effect of non-parallel shocks or some difference in width between upper and lower shock heads. Moreover, these rubbers could be moved to either side of shock’ head for a couple of millimeters, so position of both shocks might be adjusted to perfect
Kawasaki KZ650 cafe-racer: in progress
Kawasaki Zephyr 750 (810ccm, 4in4, spoked wheels)
Honda CB815 "Eight Fifteen" cafe-racer
Yamaha XJ "Eight Ball" cafe-racer
www.gazzz-garage.com
Kawasaki Zephyr 750 (810ccm, 4in4, spoked wheels)
Honda CB815 "Eight Fifteen" cafe-racer
Yamaha XJ "Eight Ball" cafe-racer
www.gazzz-garage.com
The following user(s) said Thank You: bluej58
Please Log in or Create an account to join the conversation.
- gazzz
-
Topic Author
- Offline
- Sustaining Member
-
Registered
- Posts: 563
- Thanks: 319
Re: KZ650 cafe-racer
14 Apr 2020 11:01
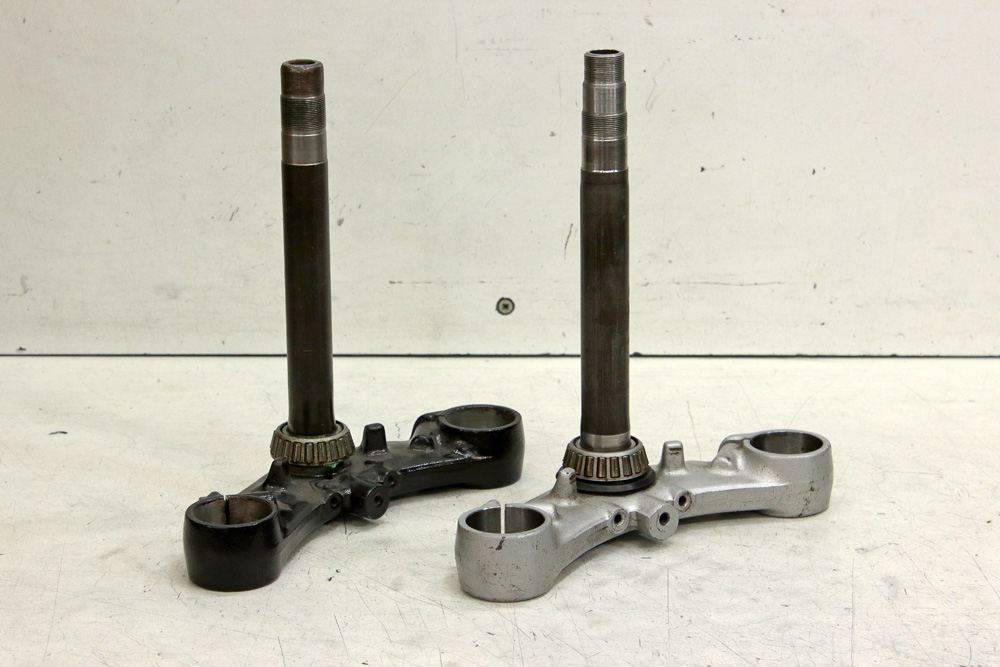
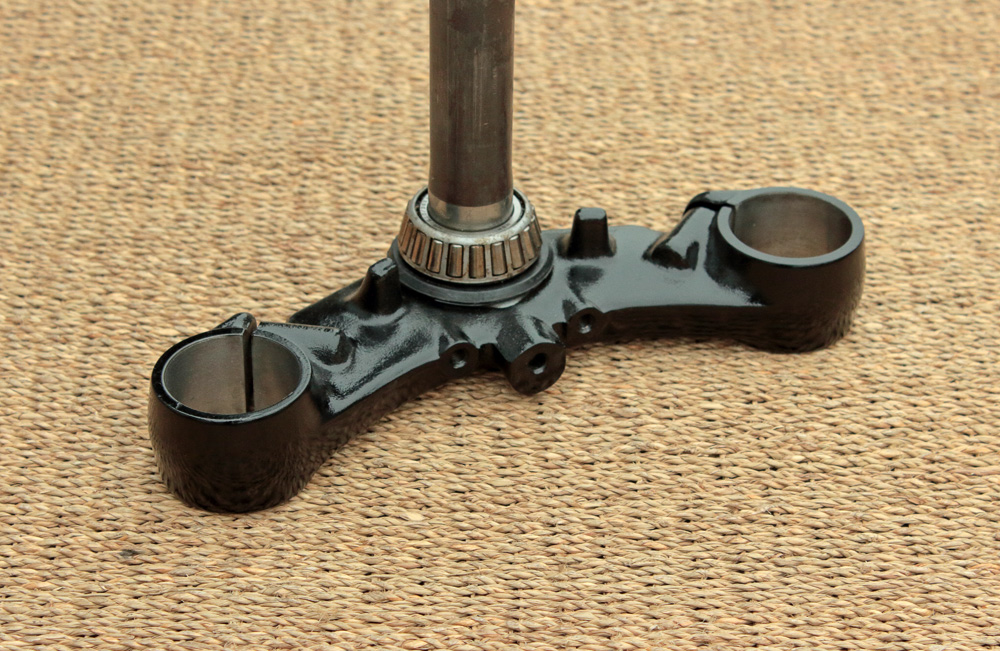
Next part of work on chassis adaptation. I used 41mm fully adjustable front fork from Kawasaki ZX6R, however I didn’t install it in ZX6R triples. In my opinion ZX6R triples have too short forks offset, thus I preferred to make a mix of Kawasaki Zephyr 750 top yoke and Kawasaki ZR7 bottom yoke. ZR7 and Zephyr 750 triples are compatible, even as they have different design, and moreover, distance between fork tubes are similar not only for ZR7 and Zephyr 750 but also for ZX6R. This little fact simplifies matter of front wheel axle.
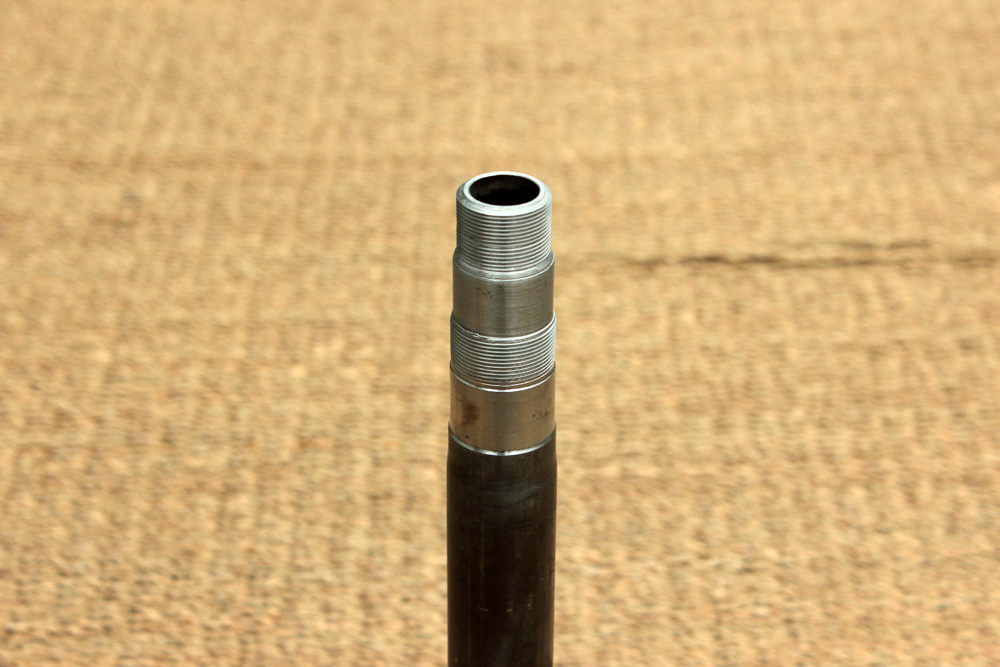
Here are bottom yokes, left is Zephyr 750 and right is ZR7. However, take into account that I’ve already shortened stem of ZR7 yoke on this photo by 6mm. As you may see, ZR7 has steering stem of bigger diameter, and their upper ends have different design, as top yoke is fixed by bolt on Zephyr 750 and by nut on ZR7.
And here are three variants of steering stem nuts:
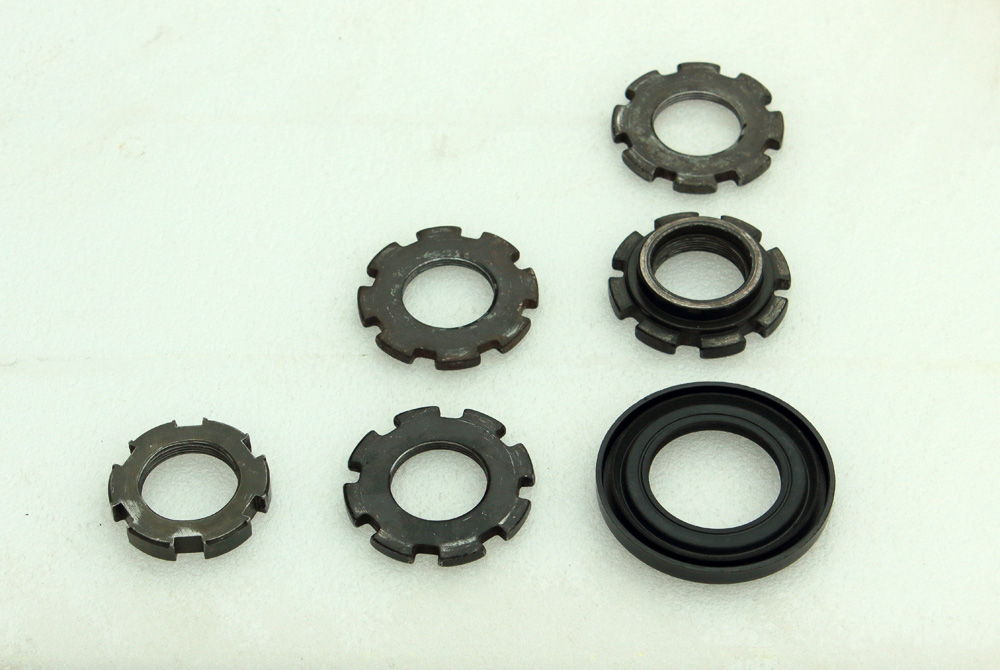

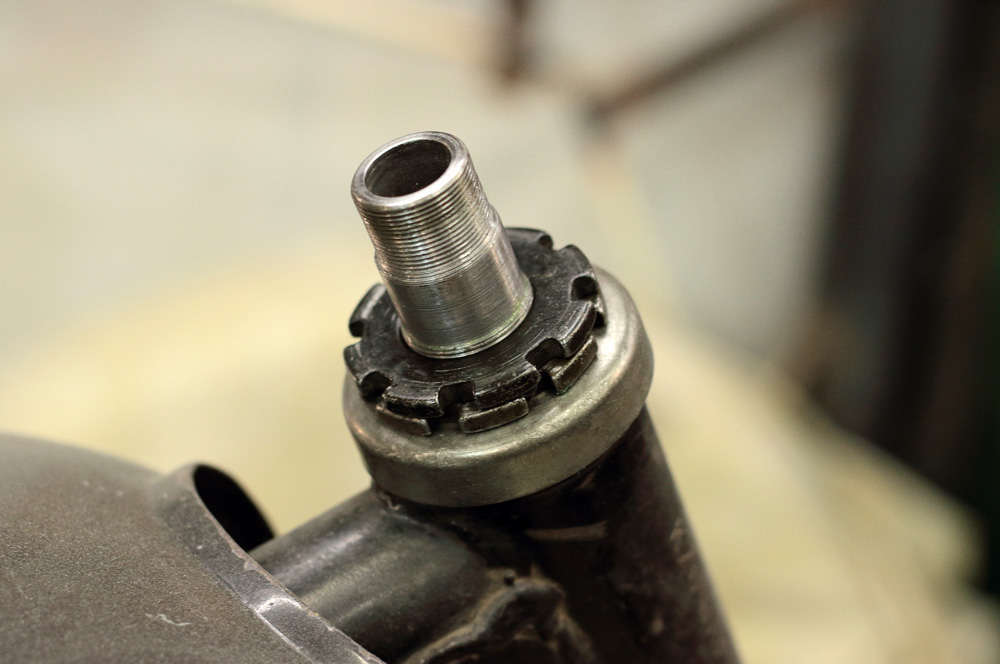
Right setup is original setup common for Zephyr 750, ZR7 and many other Kawasaki motorcycles. Central setup is in fact combination of two upper (locking) nuts from right setup. Left nut is compatible nut from some Honda. As you may see, right setup is a tallest among three, and as a matter of fact, it wouldn’t work for KZ650, as KZ650 upper steering bearing slightly protrudes above the steering head:
Here are bottom yokes, left is Zephyr 750 and right is ZR7. However, take into account that I’ve already shortened stem of ZR7 yoke on this photo by 6mm. As you may see, ZR7 has steering stem of bigger diameter, and their upper ends have different design, as top yoke is fixed by bolt on Zephyr 750 and by nut on ZR7.
And here are three variants of steering stem nuts:
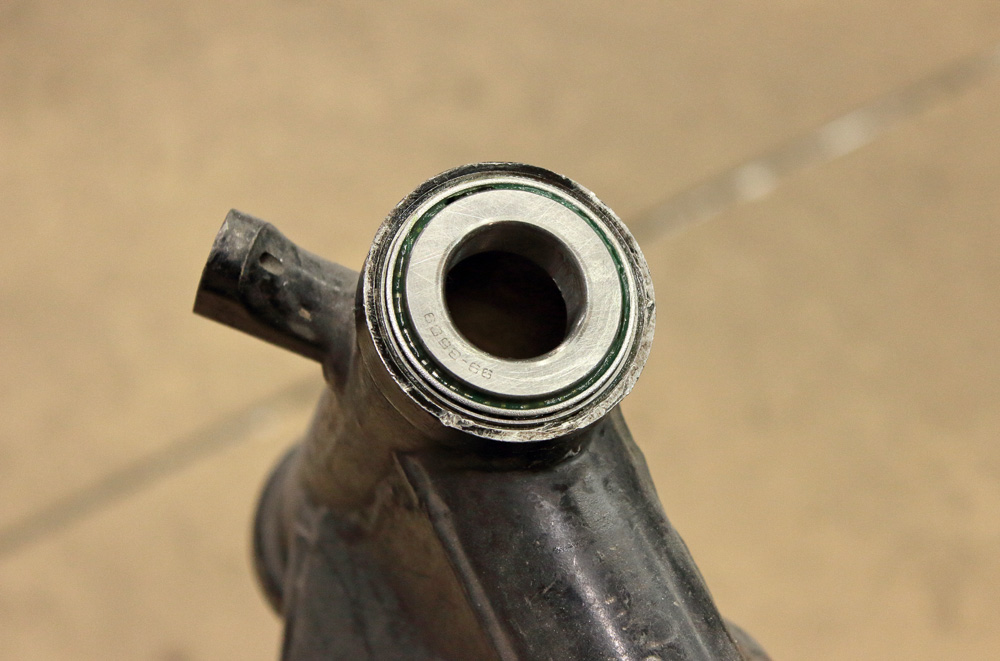
Right setup is original setup common for Zephyr 750, ZR7 and many other Kawasaki motorcycles. Central setup is in fact combination of two upper (locking) nuts from right setup. Left nut is compatible nut from some Honda. As you may see, right setup is a tallest among three, and as a matter of fact, it wouldn’t work for KZ650, as KZ650 upper steering bearing slightly protrudes above the steering head:
Kawasaki KZ650 cafe-racer: in progress
Kawasaki Zephyr 750 (810ccm, 4in4, spoked wheels)
Honda CB815 "Eight Fifteen" cafe-racer
Yamaha XJ "Eight Ball" cafe-racer
www.gazzz-garage.com
Kawasaki Zephyr 750 (810ccm, 4in4, spoked wheels)
Honda CB815 "Eight Fifteen" cafe-racer
Yamaha XJ "Eight Ball" cafe-racer
www.gazzz-garage.com
Please Log in or Create an account to join the conversation.
- gazzz
-
Topic Author
- Offline
- Sustaining Member
-
Registered
- Posts: 563
- Thanks: 319
Re: KZ650 cafe-racer
14 Apr 2020 11:02
Thus I figured out that central setup which is much lower (6mm of difference) than original and might work slightly more secure than classical one-steering-nut setup. However, I also might use single nut which is for another 1.5mm lower than my setup.
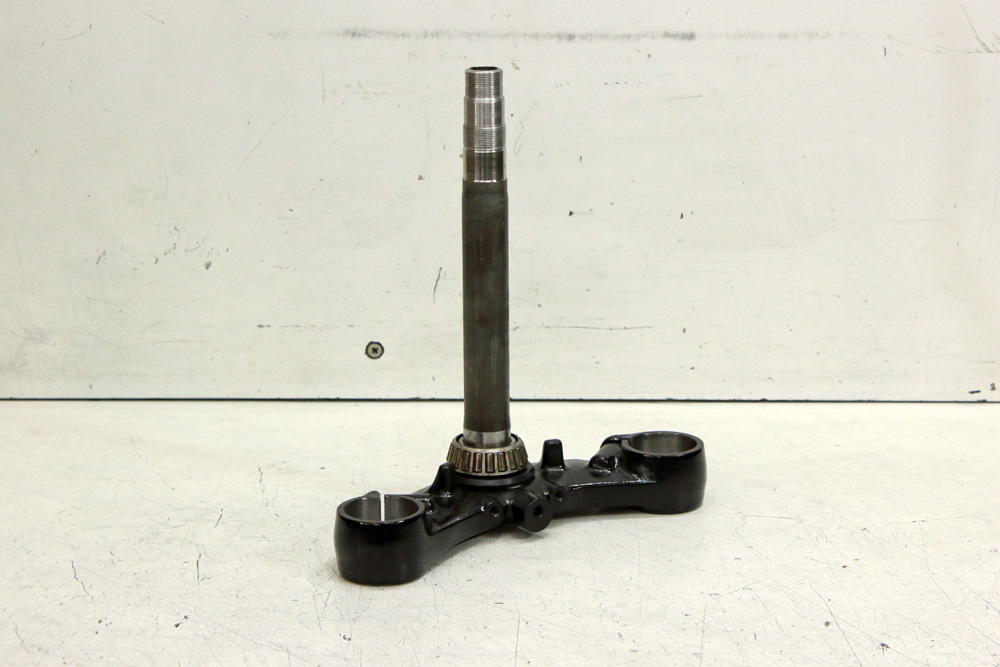
To make steering stem compatible with two left set-ups I ordered to shorten stem for 8 mm on lathe (it might be easily done with ZR7 without stem removing).
ZR7 bottom yoke looked less accurate than Zephyr 750 unit, so I sandpapered it a bit. I also temporarily painted it into black using rattle can. I plan it later to be sand- or glass-blasted and painted in black properly, of course.
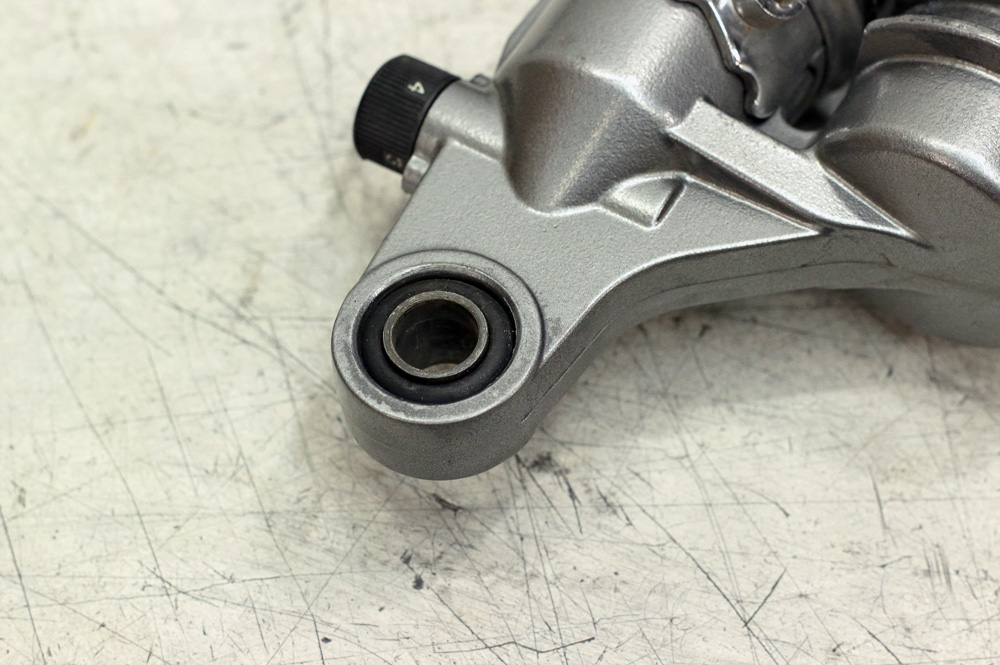
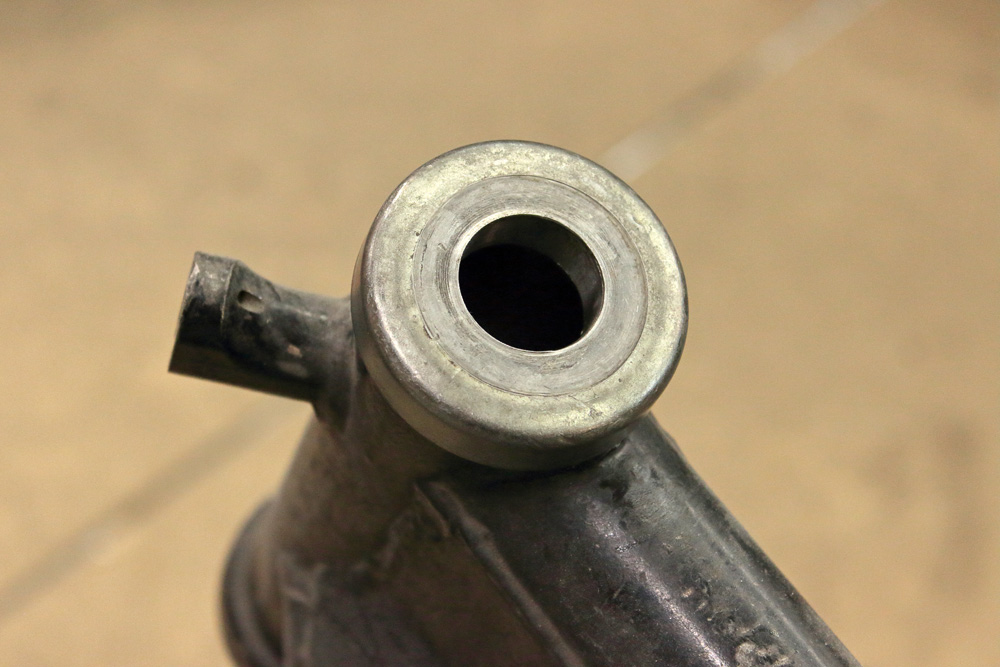
With that setup of steering nuts of mine I had to solve an issue of steering head dust protection.
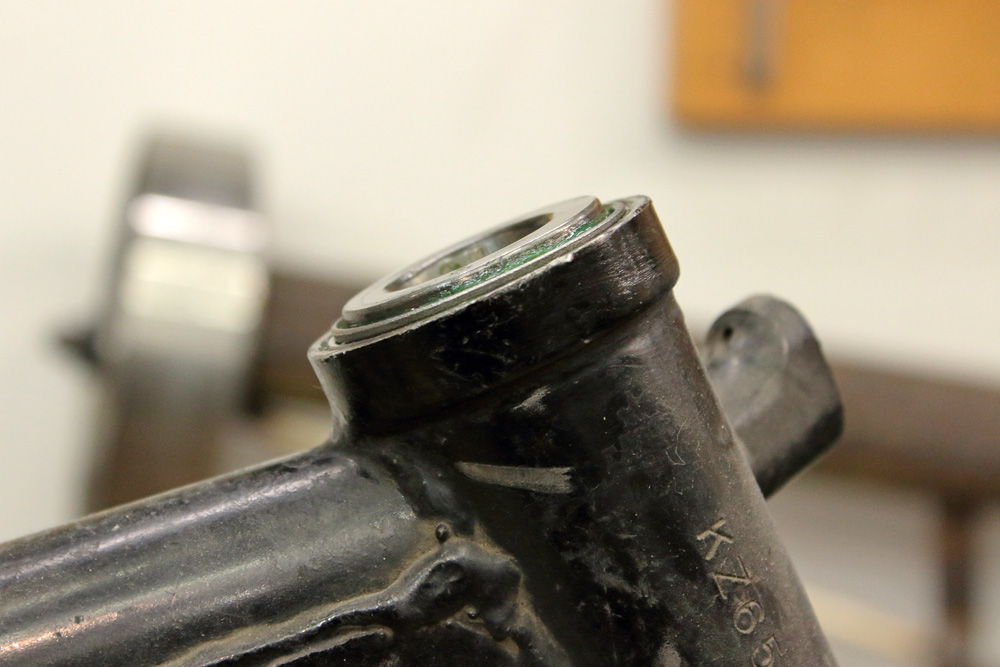
For this purpose I picked steering head cup from Yamaha XJ550 which perfectly fit Kawasaki KZ650 steering head. It sits there like it was made for it:
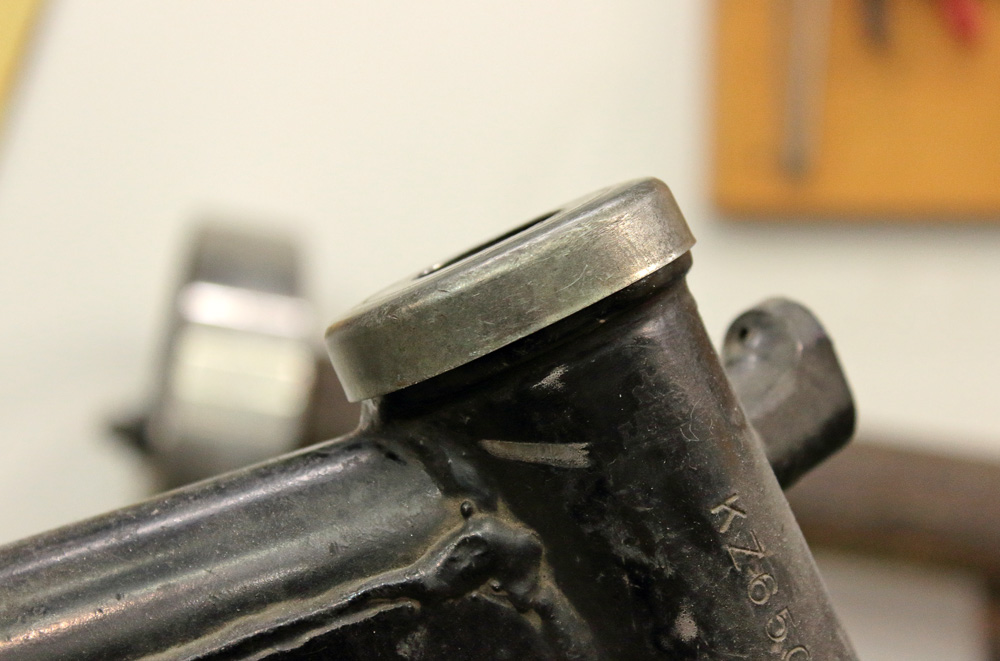
Later I’ll replace it with new part; however for the moment used part would do perfectly.
And here we came to the end of this part of the story: steering unit is ready for top yoke and fork installation.
To make steering stem compatible with two left set-ups I ordered to shorten stem for 8 mm on lathe (it might be easily done with ZR7 without stem removing).
ZR7 bottom yoke looked less accurate than Zephyr 750 unit, so I sandpapered it a bit. I also temporarily painted it into black using rattle can. I plan it later to be sand- or glass-blasted and painted in black properly, of course.
With that setup of steering nuts of mine I had to solve an issue of steering head dust protection.
For this purpose I picked steering head cup from Yamaha XJ550 which perfectly fit Kawasaki KZ650 steering head. It sits there like it was made for it:
Later I’ll replace it with new part; however for the moment used part would do perfectly.
And here we came to the end of this part of the story: steering unit is ready for top yoke and fork installation.
Kawasaki KZ650 cafe-racer: in progress
Kawasaki Zephyr 750 (810ccm, 4in4, spoked wheels)
Honda CB815 "Eight Fifteen" cafe-racer
Yamaha XJ "Eight Ball" cafe-racer
www.gazzz-garage.com
Kawasaki Zephyr 750 (810ccm, 4in4, spoked wheels)
Honda CB815 "Eight Fifteen" cafe-racer
Yamaha XJ "Eight Ball" cafe-racer
www.gazzz-garage.com
Please Log in or Create an account to join the conversation.
Moderators: Street Fighter LTD