
KZ650 cafe-racer
- gazzz
-
 Topic Author
- Offline
- Sustaining Member
-

Registered
- Posts: 563
- Thanks: 319
KZ650 cafe-racer
27 May 2019 13:29
After my first two "full scale" projects I went to conclusion that for new project I need only engine and frame with title to start with. Such approach gives two obvious advantages:
- I have freedom to create.
- No one could say I wasted the bike that otherwise could be restored to original.
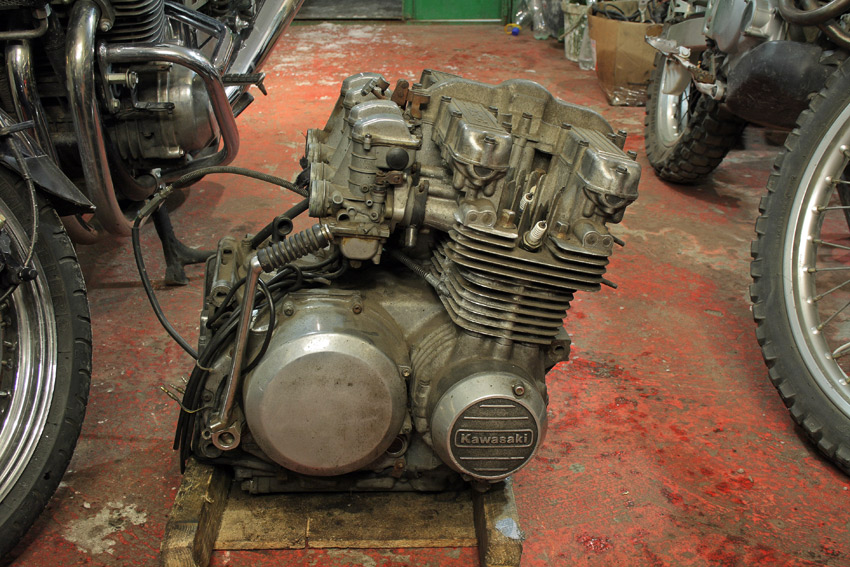
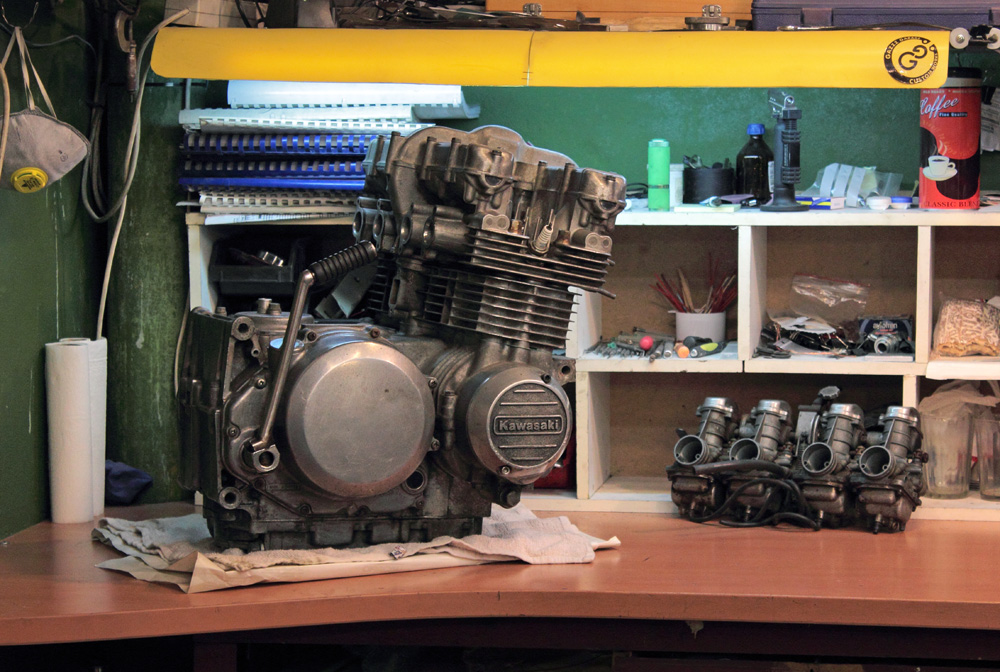
Thus I decided to start KZ650 cafe-racer project from scratch, however I already had the engine. I bought it by sheer occasion in 2011. In that days I had no such broad access to ebay and international shops so I kept my eye on local internet boards for "rare" parts and sure, I couldn't pass by that engine: complete with carburettors and wiring. I bought it and drought it to my former garage, where I partly disassembled it to check its condition, oiled what needed to be oiled and put all parts in marked boxes to avoid loss of even smallest parts.
When I was working on Yamaha "8 Ball" I needed KZ650 tank for this project and I found it, in similar to engine way. However those tank had KZ650 frame with Suzuki GS750 engine in, tail, side covers and some other parts as addition... When I moved into my current garage I put frame into the cellar and there it lay as well as boxes with engine on the shelves for some years.
Then in the very end of 2015 we started to work on two projects: Kawasaki KZ650 and Honda CB750 Seven Fifty. KZ frame in cellar had no title and moreover, front lower engine mounts were cut from it to push Suzuki engine and some junk side stand mount was welded instead of original mount, not counting other modifications.
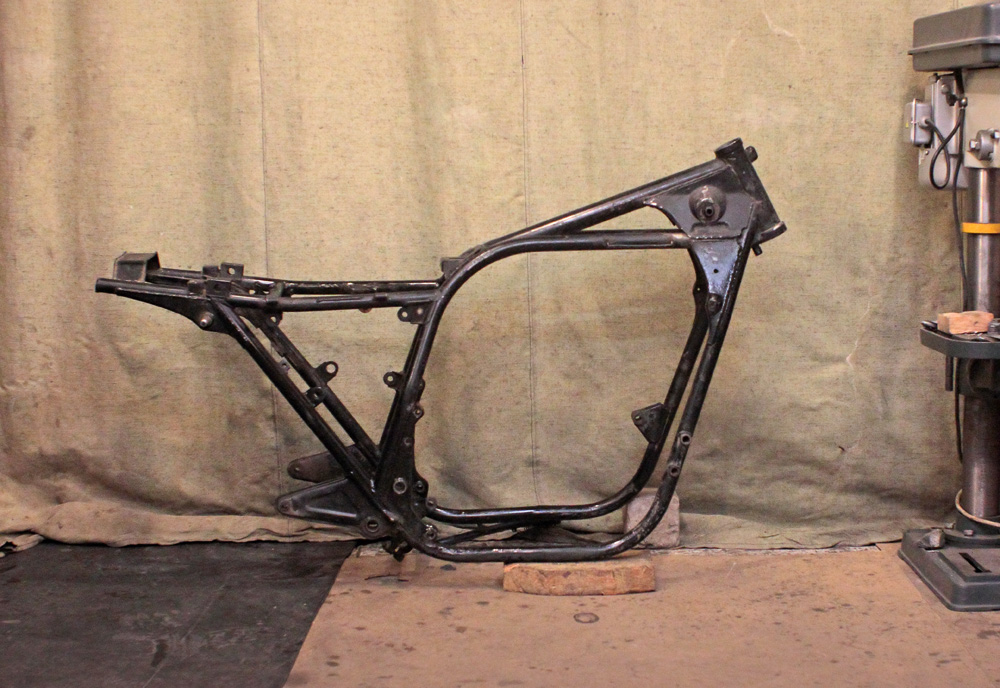
Earlier that year we successfully finished Kawasaki Zephyr in France, were good friend of mine lives; and considering that there was no chance to buy frame with title or even complete KZ650 in Ukraine, we decided: why don't buy frame for KZ650 in France? However it took time to find and buy KZ650 frame (1980 C4) and by the time we finished with its registration, we realized that we couldn't afford two parallel projects: in that time I have combined daytime job and evenings and weekends of work in garage, not counting financial aspect. It was a spring of 2016 and we also were quite deep in Honda CB750 project, so KZ project was partly frozen until summer of 2018. However, I didn't waste time and by the moment of project restarting I had not only worked out general idea, but also did some work and found and bought a number of parts for the project.
The plan was to make all possible works here in Ukraine, drove all parts for 3000km and then finish project in France. It may sound a bit crazy but let's see what came from it.
General plan for project is simple: more power, less weights, better suspension and brakes and of course, completely new design.
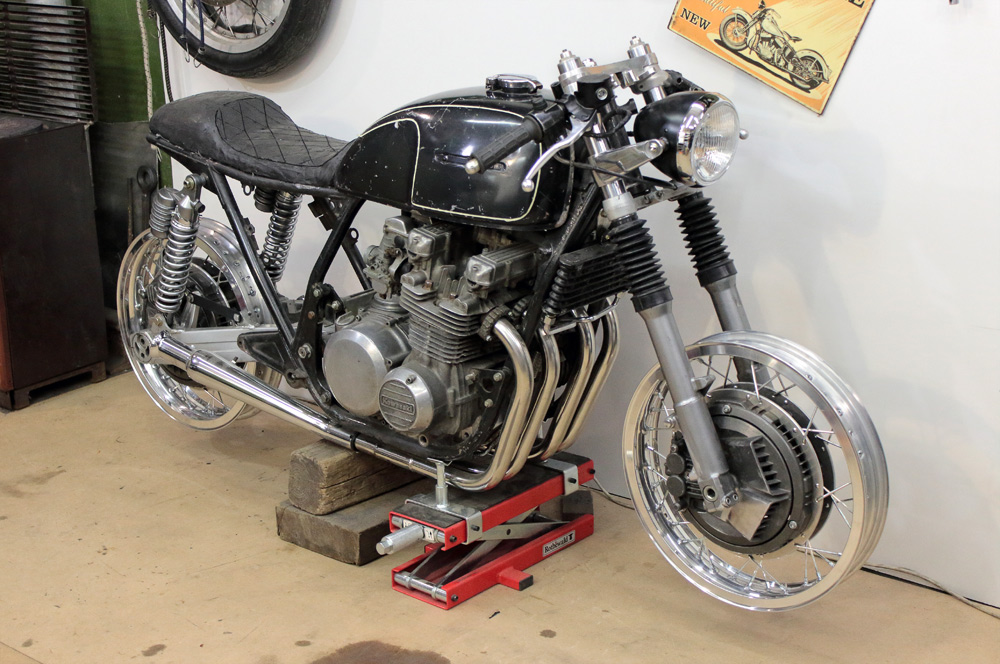
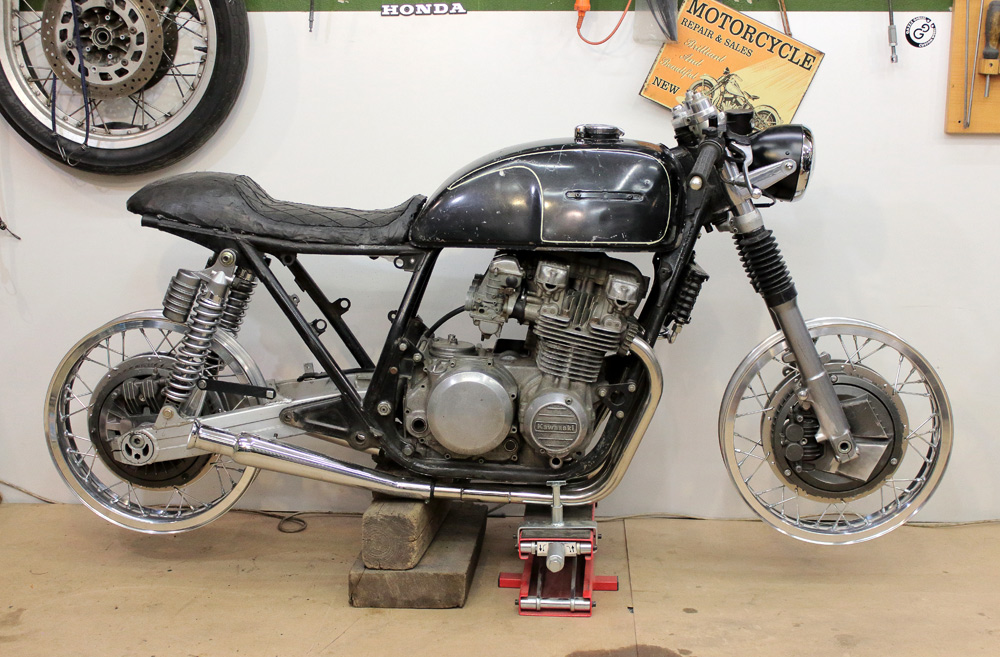
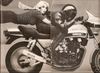
Here are few photos of how it approximately might look:
It's quite hard task to tell long story short, however I'll try to do my best to push it in several posts. It definitely will take some time so here is a link for those who don't wish to wait:
www.gazzz-garage.com/category/kawasaki-kz-650-cafe-racer/
And before I'll proceed to the project features description, here are a couple of tips that might be of use to other KZ-riders. I'll simply repost them from my website.
- I have freedom to create.
- No one could say I wasted the bike that otherwise could be restored to original.
Thus I decided to start KZ650 cafe-racer project from scratch, however I already had the engine. I bought it by sheer occasion in 2011. In that days I had no such broad access to ebay and international shops so I kept my eye on local internet boards for "rare" parts and sure, I couldn't pass by that engine: complete with carburettors and wiring. I bought it and drought it to my former garage, where I partly disassembled it to check its condition, oiled what needed to be oiled and put all parts in marked boxes to avoid loss of even smallest parts.
When I was working on Yamaha "8 Ball" I needed KZ650 tank for this project and I found it, in similar to engine way. However those tank had KZ650 frame with Suzuki GS750 engine in, tail, side covers and some other parts as addition... When I moved into my current garage I put frame into the cellar and there it lay as well as boxes with engine on the shelves for some years.
Then in the very end of 2015 we started to work on two projects: Kawasaki KZ650 and Honda CB750 Seven Fifty. KZ frame in cellar had no title and moreover, front lower engine mounts were cut from it to push Suzuki engine and some junk side stand mount was welded instead of original mount, not counting other modifications.
Earlier that year we successfully finished Kawasaki Zephyr in France, were good friend of mine lives; and considering that there was no chance to buy frame with title or even complete KZ650 in Ukraine, we decided: why don't buy frame for KZ650 in France? However it took time to find and buy KZ650 frame (1980 C4) and by the time we finished with its registration, we realized that we couldn't afford two parallel projects: in that time I have combined daytime job and evenings and weekends of work in garage, not counting financial aspect. It was a spring of 2016 and we also were quite deep in Honda CB750 project, so KZ project was partly frozen until summer of 2018. However, I didn't waste time and by the moment of project restarting I had not only worked out general idea, but also did some work and found and bought a number of parts for the project.
The plan was to make all possible works here in Ukraine, drove all parts for 3000km and then finish project in France. It may sound a bit crazy but let's see what came from it.
General plan for project is simple: more power, less weights, better suspension and brakes and of course, completely new design.
Here are few photos of how it approximately might look:
It's quite hard task to tell long story short, however I'll try to do my best to push it in several posts. It definitely will take some time so here is a link for those who don't wish to wait:
www.gazzz-garage.com/category/kawasaki-kz-650-cafe-racer/
And before I'll proceed to the project features description, here are a couple of tips that might be of use to other KZ-riders. I'll simply repost them from my website.
Kawasaki KZ650 cafe-racer: in progress
Kawasaki Zephyr 750 (810ccm, 4in4, spoked wheels)
Honda CB815 "Eight Fifteen" cafe-racer
Yamaha XJ "Eight Ball" cafe-racer
www.gazzz-garage.com
Kawasaki Zephyr 750 (810ccm, 4in4, spoked wheels)
Honda CB815 "Eight Fifteen" cafe-racer
Yamaha XJ "Eight Ball" cafe-racer
www.gazzz-garage.com
Please Log in or Create an account to join the conversation.
- gazzz
-
Topic Author
- Offline
- Sustaining Member
-
Registered
- Posts: 563
- Thanks: 319
Re: KZ650 cafe-racer
27 May 2019 13:31
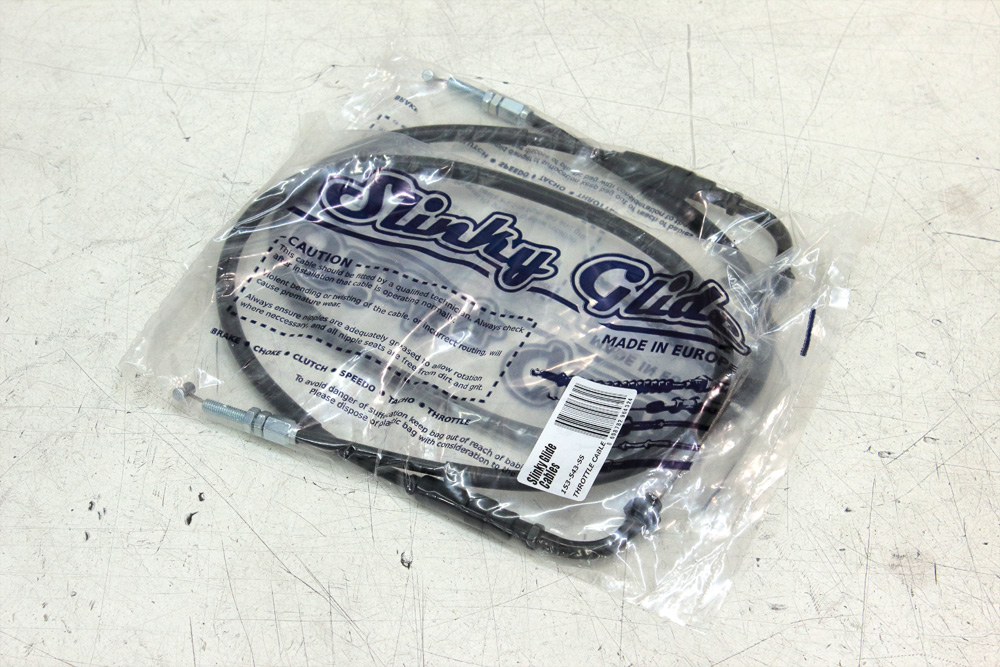
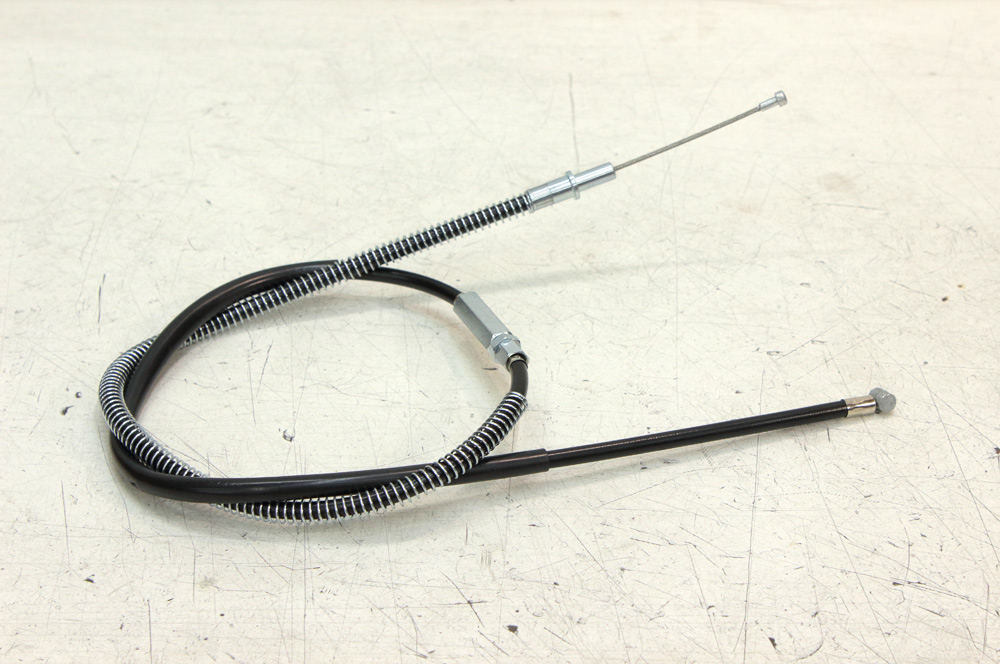
First is about shorter throttle and clutch cables:
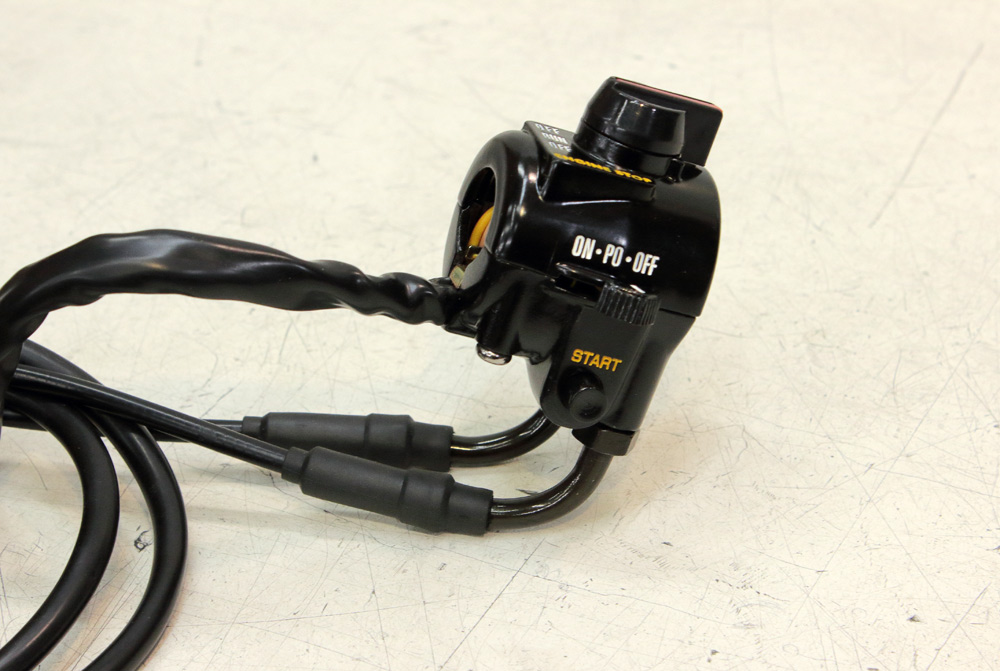
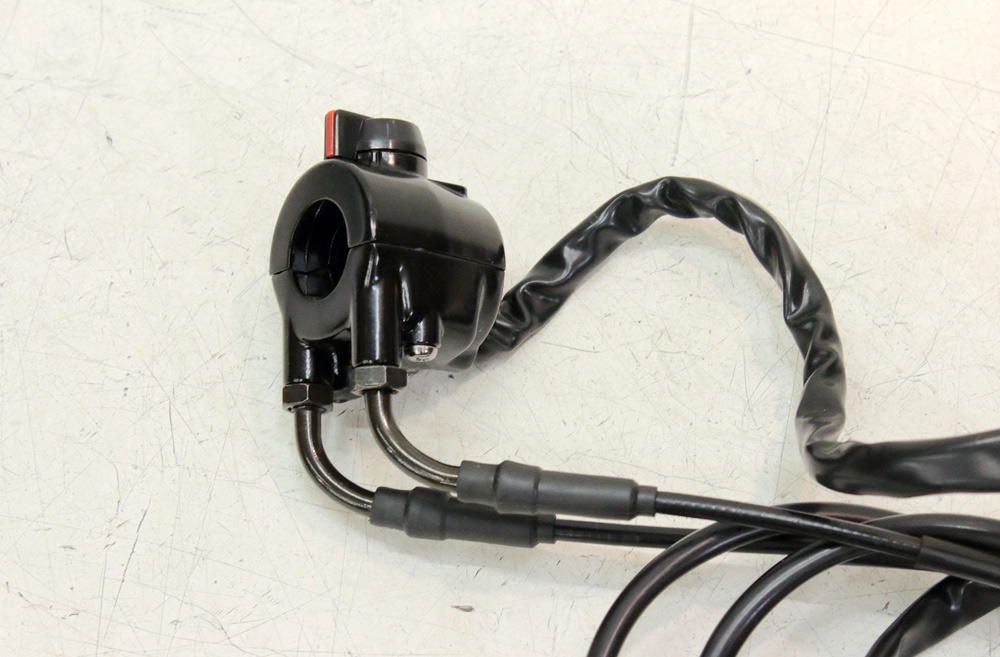
Sure, once handlebar is replaced with clipo-ns there might be an issue of too long original throttle and clutch cables. I have some kind of mania about tidiness of cables and wires routing and once it became clear that Kawasaki KZ650 original cables are too long to route them properly I began to search for shorter cables.
If you run “KZ650 shorter throttle cable” or “Kawasaki KZ shorter throttle cables” request through Google, you’ll have some results, but they wouldn’t be satisfying and completely definite. However, I found solution of this question, it was only a matter of where to look for it. It was not in Internet but… on the wall of my workshop, where I keep hanging whole assortment of different cables that remained from previous projects or occasionally got in my garage.
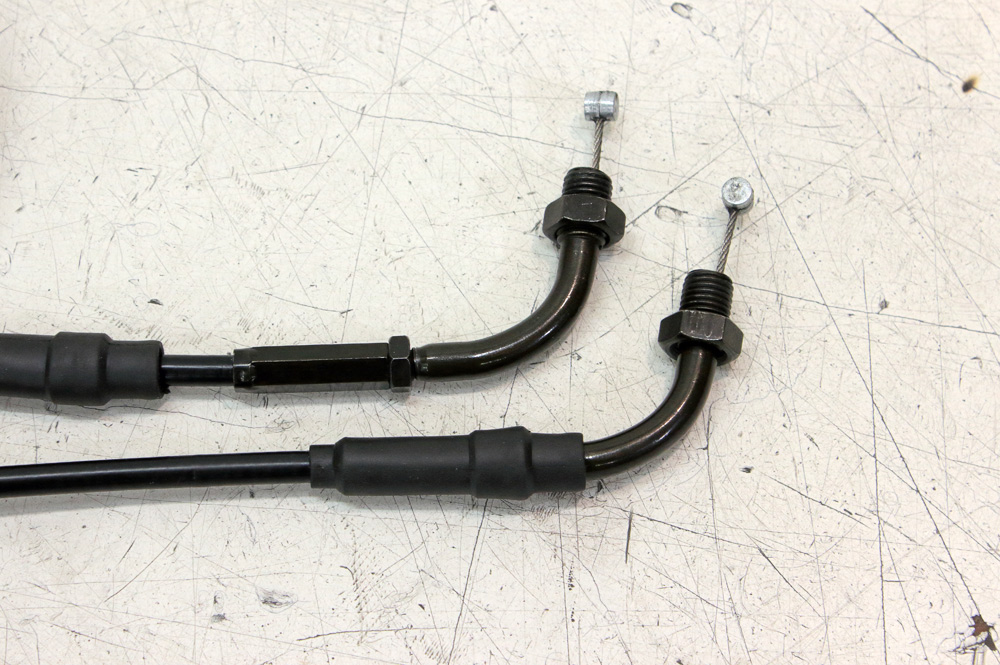
Turned out that solution is simple: Honda pull throttle cables for modern motorcycles have the same thread for mounting in handlebar switch as both pull and push Kawasaki KZ throttle cables have. After this all I had to do is rummage through Wemoto web shop cables section and find cables that should perfectly fit my KZ650 with clip-ons. I bought two pull throttle cables for Honda CB500 1993-1995:
Their dimensions are:
Outer cable: 81cm;
Inner cable: 91cm;
While original KZ650 has push cable of dimensions:
Outer cable: 93cm;
Inner cable: 102.5cm;
And pull cable:
Outer cable: 94cm;
Inner cable: 104.5cm;
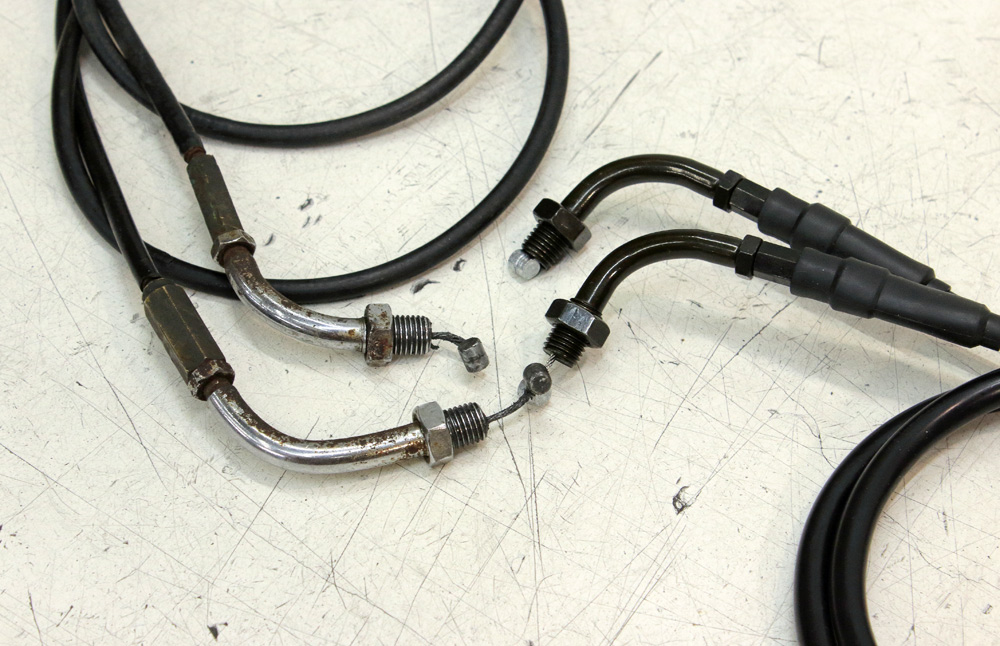
As you may see, this solution gives cables compatible with KZ650 but for 12-13cm shorter than original. Here are some additional photos:

Kawasaki KZ650 short throttle/clutch cables.
Gazzz garage > cafe racer > Kawasaki KZ650 short throttle/clutch cables.
gazzz December 20, 2018 0 cafe racer, Kawasaki KZ650 cafe-racer, kz-650
Sure, once handlebar is replaced with clipo-ns there might be an issue of too long original throttle and clutch cables. I have some kind of mania about tidiness of cables and wires routing and once it became clear that Kawasaki KZ650 original cables are too long to route them properly I began to search for shorter cables.
If you run “KZ650 shorter throttle cable” or “Kawasaki KZ shorter throttle cables” request through Google, you’ll have some results, but they wouldn’t be satisfying and completely definite. However, I found solution of this question, it was only a matter of where to look for it. It was not in Internet but… on the wall of my workshop, where I keep hanging whole assortment of different cables that remained from previous projects or occasionally got in my garage.
Turned out that solution is simple: Honda pull throttle cables for modern motorcycles have the same thread for mounting in handlebar switch as both pull and push Kawasaki KZ throttle cables have. After this all I had to do is rummage through Wemoto web shop cables section and find cables that should perfectly fit my KZ650 with clip-ons. I bought two pull throttle cables for Honda CB500 1993-1995:
Their dimensions are:
Outer cable: 81cm;
Inner cable: 91cm;
While original KZ650 has push cable of dimensions:
Outer cable: 93cm;
Inner cable: 102.5cm;
And pull cable:
Outer cable: 94cm;
Inner cable: 104.5cm;
As you may see, this solution gives cables compatible with KZ650 but for 12-13cm shorter than original. Here are some additional photos:
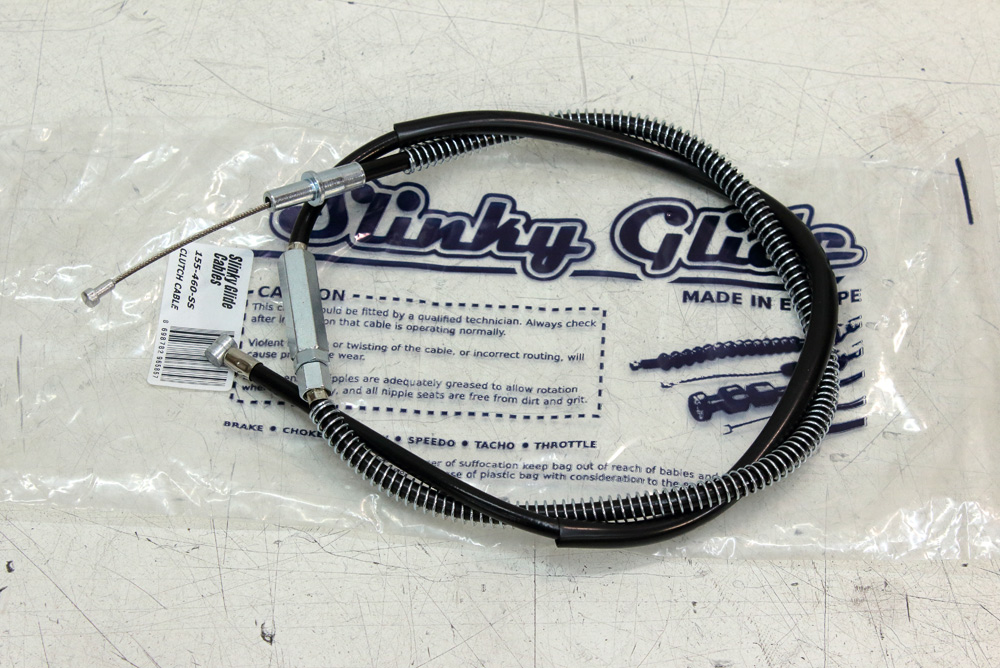
As for the clutch cable, I just bought clutch cable for Kawasaki Z400 J1 that has exactly the same design as original Kz650 clutch cable but is 7cm shorter.
Sure, once handlebar is replaced with clipo-ns there might be an issue of too long original throttle and clutch cables. I have some kind of mania about tidiness of cables and wires routing and once it became clear that Kawasaki KZ650 original cables are too long to route them properly I began to search for shorter cables.
If you run “KZ650 shorter throttle cable” or “Kawasaki KZ shorter throttle cables” request through Google, you’ll have some results, but they wouldn’t be satisfying and completely definite. However, I found solution of this question, it was only a matter of where to look for it. It was not in Internet but… on the wall of my workshop, where I keep hanging whole assortment of different cables that remained from previous projects or occasionally got in my garage.
Turned out that solution is simple: Honda pull throttle cables for modern motorcycles have the same thread for mounting in handlebar switch as both pull and push Kawasaki KZ throttle cables have. After this all I had to do is rummage through Wemoto web shop cables section and find cables that should perfectly fit my KZ650 with clip-ons. I bought two pull throttle cables for Honda CB500 1993-1995:
Their dimensions are:
Outer cable: 81cm;
Inner cable: 91cm;
While original KZ650 has push cable of dimensions:
Outer cable: 93cm;
Inner cable: 102.5cm;
And pull cable:
Outer cable: 94cm;
Inner cable: 104.5cm;
As you may see, this solution gives cables compatible with KZ650 but for 12-13cm shorter than original. Here are some additional photos:
Kawasaki KZ650 short throttle/clutch cables.
Gazzz garage > cafe racer > Kawasaki KZ650 short throttle/clutch cables.
gazzz December 20, 2018 0 cafe racer, Kawasaki KZ650 cafe-racer, kz-650
Sure, once handlebar is replaced with clipo-ns there might be an issue of too long original throttle and clutch cables. I have some kind of mania about tidiness of cables and wires routing and once it became clear that Kawasaki KZ650 original cables are too long to route them properly I began to search for shorter cables.
If you run “KZ650 shorter throttle cable” or “Kawasaki KZ shorter throttle cables” request through Google, you’ll have some results, but they wouldn’t be satisfying and completely definite. However, I found solution of this question, it was only a matter of where to look for it. It was not in Internet but… on the wall of my workshop, where I keep hanging whole assortment of different cables that remained from previous projects or occasionally got in my garage.
Turned out that solution is simple: Honda pull throttle cables for modern motorcycles have the same thread for mounting in handlebar switch as both pull and push Kawasaki KZ throttle cables have. After this all I had to do is rummage through Wemoto web shop cables section and find cables that should perfectly fit my KZ650 with clip-ons. I bought two pull throttle cables for Honda CB500 1993-1995:
Their dimensions are:
Outer cable: 81cm;
Inner cable: 91cm;
While original KZ650 has push cable of dimensions:
Outer cable: 93cm;
Inner cable: 102.5cm;
And pull cable:
Outer cable: 94cm;
Inner cable: 104.5cm;
As you may see, this solution gives cables compatible with KZ650 but for 12-13cm shorter than original. Here are some additional photos:
As for the clutch cable, I just bought clutch cable for Kawasaki Z400 J1 that has exactly the same design as original Kz650 clutch cable but is 7cm shorter.
Kawasaki KZ650 cafe-racer: in progress
Kawasaki Zephyr 750 (810ccm, 4in4, spoked wheels)
Honda CB815 "Eight Fifteen" cafe-racer
Yamaha XJ "Eight Ball" cafe-racer
www.gazzz-garage.com
Kawasaki Zephyr 750 (810ccm, 4in4, spoked wheels)
Honda CB815 "Eight Fifteen" cafe-racer
Yamaha XJ "Eight Ball" cafe-racer
www.gazzz-garage.com
The following user(s) said Thank You: tjhayes1, ktaylor42
Please Log in or Create an account to join the conversation.
- gazzz
-
Topic Author
- Offline
- Sustaining Member
-
Registered
- Posts: 563
- Thanks: 319
Re: KZ650 cafe-racer
27 May 2019 13:45
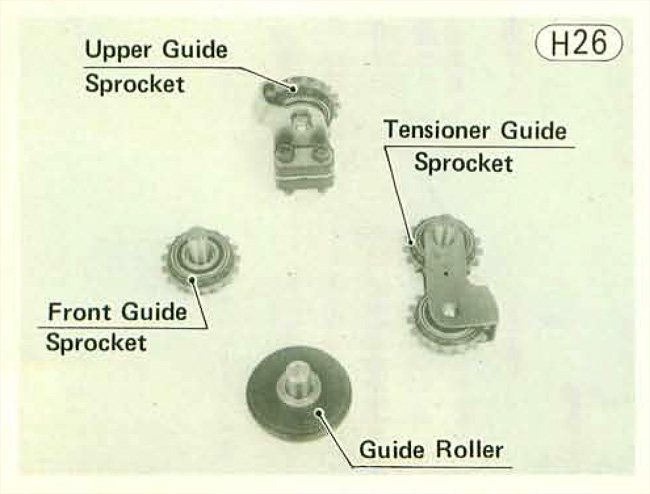
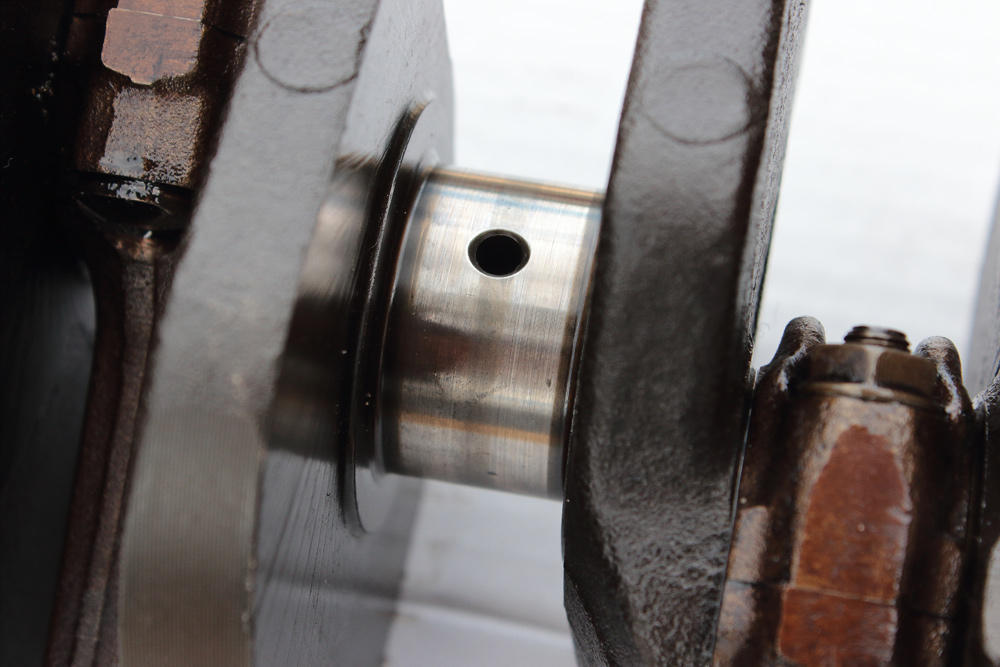
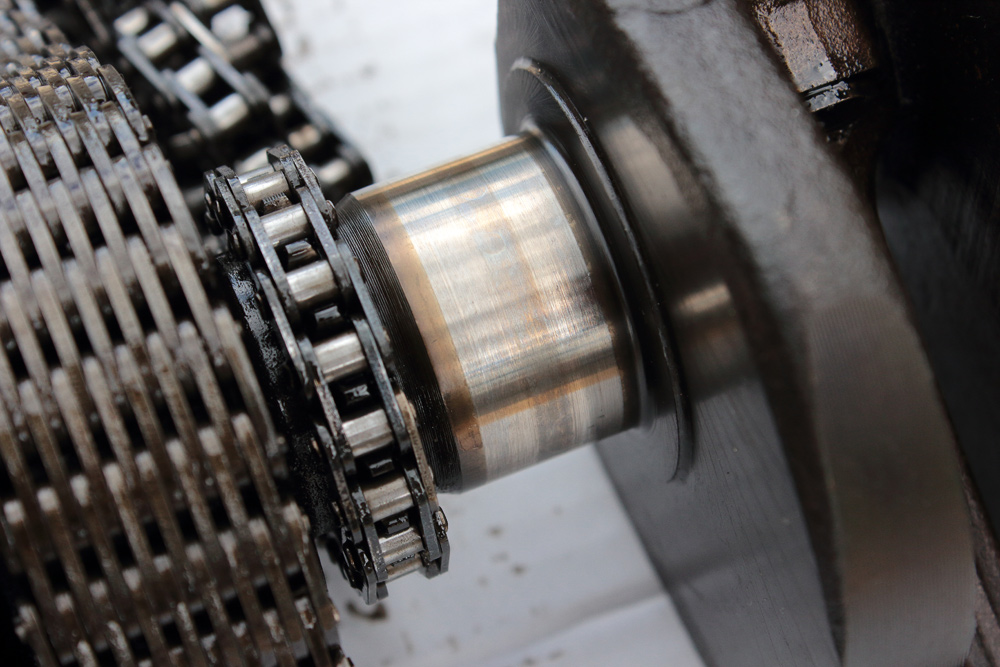
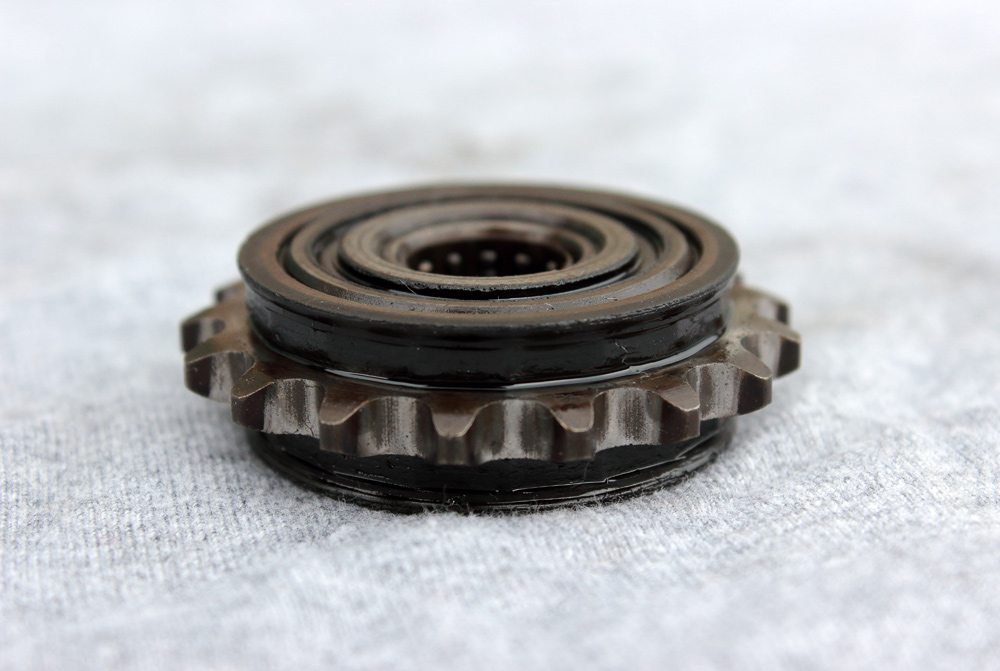
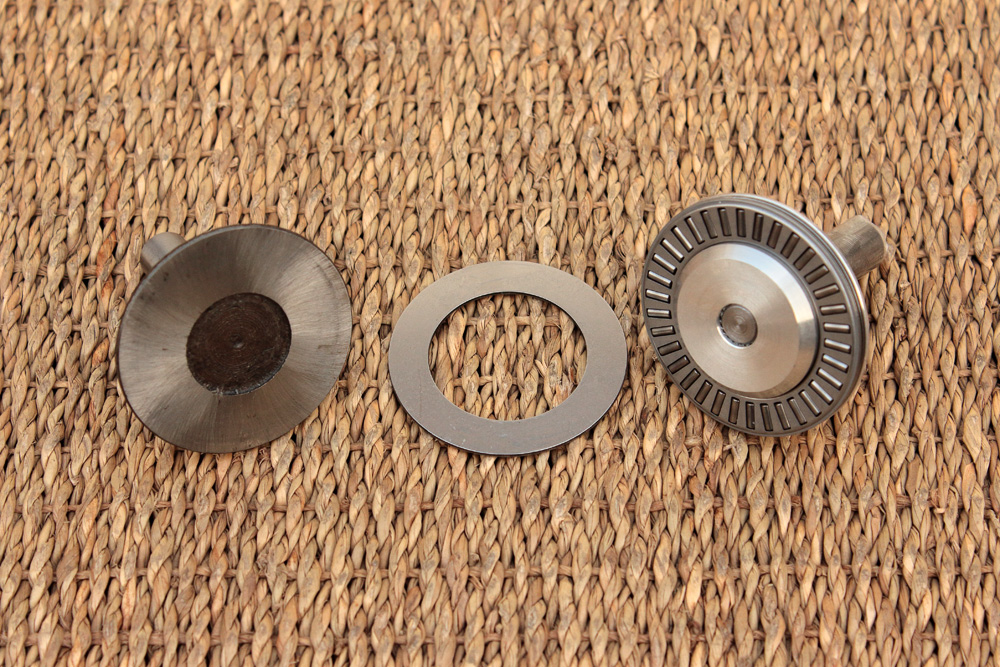
Second is about roller timing chain tension system and t Z1/KZ900 and KZ650 lower idler wheel compatibility. I know that there is no need to explain build of KZ650 timing chain tension system on this very forum. But it's simpler to repost my article as it is.
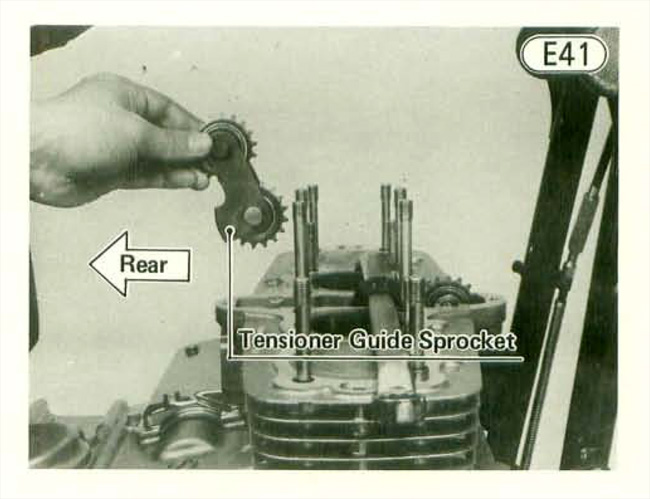
Earlier models of Kawasaki KZ650 as well as its even more famous brothers Z900, Z1 and Z2 (KZ900, KZ1000, Z750) have roller timing chain which, unlikely to modern silent timing chains (also known as hy-vo chains) needs quite complicated system of guide sprockets and rollers to be silent. Here is illustration from KZ650 part list:
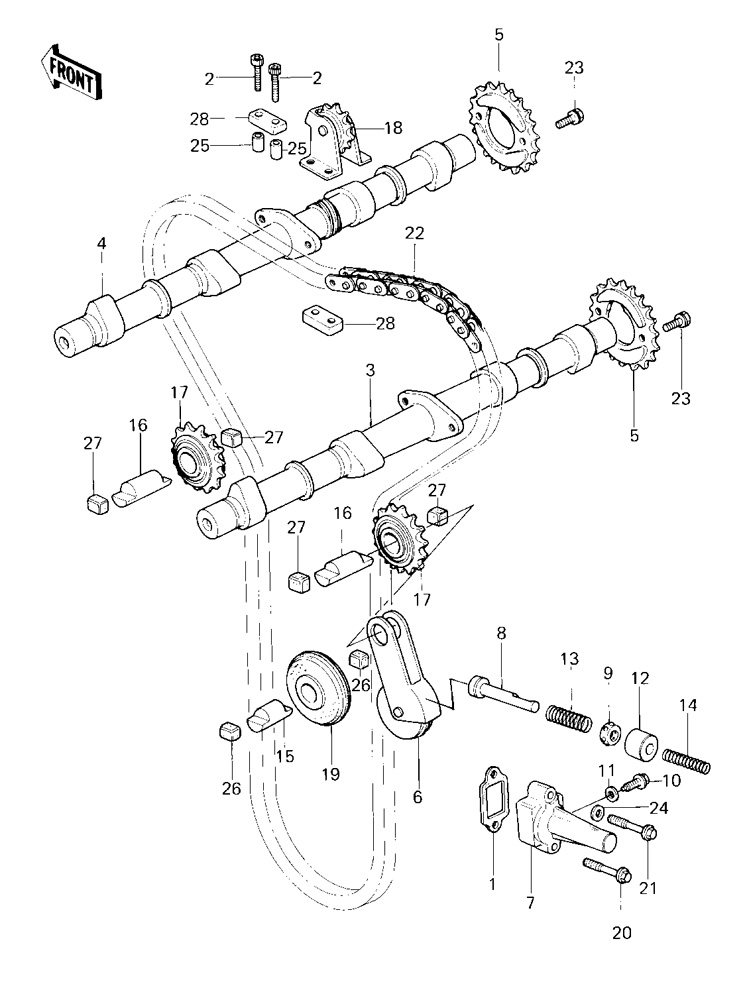
Let’s simplify it to view of only guide rollers and sprockets.
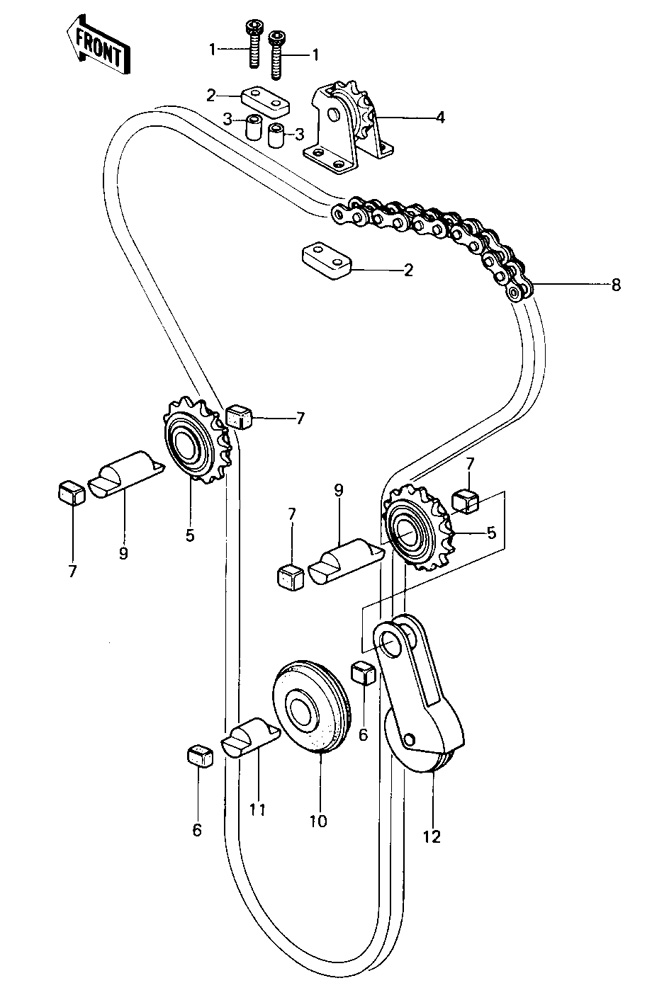
As you may see, Kawasaki KZ650 cam chain tension system has three guide sprockets (positions 4 and 5 on picture above) one rubber guide roller (or idler wheel, position 10) and one rubber tensioner roller (position 12). Sprocket 4positioned above cylinder head, sprockets 5 a placed between cylinder head and cylinder block and axle of rear sprocket is simultaneously axle of tensioner wheel bracket (12). Idler wheel 10 position is between cylinder block and crankcase, right above crankshaft timing sprocket.
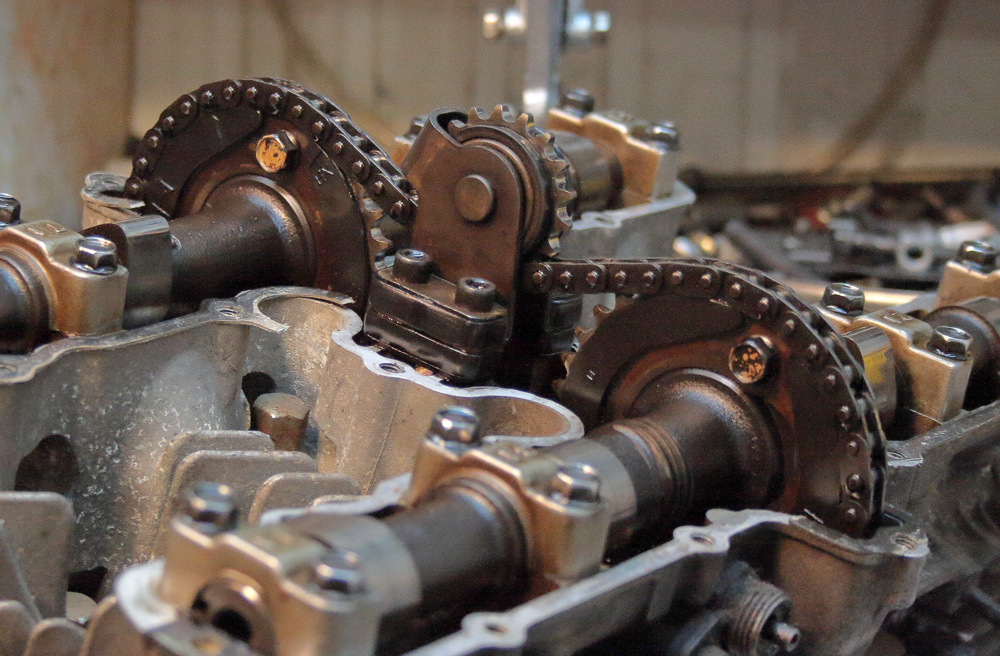

Engine I have for my KZ650 cafe-racer project has low mileage and its guide rollers and sprockets are in perfect condition and rollers still are quite soft after forty years.
I had no questions about sprockets, but as I prepared replacements for all rubber parts in engine I was wondering: should I have to replace those timing chain guide wheels as well?
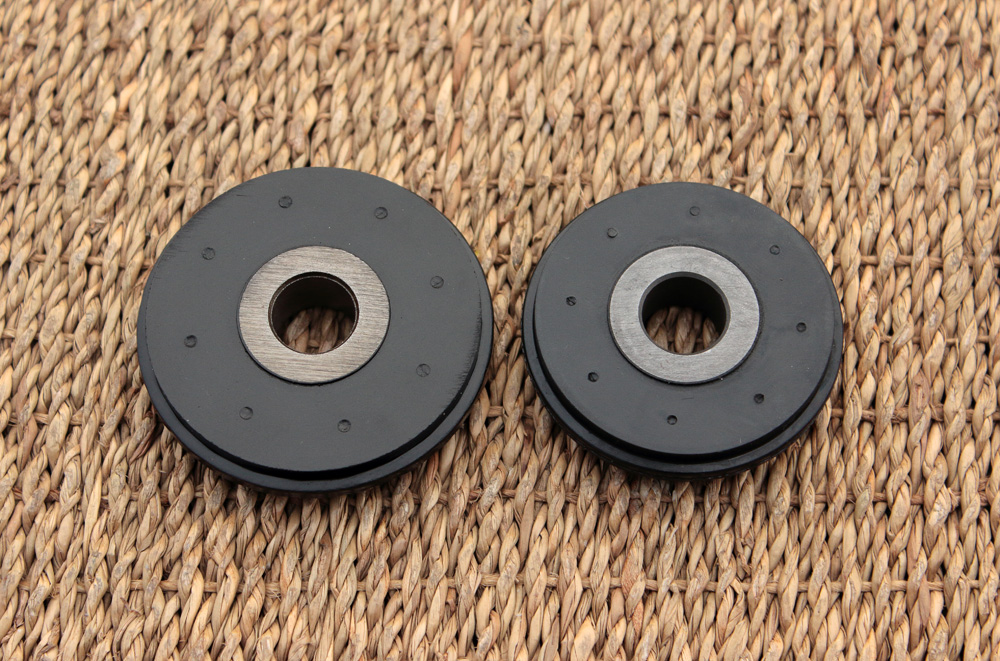
Quick search showed that OEM rollers for KZ650 are no more available, but there are quite a lot of aftermarket replacement parts for Z900, Z1 and Z2. However, even as tension systems of KZ and it’s bigger brothers looks quite similar, part numbers for lower guide rollers and tensioner rollers are different. Idler wheels for KZ650 has part number 12055-004 while bigger Z-s have 12055-002 for that roller. Same is situation with tensioner wheels: part number for KZ650 is 12048-015 and for Z-s it is 12048-001. It’s not uncommon situation when identical parts have different part numbers, but such situation always needs some proof digging, so I made as deep search as I could.
From KZrider forum I learned that Z900 and Z1 have tensioner rollers of smaller diameter than KZ650 roller, but with same “wheel center” to “bracket axle” offset. That was promising information, especially counting that I already have PMC manual tensioner which solve the question of smaller diameter, but looked like no one clearly knows if lower guide rollers are identical or not. I also found that Liska Racing (USA) makes replacements for KZ650 lower idler roller and tensioner roller and their tensioner roller has sprocket instead of wheel. PMC (Japan) also makes replacements for these parts (with tensioner sprocket instead of wheel to), but with compatibility indicated for Z1, Z2 and Z900 models.
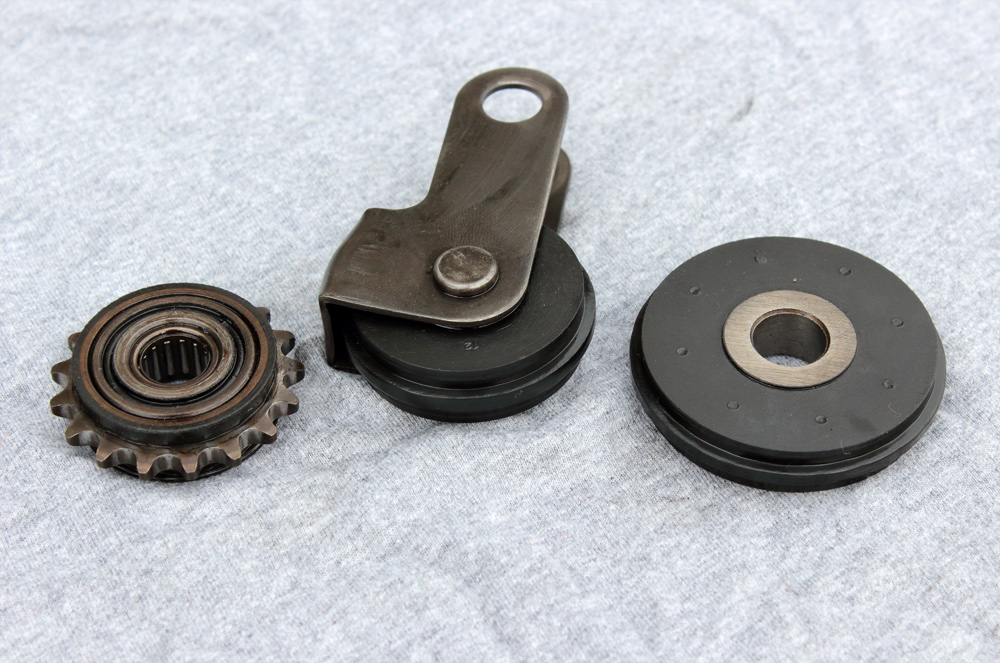
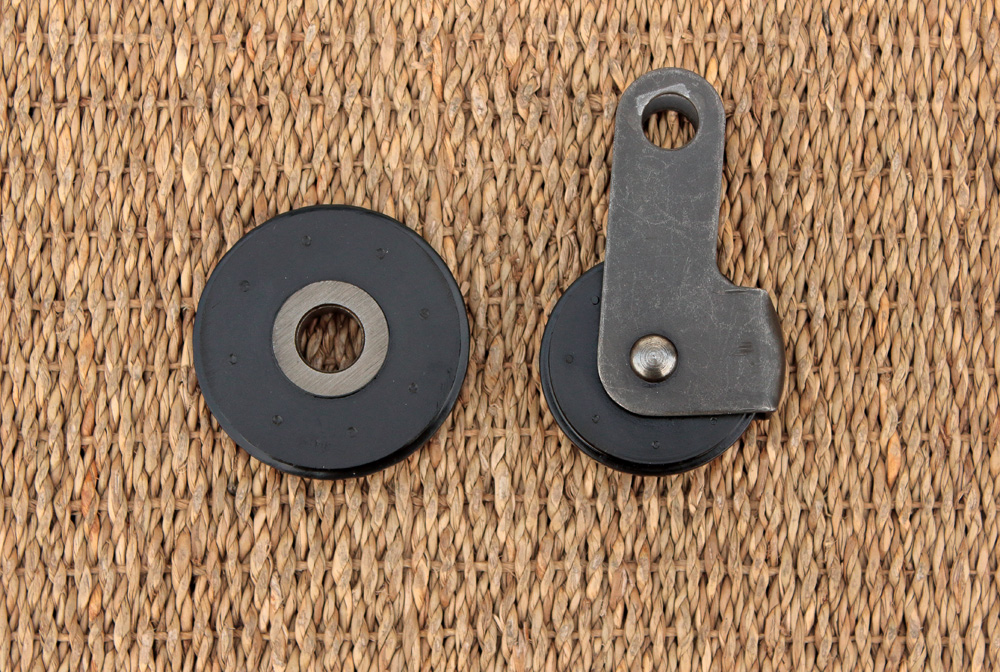
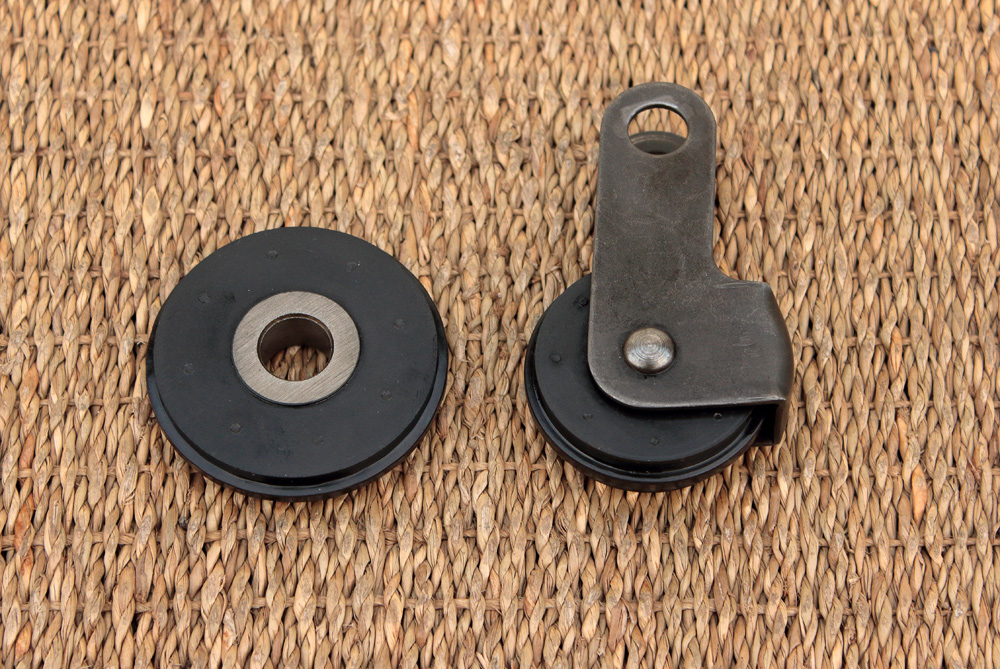
I was quite sure in compatibility of KZ650 and Z1 tensioners and I had couple of other parts in list that I wished to order from Webike (PMC dealer), so I decided to clarify by the way the question of KZ650-900-100 lower guide rollers (idler wheels) compatibility, thus I ordered timing chain tension components from Japan. Order arrived within a week and it counted these PMC parts:
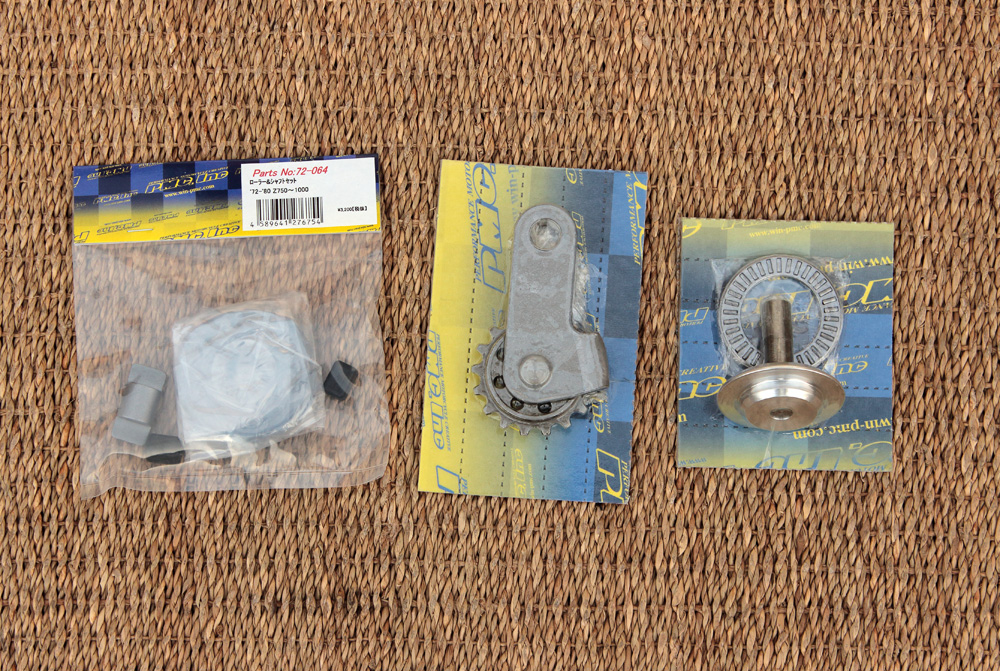

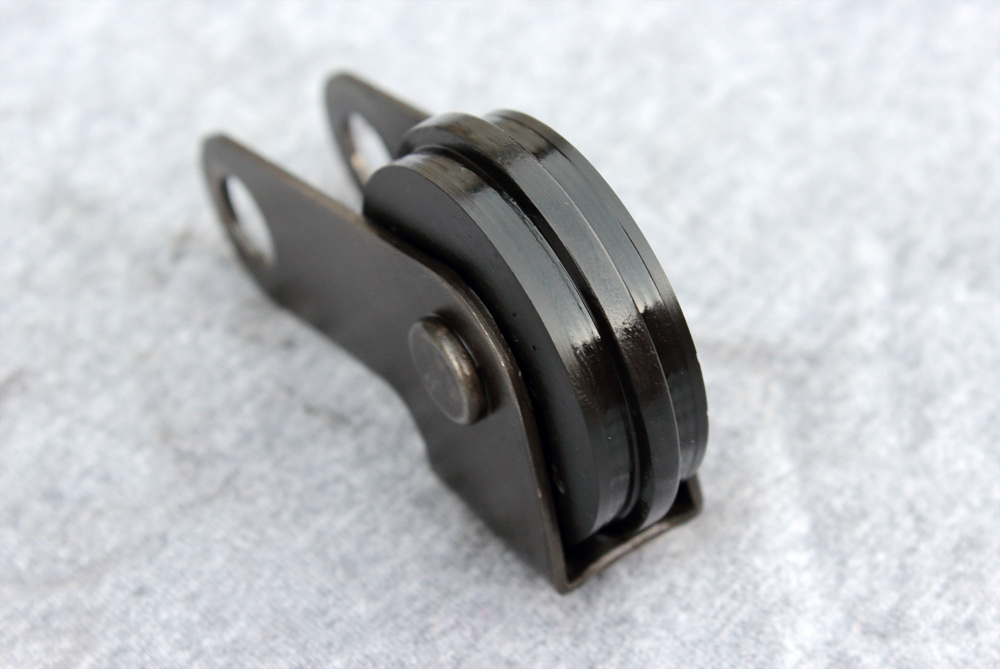
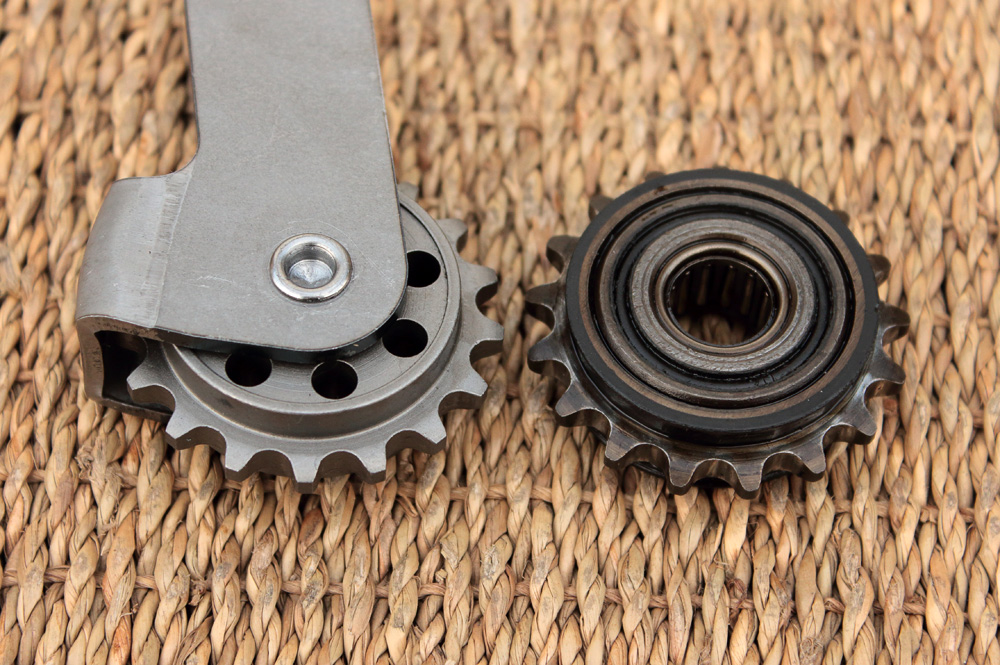
The rightmost part is not related to this article, about it I’ll write in one of the next posts. Here are photos of PMC tensioner sprocket VS OEM tensioner wheel. It’s clear that they are compatible:
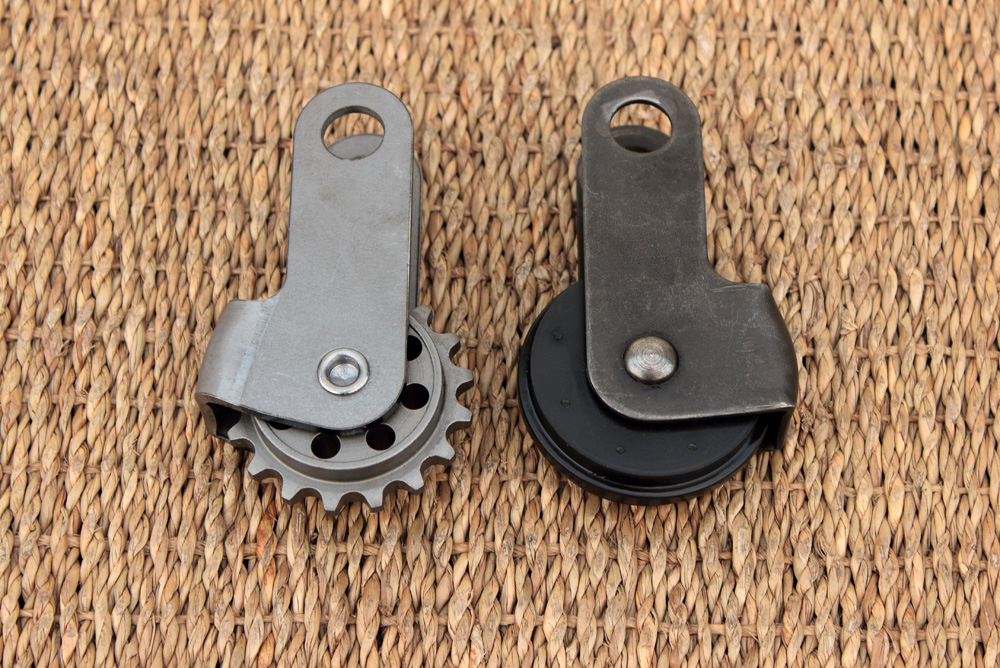
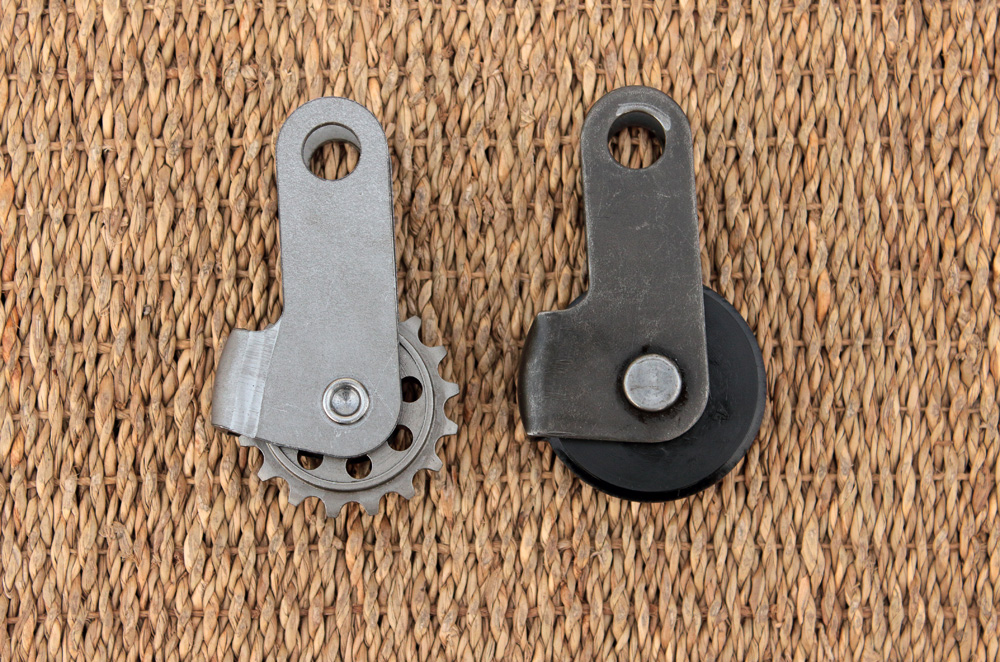
But simultaneously one may ask a question: is it safe to use sprocket instead of wheel? Answer is YES, and main proof is in earliest OEM Kawasaki KZ650 manual which is dated by 1976, while motorcycle sales started in 1977. That means that manual was illustrated with photos of pre-serial motorcycles.
On page 52 of that manual you may find this illustration:
And another one is on page 140:
So, as you may see, pre-serial KZ650 had tensioner that was equipped with sprocket identical to 17 teeth front and rear guide sprockets. I could only guess that Kawasaki switched sprocket to rubber roller only due to economy of production. PMC tensioner sprocket also has 17 teeth so we may say that we are back to the roots with it.
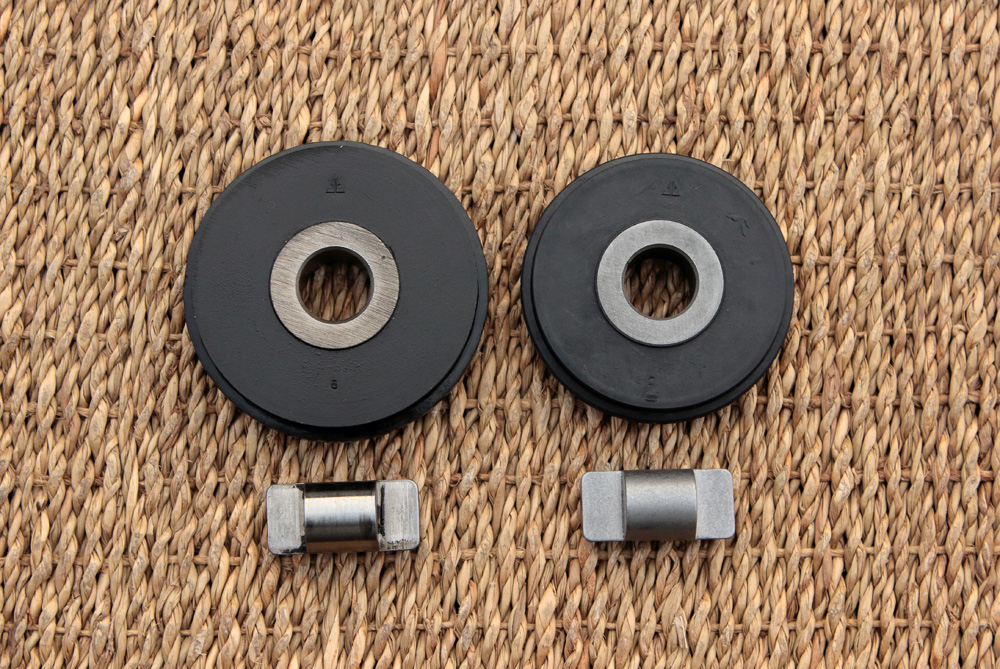
And now time to clarify another question: is lower rubber wheels of KZ 650 and 900-1000 models identical despite different part numbers? Answer is, unfortunately, NO.
They have the same thickness and axle diameter and identical axles, but their outer diameters are different. KZ650 roller body diameter is 52mm and lip diameter is 56mm while Z900-Z1 wheel has body diameter of 46 mm and lip diameter of 50mm.
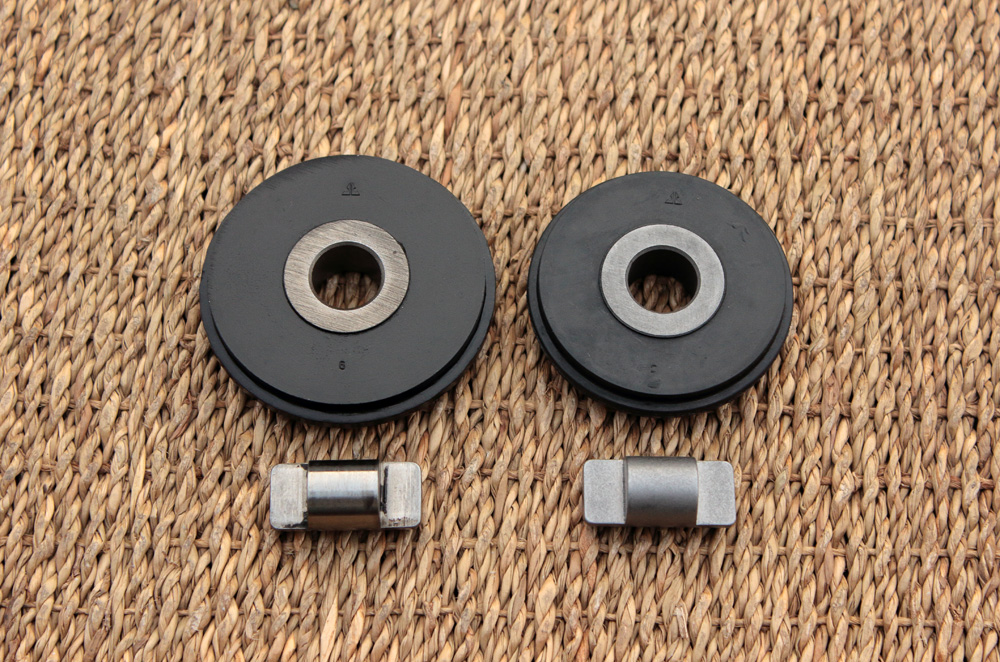

I have to pay tribute to PMC: even holding their roller in hands it’s impossible to distinguish it from OEM part, it made as complete copy of it, including all markings.
I also compared softness of this new wheel and that I removed from my KZ650 engine and looks like I have no reason to replace original roller by new, however, I still thinking about Liska Racing guide roller which is upgraded by roller bearing similar to sprockets…
Earlier models of Kawasaki KZ650 as well as its even more famous brothers Z900, Z1 and Z2 (KZ900, KZ1000, Z750) have roller timing chain which, unlikely to modern silent timing chains (also known as hy-vo chains) needs quite complicated system of guide sprockets and rollers to be silent. Here is illustration from KZ650 part list:
Let’s simplify it to view of only guide rollers and sprockets.
As you may see, Kawasaki KZ650 cam chain tension system has three guide sprockets (positions 4 and 5 on picture above) one rubber guide roller (or idler wheel, position 10) and one rubber tensioner roller (position 12). Sprocket 4positioned above cylinder head, sprockets 5 a placed between cylinder head and cylinder block and axle of rear sprocket is simultaneously axle of tensioner wheel bracket (12). Idler wheel 10 position is between cylinder block and crankcase, right above crankshaft timing sprocket.
Engine I have for my KZ650 cafe-racer project has low mileage and its guide rollers and sprockets are in perfect condition and rollers still are quite soft after forty years.
I had no questions about sprockets, but as I prepared replacements for all rubber parts in engine I was wondering: should I have to replace those timing chain guide wheels as well?
Quick search showed that OEM rollers for KZ650 are no more available, but there are quite a lot of aftermarket replacement parts for Z900, Z1 and Z2. However, even as tension systems of KZ and it’s bigger brothers looks quite similar, part numbers for lower guide rollers and tensioner rollers are different. Idler wheels for KZ650 has part number 12055-004 while bigger Z-s have 12055-002 for that roller. Same is situation with tensioner wheels: part number for KZ650 is 12048-015 and for Z-s it is 12048-001. It’s not uncommon situation when identical parts have different part numbers, but such situation always needs some proof digging, so I made as deep search as I could.
From KZrider forum I learned that Z900 and Z1 have tensioner rollers of smaller diameter than KZ650 roller, but with same “wheel center” to “bracket axle” offset. That was promising information, especially counting that I already have PMC manual tensioner which solve the question of smaller diameter, but looked like no one clearly knows if lower guide rollers are identical or not. I also found that Liska Racing (USA) makes replacements for KZ650 lower idler roller and tensioner roller and their tensioner roller has sprocket instead of wheel. PMC (Japan) also makes replacements for these parts (with tensioner sprocket instead of wheel to), but with compatibility indicated for Z1, Z2 and Z900 models.
I was quite sure in compatibility of KZ650 and Z1 tensioners and I had couple of other parts in list that I wished to order from Webike (PMC dealer), so I decided to clarify by the way the question of KZ650-900-100 lower guide rollers (idler wheels) compatibility, thus I ordered timing chain tension components from Japan. Order arrived within a week and it counted these PMC parts:
The rightmost part is not related to this article, about it I’ll write in one of the next posts. Here are photos of PMC tensioner sprocket VS OEM tensioner wheel. It’s clear that they are compatible:
But simultaneously one may ask a question: is it safe to use sprocket instead of wheel? Answer is YES, and main proof is in earliest OEM Kawasaki KZ650 manual which is dated by 1976, while motorcycle sales started in 1977. That means that manual was illustrated with photos of pre-serial motorcycles.
On page 52 of that manual you may find this illustration:
And another one is on page 140:
So, as you may see, pre-serial KZ650 had tensioner that was equipped with sprocket identical to 17 teeth front and rear guide sprockets. I could only guess that Kawasaki switched sprocket to rubber roller only due to economy of production. PMC tensioner sprocket also has 17 teeth so we may say that we are back to the roots with it.
And now time to clarify another question: is lower rubber wheels of KZ 650 and 900-1000 models identical despite different part numbers? Answer is, unfortunately, NO.
They have the same thickness and axle diameter and identical axles, but their outer diameters are different. KZ650 roller body diameter is 52mm and lip diameter is 56mm while Z900-Z1 wheel has body diameter of 46 mm and lip diameter of 50mm.
I have to pay tribute to PMC: even holding their roller in hands it’s impossible to distinguish it from OEM part, it made as complete copy of it, including all markings.
I also compared softness of this new wheel and that I removed from my KZ650 engine and looks like I have no reason to replace original roller by new, however, I still thinking about Liska Racing guide roller which is upgraded by roller bearing similar to sprockets…
Kawasaki KZ650 cafe-racer: in progress
Kawasaki Zephyr 750 (810ccm, 4in4, spoked wheels)
Honda CB815 "Eight Fifteen" cafe-racer
Yamaha XJ "Eight Ball" cafe-racer
www.gazzz-garage.com
Kawasaki Zephyr 750 (810ccm, 4in4, spoked wheels)
Honda CB815 "Eight Fifteen" cafe-racer
Yamaha XJ "Eight Ball" cafe-racer
www.gazzz-garage.com
The following user(s) said Thank You: 650ed, Scirocco
Please Log in or Create an account to join the conversation.
- gazzz
-
Topic Author
- Offline
- Sustaining Member
-
Registered
- Posts: 563
- Thanks: 319
Re: KZ650 cafe-racer
29 May 2019 11:50
The engine I have, as far as I could identify it, is 1978 KZ650 C2 engine. All engine’ hardware was original and looked untouched. Seemed like no one before me disassembled crankcase. When I began to unscrew crankcase bolts it was alike to those scenes in films when archeologists open untouched tomb of some Egyptian pharaoh: puffs of the air and white powder of oxidized aluminum and zinc entombed for thirty years under the bolts heads. I took that for a good sign.
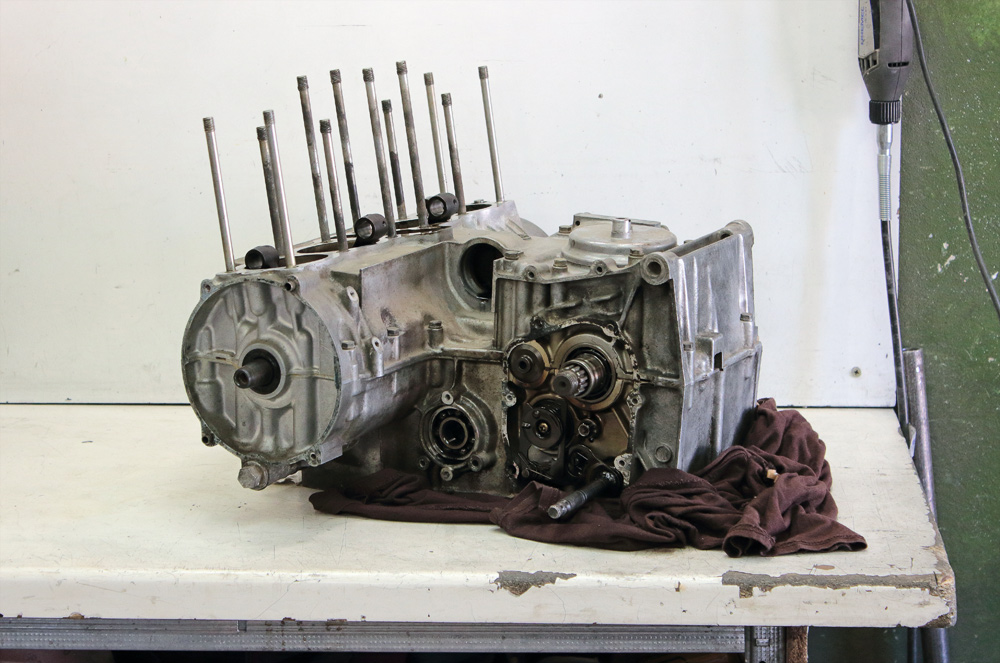
From what I saw and measured after disassembling I made conclusion that it is of very low mileage.
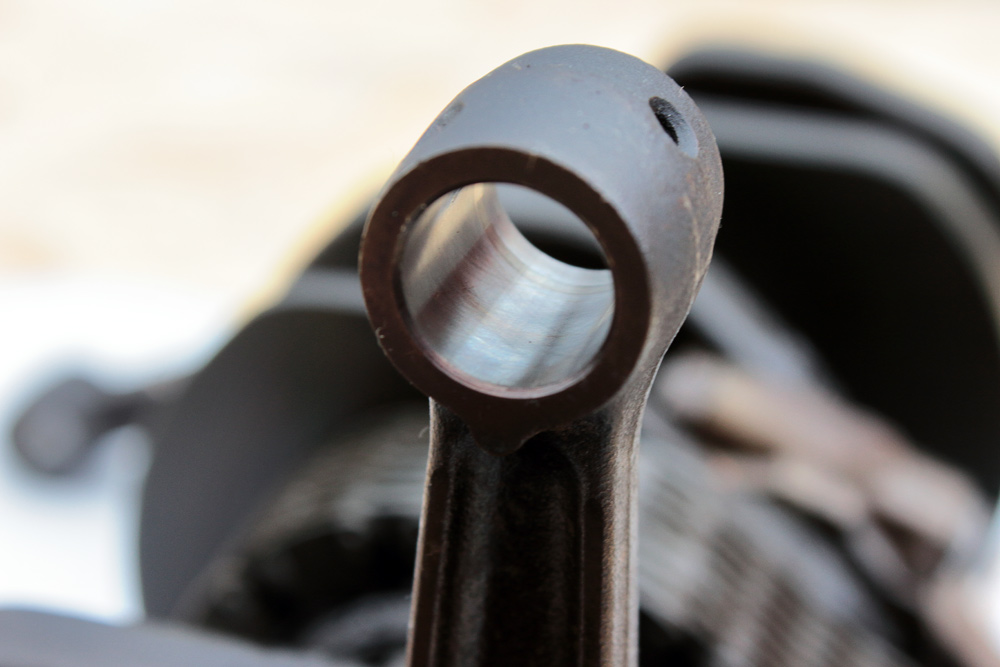

So for bottom end my plan was simple: glass beads blasting, painting, repacking with all new oil seals and rubbers including those in clutch basket.
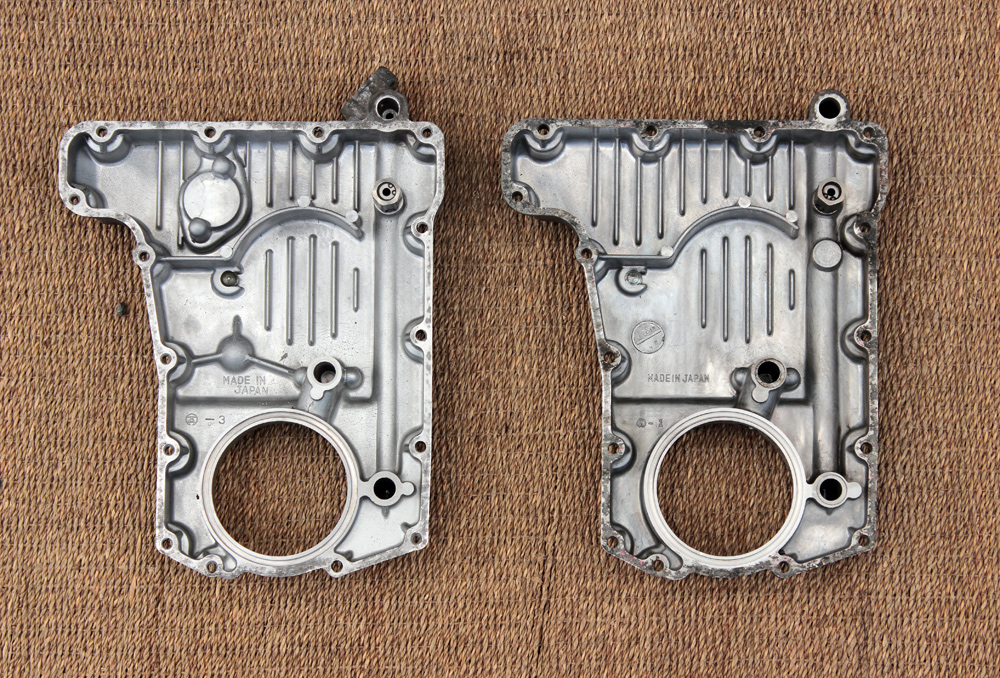
I also bought Zephyr 750 oil pan and oil cooler as they are simple, yet significant upgrade.
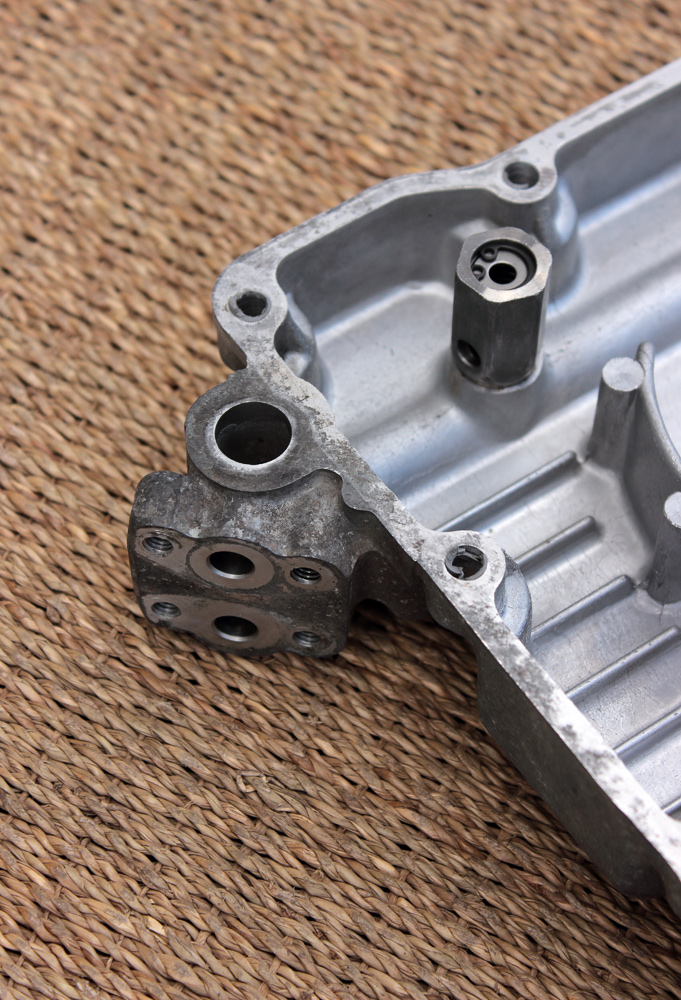
And sure I didn't forget to upgrade the clutch pusher.
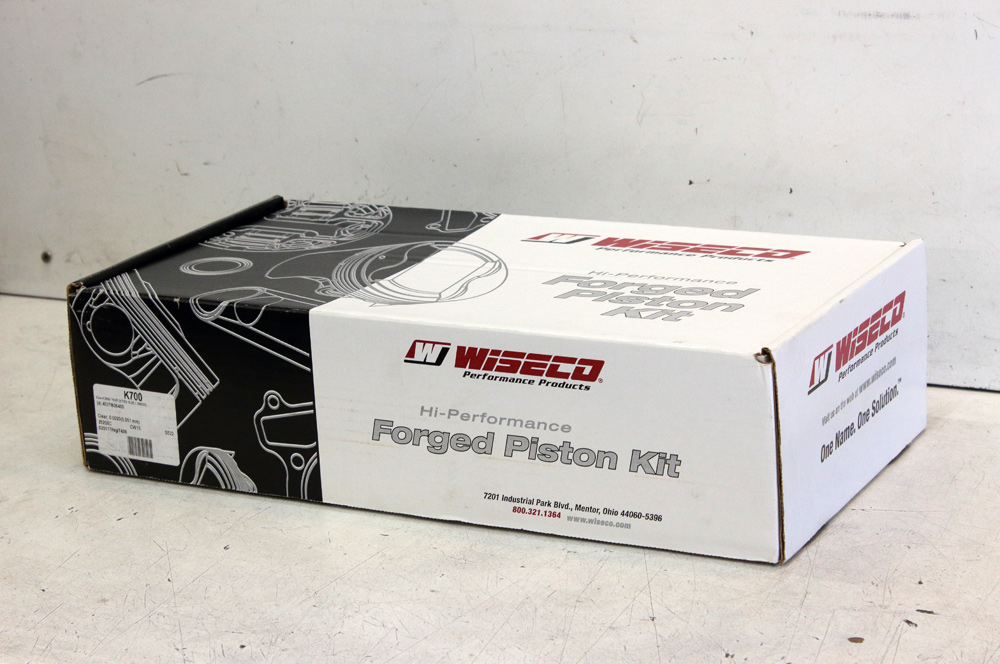
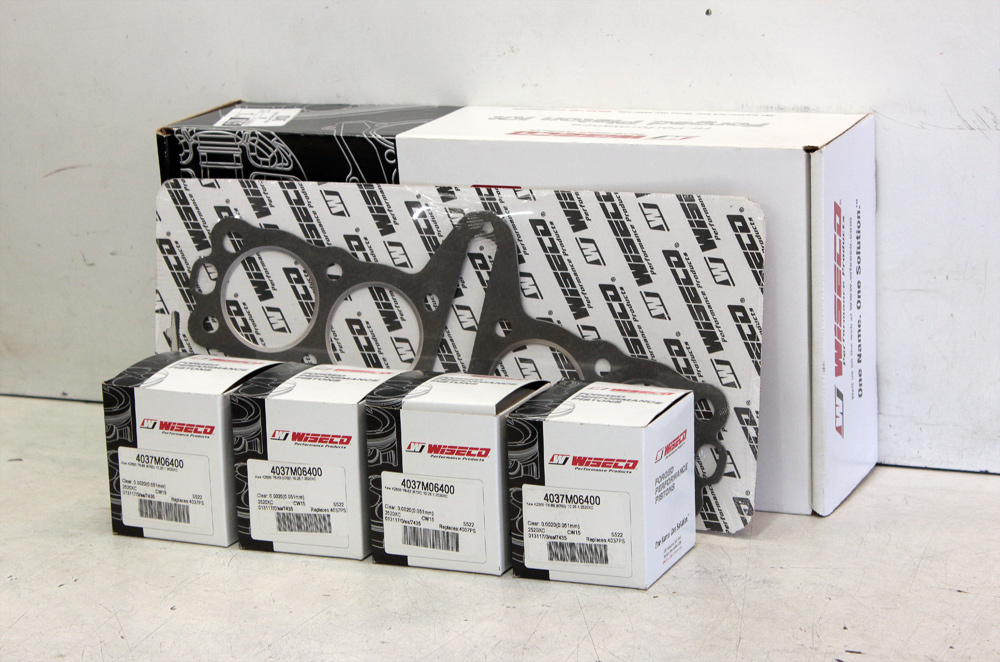
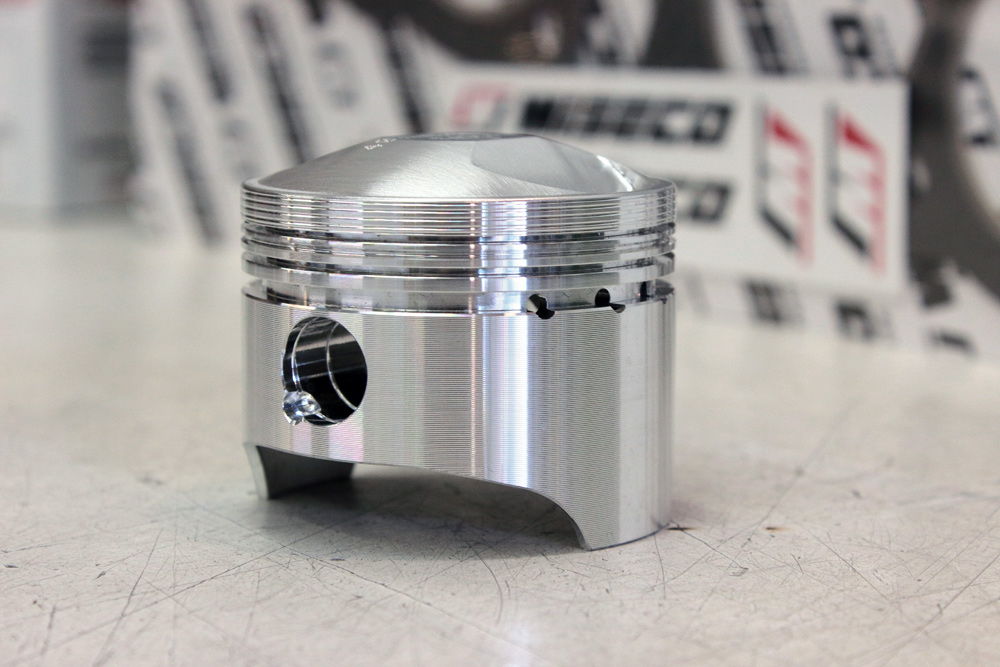
I know well that KZ650 could be upgraded up to 810ccm, but after some thoughts I decided to stop on Wiseco K700 kit.
From what I saw and measured after disassembling I made conclusion that it is of very low mileage.
So for bottom end my plan was simple: glass beads blasting, painting, repacking with all new oil seals and rubbers including those in clutch basket.
I also bought Zephyr 750 oil pan and oil cooler as they are simple, yet significant upgrade.
And sure I didn't forget to upgrade the clutch pusher.
I know well that KZ650 could be upgraded up to 810ccm, but after some thoughts I decided to stop on Wiseco K700 kit.
Kawasaki KZ650 cafe-racer: in progress
Kawasaki Zephyr 750 (810ccm, 4in4, spoked wheels)
Honda CB815 "Eight Fifteen" cafe-racer
Yamaha XJ "Eight Ball" cafe-racer
www.gazzz-garage.com
Kawasaki Zephyr 750 (810ccm, 4in4, spoked wheels)
Honda CB815 "Eight Fifteen" cafe-racer
Yamaha XJ "Eight Ball" cafe-racer
www.gazzz-garage.com
Please Log in or Create an account to join the conversation.
- gazzz
-
Topic Author
- Offline
- Sustaining Member
-
Registered
- Posts: 563
- Thanks: 319
Re: KZ650 cafe-racer
29 May 2019 11:55
Initially I thought to use original KZ650 cylinder head as it was in very nice condition: no broken cooling fins, clean intake channels and so on and so forth. The only thing I had to fix was one of exhaust studs that was torn out with a small piece of cylinder head as well.
I even mostly finished with exhaust channels cleaning...
But later I changed my mind and bought KZ750 cylinder (1980, suitable with roller cam chain and its tension system as it has larger valves and wider channels.
We use intermediate warehouses (courier services) in different countries for buying goods that have no direct shipping to Ukraine. I found KZ750 cylinder head that looked promising on USA ebay, but the day I decided to buy it I didn't get enough sleep, thus I managed to order it with delivery to Germany intermediate warehouse instead of one in USA or instead with shipping directly to Ukraine. When cylinder head arrived to Germany it for sure didn't pass Germany customs. Representatives of courier service turned out to be not cooperative, so we together with my partner successfully managed communication with German customs on distance of thousand miles without custom brokerage involvement. It was a nervous bit to find contacts of particular customs unit responsible for the mentioned warehouse and to write proper explanation email with payments proofs attached and so on. The answer was not long in coming and to our amazement customs released parcel without further questions and no duty payments.
Here is this cylinder head. Clean intake, perfect camshaft seats and carbon deposits in combustion chamber that could be easily wiped out with rag soaked in carburetor cleaner - nice catch, even counting that delivery cost was more than part itself.
It's only flaw in my opinion is air injection channels of emission reducing system, however I plan to seal them and buy KZ750 valve cover of similar to KZ650 cover design, but with additional round caps to cover those channels.
I also bought Zephyr 750 camshafts. They have no tachometer gear (which I don't need anyway) , whereas it's much easier to find low mileage parts from newer motorcycles.

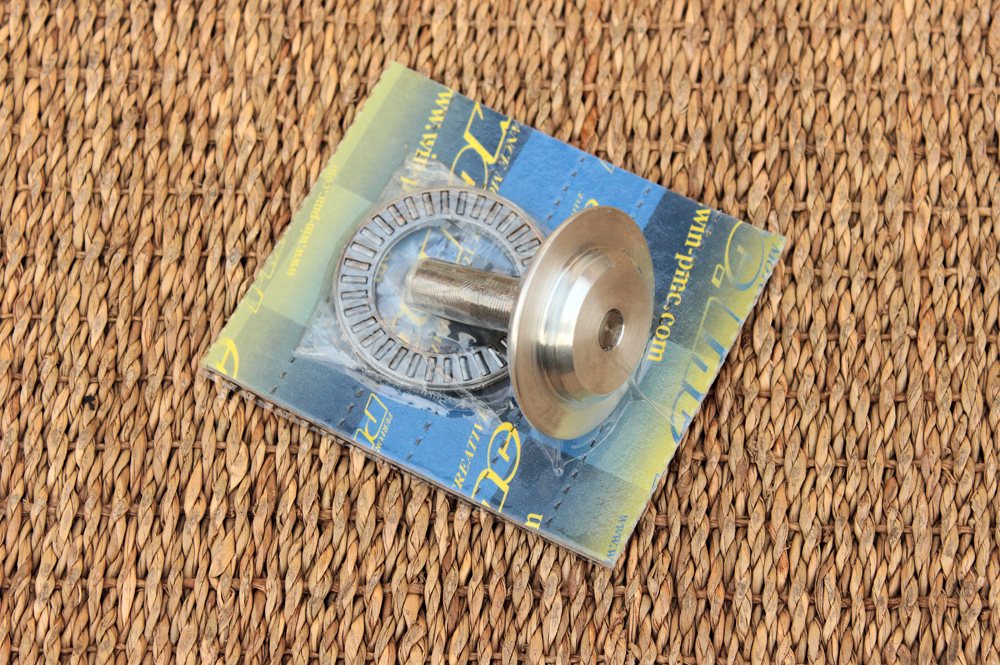
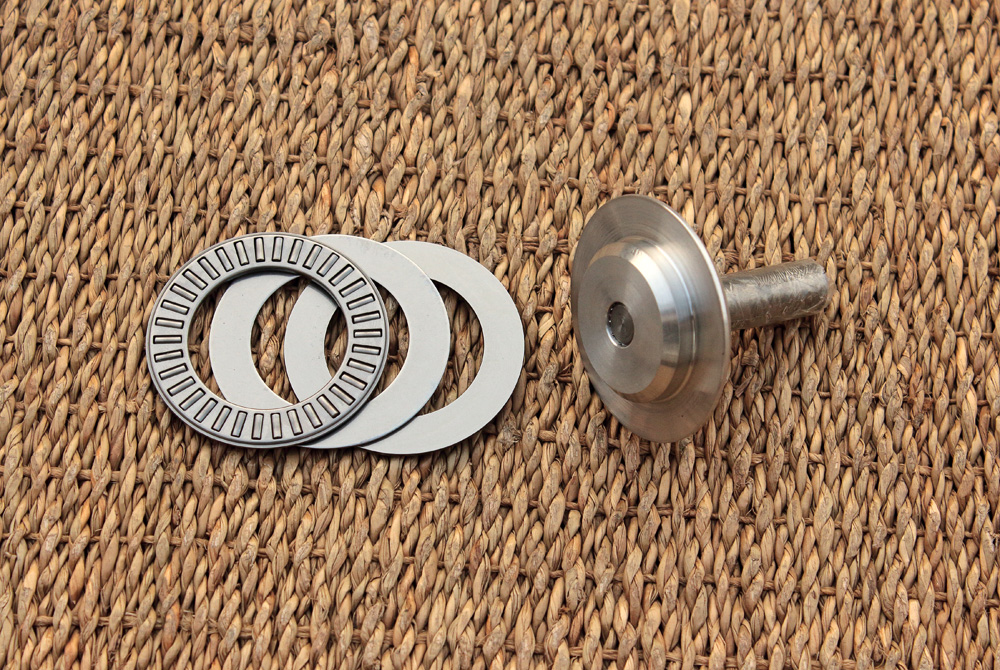
About refreshing of timing chain tension system I wrote in previous post. Here is manual tensioner mentioned in it:
I also ordered Liska lower idler wheel, now it's on its way to me.
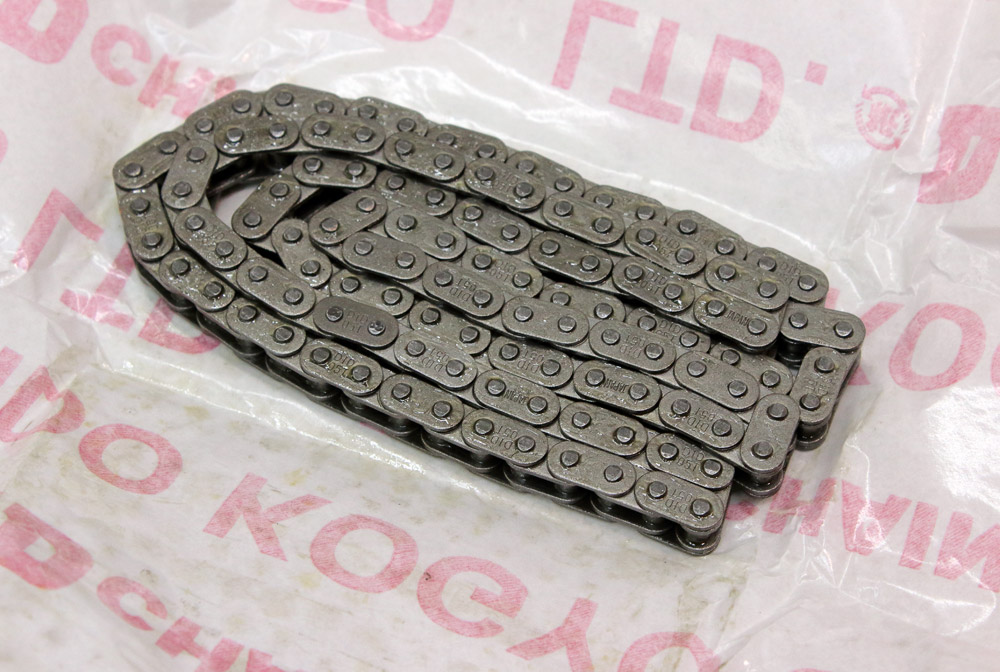
And as a matter of simple confidence I bought the new timing chain.
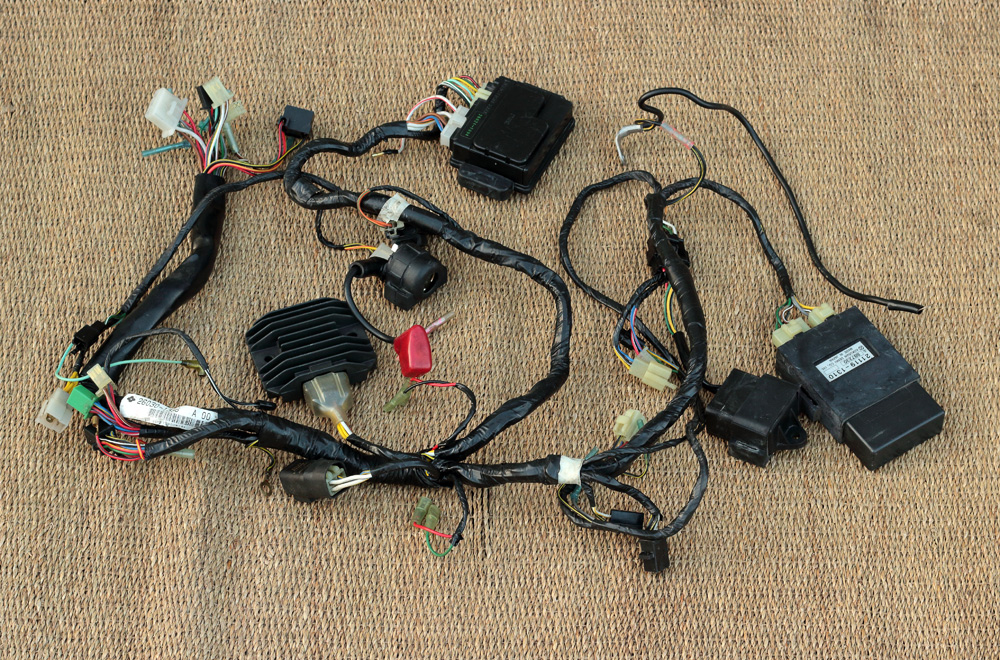
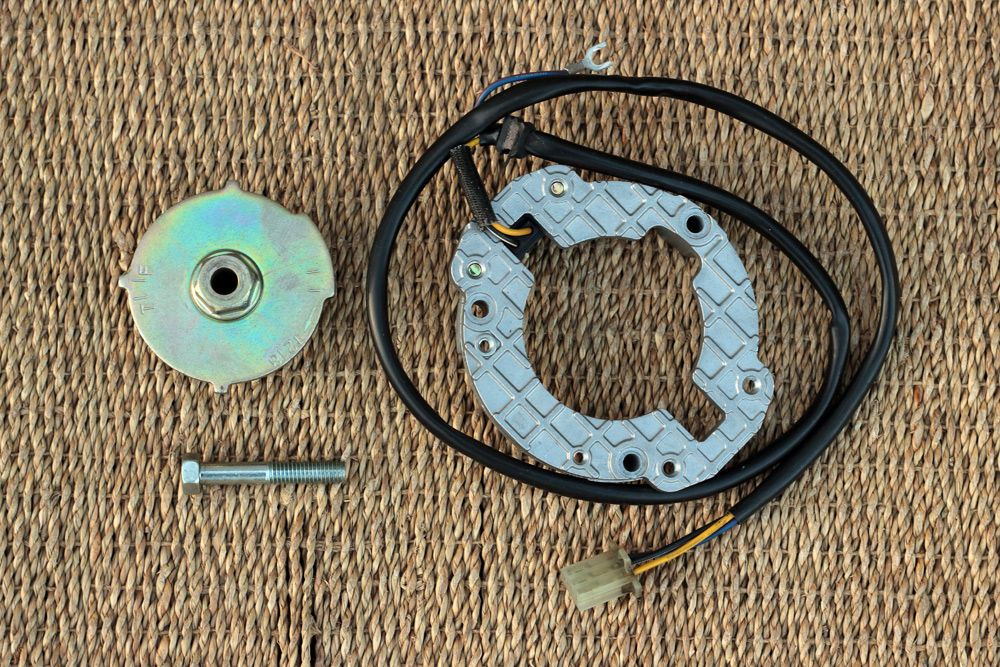
I have had enough of contact ignition maintaining and adjusting in the beginning of my motorcycle life some 15-20 years ago. Thus, I had no slightest intention to leave original contact ignition system in Kawasaki KZ650 cafe-racer project, nor I was fond of its old wiring and electrical components. The solution for replacement of KZ650 contact ignition is quite known: to use ignition picker, rotor and igniter unit from late air cooled inline four Kawasaki 750. My choice of model was obvious: I just bought Zephyr 750 ignition picker, rotor and complete wiring with all units included. Wiring was declared to be removed from bike with only 15K km on it and looked like new.
I even mostly finished with exhaust channels cleaning...
But later I changed my mind and bought KZ750 cylinder (1980, suitable with roller cam chain and its tension system as it has larger valves and wider channels.
We use intermediate warehouses (courier services) in different countries for buying goods that have no direct shipping to Ukraine. I found KZ750 cylinder head that looked promising on USA ebay, but the day I decided to buy it I didn't get enough sleep, thus I managed to order it with delivery to Germany intermediate warehouse instead of one in USA or instead with shipping directly to Ukraine. When cylinder head arrived to Germany it for sure didn't pass Germany customs. Representatives of courier service turned out to be not cooperative, so we together with my partner successfully managed communication with German customs on distance of thousand miles without custom brokerage involvement. It was a nervous bit to find contacts of particular customs unit responsible for the mentioned warehouse and to write proper explanation email with payments proofs attached and so on. The answer was not long in coming and to our amazement customs released parcel without further questions and no duty payments.
Here is this cylinder head. Clean intake, perfect camshaft seats and carbon deposits in combustion chamber that could be easily wiped out with rag soaked in carburetor cleaner - nice catch, even counting that delivery cost was more than part itself.
It's only flaw in my opinion is air injection channels of emission reducing system, however I plan to seal them and buy KZ750 valve cover of similar to KZ650 cover design, but with additional round caps to cover those channels.
I also bought Zephyr 750 camshafts. They have no tachometer gear (which I don't need anyway) , whereas it's much easier to find low mileage parts from newer motorcycles.
About refreshing of timing chain tension system I wrote in previous post. Here is manual tensioner mentioned in it:
I also ordered Liska lower idler wheel, now it's on its way to me.
And as a matter of simple confidence I bought the new timing chain.
I have had enough of contact ignition maintaining and adjusting in the beginning of my motorcycle life some 15-20 years ago. Thus, I had no slightest intention to leave original contact ignition system in Kawasaki KZ650 cafe-racer project, nor I was fond of its old wiring and electrical components. The solution for replacement of KZ650 contact ignition is quite known: to use ignition picker, rotor and igniter unit from late air cooled inline four Kawasaki 750. My choice of model was obvious: I just bought Zephyr 750 ignition picker, rotor and complete wiring with all units included. Wiring was declared to be removed from bike with only 15K km on it and looked like new.
Kawasaki KZ650 cafe-racer: in progress
Kawasaki Zephyr 750 (810ccm, 4in4, spoked wheels)
Honda CB815 "Eight Fifteen" cafe-racer
Yamaha XJ "Eight Ball" cafe-racer
www.gazzz-garage.com
Kawasaki Zephyr 750 (810ccm, 4in4, spoked wheels)
Honda CB815 "Eight Fifteen" cafe-racer
Yamaha XJ "Eight Ball" cafe-racer
www.gazzz-garage.com
Please Log in or Create an account to join the conversation.
- riturbo
-
- Offline
- Sustaining Member
-
Registered
- Posts: 838
- Thanks: 342
Re: KZ650 cafe-racer
29 May 2019 13:10
Ill be watching this . ")
Gpz 750 turbo The one I ride
Gpz 750 turbo Not finished
Gpz 750 turbo Not started
Gpz 550 1981
Gpz 550 1983
Bunch of other junk
Gpz 750 turbo Not finished
Gpz 750 turbo Not started
Gpz 550 1981
Gpz 550 1983
Bunch of other junk
Please Log in or Create an account to join the conversation.
- ThatGPzGuy
-
- Offline
- Sustaining Member
-
Registered
- More Sparky than Speed Racer
- Posts: 1549
- Thanks: 412
Re: KZ650 cafe-racer
29 May 2019 13:23
I'm in. What tank is that?
Jim
North GA
2016 Yamaha FJR1300ES
1982 GPz750 R1
1974 Kawasaki H1
1976 Kawasaki KZ400
1979 Yamaha XS650 cafe'
2001 KZ1000P (sold)
2001 Yamaha YZ426
1981 Honda XR200 stroked in an '89 CR125 chassis
1965 Mustang
1967 Triumph GT6
1976 Bronco
"If you didn't build it, it's not really yours"
North GA
2016 Yamaha FJR1300ES
1982 GPz750 R1
1974 Kawasaki H1
1976 Kawasaki KZ400
1979 Yamaha XS650 cafe'
2001 KZ1000P (sold)
2001 Yamaha YZ426
1981 Honda XR200 stroked in an '89 CR125 chassis
1965 Mustang
1967 Triumph GT6
1976 Bronco
"If you didn't build it, it's not really yours"
Please Log in or Create an account to join the conversation.
- Scirocco
-

- Offline
- Premium Member
-

Registered
- Never change a running system
- Posts: 4397
- Thanks: 2260
Re: KZ650 cafe-racer
29 May 2019 15:20
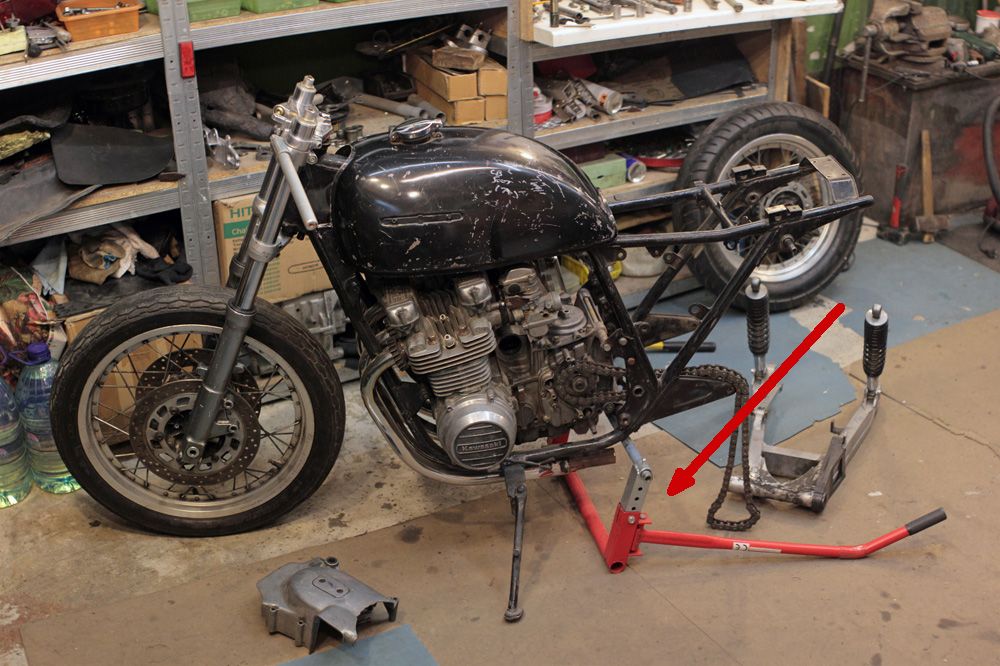
I will follow your bike build but have to ask about where did you get your bike quick lift???
My 1975 Z 1 B 900 Project
www.kzrider.com/forum/11-projects/605133...ears-deep-sleep-mode
www.kzrider.com/forum/11-projects/605133...ears-deep-sleep-mode
Please Log in or Create an account to join the conversation.
- gazzz
-
Topic Author
- Offline
- Sustaining Member
-
Registered
- Posts: 563
- Thanks: 319
Re: KZ650 cafe-racer
29 May 2019 23:55 - 29 May 2019 23:56
Thanks!
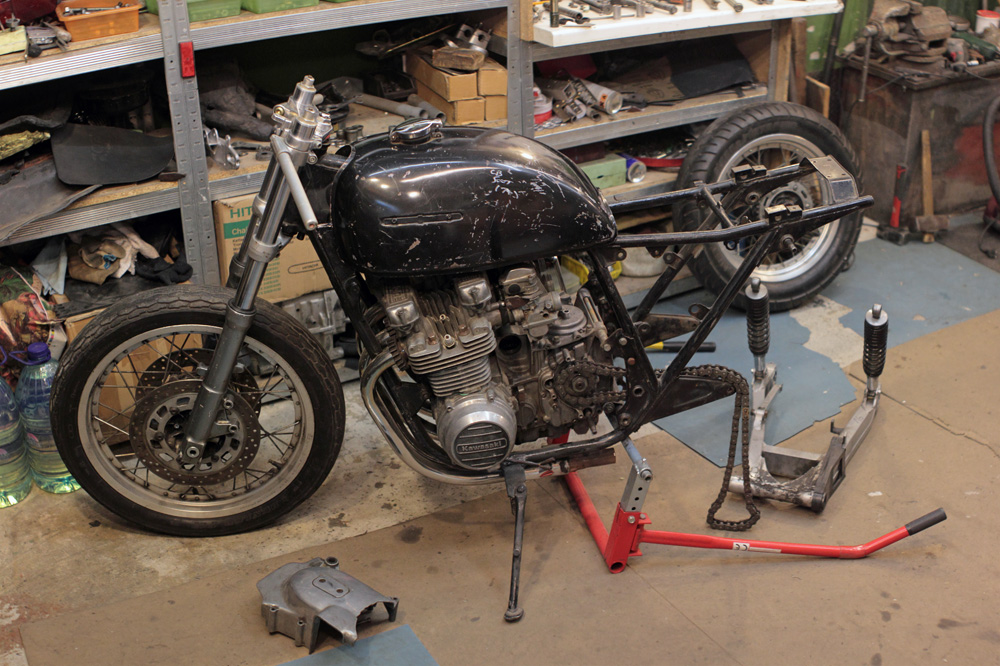
It's Honda CB500T (twin) tank. However, I have not finished modifying it to fit KZ frame properly.
Here it is: www.louis.eu/artikel/rothewald-chopper-stand-universal/10003271
I'm in. What tank is that?
It's Honda CB500T (twin) tank. However, I have not finished modifying it to fit KZ frame properly.
I will follow your bike build but have to ask about where did you get your bike quick lift???
Here it is: www.louis.eu/artikel/rothewald-chopper-stand-universal/10003271
Kawasaki KZ650 cafe-racer: in progress
Kawasaki Zephyr 750 (810ccm, 4in4, spoked wheels)
Honda CB815 "Eight Fifteen" cafe-racer
Yamaha XJ "Eight Ball" cafe-racer
www.gazzz-garage.com
Kawasaki Zephyr 750 (810ccm, 4in4, spoked wheels)
Honda CB815 "Eight Fifteen" cafe-racer
Yamaha XJ "Eight Ball" cafe-racer
www.gazzz-garage.com
Last edit: 29 May 2019 23:56 by gazzz.
The following user(s) said Thank You: Scirocco
Please Log in or Create an account to join the conversation.
- gazzz
-
Topic Author
- Offline
- Sustaining Member
-
Registered
- Posts: 563
- Thanks: 319
Re: KZ650 cafe-racer
28 Jun 2019 12:46
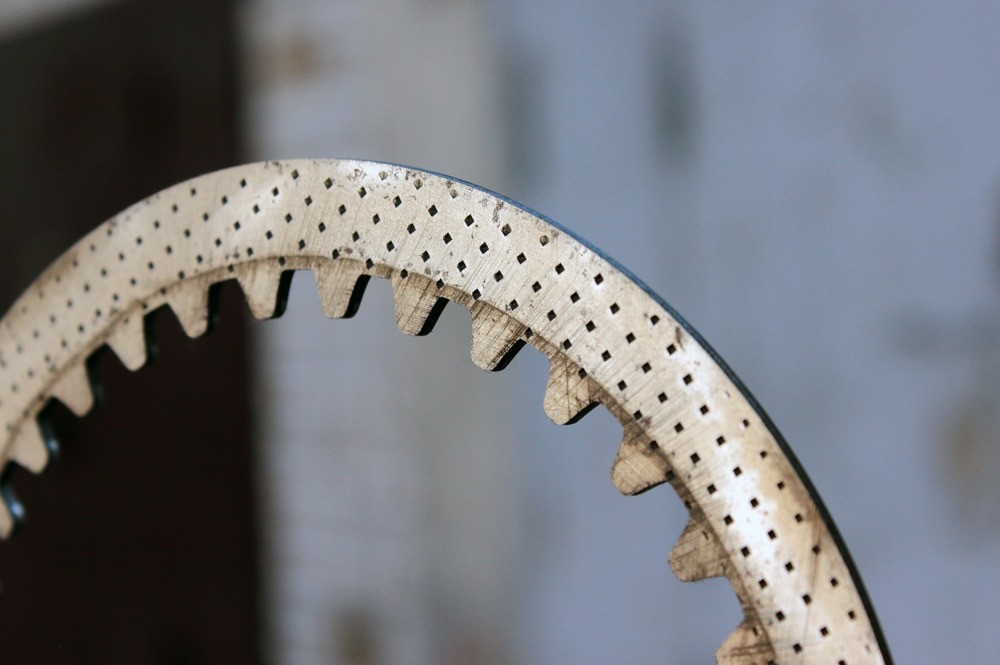
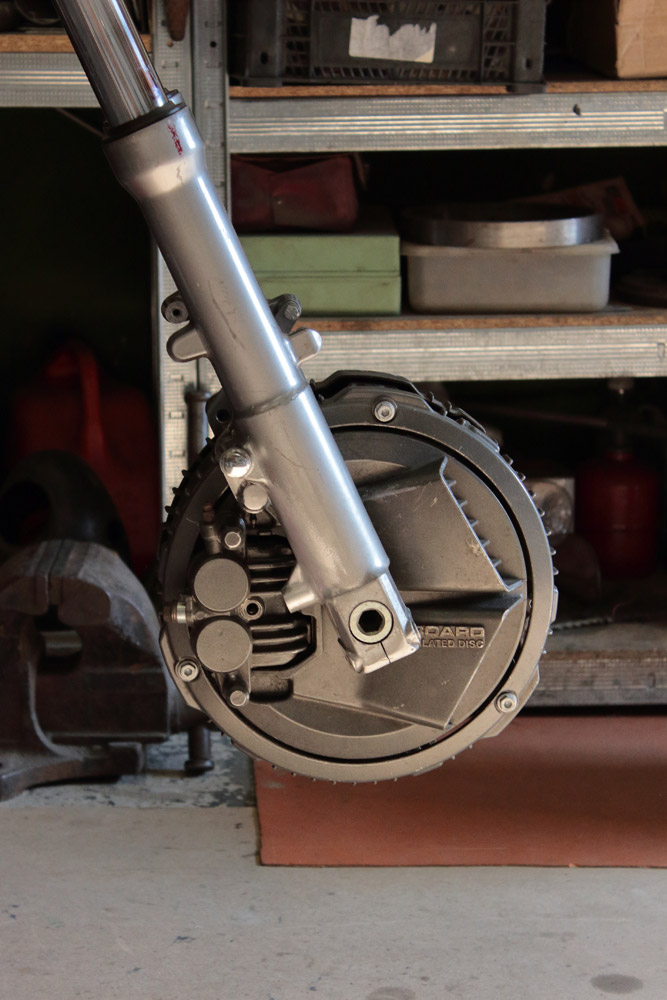
Drum brakes prevailed in Moto GP up until they where overpowered by disc brakes in the middle of 1970s, but they still are recognizable icon and symbol of vintage sport bikes. Why I am about sport drum brakes? The matter is simple: in the beginning of 1980s Honda released few models of motorcycles with Comstar wheels’ specific disc brake system which was called “inboard ventilated disc”. The idea was to hide brake discs into casing which was visually alike to drum brakes. Discs were protected from moisture, so braking in wet weather was more predictable. Such kind of protection also allowed to improve braking capabilities by using discs made of more proper but less rust resistant material.
Honda manufactured bikes with “inboard ventilated disc” brake systems of few different configurations until the end of 1980s when they gave up their position to classic brake disc systems. The most impressive representative of motorcycles with “inboard ventilated disc” brake system was CBX550. It has this system for both, front and rear brakes and moreover, there are two brake discs in front. Thus, both its wheels looked like direct descendant of 1960s-1970s Moto GP brakes, if we discard the fact that they were not spoked, but Comstar wheels. Sure, once I noticed CBX550 wheels I couldn’t help but thinking about using them in Kawasaki KZ650 project.
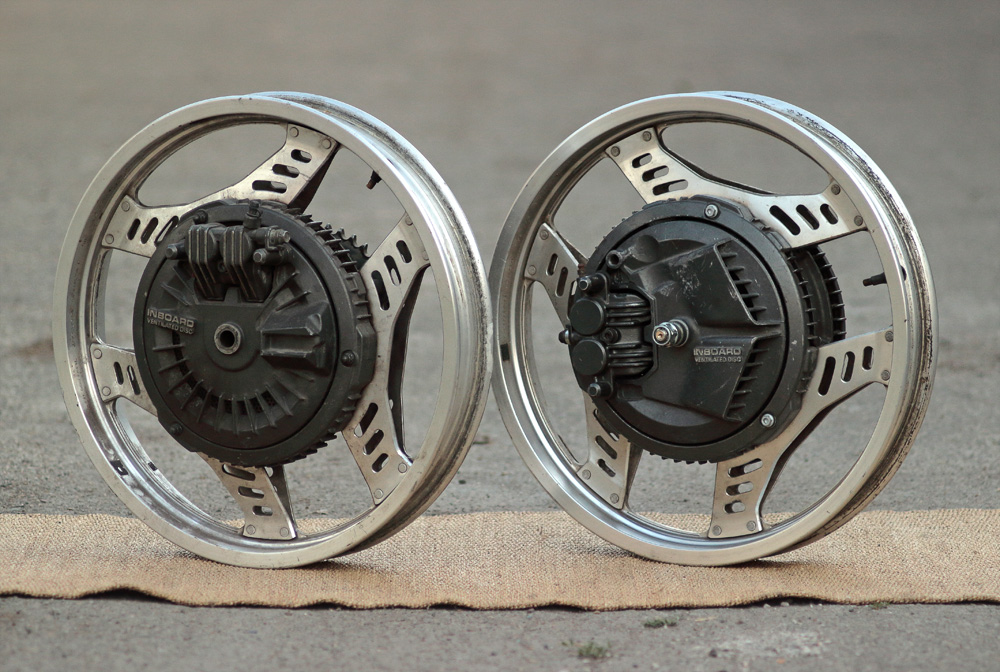
These wheels as was said are Comstar, so they may be disassembled and converted into spoked wheels. I am not the first who do such conversion, but I found the way to add some specific features to it.
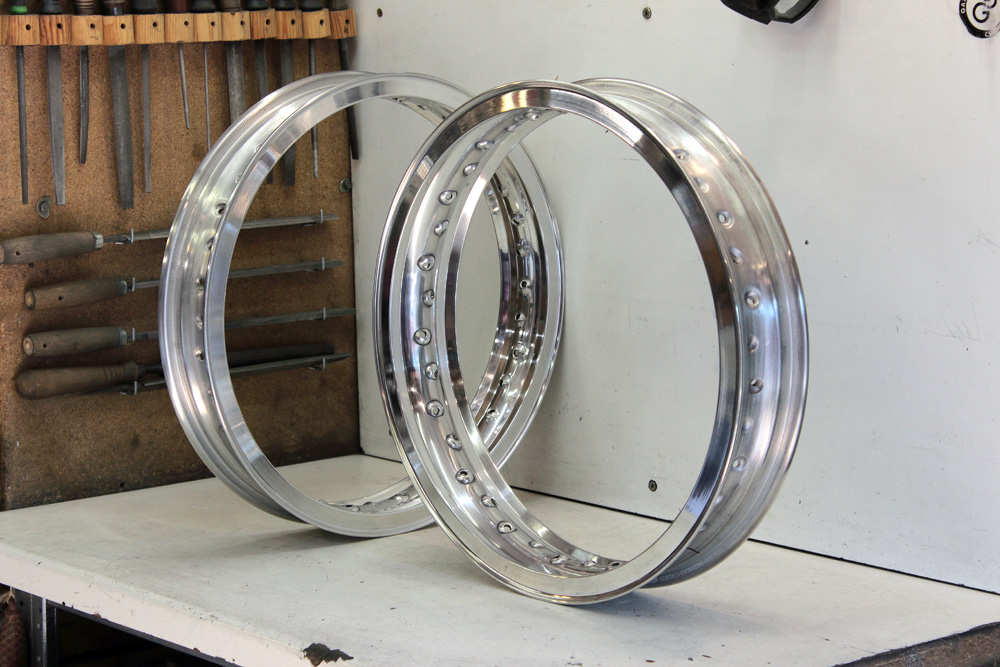
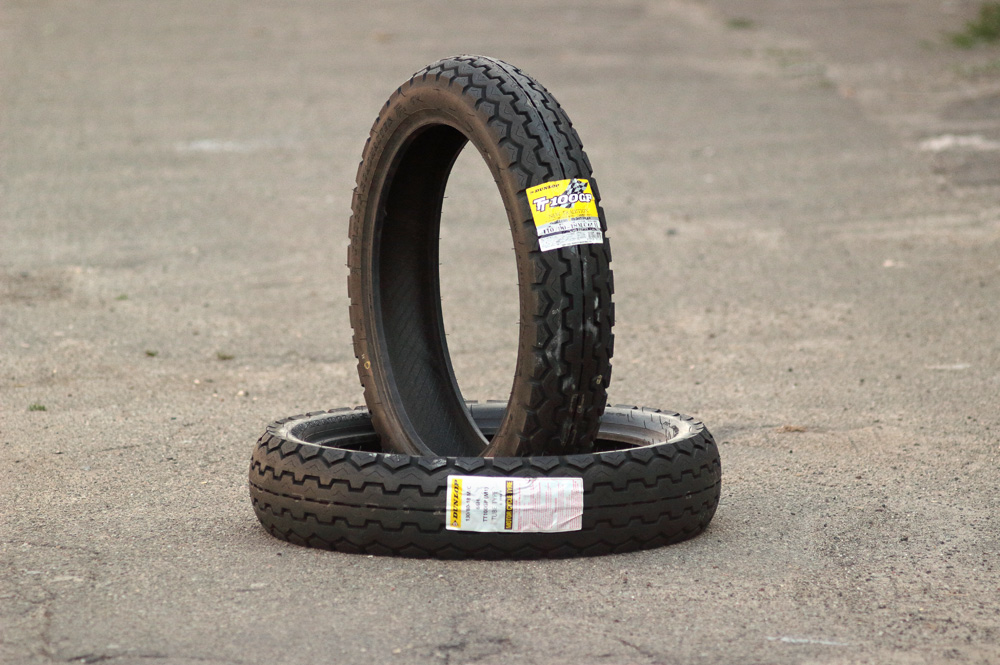
For conversion I initially chose replica of Borrani Record rims (made in Italy), also called high shoulder or H-type rims. I chose 18″ 2.50″ wide rim for front wheel and 18″ 3.00″ rim – for rear.
Dunlop manufacture modern version of legendary TT100 in two version: ordinary TT100 and TT100GP with improved tire compound for better grip. As it’s written about GP version on website of Dunlop:
Thus I stopped my choice on Dunlop TT100GP. I bought brand new 110/90-18 tyre (Had to order it from Japan) for front wheel and 130/90-18 – for rear. They are lovely looking tyres:
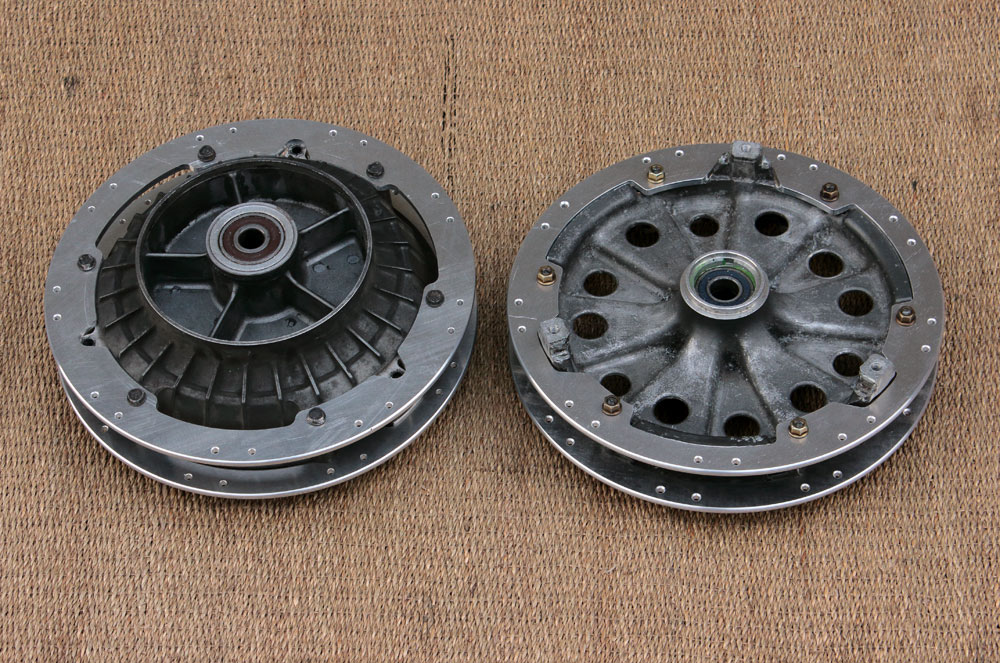
Comstar wheels consist of hub, rim and banana-like spacer that are mounted by rivets to rim and by 7mm bolt and nuts with triangle heads to hub. Firstly I removed triangle nuts with help of 11mm 12-point socket (I pressed it on nut) and impact wrench.
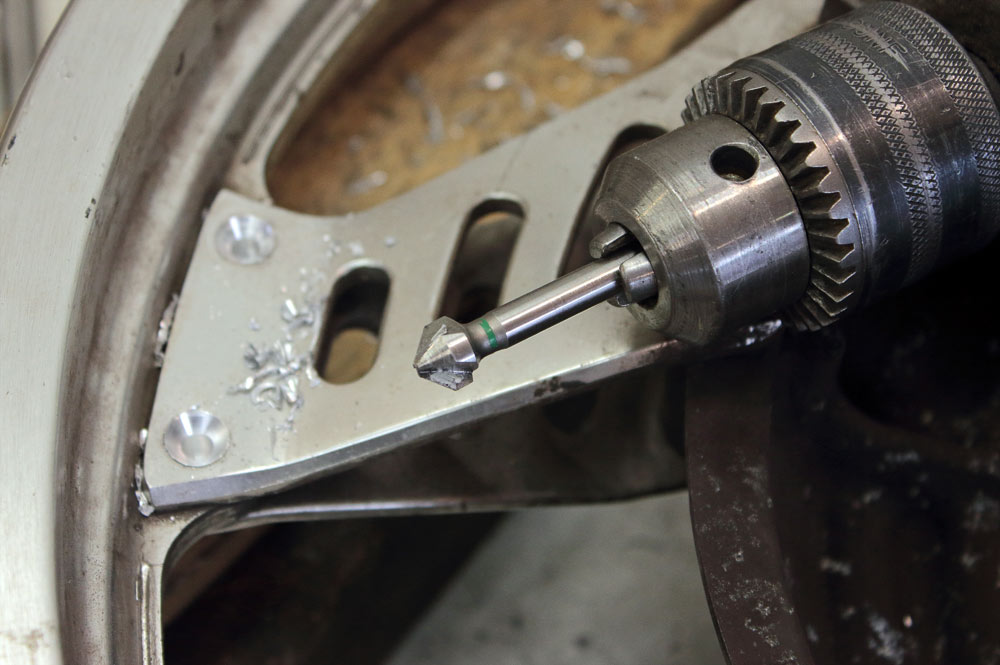
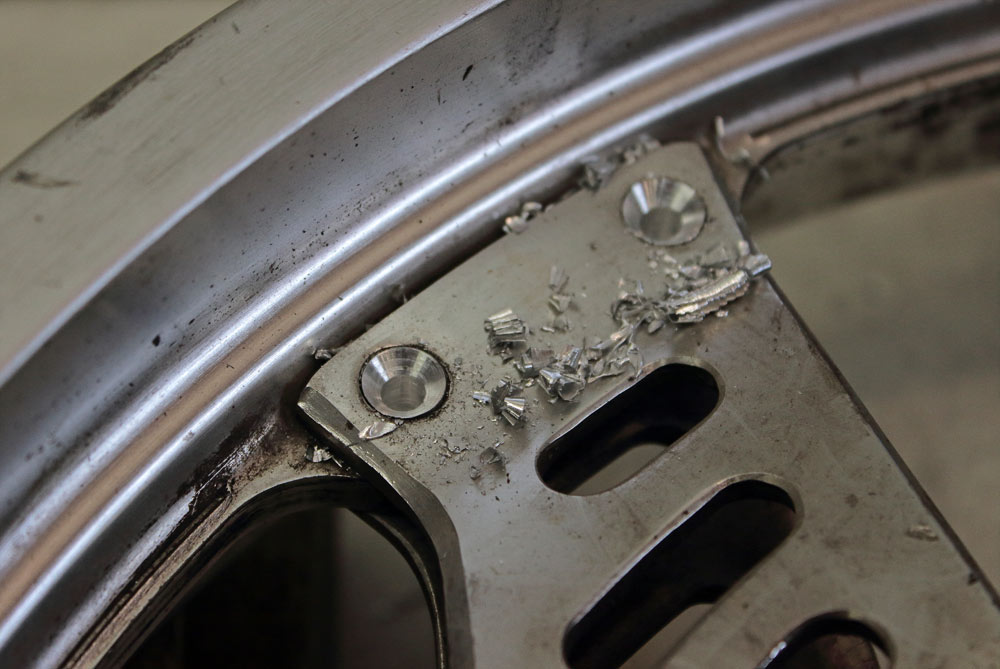
Some drilling and countersink bit solved question of rivets. After such treatment they could be easy knocked out.
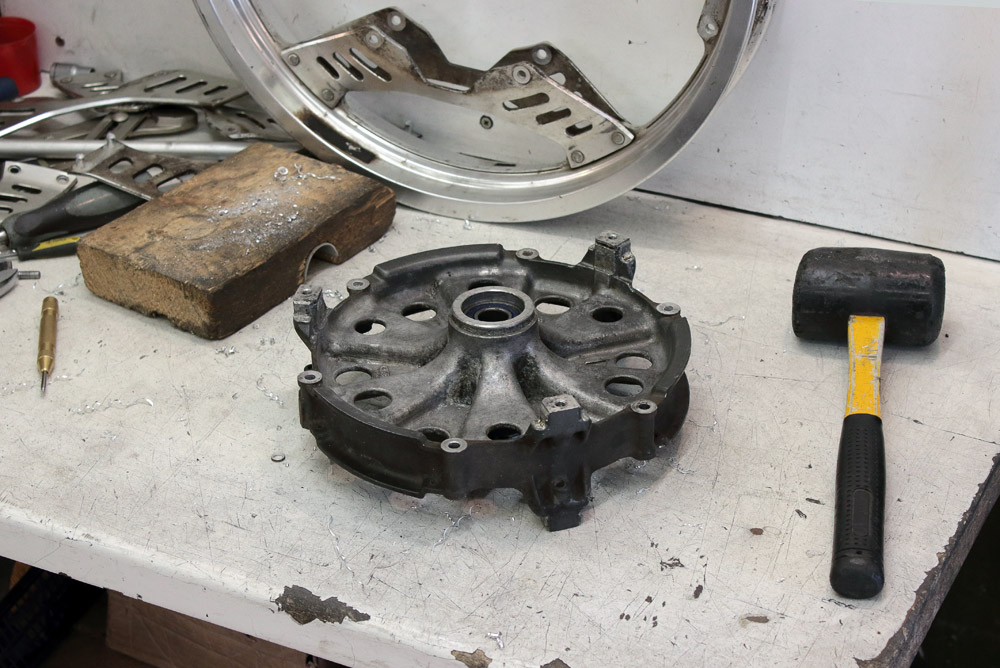
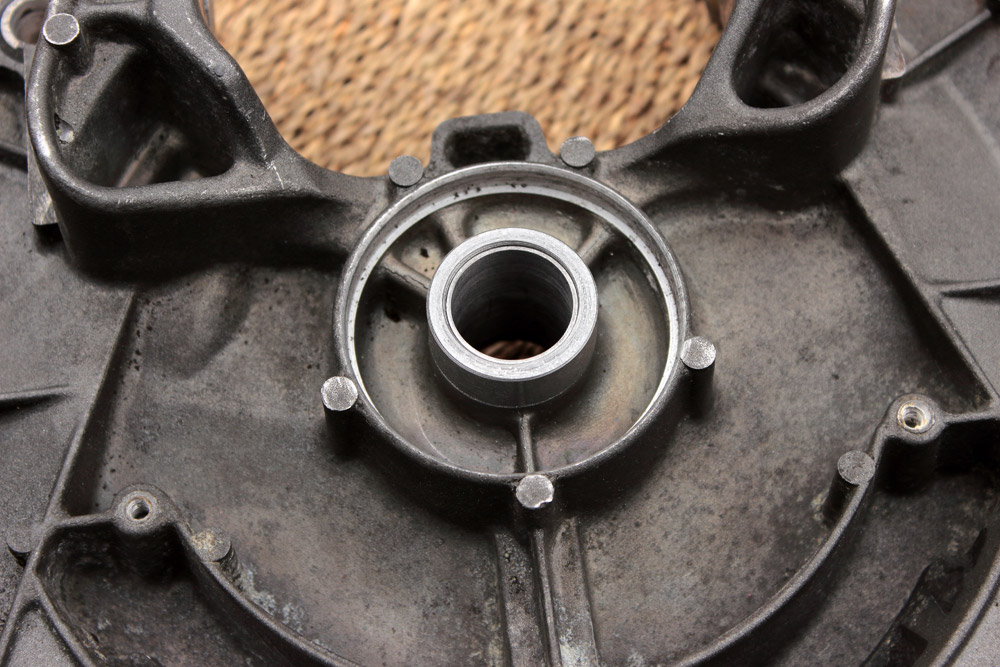
Honda CBX550 has 15mm front wheel axle, while 1996 Kawasaki ZX6R which front fork I used in this my project has 20mm front axle. Advantages of thicker axle are obvious, so first issue I had to solve was convert all parts to fit 20mm axle. Wheel hub was simple to manage: it was only question of new bearings with 20mm inner diameter and new spacer. Task of brake boards was a bit harder: some accurate boring had to be done.
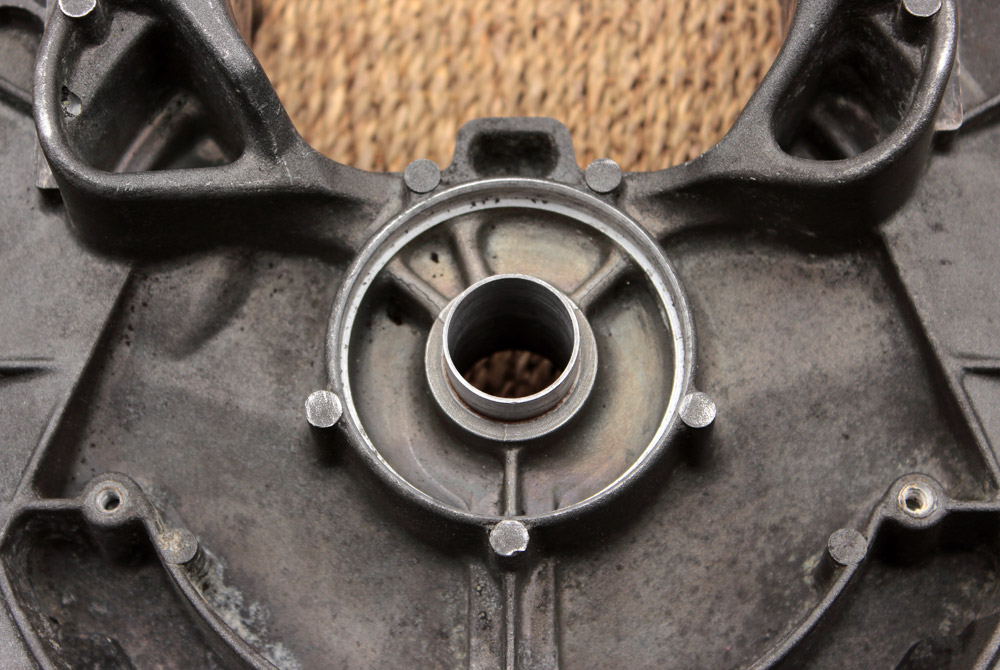
As you may see the walls of old axle shaft became too thin, thus reinforcing spacers had to be made.
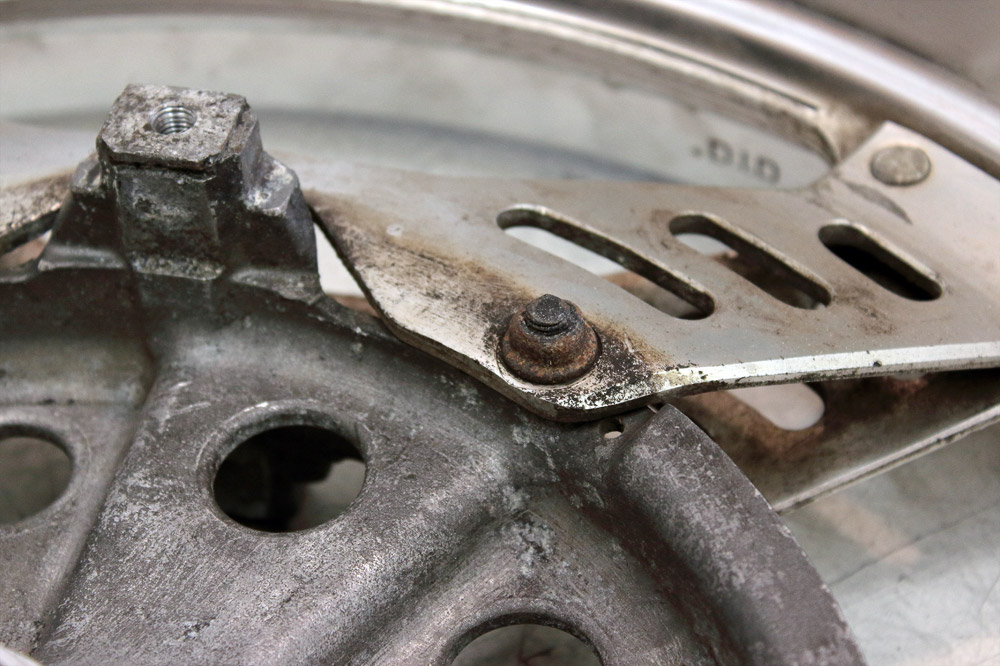
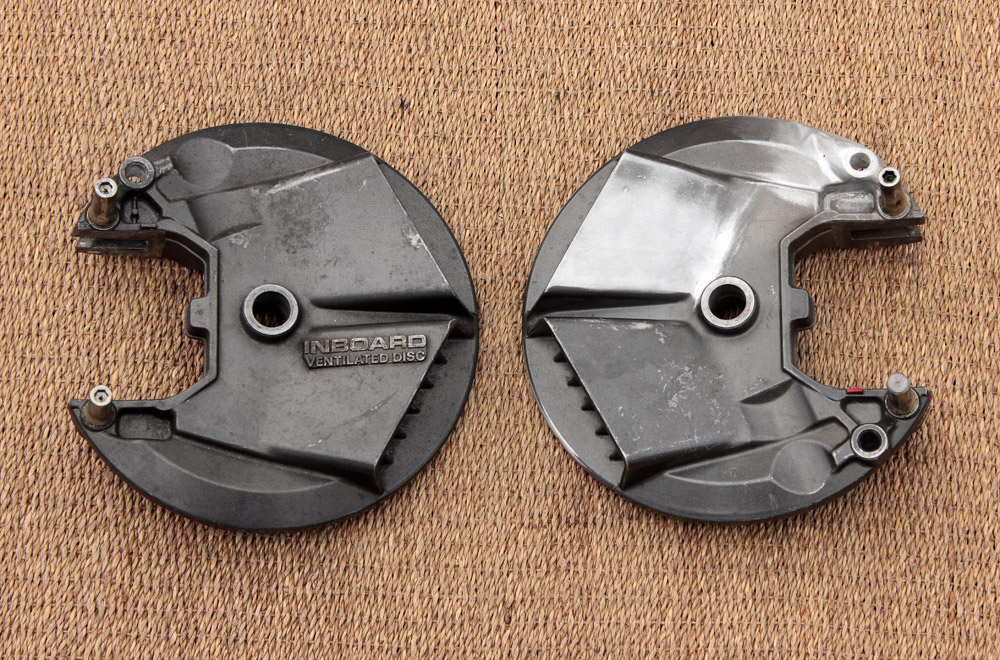
What I really don’t like in CBX550 wheel is brake boards’ asymmetry. As you may see on photo below, right and left boards have quite different configuration because left board was mounted to fork anti dive drive.
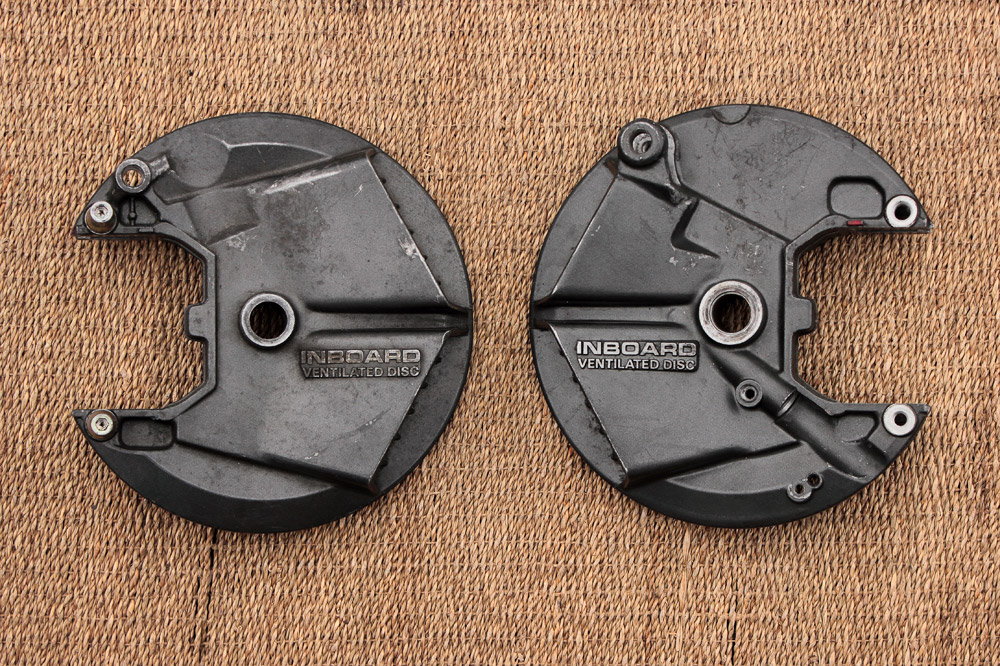
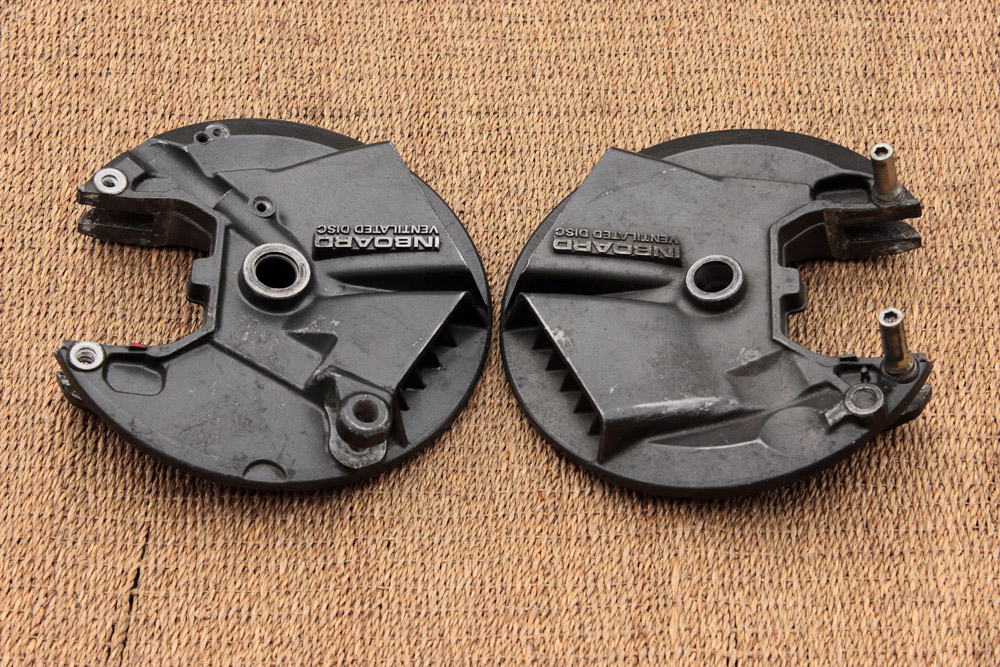
After close look on both boards I came to conclusion that I could use another one left brake board to replace right board. So I got spare left brake board and applied to it next list of modifications:
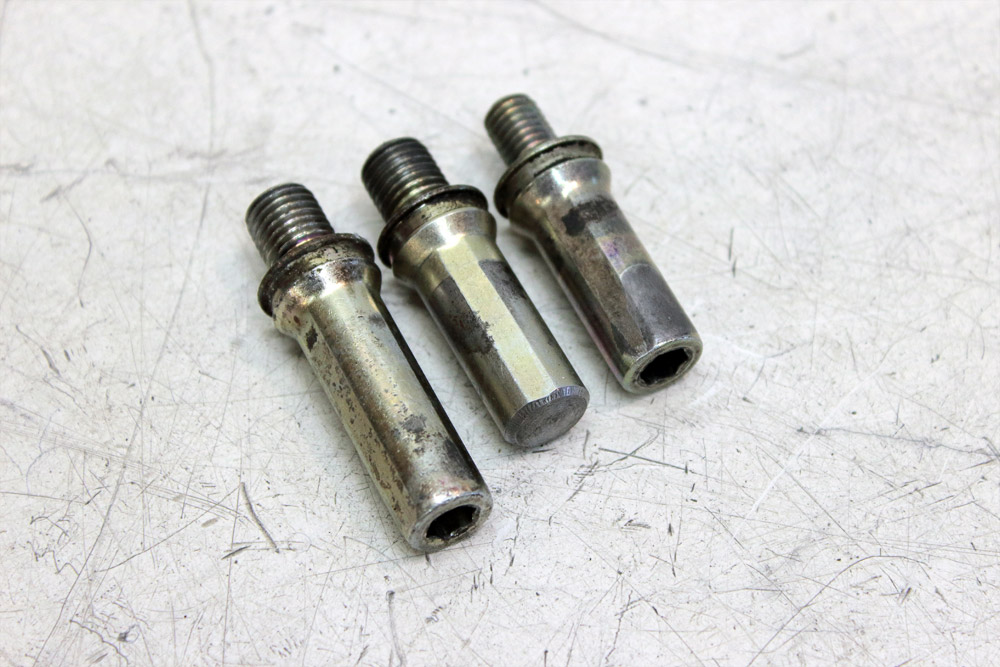
First, brake board has two guide pins for brake caliper. Pins have same diameter, but upper pin is longer and have 10mm thread, while lower is shorter and has 8mm thread. When left board is place instead of right it stands upside down, so I drilled smaller hole and re-cut it with 10mm thread. Now I had two holes with 10mm thread and longer pin might be installed in place of short. One of the longer pins was shortened in lathe machine and provide me lower pin with 10mm thread.
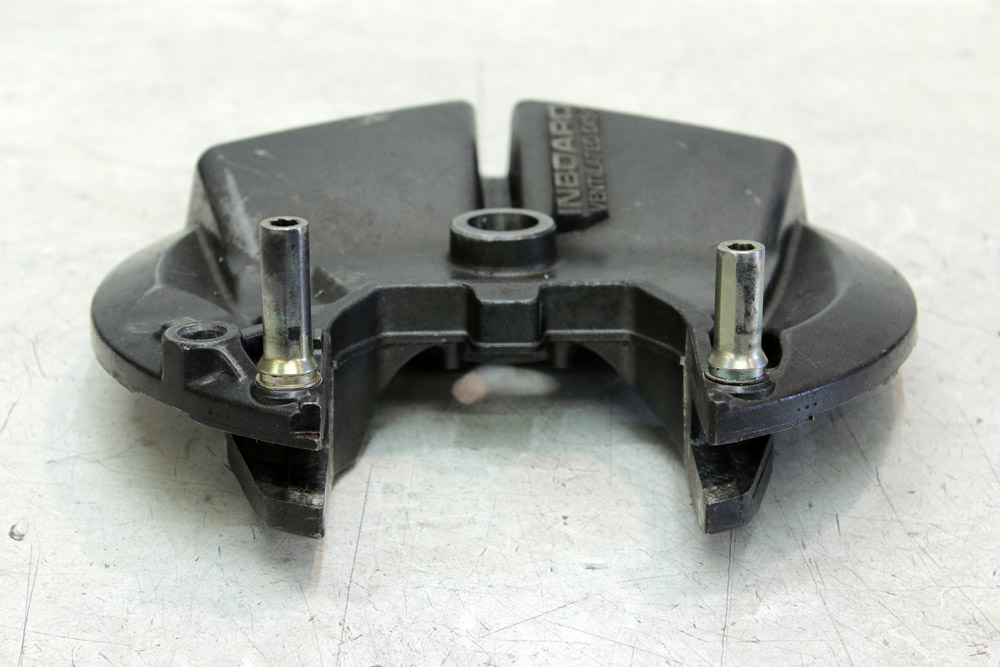
Whole Honda “inboard ventilated disc” system is quite unusual and it has a lot of specific features. One of them is how brake boards are mounted to the fork. Originally Honda CBX550 right brake board is prevented from rotation around wheel axle by special bolt with 12mm thread and recessed to 10mm pin-like nose. Therefore there is 10mm hole for bolt nose in board, near the upper brake caliper guide pin.
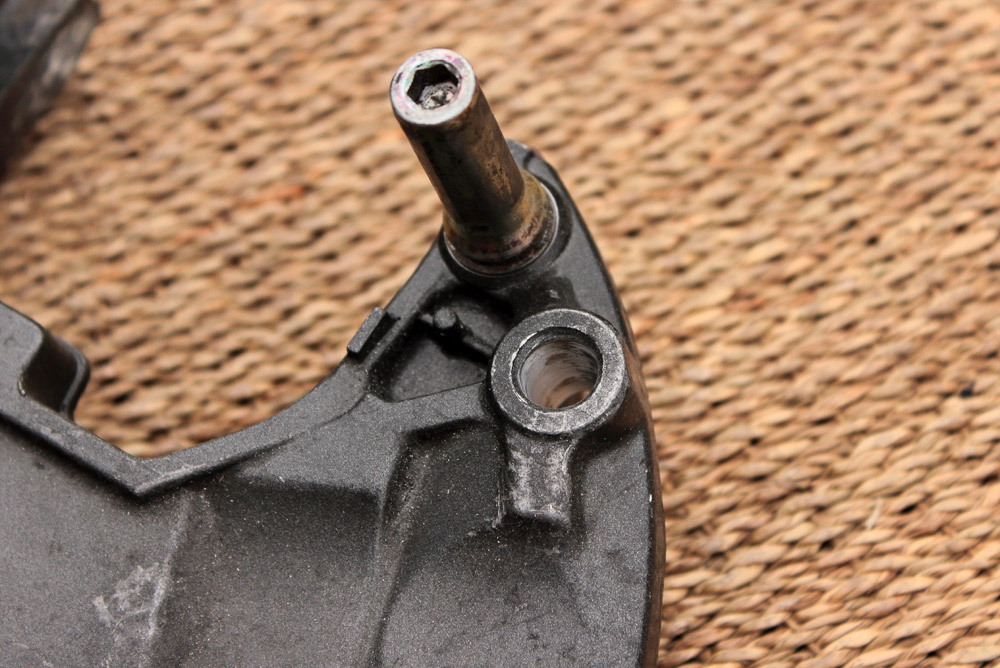

When right board is installed in place of left board slot for bolt nose became useless, as it positioned near the lower pin. With help of specialist skillful with TIG welder I reinforced end of brake board that is opposite to those one with brake slot in it. Once welding and grinding were done I drilled hole absolutely symmetrically positioned to original slot.
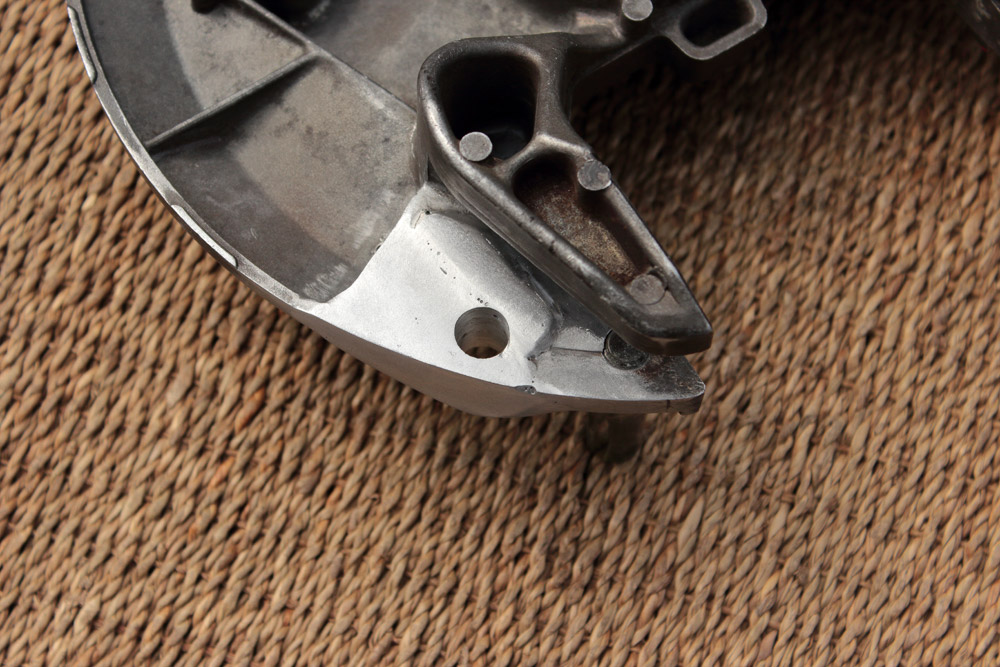
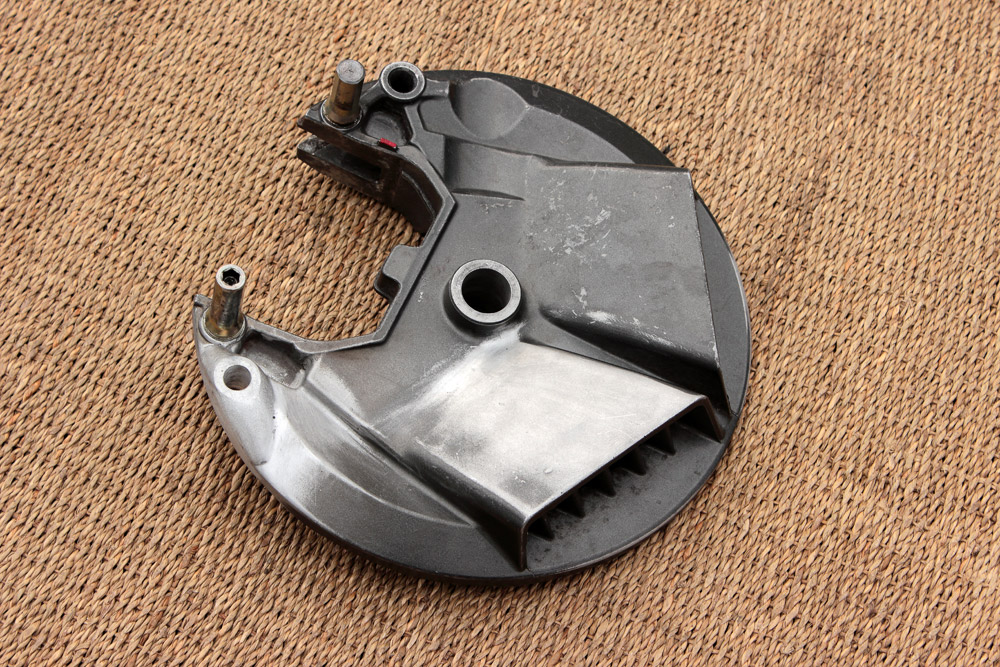
In result of these modifications I got two mostly symmetrical brake boards for which I could design symmetrical parts for “boards to fork” mounts. I also plan to erase all “Inboard ventilated disc” letterings from brake boards to make their look yet a bit more close to look of drum brakes.
Honda manufactured bikes with “inboard ventilated disc” brake systems of few different configurations until the end of 1980s when they gave up their position to classic brake disc systems. The most impressive representative of motorcycles with “inboard ventilated disc” brake system was CBX550. It has this system for both, front and rear brakes and moreover, there are two brake discs in front. Thus, both its wheels looked like direct descendant of 1960s-1970s Moto GP brakes, if we discard the fact that they were not spoked, but Comstar wheels. Sure, once I noticed CBX550 wheels I couldn’t help but thinking about using them in Kawasaki KZ650 project.
These wheels as was said are Comstar, so they may be disassembled and converted into spoked wheels. I am not the first who do such conversion, but I found the way to add some specific features to it.
For conversion I initially chose replica of Borrani Record rims (made in Italy), also called high shoulder or H-type rims. I chose 18″ 2.50″ wide rim for front wheel and 18″ 3.00″ rim – for rear.
Dunlop manufacture modern version of legendary TT100 in two version: ordinary TT100 and TT100GP with improved tire compound for better grip. As it’s written about GP version on website of Dunlop:
“Benefits:
Modern race tread compounds used;
Extra grip capability makes this tyre well suited to fit to valuable classic bikes used on the road;…”
Thus I stopped my choice on Dunlop TT100GP. I bought brand new 110/90-18 tyre (Had to order it from Japan) for front wheel and 130/90-18 – for rear. They are lovely looking tyres:
Comstar wheels consist of hub, rim and banana-like spacer that are mounted by rivets to rim and by 7mm bolt and nuts with triangle heads to hub. Firstly I removed triangle nuts with help of 11mm 12-point socket (I pressed it on nut) and impact wrench.
Some drilling and countersink bit solved question of rivets. After such treatment they could be easy knocked out.
Honda CBX550 has 15mm front wheel axle, while 1996 Kawasaki ZX6R which front fork I used in this my project has 20mm front axle. Advantages of thicker axle are obvious, so first issue I had to solve was convert all parts to fit 20mm axle. Wheel hub was simple to manage: it was only question of new bearings with 20mm inner diameter and new spacer. Task of brake boards was a bit harder: some accurate boring had to be done.
As you may see the walls of old axle shaft became too thin, thus reinforcing spacers had to be made.
What I really don’t like in CBX550 wheel is brake boards’ asymmetry. As you may see on photo below, right and left boards have quite different configuration because left board was mounted to fork anti dive drive.
After close look on both boards I came to conclusion that I could use another one left brake board to replace right board. So I got spare left brake board and applied to it next list of modifications:
First, brake board has two guide pins for brake caliper. Pins have same diameter, but upper pin is longer and have 10mm thread, while lower is shorter and has 8mm thread. When left board is place instead of right it stands upside down, so I drilled smaller hole and re-cut it with 10mm thread. Now I had two holes with 10mm thread and longer pin might be installed in place of short. One of the longer pins was shortened in lathe machine and provide me lower pin with 10mm thread.
Whole Honda “inboard ventilated disc” system is quite unusual and it has a lot of specific features. One of them is how brake boards are mounted to the fork. Originally Honda CBX550 right brake board is prevented from rotation around wheel axle by special bolt with 12mm thread and recessed to 10mm pin-like nose. Therefore there is 10mm hole for bolt nose in board, near the upper brake caliper guide pin.
When right board is installed in place of left board slot for bolt nose became useless, as it positioned near the lower pin. With help of specialist skillful with TIG welder I reinforced end of brake board that is opposite to those one with brake slot in it. Once welding and grinding were done I drilled hole absolutely symmetrically positioned to original slot.
In result of these modifications I got two mostly symmetrical brake boards for which I could design symmetrical parts for “boards to fork” mounts. I also plan to erase all “Inboard ventilated disc” letterings from brake boards to make their look yet a bit more close to look of drum brakes.
Kawasaki KZ650 cafe-racer: in progress
Kawasaki Zephyr 750 (810ccm, 4in4, spoked wheels)
Honda CB815 "Eight Fifteen" cafe-racer
Yamaha XJ "Eight Ball" cafe-racer
www.gazzz-garage.com
Kawasaki Zephyr 750 (810ccm, 4in4, spoked wheels)
Honda CB815 "Eight Fifteen" cafe-racer
Yamaha XJ "Eight Ball" cafe-racer
www.gazzz-garage.com
Please Log in or Create an account to join the conversation.
- gazzz
-
Topic Author
- Offline
- Sustaining Member
-
Registered
- Posts: 563
- Thanks: 319
Re: KZ650 cafe-racer
28 Jun 2019 12:58
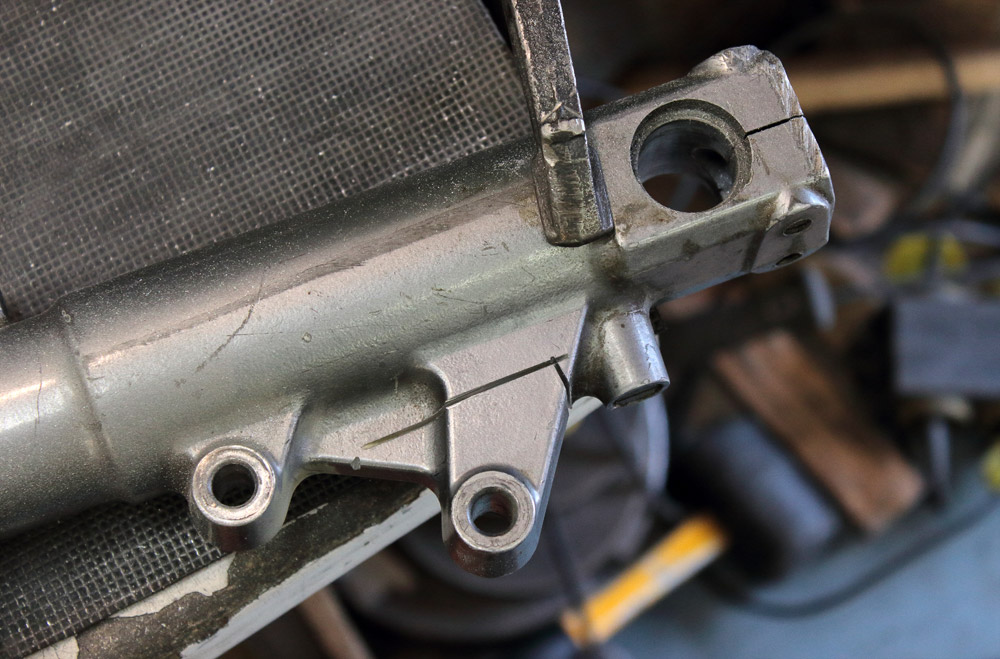
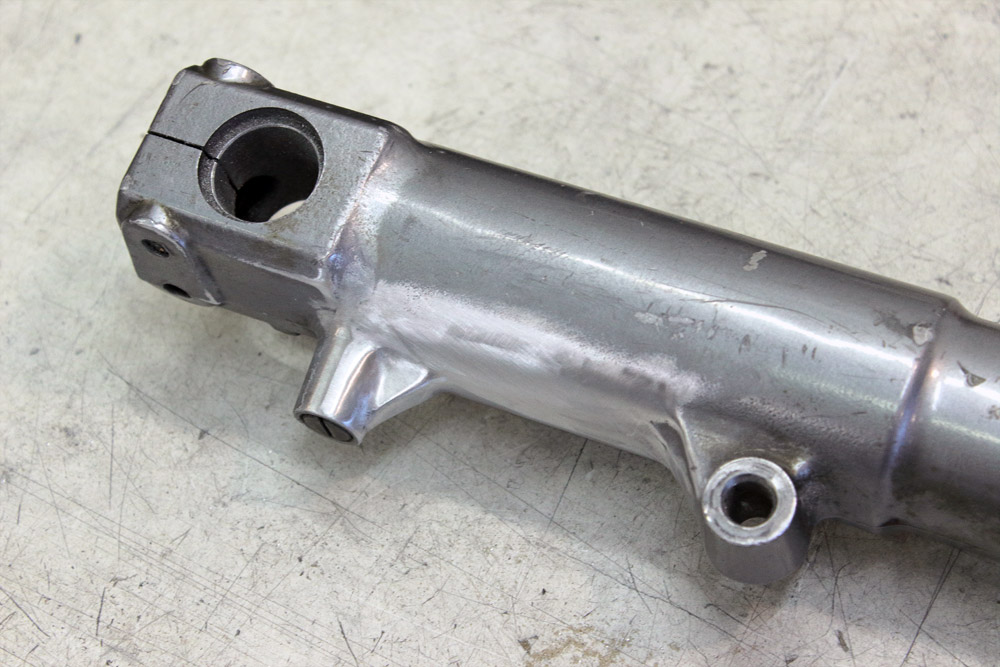
The mounts gave me a real headache. It looked like there was no even slight chance to make Honda CBX550 front wheel and Kawasaki ZX6R front fork compatible in easy way. I tried to workout couple of solutions, but they all seemed overcomplicated. But after some thinking and with some help of one old friend of mine I found solution and begin embody my plan immediately.
First, I cut lower brake calipers’ mount from outer fork tunes and grinded their surface to make a look that there never were any mounts.
Then I cut out two parts from 8mm steel plate, drilled holes and cut thread:
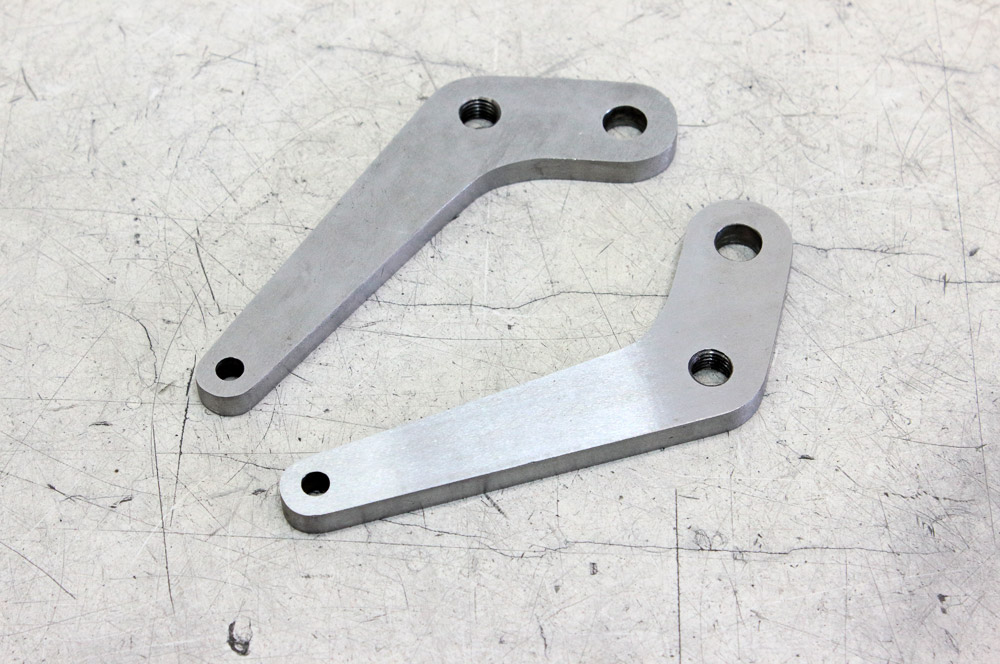
I ordered two sets of machined parts:
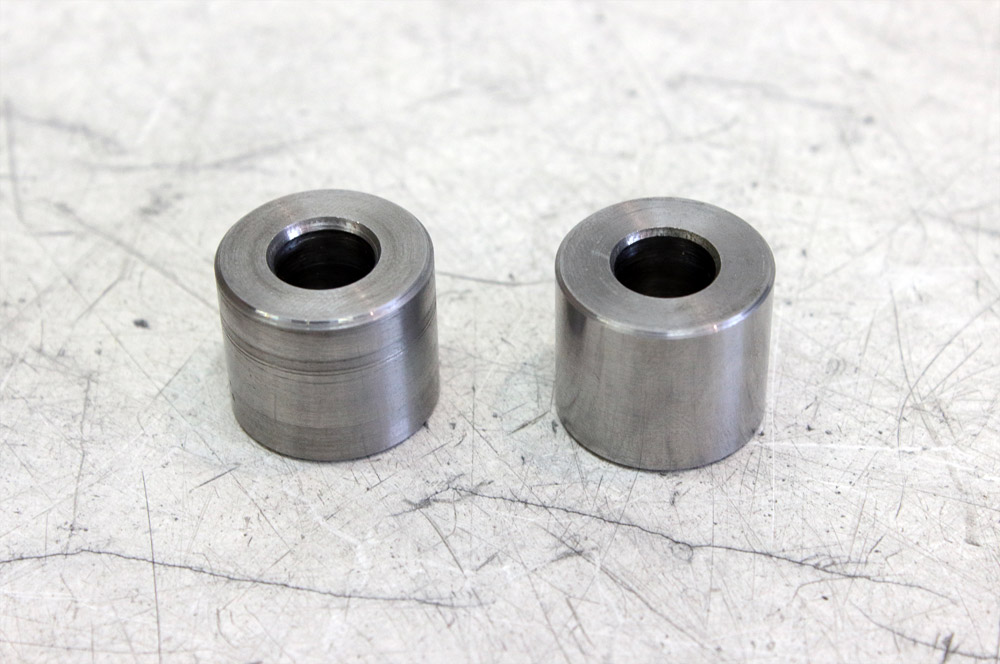
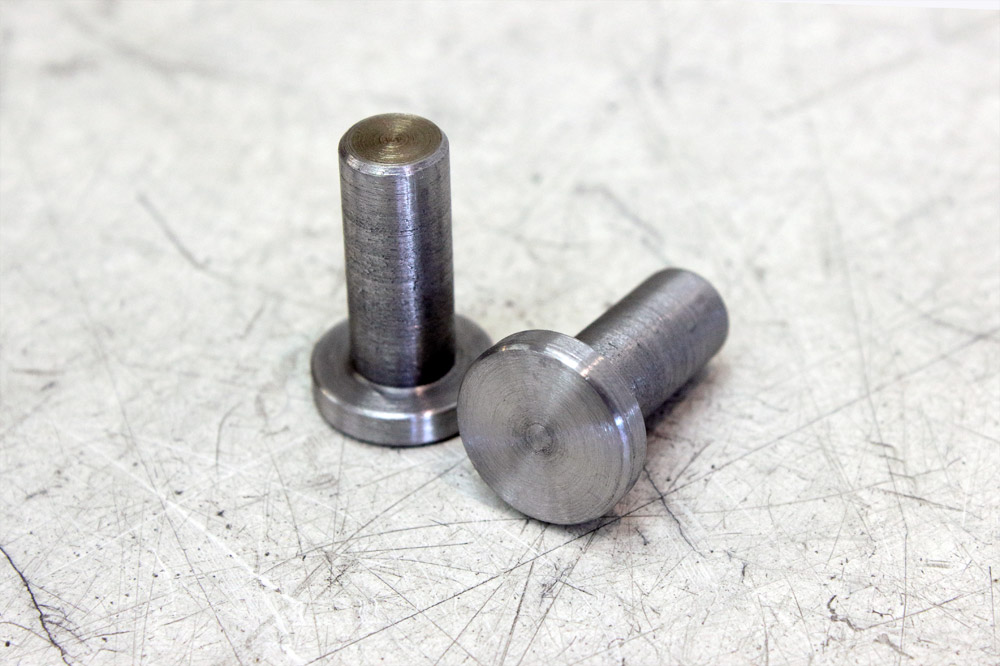
And then these parts were welded together:
And that’s how all look assembled together:
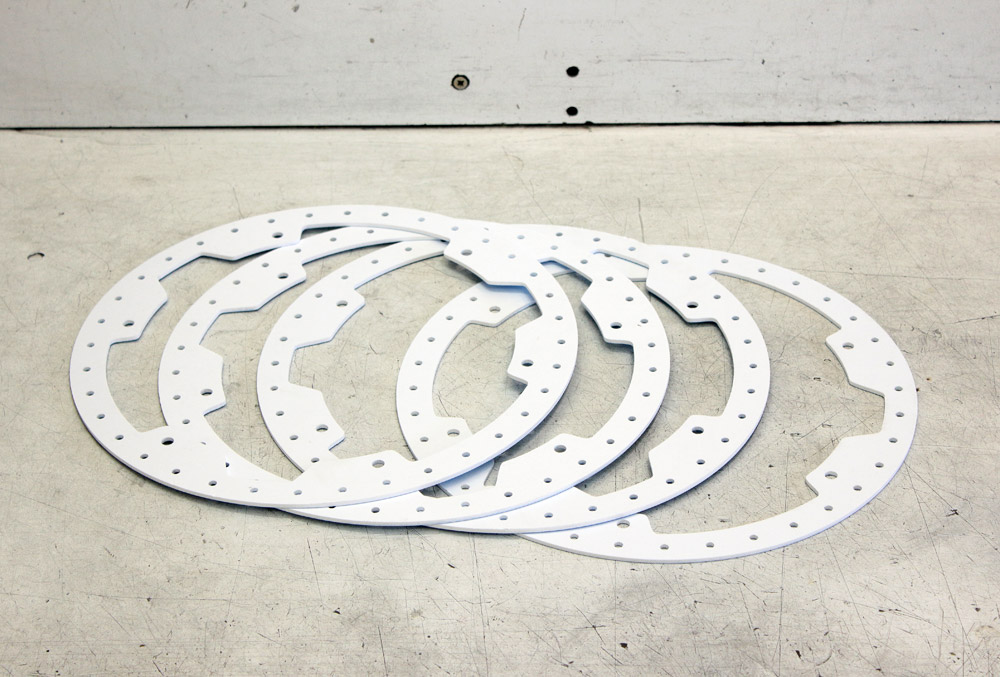
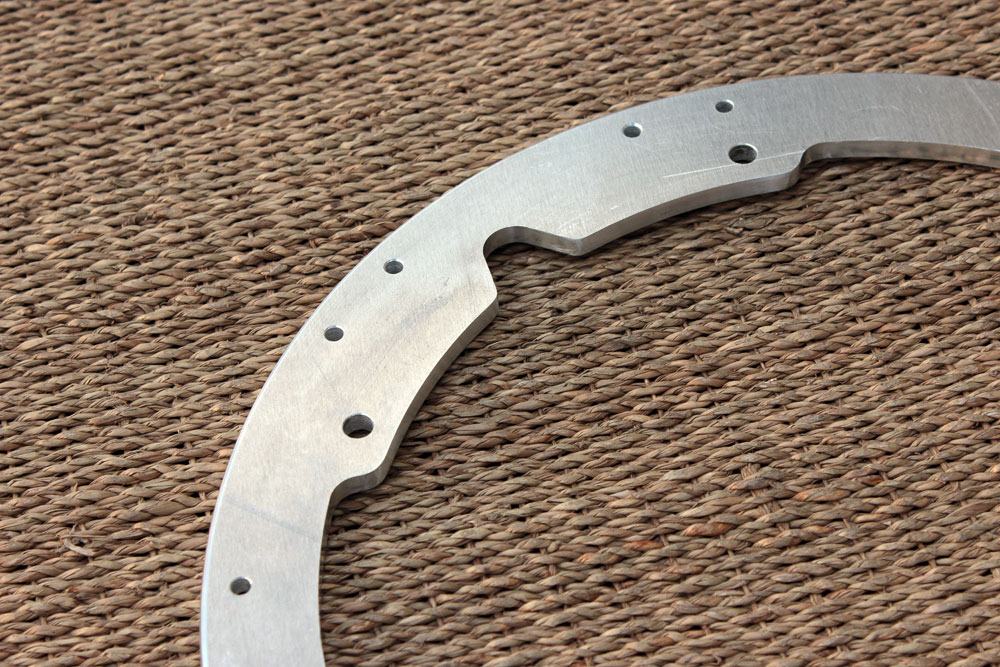
Once I got bare hubs I made all measuring and then drew first version of blueprints. I chose 6mm 2024 aluminum alloy for spoke adapters and this aluminum as well as CNC machining isn’t cheap thing. So to check if I made no mistakes in my drawings and to improve them I ordered to cut parts from 3mm expanded PVC sheet on cutting plotter. I ordered four parts to imitated two 6mm adapters.

Ones I learned all I wished from PVC models of adapters I made corrections to the drawings and ordered adapters to be machined from aluminum. Spoke adapters for front wheels I made identical:
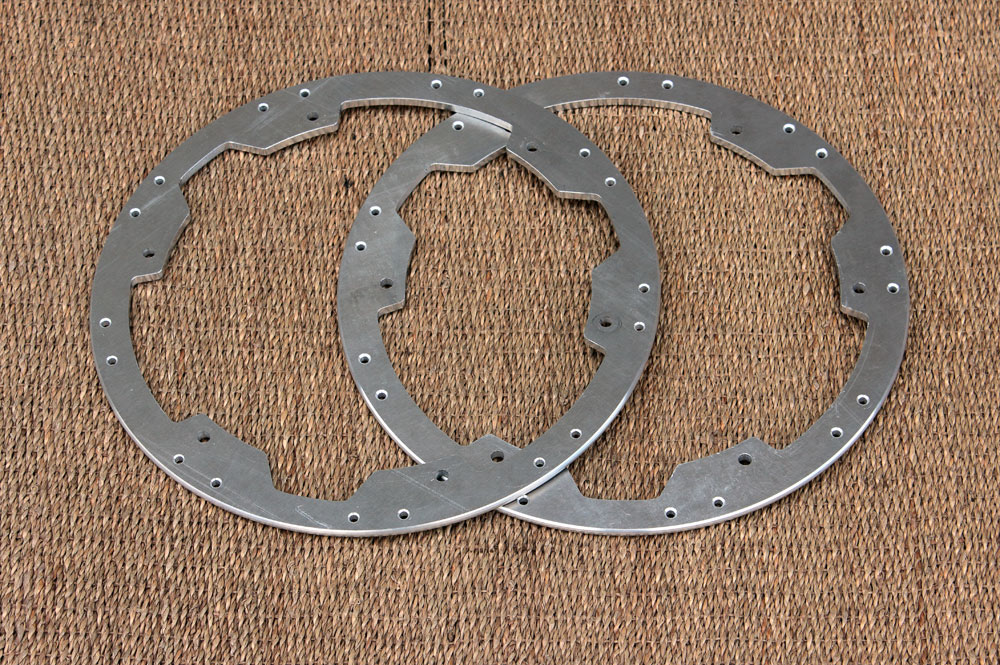
And mostly similar to them is right side adapter for rear wheel, but left side adapter for rear wheel I designed to be different. This spoke adapter is to be installed from sprocket side of wheel so it needs no openings and cutting similar to other adapters for its installation. And unlike the other adapters it is completely visible when installed, so I improved its view.
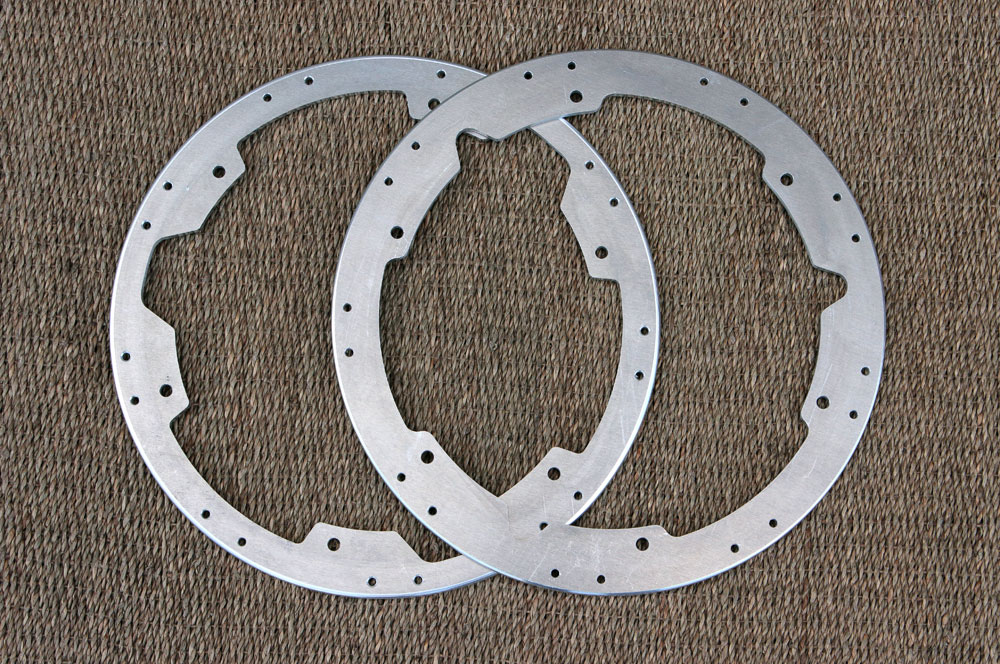
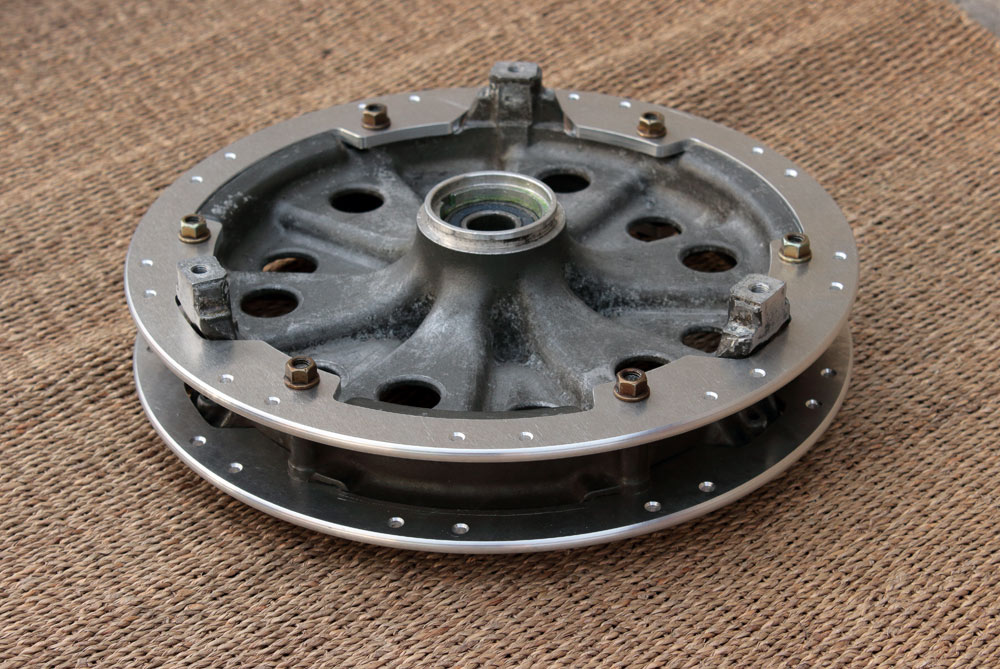
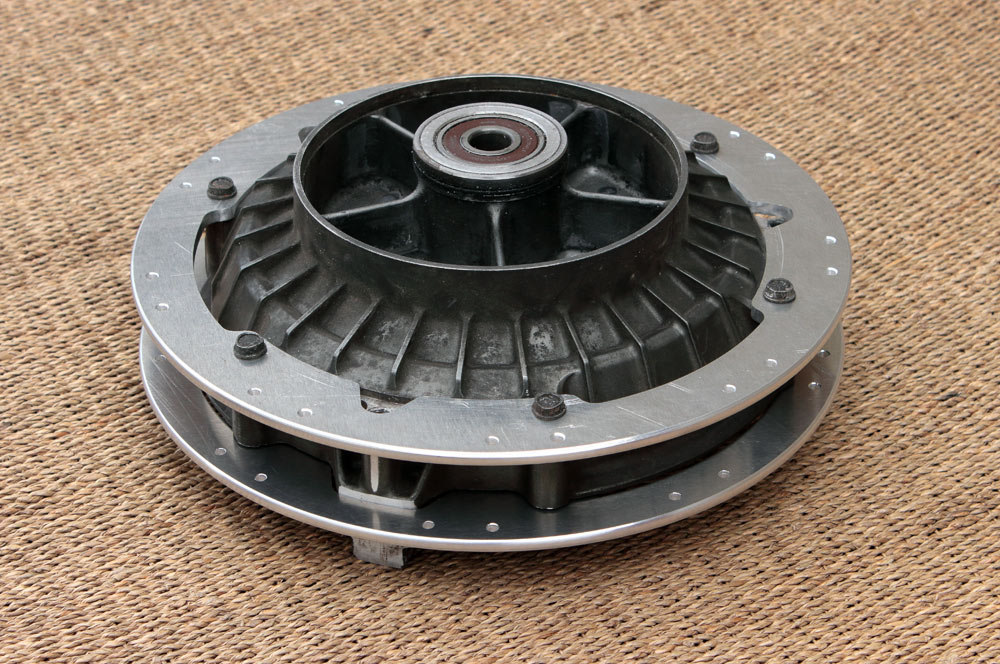
Here are photos of adapters installed on hubs:
First, I cut lower brake calipers’ mount from outer fork tunes and grinded their surface to make a look that there never were any mounts.
Then I cut out two parts from 8mm steel plate, drilled holes and cut thread:
I ordered two sets of machined parts:
And then these parts were welded together:
And that’s how all look assembled together:
Once I got bare hubs I made all measuring and then drew first version of blueprints. I chose 6mm 2024 aluminum alloy for spoke adapters and this aluminum as well as CNC machining isn’t cheap thing. So to check if I made no mistakes in my drawings and to improve them I ordered to cut parts from 3mm expanded PVC sheet on cutting plotter. I ordered four parts to imitated two 6mm adapters.
Ones I learned all I wished from PVC models of adapters I made corrections to the drawings and ordered adapters to be machined from aluminum. Spoke adapters for front wheels I made identical:
And mostly similar to them is right side adapter for rear wheel, but left side adapter for rear wheel I designed to be different. This spoke adapter is to be installed from sprocket side of wheel so it needs no openings and cutting similar to other adapters for its installation. And unlike the other adapters it is completely visible when installed, so I improved its view.
Here are photos of adapters installed on hubs:
Kawasaki KZ650 cafe-racer: in progress
Kawasaki Zephyr 750 (810ccm, 4in4, spoked wheels)
Honda CB815 "Eight Fifteen" cafe-racer
Yamaha XJ "Eight Ball" cafe-racer
www.gazzz-garage.com
Kawasaki Zephyr 750 (810ccm, 4in4, spoked wheels)
Honda CB815 "Eight Fifteen" cafe-racer
Yamaha XJ "Eight Ball" cafe-racer
www.gazzz-garage.com
The following user(s) said Thank You: Scirocco, Oldjeep
Please Log in or Create an account to join the conversation.
- gazzz
-
Topic Author
- Offline
- Sustaining Member
-
Registered
- Posts: 563
- Thanks: 319
Re: KZ650 cafe-racer
28 Jun 2019 13:15
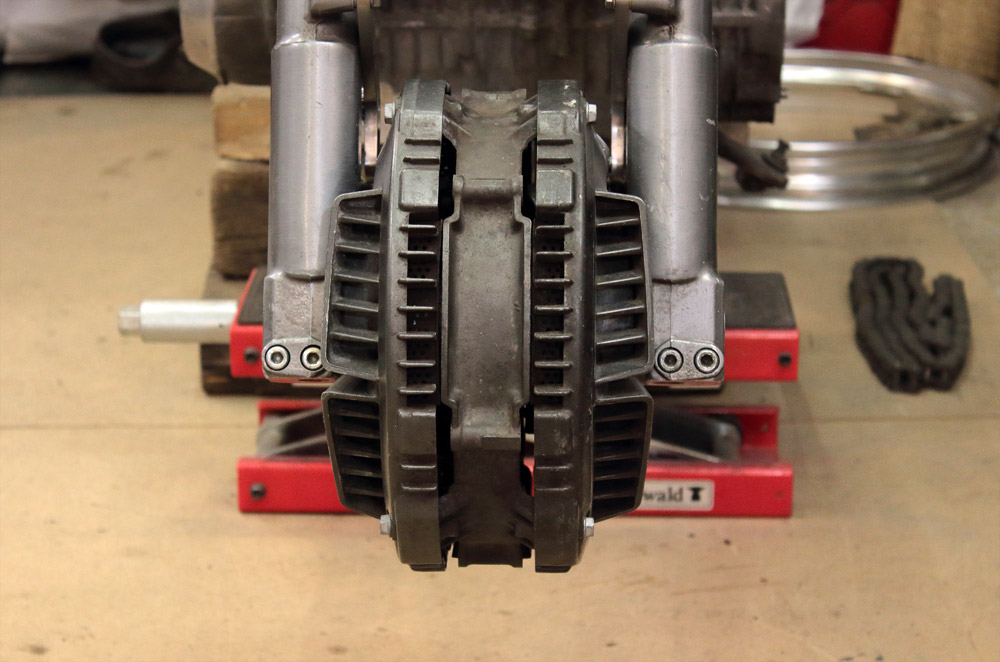
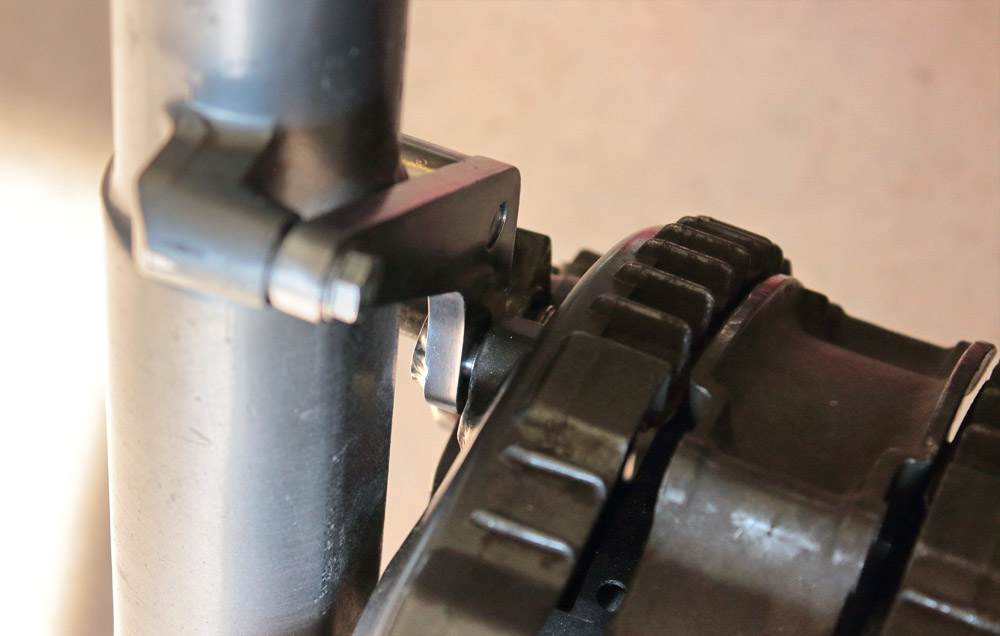
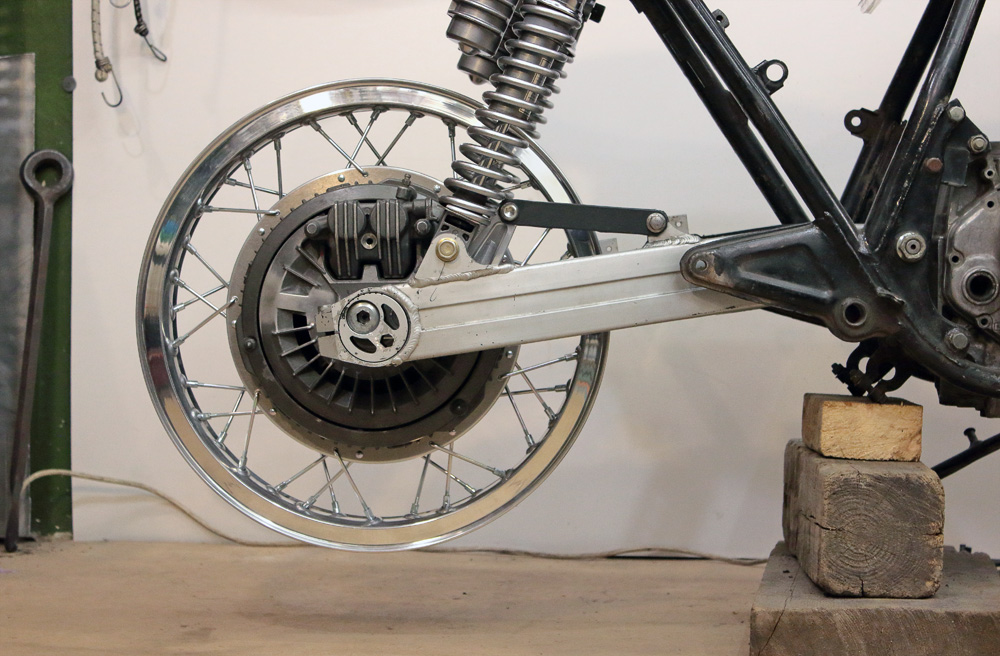
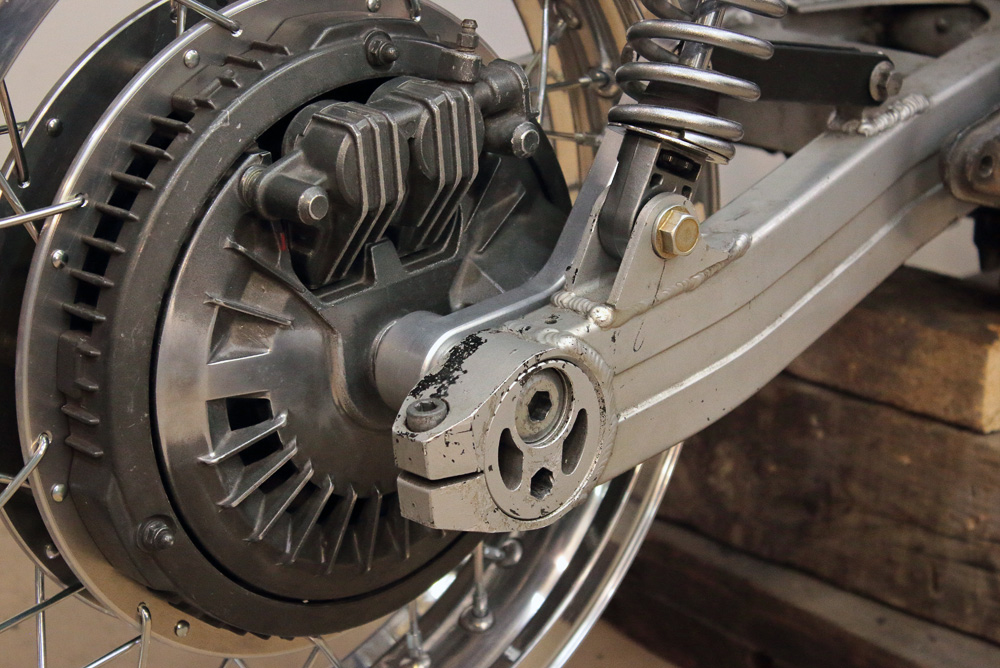
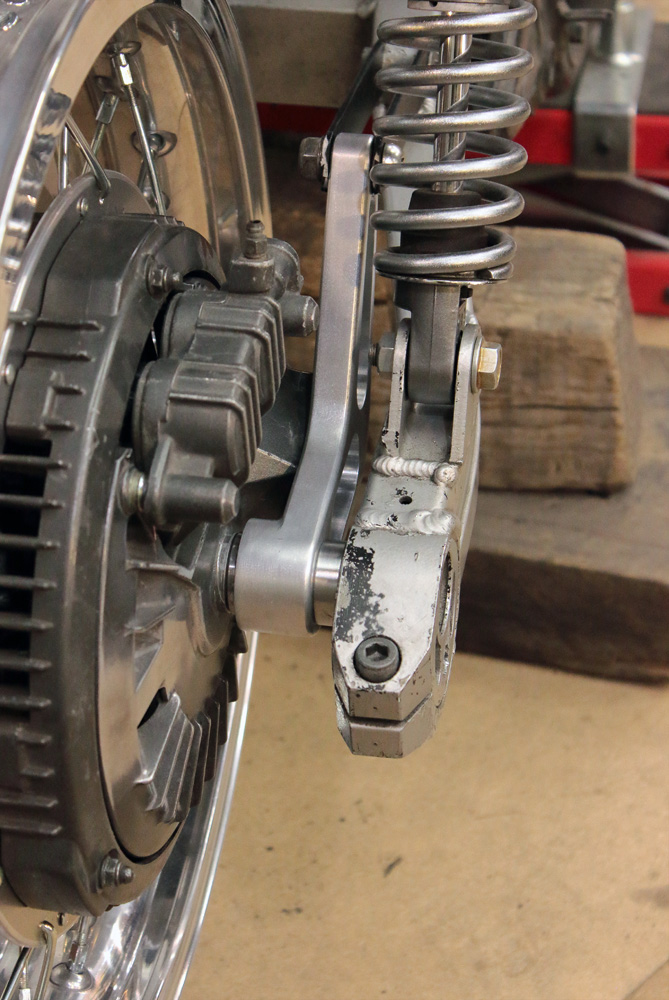
I am fond of aluminum Kawasaki swingarms with eccentric drive chain tensioners. For one thing they are light but strong and excellently withstand lateral and twisting loads. For another thing they are stylish: no axle head or nut protruding from their sides, neither tension bolts stick out from arms ends. And in addition eccentric adjusters are helluva practical: you tight axle nut only once when install it and the process of chain adjusting becomes simple and fast thing, moreover with no need to check marks every time.
The particular feature of eccentric adjusters is rotation of brake caliper bracket around axle when axle nut is tightened. For this purpose it usually has collar and bushing: a collar became static part once axle nut is tightened and bushing, being not mandatory part, however helps bracket to rotate around collar.
This time using of swingarm with eccentric chain adjusters made things a bit more complicated, as Honda CBX550 rear wheel is designed for swingarms with linear adjusters And what is most significant, in case of CBX550 wheel the very brake shield works as brake caliper bracket, thus it couldn’t be replaced with any other bracket.
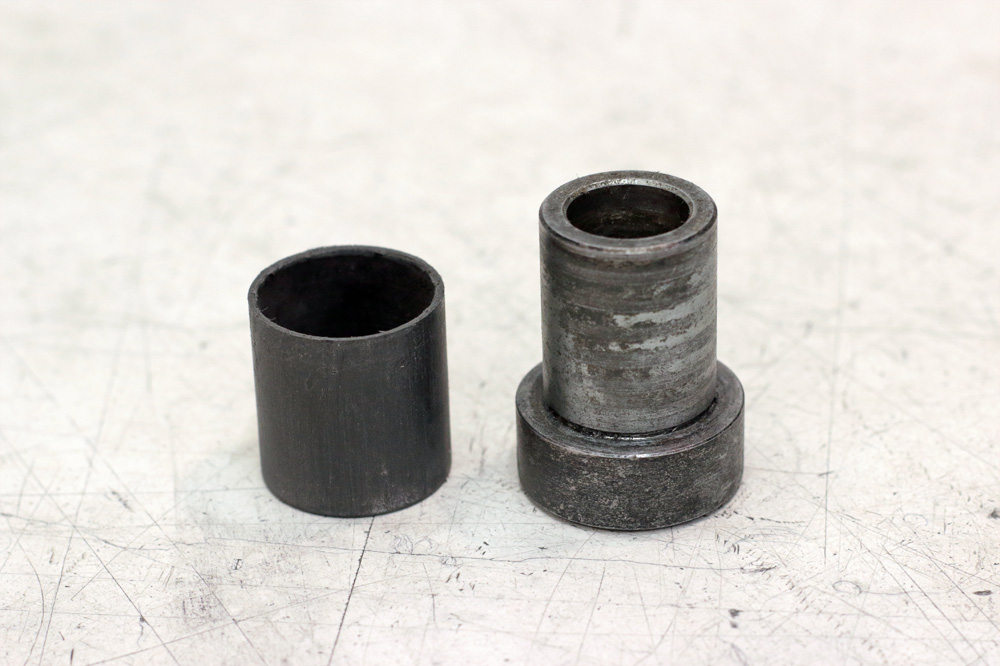
Thus, first task was to modify brake shield to make it rotatable after axle nut is fixed. Luckily, brake shield central part has body enough to machine it for collar. Bushing is not necessary part of this system, zinc anodized steel and aluminum will do, thus I made measurements, produced blueprints and ordered these works from local machine workshop.
And here is result, the collar:
Machined shield:
And that’s how it meant to work:
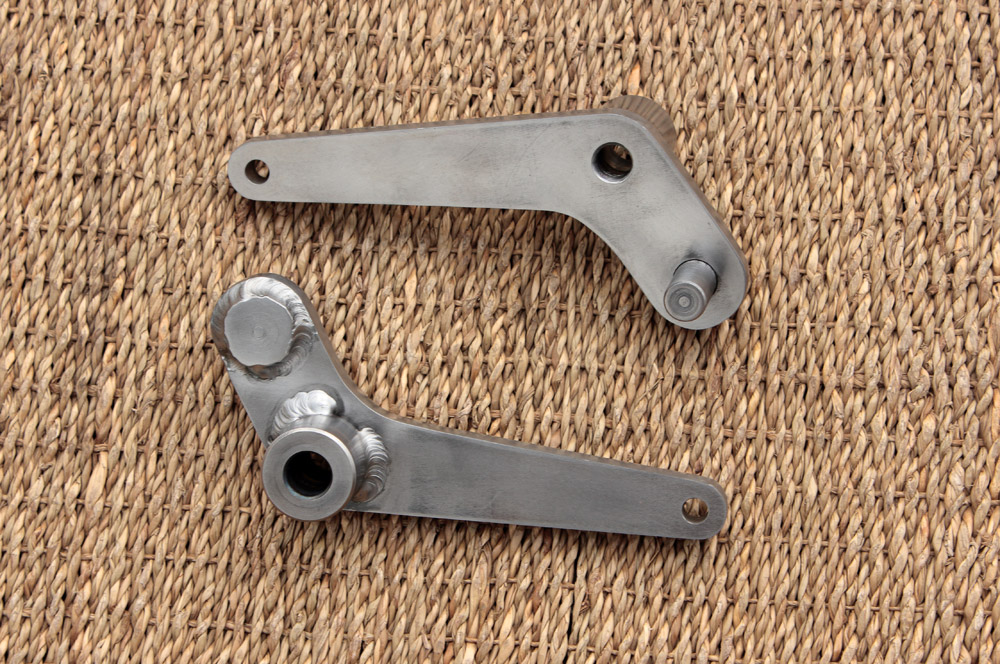
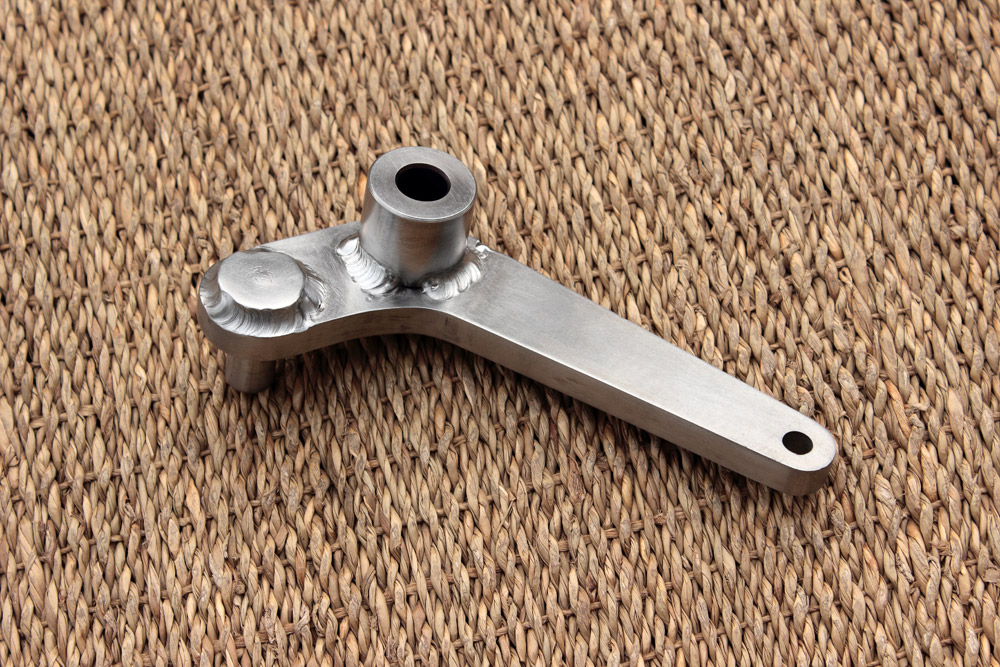
Next question was how to connect brake shield and swingarm with brake torque rod. The idea of adapter was quite obvious, but there was more than one way to make it. The simplest solution was to cut it from thick aluminum plate, then make holes for collar, torque rod and threaded hole for “fixer” that connect adapter and brake shield. However, I chose more complicated but more interesting way. First, I made simple PVC model to work out final dimensions and design of parts.
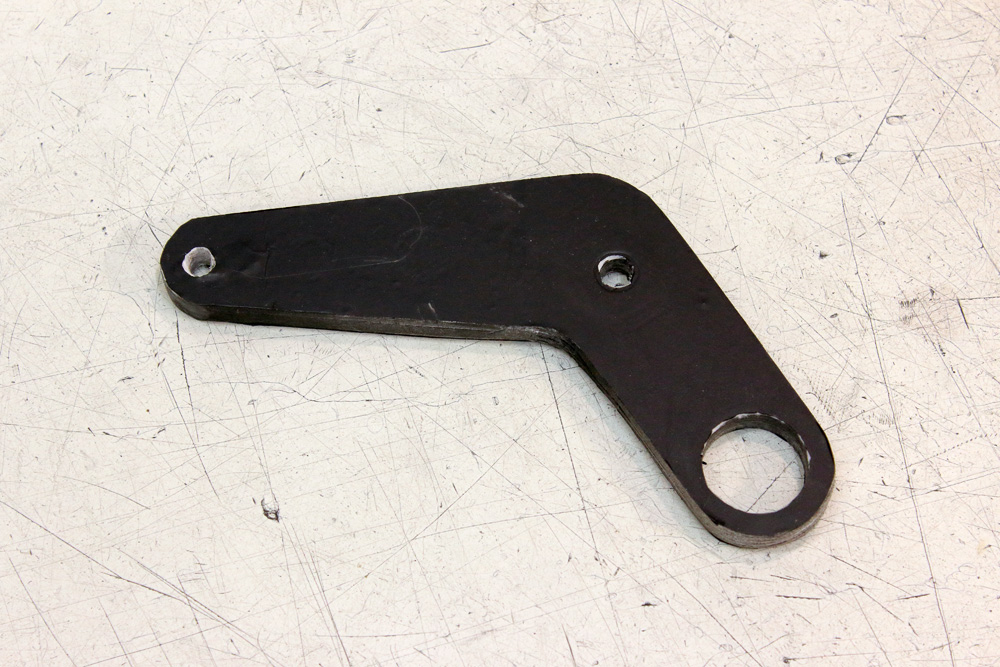
After that I made blueprints and give them to one friend of mine of whom I also wrote earlier: he make 3D models of parts for company that produce light aircrafts. He made 3D model of brake adapter for me:
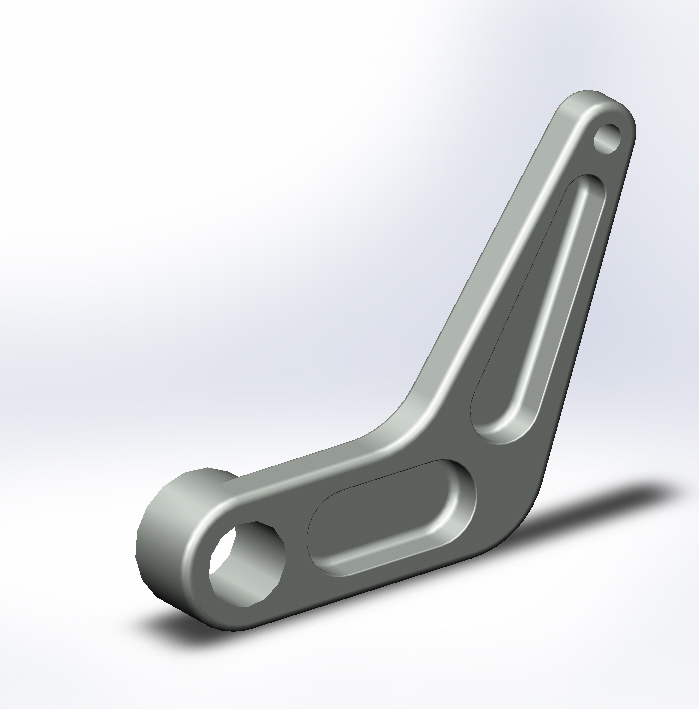
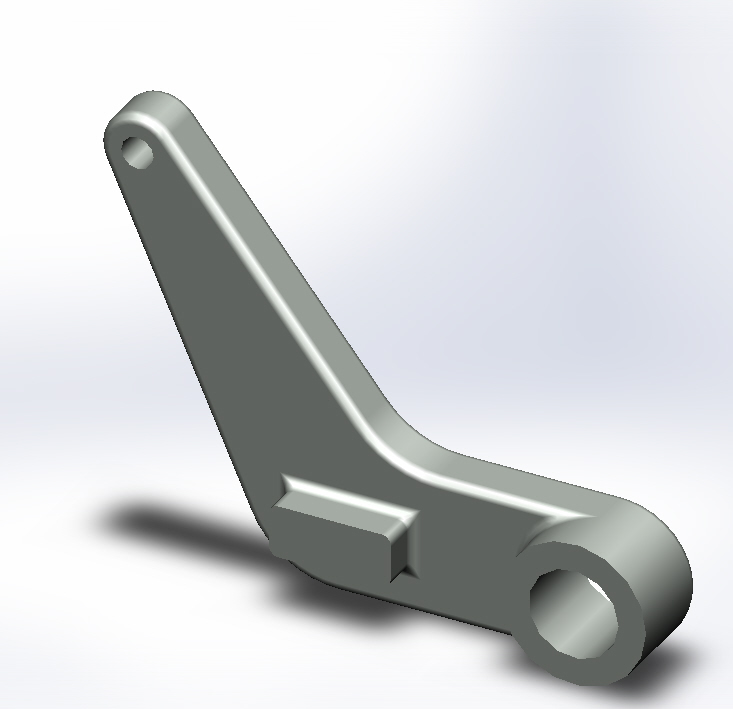
I gave this model and plate of 30mm aluminum to guys with CNC machines and get from them ready part:

I designed it to be compatible with OEM Kawasaki Zephyr 550 brake bracket bushing. I bought new bushing, but for now I used one I had at hand in my garage, keeping new unpacked until final assembling.
I sandpapered brake adapter and made some final grinding to fit adapter and CBX550 brake shield as tight and close as possible.

I used modified original Zephyr 550 brake bracket collar and I designed and ordered all other collars I needed for rear wheel setup.
Brake adapter and brake shield with collars:
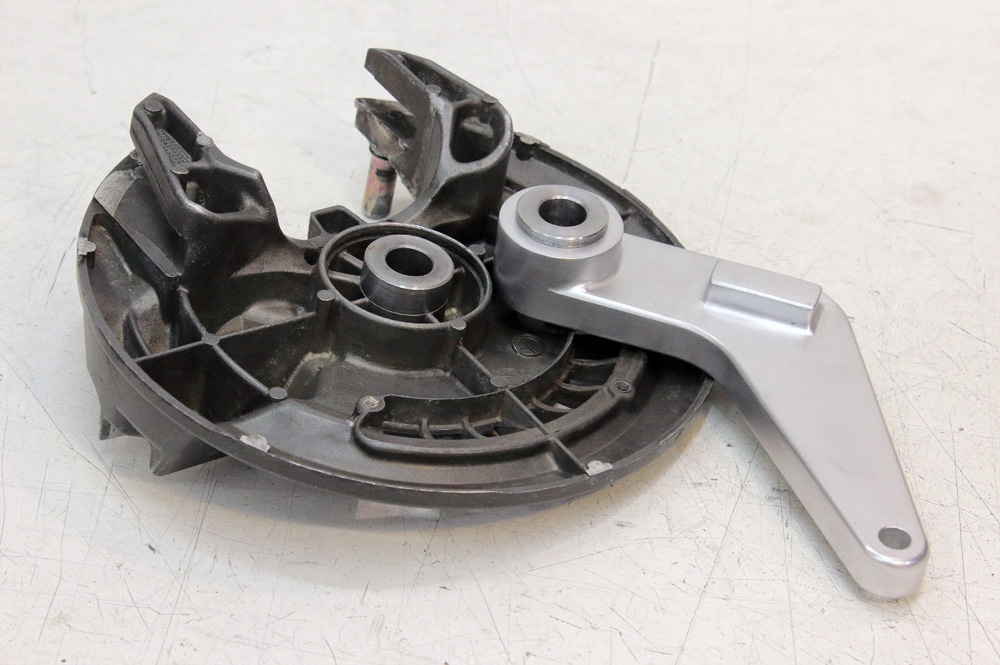
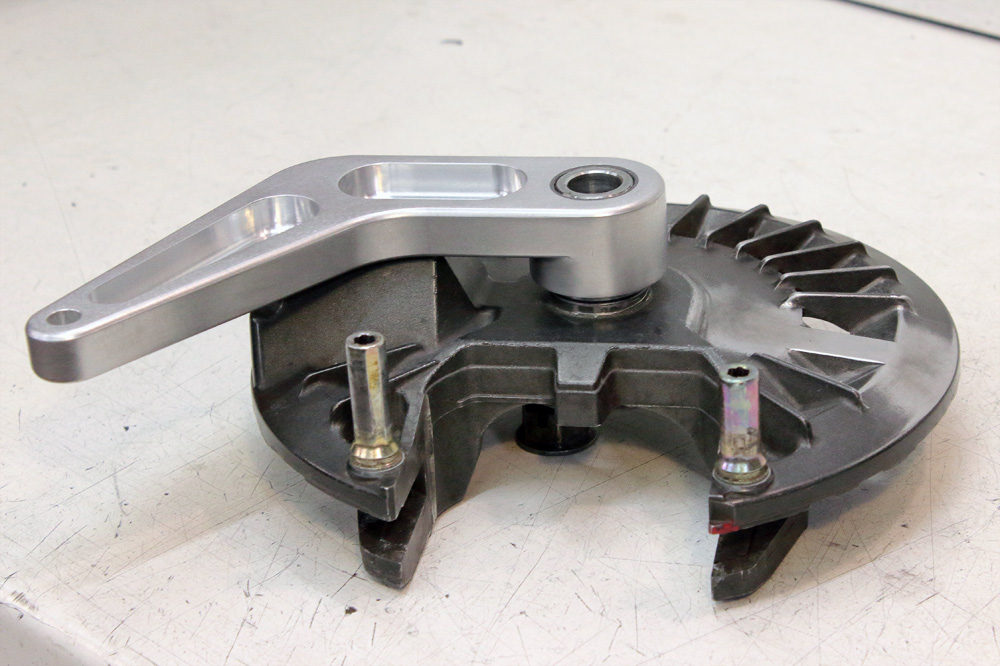
And that’s how it all looks when assembled together in swingarm:
The particular feature of eccentric adjusters is rotation of brake caliper bracket around axle when axle nut is tightened. For this purpose it usually has collar and bushing: a collar became static part once axle nut is tightened and bushing, being not mandatory part, however helps bracket to rotate around collar.
This time using of swingarm with eccentric chain adjusters made things a bit more complicated, as Honda CBX550 rear wheel is designed for swingarms with linear adjusters And what is most significant, in case of CBX550 wheel the very brake shield works as brake caliper bracket, thus it couldn’t be replaced with any other bracket.
Thus, first task was to modify brake shield to make it rotatable after axle nut is fixed. Luckily, brake shield central part has body enough to machine it for collar. Bushing is not necessary part of this system, zinc anodized steel and aluminum will do, thus I made measurements, produced blueprints and ordered these works from local machine workshop.
And here is result, the collar:
Machined shield:
And that’s how it meant to work:
Next question was how to connect brake shield and swingarm with brake torque rod. The idea of adapter was quite obvious, but there was more than one way to make it. The simplest solution was to cut it from thick aluminum plate, then make holes for collar, torque rod and threaded hole for “fixer” that connect adapter and brake shield. However, I chose more complicated but more interesting way. First, I made simple PVC model to work out final dimensions and design of parts.
After that I made blueprints and give them to one friend of mine of whom I also wrote earlier: he make 3D models of parts for company that produce light aircrafts. He made 3D model of brake adapter for me:
I gave this model and plate of 30mm aluminum to guys with CNC machines and get from them ready part:
I designed it to be compatible with OEM Kawasaki Zephyr 550 brake bracket bushing. I bought new bushing, but for now I used one I had at hand in my garage, keeping new unpacked until final assembling.
I sandpapered brake adapter and made some final grinding to fit adapter and CBX550 brake shield as tight and close as possible.
I used modified original Zephyr 550 brake bracket collar and I designed and ordered all other collars I needed for rear wheel setup.
Brake adapter and brake shield with collars:
And that’s how it all looks when assembled together in swingarm:
Kawasaki KZ650 cafe-racer: in progress
Kawasaki Zephyr 750 (810ccm, 4in4, spoked wheels)
Honda CB815 "Eight Fifteen" cafe-racer
Yamaha XJ "Eight Ball" cafe-racer
www.gazzz-garage.com
Kawasaki Zephyr 750 (810ccm, 4in4, spoked wheels)
Honda CB815 "Eight Fifteen" cafe-racer
Yamaha XJ "Eight Ball" cafe-racer
www.gazzz-garage.com
The following user(s) said Thank You: Scirocco, Oldjeep
Please Log in or Create an account to join the conversation.
Moderators: Street Fighter LTD