
KZ650 cafe-racer
- kzsolo
-

- Offline
- User
-

Registered
- Posts: 33
- Thanks: 7
Re: KZ650 cafe-racer
26 Aug 2019 07:37
I am enthralled by this thread. You do fantastic work!
The following user(s) said Thank You: gazzz
Please Log in or Create an account to join the conversation.
- gazzz
-
 Topic Author
- Offline
- Sustaining Member
-

Registered
- Posts: 563
- Thanks: 319
Re: KZ650 cafe-racer
27 Aug 2019 13:50
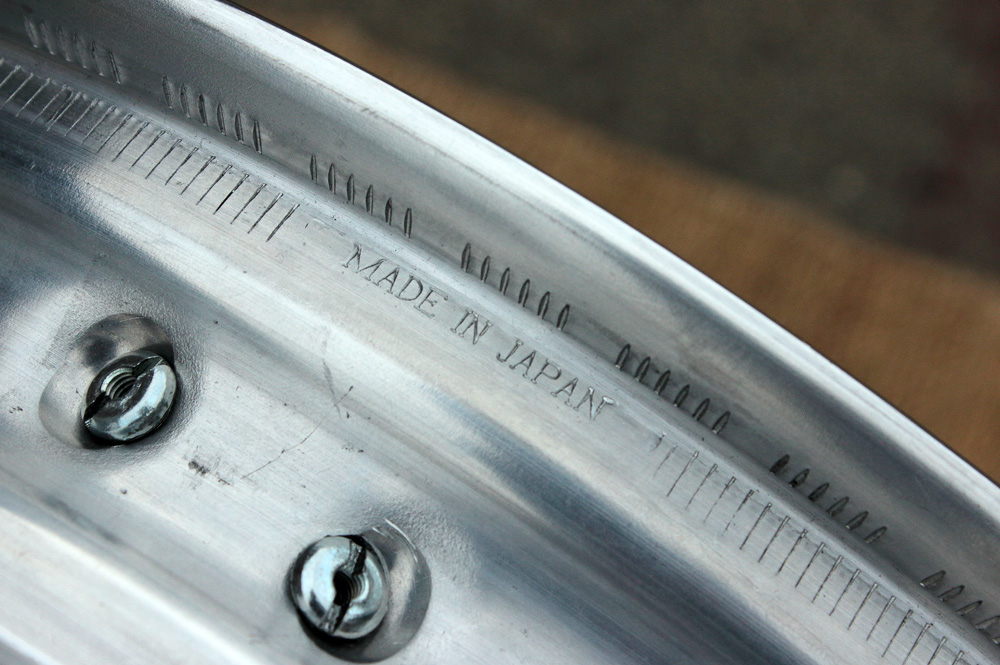
18″ high shouldered (H-type, H-shape, flanged or valanced) rims are essential point of both, CBX550 spoked wheels project and whole KZ650 project. I bought first pair of such rims on Italian ebay. They were descendants of Borrani Record rims and they were definitely made in Italy, not somewhere in nowhere. They looked great and I was happy with them up to the point when I started spokes tightening and began my work on achieving satisfactory lateral (radial, out-of-round) and axial (side-to-side) runouts. My standards are 0.7mm for lateral and 0.5mm for axial run-out. I use two indicators (dial gauges) simultaneously, as usually.
When it was looking like I was close to good result I levelled up indicators and spun the wheel. And Holy Molly! The opposite to “lateral” indicator side of rim was wobbling like a drunken sailor…
After first shock faded I used third dial gauge to clarify the picture.
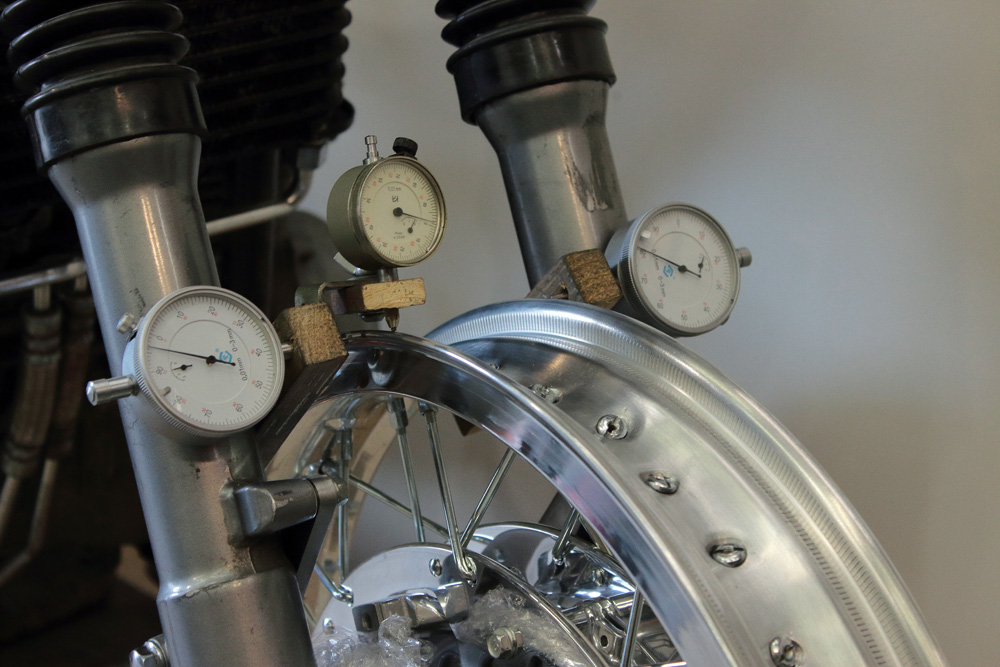
It turned out that rim was narrower for more than 2.5 (two and half) millimetres on quite long area around the welding seam. It’s unimaginable, but it’s a fact. I checked once more and found out that only outer walls of rim were narrower in that area, while distance between inner walls was more or less constant. However, it was clear for me that I had to find better rims…
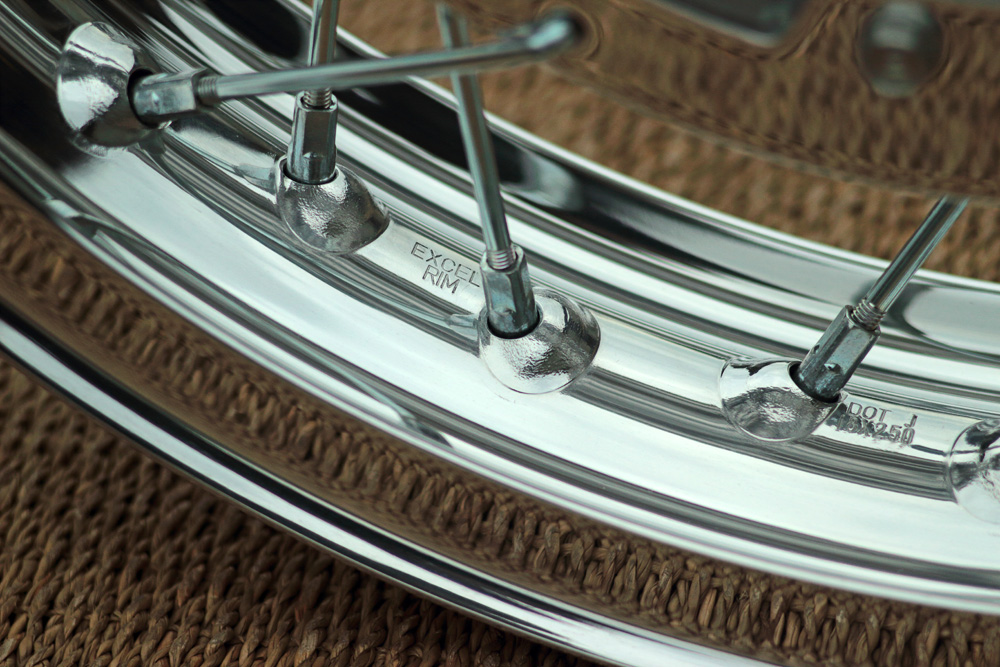
The search took some time, but luckily for me I found that Takasago Excel makes 18″ x 2.5 shouldered rims. And luckily for me I decided to order them from www.central-wheel.co.uk
It is said on Central Wheel website:
“Here at Central Wheel Components, we pride ourselves on being Europe’s largest stockist of classic rims. We have been collecting data for over 120 years, and drill the rims in house. So if you can’t find what you’re looking for, get in touch!”
And it’s true. I wrote email to Central Wheel with a question if they have Excel flanged rims in stock and if yes, is it possible to drill them to fit my conversion of CBX550 hubs. Sure, I attached some photos and hub drawings. I was instantly answered by Richard Hoyland and he confirmed that they could do the job. I ordered first rim and, thanks to Central Wheel Components, order was processed very fast and soon parcel with rim was on its way to us.
However, right when I was ordering rim, Ukrainian government lowered limit for non-taxable parcel down to EUR 100. Thus when parcel with rim arrived to Ukraine it was handed to customs. It wasn’t a big deal to pay another 10 EUR of custom duty; the problem was that custom held parcel up to the last term described in law, which is 7 working days, that automatically means 9 calendar days. Only after the deadline passed I’ve got SMS with a sum of tax and requisites to pay. I made payment in ten minutes and waited for another few days while parcel was released by customs and delivered to me. It’s ridiculous: it took only 5 days to deliver parcel from England to Ukraine and mostly two weeks delivering it from incoming centre (Lviv, Western Ukraine) to me.
As soon as I could lay my hands on parcel I unpacked it. Content was looking like a ring wrapped in gift ribbon.
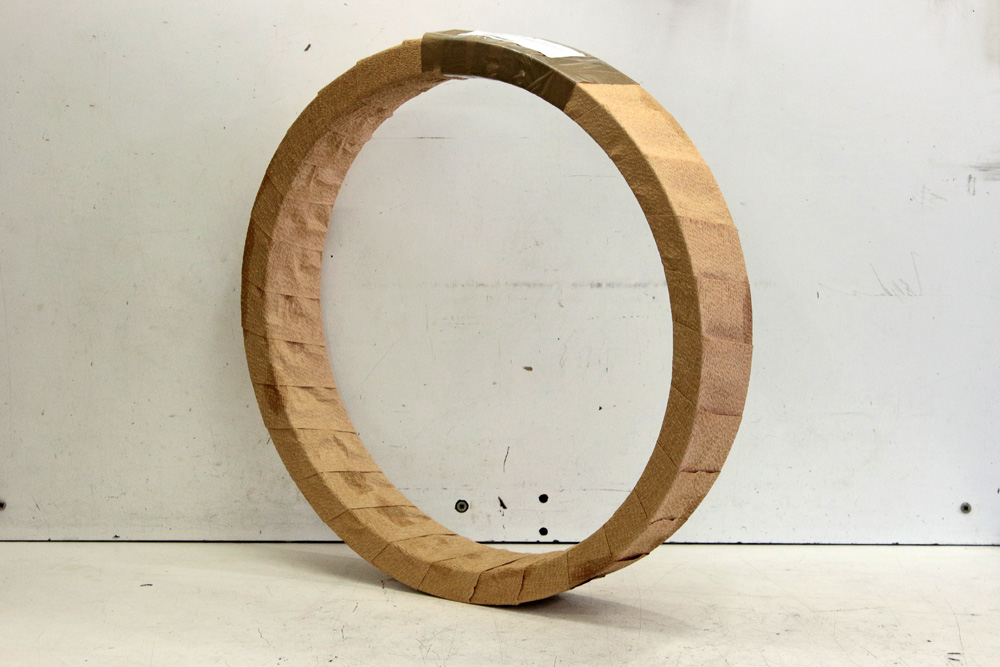
And where is a gift ribbons and ring, you for sure may find some girl name…

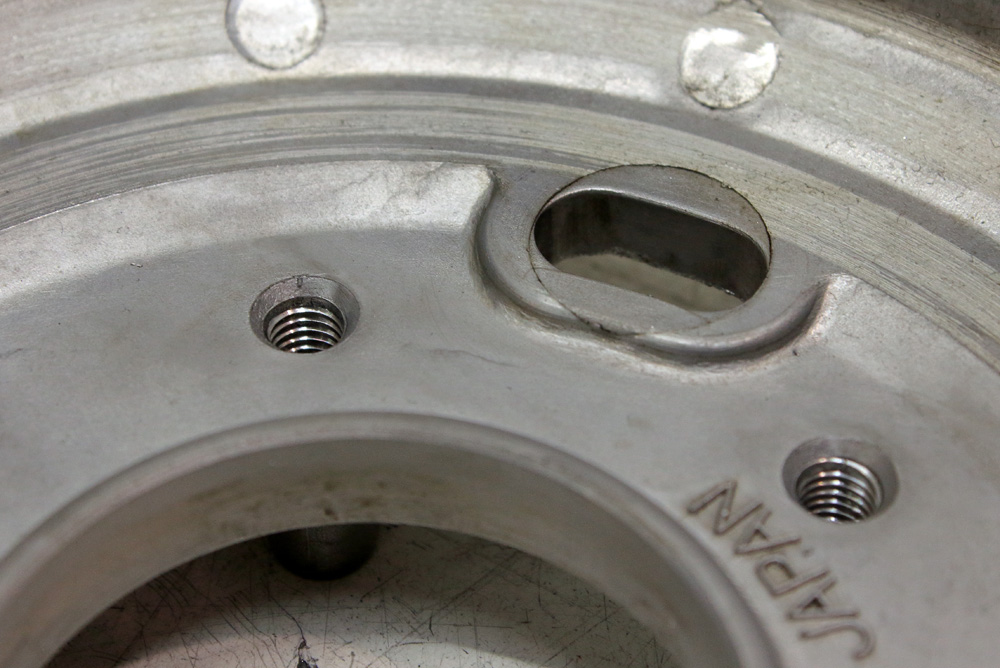
Central Wheel Components made a great work. I think, they might have supply of undrilled polished Excel shouldered rims, thus they could drill them according to specific hub. But hubs of CBX550 have quite a large diameter, larger than most, eve dram brake hubs. So I guess in this case Central Wheel firstly deepened spoke dimples and then drilled them at angles corresponding to spokes holes in hub flanges.
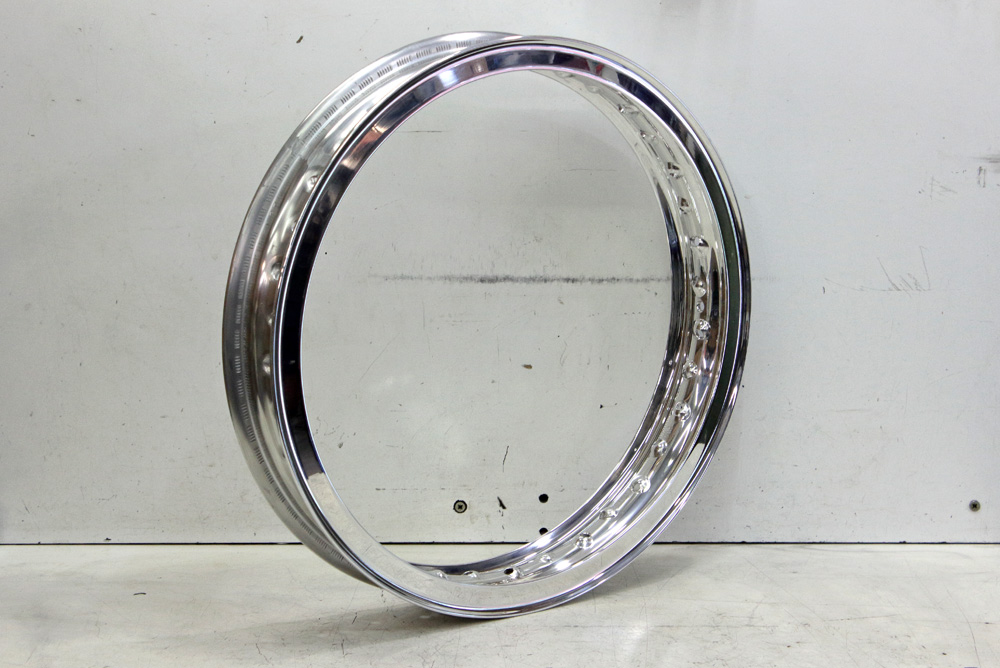
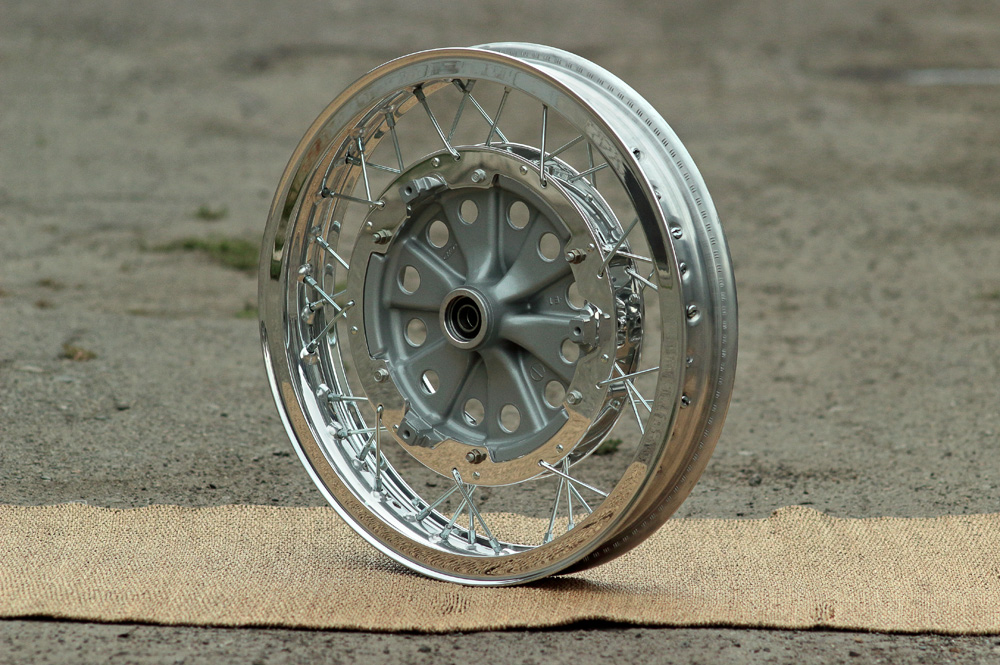
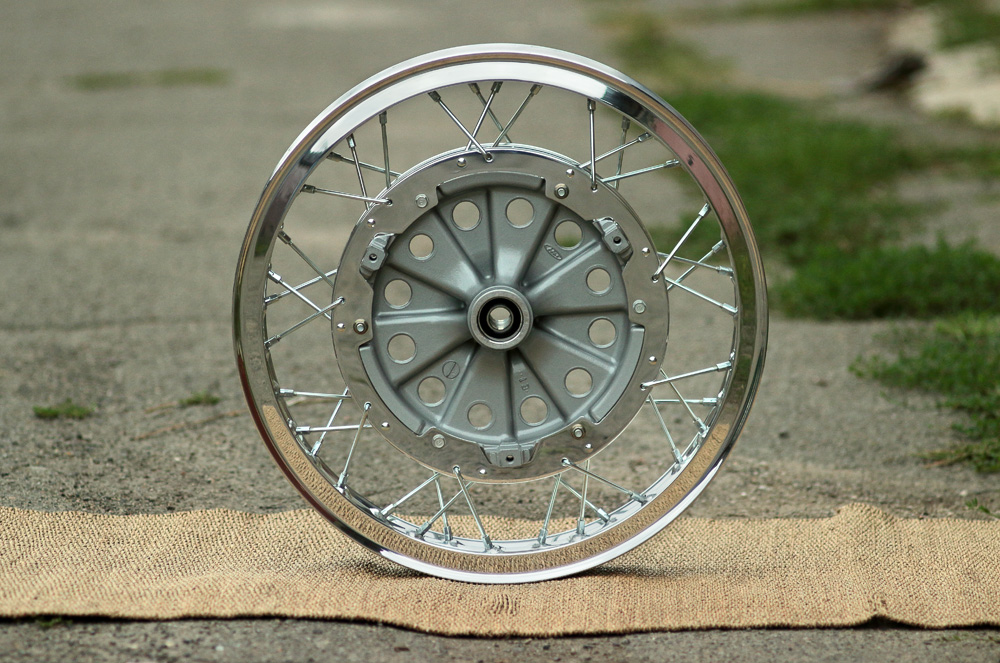
I put some extra polishing on rim and proceeded to front wheel spoking. With such a rim sit was an easy game. I managed to get 0.4mm for both lateral and radial runouts (including the zone of welding seam).
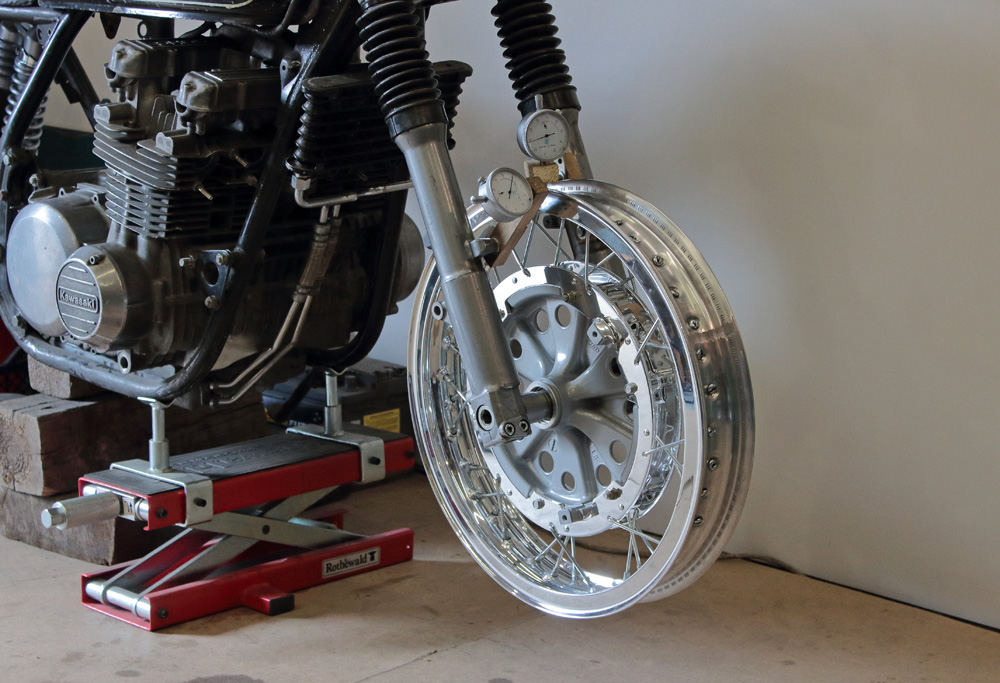
Spoked polished wheel looked great:

My next task was putting tyre on rim.
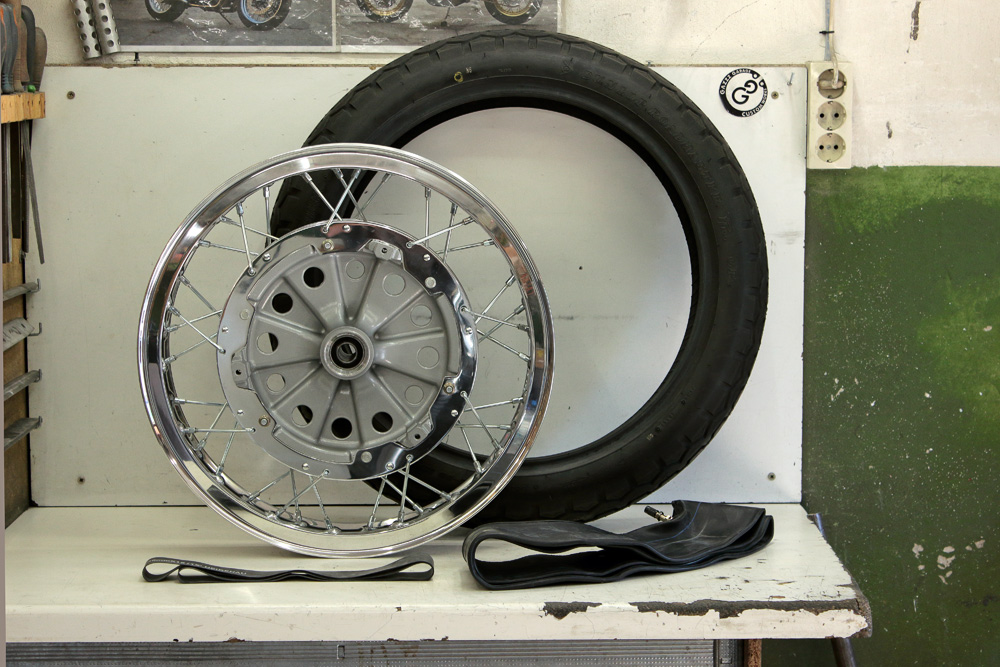
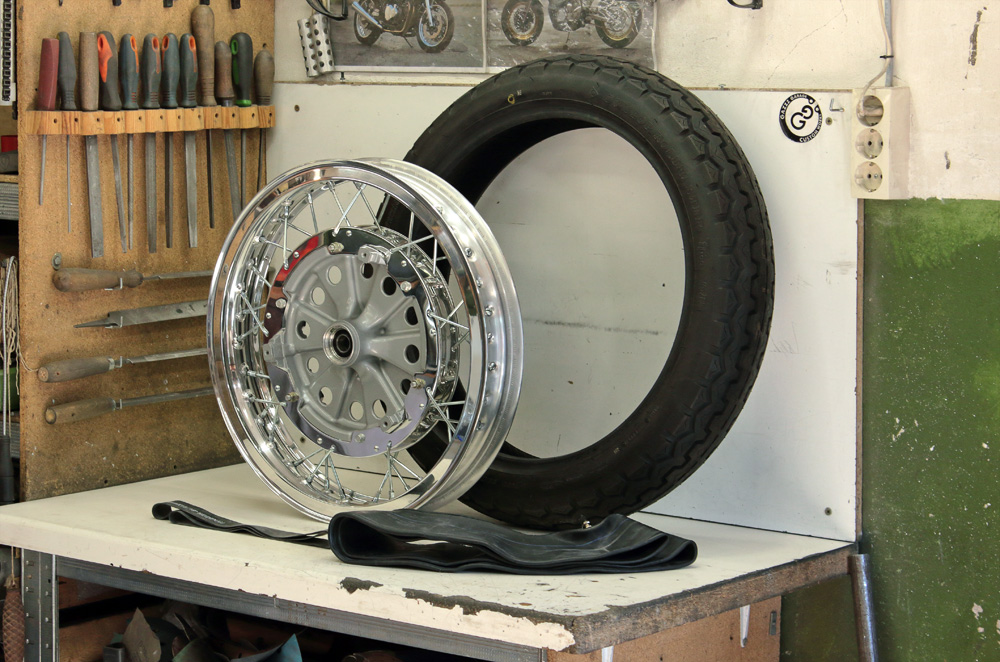
As all components are highly polished I didn’t dared to entrust this work to tyre service. I have quite an experience with tyre fitting and simple tools to do the job, so I managed to do the work without any scratches. With tyre and some components installed, front wheel looks magnificent.

When it was looking like I was close to good result I levelled up indicators and spun the wheel. And Holy Molly! The opposite to “lateral” indicator side of rim was wobbling like a drunken sailor…
After first shock faded I used third dial gauge to clarify the picture.
It turned out that rim was narrower for more than 2.5 (two and half) millimetres on quite long area around the welding seam. It’s unimaginable, but it’s a fact. I checked once more and found out that only outer walls of rim were narrower in that area, while distance between inner walls was more or less constant. However, it was clear for me that I had to find better rims…
The search took some time, but luckily for me I found that Takasago Excel makes 18″ x 2.5 shouldered rims. And luckily for me I decided to order them from www.central-wheel.co.uk
It is said on Central Wheel website:
“Here at Central Wheel Components, we pride ourselves on being Europe’s largest stockist of classic rims. We have been collecting data for over 120 years, and drill the rims in house. So if you can’t find what you’re looking for, get in touch!”
And it’s true. I wrote email to Central Wheel with a question if they have Excel flanged rims in stock and if yes, is it possible to drill them to fit my conversion of CBX550 hubs. Sure, I attached some photos and hub drawings. I was instantly answered by Richard Hoyland and he confirmed that they could do the job. I ordered first rim and, thanks to Central Wheel Components, order was processed very fast and soon parcel with rim was on its way to us.
However, right when I was ordering rim, Ukrainian government lowered limit for non-taxable parcel down to EUR 100. Thus when parcel with rim arrived to Ukraine it was handed to customs. It wasn’t a big deal to pay another 10 EUR of custom duty; the problem was that custom held parcel up to the last term described in law, which is 7 working days, that automatically means 9 calendar days. Only after the deadline passed I’ve got SMS with a sum of tax and requisites to pay. I made payment in ten minutes and waited for another few days while parcel was released by customs and delivered to me. It’s ridiculous: it took only 5 days to deliver parcel from England to Ukraine and mostly two weeks delivering it from incoming centre (Lviv, Western Ukraine) to me.
As soon as I could lay my hands on parcel I unpacked it. Content was looking like a ring wrapped in gift ribbon.
And where is a gift ribbons and ring, you for sure may find some girl name…
Central Wheel Components made a great work. I think, they might have supply of undrilled polished Excel shouldered rims, thus they could drill them according to specific hub. But hubs of CBX550 have quite a large diameter, larger than most, eve dram brake hubs. So I guess in this case Central Wheel firstly deepened spoke dimples and then drilled them at angles corresponding to spokes holes in hub flanges.
I put some extra polishing on rim and proceeded to front wheel spoking. With such a rim sit was an easy game. I managed to get 0.4mm for both lateral and radial runouts (including the zone of welding seam).
Spoked polished wheel looked great:
My next task was putting tyre on rim.
As all components are highly polished I didn’t dared to entrust this work to tyre service. I have quite an experience with tyre fitting and simple tools to do the job, so I managed to do the work without any scratches. With tyre and some components installed, front wheel looks magnificent.
Kawasaki KZ650 cafe-racer: in progress
Kawasaki Zephyr 750 (810ccm, 4in4, spoked wheels)
Honda CB815 "Eight Fifteen" cafe-racer
Yamaha XJ "Eight Ball" cafe-racer
www.gazzz-garage.com
Kawasaki Zephyr 750 (810ccm, 4in4, spoked wheels)
Honda CB815 "Eight Fifteen" cafe-racer
Yamaha XJ "Eight Ball" cafe-racer
www.gazzz-garage.com
Please Log in or Create an account to join the conversation.
- Scirocco
-

- Offline
- Premium Member
-

Registered
- Never change a running system
- Posts: 4397
- Thanks: 2260
Re: KZ650 cafe-racer
29 Aug 2019 03:30 - 29 Aug 2019 03:31
No eBay APP ID and/or Cert ID defined in Kunena configurationSo this 750E cylinder head could be interesting for your 650 engine. All needed parts for 110 Euro with free shipping in Germany
My 1975 Z 1 B 900 Project
www.kzrider.com/forum/11-projects/605133...ears-deep-sleep-mode
www.kzrider.com/forum/11-projects/605133...ears-deep-sleep-mode
Last edit: 29 Aug 2019 03:31 by Scirocco.
The following user(s) said Thank You: gazzz
Please Log in or Create an account to join the conversation.
- gazzz
-
Topic Author
- Offline
- Sustaining Member
-
Registered
- Posts: 563
- Thanks: 319
Re: KZ650 cafe-racer
29 Aug 2019 13:07
Yep, I know about it. To be honest I know every suitable head on German ebay. This head has a broken cooling fin on right side, right under front oil channels plugs. In my opinion it's too close to plugs therefore welding may cause plugs loosing and thus oil leaking. I chose and ordered another lot from German ebay. Waiting for it with my fingers crossed...
Kawasaki KZ650 cafe-racer: in progress
Kawasaki Zephyr 750 (810ccm, 4in4, spoked wheels)
Honda CB815 "Eight Fifteen" cafe-racer
Yamaha XJ "Eight Ball" cafe-racer
www.gazzz-garage.com
Kawasaki Zephyr 750 (810ccm, 4in4, spoked wheels)
Honda CB815 "Eight Fifteen" cafe-racer
Yamaha XJ "Eight Ball" cafe-racer
www.gazzz-garage.com
Please Log in or Create an account to join the conversation.
- gazzz
-
Topic Author
- Offline
- Sustaining Member
-
Registered
- Posts: 563
- Thanks: 319
Re: KZ650 cafe-racer
05 Sep 2019 10:41
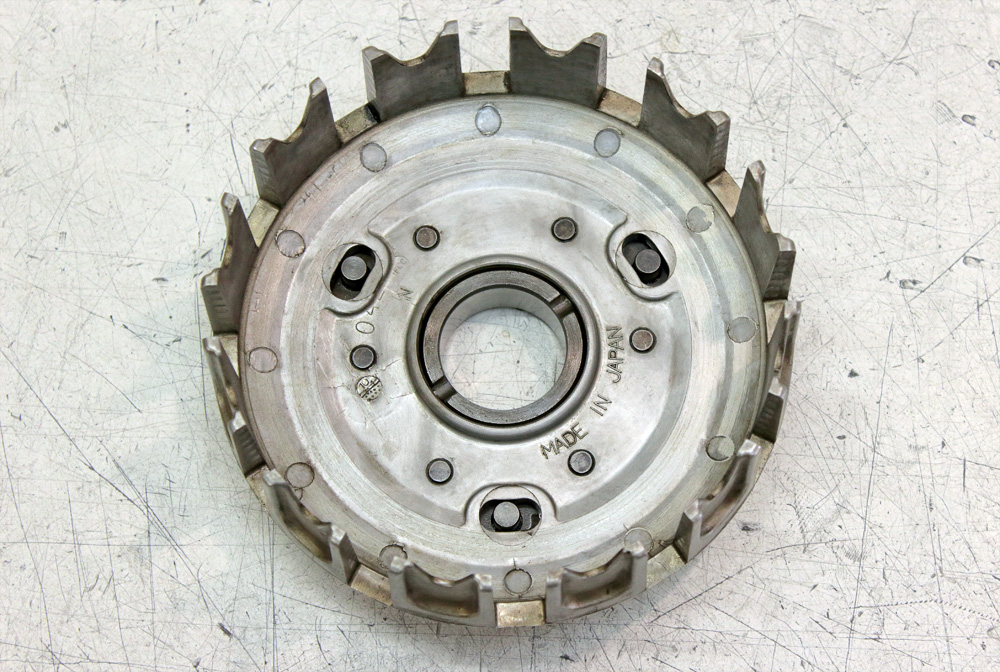
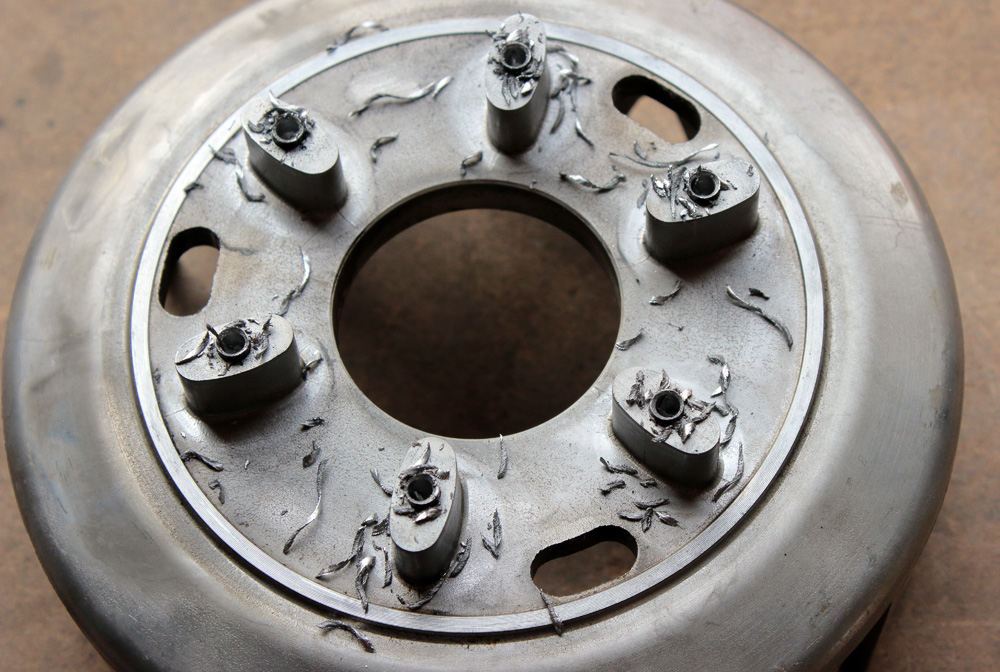
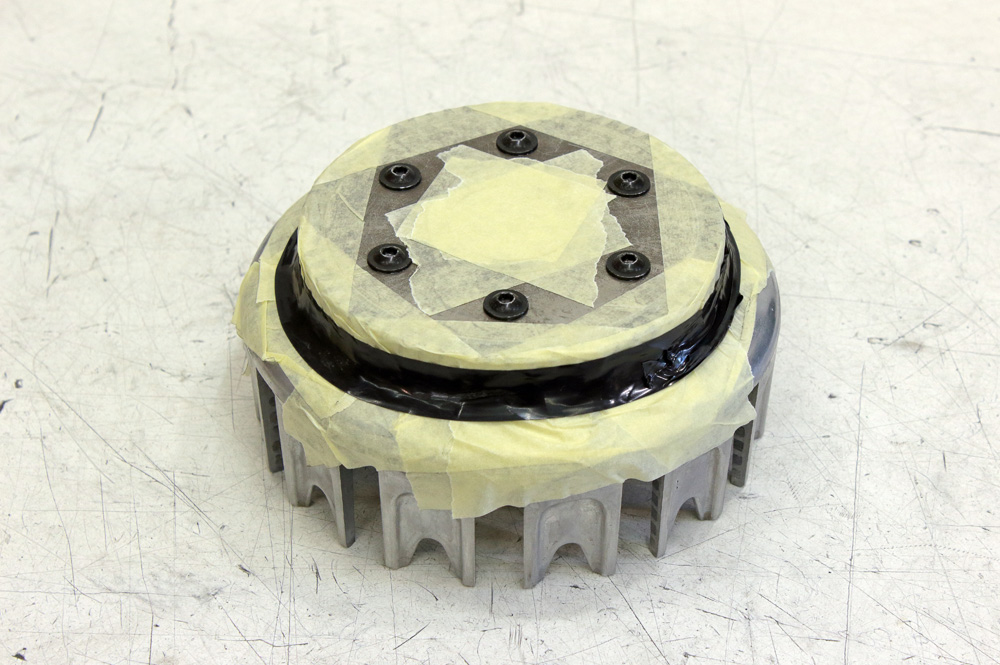
It’s well known, that clutch baskets of Kawasaki KZ650/KZ750, as well as that of Zephyr 750 are equipped with rubber dampers. These rubbers shrink and even crumble after a long time of exploitation, therefore cease to perform damping functions. Clutch basket joins secondary shaft and gearbox, so it’s essential to keep those rubbers working. Clutch basket’ outer, where dampers sit is made in “non-separable” style, and Kawasaki does not provide replacement dampers. However, aftermarket dampers made of Viton rubber are available, and methods of clutch basket disassembling are well known. Thus I am not the first person who did such replacement, and not the first person who wrote tutorial for it, but may be you could find something interesting in my approach to the issue, as I am used to make the work as I deemed necessary.
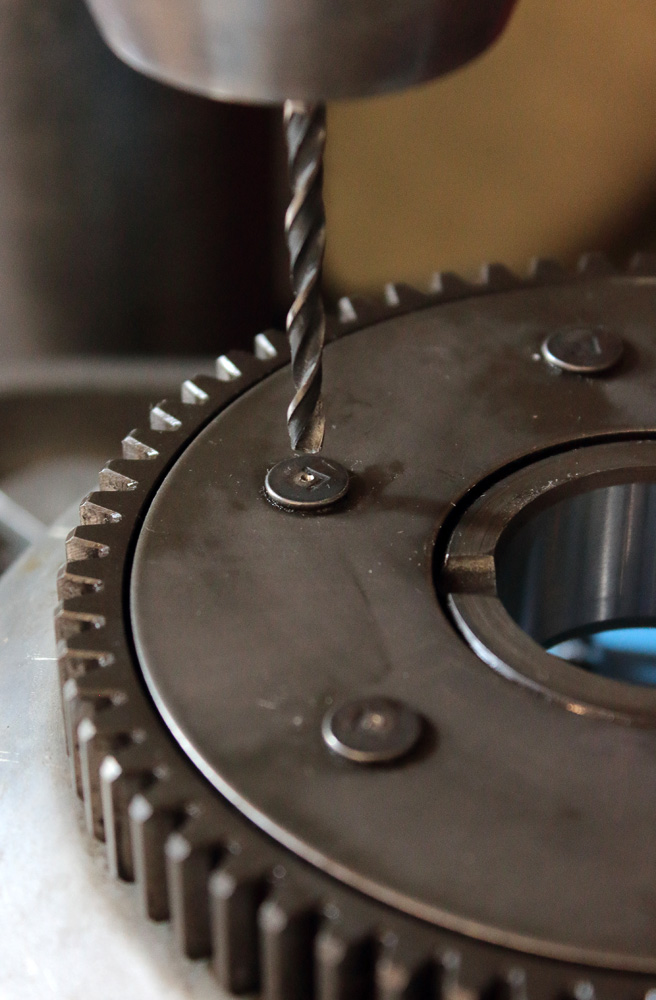
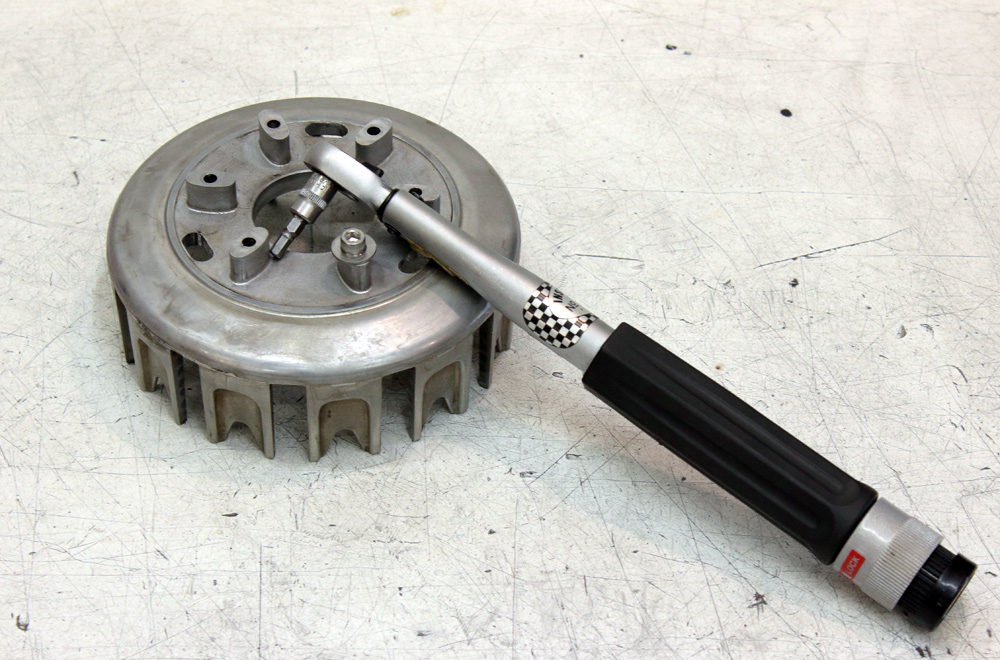
So what do we have at start? As you may see from photos below aluminium clutch basket outer is riveted by six 5mm rivets to steel gear.

Our first task is to remove rivet caps from the side of the gear. I drilled them with 3mm drill to some depth.
And then remove caps with countersink bit. I recommend to use countersink bit instead of large drill, as it works much more predictable and precise.

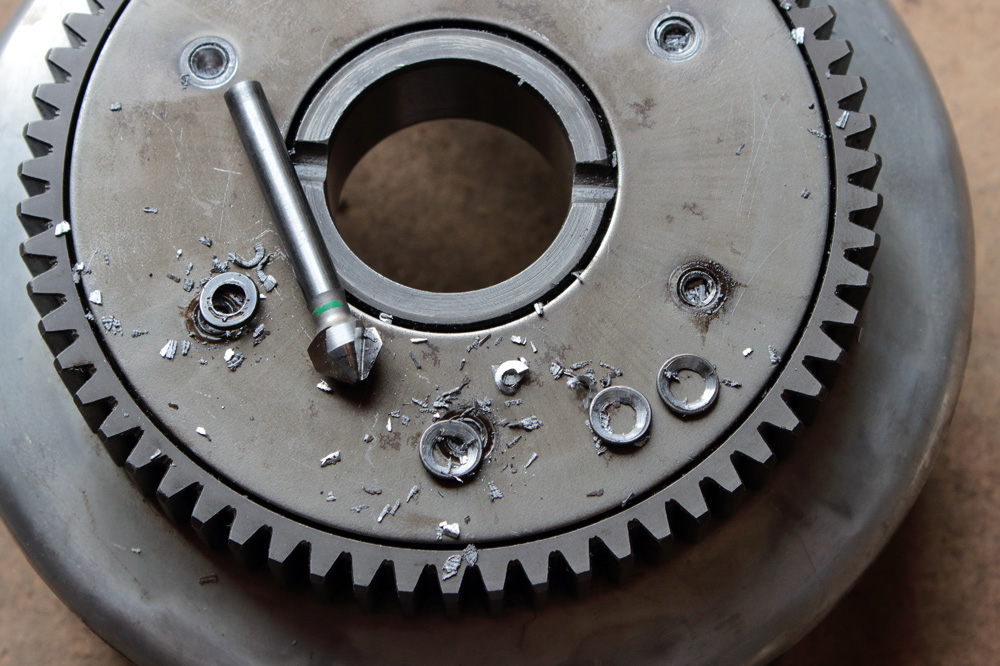
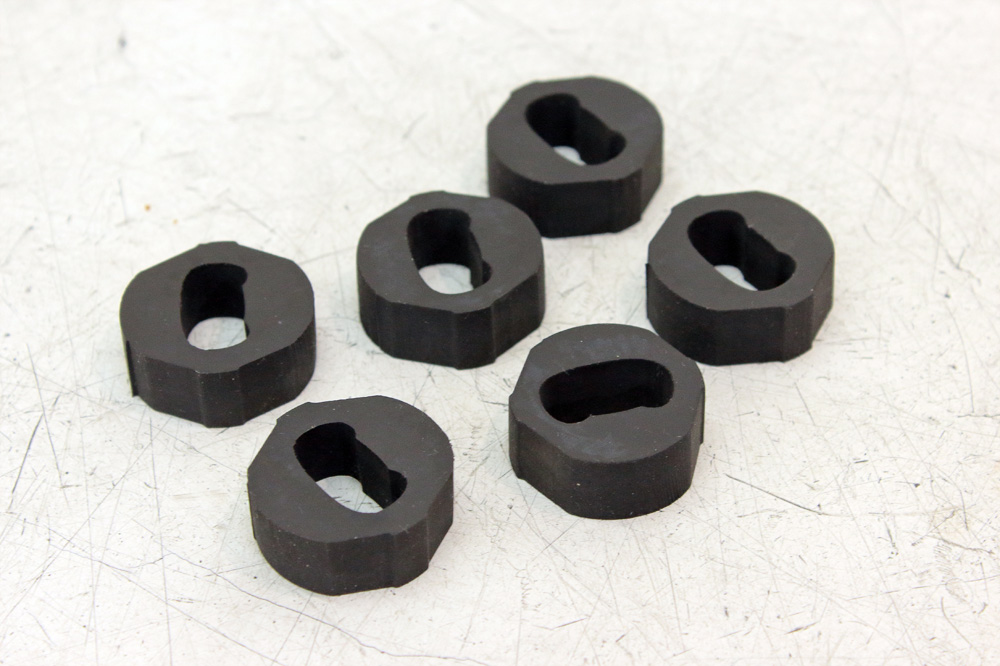
After rivets’ caps removed we could remove steel sear cover and see what came from original rubber dampers. In case of my KZ650 basket they shrunk and all of them have cracks.
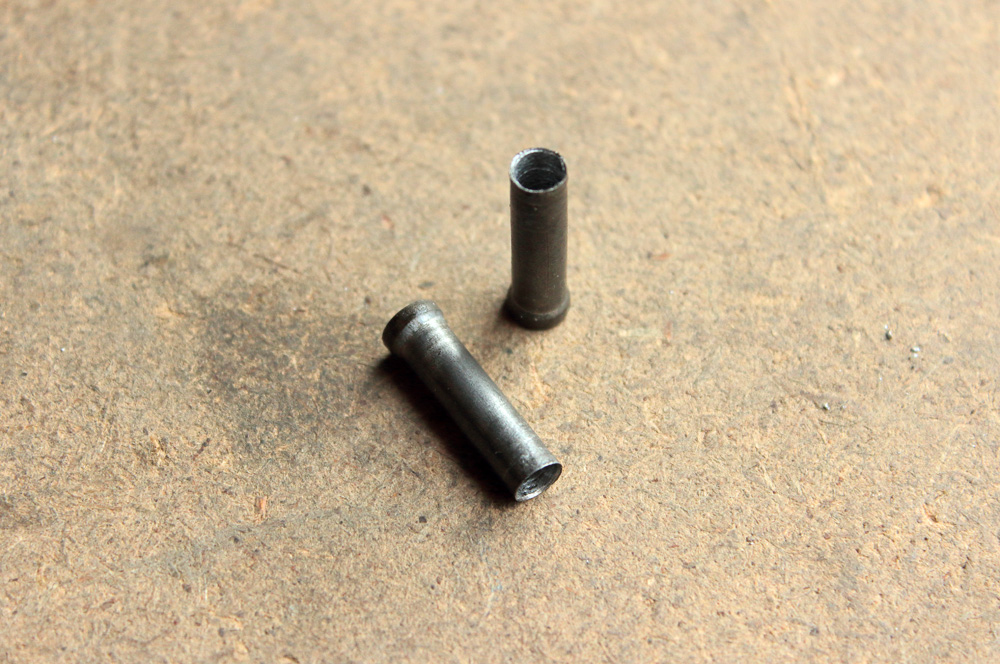
Our next task is most important. We have to remove rivets without even slightest damage to aluminium basket, as later we have to cut the thread in holes where rivet sits. Do not try to punch out rivets as they are, and do not try to drill them out with 5mm drill bit. Instead use 3.5-4mm drill bit and drill rivets’ bodies MOSTLY through.
This will remove the tension between the rivet body and aluminium housing so you could punch out rivets from basket without application of excessive force.
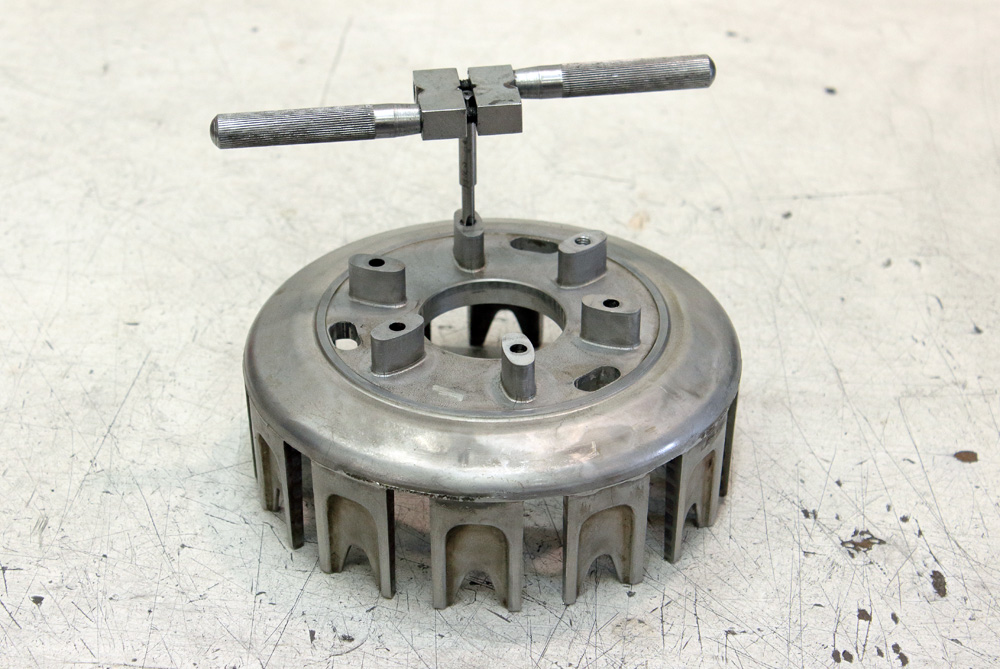
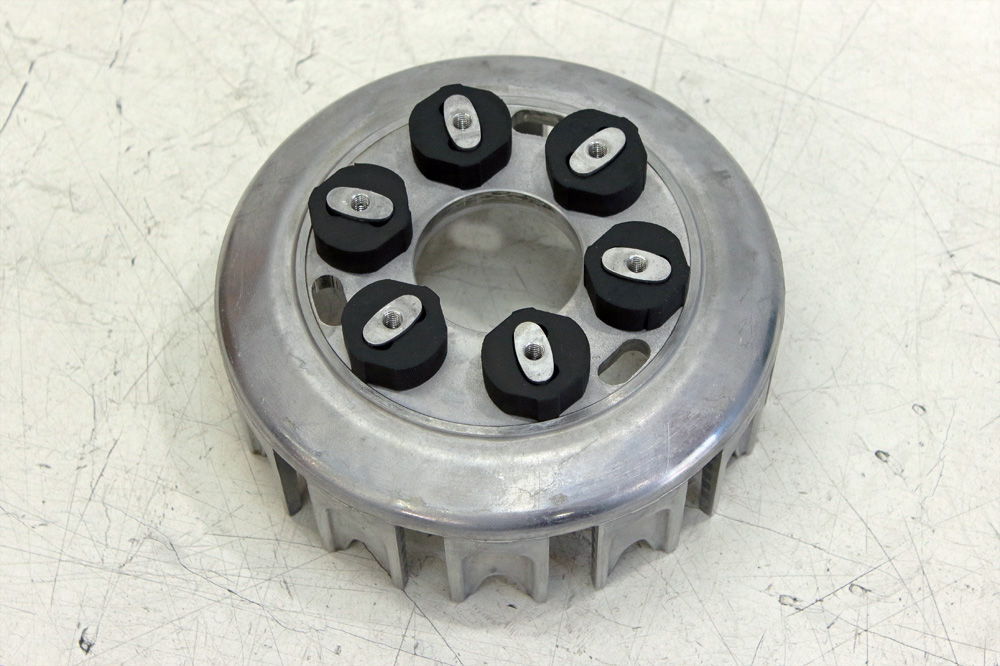
If you made everything correctly, you have six undamaged holes each of them by 5.1mm in diameter. We have to cut M6x1mm thread. According to specs, such thread needs 5mm hole. However I cut the thread and found result being very sufficient: thread looked fine/
So what do we have at start? As you may see from photos below aluminium clutch basket outer is riveted by six 5mm rivets to steel gear.
Our first task is to remove rivet caps from the side of the gear. I drilled them with 3mm drill to some depth.
And then remove caps with countersink bit. I recommend to use countersink bit instead of large drill, as it works much more predictable and precise.
After rivets’ caps removed we could remove steel sear cover and see what came from original rubber dampers. In case of my KZ650 basket they shrunk and all of them have cracks.
Our next task is most important. We have to remove rivets without even slightest damage to aluminium basket, as later we have to cut the thread in holes where rivet sits. Do not try to punch out rivets as they are, and do not try to drill them out with 5mm drill bit. Instead use 3.5-4mm drill bit and drill rivets’ bodies MOSTLY through.
This will remove the tension between the rivet body and aluminium housing so you could punch out rivets from basket without application of excessive force.
If you made everything correctly, you have six undamaged holes each of them by 5.1mm in diameter. We have to cut M6x1mm thread. According to specs, such thread needs 5mm hole. However I cut the thread and found result being very sufficient: thread looked fine/
Kawasaki KZ650 cafe-racer: in progress
Kawasaki Zephyr 750 (810ccm, 4in4, spoked wheels)
Honda CB815 "Eight Fifteen" cafe-racer
Yamaha XJ "Eight Ball" cafe-racer
www.gazzz-garage.com
Kawasaki Zephyr 750 (810ccm, 4in4, spoked wheels)
Honda CB815 "Eight Fifteen" cafe-racer
Yamaha XJ "Eight Ball" cafe-racer
www.gazzz-garage.com
The following user(s) said Thank You: linuxrob
Please Log in or Create an account to join the conversation.
- gazzz
-
Topic Author
- Offline
- Sustaining Member
-
Registered
- Posts: 563
- Thanks: 319
Re: KZ650 cafe-racer
05 Sep 2019 10:46
But appearance is not only parameter of the thread. The maximum torque for M6 thread made in aluminium is 12-14 Nm (camshaft caps). Thus, I tightened 6mm bolt with 14Nm to check if thread holds firmly. Test went successfully. That’s why undamaged holes were such essential: be they a little bit larger and thread might be loosed.
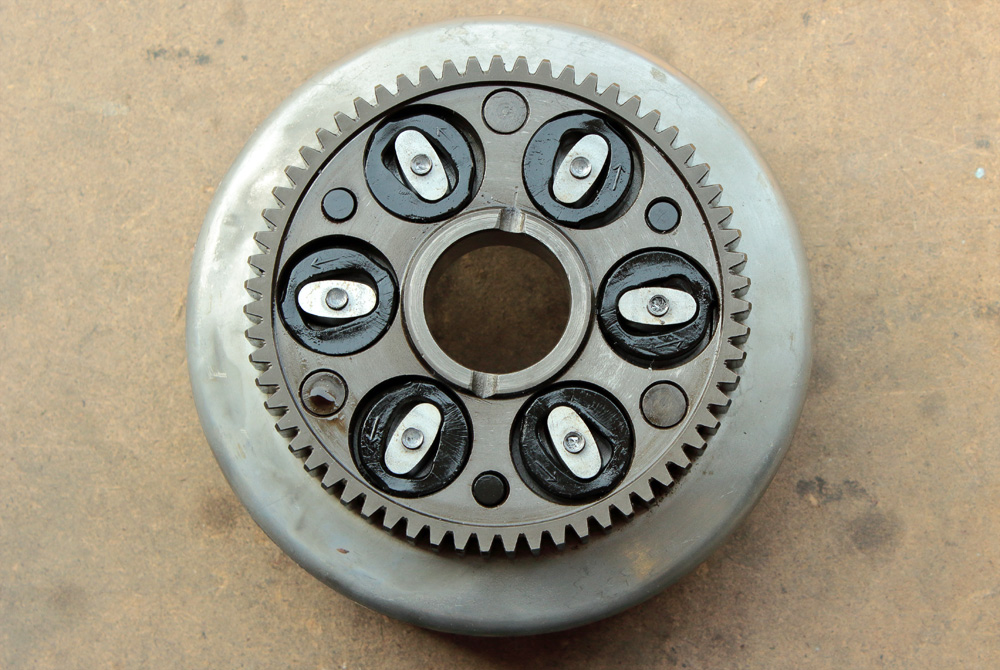
I bought two sets of Viton dampers from Turbosteve, one for KZ and one for Zephyr. When I installed one of them on KZ650 clutch basket I found that I wasn’t satisfied with backlash between gear and basket. Thus I took second set of rubbers, and combined dampers until backlash became minimally possible. It was alike the scene from movie “The Good, the Bad and the Ugly”, where Tuco assembles a gun in gun shop.
Once I was satisfied with backlash I proceeded to assembling.
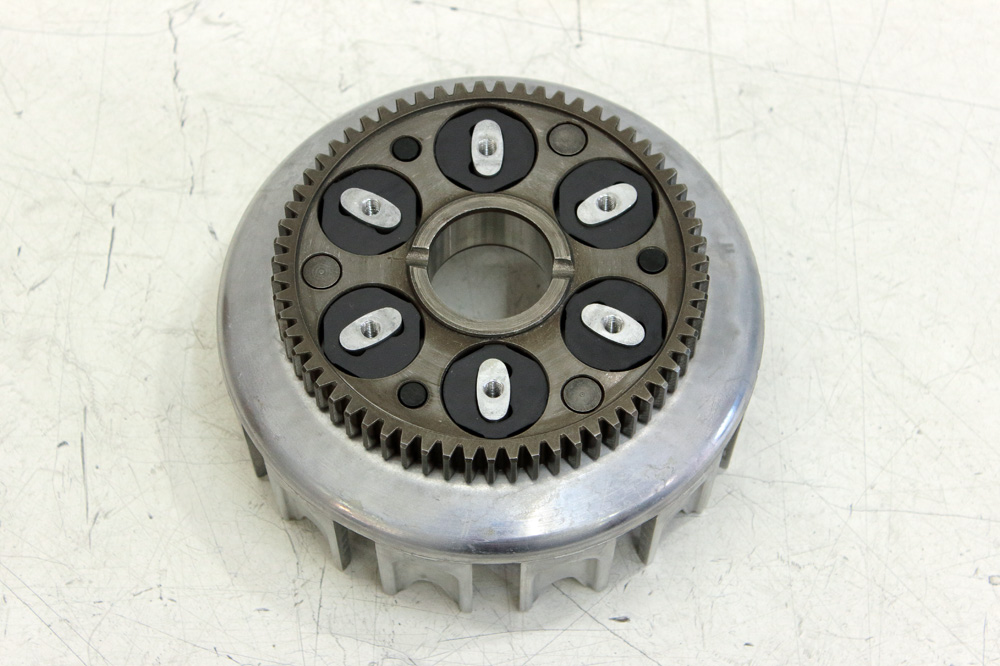
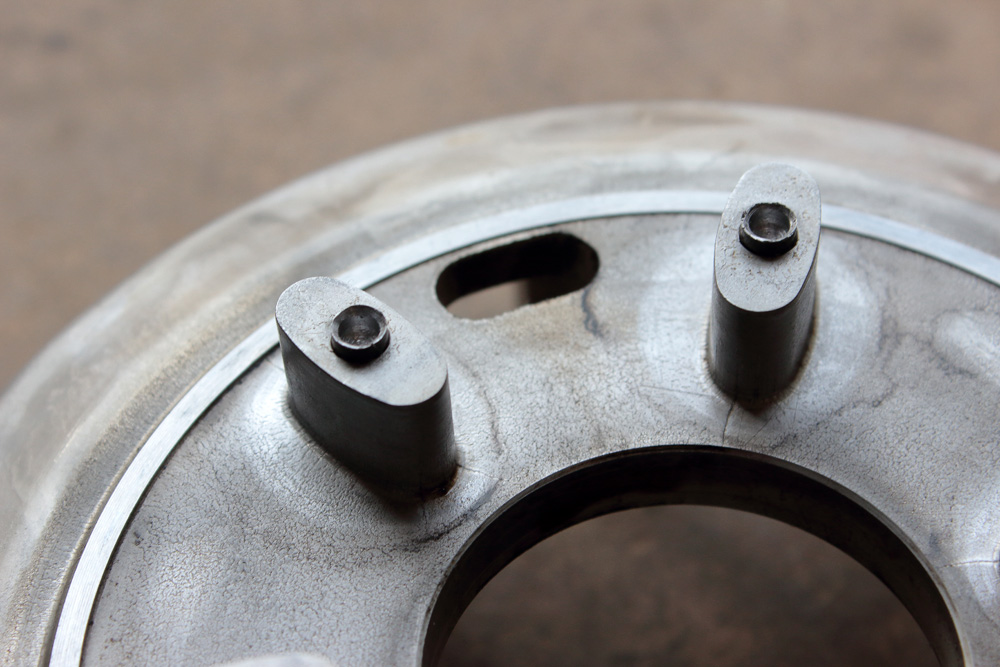
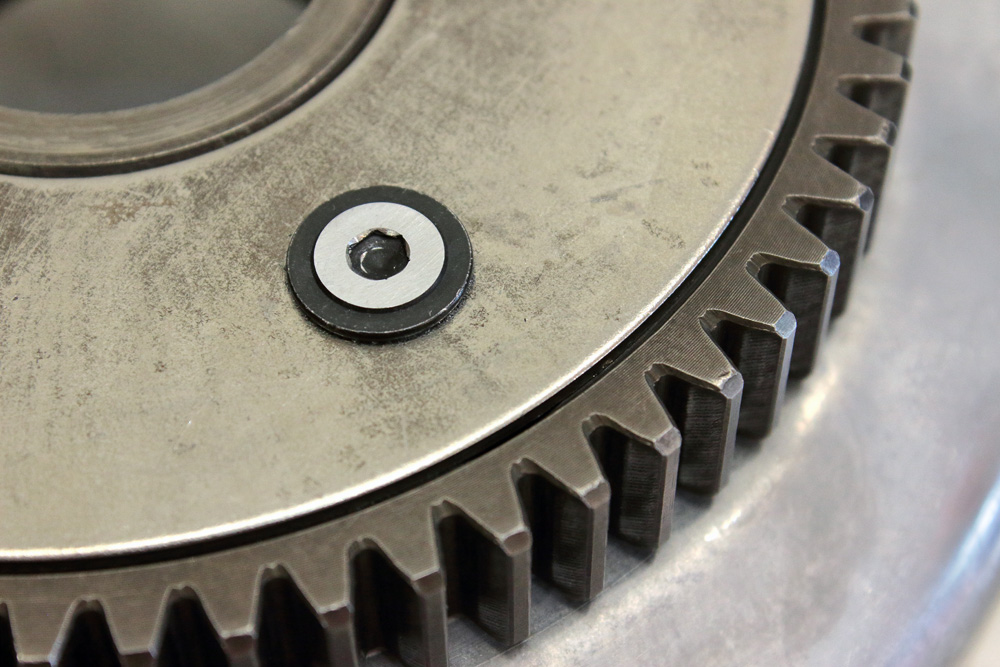
There is a variety of methods how to fix gear cover back. Here is my version. I chose flanged screws with grade 12.9 and 2701 Loctite (which is temperature improved version of 2700). And if you are a control freak, here is my little invention that will allow you to sleep without bad dreams about wrecked crankcase. In fact it not exactly invention. Everyone who have to replace driving chain before next day ride and found out that his chain riveting tool was lent, but not returned, or not functioning properly. could of invented this method. In fact it’s old school chain riveting method that may be called “bearing ball and hummer”.
To check if it works on screws that I’ve bought for clutch basket, I drilled the end of one of them with 3mm drill bit, screwed a standard nut on it, and then with help of suitable bearing ball and hummer widened drilled opening. After this I tried to unscrew nut and here it is, it didn’t come off.

So I modified all six screws in same manner:
Torque them with 13Nm and then riveted screw ends. Here is how the same screw looked before and after such operation:
Screw heads were protruding for about 3mm about gear cover, while suitable protruding is not more than 1.5mm. I protected clutch basket from abrasive penetration and then removed the extra heights with file tool. I equalized heights of heads and then made final grinding using as base thick mirror with sheet of sandpaper on it.
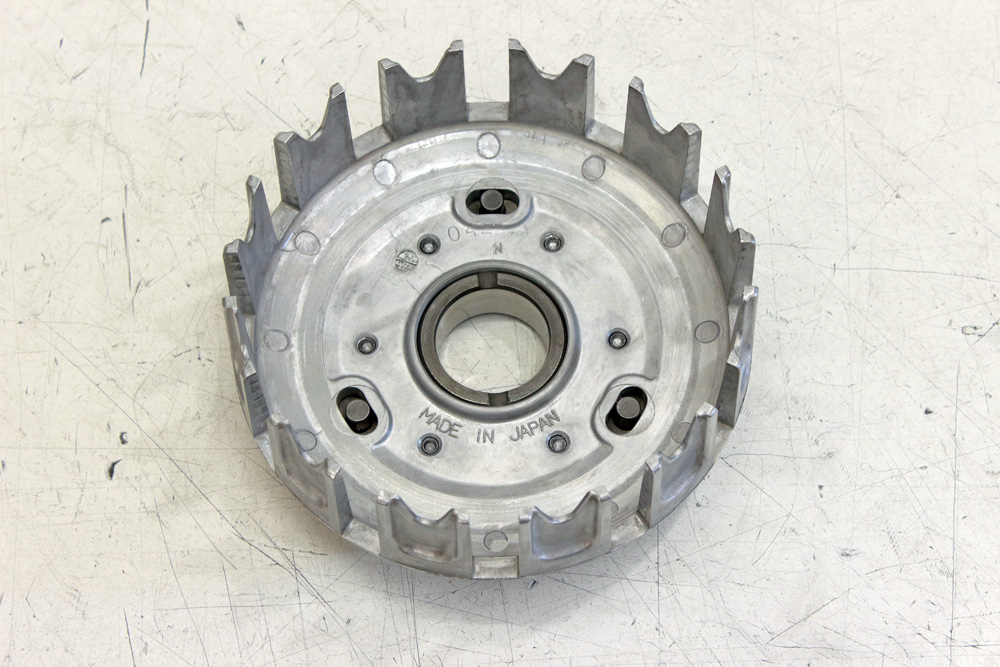
Result of my work looks fine. Yet one unit of project is ready.
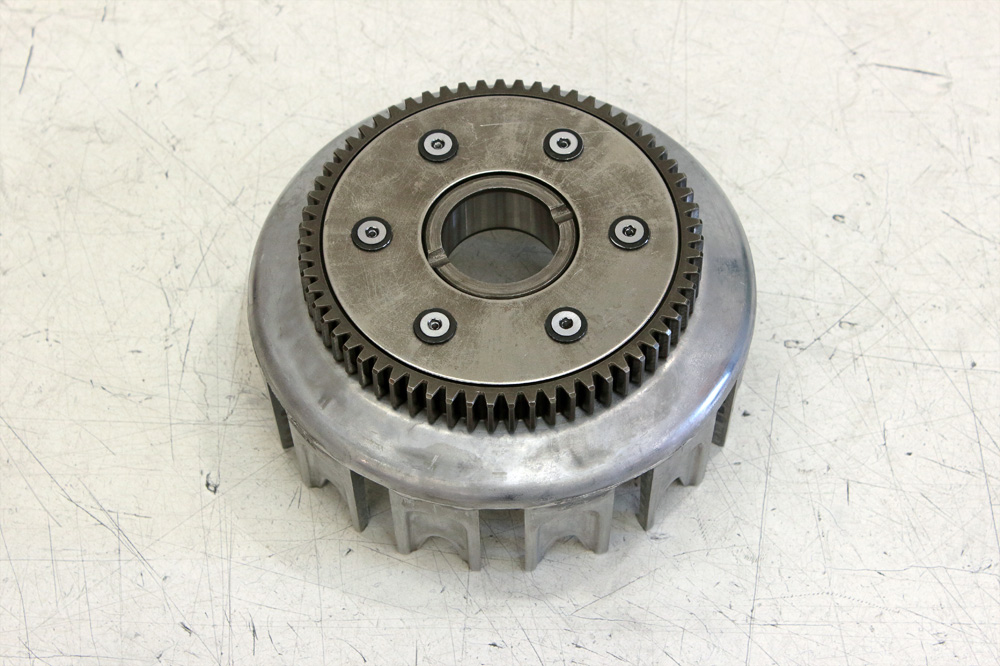
I’ll check clearance between screw heads and crankcase before assembling and I also have a thought to soak gear in oil before install it.
I bought two sets of Viton dampers from Turbosteve, one for KZ and one for Zephyr. When I installed one of them on KZ650 clutch basket I found that I wasn’t satisfied with backlash between gear and basket. Thus I took second set of rubbers, and combined dampers until backlash became minimally possible. It was alike the scene from movie “The Good, the Bad and the Ugly”, where Tuco assembles a gun in gun shop.
Once I was satisfied with backlash I proceeded to assembling.
There is a variety of methods how to fix gear cover back. Here is my version. I chose flanged screws with grade 12.9 and 2701 Loctite (which is temperature improved version of 2700). And if you are a control freak, here is my little invention that will allow you to sleep without bad dreams about wrecked crankcase. In fact it not exactly invention. Everyone who have to replace driving chain before next day ride and found out that his chain riveting tool was lent, but not returned, or not functioning properly. could of invented this method. In fact it’s old school chain riveting method that may be called “bearing ball and hummer”.
To check if it works on screws that I’ve bought for clutch basket, I drilled the end of one of them with 3mm drill bit, screwed a standard nut on it, and then with help of suitable bearing ball and hummer widened drilled opening. After this I tried to unscrew nut and here it is, it didn’t come off.
So I modified all six screws in same manner:
Torque them with 13Nm and then riveted screw ends. Here is how the same screw looked before and after such operation:
Screw heads were protruding for about 3mm about gear cover, while suitable protruding is not more than 1.5mm. I protected clutch basket from abrasive penetration and then removed the extra heights with file tool. I equalized heights of heads and then made final grinding using as base thick mirror with sheet of sandpaper on it.
Result of my work looks fine. Yet one unit of project is ready.
I’ll check clearance between screw heads and crankcase before assembling and I also have a thought to soak gear in oil before install it.
Kawasaki KZ650 cafe-racer: in progress
Kawasaki Zephyr 750 (810ccm, 4in4, spoked wheels)
Honda CB815 "Eight Fifteen" cafe-racer
Yamaha XJ "Eight Ball" cafe-racer
www.gazzz-garage.com
Kawasaki Zephyr 750 (810ccm, 4in4, spoked wheels)
Honda CB815 "Eight Fifteen" cafe-racer
Yamaha XJ "Eight Ball" cafe-racer
www.gazzz-garage.com
The following user(s) said Thank You: 650ed, linuxrob, jimdgreat1
Please Log in or Create an account to join the conversation.
- TexasKZ
-

- Offline
- Platinum Member
-
Registered
- Posts: 8244
- Thanks: 2707
Re: KZ650 cafe-racer
06 Sep 2019 06:36
Nicely done. Thank you for the tutorial. Perhaps this could be copied into a new thread and and made a sticky thread so folks in the future can find it easily.
1982 KZ1000 LTD parts donor
1981 KZ1000 LTD awaiting resurrection
2000 ZRX1100 not ridden enough
www.kzrider.com/forum/11-projects/620336...amateur-build-thread
1981 KZ1000 LTD awaiting resurrection
2000 ZRX1100 not ridden enough
www.kzrider.com/forum/11-projects/620336...amateur-build-thread
The following user(s) said Thank You: gazzz
Please Log in or Create an account to join the conversation.
- Forrest
-
- Offline
- Sustaining Member
-
Registered
- The Mad Duck
- Posts: 786
- Thanks: 191
Re: KZ650 cafe-racer
12 Sep 2019 17:01
Very impressive work and attention to detail. Make me wonder what lies beneath my clutch basket! :ohmy:
KZ RIDER RELAY FLAG CARRIER #55
1977 KZ650B Ready & Fit to Roll Anywhere!
1974 F7 175 -first bike and still own, full resto soon!
2002 ZRX1200R -Red the faster color
2011 Concours 14 -Now a Snarling Wolf in Sheep's Clothing!
1977 KZ650B Ready & Fit to Roll Anywhere!
1974 F7 175 -first bike and still own, full resto soon!
2002 ZRX1200R -Red the faster color
2011 Concours 14 -Now a Snarling Wolf in Sheep's Clothing!
The following user(s) said Thank You: gazzz
Please Log in or Create an account to join the conversation.
- gazzz
-
Topic Author
- Offline
- Sustaining Member
-
Registered
- Posts: 563
- Thanks: 319
Re: KZ650 cafe-racer
13 Sep 2019 13:44
Thank you!
TexasKZ: Sure, I could do that, but it'll be up to moderators to stick the thread.
It was a busy week: I was assembling rear wheel and working on carburetors. Not counting that yet one KZ750 cylinder head arrived. I found it acceptable so now I am working on it. Hope to finish channels cleaning on weekend.
Kawasaki KZ650 cafe-racer: in progress
Kawasaki Zephyr 750 (810ccm, 4in4, spoked wheels)
Honda CB815 "Eight Fifteen" cafe-racer
Yamaha XJ "Eight Ball" cafe-racer
www.gazzz-garage.com
Kawasaki Zephyr 750 (810ccm, 4in4, spoked wheels)
Honda CB815 "Eight Fifteen" cafe-racer
Yamaha XJ "Eight Ball" cafe-racer
www.gazzz-garage.com
The following user(s) said Thank You: SWest
Please Log in or Create an account to join the conversation.
- gazzz
-
Topic Author
- Offline
- Sustaining Member
-
Registered
- Posts: 563
- Thanks: 319
Re: KZ650 cafe-racer
15 Sep 2019 00:32
Saturday was completely f*cked up. I ordered cylinder to be honed for Wiseco K700 kit (64.00mm for barrel). Yesterday I took them ready from specialized workshop. Cylinders looked nice but I decided to measure them. Even presuming that different bore gauges may give slightly different results there is no way to be mistaken with different measurements of same gauge. I clearly see 0.02 difference between measurement which is unacceptable.
Kawasaki KZ650 cafe-racer: in progress
Kawasaki Zephyr 750 (810ccm, 4in4, spoked wheels)
Honda CB815 "Eight Fifteen" cafe-racer
Yamaha XJ "Eight Ball" cafe-racer
www.gazzz-garage.com
Kawasaki Zephyr 750 (810ccm, 4in4, spoked wheels)
Honda CB815 "Eight Fifteen" cafe-racer
Yamaha XJ "Eight Ball" cafe-racer
www.gazzz-garage.com
Please Log in or Create an account to join the conversation.
- gazzz
-
Topic Author
- Offline
- Sustaining Member
-
Registered
- Posts: 563
- Thanks: 319
Re: KZ650 cafe-racer
18 Sep 2019 11:53
Seems I've been slightly carried away when working on cylinder head. I started it like cleaning but then it turned... no, couldn't call it porting. Shaving is more close to what I did to intake and exhaust ports. Work on head is mostly finished but still is in progress.
By the way, turned out that black and silver KZ750 cylinder heads have different part numbers not only due to color. They were cast in different molds. About differences I'll write later.
By the way, turned out that black and silver KZ750 cylinder heads have different part numbers not only due to color. They were cast in different molds. About differences I'll write later.
Kawasaki KZ650 cafe-racer: in progress
Kawasaki Zephyr 750 (810ccm, 4in4, spoked wheels)
Honda CB815 "Eight Fifteen" cafe-racer
Yamaha XJ "Eight Ball" cafe-racer
www.gazzz-garage.com
Kawasaki Zephyr 750 (810ccm, 4in4, spoked wheels)
Honda CB815 "Eight Fifteen" cafe-racer
Yamaha XJ "Eight Ball" cafe-racer
www.gazzz-garage.com
Please Log in or Create an account to join the conversation.
- gazzz
-
Topic Author
- Offline
- Sustaining Member
-
Registered
- Posts: 563
- Thanks: 319
Re: KZ650 cafe-racer
19 Sep 2019 11:03
Meanwhile, lets talk about intake. I am about to use Mikuni VM24 and I need not only rebuild them but also re-tune them to fit Wiseco K700 kit and KZ750 cylinder head. So I decided to try Keyster repair/tuning kits for Kawasaki KZ650 carburetors:
Kawasaki KZ650 cafe-racer: in progress
Kawasaki Zephyr 750 (810ccm, 4in4, spoked wheels)
Honda CB815 "Eight Fifteen" cafe-racer
Yamaha XJ "Eight Ball" cafe-racer
www.gazzz-garage.com
Kawasaki Zephyr 750 (810ccm, 4in4, spoked wheels)
Honda CB815 "Eight Fifteen" cafe-racer
Yamaha XJ "Eight Ball" cafe-racer
www.gazzz-garage.com
Please Log in or Create an account to join the conversation.
Moderators: Street Fighter LTD