
kz750e Resto-Mod
- Daftrusty
-
 Topic Author
- Offline
- User
-

Registered
- Posts: 377
- Thanks: 210
Re: kz750e Resto-Mod
12 Sep 2016 07:03
Thank you guys again for the positive support.
It has been awhile, but I have finally made some progress....
So my cylinder bores were worn way beyond the service limit after 27,000 miles.
This forced me to decide whether I wanted to go the 810 over bore or try to buy a used cylinder head and 9.5:1 pistons online that may or may not arrive worn past its service limit. I had already gone this route before when I was putting gpz550 pistons and cams in my zr550 and it turned out to be a nightmare of getting e-screwed with numerous unusable parts. So after a year of researching the Cruzinimage pistons kits, I decided to give them a try. (Yes…I know…I know….)
Disclaimer:
This is me documenting my experience with these particular piston kits. This me not yet saying that they are of good quality and people should buy them, only that I am trying them for my own reasons. ( I simply cannot afford the Wiseco kit.)
Because I couldn’t find kz owners who have used these and could give an opinion, I have literally read hundreds of threads on Honda and Yamaha forums regarding the Cruzinimage kits and virtually every consensus was the same:
”Inspect them for sharp edges and file them down” and “I have been running them for a xxxxx miles and have had no issues.”
This gave me the confidence to try them on my project and will see how they hold up.
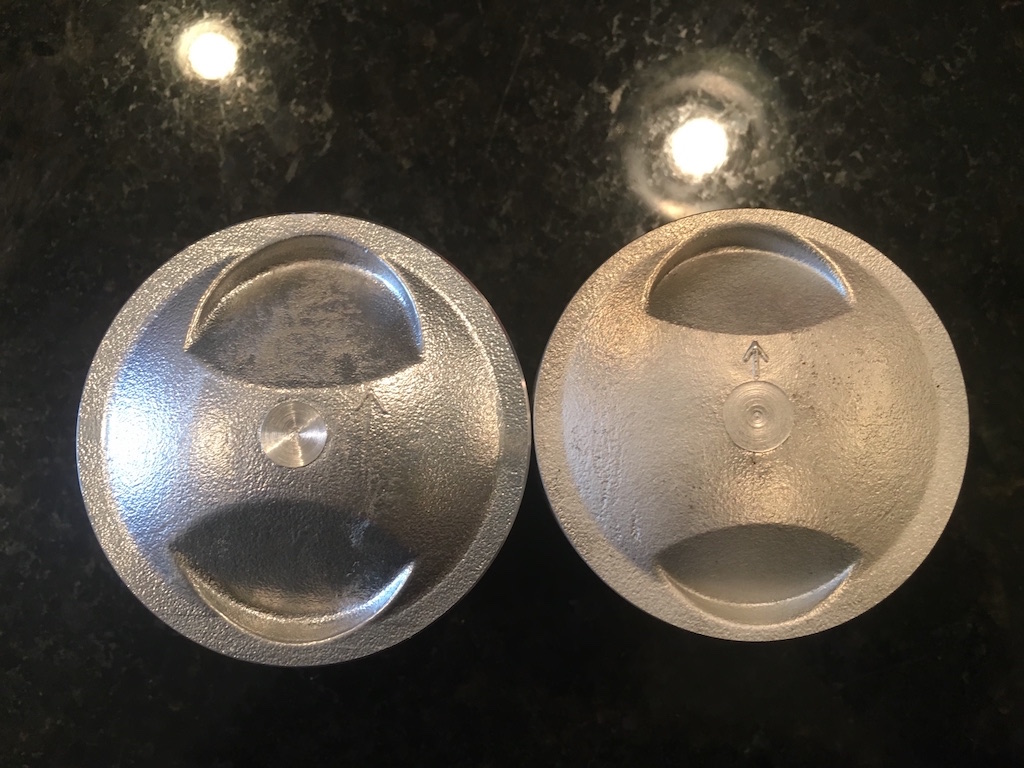
The pistons look very respectable and were packaged very well. No scratches or flashing or sharp edges on the milled areas. They are essentially stock 9.5:1 pistons only 3mm over sized, but with my smaller non-quench chambers I will still have close to 10.5:1 compression.
Compared to the stock 9:1 pistons.
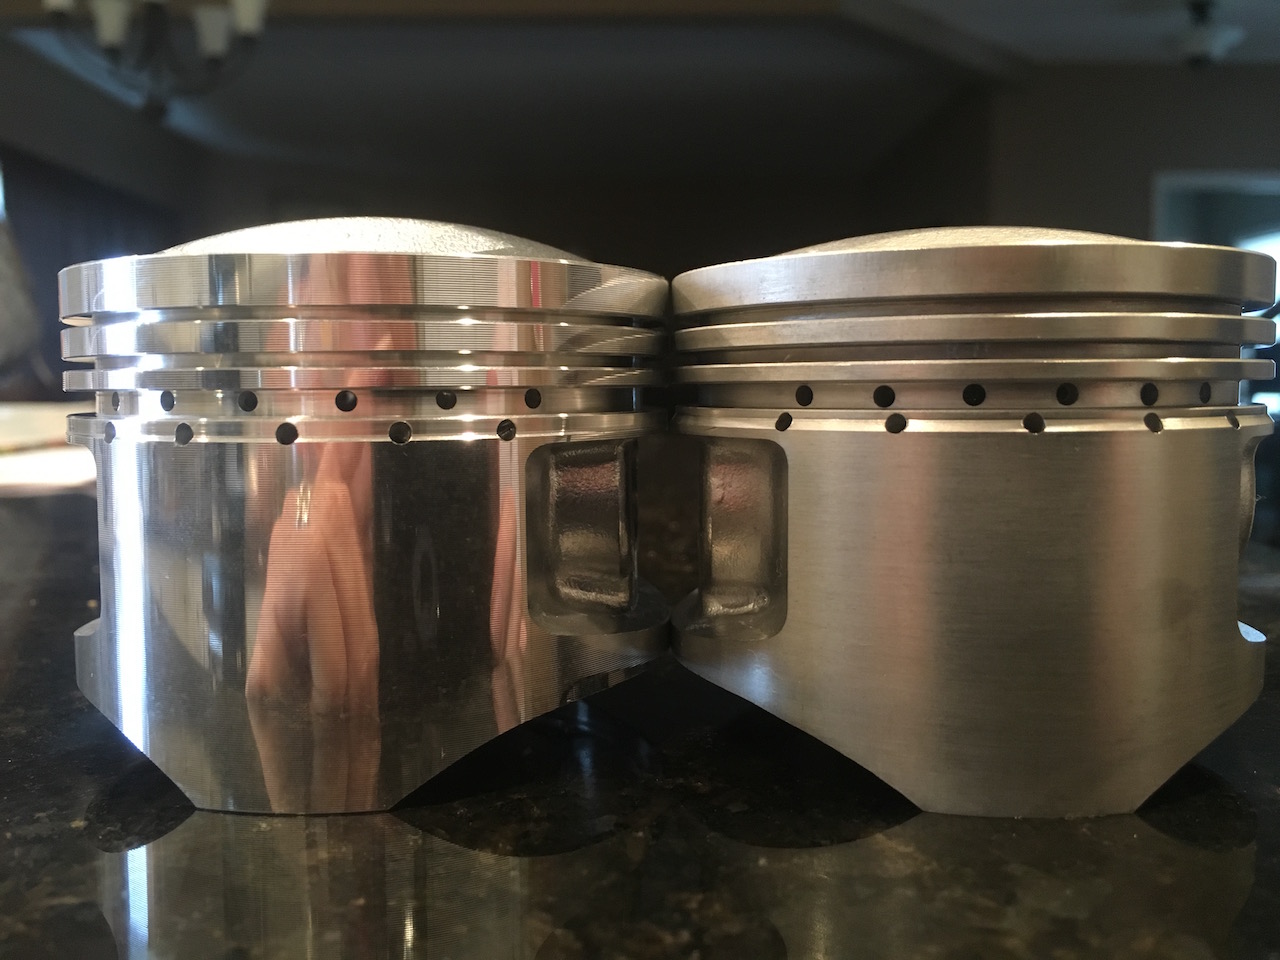
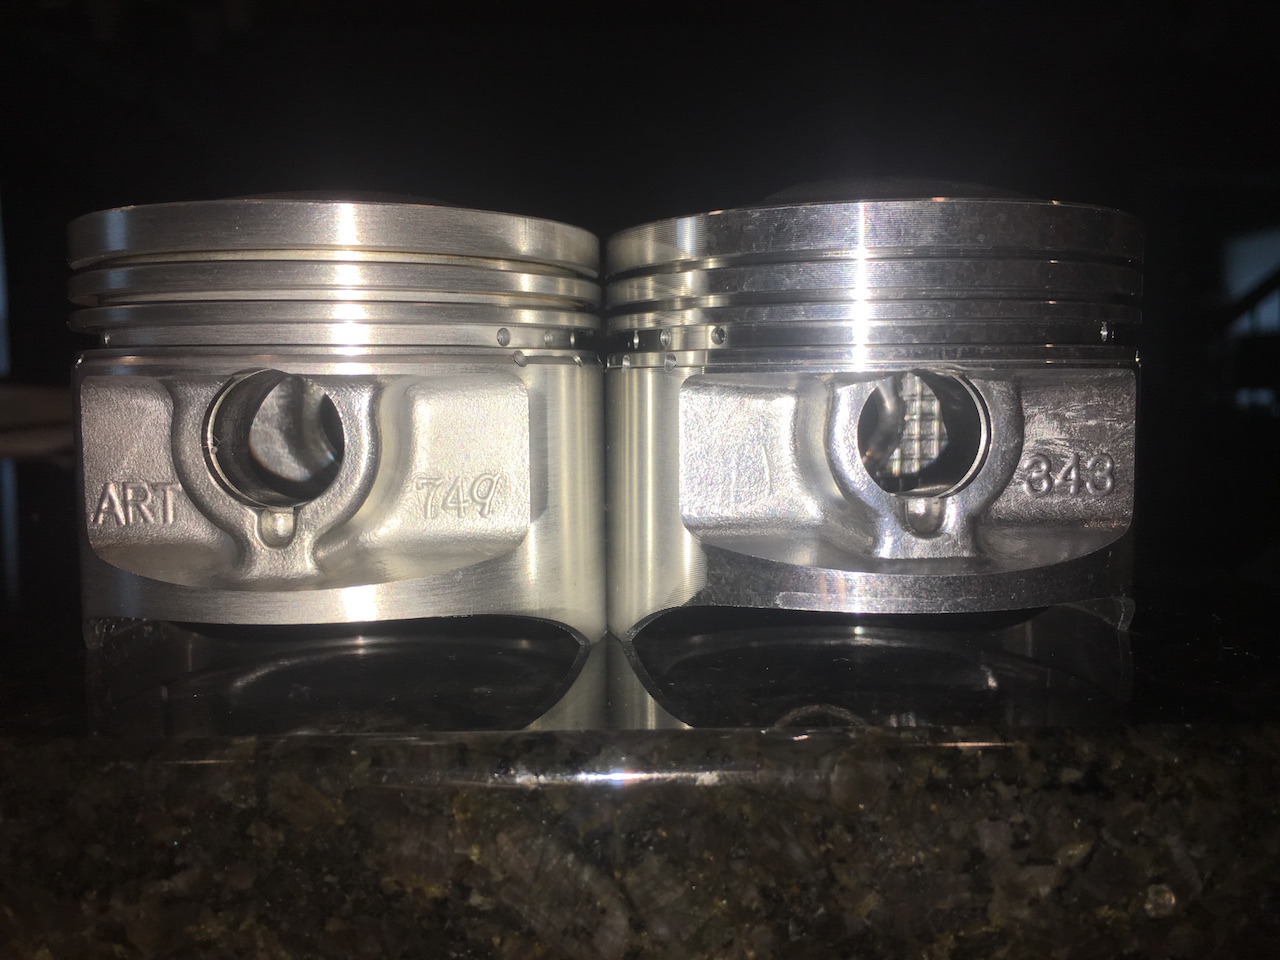
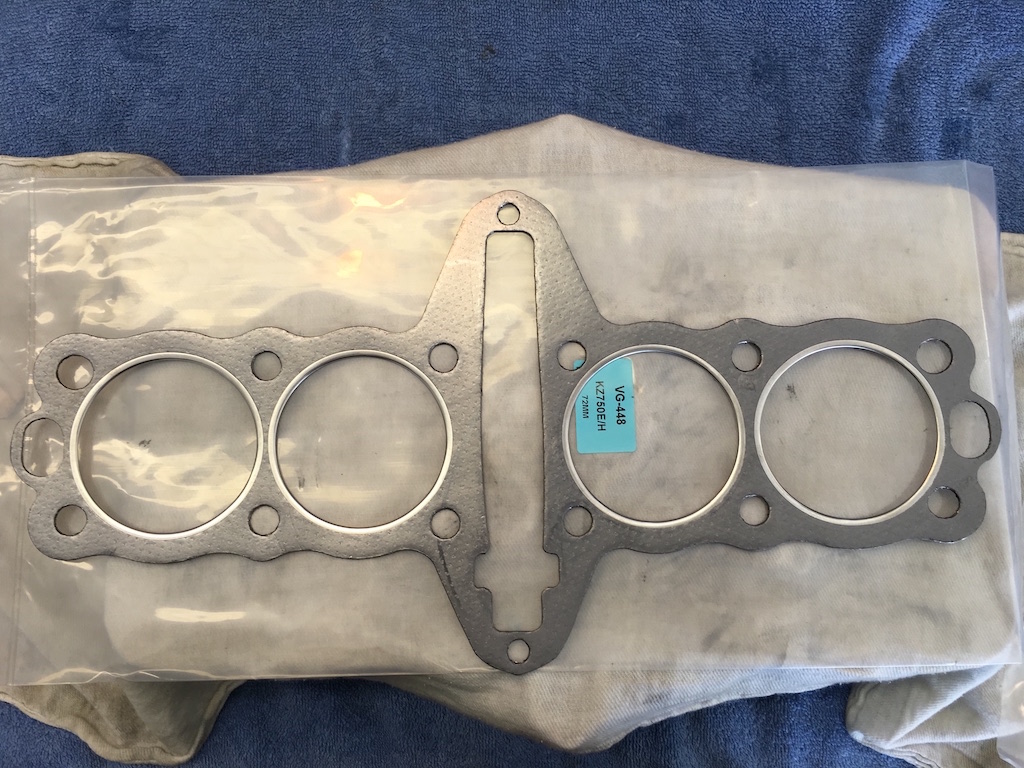
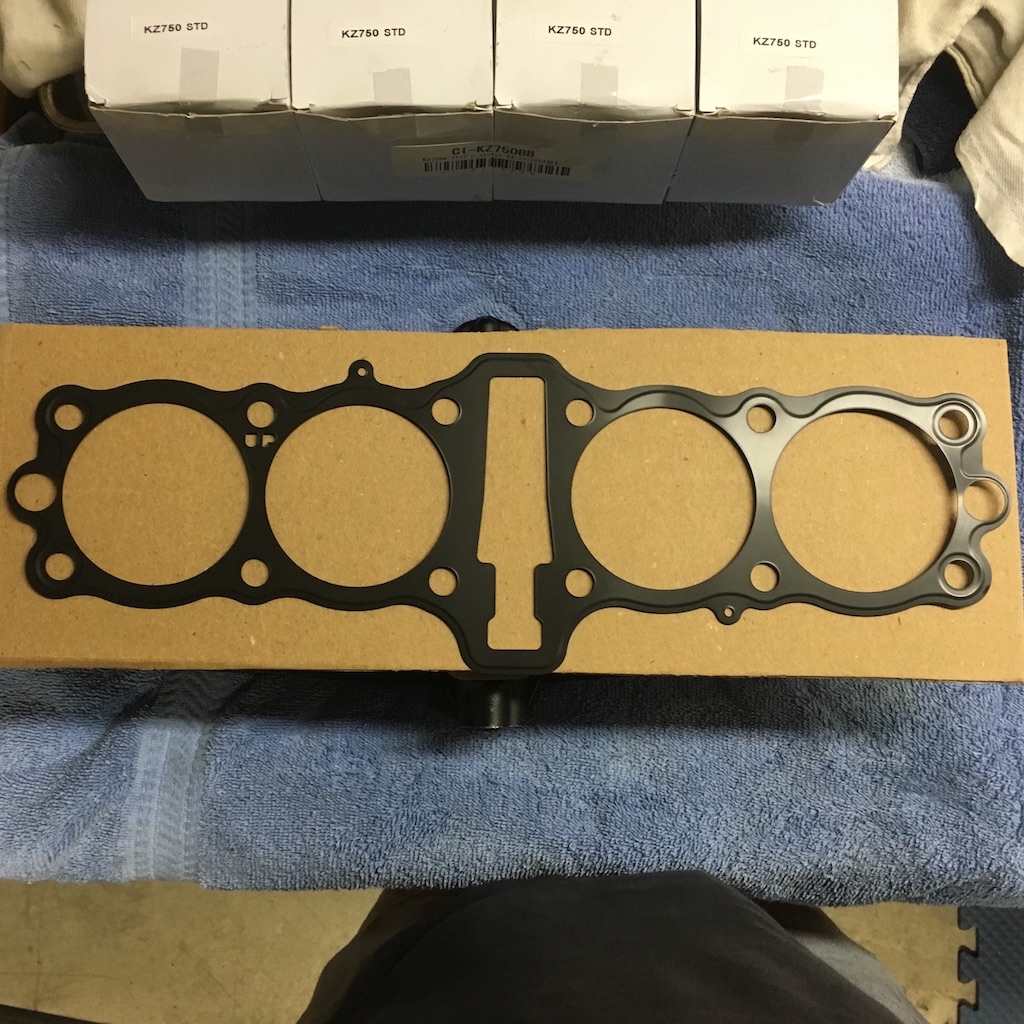
The head gasket is a MLS type that looks identical in construction to the OEM Kawasaki gasket I used on my zr550.
I made the point of finding an engine machinist that was motorcycle specific to do the cylinder boring, as I wanted there to be no question of the quality of machine work since I was using unproven pistons. I finally found one that had 30+ years of motorcycle machine experience and was in the Minneapolis area. They had worked with the Cruzinimage pistons before and reported they were that they “never had a issue with them” which is a high praise since they are a Wiseco dealer.
Once they had bored and matched the pistons to .045mm clearances, I had to gap the rings myself and all of the rings required no adjustment as they all were within the factory specs.
*I did have one oil control spring that wanted to overlap ends when I installed it on its piston. I fiddled with it for an hour before I was sure I had corrected the issue, but I am not 100% convinced that the spring didn’t try to overlap itself once I had the piston in the bore. This has kept me literally kept me awake at night and only when I have the engine running and it doesn’t blow blue smoke will I be able to relax.*
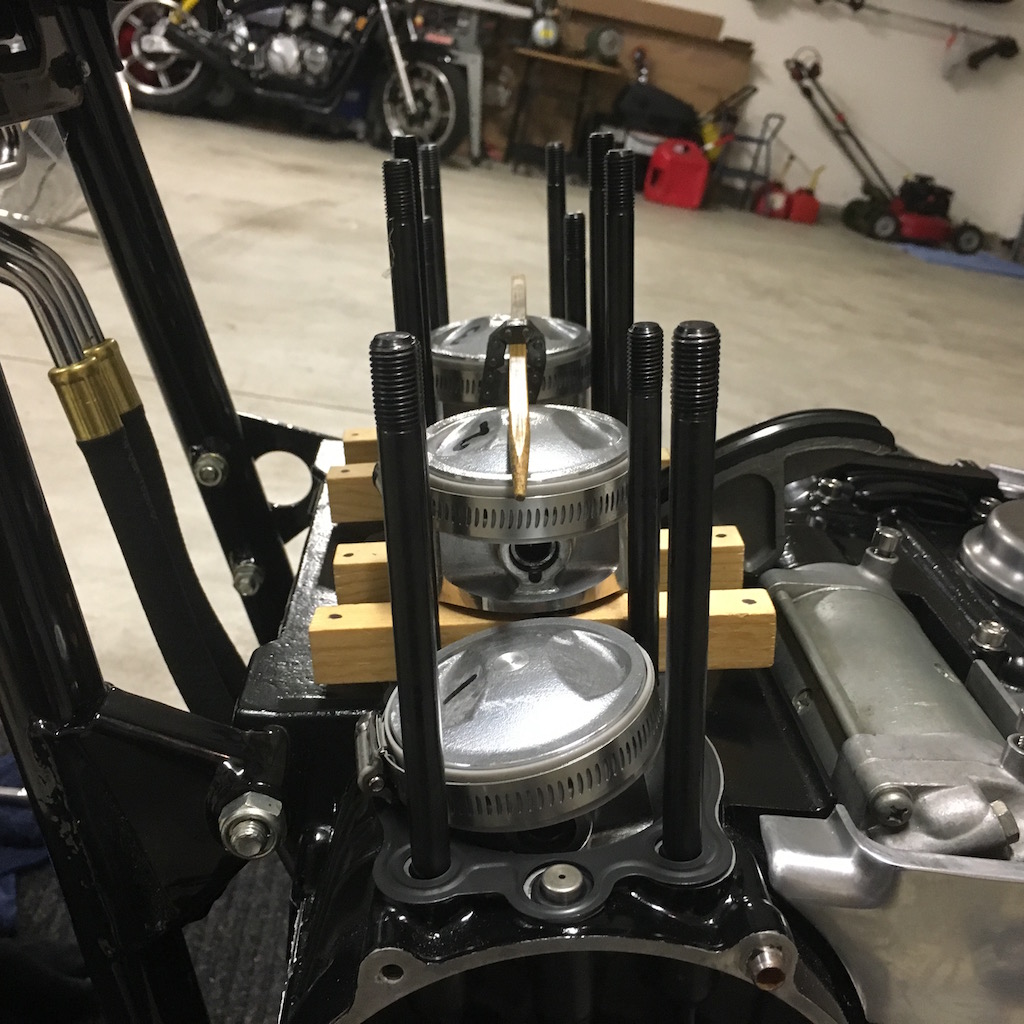
Installing the pistons is my most dreaded task of the entire bike build. ( I once had an oil control ring pop out upon installation and irreparably damage a cylinder bore.) I used the hose clamp and plastic strap style ring compressor and after what seemed like a hundred stops and starts got all the pistons into the bores without damaging anything. Deck height is right at 0 when using the weird single layer metal base gasket that I got from Kawasaki (I ordered the one for the 81 kz750e and this is what they sent me.)
Here goes nothin....
Finally together
OEM metal base gasket
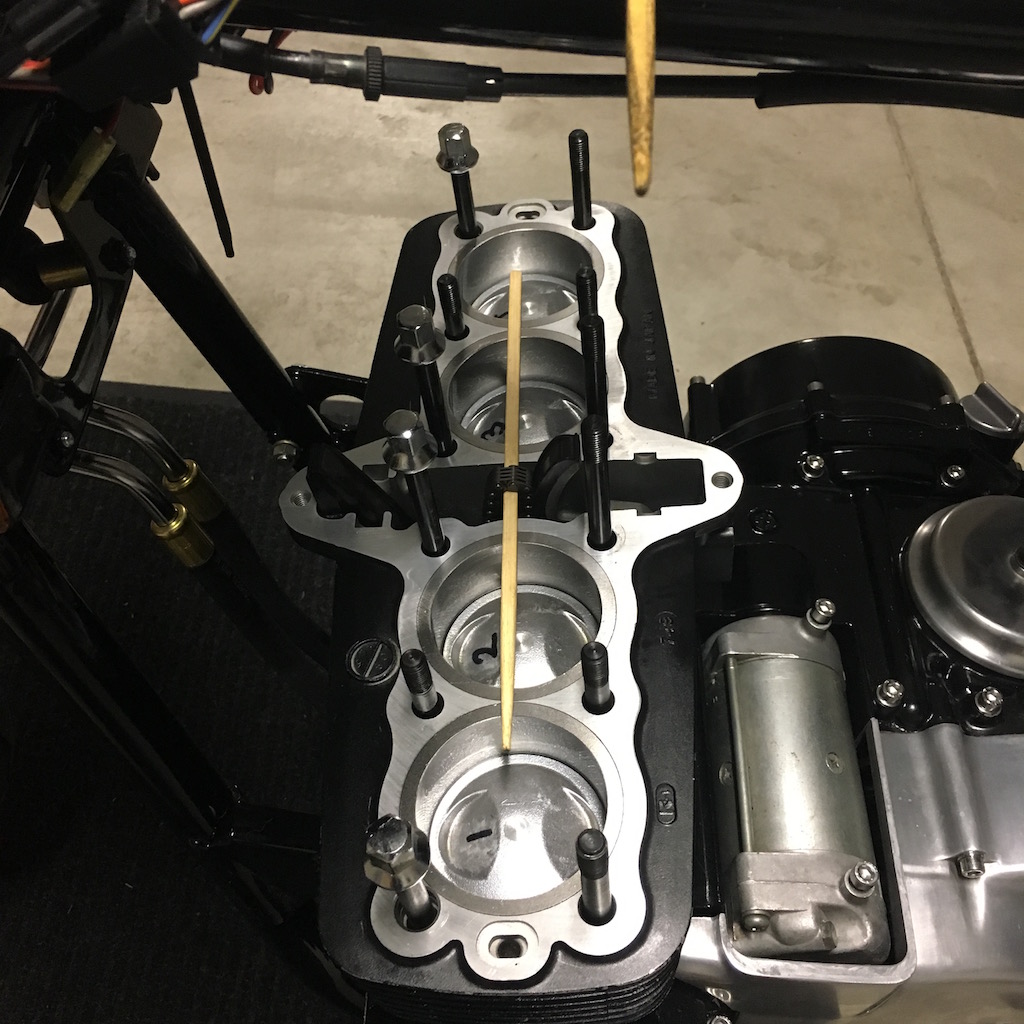
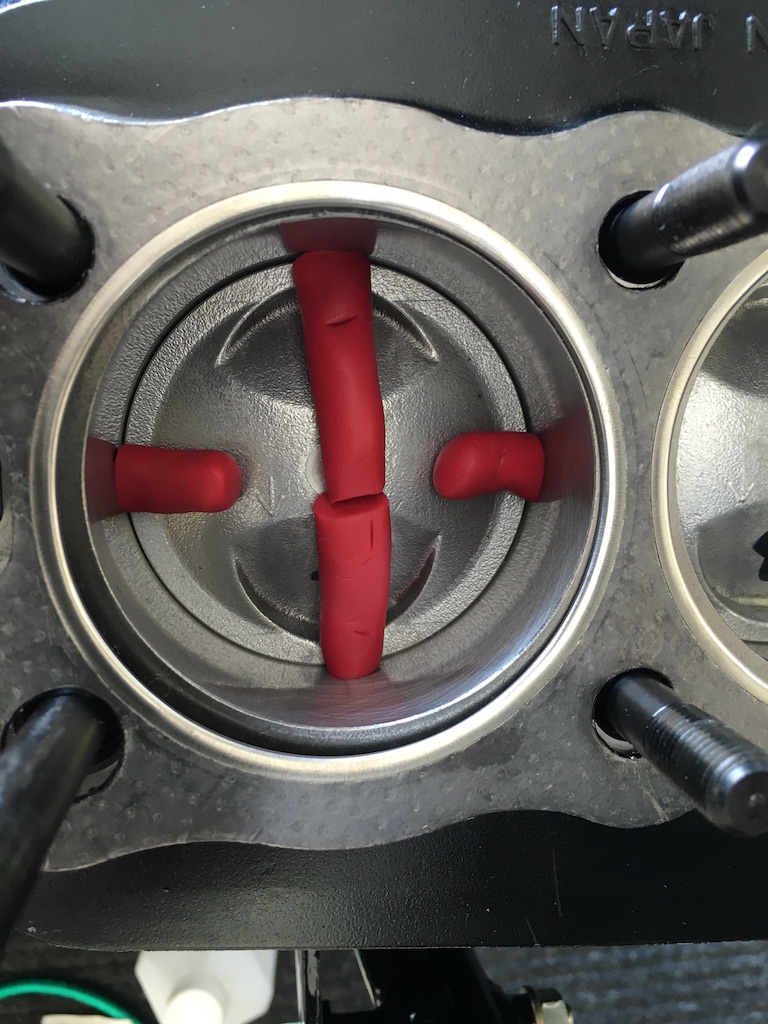
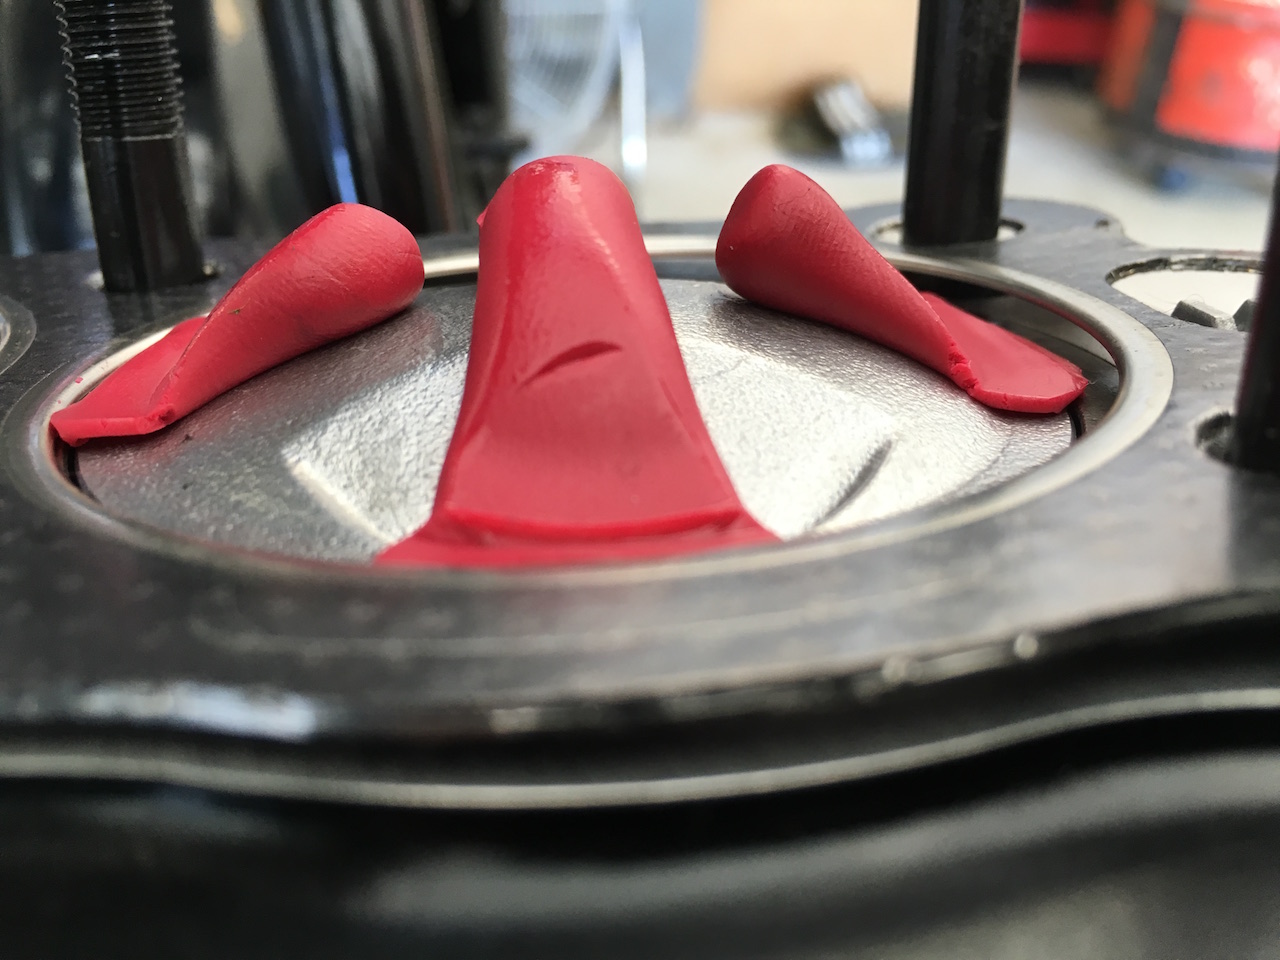
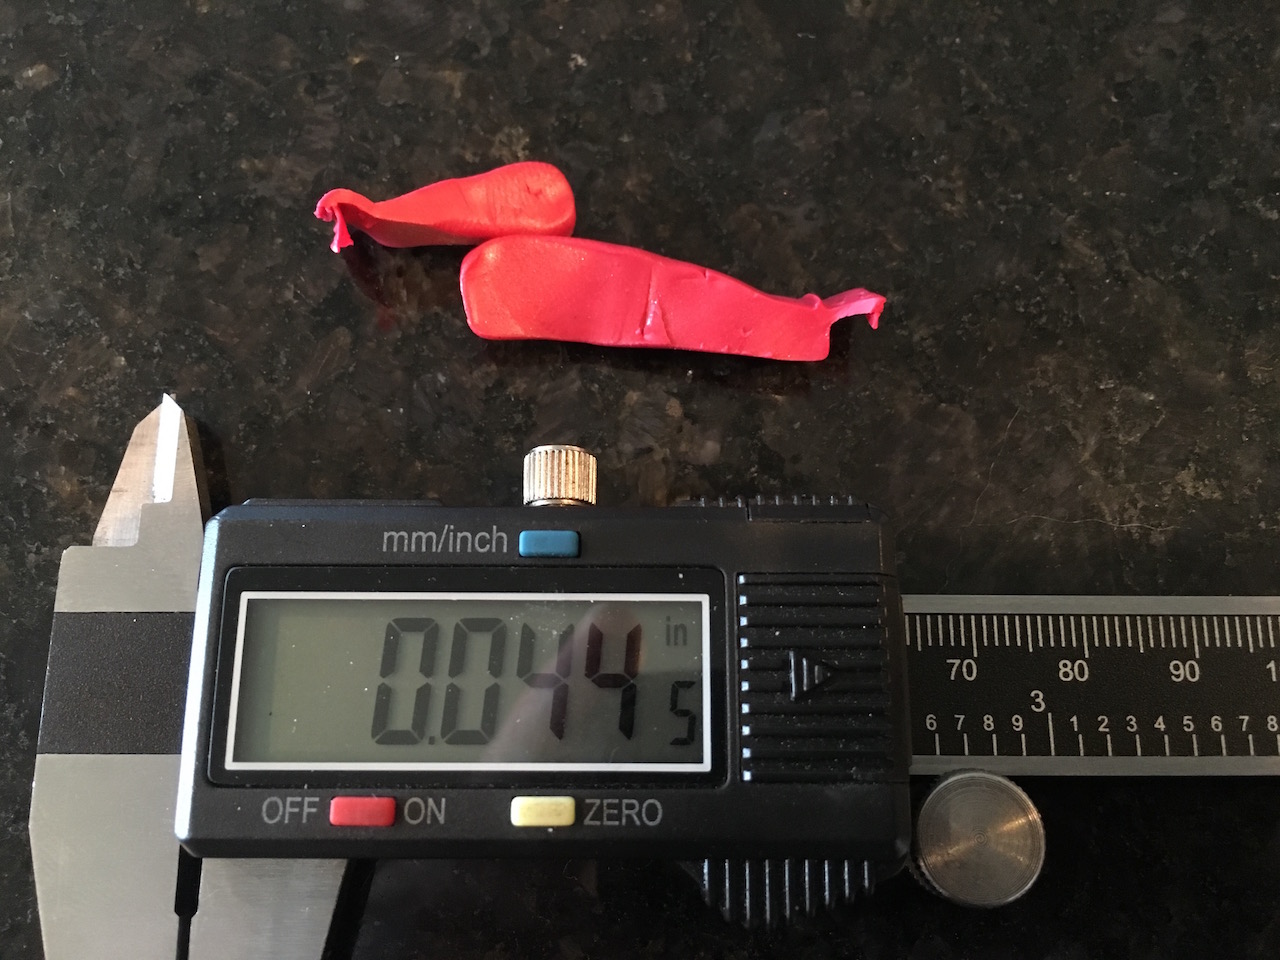
Once that was done, I now had to determine if the pistons would make contact with my non-quench cut head. I had posed the question in a separate thread if using 9.5:1 or 69mm pistons in a non-quench head was possible, but no one was able to deny or confirm if it was possible. So I made some clay strips and placed them in the bores, torqued down the head down and and spun the piston up and over TDC, removed head and measured. Thankfully I have a .044” quench ring clearance and gap between the piston dome and lip of the chamber. The quench ring varies from 7mm wide on the sides to 5mm at the valve pockets which hopefully will help keep down the risk of detonation and help with squish effect mixture circulation.
I’m just relived that nothing collided.
Non-quench cut chambers in question
It has been awhile, but I have finally made some progress....
So my cylinder bores were worn way beyond the service limit after 27,000 miles.
This forced me to decide whether I wanted to go the 810 over bore or try to buy a used cylinder head and 9.5:1 pistons online that may or may not arrive worn past its service limit. I had already gone this route before when I was putting gpz550 pistons and cams in my zr550 and it turned out to be a nightmare of getting e-screwed with numerous unusable parts. So after a year of researching the Cruzinimage pistons kits, I decided to give them a try. (Yes…I know…I know….)
Disclaimer:
This is me documenting my experience with these particular piston kits. This me not yet saying that they are of good quality and people should buy them, only that I am trying them for my own reasons. ( I simply cannot afford the Wiseco kit.)
Because I couldn’t find kz owners who have used these and could give an opinion, I have literally read hundreds of threads on Honda and Yamaha forums regarding the Cruzinimage kits and virtually every consensus was the same:
”Inspect them for sharp edges and file them down” and “I have been running them for a xxxxx miles and have had no issues.”
This gave me the confidence to try them on my project and will see how they hold up.
The pistons look very respectable and were packaged very well. No scratches or flashing or sharp edges on the milled areas. They are essentially stock 9.5:1 pistons only 3mm over sized, but with my smaller non-quench chambers I will still have close to 10.5:1 compression.
Compared to the stock 9:1 pistons.
The head gasket is a MLS type that looks identical in construction to the OEM Kawasaki gasket I used on my zr550.
I made the point of finding an engine machinist that was motorcycle specific to do the cylinder boring, as I wanted there to be no question of the quality of machine work since I was using unproven pistons. I finally found one that had 30+ years of motorcycle machine experience and was in the Minneapolis area. They had worked with the Cruzinimage pistons before and reported they were that they “never had a issue with them” which is a high praise since they are a Wiseco dealer.
Once they had bored and matched the pistons to .045mm clearances, I had to gap the rings myself and all of the rings required no adjustment as they all were within the factory specs.
*I did have one oil control spring that wanted to overlap ends when I installed it on its piston. I fiddled with it for an hour before I was sure I had corrected the issue, but I am not 100% convinced that the spring didn’t try to overlap itself once I had the piston in the bore. This has kept me literally kept me awake at night and only when I have the engine running and it doesn’t blow blue smoke will I be able to relax.*
Installing the pistons is my most dreaded task of the entire bike build. ( I once had an oil control ring pop out upon installation and irreparably damage a cylinder bore.) I used the hose clamp and plastic strap style ring compressor and after what seemed like a hundred stops and starts got all the pistons into the bores without damaging anything. Deck height is right at 0 when using the weird single layer metal base gasket that I got from Kawasaki (I ordered the one for the 81 kz750e and this is what they sent me.)
Here goes nothin....
Finally together
OEM metal base gasket
Once that was done, I now had to determine if the pistons would make contact with my non-quench cut head. I had posed the question in a separate thread if using 9.5:1 or 69mm pistons in a non-quench head was possible, but no one was able to deny or confirm if it was possible. So I made some clay strips and placed them in the bores, torqued down the head down and and spun the piston up and over TDC, removed head and measured. Thankfully I have a .044” quench ring clearance and gap between the piston dome and lip of the chamber. The quench ring varies from 7mm wide on the sides to 5mm at the valve pockets which hopefully will help keep down the risk of detonation and help with squish effect mixture circulation.
I’m just relived that nothing collided.
Non-quench cut chambers in question
1990 zr550
kz750e
650/750 6-speed Transmission Swap
kz750e
650/750 6-speed Transmission Swap
Please Log in or Create an account to join the conversation.
- Nessism
-

- Offline
- Sustaining Member
-

Registered
- Posts: 8114
- Thanks: 3495
Re: kz750e Resto-Mod
12 Sep 2016 08:02 - 12 Sep 2016 09:51
Nice update and I'm looking forward to your review of those pistons.
When rebuilding my 750E engine, which only had 11k miles on it, I found the piston to cylinder clearance was at about .004", which is about double what I wish it was. I spent a lot of time with a micrometer and a bore gauge measuring everything very carefully too. Even when measuring at the very top of the cylinder, where the piston doesn't stroke, showed a greater clearance than expected. After all the gnashing of teeth I came to the opinion that Kawasaki bored the cylinders loose. Makes me wonder if they bored the liners before install into the cylinders like was reputed on the 1000 engine of the same era. At the end of the day I decided to just run them as is w/new rings. So far so good but I like your approach better. As an aside, there is a company in the UK that sells .05mm OS pistons for the 750 for a halfway reasonable price. Those would be another possible option for guys that don't really care about extra power but just want some clean and tight bores.
When rebuilding my 750E engine, which only had 11k miles on it, I found the piston to cylinder clearance was at about .004", which is about double what I wish it was. I spent a lot of time with a micrometer and a bore gauge measuring everything very carefully too. Even when measuring at the very top of the cylinder, where the piston doesn't stroke, showed a greater clearance than expected. After all the gnashing of teeth I came to the opinion that Kawasaki bored the cylinders loose. Makes me wonder if they bored the liners before install into the cylinders like was reputed on the 1000 engine of the same era. At the end of the day I decided to just run them as is w/new rings. So far so good but I like your approach better. As an aside, there is a company in the UK that sells .05mm OS pistons for the 750 for a halfway reasonable price. Those would be another possible option for guys that don't really care about extra power but just want some clean and tight bores.
Ed
Carb O-ring Kits : www.kzrider.com/forum/14-vendor-forum/62...rburetor-o-ring-kits
www.kzrider.com/forum/faq-wiki/618026-new-owner-things-to-know
1981 KZ750E2
www.kzrider.com/forum/11-projects/604901...z750e-project-thread
Carb O-ring Kits : www.kzrider.com/forum/14-vendor-forum/62...rburetor-o-ring-kits
www.kzrider.com/forum/faq-wiki/618026-new-owner-things-to-know
1981 KZ750E2
www.kzrider.com/forum/11-projects/604901...z750e-project-thread
Last edit: 12 Sep 2016 09:51 by Nessism.
Please Log in or Create an account to join the conversation.
- Daftrusty
-
Topic Author
- Offline
- User
-
Registered
- Posts: 377
- Thanks: 210
Re: kz750e Resto-Mod
12 Sep 2016 08:07
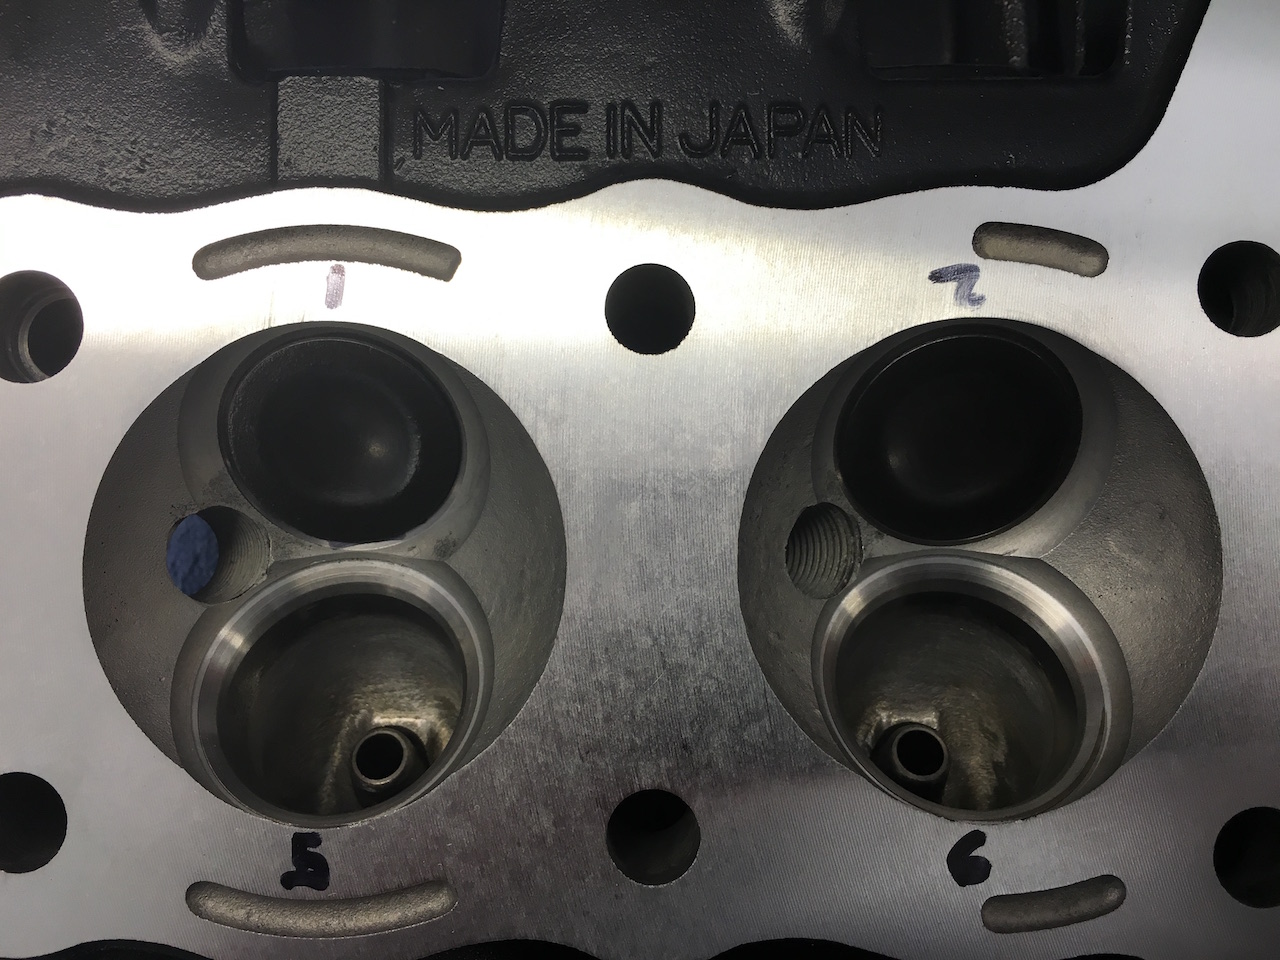
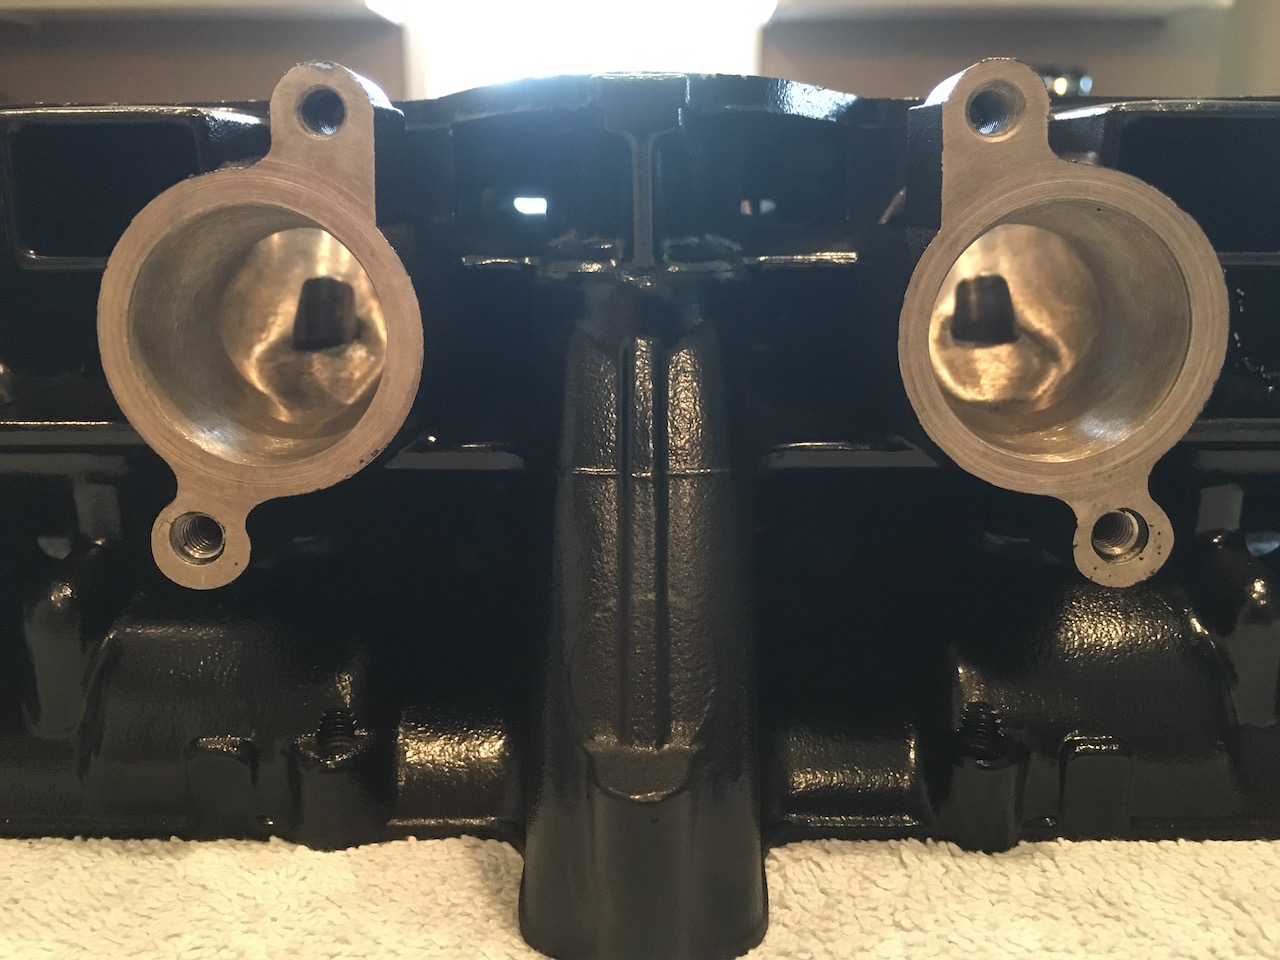
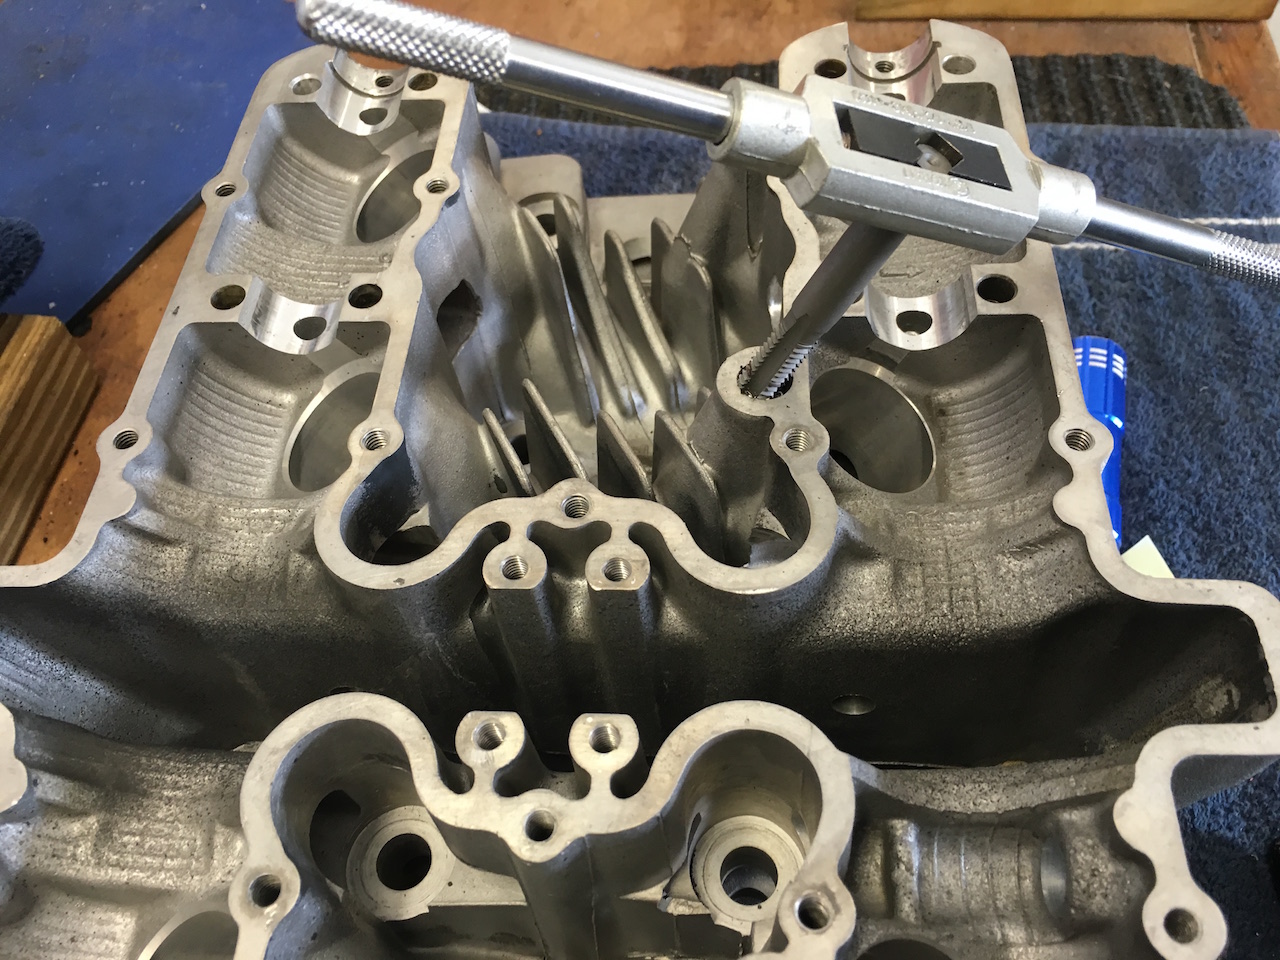
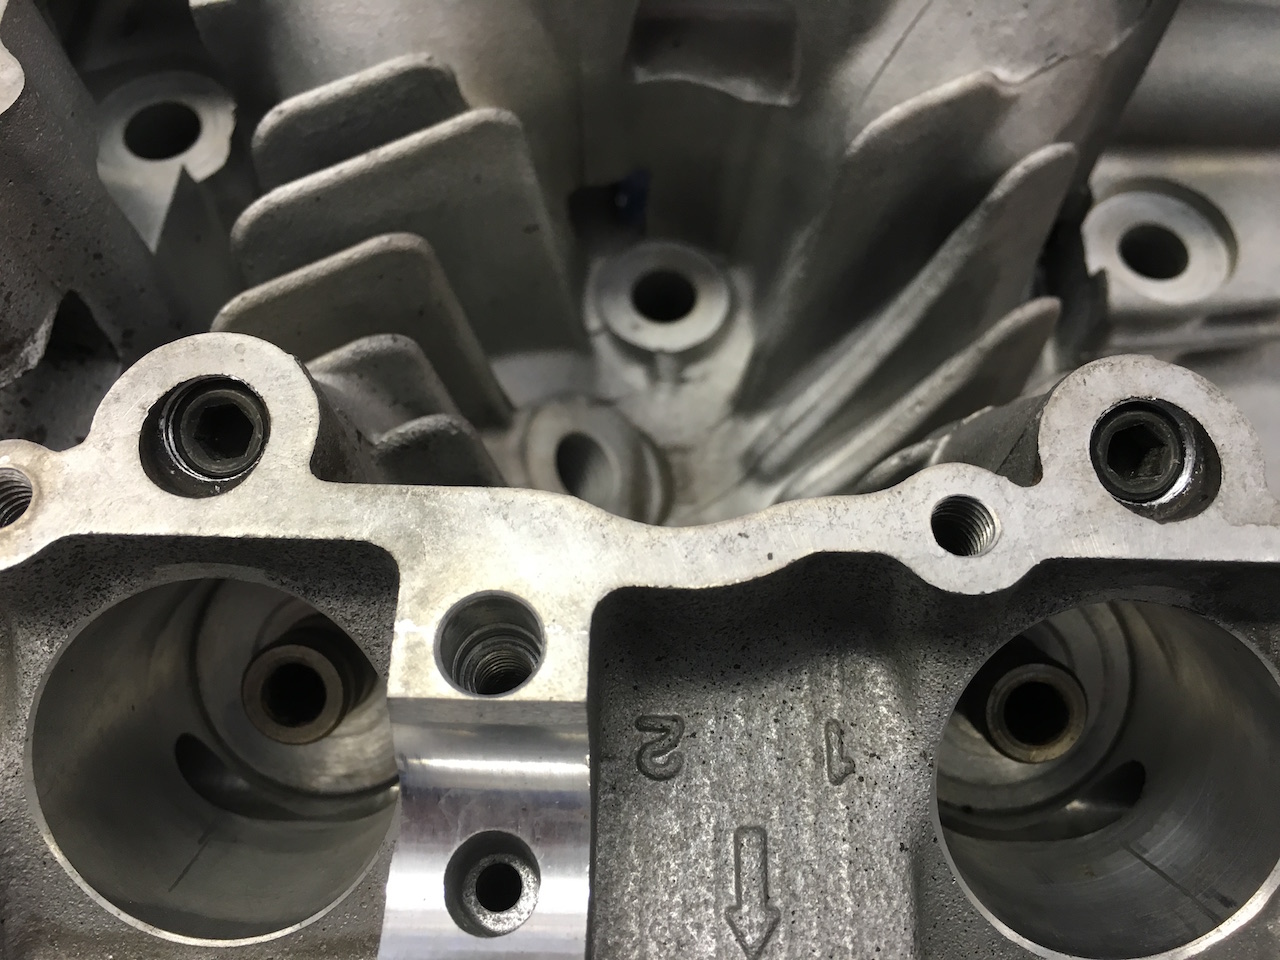
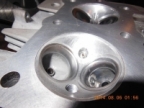
For my head I decided to do a mild porting job to match the inlet and exhaust runners to the valve seats. From the factory, both the intake and exhaust had a massive lip from where the pocket was milled for the valve seat and where the runners started. So my objective was to smooth those out, match the intake boots to the intakes ports and remove casting defects and nothing more. The only significant amount of material removed were the afore mentioned lips at the valve seats.
I seem to have lost the pictures of the exhaust side porting, but it simply looks no different than the intake side. I first practiced on junk head for a couple of days before I had the confidence to start for real on my good one.
Example picture of lip under valve seats in all of the ports
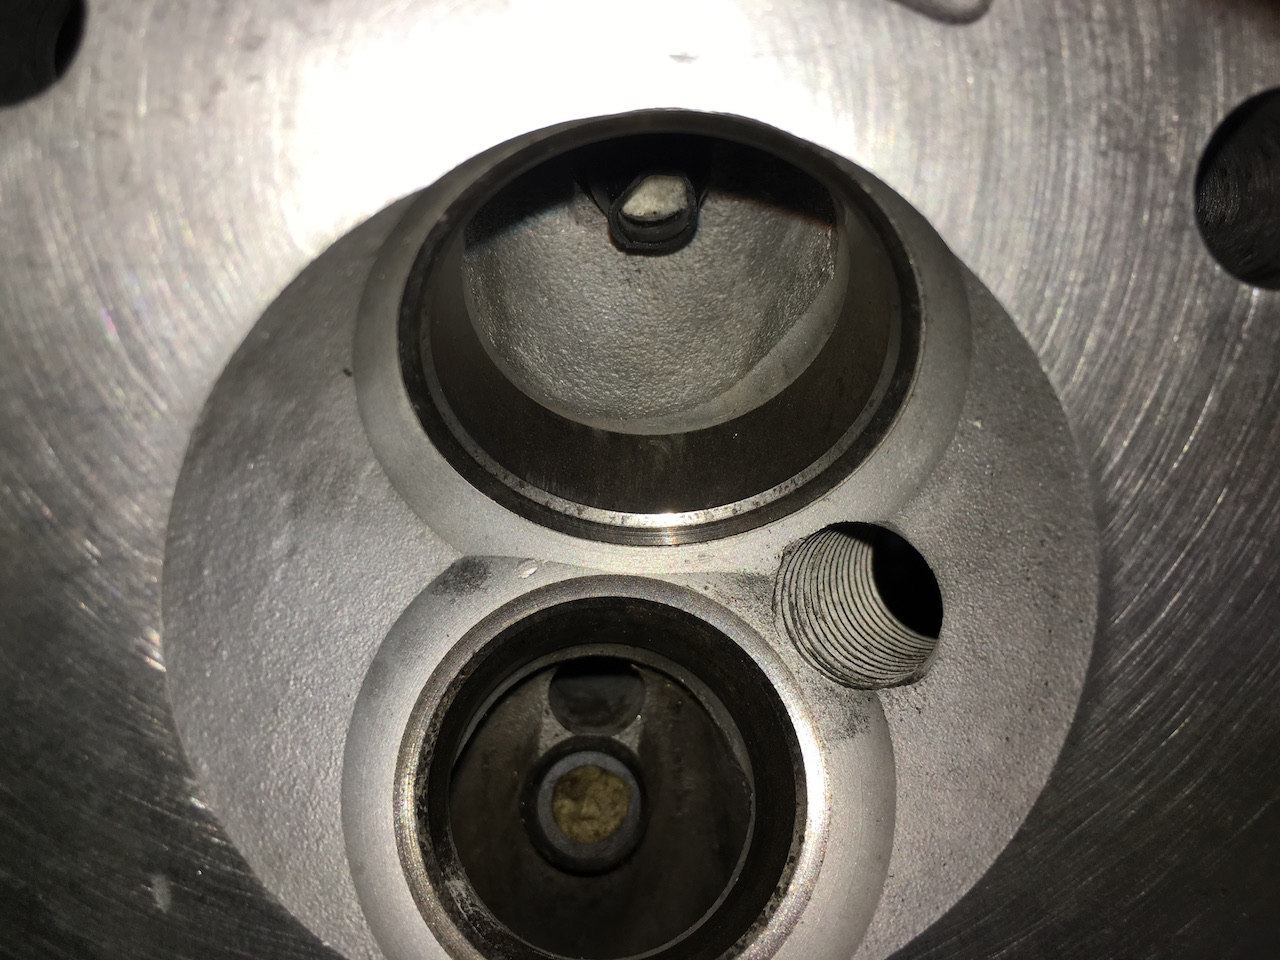
After lip removal
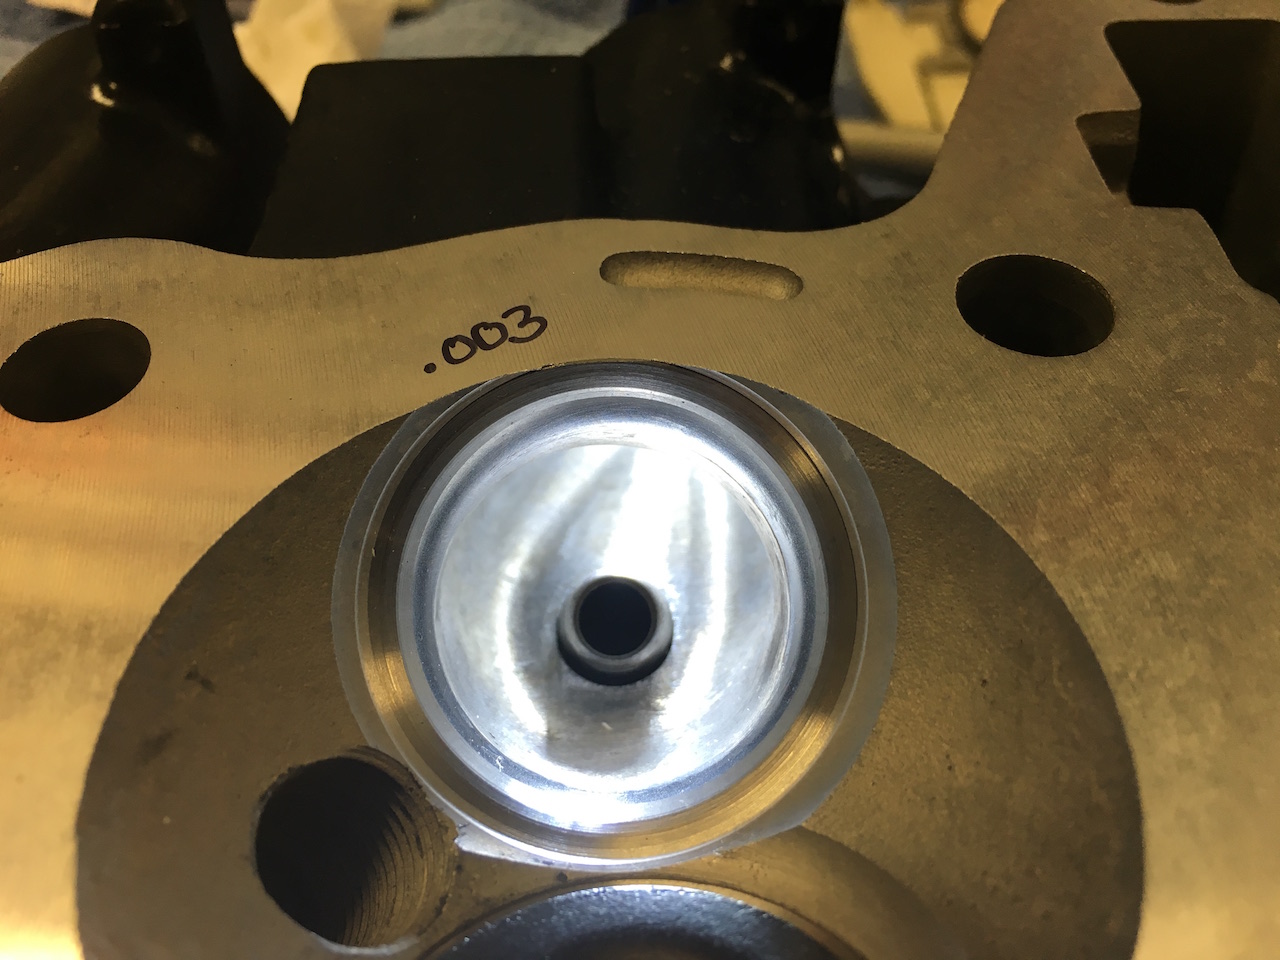
Matched intake ports
I had to have both the head and cylinder block milled flat roughly .003” each, and you can see that even that small amount of material removed cut into the exhaust valve seat.
Using the Unitrak gpz/zx750 cams turned out to be easier than I thought in regards to valve shimming. Because the exhaust cam has a 1mm smaller base circle, I was afraid that I wouldn’t be able to find a shim thick enough to properly set the valve lash. But once I had a 3 angle valve job done on the head, it has sunk the exhaust valves enough that I was able to shim them all with a range of shims from 2.50~2.70.
The intake side required that I have the valves stems trimmed in order to get the shims to fit and lash properly set. I made sure to use Viton valves seals all around.
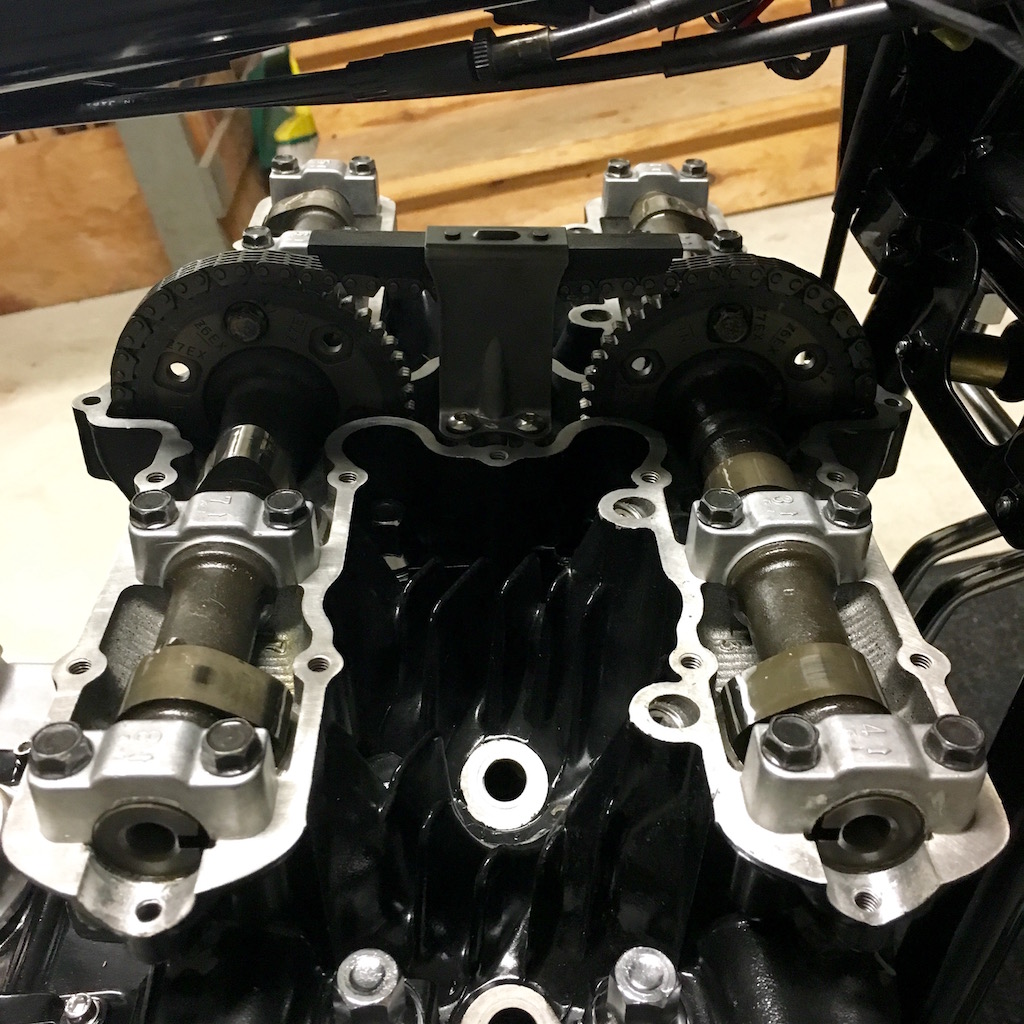
I indexed the cams to the factory zx750 specs and temporarily used a zr-7 upper cam chain guide to verify that the cam timing marks lined up properly.
I am also using a Kreiger manual cam chain tensioner.
I also used a zr-7 cam chain (as well as the matching primary chain) that came in a lot of used parts I bought. The zr-7 chain showed to be exactly the same length as the original kz750 one, but it is of a slightly beefier construction.
**Side note: The zr-7 also has dramatically different internal cam chain guides. The front one extends all the way down to the very bottom of the engine case, but is designed to work around the primary chain tensioner the zr-7 uses, so it seemed I could not reliably make it work in my kz750 engine case. The rear guide is also longer but the tensioner area is shaped very differently and would have required making a custom cam chain tensioner. Just food for thought.**
zx750 cams installed with zr-7 guide to confirm proper timing.
Because I started to worry about oil leaks in the head from the additional oil pressure from the zr-7 pump, I decided to use the later style oil nozzles in the cylinder block that have wings on the sides that direct oil pressure/flow up and into the head thus protecting the oval o-ring from direct oil pressure. I’m hoping it will help prevent leaks.
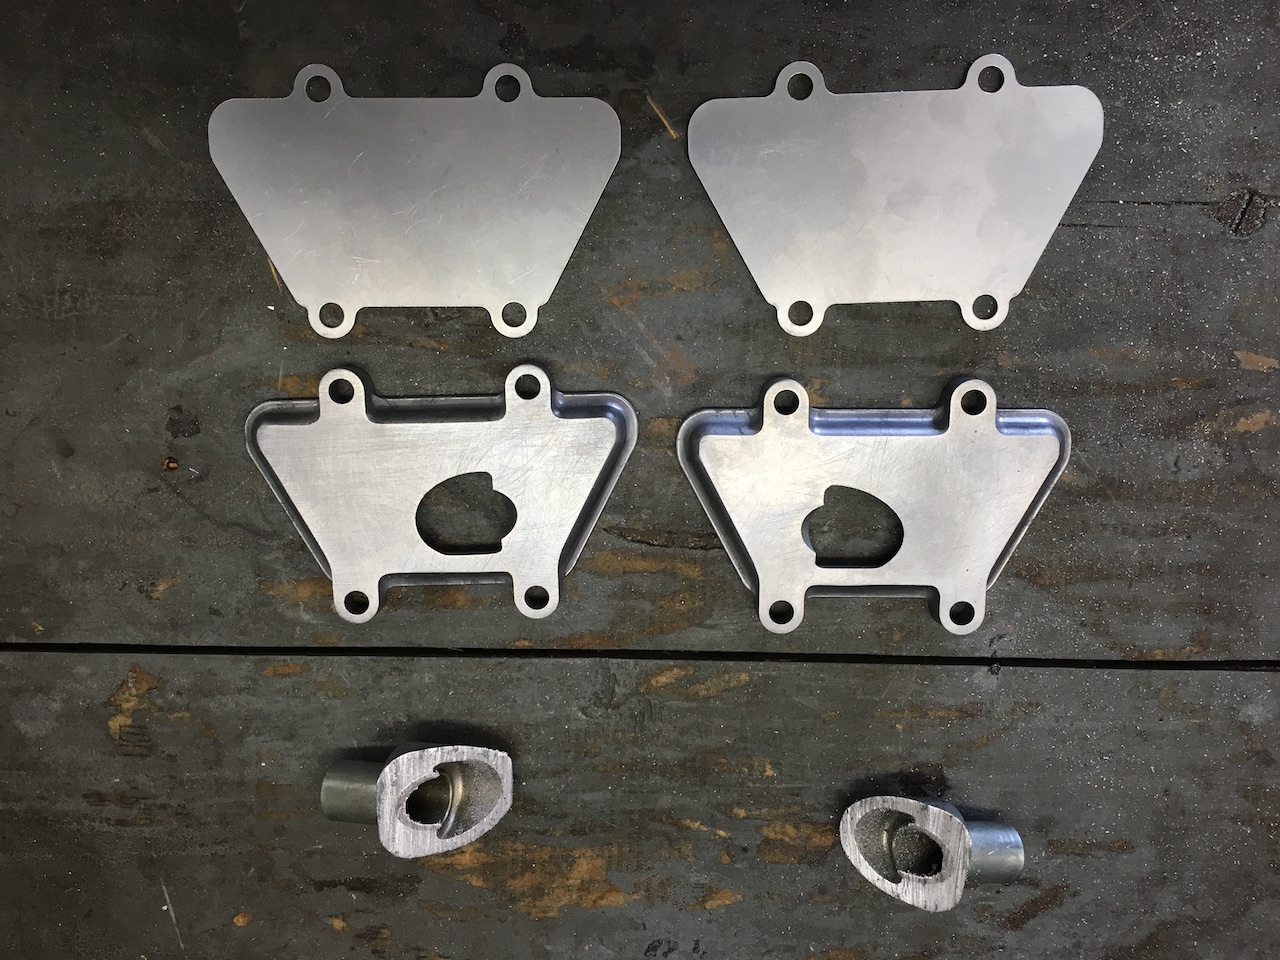
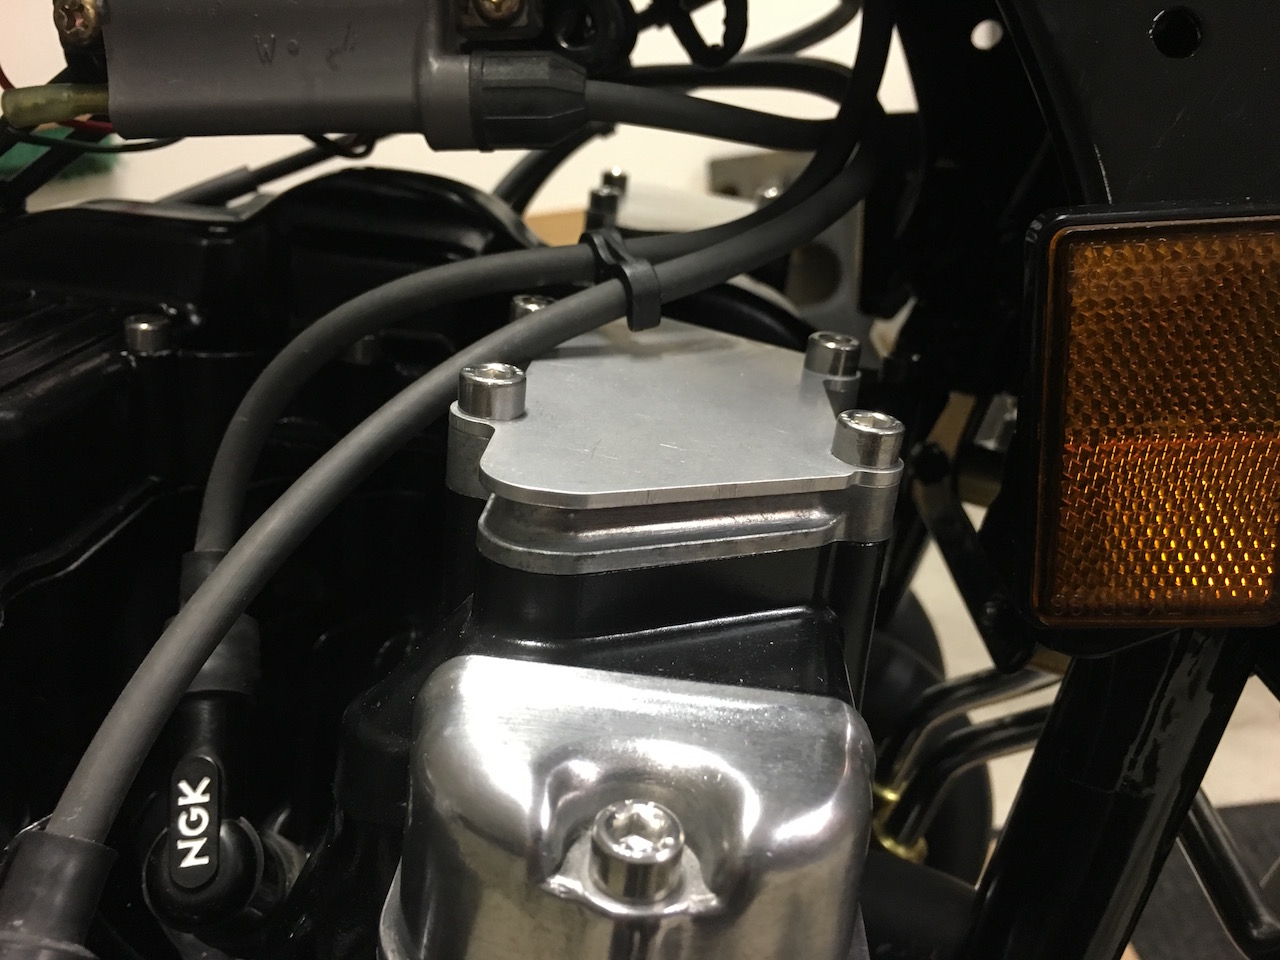
Because I am not using any of the air injector equipment, I tapped the ports in the top of the head threaded in a 3/8” bung to keep exhaust gasses from creeping into the valve cover. I ordered what I thought were thick aluminum block off plates for the valve covers, but turned out to only be a couple of mm thick. So I cut the tops off the stock covers and filed them flat making a riser for the thin plates to sit on.
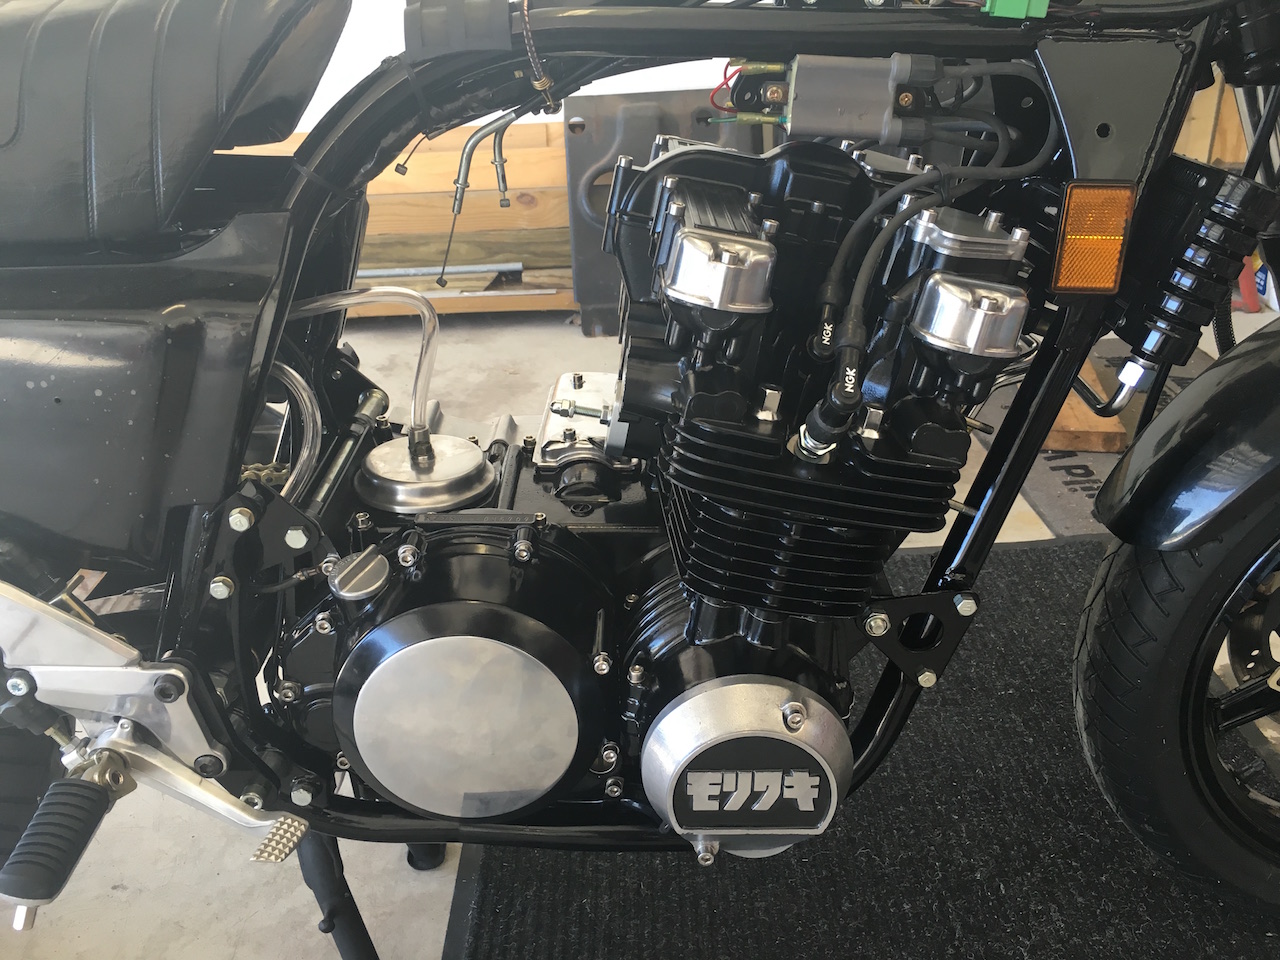
Buttoned up and almost ready.
I seem to have lost the pictures of the exhaust side porting, but it simply looks no different than the intake side. I first practiced on junk head for a couple of days before I had the confidence to start for real on my good one.
Example picture of lip under valve seats in all of the ports
After lip removal
Matched intake ports
I had to have both the head and cylinder block milled flat roughly .003” each, and you can see that even that small amount of material removed cut into the exhaust valve seat.
Using the Unitrak gpz/zx750 cams turned out to be easier than I thought in regards to valve shimming. Because the exhaust cam has a 1mm smaller base circle, I was afraid that I wouldn’t be able to find a shim thick enough to properly set the valve lash. But once I had a 3 angle valve job done on the head, it has sunk the exhaust valves enough that I was able to shim them all with a range of shims from 2.50~2.70.
The intake side required that I have the valves stems trimmed in order to get the shims to fit and lash properly set. I made sure to use Viton valves seals all around.
I indexed the cams to the factory zx750 specs and temporarily used a zr-7 upper cam chain guide to verify that the cam timing marks lined up properly.
I am also using a Kreiger manual cam chain tensioner.
I also used a zr-7 cam chain (as well as the matching primary chain) that came in a lot of used parts I bought. The zr-7 chain showed to be exactly the same length as the original kz750 one, but it is of a slightly beefier construction.
**Side note: The zr-7 also has dramatically different internal cam chain guides. The front one extends all the way down to the very bottom of the engine case, but is designed to work around the primary chain tensioner the zr-7 uses, so it seemed I could not reliably make it work in my kz750 engine case. The rear guide is also longer but the tensioner area is shaped very differently and would have required making a custom cam chain tensioner. Just food for thought.**
zx750 cams installed with zr-7 guide to confirm proper timing.
Because I started to worry about oil leaks in the head from the additional oil pressure from the zr-7 pump, I decided to use the later style oil nozzles in the cylinder block that have wings on the sides that direct oil pressure/flow up and into the head thus protecting the oval o-ring from direct oil pressure. I’m hoping it will help prevent leaks.
Because I am not using any of the air injector equipment, I tapped the ports in the top of the head threaded in a 3/8” bung to keep exhaust gasses from creeping into the valve cover. I ordered what I thought were thick aluminum block off plates for the valve covers, but turned out to only be a couple of mm thick. So I cut the tops off the stock covers and filed them flat making a riser for the thin plates to sit on.
Buttoned up and almost ready.
1990 zr550
kz750e
650/750 6-speed Transmission Swap
kz750e
650/750 6-speed Transmission Swap
Please Log in or Create an account to join the conversation.
- Daftrusty
-
Topic Author
- Offline
- User
-
Registered
- Posts: 377
- Thanks: 210
Re: kz750e Resto-Mod
12 Sep 2016 08:19
Nessism - I also seriously considered getting the UK oversize pistons, but in the end they still cost more than the CruzinImage pistons and I was still going to have to pay the same amount of money to have the cylinders bored out whether it was .5mm or 3mm.
That is another factor in my decision to give the Cruzinimage pistons a go.
That is another factor in my decision to give the Cruzinimage pistons a go.
1990 zr550
kz750e
650/750 6-speed Transmission Swap
kz750e
650/750 6-speed Transmission Swap
Please Log in or Create an account to join the conversation.
- Daftrusty
-
Topic Author
- Offline
- User
-
Registered
- Posts: 377
- Thanks: 210
Re: kz750e Resto-Mod
12 Sep 2016 08:35
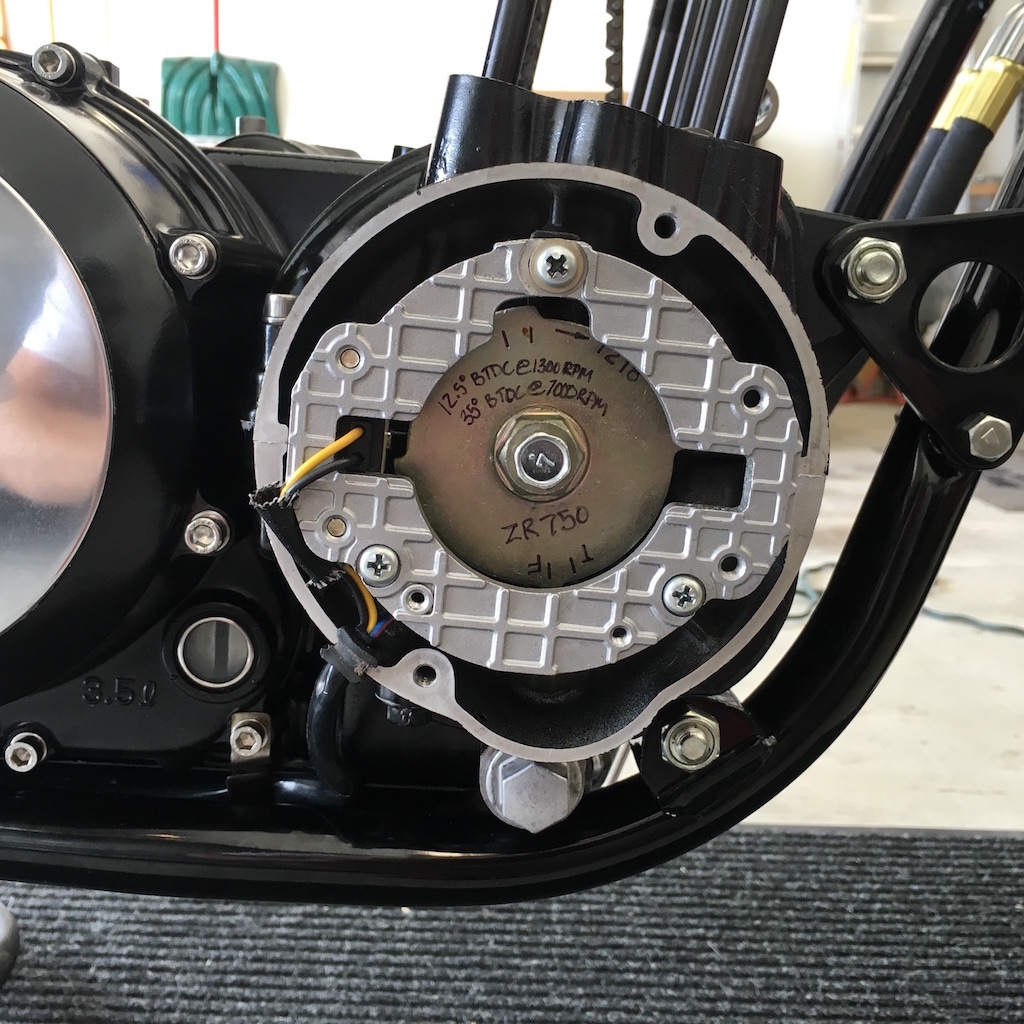
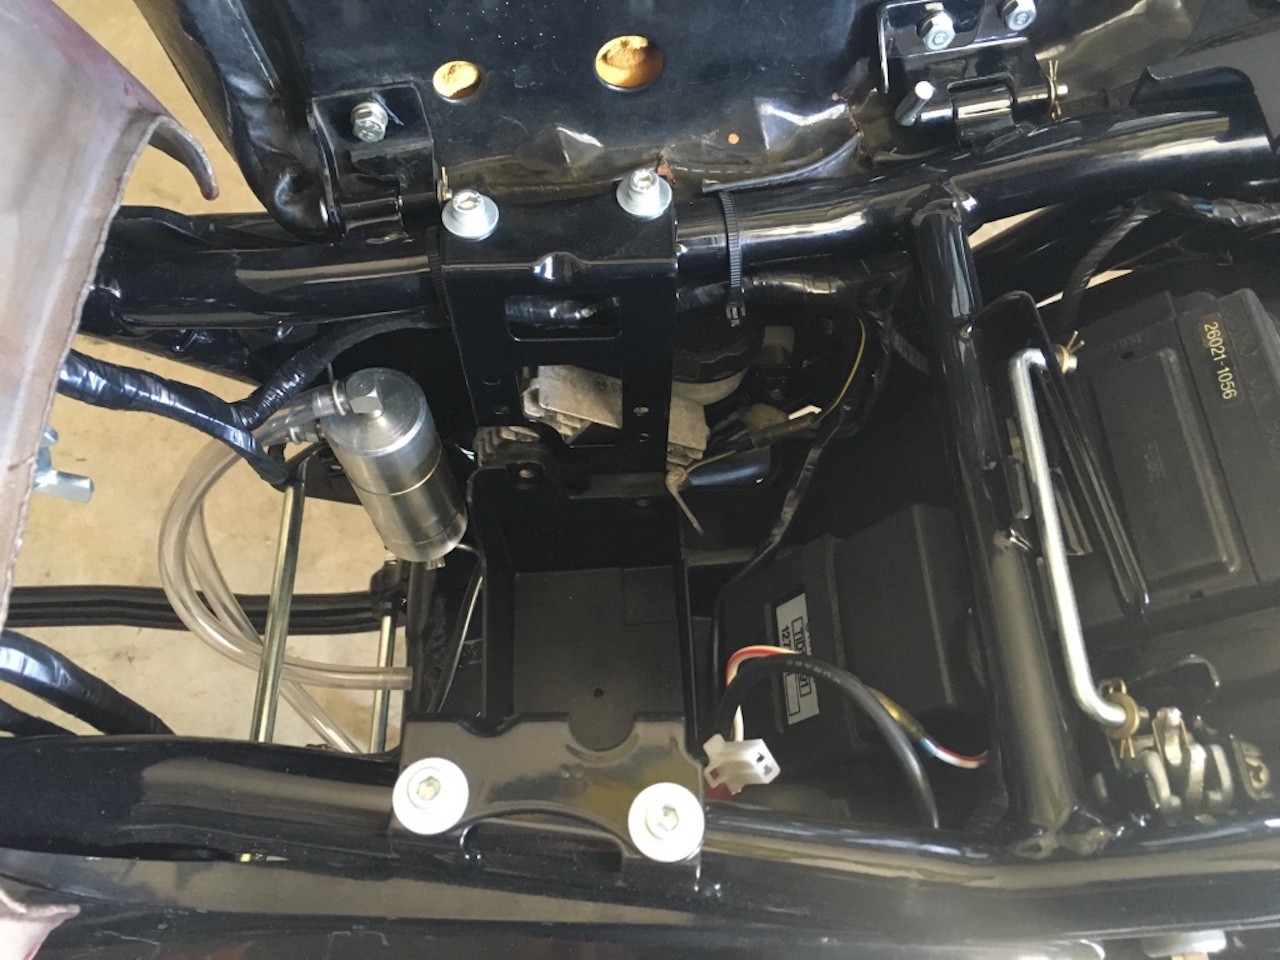
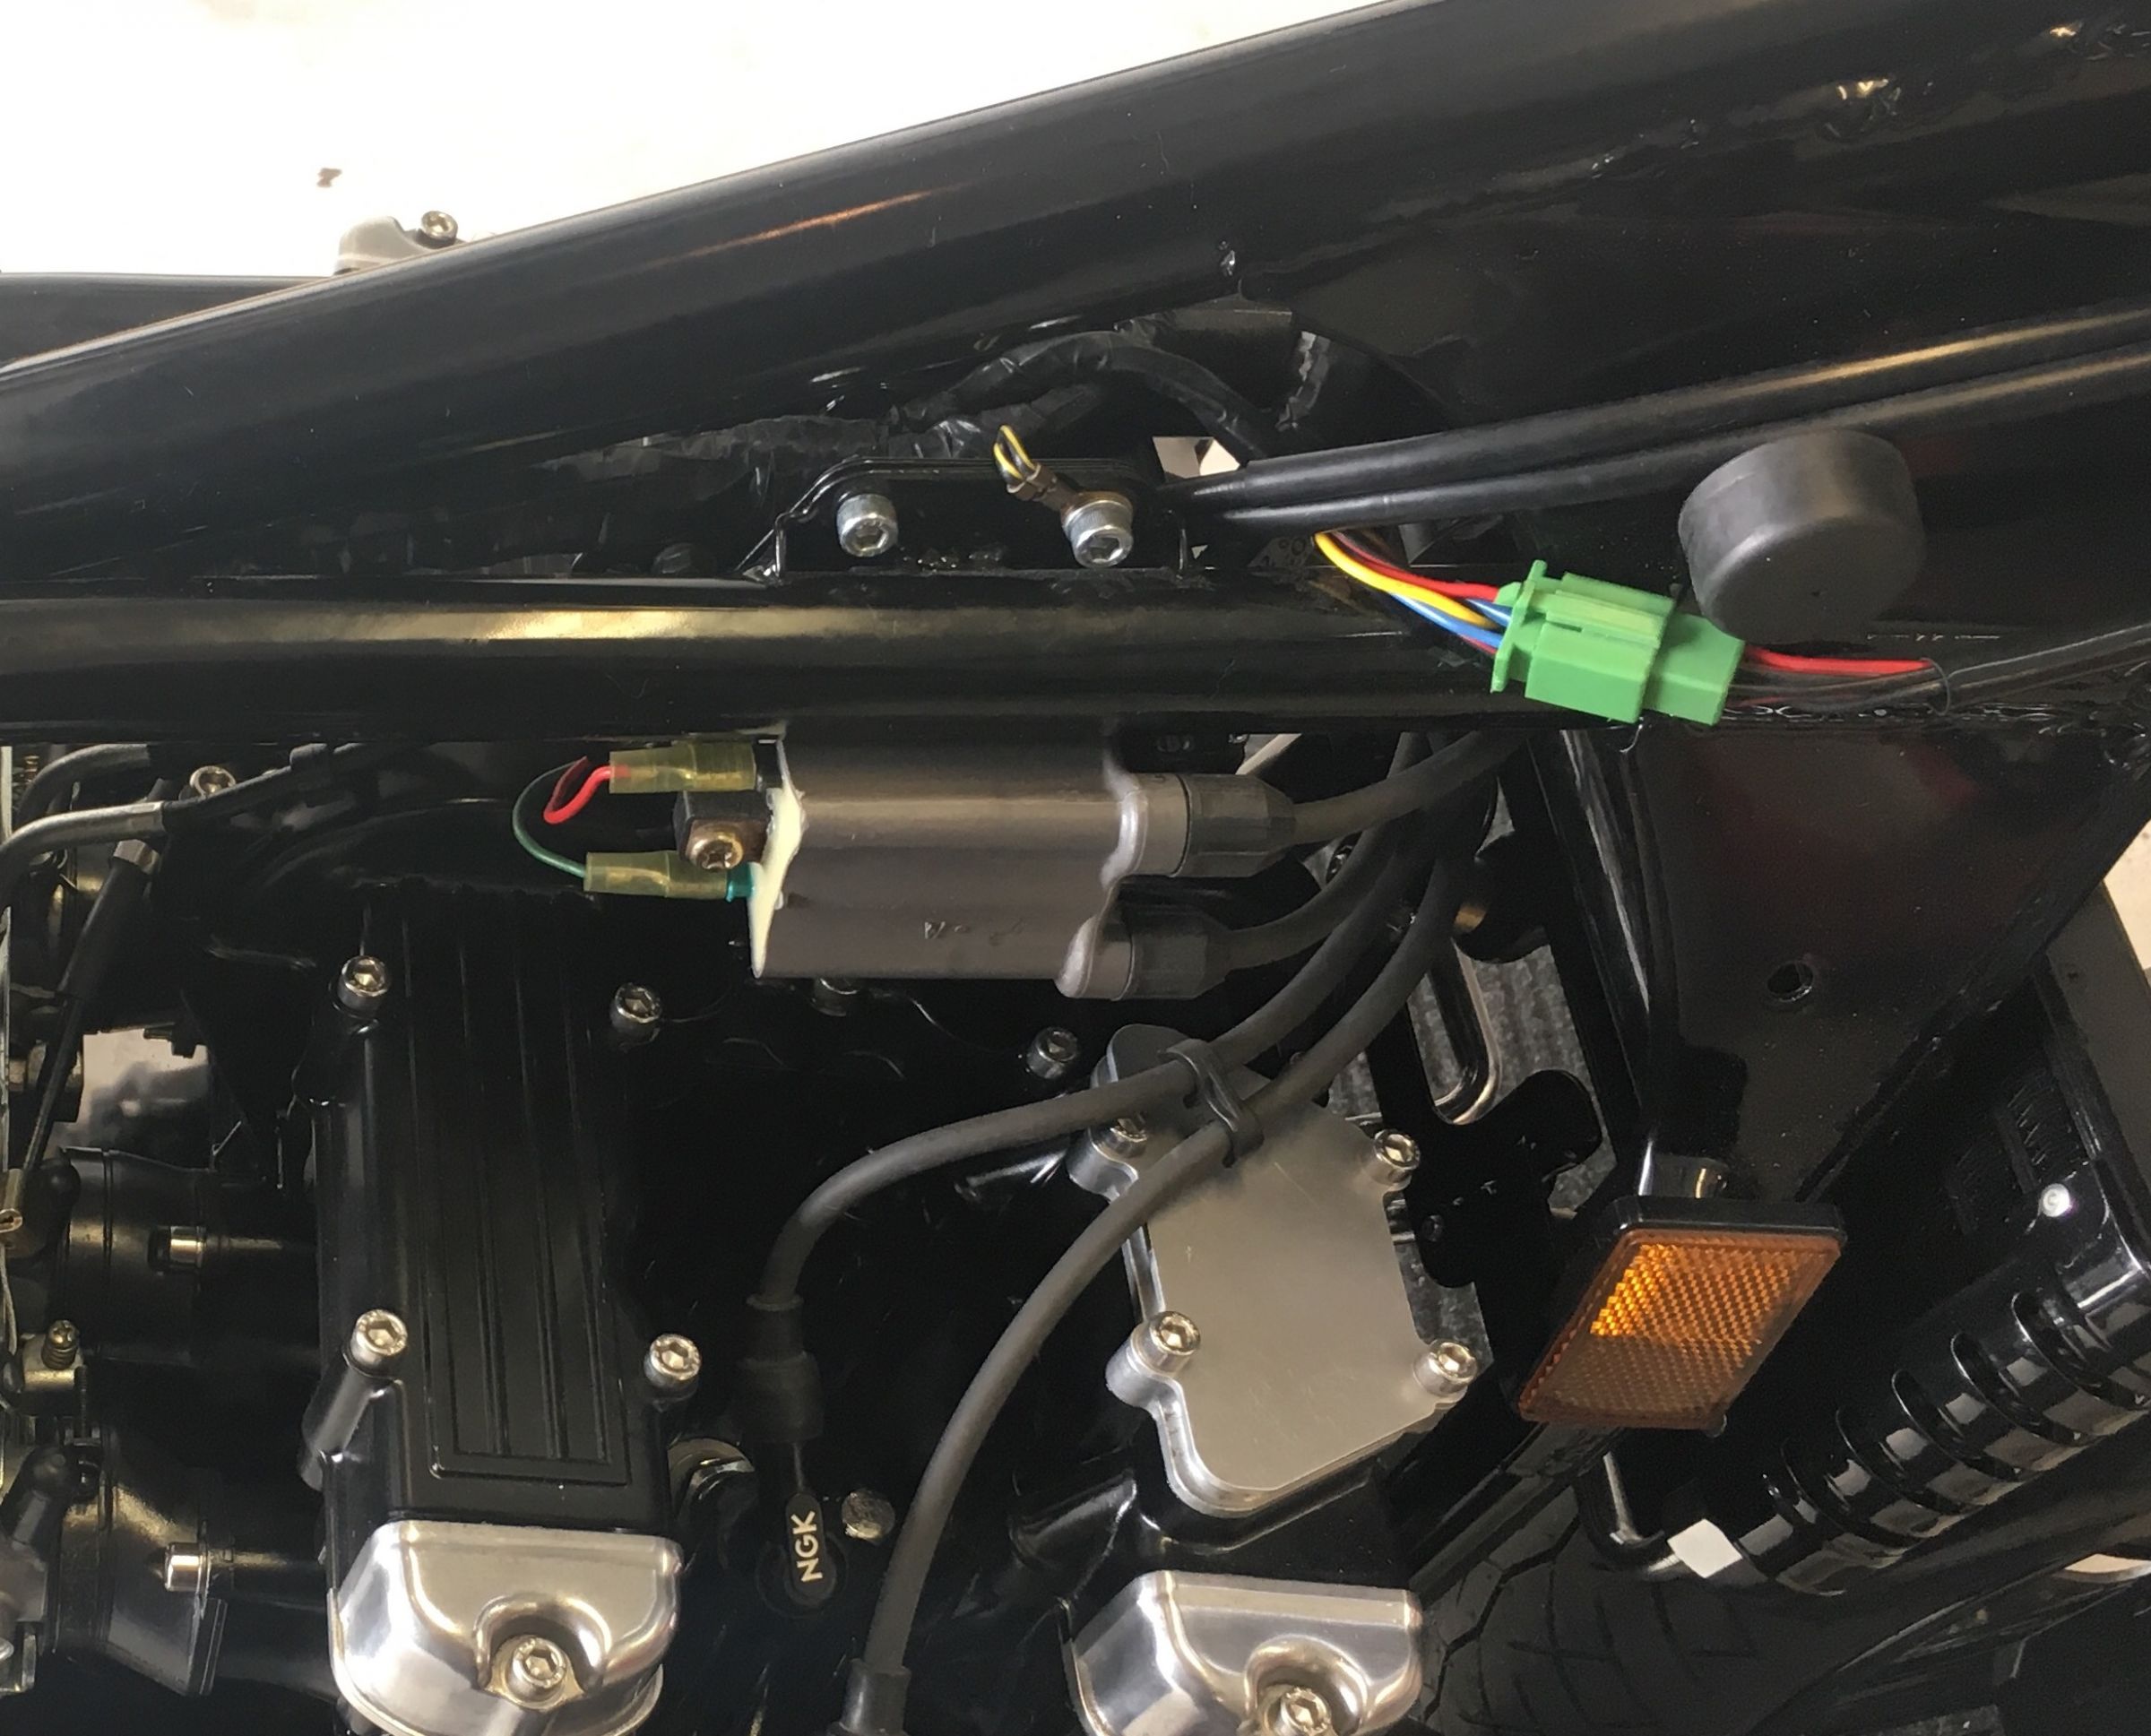
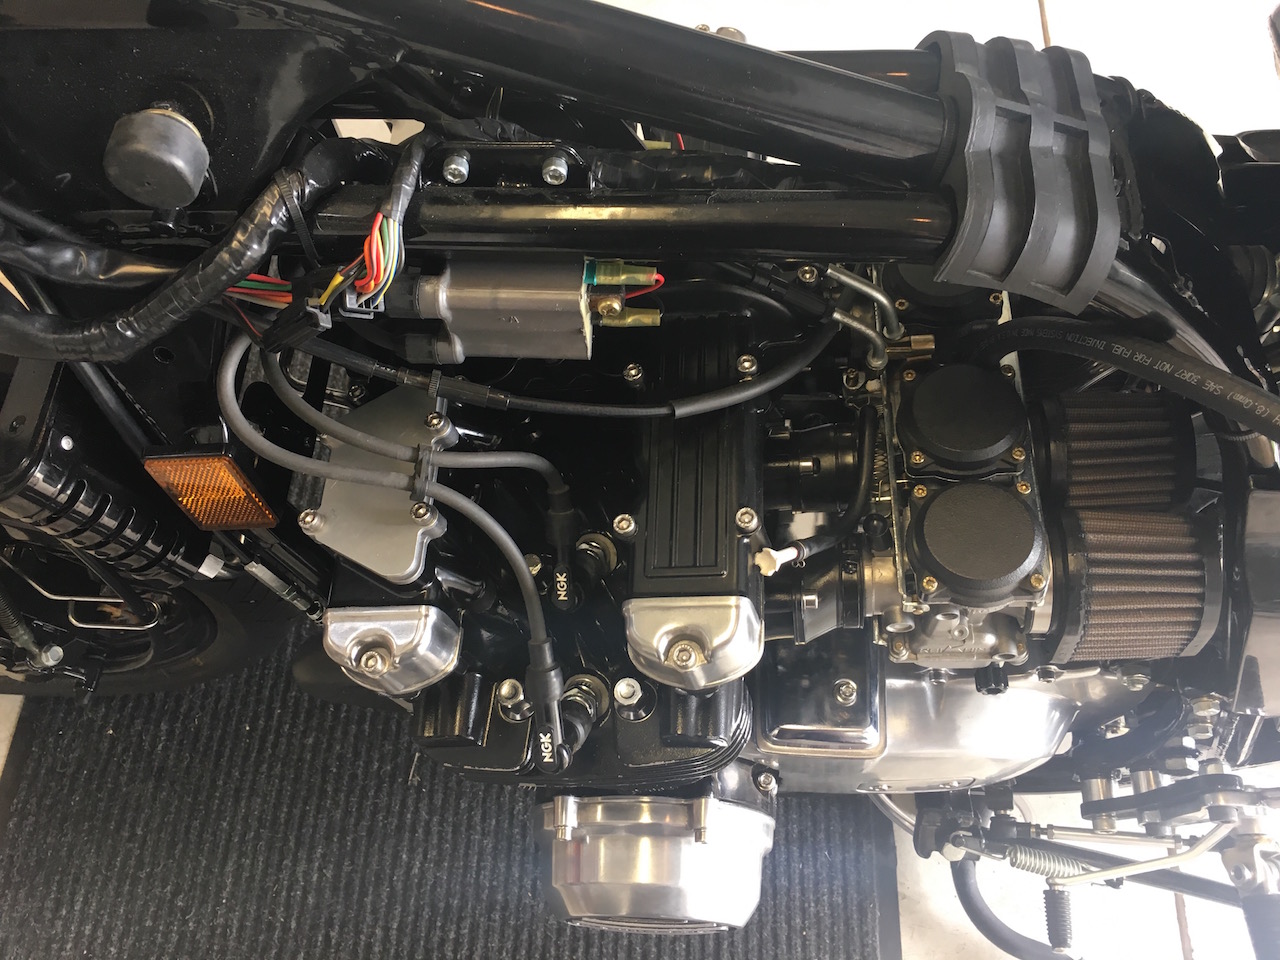
My ignition system is made up of a Zephyr 750 ignition timing rotor, and Zephyr 550 pickup coil, CDI and coils.
The bracket that the pickup coil is mounts on had to have the top mounting hole elongated in order for it to bolt up properly to my engine case. I had a bracket from both a Zephyr 550 and 750 and they are identical, but for some reason the kz750 engine case has the top mounting boss moved forward about 2mm. Beyond that, the ignition rotor, bracket and oil pressure sensor wiring bolts right up.
The coils fit almost as if they were designed to be there after drilling new mounting holes in the factory bracket.
Timing rotor
CDI
Coils
1990 zr550
kz750e
650/750 6-speed Transmission Swap
kz750e
650/750 6-speed Transmission Swap
Please Log in or Create an account to join the conversation.
- Daftrusty
-
Topic Author
- Offline
- User
-
Registered
- Posts: 377
- Thanks: 210
Re: kz750e Resto-Mod
12 Sep 2016 09:41 - 12 Sep 2016 09:42
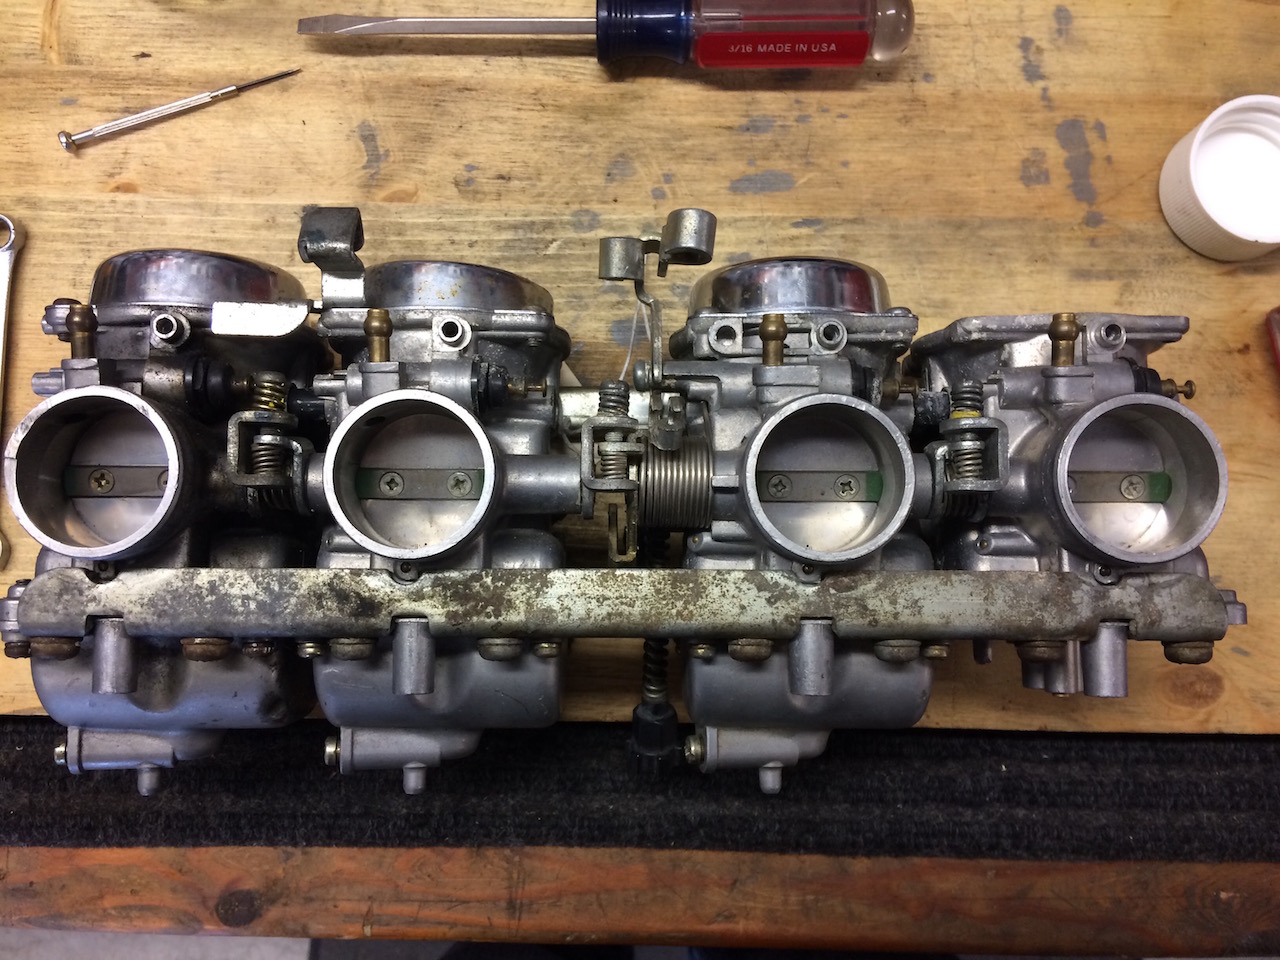
Because I have no room for the stock air box and will need to run pod filters, I considered using vm's, CR Specials, FCR's or anything that wasn't a CV carb. But after never finding what I wanted or frankly could afford, I decided to go with the Zephyr 750 cvk32's as I have had years of experience with them and have a load of spare parts for them as well.
I had run pod filters on my zr550 for several years using a Factory Pro stage 3 jet kit and it worked fantastically. So because Factory pro also makes a Stage 3 kit for the Zephyr 750 (which is as close to my engine as I can get) for use with pods and 4-1, it seemed to make sense. (Famous last words...)
So I had to find a set of Zephyr cvk32's. I had a suspicion that the Zephyr cvk32's were identical to the early zx600 "Ninja" cvk32's but I couldn't be 100% sure that the carbs spacing was exactly the same. From research I knew that the Zephyr and Ninja carbs shared the same pressed in air jets, needle jets, and pilot jets but also that the Ninja carbs were way cheaper and easier to find.
After a year of searching I finally found an affordable set of Zephyr 750 carbs and bought them off of ebay.
Of course they showed up and not only are they exactly the same carbs as the Ninja (including spacing) but it looked like someone had used them as a hammer.
One carb had a caved in diaphragm lid, ripped diaphragm and the float bowl was dented and cracked. But I had a a spare set of cvk30's (that are also identical in every way except they are only bored out to 30mm.) and was able to quickly replace the torn diaphragm, float bowl and convert the dented and rusted chrome lids to the black plastic lids.
I eventually tore them all the way down and had all the hardware re-zinc plated, bodies soda blasted and cleaned, then rebuilt with new o-rings and Factory Pro Stage 3 Jet kit.
All I needed to bolt them to my head was a used set of zr-7 intake manifolds and new o-rings.
Thankfully the zr550 throttle and choke cables were just long enough to reach and not tug on the carbs when the handlebars were turned all the way to the sides.
When I got them
When I was done
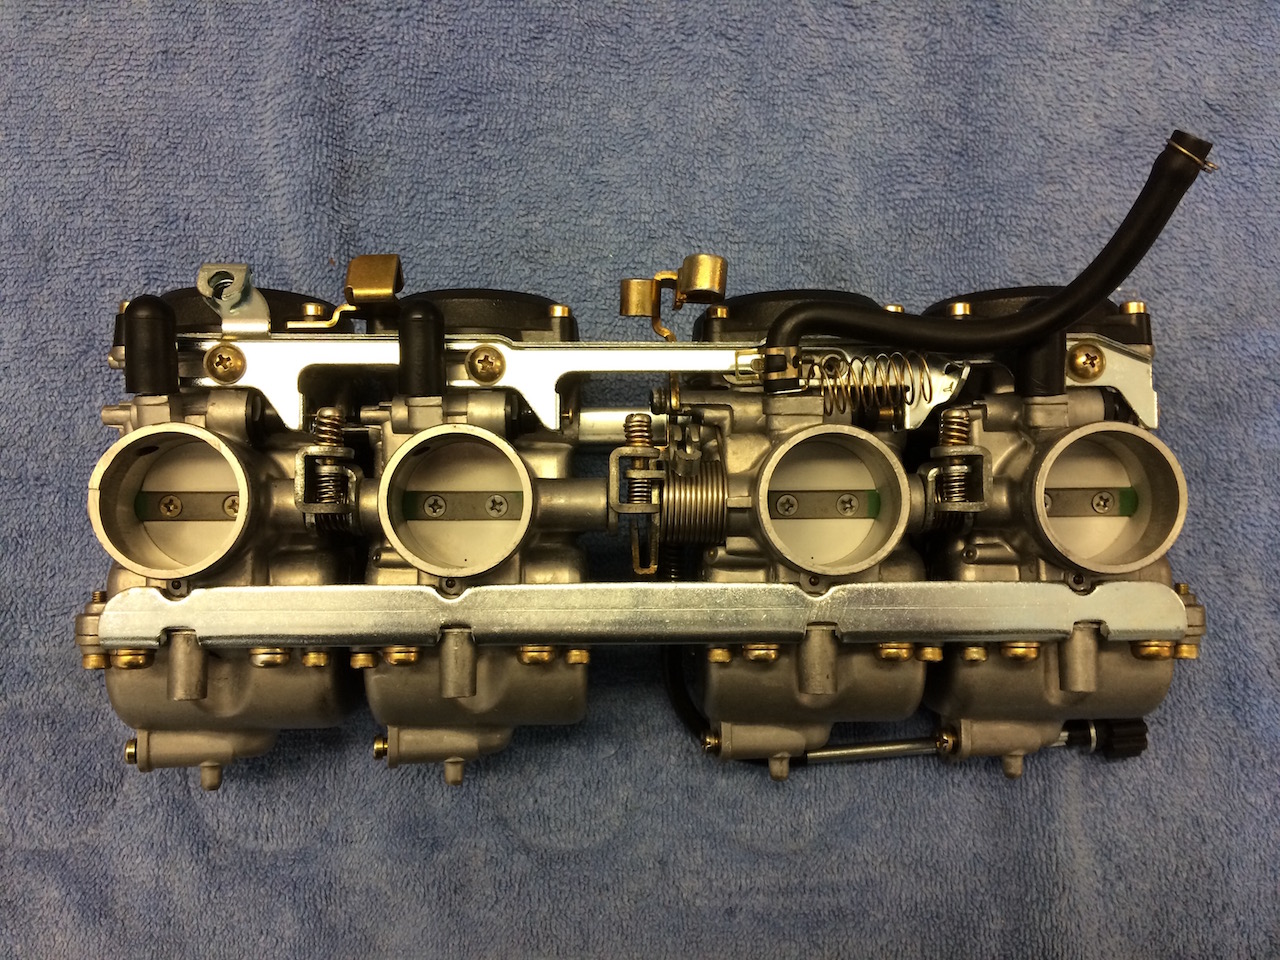
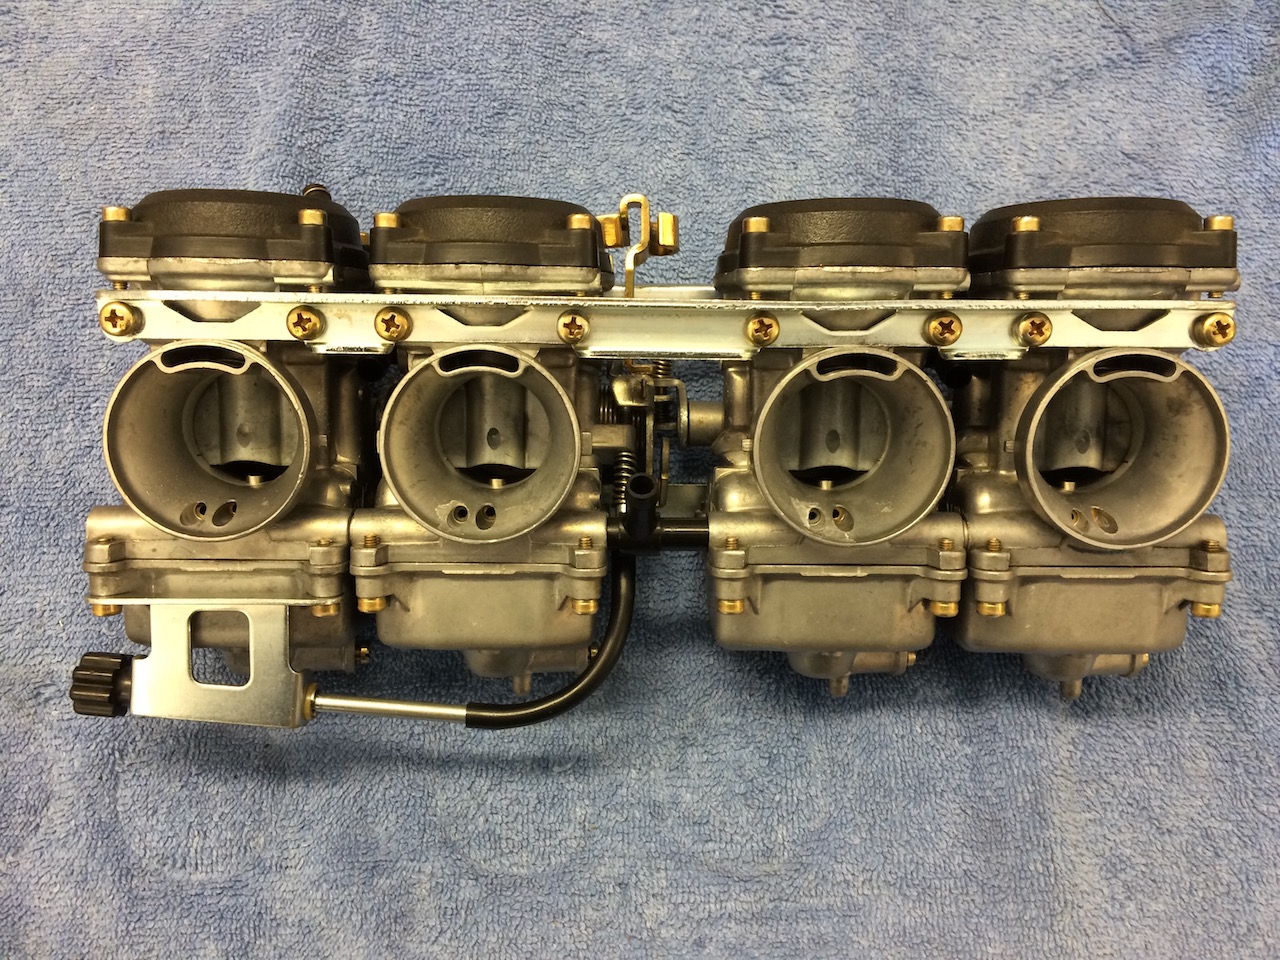
Installed with K&N filters
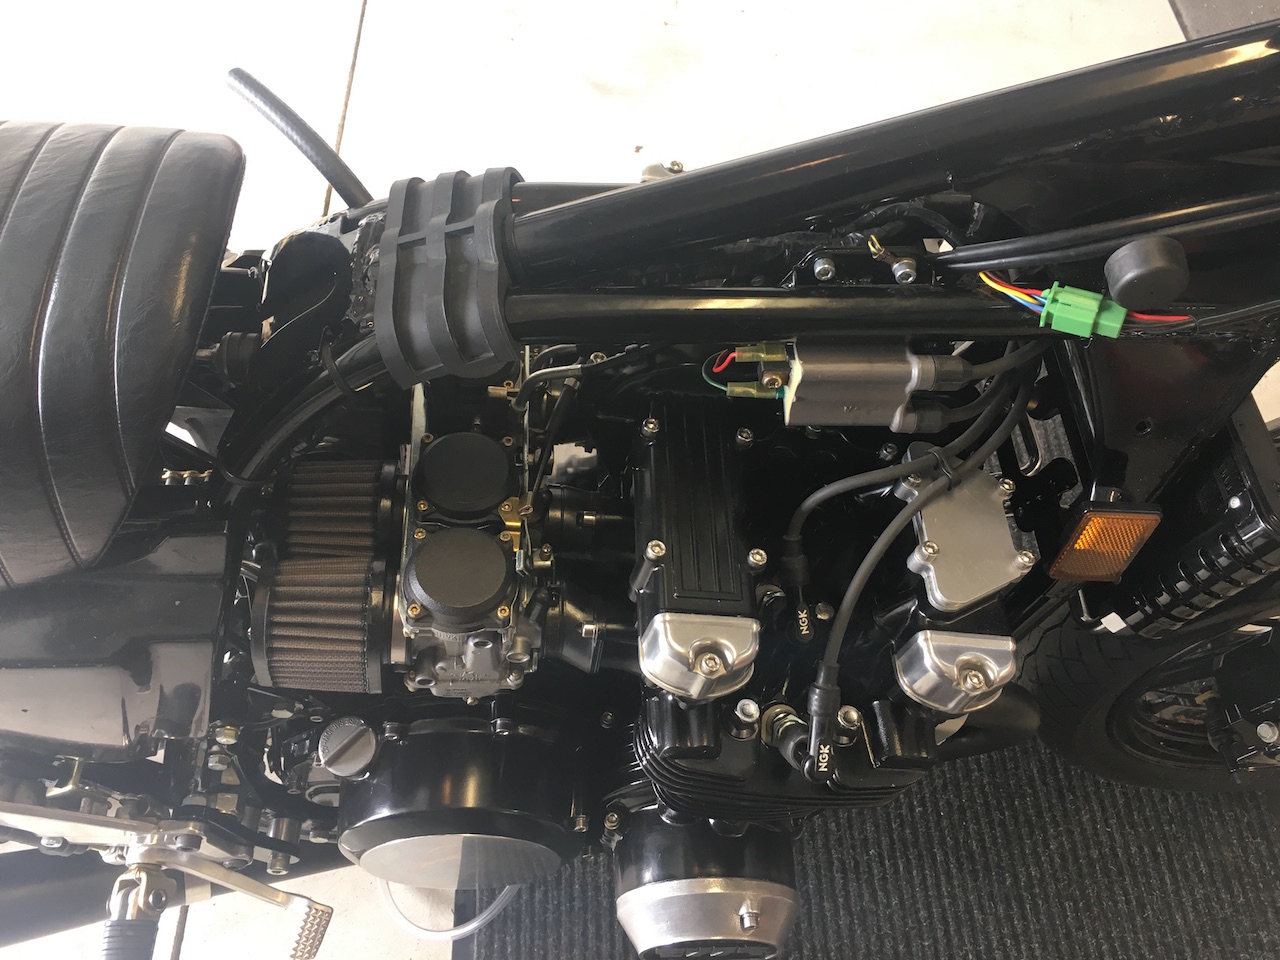
My gas tank has been Red-Koted but is not quite is ready for gas, so......
As long as my cheap pistons, custom wiring harness, pieced together ignition system, unproven carb settings and all the other "improvements" i have made don't totally fail me....this may start tomorrow.

I had run pod filters on my zr550 for several years using a Factory Pro stage 3 jet kit and it worked fantastically. So because Factory pro also makes a Stage 3 kit for the Zephyr 750 (which is as close to my engine as I can get) for use with pods and 4-1, it seemed to make sense. (Famous last words...)
So I had to find a set of Zephyr cvk32's. I had a suspicion that the Zephyr cvk32's were identical to the early zx600 "Ninja" cvk32's but I couldn't be 100% sure that the carbs spacing was exactly the same. From research I knew that the Zephyr and Ninja carbs shared the same pressed in air jets, needle jets, and pilot jets but also that the Ninja carbs were way cheaper and easier to find.
After a year of searching I finally found an affordable set of Zephyr 750 carbs and bought them off of ebay.
Of course they showed up and not only are they exactly the same carbs as the Ninja (including spacing) but it looked like someone had used them as a hammer.
One carb had a caved in diaphragm lid, ripped diaphragm and the float bowl was dented and cracked. But I had a a spare set of cvk30's (that are also identical in every way except they are only bored out to 30mm.) and was able to quickly replace the torn diaphragm, float bowl and convert the dented and rusted chrome lids to the black plastic lids.
I eventually tore them all the way down and had all the hardware re-zinc plated, bodies soda blasted and cleaned, then rebuilt with new o-rings and Factory Pro Stage 3 Jet kit.
All I needed to bolt them to my head was a used set of zr-7 intake manifolds and new o-rings.
Thankfully the zr550 throttle and choke cables were just long enough to reach and not tug on the carbs when the handlebars were turned all the way to the sides.
When I got them
When I was done
Installed with K&N filters
My gas tank has been Red-Koted but is not quite is ready for gas, so......
As long as my cheap pistons, custom wiring harness, pieced together ignition system, unproven carb settings and all the other "improvements" i have made don't totally fail me....this may start tomorrow.
1990 zr550
kz750e
650/750 6-speed Transmission Swap
kz750e
650/750 6-speed Transmission Swap
Last edit: 12 Sep 2016 09:42 by Daftrusty.
The following user(s) said Thank You: Nessism, Kray-Z
Please Log in or Create an account to join the conversation.
- Kray-Z
-
- Offline
- User
-
Registered
- I need more power Scotty....
- Posts: 583
- Thanks: 107
Re: kz750e Resto-Mod
12 Sep 2016 13:20
I have to say I really like the quality you are putting into this build - exceptional! You have been meticulous in the engine assembly and carb prep - I am sure it will run just fine.
Where in Mini do you get your plating done? I would like to know of any sources for re-finishing you are using in your area - where I am (6 hours or so from you) I can't find a place to reliably and reasonably clean shirts, never mind powder coat or re-plate....
Where in Mini do you get your plating done? I would like to know of any sources for re-finishing you are using in your area - where I am (6 hours or so from you) I can't find a place to reliably and reasonably clean shirts, never mind powder coat or re-plate....
2-04 R1, 81 CSR1000, 81 LTD1000, 2-83 GPz1100, 3-79CBX, 81 CBX, 3-XS650, 84 Venture, +parts
Quote "speed costs money...how fast do you want to go?" (Which Z movie?)
Universal formula for how many motorcycles one should own = n + 1, where n is how many motorcycles you own right now....
Quote "speed costs money...how fast do you want to go?" (Which Z movie?)
Universal formula for how many motorcycles one should own = n + 1, where n is how many motorcycles you own right now....
Please Log in or Create an account to join the conversation.
- Nessism
-
- Offline
- Sustaining Member
-
Registered
- Posts: 8114
- Thanks: 3495
Re: kz750e Resto-Mod
12 Sep 2016 15:24
There was a thread a year or so back where some guys were talking about milling a 750 head to increase compression. I chimed in saying you can't really do anything in that regard because the exhaust seats were too close to the gasket surface but my comment was dismissed.
At any rate, I like your porting job. I assume you smoothed out the sharp edges on the short side radius? Running your finger along the floor of the port really highlights the sharp edge on the heads from the factory.
At any rate, I like your porting job. I assume you smoothed out the sharp edges on the short side radius? Running your finger along the floor of the port really highlights the sharp edge on the heads from the factory.
Ed
Carb O-ring Kits : www.kzrider.com/forum/14-vendor-forum/62...rburetor-o-ring-kits
www.kzrider.com/forum/faq-wiki/618026-new-owner-things-to-know
1981 KZ750E2
www.kzrider.com/forum/11-projects/604901...z750e-project-thread
Carb O-ring Kits : www.kzrider.com/forum/14-vendor-forum/62...rburetor-o-ring-kits
www.kzrider.com/forum/faq-wiki/618026-new-owner-things-to-know
1981 KZ750E2
www.kzrider.com/forum/11-projects/604901...z750e-project-thread
Please Log in or Create an account to join the conversation.
- Kray-Z
-
- Offline
- User
-
Registered
- I need more power Scotty....
- Posts: 583
- Thanks: 107
Re: kz750e Resto-Mod
12 Sep 2016 15:36Nessism wrote: There was a thread a year or so back where some guys were talking about milling a 750 head to increase compression. I chimed in saying you can't really do anything in that regard because the exhaust seats were too close to the gasket surface but my comment was dismissed.
I'm with you on this one - all the KZ heads I've worked with would only allow a clean up pass on milling the head before hitting the valve seats...
Many road racing tuners did so anyway (how else do you increase compression ratio and stay - ish - within the stock class rules - we did it with aluminum V-8 car racing heads all the time, often milling up to 0.240" when angle milling heads)...that is racing... but I wouldn't do it on a street engine. For one thing, when the milling cutters pass over the hard steel / hardened bronze seat insert, it creates a "bump" in the surface. It is o.k. as long as the "bump" doesn't get large enough to interfere with gasket sealing....the cutters have to be pretty sharp to mitigate this effect.
2-04 R1, 81 CSR1000, 81 LTD1000, 2-83 GPz1100, 3-79CBX, 81 CBX, 3-XS650, 84 Venture, +parts
Quote "speed costs money...how fast do you want to go?" (Which Z movie?)
Universal formula for how many motorcycles one should own = n + 1, where n is how many motorcycles you own right now....
Quote "speed costs money...how fast do you want to go?" (Which Z movie?)
Universal formula for how many motorcycles one should own = n + 1, where n is how many motorcycles you own right now....
Please Log in or Create an account to join the conversation.
- 750 R1
-
- Offline
- User
-
Registered
- Posts: 1150
- Thanks: 389
Re: kz750e Resto-Mod
12 Sep 2016 16:10
You can order MLS head gaskets in almost any thickness you desire, that would be one way to get a modest rise in compression without touching the head..Same could be done with the base gasket as well... Nice build...
Please Log in or Create an account to join the conversation.
- Daftrusty
-
Topic Author
- Offline
- User
-
Registered
- Posts: 377
- Thanks: 210
Re: kz750e Resto-Mod
12 Sep 2016 17:42 - 12 Sep 2016 17:43
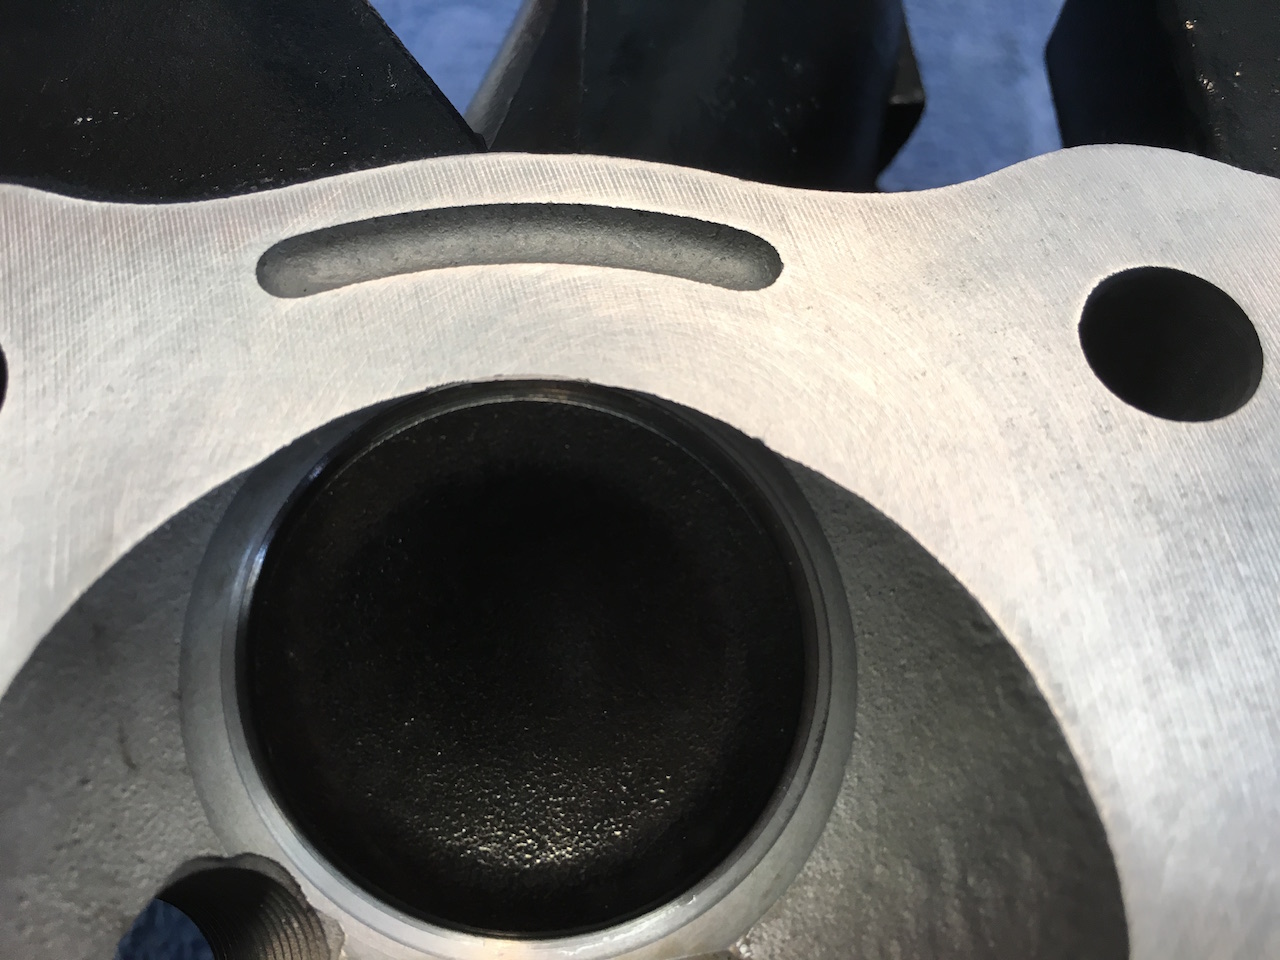
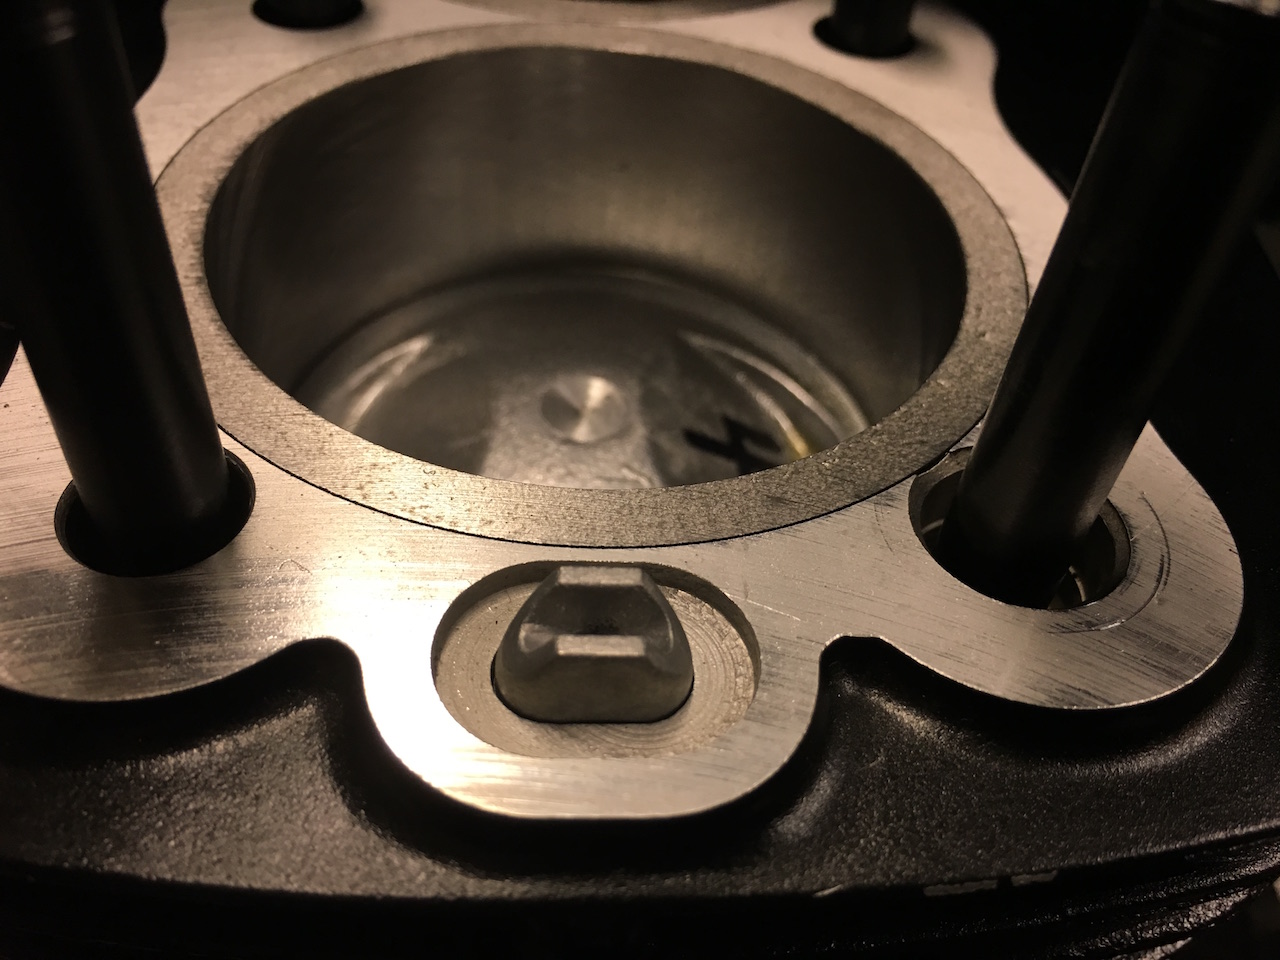
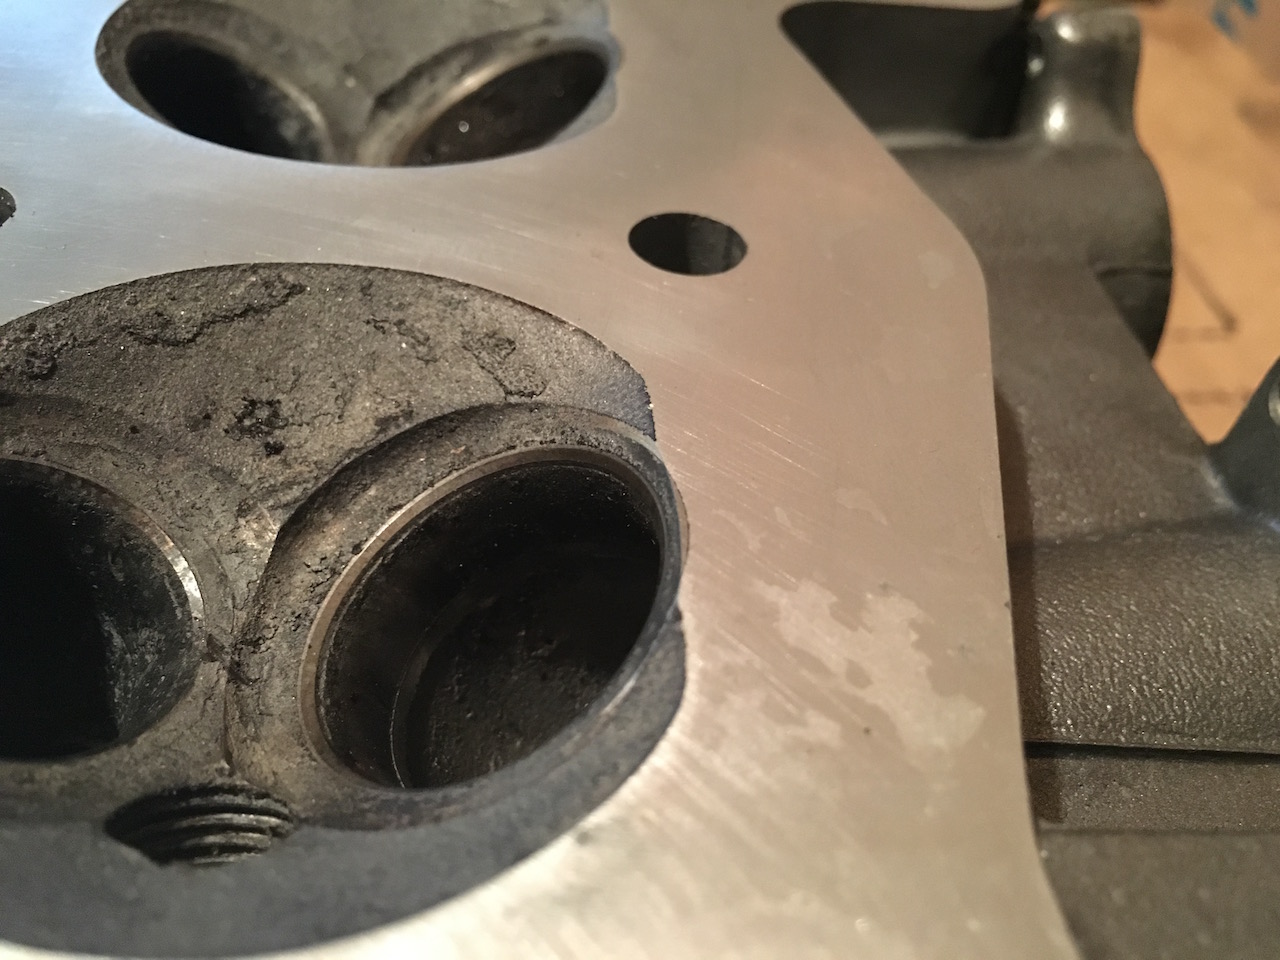
Nessism- I think I remember that thread and the issue brought up about the valve seats being so close and getting cut down when the head is skimmed. Thats the exact reason I bothered to post a picture of the valve seat, so I could illustrate just how close the seat is to the deck surface.
I was worried about it, until I saw the junk zr550 head I was practicing my porting on. It is totally stock and it has a fair amount of the Intake valve seat material removed from the factory deck cut. So I guess even more can be safely removed from the kz750 head before it gets dicey.
Stock zr550
NOTE:
In my earlier post I listed the valve seat that got cut into as the exhaust side. It is actually the intake valve seat.
But It won't let me edit the error in the post.
I CC'ed my combustion chambers after the valve job and they all are right at 25cc (+- 1cc) They are supposed to be 24.8cc from the factory, but the valves get recessed into the head after the seats are cut, so it seems about right.
I used an online compression ratio calculator, and I should end up at around 10.5:1 with the non-quench chambers and the smaller piston domes. Which is just fine by me.
1990 zr550
kz750e
650/750 6-speed Transmission Swap
kz750e
650/750 6-speed Transmission Swap
Last edit: 12 Sep 2016 17:43 by Daftrusty.
Please Log in or Create an account to join the conversation.
- 531blackbanshee
-
- Offline
- Vendor
-
Vendors
- Posts: 7442
- Thanks: 796
Re: kz750e Resto-Mod
13 Sep 2016 05:58
nice work and very well documented,
a very nice addition to the forum :evil: .
beyond that,
what a k!ckA$$ bike you are going to own

thanks for posting,
leon
a very nice addition to the forum :evil: .
beyond that,
what a k!ckA$$ bike you are going to own
thanks for posting,
leon
skiatook,oklahoma 1980 z1r,1978 kz 1000 z1r x 3,
1976 kz 900 x 3
i make what i can,and save the rest!
billybiltit.blogspot.com/
www.kzrider.com/forum/5-chassis/325862-triple-tree-custom-work
kzrider.com/forum/5-chassis/294594-frame-bracing?limitstart=0
1976 kz 900 x 3
i make what i can,and save the rest!
billybiltit.blogspot.com/
www.kzrider.com/forum/5-chassis/325862-triple-tree-custom-work
kzrider.com/forum/5-chassis/294594-frame-bracing?limitstart=0
Please Log in or Create an account to join the conversation.
Moderators: Street Fighter LTD