
Doctorot's '78 KZ1000 build
- Gordy
-

- Offline
- User
-

Registered
- Posts: 134
- Thanks: 5
Re: Doctorot's '78 KZ1000 build
25 Aug 2015 07:12DoctoRot wrote:TexasKZ wrote: Doc is such a tease..............
HA! I really wanted to see the body work on the bike but it was already tucked away in storage. sorry guys it will have to wait
Gordy wrote: That paintwork looks awesome.
Do you have any info on the pod filters you've gone for? They look like dual pod ones?
Yes they are K&N filters. A member on here had Wompy at Still Kicking Moto make him these velocity stacks that insert into the two filters.
There is a thread here on the design, also when i talked to Wompy he had a few sets left. Its possible he still has some...
kzrider.com/forum/3-carburetor/408059-ve...thbores?limitstart=0

Perfect thanks, that's what I thought they were from some other pics I found.
Please Log in or Create an account to join the conversation.
- jcw
-

- Offline
- User
-
Registered
- Posts: 6
- Thanks: 3
Re: Doctorot's '78 KZ1000 build
27 Aug 2015 13:21
Nice build
Beautiful work.
Can you tell me how you went about getting the discs from ISR? Did u order straight from Sweden or did u find a US distributor? Prices seem very competitive. How much did shipping cost and what was the time frame getting them?
Thanks
Beautiful work.
Can you tell me how you went about getting the discs from ISR? Did u order straight from Sweden or did u find a US distributor? Prices seem very competitive. How much did shipping cost and what was the time frame getting them?
Thanks
The following user(s) said Thank You: DoctoRot
Please Log in or Create an account to join the conversation.
- DoctoRot
-
 Topic Author
- Offline
- Sustaining Member
-

Registered
- Oh, the usual... I bowl, I drive around...
- Posts: 2621
- Thanks: 784
Re: Doctorot's '78 KZ1000 build
27 Aug 2015 16:05jcw wrote: Nice build
Beautiful work.
Can you tell me how you went about getting the discs from ISR? Did u order straight from Sweden or did u find a US distributor? Prices seem very competitive. How much did shipping cost and what was the time frame getting them?
Thanks
I called up ISR and talked to the owner Acke. Very friendly. He does not do email so you have to send everything by fax and do a bank transfer to pay. Kind of a hassle, but his products are VERY nice, and like you said, competitive prices considering they are one off pieces. Shipping was like $50, and they came in about 6 weeks. All in all, I'm very happy with the purchase.
The following user(s) said Thank You: jcw
Please Log in or Create an account to join the conversation.
- rich67
-
- Offline
- User
-
Registered
- Posts: 206
- Thanks: 57
Re: Doctorot's '78 KZ1000 build
27 Aug 2015 16:39
Top notch build , you have done an amazing job my friend your fabrication and design are second to none , can't wait to see it complete .
The following user(s) said Thank You: DoctoRot
Please Log in or Create an account to join the conversation.
- Ed_in_Miami
-
- Offline
- User
-
Registered
- Posts: 259
- Thanks: 46
Re: Doctorot's '78 KZ1000 build
04 Sep 2015 13:18
Suscribed. Will hold for further updates.
Bitching build!
Bitching build!
This is my build:
kzrider.com/forum/11-projects/600312-ano...rtment-build?start=0
There are many more like it, but this one is mine... news to come!
kzrider.com/forum/11-projects/600312-ano...rtment-build?start=0
There are many more like it, but this one is mine... news to come!
The following user(s) said Thank You: DoctoRot
Please Log in or Create an account to join the conversation.
- DoctoRot
-
Topic Author
- Offline
- Sustaining Member
-
Registered
- Oh, the usual... I bowl, I drive around...
- Posts: 2621
- Thanks: 784
Re: Doctorot's '78 KZ1000 build
14 Dec 2015 10:35
Im finished with school for the semester, so this will be getting some attention.
Please Log in or Create an account to join the conversation.
- 531blackbanshee
-
- Offline
- Vendor
-
Vendors
- Posts: 7442
- Thanks: 796
Re: Doctorot's '78 KZ1000 build
15 Dec 2015 03:29
a ton of good sh!t in that pic right there! :ohmy: :evil:
pretty amazing how far you have come since starting this build.
can't say "I have very little experience with bikes, never rebuilt an engine" anymore :whistle: :silly: :blink: :woohoo: :laugh:
you've sure honed your skillset on this build.
not too mention the lil bikes you've messed with.
leon
pretty amazing how far you have come since starting this build.
can't say "I have very little experience with bikes, never rebuilt an engine" anymore :whistle: :silly: :blink: :woohoo: :laugh:
you've sure honed your skillset on this build.
not too mention the lil bikes you've messed with.
leon
skiatook,oklahoma 1980 z1r,1978 kz 1000 z1r x 3,
1976 kz 900 x 3
i make what i can,and save the rest!
billybiltit.blogspot.com/
www.kzrider.com/forum/5-chassis/325862-triple-tree-custom-work
kzrider.com/forum/5-chassis/294594-frame-bracing?limitstart=0
1976 kz 900 x 3
i make what i can,and save the rest!
billybiltit.blogspot.com/
www.kzrider.com/forum/5-chassis/325862-triple-tree-custom-work
kzrider.com/forum/5-chassis/294594-frame-bracing?limitstart=0
The following user(s) said Thank You: DoctoRot
Please Log in or Create an account to join the conversation.
- DoctoRot
-
Topic Author
- Offline
- Sustaining Member
-
Registered
- Oh, the usual... I bowl, I drive around...
- Posts: 2621
- Thanks: 784
Re: Doctorot's '78 KZ1000 build
15 Dec 2015 16:32
Thanks Leon. I definitely have come a long way, but I still have a long way to go.
Please Log in or Create an account to join the conversation.
- DoctoRot
-
Topic Author
- Offline
- Sustaining Member
-
Registered
- Oh, the usual... I bowl, I drive around...
- Posts: 2621
- Thanks: 784
Re: Doctorot's '78 KZ1000 build
25 Dec 2015 22:59 - 02 Jul 2017 19:43
Unfortunately I wont be getting a garage till this summer so the bikes have to stay in storage. I am going to do some assembly and figure what else this and my other project bike need. So I'm going to take a crap load of measurements of different things I want to machine/fabricate so i can continue progress (at a snails pace) while they are locked up. its the best compromise i could find. 
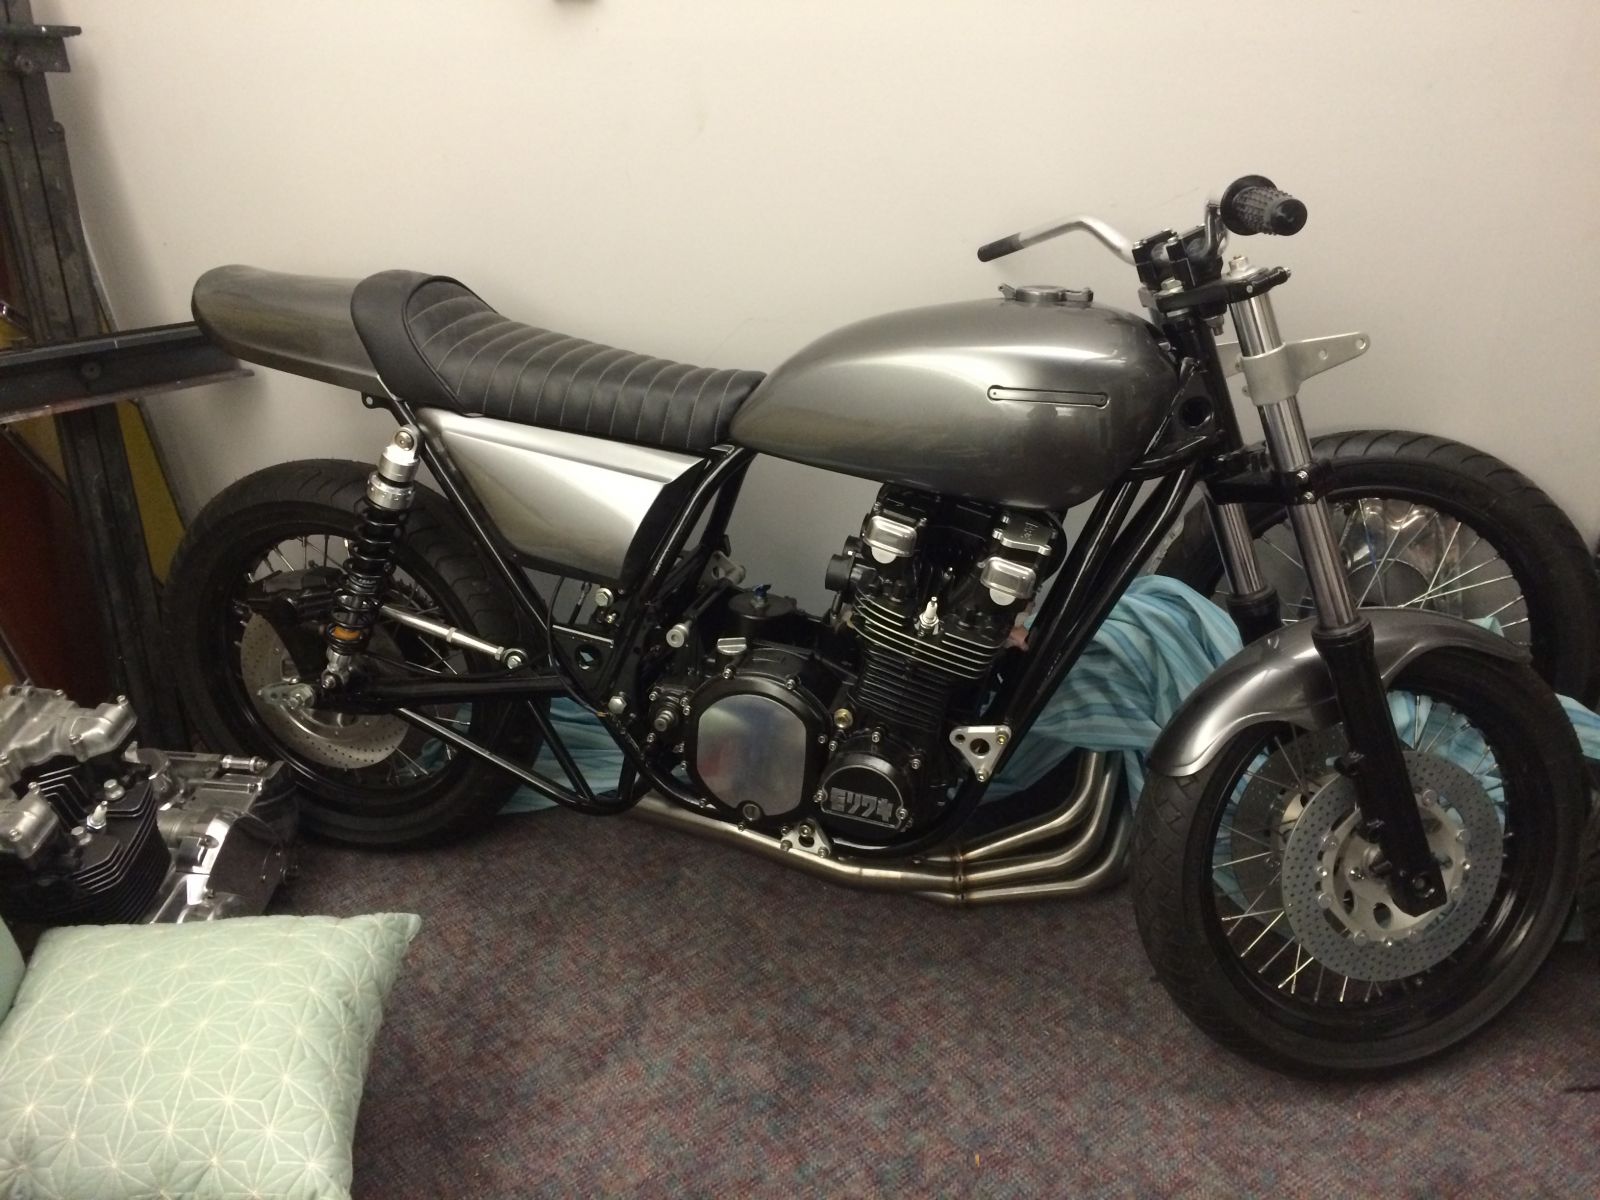
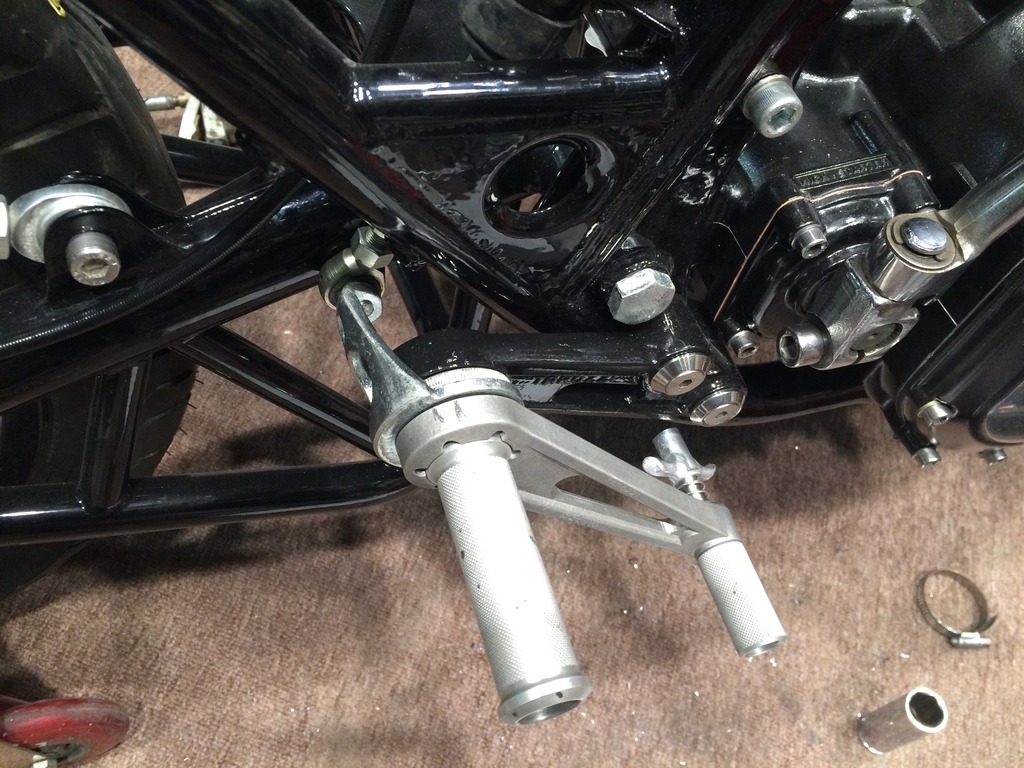
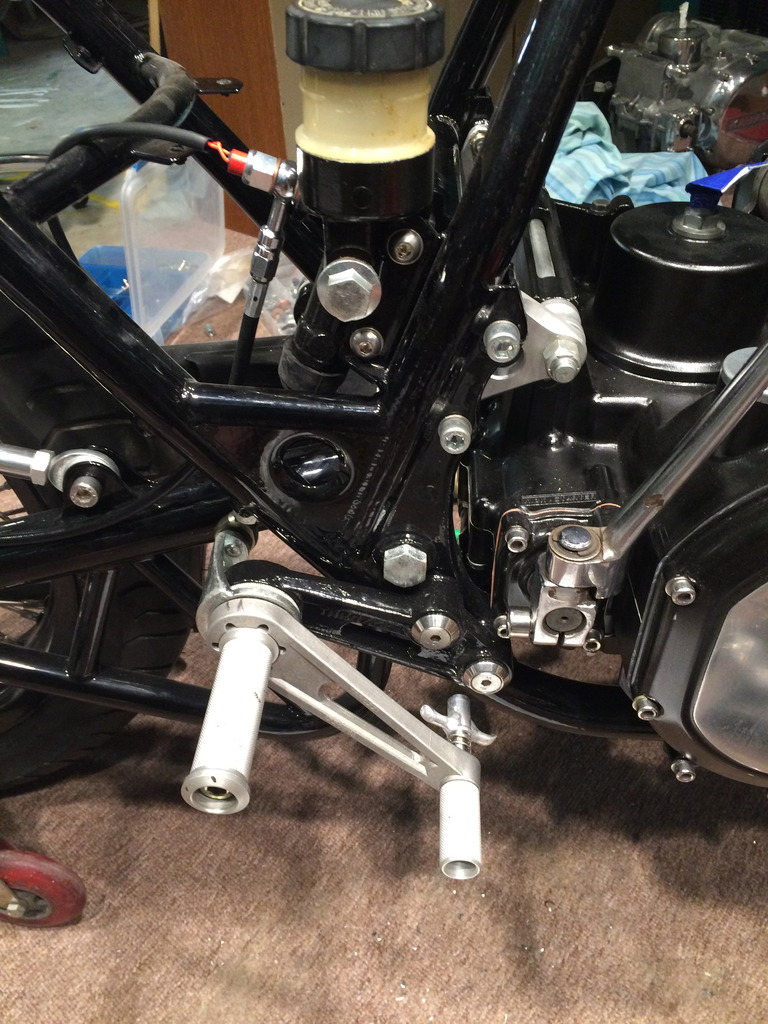
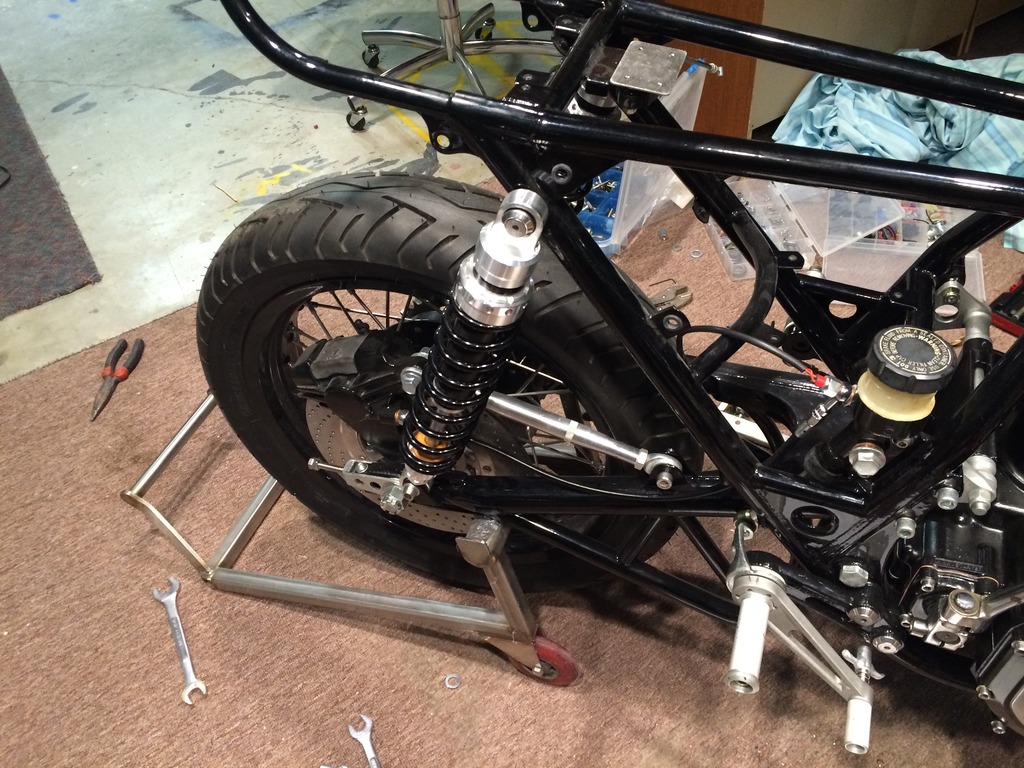
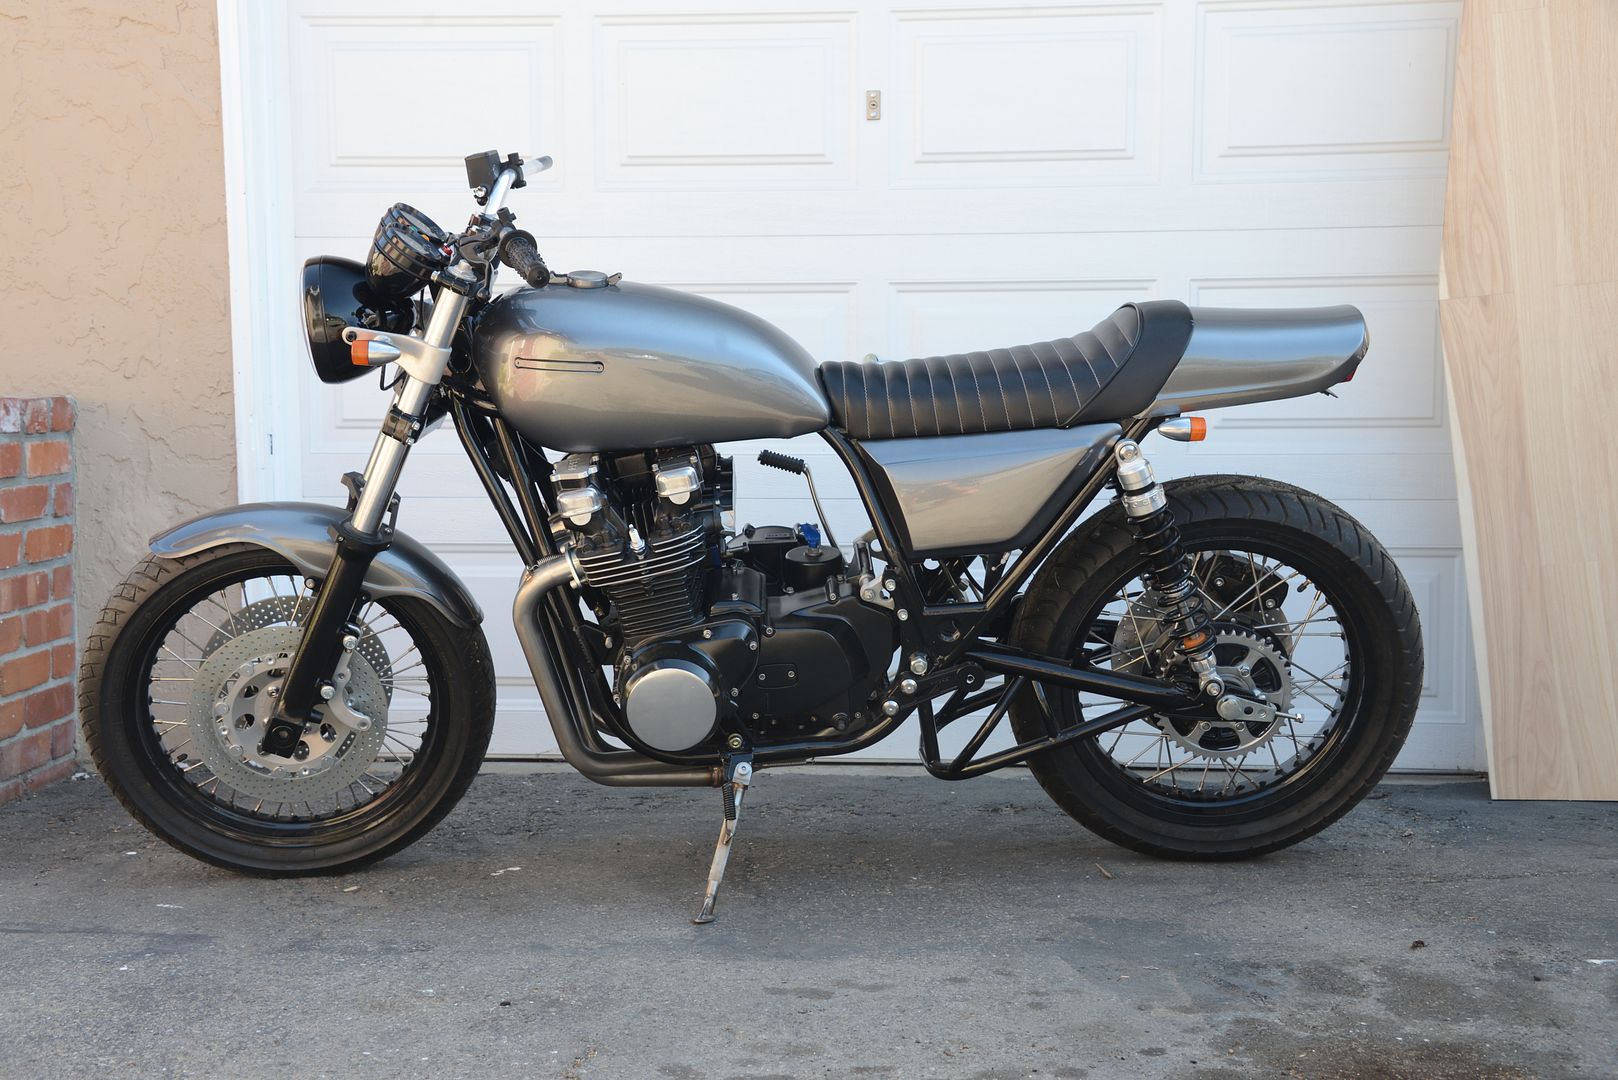
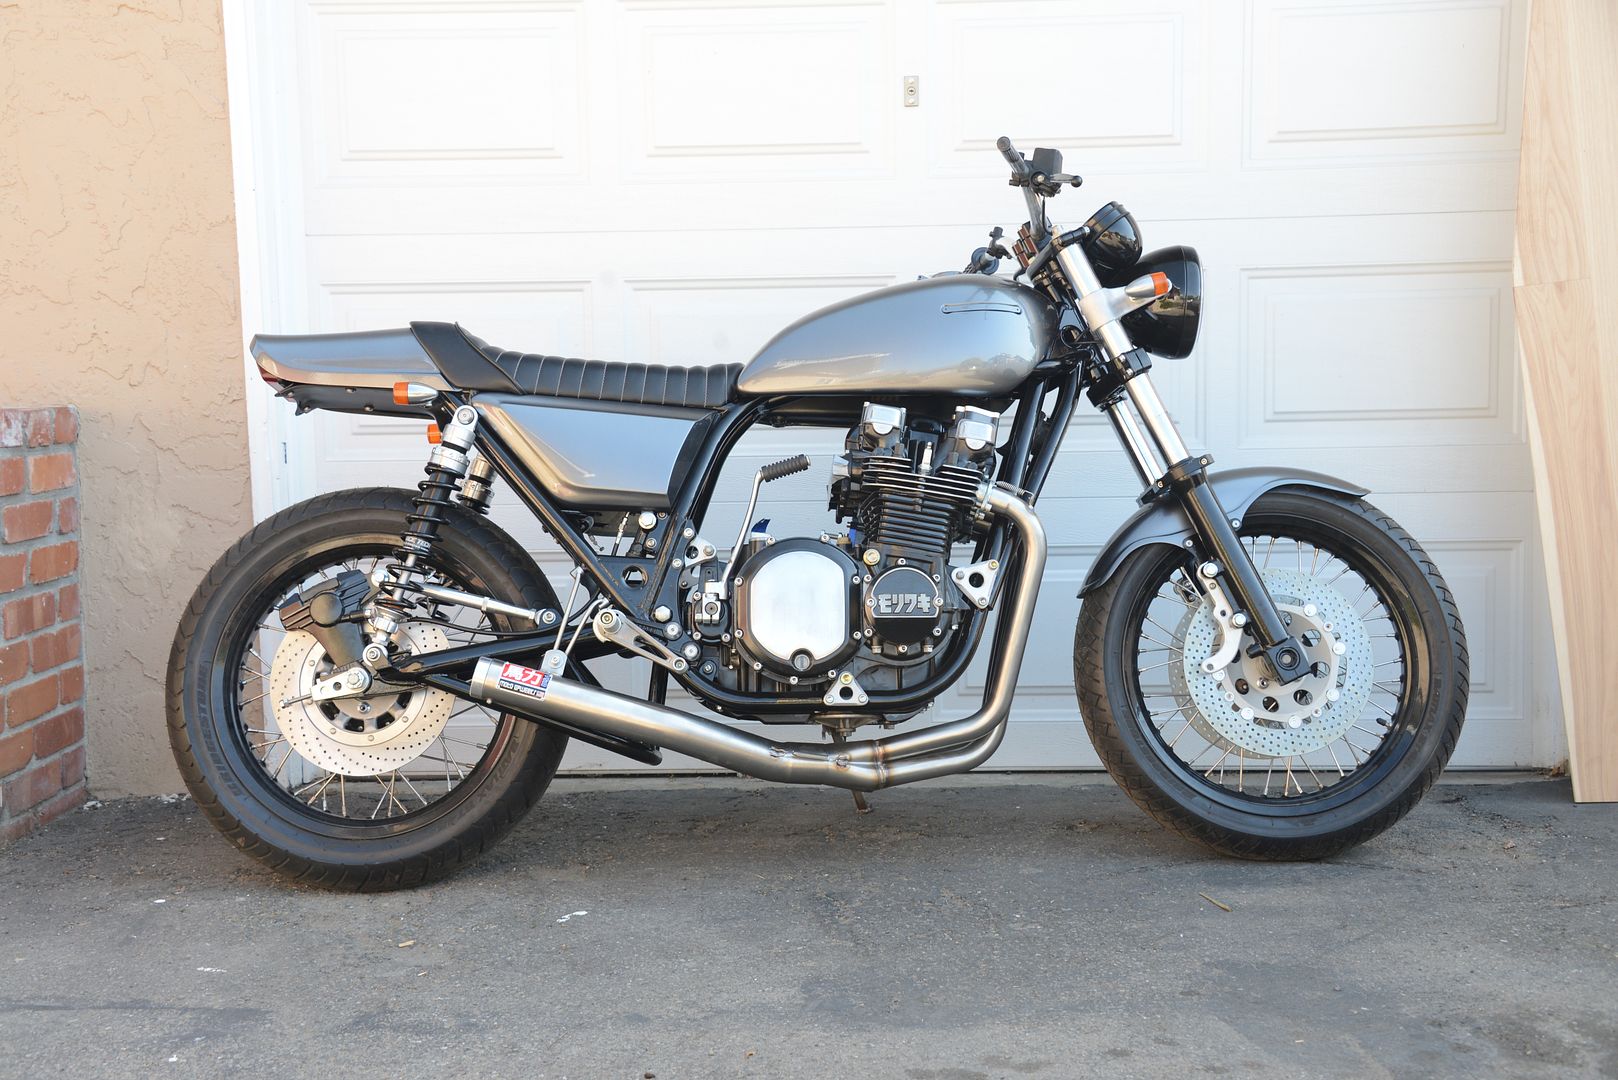
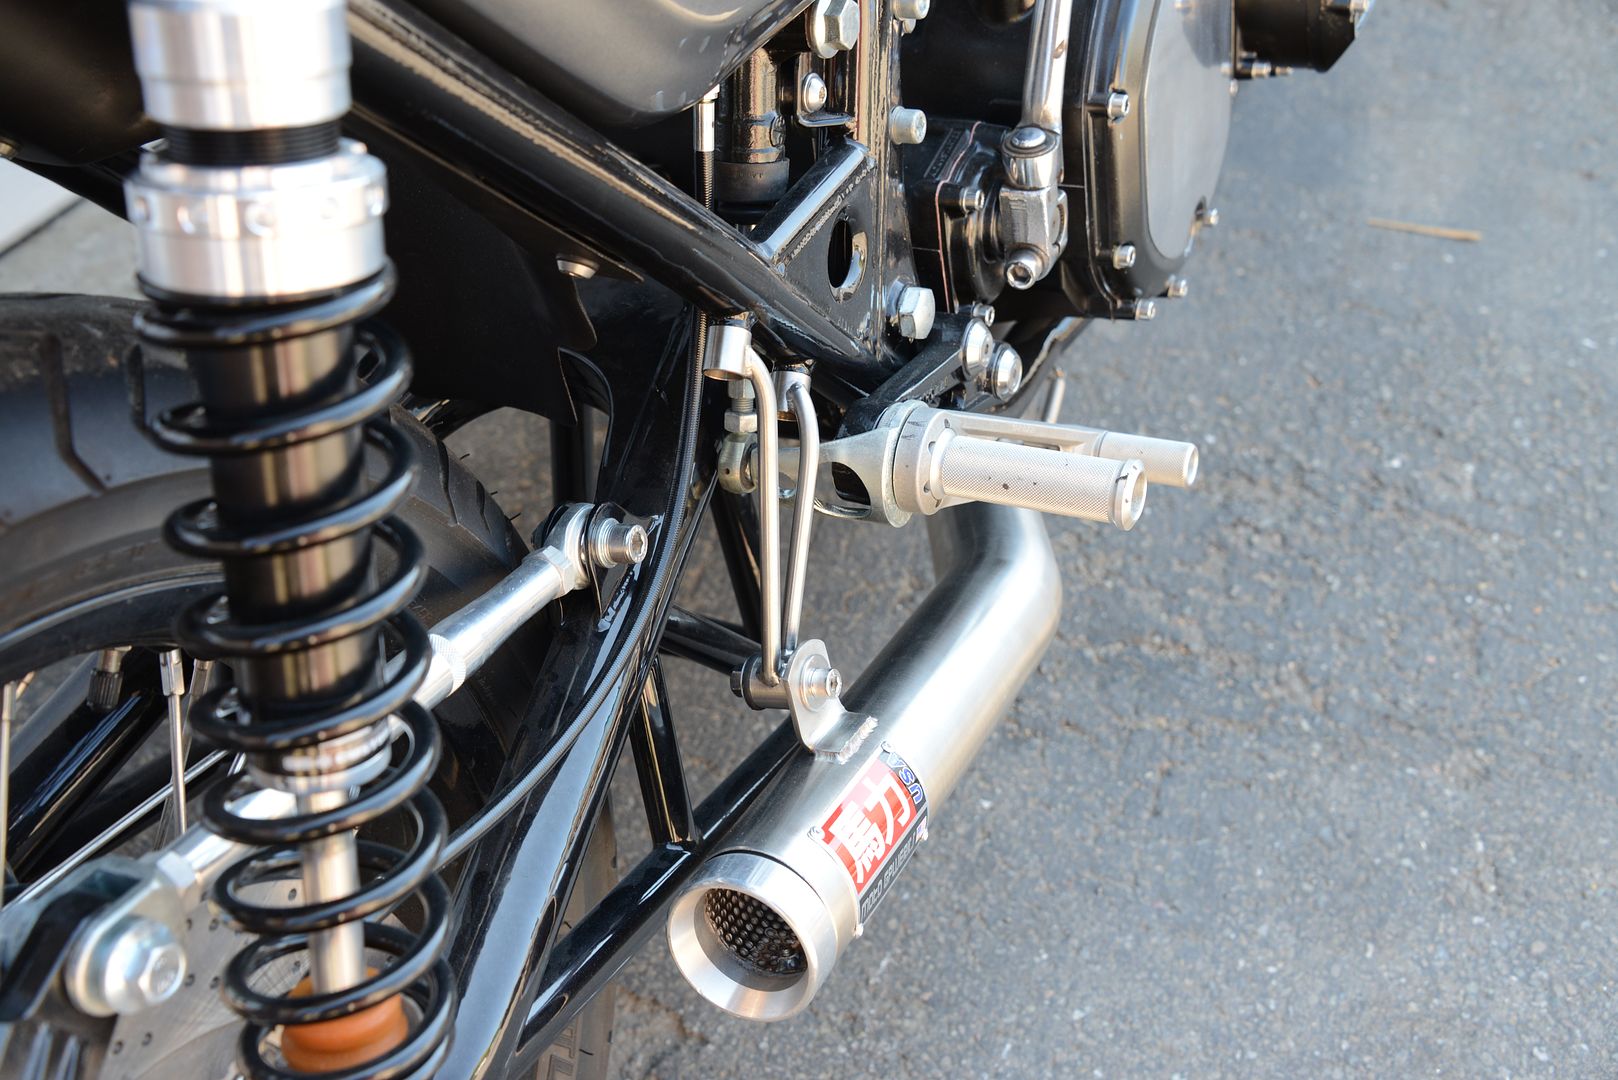
I finally have some time to work on the bike and started assembling a couple more things. Very pleased with how the rear sets worked out, but I need to modify the kick for more clearance, and perhaps get some folding footpegs. which are a good safety feature as well for a street bike. My buddy also gave me this sweet stainless stand he welded up years ago for his track bike.
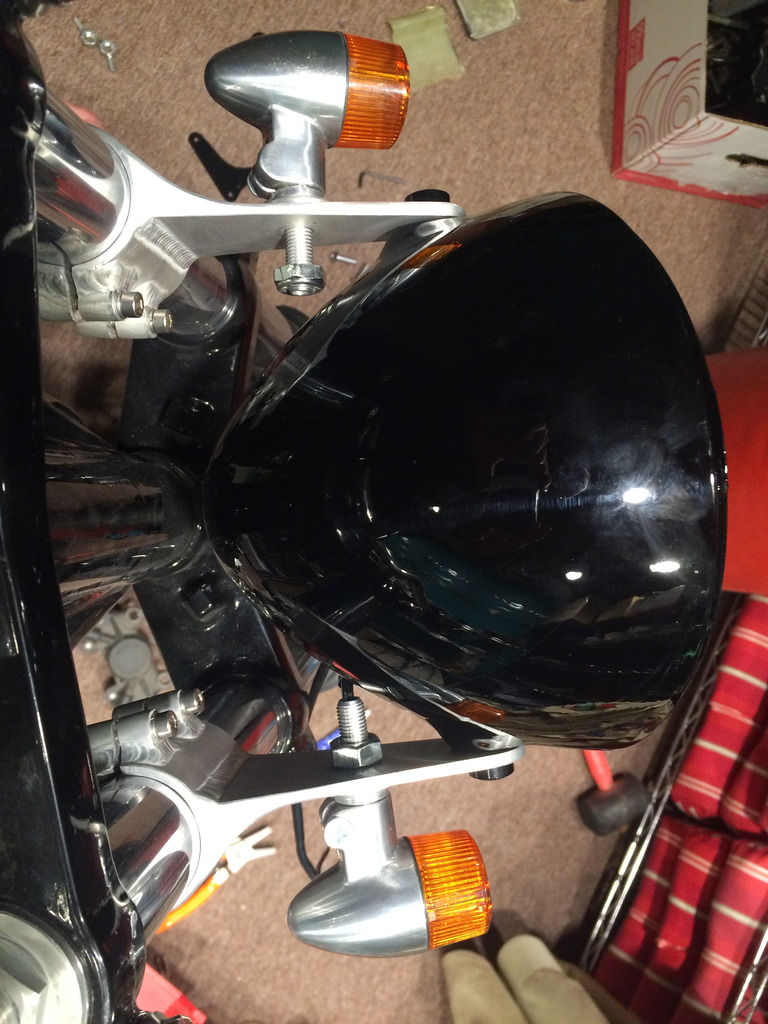
Also here is a design feature I'm trying to work out; I need to finish the back of the turn signal off a little more elegantly. I'm thinkin of triming the bolt down, using a flanged nut, and then routing the wires straight to the headlight bucket with a small hole and a grommet. Im not really satisfied with this solution as i think seeing wires bridging a gap like this doesnt look great, but im am stumped and not willing to remake the headlight ears. I was thinking about getting some cool expandable sleeve to dress up the wires a bit. thoughts?
I finally have some time to work on the bike and started assembling a couple more things. Very pleased with how the rear sets worked out, but I need to modify the kick for more clearance, and perhaps get some folding footpegs. which are a good safety feature as well for a street bike. My buddy also gave me this sweet stainless stand he welded up years ago for his track bike.
Also here is a design feature I'm trying to work out; I need to finish the back of the turn signal off a little more elegantly. I'm thinkin of triming the bolt down, using a flanged nut, and then routing the wires straight to the headlight bucket with a small hole and a grommet. Im not really satisfied with this solution as i think seeing wires bridging a gap like this doesnt look great, but im am stumped and not willing to remake the headlight ears. I was thinking about getting some cool expandable sleeve to dress up the wires a bit. thoughts?
Last edit: 02 Jul 2017 19:43 by DoctoRot.
Please Log in or Create an account to join the conversation.
- kaw-a-holic
-
- Offline
- User
-
Registered
- Posts: 1808
- Thanks: 249
Re: Doctorot's '78 KZ1000 build
26 Dec 2015 03:50
Rearsets look great Doc. I think the turn signals will loom just fine with nicely done wiring loom. I used black on my bike and the wiring is hardly noticeable.
Jon
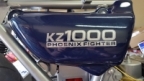
1977 KZ1000a1
Mesa, AZ
Phoenix Fighter Project
1977 KZ1000a1
Mesa, AZ
Phoenix Fighter Project
Please Log in or Create an account to join the conversation.
- SWest
-

- Offline
- Sustaining Member
-
Registered
- 10 22 2014
- Posts: 23735
- Thanks: 3016
Re: Doctorot's '78 KZ1000 build
26 Dec 2015 03:58
I agree. Too many other things for the eye to look at. ")
Steve
Steve
Z1b1000 1975 Z1b
kzrider.com/forum/11-projects/598262-kz-...-will-it-live#672882
kzrider.com/forum/2-engine/597654-poser?start=240#704229
kzrider.com/forum/11-projects/598262-kz-...-will-it-live#672882
kzrider.com/forum/2-engine/597654-poser?start=240#704229
Please Log in or Create an account to join the conversation.
- DoctoRot
-
Topic Author
- Offline
- Sustaining Member
-
Registered
- Oh, the usual... I bowl, I drive around...
- Posts: 2621
- Thanks: 784
Re: Doctorot's '78 KZ1000 build
06 Sep 2016 18:04
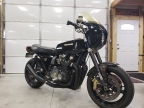
The forgotten child. I finally got off my ass and made some good progress on this. There were some fitment issues that I was dreading dealing with but my friend Eric sorted them out. Because this was the first seat pan I ever made I accidentally went a little too thin on it and when the seat cover was stretched over the pan it caused the whole back end to bow up and had an unsightly 3/4" gap to the tail. Eric bent a piece of titanium (according to him it was because he didn't want to paint it :") ) and riveted it to the back pulling the gap shut, he also attached the mounting hardware and the seat fits great, in fact it is probably the easiest seat to remove I have ever had. I welded up a stainless exhaust mount using the hardware I turned on the lathe a few months ago and it is rubber mounted. I also go the instrument cluster mounted so I can figure out where i need to start drilling holes in things, I think I have about 50 hours in the instrument/headlight cluster alone. The rear fender turned out real nice as well, too bad you cant really see it. This project has been bumped up in the triage list and is now a top priority. I'm getting near the end of stuff that needs to be done; I can see the end!
) and riveted it to the back pulling the gap shut, he also attached the mounting hardware and the seat fits great, in fact it is probably the easiest seat to remove I have ever had. I welded up a stainless exhaust mount using the hardware I turned on the lathe a few months ago and it is rubber mounted. I also go the instrument cluster mounted so I can figure out where i need to start drilling holes in things, I think I have about 50 hours in the instrument/headlight cluster alone. The rear fender turned out real nice as well, too bad you cant really see it. This project has been bumped up in the triage list and is now a top priority. I'm getting near the end of stuff that needs to be done; I can see the end!
) and riveted it to the back pulling the gap shut, he also attached the mounting hardware and the seat fits great, in fact it is probably the easiest seat to remove I have ever had. I welded up a stainless exhaust mount using the hardware I turned on the lathe a few months ago and it is rubber mounted. I also go the instrument cluster mounted so I can figure out where i need to start drilling holes in things, I think I have about 50 hours in the instrument/headlight cluster alone. The rear fender turned out real nice as well, too bad you cant really see it. This project has been bumped up in the triage list and is now a top priority. I'm getting near the end of stuff that needs to be done; I can see the end!
Please Log in or Create an account to join the conversation.
Moderators: Street Fighter LTD