
Search Results (Searched for: gs swing arm)
Replied by Dr. Gamma on topic Better Than Nothing---The rebirth of a Superbike.
06 Feb 2018 17:19Dr. Gamma wrote: Here is a short summary of whats all been done in the building of my Kz1000 Superbike road racer.
All major frame modifications done by Rob North and Pierre DesRoche back in 1979. This chassis is basically a copy of the bike that Reg Pridmore won the 1977 and 1978 AMA Superbike Championship on. Chuck Parme used basically the same bike to finish the highest placed privateer in the 1980 AMA Superbike Championship.
An oversize steering neck with TZ750 roller bearings is used, and has been relocated to put the front and rear wheels in alignment. Neck has also been repositioned rearward to put more weight on the front wheel, and it has about 2 more degrees of fork angle. KZ650 triple trees that have less trail are used to quicken up the steering. Double fork tube clamp bolts have been added to lower tree to increase fork rigidity.
Swing arm has been modified by DesRoche by cutting open, and welding in some internal bracing. An extra tubular 4130 moly hoop has also been added to bottom of swing arm. An oversize swing arm pivit bolt with matching swing arm inner sleeve are used, and mated to a honed to size mounting bosses on frame.
Frame has extra tubular bracing added through out the whole frame. This triangular bracing along with the DesRoche aluminum motor mount plates with ream-fit oversize bolts ties the motor to the frame making it one strong non-flexing structure. All worthless brackets, and tabs have been removed from frame for extra weight savings.
Yoshimura/Kayaba road race forks are used along with a 2.50X19 inch magnesium Morris mag. Brakes are 13 inch Kosman full-floating rotors with a pair of reworked Lockheed dual piston calipers mated to a KZ1000S1 master cylinder with a 11/16 piston. Earl's Supply -3 braided steel lines tie the whole brake system together.
Rear rim is a 3.50X18 inch magnesium Morris mag. Along with a Hunt plasma-coated aluminum brake rotor, and a KZ1000A brake caliper.
Light weight rearsets are fabricated using KZ1000S1 components. Mark II fuel tank has been reworked to use dual Z1R petcocks. This setup will allow the very last ounce of fuel to be picked up from tank!!! Custom fabricated gauge bracket with a rare KZ1000S1 road race tach. Vintage Yoshimura 1/8 turn Superbike throttle is used to open up the Keihin CR33 carbs. Custom fabricated Bassani Superbike pipe for the ultimate in cornering clearance is used.
Bike can be made street-legal with very little effort. All the provisions are there to add lights and charging system for street use. A under 440 pound street-legal KZ1000 makes a pretty nice street bike!!!
Current motor in bike;
KZ900 cases and covers are used for their lighter weight over similar KZ1000 parts.
KZ1000 cylinder block and head are used for this motor.
Lighten and polished KZ900 Falicon Supercrank with polished stock rods.
Moriwaki Engineering 73mm two ring cast pistons.
Cylinder head work by Yoshimura R&D with 37.5mm intake valves.
Yoshimura Super Bonneville cams running on Yoshumura KZ650 style shim buckets with lighten Yoshimura valve spring retainers.
Lighten and balanced Falicon clutch basket with O.E.M. clutch plates, H/D springs, and a needle bearing clutch pusher.
Transmission is a factory Kawasaki close ratio road race item. It comes from the factory fully undercut.
Andrews Products kickstart gear is fitted so the stock kickstarter can still be used with the close ratio box.
Motor has no provisions for electric start. Even the starter motor mounts have been removed for weight savings!!!
Stock diameter M.T.C. H/D Golden Studs are used so not to impede oil flow to the head.
Modified oil pump to eliminate any chance of oil aeration.
Earl's Supply 10 row oil cooler and plumbed with Earl's Supply AN8 braided steel lines and fittings.
Keihin CR33 carbs with the AMA mandated 31mm restrictors still installed are used.
Kal Gaurd Gun Kote coating has been applied to the complete motor, and covers to aid in the reduction of engine temperature.
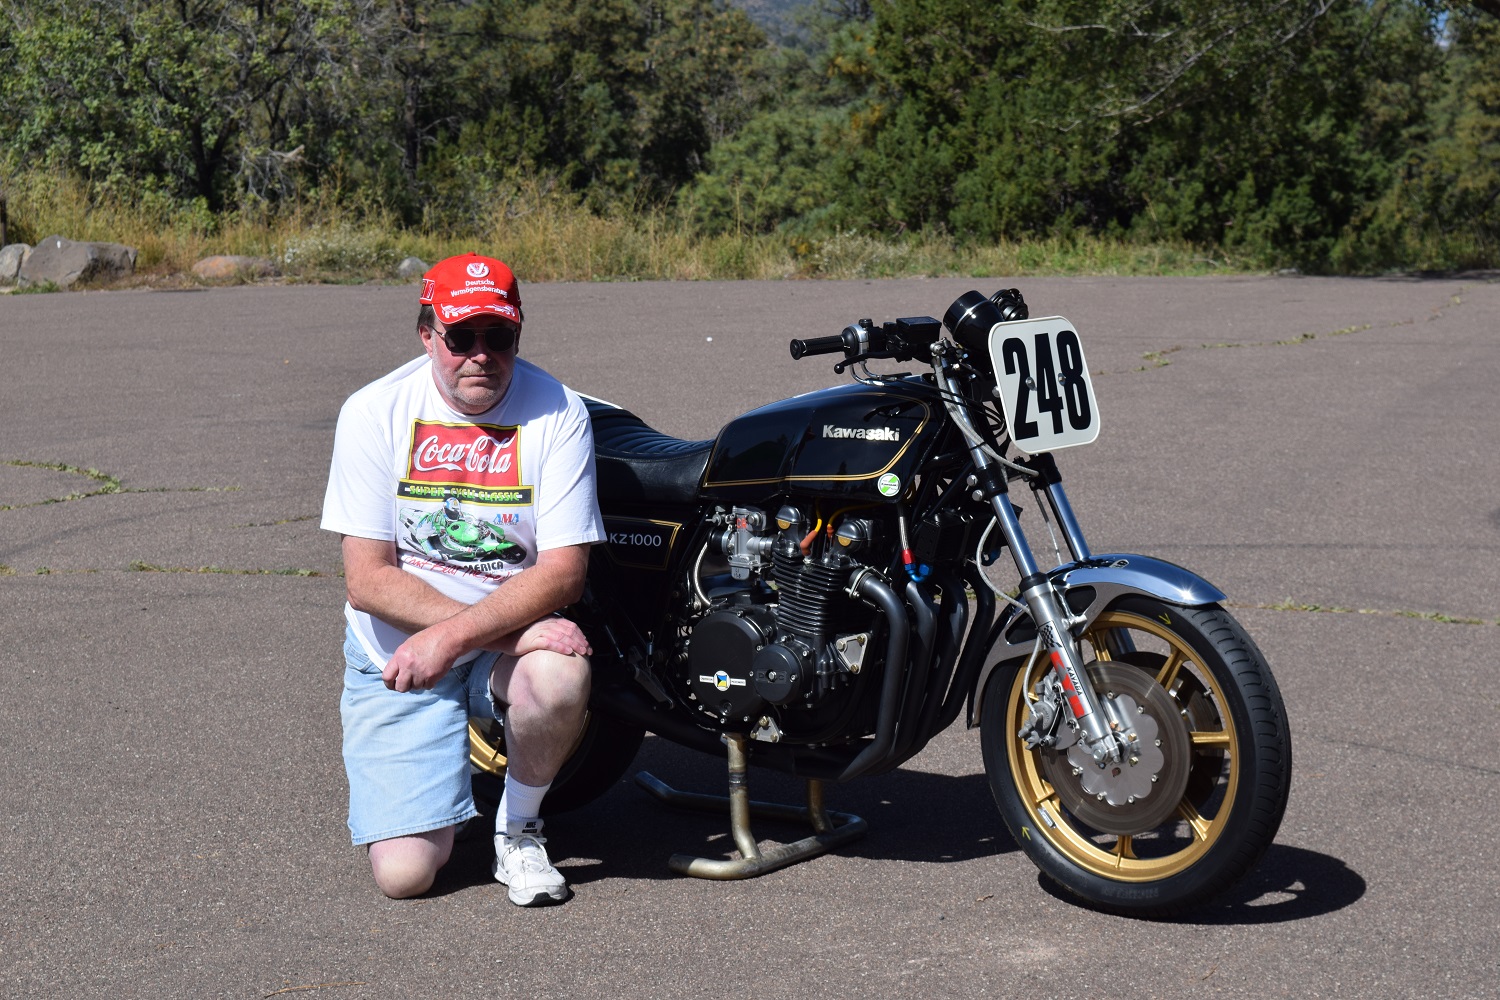
If anybody wants to know exactly what makes up or what has been done to my KZ1000 MK. II Superbike, here is a short list. I restored this as close as I could to the very last time I raced it. This bike has 5 seasons of racing on it in its past. Its now back to its original 1979 factory blue paint job too!!!
TexasKZ wrote: That is an interesting question that I raised with a mechanic some years ago. His position was that in this application, bushings would be better. Since there is such a small range of motion at the pivot, any additional fiction that the bushing might have due to the greater contact area would be offset by the broader distribution of force that greater contact area would provide. If true, the bushings would last much longer and would not create divots in the bearing race ( the correct term for that escapes me at the moment).
This sounded perfectly plausible to me.
Some precision machining would be called for, including creating a reliable way to insure that the bushing surface stays lubricated.
Want to be the guinea pig?
Agree. The term for the divots is "brinelling." Ed
Replied by TexasKZ on topic Bronze Swing Arm Bushings ?
05 Feb 2018 05:31
That is an interesting question that I raised with a mechanic some years ago. His position was that in this application, bushings would be better. Since there is such a small range of motion at the pivot, any additional fiction that the bushing might have due to the greater contact area would be offset by the broader distribution of force that greater contact area would provide. If true, the bushings would last muc longer and would not create divots in the bearing race ( the correct term for that escapes me at the moment).
This sounded perfectly plausible to me.
Some precision machining would be called for, including creating a reliable way to insure that the bushing surface stays lubricated.
Want to be the guinea pig?
This sounded perfectly plausible to me.
Some precision machining would be called for, including creating a reliable way to insure that the bushing surface stays lubricated.
Want to be the guinea pig?
Replied by kzdcw on topic Bronze Swing Arm Bushings ?
05 Feb 2018 04:16 kzdcw
kzdcw
Steve, I didn't realize that I have needle bearings already. Maybe i should either leave well enough alone or upgrade to the later double needle bearing side ? Wouldn't needle bearings be better than bronze bushings anyway ?
Replied by SWest on topic Bronze Swing Arm Bushings ?
04 Feb 2018 21:13
I'd check Z1E and see if they have the same listing.
Steve
Steve
Bronze Swing Arm Bushings ? was created by kzdcw
04 Feb 2018 15:10
kzdcw
I have a pair of Bronze swing arm bushing left over from my H2 project and never used. Can these be used on my 77' KZ1000A swing arm ?
Replied by ImaKZ1 on topic Swingarm offset?
24 Jan 2018 19:06
Original thought yes, 5.5” Zx6 6 spoke wheel.
I’m still doing research and collecting parts. I have a 6” wheel with 190 tire but haven’t checked to see if it will fit. The way things compute in my head, everything should be symmetrical and that’s why the arm offset at the pivot has me unsure. I’m going to run the dual rear shocks and it seems the mounts on the arm will have to be attached slightly off as well so that they center to the frame.
Before I start cutting limbs off the frame I want to be sure of my reasoning. Measure twice cut once.
I could just be overthinking this.....
read, research and ask questions. That’s where I’m at. Thanks for the help everyone!
Welcome Vinvar,
It's your bike so make it your own.
just try not to do a lot of things you can't reverse and keep your parts,
good tires and good shocks are the best mods
These stock bikes still ride real good after 40 years
Grease the swing arm
It's your bike so make it your own.
just try not to do a lot of things you can't reverse and keep your parts,
good tires and good shocks are the best mods
These stock bikes still ride real good after 40 years
Grease the swing arm
Replied by Kray-Z on topic Stripped cam bearing threads - shim under buckets
15 Jan 2018 17:15
The owner of this head finished up drilling and tapping the head for the inserts on a Bridgeport - style vertical milling machine this past weekend. It went very well. For anyone interested, the spacing of the cam cap bolts (each cap) is 38 x 40 mm, and I'll have to go back out to the shop in a few days to get the spacing between the caps (I forget). It is bitterly cold here (-33 C overnight), so I've shut the main heaters off and left the shop at just above freezing until it warms up a bit outside. I'll sand / prep bodywork in the basement of the house, and fix tattered wiring looms in the kitchen until then....
A few notes....
1. We are going to run the studs through the H cover, just tall enough with drilled and spot faced cover, sealing washers, spacers, and external nuts and use them to hold the cover with a few of the original cover bolts blocked off (the owner's plan is to use 12 point ARP nuts for appearances). The studs will be installed thus: coat the stud threads with moly grease - turn the stud in by hand until it bottoms - back the stud out 1/2 turn - install cam bearing caps, washers and nuts - gradually tighten each nut 1/2 turn evenly until all the caps are fully seated on the head - torque to 8 ft-lbs. (96 in-lbs) in 2 stages - install top spacers above nuts - install cam cover and gasket- install sealing washers and top nuts - torque top nuts to 70 in-lbs.
Not for everyone, we know, but this is more a race engine than daily commuter. There are other ways to use studs without putting holes in the cam cover....I'll explain some of those in a later post.
2. We must use permanent thread lock adhesive (such as red Lock-Tite) when installing the thread inserts. We make sure each insert will fit properly (test fit) before cleaning the parts with contact cleaner, then apply the thread locking adhesive. The adhesive is necessary as the top of the holes where the Heli-Coils had pulled out didn't have much aluminum left to cut new 5/16 " UNF threads. The fact that our inserts go in all the way to the bottom of the holes, are one-piece solid parts of high strength steel, and are "glued" in place will make them much stronger than the original threads,
3. The owner was doing all the work drilling and tapping the head, and didn't take nearly enough photos. I was too busy cleaning and rebuilding old Amal Concentric carbs and trying to get rusted / seized Norton "Iso-Elastic" engine / transmission mounts, and swing arm pivots out of a bike that sat (and rusted) since 1986. I have to earn the money to keep the heat and lights going somedays. I'll get some photos of the faux milling machine set-ups and do a proper write up when the weather improves a bit.
4. The inserts still have to be test-fit and glued in place. The owner will order the studs from the manufacturer soon. For now we will be using the standard bolts to check our work. I also have to plasti-gauge the cam bearings to be sure the alignment of the caps is acceptable. If not, I'll have to work carefully to precisely correct or re-locate the dowel / knock pins. I'm hoping that won't be needed!!!!!
5. I will be using the same stud system on my own KZ-J 1394 big block and my "Beater II" 's new street / strip KZ-J 1170 engine (made out of discarded used / reconditioned racing parts). My heads don't have stripped threads, so no need to install the inserts. The studs will keep the original threads safe from damages over the harsh life my "experimental" racing engines will see in the future....
Replied by davido on topic Finding chain line
08 Jan 2018 13:04
I had great fun sorting mine out. I fitted a Bandit600 wheel into GSXR600 swingarm with,I think, a 160 tyre, into my CSR1000 frame.
The whole process is in my build thread (somewhere!)
I started with centering the back wheel. I measured the clearance between the tyre edge and the inside of the frame downtube. Then subtracting the width of the chain,I was able to calculate the ideal position of the rear sprocket,leaving equal clearance either side of the chain ( I think I had about 4mm either side) . I needed to have about 9mm shaved off the sprocket carrier. That was it for the back end. Luckily the front sprocket turned out to be a standard sized offset.
A couple of things that came up. A lot of people seemed to think that the back wheel didnt need to be centered and could be run offset. This made no sense to me at all (and the fact that Harley do it on some of their bikes convinced me that it must be a bad idea!!)
I dont know the science behind it,others have their opinions about it but I wanted my front and back wheels running in line.
If youre using twin shocks rather than mono,keep an eye on the bottom of the left shock,you might have problems there with the chain.
And you may need some protection on the top of the swingarm over the pivot bolt, as the chain is prone to dragging on this.There are
different solutions for it.
That my tuppence worth. Good luck with it
Displaying 701 - 710 out of 7255 results.