
79 KZ1000 head removal
- Deuce
-
 Topic Author
- Offline
- User
-

Registered
- Posts: 62
- Thanks: 4
Re: 79 KZ1000 head removal
03 May 2022 10:35In a perfect world (where my funds and space are endless, lol,) I would do that. I'm way out of my comfort level going this far. It appears the rust is confined to that one cylinder. Top view down didn't show anything below the piston and from underneath, there is no rust.Glad to see you have the cylinder off
.
My 2 cents is pull the motor and split the cases. You need to inspect and clean properly the crank and trans for wear and water damage
Replace the camchain at this point and any worn cam chain, guides and rollers and gears that show wear.
Dont make a piston decision until the cylinder can be checked for size, wear and pitting
Pulling the motor is easy Especially with the top end off already and a minimal amount of extra gaskets will be needed
Dave
I may get a wild hair and rebuild the other motor to be a bit more performance oriented, and I will take it down all the way. That will be down the road, however.
www.flickr.com/gp/162005819@N03/J055kUZ1a8
1982 GS1100G
1997 Yamaha Vmax
1979 Kawasaki 1000
1982 GS1100G
1997 Yamaha Vmax
1979 Kawasaki 1000
Please Log in or Create an account to join the conversation.
- hardrockminer
-

- Offline
- Sustaining Member
-

Registered
- Posts: 3099
- Thanks: 1199
Re: 79 KZ1000 head removal
03 May 2022 16:56
The early Z1's used a one piece gasket but they had leakage issues so they went with a two piece with an o ring around the center cavity. If you want to go with a one piece you will need to fill up the indent for the o ring. You won't need any extra gaskets if you split the cases to check the crank and tranny. Just a bit of 3 Bond when you re-seal the cases.
You should check the cam chain for stretch. There is a spec in the service manual. If the chain is in spec I would reuse it. Check the rollers carefully on top of the cylinders. I've had the bearing separate from the core on one bike. The idler underneath the cylinders should probably be replaced, as it's a big job to do it after you've rebuilt the engine. Again, I use OEM but they are expensive and I'm told Liska makes good stuff.
Keep track of which piston was in which cylinder and make sure you keep the rings for each piston. Measure your cylinders, pistons and rings. I would reuse if they are in spec. Your #1 cylinder may need a new sleeve, or you can bore them all and put in new pistons and rings.
I have several restored bikes along with a 2006 Goldwing with a sidecar.
Please Log in or Create an account to join the conversation.
- Dr. Gamma
-

- Offline
- Sustaining Member
-
Registered
- Posts: 1231
- Thanks: 698
Re: 79 KZ1000 head removal
03 May 2022 19:18Looking at your cylinder head its going to need a bunch of work to make it right again!!! Number three cylinder looks to be the healthiest of the bunch. Bet you the water damaged cylinder will need a valve or two. The exhaust guides most likely are due to be replaced too. Do yourself a big favor and have someone that does KZ cylinder heads for a living do up your head. Not someone that does car heads or even a machine shop that is not familiar with KZ heads. One too many cuts with a seat cutter and you are out of shim range!!!! 10 to 1 it will also need four new intake boots!!!
The cylinder with the water damage is toast. Go oversize on all four so you are starting with something of known quality. There are some nice inexpensive OEM style piston kits out there. Split the cases and have a quick look around the trans and crank just to make sure everything is good to go. Replace the cam chain along with any rollers that show a huge amount of wear. Wait to you see the prices on Factory Kawasaki gaskets!!!!!! They have gone insane in the past few years!!!!!
You can nickel and dime this motor back together. But it will never really run the way it should if you do. In the end its just a big waste of your money. Spend the time and the money and do it right. If you do I bet you it will fire up on the third or fourth kick!!!!!!!
1972 H2 750 Cafe Racer built in 1974.
1976 KH400 Production Road Racer.
1979 Kz1000 MK. II Old AMA/WERA Superbike.
1986 RG500G 2 stroke terror.
1986 GSXR750RG The one with the clutch that rattles!
Up in the hills near Prescott, Az.
1976 KH400 Production Road Racer.
1979 Kz1000 MK. II Old AMA/WERA Superbike.
1986 RG500G 2 stroke terror.
1986 GSXR750RG The one with the clutch that rattles!
Up in the hills near Prescott, Az.
Please Log in or Create an account to join the conversation.
- DOHC
-
- Offline
- Sustaining Member
-
Registered
- Those Doe-Hawks really go!
- Posts: 1271
- Thanks: 595
Re: 79 KZ1000 head removal
03 May 2022 19:23. Do yourself a big favor and have someone that does KZ cylinder heads for a living do up your head.
Do you have someone you would recommend? I'm looking...
'78 Z1-R in blue
, '78 Z1-R in black,
'78 Z1-R in pieces
My dad's '74 Z1
'00 ZRX1100
My dad's '74 Z1
'00 ZRX1100
Please Log in or Create an account to join the conversation.
- Dr. Gamma
-
- Offline
- Sustaining Member
-
Registered
- Posts: 1231
- Thanks: 698
Re: 79 KZ1000 head removal
03 May 2022 21:08I had three people that did all my cylinder heads over the years. Old age has caught up with about everybody in my group. One died last year. Another retired and moved to Kentucky.
The only one left is pushing 70 with all kinds of health problems. He is back in Chicagoland. He freshened up my Superbike head a few years back. He picks and chooses on what he takes in anymore. His workmanship is fantastic but he ain't cheap!!!!
1972 H2 750 Cafe Racer built in 1974.
1976 KH400 Production Road Racer.
1979 Kz1000 MK. II Old AMA/WERA Superbike.
1986 RG500G 2 stroke terror.
1986 GSXR750RG The one with the clutch that rattles!
Up in the hills near Prescott, Az.
1976 KH400 Production Road Racer.
1979 Kz1000 MK. II Old AMA/WERA Superbike.
1986 RG500G 2 stroke terror.
1986 GSXR750RG The one with the clutch that rattles!
Up in the hills near Prescott, Az.
Please Log in or Create an account to join the conversation.
- Deuce
-
Topic Author
- Offline
- User
-
Registered
- Posts: 62
- Thanks: 4
Re: 79 KZ1000 head removal
04 May 2022 06:15
I'm going to be picky on anyone doing machine work. I'd be willing to bet no one where I live does it. I'll probably have to drive up to San Antonio.
With that being said, a friend sent me a link to this one. While I'd prefer not to have another shaftie, I don't think I'd find a MKII at a reasonable price. He's asking $2500 for this. He's a little over 300 miles from me. I can just imagine what it would cost to get the one I have into this condition. According to him, carbs and brakes have been rebuilt and new paint (that would be changed, though.)
I could then build the one I have into a screamer, if I so desire. Until I know for sure if I buy this one, I'll be chugging along with what I've been doing. I guess I'd better start hunting down parts for it.
www.flickr.com/gp/162005819@N03/J055kUZ1a8
1982 GS1100G
1997 Yamaha Vmax
1979 Kawasaki 1000
1982 GS1100G
1997 Yamaha Vmax
1979 Kawasaki 1000
Please Log in or Create an account to join the conversation.
- Wookie58
-

- Offline
- Moderator
-

Registered
- Posts: 5469
- Thanks: 3349
Re: 79 KZ1000 head removal
04 May 2022 08:05
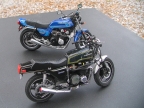
This is what happens when you leave your collection out in the rain, IT GROWS

PS: remember to hide the new one at the back of the pack

PS: remember to hide the new one at the back of the pack
1982 KZ1000 Ltd
www.kzrider.com/forum/11-projects/617631...-82-begins?start=192
kzrider.com/filebase-alias?view=download...d-fault-diagnosis&ca
www.kzrider.com/forum/11-projects/617631...-82-begins?start=192
kzrider.com/filebase-alias?view=download...d-fault-diagnosis&ca
Please Log in or Create an account to join the conversation.
- Deuce
-
Topic Author
- Offline
- User
-
Registered
- Posts: 62
- Thanks: 4
Re: 79 KZ1000 head removal
04 May 2022 10:05Funny how that happens, isn't it?This is what happens when you leave your collection out in the rain, IT GROWS
PS: remember to hide the new one at the back of the pack

www.flickr.com/gp/162005819@N03/J055kUZ1a8
1982 GS1100G
1997 Yamaha Vmax
1979 Kawasaki 1000
1982 GS1100G
1997 Yamaha Vmax
1979 Kawasaki 1000
Please Log in or Create an account to join the conversation.
- Rick H.
-

- Offline
- User
-
Registered
- Posts: 840
- Thanks: 241
Re: 79 KZ1000 head removal
04 May 2022 16:27
Deuce: Keep your eye on the project at hand. I don't mean to sound like a nanny, but you have a fairly involved project already at hand. Concentrate on what you have on your plate now. This project will test your ability to take something apart and put it back together correctly. Jumping into another bike will just complicate matters for you. Unless you have a large working area and alot of disposable income stay with one project and see it through. These jobs tend to get much more expensive than we anticipate, and costs can run away on you, but one thing is certain, the more you replace or repair now the better off you will be later on. I refer to your situation will the cam chain and associated parts. Some of them are accessible only with the cylinder block off and that is the time to replace them, not later on with the engine back together. When I did my top end I left the cam chain alone, but replaced all the other items. The cam chain was still within spec so I saw no need to replace it. The parts I did replace ended up being quite expensive and I used Liska rollers. OEM was more than Liska at the time. There is some prep work to using a one piece head gasket instead of the OEM multi-piece gasket. I followed the instructions for the one piece gasket closely and it worked well. With your engine where it is and its condition I would look at replacing all the pistons and rings with a "kit", but there is still prep work that must be done even with a kit. This is where a really Kawasaki knowledgeable machine shop comes into play. I used APE for my head work and a motorcycle machine shop here in Wisconsin for my cylinder work. They came highly regarded and did a great job. As others have already said, you really need to see how far out the cylinders will have to be bored to figure out what size pistons you will need. If you use a "shop" for your cylinder work they should have the pistons in hand for final fitting. Piston to cylinder clearance is critical to a successful rebuild. As a point of reference there are several good videos on You Tube that talk about this kind of work and show you how it is done. When it comes to measuring items, such as cylinders, there are some very specific instruments that must be used and they must be used in a specific manner. Again you can find videos that can show you how this is done, but there is no replacement for real experience. I am not trying to scare you off of doing this project, but you have to understand what it entails and that it can be expensive. There really is a reward when the engine is back together and you go out for the first ride knowing you did the best job you could on it. Also plan on removing the engine oil pan so you can clean it out and look for any bad news in it. It is also nice to have it off in case you drop anything and it falls into the block. Hopefully it will just fall through for retrieval. Good luck no matter what you do!
Rick H.
Rick H.
Rick H.
1977 Kawasaki KZ-1000A1
1977 Kawasaki KZ-1000A1
Please Log in or Create an account to join the conversation.
- Deuce
-
Topic Author
- Offline
- User
-
Registered
- Posts: 62
- Thanks: 4
Re: 79 KZ1000 head removal
05 May 2022 10:10Oh, I won't give up on the one I'm tearing apart. I quit "quitting" years ago. I'm bound and determined to finish what I started.Deuce: Keep your eye on the project at hand. I don't mean to sound like a nanny, but you have a fairly involved project already at hand. Concentrate on what you have on your plate now. This project will test your ability to take something apart and put it back together correctly. Jumping into another bike will just complicate matters for you. Unless you have a large working area and alot of disposable income stay with one project and see it through. These jobs tend to get much more expensive than we anticipate, and costs can run away on you, but one thing is certain, the more you replace or repair now the better off you will be later on. I refer to your situation will the cam chain and associated parts. Some of them are accessible only with the cylinder block off and that is the time to replace them, not later on with the engine back together. When I did my top end I left the cam chain alone, but replaced all the other items. The cam chain was still within spec so I saw no need to replace it. The parts I did replace ended up being quite expensive and I used Liska rollers. OEM was more than Liska at the time. There is some prep work to using a one piece head gasket instead of the OEM multi-piece gasket. I followed the instructions for the one piece gasket closely and it worked well. With your engine where it is and its condition I would look at replacing all the pistons and rings with a "kit", but there is still prep work that must be done even with a kit. This is where a really Kawasaki knowledgeable machine shop comes into play. I used APE for my head work and a motorcycle machine shop here in Wisconsin for my cylinder work. They came highly regarded and did a great job. As others have already said, you really need to see how far out the cylinders will have to be bored to figure out what size pistons you will need. If you use a "shop" for your cylinder work they should have the pistons in hand for final fitting. Piston to cylinder clearance is critical to a successful rebuild. As a point of reference there are several good videos on You Tube that talk about this kind of work and show you how it is done. When it comes to measuring items, such as cylinders, there are some very specific instruments that must be used and they must be used in a specific manner. Again you can find videos that can show you how this is done, but there is no replacement for real experience. I am not trying to scare you off of doing this project, but you have to understand what it entails and that it can be expensive. There really is a reward when the engine is back together and you go out for the first ride knowing you did the best job you could on it. Also plan on removing the engine oil pan so you can clean it out and look for any bad news in it. It is also nice to have it off in case you drop anything and it falls into the block. Hopefully it will just fall through for retrieval. Good luck no matter what you do!
Rick H.
I just got in the 2 piece head gasket, so I'll be using that. I removed the oil pan early on to look for metal shavings or pieces. There wasn't any, thank God. I think what will be great is having a running one right there to use as a rebuild reference. Oh course, that doesn't apply to the internals of the motor. I went by to get my carbs, and the guy wasn't there. So many of these shops near me have a strange idea of when to come in to work.
As far as the oil pump goes, I know on my older cars I used to have, that if I took the pan off, I replaced the oil pump. Should I do the same for the bike?
www.flickr.com/gp/162005819@N03/J055kUZ1a8
1982 GS1100G
1997 Yamaha Vmax
1979 Kawasaki 1000
1982 GS1100G
1997 Yamaha Vmax
1979 Kawasaki 1000
Please Log in or Create an account to join the conversation.
- Dr. Gamma
-
- Offline
- Sustaining Member
-
Registered
- Posts: 1231
- Thanks: 698
Re: 79 KZ1000 head removal
05 May 2022 11:55
As far as your oil pump. There is a Factory Kawasaki Service Bulletin about the Z1~Kz1000 oil pumps. Some had the oil pressure light flicker off and on during hard acceleration. This bulletin tells how to go through a KZ oil pump. How to check the pump rotors with PlastiGauge for excessive clearance. Plus where to drill a small hole in the pump body to help with aeration of the oil coming from the pump. They listed a thinner oil pump gasket to help getting the clearance reduced between the pump body and the pump rotors. 11009-1023 is the part number for that thinner gasket. They are all over ebay. Find a copy of that service bulletin and that will set you straight on what needs to be done to your oil pump. Every motor I ever built I did this to all the oil pumps I used. Along with that little oil gate that is placed in the pan to keep oil around the oil pickup under hard acceleration and going through the oil pump per that bulletin you will never have a problem with oil pressure in your Kz1000 motor!!!!
Oil pan gate in Kz oil pan.
Oil pan gate in Kz oil pan.
1972 H2 750 Cafe Racer built in 1974.
1976 KH400 Production Road Racer.
1979 Kz1000 MK. II Old AMA/WERA Superbike.
1986 RG500G 2 stroke terror.
1986 GSXR750RG The one with the clutch that rattles!
Up in the hills near Prescott, Az.
1976 KH400 Production Road Racer.
1979 Kz1000 MK. II Old AMA/WERA Superbike.
1986 RG500G 2 stroke terror.
1986 GSXR750RG The one with the clutch that rattles!
Up in the hills near Prescott, Az.
The following user(s) said Thank You: DOHC, SWest, Wookie58
Please Log in or Create an account to join the conversation.
- DOHC
-
- Offline
- Sustaining Member
-
Registered
- Those Doe-Hawks really go!
- Posts: 1271
- Thanks: 595
Re: 79 KZ1000 head removal
05 May 2022 15:21As far as your oil pump. There is a Factory Kawasaki Service Bulletin about the Z1~Kz1000 oil pumps.
Do you know where someone could find this bulletin? Does it have a part number? Do you have a copy you could share? I have no idea where to find such a thing
'78 Z1-R in blue
, '78 Z1-R in black,
'78 Z1-R in pieces
My dad's '74 Z1
'00 ZRX1100
My dad's '74 Z1
'00 ZRX1100
Please Log in or Create an account to join the conversation.
Moderators: Street Fighter LTD