
79 KZ1000 head removal
- 750 R1
-
- Offline
- User
-

Registered
- Posts: 1161
- Thanks: 388
Re: 79 KZ1000 head removal
25 Apr 2022 18:431:1 acetone to atf
Try and use mineral oil ATF, the synthetic stuff like to separate from the acetone. I've been using the ATF acetone mix for 30 years or more...
Please Log in or Create an account to join the conversation.
- Deuce
-
 Topic Author
- Offline
- User
-
Registered
- Posts: 62
- Thanks: 4
Re: 79 KZ1000 head removal
26 Apr 2022 06:16Haven't measured yet. It was raining last night and unfortunately, the bike has to sit outside. I may not get a chance to go out and work on it till this weekend.Again, you don't know how much I appreciate your guidance and input. I've been on sites that will start treating you like an idiot if they think your question is beneath them.
What's the ratio of trans fluid to acetone, or just dump some of each in? Luckily, I have both here at my house.
50/50 If you can get them to move then add more wood blocks until you can pull the barrels free. Don't pound on it if the crank is at bottom dead center. Hopefully water didn't get past the rings. Did you measure the holes? Looks like big bore pistons to me. If so used barrels and pistons would work or stock barrels bored to 1045/75 could make a good runner if the crank isn't shot.
Steve
On a side note, I did see where the shims sit on top of the buckets.
www.flickr.com/gp/162005819@N03/J055kUZ1a8
1982 GS1100G
1997 Yamaha Vmax
1979 Kawasaki 1000
1982 GS1100G
1997 Yamaha Vmax
1979 Kawasaki 1000
Please Log in or Create an account to join the conversation.
- Deuce
-
Topic Author
- Offline
- User
-
Registered
- Posts: 62
- Thanks: 4
Re: 79 KZ1000 head removal
26 Apr 2022 06:18I'll have to stop and get the mineral oil ATF. All I have on hand is the Type F.
www.flickr.com/gp/162005819@N03/J055kUZ1a8
1982 GS1100G
1997 Yamaha Vmax
1979 Kawasaki 1000
1982 GS1100G
1997 Yamaha Vmax
1979 Kawasaki 1000
Please Log in or Create an account to join the conversation.
- Wookie58
-

- Offline
- Moderator
-

Registered
- Posts: 5463
- Thanks: 3344
Re: 79 KZ1000 head removal
26 Apr 2022 06:55 - 26 Apr 2022 06:57
Hi Duece, something else you could look at ref Steve's comments about the bore size. While your "rusty hole is soaking"
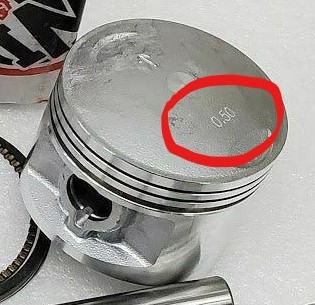
If you take a wire brush and some emery paper and carefully clean the crowns of the pistons that are at TDC, if it has been bored previously you may be able to see the markings on the crown that show by how much (see below). As I understand it +1mm (2nd oversize) is the max for regular oversized pistons, after that it would be a liner or performance pistons (Wiseco, Wossner etc) which are 2 to 3 times the price of regular pistons.
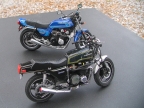
Just out of interest, is the motor in your parts bike (the one with the banana frame that only turns left !) in any better shape than this one

Just out of interest, is the motor in your parts bike (the one with the banana frame that only turns left !) in any better shape than this one
1982 KZ1000 Ltd
www.kzrider.com/forum/11-projects/617631...-82-begins?start=192
kzrider.com/filebase-alias?view=download...d-fault-diagnosis&ca
www.kzrider.com/forum/11-projects/617631...-82-begins?start=192
kzrider.com/filebase-alias?view=download...d-fault-diagnosis&ca
Last edit: 26 Apr 2022 06:57 by Wookie58.
Please Log in or Create an account to join the conversation.
- Deuce
-
Topic Author
- Offline
- User
-
Registered
- Posts: 62
- Thanks: 4
Re: 79 KZ1000 head removal
27 Apr 2022 06:02I don't think it's been bored out. I came up with a 68 mm bore with my cheapo caliper. I see factory is 70 mm. I didn't get a chance to do much more than put the "mix" in the bad cylinder before it started raining. I didn't tear into the other motor as it appeared (on the surface anyway) to have been sitting outside longer. Right now, it's tucked safely away in my garage.Hi Duece, something else you could look at ref Steve's comments about the bore size. While your "rusty hole is soaking"If you take a wire brush and some emery paper and carefully clean the crowns of the pistons that are at TDC, if it has been bored previously you may be able to see the markings on the crown that show by how much (see below). As I understand it +1mm (2nd oversize) is the max for regular oversized pistons, after that it would be a liner or performance pistons (Wiseco, Wossner etc) which are 2 to 3 times the price of regular pistons.
Just out of interest, is the motor in your parts bike (the one with the banana frame that only turns left !) in any better shape than this one
I'll have to wait and see what the machine shop says regarding the block. This is a far cry from what I was hoping to buy regarding a KZ1000. I was wanting to buy one that I maybe had to throw some spark plugs in and clean the tank and that would be that.

www.flickr.com/gp/162005819@N03/J055kUZ1a8
1982 GS1100G
1997 Yamaha Vmax
1979 Kawasaki 1000
1982 GS1100G
1997 Yamaha Vmax
1979 Kawasaki 1000
Please Log in or Create an account to join the conversation.
- Wookie58
-
- Offline
- Moderator
-
Registered
- Posts: 5463
- Thanks: 3344
Re: 79 KZ1000 head removal
27 Apr 2022 06:30
You will get a huge sense of satisfaction when it fires for the first time
1982 KZ1000 Ltd
www.kzrider.com/forum/11-projects/617631...-82-begins?start=192
kzrider.com/filebase-alias?view=download...d-fault-diagnosis&ca
www.kzrider.com/forum/11-projects/617631...-82-begins?start=192
kzrider.com/filebase-alias?view=download...d-fault-diagnosis&ca
Please Log in or Create an account to join the conversation.
- Deuce
-
Topic Author
- Offline
- User
-
Registered
- Posts: 62
- Thanks: 4
Re: 79 KZ1000 head removal
30 Apr 2022 11:58I believe so, too.You will get a huge sense of satisfaction when it fires for the first time
I dropped the head off and I was supposed to get the carbs, but they weren't quite ready. Managed to wiggle the block up about 5/8ths inches on the bad side. The good side moves freely. Tapped on the piston using a wooden stick. Still looks pretty stuck. I cleaned it out and poured in some more of the concoction. I figure I'll have to let it sit a little to absorb in. After about 5 minutes, I noticed a bubble pop up on one side, and then the other. That's a good sign. I told the guy that's working on the other stuff I'd have that ready for him on Monday, so I hope it cooperates.
For my other bikes, eBay was my go-to place for parts, but something's happened to them in the past year or so. I couldn't find the gaskets I need. Where do you guys recommend I look?
www.flickr.com/gp/162005819@N03/J055kUZ1a8
1982 GS1100G
1997 Yamaha Vmax
1979 Kawasaki 1000
1982 GS1100G
1997 Yamaha Vmax
1979 Kawasaki 1000
Please Log in or Create an account to join the conversation.
- hardrockminer
-

- Offline
- Sustaining Member
-

Registered
- Posts: 3096
- Thanks: 1196
Re: 79 KZ1000 head removal
30 Apr 2022 12:10
The critical gasket is the two piece head gasket. I only use OEM, purchased from Partzilla. I normally use OEM base gaskets but will use Vesrah if OEM isn't available.
I have several restored bikes along with a 2006 Goldwing with a sidecar.
Please Log in or Create an account to join the conversation.
- Deuce
-
Topic Author
- Offline
- User
-
Registered
- Posts: 62
- Thanks: 4
Re: 79 KZ1000 head removal
01 May 2022 05:41Thank you! I'm assuming the Partzilla gasket will be both pieces? Otherwise, it's over 200 dollars. In your opinion, what issues crop up using a cheaper one?The critical gasket is the two piece head gasket. I only use OEM, purchased from Partzilla. I normally use OEM base gaskets but will use Vesrah if OEM isn't available.
www.flickr.com/gp/162005819@N03/J055kUZ1a8
1982 GS1100G
1997 Yamaha Vmax
1979 Kawasaki 1000
1982 GS1100G
1997 Yamaha Vmax
1979 Kawasaki 1000
Please Log in or Create an account to join the conversation.
- Rick H.
-

- Offline
- User
-
Registered
- Posts: 840
- Thanks: 241
Re: 79 KZ1000 head removal
01 May 2022 08:37
Deuce: There are some differences of opinions on which style of head gasket to use. Some like and stay with OEM type and others like a one piece arrangement. I opted for a one piece head gasket when I rebuilt the top end on my KZ-1000. I can't recall what exactly drove me to that decision as I tried to stay with OEM parts as much as possible. Guess the one piece just sounded like a better option at the time which is about 2 years ago now. At this point I don't recall who made the gasket, but I bought it from Redline (?) in Illinois and he swore by them at the time. Knock on wood, I haven't had any problems with leaks which is fine with me. Install for me had a bit of a learning curve as I had never installed a one piece before, but I assume I did it correctly. If you do some research on this forum you will no doubt run across several discussions about this subject. If I were to go with a 2 piece gasket I would try to stay with OEM regardless of the cost. My idea of a good time is NOT having to take something apart to re-fix it. Whichever way you go just use a really good torque wrench and remember to re-torque after the initial startup. I went with minimum torque values on mine to avoid stripping anything out. Ended up one and done. Good luck.
Rick H.
Rick H.
Rick H.
1977 Kawasaki KZ-1000A1
1977 Kawasaki KZ-1000A1
The following user(s) said Thank You: Street Fighter LTD, Deuce, Wookie58
Please Log in or Create an account to join the conversation.
- Deuce
-
Topic Author
- Offline
- User
-
Registered
- Posts: 62
- Thanks: 4
Re: 79 KZ1000 head removal
01 May 2022 08:53Great info. Thanks! In my mind, I would think the one piece would be easier to install, but then again, most of my repair experience is with vintage automotive.Deuce: There are some differences of opinions on which style of head gasket to use. Some like and stay with OEM type and others like a one piece arrangement. I opted for a one piece head gasket when I rebuilt the top end on my KZ-1000. I can't recall what exactly drove me to that decision as I tried to stay with OEM parts as much as possible. Guess the one piece just sounded like a better option at the time which is about 2 years ago now. At this point I don't recall who made the gasket, but I bought it from Redline (?) in Illinois and he swore by them at the time. Knock on wood, I haven't had any problems with leaks which is fine with me. Install for me had a bit of a learning curve as I had never installed a one piece before, but I assume I did it correctly. If you do some research on this forum you will no doubt run across several discussions about this subject. If I were to go with a 2 piece gasket I would try to stay with OEM regardless of the cost. My idea of a good time is NOT having to take something apart to re-fix it. Whichever way you go just use a really good torque wrench and remember to re-torque after the initial startup. I went with minimum torque values on mine to avoid stripping anything out. Ended up one and done. Good luck.
Rick H.
A little more tapping on that stuck piston and the block lifted off pretty effortlessly. The rings on that one piston stayed compressed.
Should I re-ring just the one, or all of them? Once I get the block to my guy, I guess that will tell me if it's going to have to be bored sleeved, or just honed.
Now, on to other parts I should get. Regarding the cam chain, is it best practice to replace it and guides as well? I was looking at this one pictured, and it felt too hard and has the chain indentations on it.
www.flickr.com/gp/162005819@N03/J055kUZ1a8
1982 GS1100G
1997 Yamaha Vmax
1979 Kawasaki 1000
1982 GS1100G
1997 Yamaha Vmax
1979 Kawasaki 1000
Please Log in or Create an account to join the conversation.
- Street Fighter LTD
-
- Offline
- Moderator
-
Registered
- TURBO, Its Better to be Blown than Injected
- Posts: 5014
- Thanks: 2207
Re: 79 KZ1000 head removal
01 May 2022 10:14
Glad to see you have the cylinder off
.
My 2 cents is pull the motor and split the cases. You need to inspect and clean properly the crank and trans for wear and water damage
Replace the camchain at this point and any worn cam chain, guides and rollers and gears that show wear.
Dont make a piston decision until the cylinder can be checked for size, wear and pitting
Pulling the motor is easy Especially with the top end off already and a minimal amount of extra gaskets will be needed
Dave
Original owner 78 1000 LTD
Mr Turbo Race Kit, MTC 1075 Turbo pistons by PitStop Performance , Falicon Ultra Lite Super Crank, APE everything. Les Holt @ PDM's Billet Goodies . Frame by Chuck Kurzawa @ Logghe Chassis . Deep sump 5qt oil pan. RIP Bill Hahn
The following user(s) said Thank You: Wookie58
Please Log in or Create an account to join the conversation.
Moderators: Street Fighter LTD