
Cam install help
- Scirocco
-

- Offline
- Premium Member
-

Registered
- Never change a running system
- Posts: 4397
- Thanks: 2262
Re: Cam install help
02 Jul 2021 12:19 - 02 Jul 2021 12:21I am working on the valve clearances. Was surprised at the small tolerances... .05 to .10 mm??? that' like a couple piece of paper. What's the best source for these 29 mm shims while I'm on the subject?
Just for your interrest, the BMW K750, K1000, F650, Yamaha XS750, XS850, XS1100 bike engine share the same 29 mm shim size if your Kawa dealer fail. Here is a full list of bikes sharing the same shim size and range. www.tills.de/product-320.html?language=en
My 1975 Z 1 B 900 Project
www.kzrider.com/forum/11-projects/605133...ears-deep-sleep-mode
www.kzrider.com/forum/11-projects/605133...ears-deep-sleep-mode
Last edit: 02 Jul 2021 12:21 by Scirocco.
The following user(s) said Thank You: Mikaw, 750 R1, Robb2018
Please Log in or Create an account to join the conversation.
- TexasKZ
-

- Busy
- Platinum Member
-

Registered
- Posts: 8293
- Thanks: 2737
Re: Cam install help
02 Jul 2021 13:37
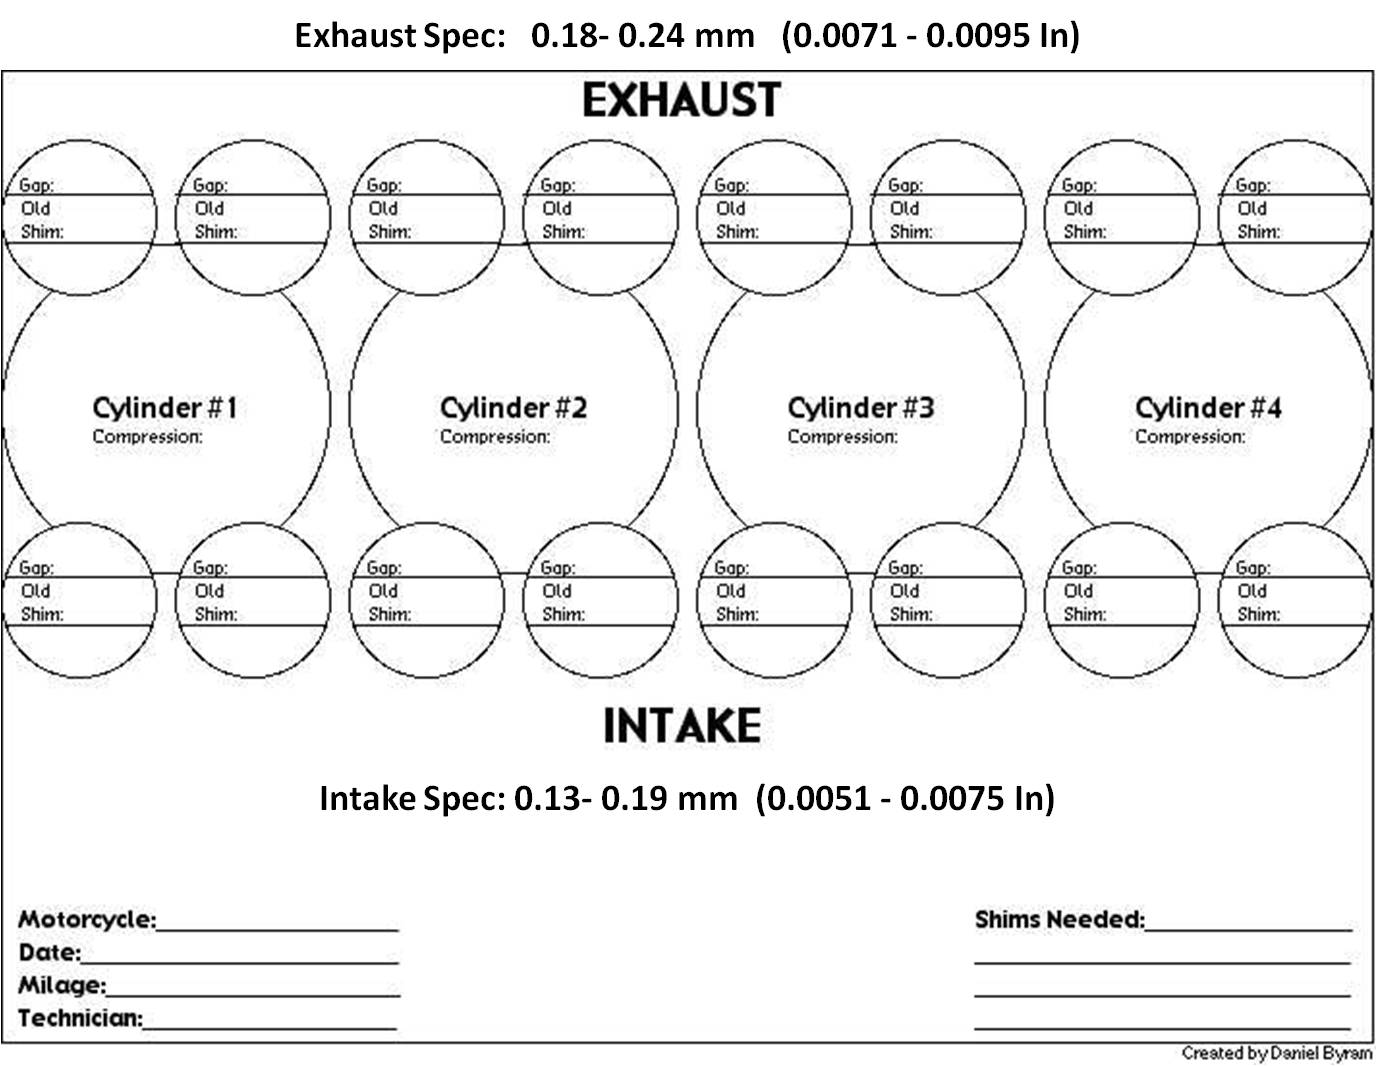
I find this helpful. It is for a 16 valve engine, so you need use only half of the little circles. Also ignore the adjustment specs.
1982 KZ1000 LTD parts donor
1981 KZ1000 LTD awaiting resurrection
2000 ZRX1100 not ridden enough
www.kzrider.com/forum/11-projects/620336...amateur-build-thread
1981 KZ1000 LTD awaiting resurrection
2000 ZRX1100 not ridden enough
www.kzrider.com/forum/11-projects/620336...amateur-build-thread
The following user(s) said Thank You: Mikaw, Robb2018
Please Log in or Create an account to join the conversation.
- loudhvx
-

- Offline
- KZr Legend
-

Registered
- Posts: 10863
- Thanks: 1622
Re: Cam install help
02 Jul 2021 14:34
I also find it helpful to record the new gap and new shim sizes after shim change to see if the gap changes in the future and to know what shims to get before the next adjustment.
1981 KZ550 D1 gpz.
Kz550 valve train warning.
Other links.
Kz550 valve train warning.
Other links.
Please Log in or Create an account to join the conversation.
- zed1015
-

- Offline
- User
-

Registered
- Posts: 3298
- Thanks: 2003
Re: Cam install help
02 Jul 2021 15:07Clearances need to be 0.10 to 0.15mm.I am working on the valve clearances. Was surprised at the small tolerances... .05 to .10 mm??? that' like a couple piece of paper. What's the best source for these 29 mm shims while I'm on the subject?
.05 to .10mm are the old Z1 clearances which were superseded.
Aim for the wider 0.15mm .
AIR CORRECTOR JETS FOR VM CARBS AND ETHANOL RESISTANT VITON CHOKE PLUNGER SEAL REPLACMENT FOR ALL CLASSIC AND MODERN MOTORCYCLE CARBURETTORS
www.kzrider.com/forum/23-for-sale/611992...lide-mikunis?start=1
www.kzrider.com/forum/23-for-sale/611992...lide-mikunis?start=1
Please Log in or Create an account to join the conversation.
- hardrockminer
-

- Offline
- Sustaining Member
-
Registered
- Posts: 3146
- Thanks: 1246
Re: Cam install help
02 Jul 2021 15:56 - 02 Jul 2021 16:04
A couple of things....
1) I wouldn't worry about a cam moving a degree or two. What's important is that your crank is set at TDC for #1/4 cylinders; that there is absolutely no slack in the chain below the head; that you have 28 links between the two cams and that the exhaust cam is set correctly on the mark. One or two degrees of movement is meaningless.The cam sprockets have 30 teeth, which means each tooth is 360/30, or 12 degrees. Your timing will be fine if the cam moves a little bit as long as the sprocket doesn't jump a tooth.
2) There is a correct sequence for tightening the cam bearing covers. It's in the Z1 manual. You can access a copy of the manual on this site.
3) To me the chain in your photo looks too tight. I think you're going to have a hard time putting the top idler in place. You haven't eliminated any slack...just moved it to below the head.
If I was having this problem I would look for other causes. The cam chain may be stretched, which means there is more slack than normal. This is bad. The chain is not on the bottom sprocket correctly, causing slack above the head. Or the head has been shaved, causing increased slack above the head and you need a thicker gasket.
I have several restored bikes along with a 2006 Goldwing with a sidecar.
Last edit: 02 Jul 2021 16:04 by hardrockminer.
Please Log in or Create an account to join the conversation.
- Robb2018
-
 Topic Author
- Offline
- User
-
Registered
- 76 KZ900 73 Z1 A
- Posts: 270
- Thanks: 28
Re: Cam install help
02 Jul 2021 20:27 - 02 Jul 2021 20:33
1. All good on that.
2. I have a hard copy of the FSM. Was using sequence but cam kept slipping. I modified it a little to make it work.
3. When I installed the idler tower it pushed the chain down to just the right amount of slack... took it up from the back side. The slack left on backside was tightened up when I installed the adjuster, just like it's supposed to. Things were a bit wonky during the process, not sure why. Always difficult picking up where someone else left off. Especially if the guy's dead.
The cam chain is routed properly. I pulled it through a whole bunch of times and even spun it with the starter a little. I think everything's OK.
KZ900; Z1
Last edit: 02 Jul 2021 20:33 by Robb2018.
Please Log in or Create an account to join the conversation.
- Robb2018
-
Topic Author
- Offline
- User
-
Registered
- 76 KZ900 73 Z1 A
- Posts: 270
- Thanks: 28
Re: Cam install help
21 Jul 2021 07:06
Started the Z1 today. I borrowed the battery out of my Triumph and rigged up a temporary fuel tank from an old pop bottle. With the exception of 4 stuck floats and a couple air leaks, it ran really good... no strange noises, accelerates smoothly. You can imagine what a load this is off my mind. I've been trying to get inside the head of the PO since I got the bike. I knew he at least had the cams out but don't know how far he got into the motor after that. I suspect he had the head off but that's just total speculation based on some tell tale signs I saw. So... waiting for the tank, tail and side covers to get back from the painter and I can take it for a ride. Thanks to all of you for the help you've given me. This place is the greatest. Pics to come when the tank gets here.... probably in a month or so.
KZ900; Z1
Please Log in or Create an account to join the conversation.
- DOHC
-

- Offline
- Sustaining Member
-
Registered
- Those Doe-Hawks really go!
- Posts: 1272
- Thanks: 601
Re: Cam install help
21 Jul 2021 21:07 - 21 Jul 2021 21:07I've been thinking about this thread, and I went back and reread the cam installation instructions in the FSM....all the while holding pressure on that cam sprocket bolt. With the screwdriver still in place to show how I held it, here's what it looks like with all the cam bolts torqued down. So later today when I install the idler tower and chain adjuster it will be able to take up that slack that had been ending up between the two cams. I'm still concerned about this because if this was how the installation procedure needed to be done, why am I the only one who had to do it this way. Without holding the cam in place with the screwdriver, when tightening the caps it has a natural tendency to rotate clockwise a degree or two and the manual makes no mention of having to hold it in place to keep it from rotating.
I understand your earlier concerns about the tensioner function made you nervous about rotating the engine, which makes sense. But it seems like it doesn't really matter how much slack there is on either side of the intake camshaft at that point in the process. I don't think you need to mess with locking the cam in place with a screwdriver.
As long as the following are true:
* crank is at TDC
* cam chain has no slack between the crank and the exhaust cam
* exhaust cam mark is flat with head
* correct number of chain links between exh and int cam marks
* top idler is installed
At that point, the next step is to rotate the crankshaft one full rotation clockwise before you lock the tensioner in place. Rotating the crankshaft will take up any random slack and put it all on the tensioner side, so the tensioner spring can take up that slack. Bringing the crank back to TDC should also put both cams in the correct position so you can confirm that you aligned the marks and chain links correctly.
I suppose if you had really high compression pistons some small initial intake cam misalignment could cause an issue, but I don't think the clearances are generally that tight.
Does that sound right?
")
'78 Z1-R in blue
, '78 Z1-R in black,
'78 Z1-R in pieces
My dad's '74 Z1
'00 ZRX1100
My dad's '74 Z1
'00 ZRX1100
Last edit: 21 Jul 2021 21:07 by DOHC.
The following user(s) said Thank You: Robb2018
Please Log in or Create an account to join the conversation.
- hardrockminer
-
- Offline
- Sustaining Member
-
Registered
- Posts: 3146
- Thanks: 1246
Re: Cam install help
22 Jul 2021 03:56
This are my installation checkpoints.
Ensure chain is on the crank sprocket (Rotate crank with kicker while holding chain taut and allowing it to slide through hand)
Crank set at TDC
No slack in the chain below the cams. (Hold it tight by hand with fingers spread)
Exhaust cam placed on the mark. (Ensure no slack below the mark)
Intake cam set in place. (#4 cam lobe will be facing exhaust cam lobe. Ensure no slack below the cam)
Install top idler
Install tensioner
Rotate crank with kicker to ensure valves open and close without touching.
I have several restored bikes along with a 2006 Goldwing with a sidecar.
The following user(s) said Thank You: Robb2018
Please Log in or Create an account to join the conversation.
- Robb2018
-
Topic Author
- Offline
- User
-
Registered
- 76 KZ900 73 Z1 A
- Posts: 270
- Thanks: 28
Re: Cam install help
22 Jul 2021 19:33 - 22 Jul 2021 19:40
Good post DOHC. Starting to make sense now. Rotating the motor clockwise would bring that slack right up to the idler tower and as long as the chain didn't jump, the timing wouldn't be effected; and once tight the 28th link would still align with the dot on the intake cam when the arrow on the exhaust cam was parallel to the surface of the head . The thing that kept stumping me was the tensioner was pushing against a tight chain that it wasn't going to move. Now, that slack needed to be on the back side of the intake cam so the tensioner could do its job. Rotating the crank is going to pull the exhaust cam which will take up the slack in the middle and firm it up to the idler, ending up on the back side between the crank and the intake cam... right where the tensioner needs it to be to do its job. Its all starting to make sense. Not totally, but starting to. This is basically where the motor was when I first opened it up... Cams installed, idle tower in place but enough slack for it to jump a tooth or two. So where I was at when I set it up, I couldn't install the tensioner because there was no slack on the backside between the crank and intake cam and I think if I had rotated it at that point it would have jumped some teeth again. So yeah... not totally clear yet.
KZ900; Z1
Last edit: 22 Jul 2021 19:40 by Robb2018.
Please Log in or Create an account to join the conversation.
- hardrockminer
-
- Offline
- Sustaining Member
-
Registered
- Posts: 3146
- Thanks: 1246
Re: Cam install help
23 Jul 2021 04:17
You don't want any slack on the backside. It's not needed to install the tensioner. Any slack in the chain should be between the two cams.
Just slide the tensioner pusher into the shell by hand and tighten down the bolt to hold the pusher while you bolt the tensioner onto the engine. Then release the tensioner bolt and retighten it.
Just slide the tensioner pusher into the shell by hand and tighten down the bolt to hold the pusher while you bolt the tensioner onto the engine. Then release the tensioner bolt and retighten it.
I have several restored bikes along with a 2006 Goldwing with a sidecar.
Please Log in or Create an account to join the conversation.
- Robb2018
-
Topic Author
- Offline
- User
-
Registered
- 76 KZ900 73 Z1 A
- Posts: 270
- Thanks: 28
Re: Cam install help
23 Jul 2021 05:45 - 23 Jul 2021 05:46
Well, no matter where the slack is, as long as the exhaust cam is on the mark and the 28 pin lines up on the mark on the intake cam, when the crank rotates, it pulls the exhaust cam which tightens up the chain to the idler and what slack is left over ends up on the backside between the crank and the intake cam, where it's taken up by the tensioner. Like DOHC said though, had I just installed the idler and slowly rotated the crank it would have tightened everything the way it should be and as long as the chain didn't jump, it would be timed. But when doing the install, with all the slack between the cams, I couldn't install the tensioner because with no slack on the backside it wouldn't fit, was just jamming up against a tight chain. With enough pressure it could have pulled the intake cam counter clockwise but it would have taken more force than I was feeling good about giving to do that. I think I may have had the guide on the intake cam jammed in the journal the first time I went through it. After Steve mentioned that and I corrected it, I just held the intake cam with a big screw driver to keep it from rotating and pulling the slack into the middle while I tightened the caps... which worked.
KZ900; Z1
Last edit: 23 Jul 2021 05:46 by Robb2018.
Please Log in or Create an account to join the conversation.
Moderators: Street Fighter LTD