
Cam install help
- Robb2018
-
 Topic Author
- Offline
- User
-

Registered
- 76 KZ900 73 Z1 A
- Posts: 270
- Thanks: 28
Re: Cam install help
01 Jul 2021 20:50 - 01 Jul 2021 20:55
Rick H. said: "I seem to recall the OP mentioning a strange snap sound when he was doing something with the cam chain adjuster awhile back but I don’t know if that was sorted out."
Yes, that may have been a little misleading. I had taken the valve cover off for a general inspection and to check valve clearances. When I turned the crank the chain jumped a link.. not bad enough to hit a valve. The chain was pretty loose so I removed the tensioner. The tensioner assembly (#10 in diagram) was jammed on something, probably the chain. I pushed against it with my finger and it snapped free. There really was no strange "pop". But this is the condition the PO left the bike in before he passed away in January, so there's no asking him what was up last he was inside the motor.
I've determined so far that the adjuster is working properly. I installed it without the cam caps in and the cam lobes all laying on their sides so it would lay flat. I loosened the nut and the adjuster snapped in place and tightened the chain. Also, 99.999 % sure the chain is routed properly. For all I know Rick, there IS nothing wrong and I'm just in unfamiliar territory never having had the cams out on a Z or KZ before and other bikes I've done this procedure before, their was a bunch of slack on the back of the intake cam which was tightened up when the adjuster was installed end of story. I stopped because things just don't seem right. After the cams are bolted down there IS no slack on the intake side, it's all in the middle between the cams. Maybe I should just put the intake cam and the idler back in and install the adjuster and see if that magically makes it all right. I can't see this happening though since after I torqued down the caps on both cams and installed the idler, there was so much slack between the cams that the chain didn't even touch the idler so seemed a waste of time at that point to install the adjuster.
KZ900; Z1
Last edit: 01 Jul 2021 20:55 by Robb2018.
Please Log in or Create an account to join the conversation.
- Robb2018
-
Topic Author
- Offline
- User
-
Registered
- 76 KZ900 73 Z1 A
- Posts: 270
- Thanks: 28
Re: Cam install help
01 Jul 2021 21:16 - 02 Jul 2021 13:41The #1 and #3 cam caps have a guide milled in them so the cams won't walk side to side. Did you pinch the #3 cap on the cam making it immovable. I've had that happen more than once. Is there still slack at the idler between the cams?
Steve
Steve, there is a distinct possibility this happened. But I would have had to have done it several times as I've had that intake cam out and reinstalled it at least 4 times. But, like they say, the definition of insanity is doing the same thing over and over and expecting different results. That #3 cap is a bitch because the 2nd lobe is pointing almost straight down at that point, so getting it jammed wouldn't be hard to do. But when the adjuster is installed and the spring released and the plunger pushes on the chain, will it rotate the intake cam a degree or so counter clockwise? Because it seems that this would make everything right.. would pull out all that excess slack between the cams so the idler could actually idle on something. First thing I'm doing tomorrow morning is reinstalling the intake cam being extremely mega careful I don't pinch that #3 cap.
KZ900; Z1
Last edit: 02 Jul 2021 13:41 by Robb2018.
Please Log in or Create an account to join the conversation.
- SWest
-

- Offline
- Sustaining Member
-

Registered
- 10 22 2014
- Posts: 23750
- Thanks: 3022
Re: Cam install help
01 Jul 2021 22:08
Make sure of your count, install the IN cam then the idler. If you did pinch the cam cap you should see it. A small amount of crushed aluminum. Clean that up and tighten down. If still too much slack use a screw driver the rotate the cam back so the slack will be behind it. If you get that far the adjuster should work.
Steve
Steve
Z1b1000 1975 Z1b
kzrider.com/forum/11-projects/598262-kz-...-will-it-live#672882
kzrider.com/forum/2-engine/597654-poser?start=240#704229
kzrider.com/forum/11-projects/598262-kz-...-will-it-live#672882
kzrider.com/forum/2-engine/597654-poser?start=240#704229
The following user(s) said Thank You: Robb2018
Please Log in or Create an account to join the conversation.
- hardrockminer
-

- Offline
- Sustaining Member
-
Registered
- Posts: 3146
- Thanks: 1246
Re: Cam install help
02 Jul 2021 04:31
I wonder if the chain is properly located on the crank sprocket? When I install the cams I start by holding the chain in my spread fingers and then rotating the crank to ensure the chain is properly located on the crank. Then without allowing any slack, set the crank at TDC. Then without allowing any slack I install the exhaust cam on the mark. Then I install the intake cam. I look at both #4 cams...the lobes should be facing each other if everything is correct.
With a very red face I can add that I once installed the head without any gaskets in place. I had a LOT of slack!
With a very red face I can add that I once installed the head without any gaskets in place. I had a LOT of slack!
I have several restored bikes along with a 2006 Goldwing with a sidecar.
The following user(s) said Thank You: Robb2018
Please Log in or Create an account to join the conversation.
- Robb2018
-
Topic Author
- Offline
- User
-
Registered
- 76 KZ900 73 Z1 A
- Posts: 270
- Thanks: 28
Re: Cam install help
02 Jul 2021 05:51
This also is a distinct possibilitty. I'll check for that.
KZ900; Z1
Please Log in or Create an account to join the conversation.
- Robb2018
-
Topic Author
- Offline
- User
-
Registered
- 76 KZ900 73 Z1 A
- Posts: 270
- Thanks: 28
Re: Cam install help
02 Jul 2021 06:49 - 02 Jul 2021 06:52
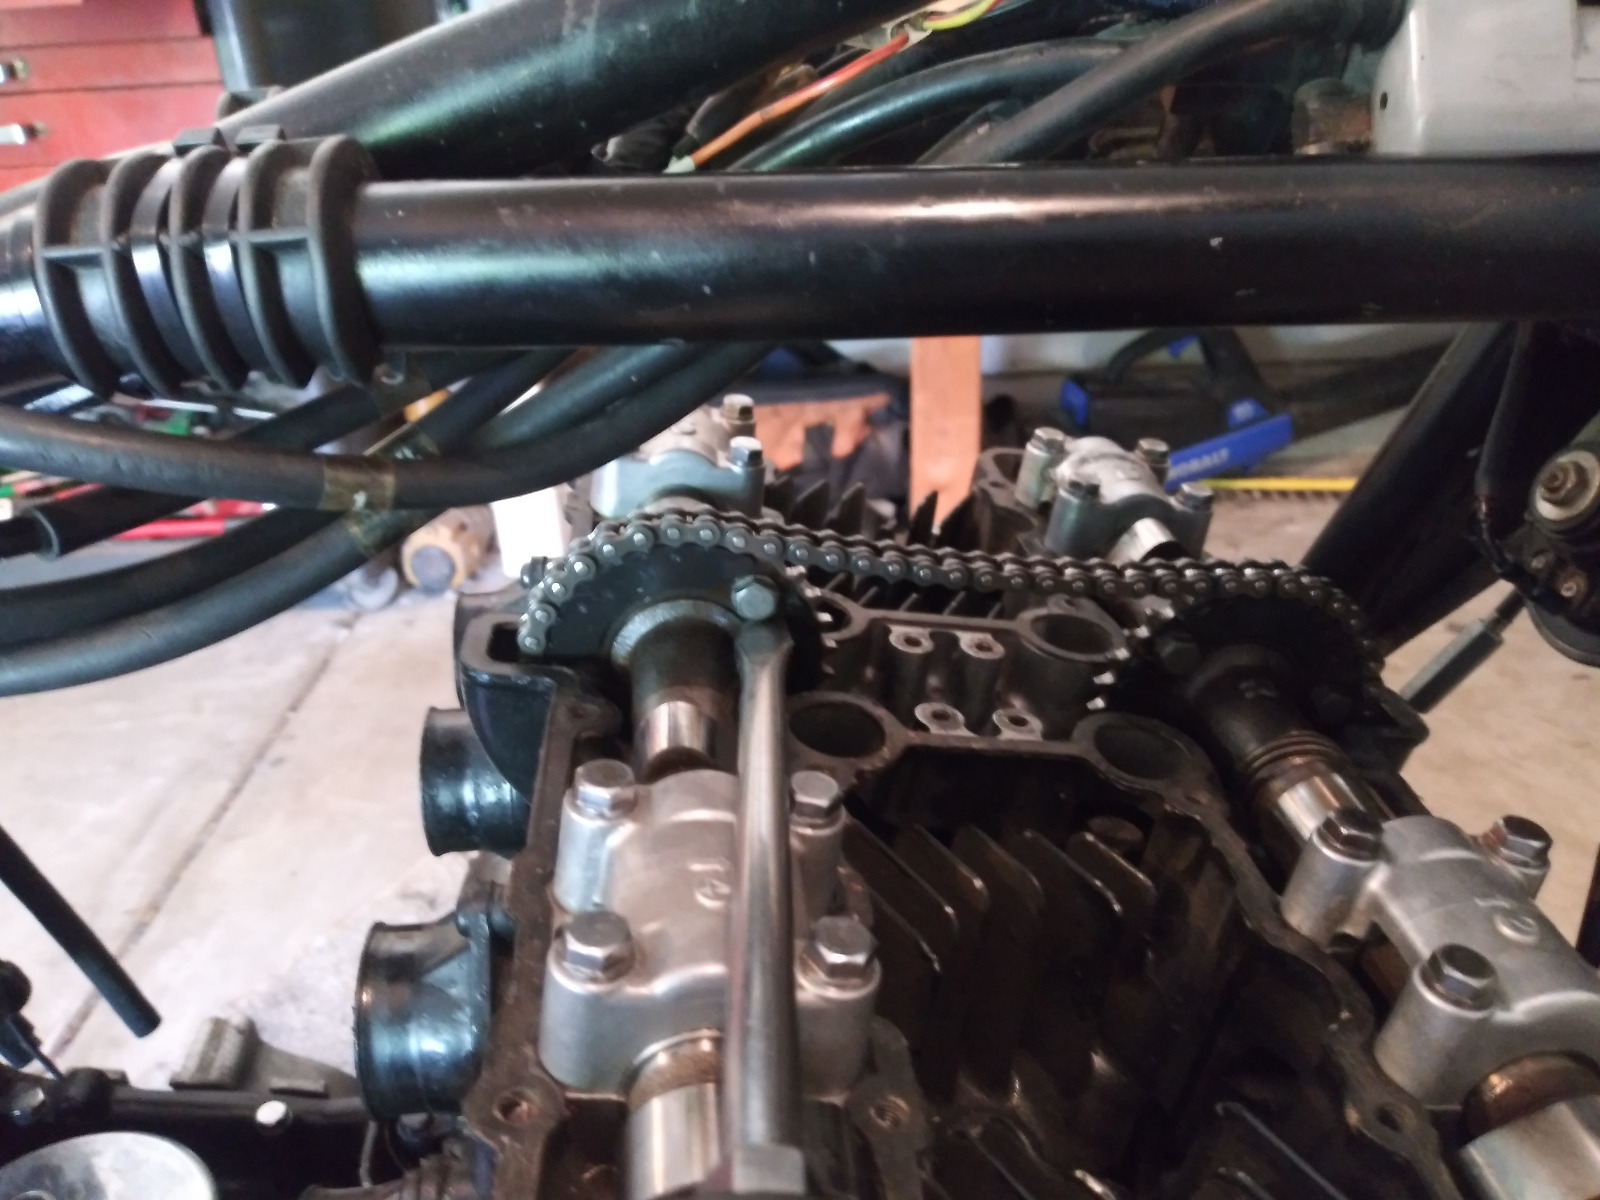
Well here's what I just did: As per Steve's instructions, I reinstalled the intake cam but this time instead of progressively tightening from inside to outside, with great fear of busting another cap, I tightened the two inside bolts on 3 about half way down, holding a big screwdriver on the cam bolt so the cam couldn't rotate clockwise. Then I snugged up the 4 bolts on #4, and then crisscrossed tightened the rest of the bolts on #3, all the while holding pressure on that cam sprocket bolt. With the screwdriver still in place to show how I held it, here's what it looks like with all the cam bolts torqued down. So later today when I install the idler tower and chain adjuster it will be able to take up that slack that had been ending up between the two cams. I'm still concerned about this because if this was how the installation procedure needed to be done, why am I the only one who had to do it this way. Without holding the cam in place with the screwdriver, when tightening the caps it has a natural tendency to rotate clockwise a degree or two and the manual makes no mention of having to hold it in place to keep it from rotating. That's why the PO left it this way and why it kept ending up with all the slack between the two cams each time I tightened the IN cam down. So, I'm feeling a little relieved yet still a little concerned.
KZ900; Z1
Last edit: 02 Jul 2021 06:52 by Robb2018.
Please Log in or Create an account to join the conversation.
- SWest
-
- Offline
- Sustaining Member
-
Registered
- 10 22 2014
- Posts: 23750
- Thanks: 3022
Re: Cam install help
02 Jul 2021 08:16
I didn't know you had broken one cap. That may be a problem as they aren't all the same. The one you are using may be too tight. Having no slack between the cams might bend a valve. You must leave some slack for the idler. Without it the timing will be off. I suggest using the broken cap to put it together then use the screw driver to rotate the IN cam backwards to bring the slack to the rear of the engine. Once you have the tensioner in place and adjusted you can rotate the engine two full cycles by hand to see if there's any restriction. Check the clearances again to see if any valves have made contact with a piston. It will be obvious if it had. If all is well you can try the new (foreign) cap to see if there's any drag. It doesn't take much to bend a valve. If any problems the head has to come off for a closer look.
Steve
Steve
Z1b1000 1975 Z1b
kzrider.com/forum/11-projects/598262-kz-...-will-it-live#672882
kzrider.com/forum/2-engine/597654-poser?start=240#704229
kzrider.com/forum/11-projects/598262-kz-...-will-it-live#672882
kzrider.com/forum/2-engine/597654-poser?start=240#704229
The following user(s) said Thank You: Robb2018
Please Log in or Create an account to join the conversation.
- Robb2018
-
Topic Author
- Offline
- User
-
Registered
- 76 KZ900 73 Z1 A
- Posts: 270
- Thanks: 28
Re: Cam install help
02 Jul 2021 09:30
Steve, The cap in question was number 1 and had broken right in the middle between the two bearings. I drilled 4 holes in a 1/4" steel plate to correspond to the holes in the cap and bolted it in place to keep it square and had a guy TIG weld it. It's good as new and bearings were all put back in their proper spots. I just did all you suggested. As I installed the idler, it pushed the chain down to where it should be and installing the adjusted took out the slack on the back side. I pulled it through a whole bunch of times and it's all good. Thanks for your help. I think we can close this file. I think a couple things were happening... the intake cam was binding in that place you suggested which made it nearly impossible to take the slack out of the center with the adjuster. As it ended up it still needed some help with the screwdriver at the end. Now to adjust the valve clearances. I have a feeling they're going to be out big time as most of the shims barely clear the top of the bucket. But big relief getting this conundrum out of the way.
KZ900; Z1
The following user(s) said Thank You: SWest
Please Log in or Create an account to join the conversation.
- SWest
-
- Offline
- Sustaining Member
-
Registered
- 10 22 2014
- Posts: 23750
- Thanks: 3022
Re: Cam install help
02 Jul 2021 10:53
Keep us up to date on this thread. It's good for newbies that find themselves in the same spot.
Good luck on the valves.

Steve
Good luck on the valves.
Steve
Z1b1000 1975 Z1b
kzrider.com/forum/11-projects/598262-kz-...-will-it-live#672882
kzrider.com/forum/2-engine/597654-poser?start=240#704229
kzrider.com/forum/11-projects/598262-kz-...-will-it-live#672882
kzrider.com/forum/2-engine/597654-poser?start=240#704229
The following user(s) said Thank You: Robb2018
Please Log in or Create an account to join the conversation.
- Mikaw
-
- Offline
- Sustaining Member
-
Registered
- Posts: 4825
- Thanks: 1852
Re: Cam install help
02 Jul 2021 11:27
So I was correct in stating as the IN cam was tightened it was rotating clockwise pulling all the slack to the top. Just didn’t know why and it sounds like you still don’t know why. Like Steve said this will be a good learning thread for all. Hope your actually past this and just working on valve lash. Did you check the cam chain for stretch?
1976 KZ 900 A4
kzrider.com/forum/11-projects/613548-1976-kz-900-a4
1976 KZ 900 B1 LTD
1978 KZ 1000 B2 LTD
1980 KZ 750 E1
Kowledge Speaks, But Wisdom Listens.
Jimi Hendrix.
1976 KZ 900 B1 LTD
1978 KZ 1000 B2 LTD
1980 KZ 750 E1
Kowledge Speaks, But Wisdom Listens.
Jimi Hendrix.
Please Log in or Create an account to join the conversation.
- Robb2018
-
Topic Author
- Offline
- User
-
Registered
- 76 KZ900 73 Z1 A
- Posts: 270
- Thanks: 28
Re: Cam install help
02 Jul 2021 11:51
Yes Mikaw that's exactly what was happening. Why? My guess is as pressure is put on the cam pushing it down, it wants to follow the path of least resistance from the lobes that are pointed down at the buckets. But this doesn't seem to be a common problem with other members, so yeah, still a big question mark.
I am working on the valve clearances. Was surprised at the small tolerances... .05 to .10 mm??? that' like a couple piece of paper. What's the best source for these 29 mm shims while I'm on the subject?
I am working on the valve clearances. Was surprised at the small tolerances... .05 to .10 mm??? that' like a couple piece of paper. What's the best source for these 29 mm shims while I'm on the subject?
KZ900; Z1
Please Log in or Create an account to join the conversation.
- Mikaw
-
- Offline
- Sustaining Member
-
Registered
- Posts: 4825
- Thanks: 1852
Re: Cam install help
02 Jul 2021 12:12 - 02 Jul 2021 13:02
The best source is your own engine. Take the time to feeler gauge all of your valve lash on each valve, record it and then pull the shim and note the shim number along with the current lash. Do this for all of your valves first, normally you can swap shims from A to B and typically only need one or two different, new shims. Once you know the size evil Bay pricing is consistent with everyone else. Just make sure you only use Kawasaki OEM shims
EDIT, Once you get your new shim, install that one first then take the shim out of that bucket and look through your list and figure where it needs to go and swap that one out next continue that process until they are all Lashed correctly. Never rotate that engine without a shim in the bucket
EDIT, Once you get your new shim, install that one first then take the shim out of that bucket and look through your list and figure where it needs to go and swap that one out next continue that process until they are all Lashed correctly. Never rotate that engine without a shim in the bucket
1976 KZ 900 A4
kzrider.com/forum/11-projects/613548-1976-kz-900-a4
1976 KZ 900 B1 LTD
1978 KZ 1000 B2 LTD
1980 KZ 750 E1
Kowledge Speaks, But Wisdom Listens.
Jimi Hendrix.
1976 KZ 900 B1 LTD
1978 KZ 1000 B2 LTD
1980 KZ 750 E1
Kowledge Speaks, But Wisdom Listens.
Jimi Hendrix.
Last edit: 02 Jul 2021 13:02 by Mikaw.
The following user(s) said Thank You: Robb2018
Please Log in or Create an account to join the conversation.
Moderators: Street Fighter LTD