
cam install
- kayodash
-
 Topic Author
- Offline
- User
- Posts: 103
- Thanks: 0
cam install
10 May 2016 06:17
Hey guys I'm back.... Again.. 84 kz550 ltd... Straight forward.. Any tricks on getting the cams installed?? Auto tensioner... Should I take that out and put it back on when the cams are on? I just can't quite get the marks to line up.. Worked on it for 3 hrs last night. So I figured I'd ask you wonderful people here.
1984 Kawasaki KZ550 LTD F2
1981 Kawasaki KZ750 LTD
1981 Kawasaki KZ750 LTD
Please Log in or Create an account to join the conversation.
- SWest
-

- Offline
- Sustaining Member
- 10 22 2014
- Posts: 23352
- Thanks: 2887
Re: cam install
10 May 2016 06:21
Do you have a manual? Don't put the cover on with the adjuster still on the engine. Loud has manuals in his signature.
Steve
Steve
Z1b1000 1975 Z1b
kzrider.com/forum/11-projects/598262-kz-...-will-it-live#672882
kzrider.com/forum/2-engine/597654-poser?start=240#704229
kzrider.com/forum/11-projects/598262-kz-...-will-it-live#672882
kzrider.com/forum/2-engine/597654-poser?start=240#704229
Please Log in or Create an account to join the conversation.
- kayodash
-
Topic Author
- Offline
- User
- Posts: 103
- Thanks: 0
Re: cam install
10 May 2016 07:01
Yes I have manual. I've got the info from loud. Removed the spring, cap and wedge wasn't sure if whole tensioner should come out too manual doesn't specify. Or any tricks on gettin the cams lined up.
1984 Kawasaki KZ550 LTD F2
1981 Kawasaki KZ750 LTD
1981 Kawasaki KZ750 LTD
Please Log in or Create an account to join the conversation.
- wrenchmonkey
-
- Offline
- User
- Posts: 568
- Thanks: 75
Re: cam install
10 May 2016 07:03
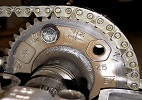
In a nutshell:
Cam chain tensioner is removed
Timing mark is set on the line
Front exhaust cam gear is aligned to case top
Count back number of pins on the cam chain as indicated by manual
Rear cam gear is thus, aligned
I fell into this problem with my '82 550a not too long ago. Couldn't seem to get the two gears aligned as per the manuals.
Problem one - I was using the Clymer manual which is somewhat vague and/or plainly wrong
Problem two - I wasn't depressing the cam chain between the gears once set, so the rear intake cam gear was always rotated backward beyond what the manual stipulates - and here in lay the rub - the cam chain will be deflected downward between the gears ONCE the valve cover is bolted down (hence why you must remove your auto-tensioner to allow slack in the chain.
I ended up doing this process 4 times, my first time ever adjusting my 550a valves due to using the Clymer manual. Hope you have better luck!
Notice how the cam chain is straight across?
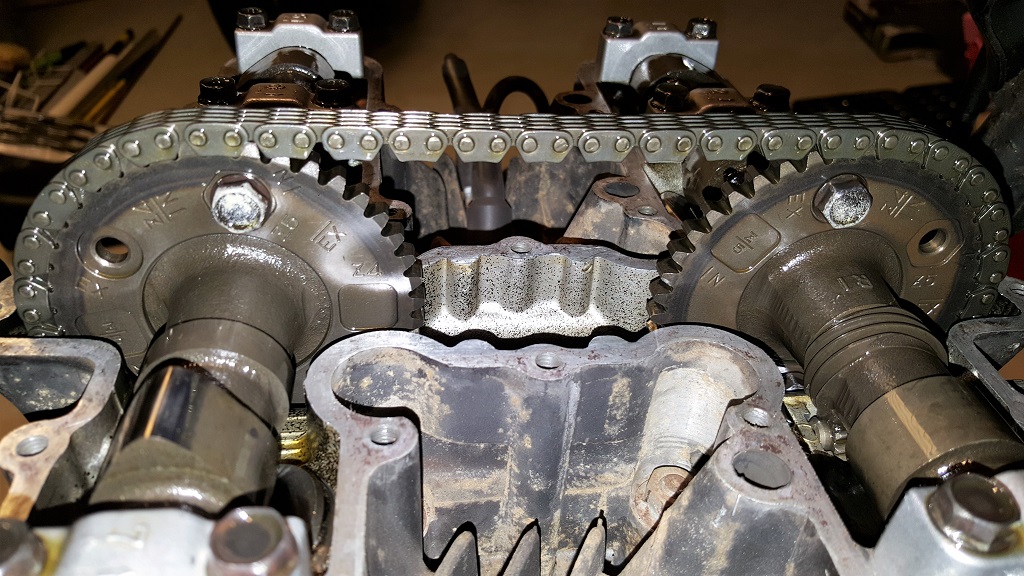
The valve cover has a plastic/nylon guide which causes the chain to deflect downward between the two gears and until you press your thumb down upon the chain with the auto-tensioner removed, your rear cam gear won't appear as the manual stipulates.
Cam chain tensioner is removed
Timing mark is set on the line
Front exhaust cam gear is aligned to case top
Count back number of pins on the cam chain as indicated by manual
Rear cam gear is thus, aligned
I fell into this problem with my '82 550a not too long ago. Couldn't seem to get the two gears aligned as per the manuals.
Problem one - I was using the Clymer manual which is somewhat vague and/or plainly wrong
Problem two - I wasn't depressing the cam chain between the gears once set, so the rear intake cam gear was always rotated backward beyond what the manual stipulates - and here in lay the rub - the cam chain will be deflected downward between the gears ONCE the valve cover is bolted down (hence why you must remove your auto-tensioner to allow slack in the chain.
I ended up doing this process 4 times, my first time ever adjusting my 550a valves due to using the Clymer manual. Hope you have better luck!
Notice how the cam chain is straight across?
The valve cover has a plastic/nylon guide which causes the chain to deflect downward between the two gears and until you press your thumb down upon the chain with the auto-tensioner removed, your rear cam gear won't appear as the manual stipulates.
Please Log in or Create an account to join the conversation.
- kayodash
-
Topic Author
- Offline
- User
- Posts: 103
- Thanks: 0
Re: cam install
10 May 2016 07:39
ok tonight ill pop off the tensioner. i thought only the wedge and spring had to be taken out to allow the tensioner to retract. but ill pop her off and give her a whirl. not to be rude, but by the picture. it doesnt look exactly lined up on the intake side. I'm pretty new to motorcycle mechanics so I'm asking question to not mess up. do the lines have to be exactly lined up or is there some wiggle room?
1984 Kawasaki KZ550 LTD F2
1981 Kawasaki KZ750 LTD
1981 Kawasaki KZ750 LTD
Please Log in or Create an account to join the conversation.
- Nessism
-

- Offline
- Sustaining Member
- Posts: 7676
- Thanks: 3052
Re: cam install
10 May 2016 07:42 - 10 May 2016 07:44
If you have the cross wedge type tensioner there is no need to remove it. Just remove the spring cap and spring, and pull back on the wedge slightly to make sure it's not jammed in tight. The tensioner plunger spring will push on the chain, but when you pull the chain tight to install the intake cam the plunger will move back to the proper position. After you get everything aligned properly and install the valve cover back on, the last thing you do is install the tensioner spring cap back on.
A few suggestions which may help you...
- remove the round ignition plate and let it dangle on it's wires. It's much easier to see the 1-4 T mark this way.
- Align 1-4 T, pull up on cam chain in front and install the exhaust cam. Aim the EX mark slightly down because when you tighten the cam caps the mark will align with the gasket surface.
- After you snug up on the exhaust cam caps double check the 1-4 T and make sure the EX mark is properly aligned. Only then can you move to do the intake cam.
- install the intake cam, counting the link pins on the chain per the manual. Snug down on the cam cap screws.
- install the tensioner cross wedge spring and lighten tighten the cap. This will allow you to turn over the engine without fear of the chain jumping any teeth. Spin the engine over with a wrench a couple of turns and then double check the cam timing. Assuming all is well, remove the tensioner spring cap and spring once more and install the cam cover. Last step is installing the tensioner spring and tighten down the cap firmly.
Ed
Carb O-ring Kits : www.kzrider.com/forum/3-carburetor/61807...-o-ring-kits?start=0
www.kzrider.com/forum/faq-wiki/618026-new-owner-things-to-know
1981 KZ750E2
www.kzrider.com/forum/11-projects/604901...z750e-project-thread
Carb O-ring Kits : www.kzrider.com/forum/3-carburetor/61807...-o-ring-kits?start=0
www.kzrider.com/forum/faq-wiki/618026-new-owner-things-to-know
1981 KZ750E2
www.kzrider.com/forum/11-projects/604901...z750e-project-thread
Last edit: 10 May 2016 07:44 by Nessism.
The following user(s) said Thank You: kosh3rhalal
Please Log in or Create an account to join the conversation.
- kayodash
-
Topic Author
- Offline
- User
- Posts: 103
- Thanks: 0
Re: cam install
10 May 2016 07:58
ok ill also try aiming it down. if i can remember right it seems last night i was leveling it just above surface. (bottom of the wording EX level with surface) because once i tighten down the caps it brings it down a little closer to the line. but i do think actually that when i tried the intake side it would roll off the T. who knows. what i do know is that on my 750, Im gonna ziptie the chain to the sprocket and do one cam at a time. so hopefully i dont have to deal with this again
1984 Kawasaki KZ550 LTD F2
1981 Kawasaki KZ750 LTD
1981 Kawasaki KZ750 LTD
Please Log in or Create an account to join the conversation.
- kayodash
-
Topic Author
- Offline
- User
- Posts: 103
- Thanks: 0
Re: cam install
10 May 2016 08:06
i do know that when i lined up the exhaust side. if i tried putting the intake on it would roll off the T 1-4 mark. how do i not let that happen?
1984 Kawasaki KZ550 LTD F2
1981 Kawasaki KZ750 LTD
1981 Kawasaki KZ750 LTD
Please Log in or Create an account to join the conversation.
- SWest
-
- Offline
- Sustaining Member
- 10 22 2014
- Posts: 23352
- Thanks: 2887
Re: cam install
10 May 2016 08:07
Take the plugs out.
Steve
Steve
Z1b1000 1975 Z1b
kzrider.com/forum/11-projects/598262-kz-...-will-it-live#672882
kzrider.com/forum/2-engine/597654-poser?start=240#704229
kzrider.com/forum/11-projects/598262-kz-...-will-it-live#672882
kzrider.com/forum/2-engine/597654-poser?start=240#704229
Please Log in or Create an account to join the conversation.
- loudhvx
-

- Offline
- KZr Legend
- Posts: 10864
- Thanks: 1618
Re: cam install
10 May 2016 08:20
The rolling off the mark is not from compression unless you are spinning the motor full rotations. That should not be necessary. Don't worry about the plugs.
As Ed Nessism said, you only need to remove the cap/spring and make sure the crosswedge is moved outward a bit.
Kayodash wrote:
I tighten the camshaft caps with the chain off (laying on the cams). I only start timing the cams after they are full installed.
As Ed Nessism said, you only need to remove the cap/spring and make sure the crosswedge is moved outward a bit.
Kayodash wrote:
If the BOTTOM of "EX" is lined up, then you are off by a tooth. You will need to walk the chain over the sprocket....(bottom of the wording EX level with surface)...
I tighten the camshaft caps with the chain off (laying on the cams). I only start timing the cams after they are full installed.
1981 KZ550 D1 gpz.
Kz550 valve train warning.
Other links.
Kz550 valve train warning.
Other links.
Please Log in or Create an account to join the conversation.
- loudhvx
-
- Offline
- KZr Legend
- Posts: 10864
- Thanks: 1618
Re: cam install
10 May 2016 08:38 - 10 May 2016 08:46
I'm sure there are many ways to do it, but the way I found works best for me is:
1) confirm the crank is at 1-4 TDC.
2) lay the cams in place (with sprockets) so the end notches point outward.
3) very methodically tighten the caps so the camshaft goes down evenly. don't tighten any more than others because the camshaft will want to rock into position. If the low end isn't allowed to rise, the camshaft will bind.
4) remove the sprocket screws and let the sprocket slide off the flange onto the shaft portion.
5) now it's really easy to time the sprockets and slide them up onto the flanges to check the position. (Crank will not move.)
6) when the sprockets are timed, I rotate the cams slightly so the sprocket screws can be installed.
7) torque the sprocket screws ( it says to use threadlocker, but I don't and have gotten away with it. It makes a mess when removing the screws. Use a towel to catch the bits of old thread locker. I then clean them up on a wire wheel.
You can shortcut this by not removing the sprockets, but then it is a lot more juggling when installing the cams and getting the timing to work out correctly. I just learned my method and stuck with it. Since my way does not affect the crank until after the sprocket are timed, there is no issue with the crank rolling off TDC.
But the sprocket screws are not easy to remove after the chain is off and cams are loose. They are threadlocked. I do this before removing the cams, so I can use the motor to stop the sprockets from turning. You can try to use a screwdriver as a bar against the 10mm socket to stop the cam from rotating.
Sometimes the chain can get balled up at the bottom of the motor. If you think this has happened, rock the crankshaft back and forth a little while pulling up on the chain. Then make sure to put the crank back to TDC.
Remember, there is always spring tension acting on the chain because of the tensioner. But this should be easy to overcome by pulling on the chain. The tensioner is free to retract, so it should give back the slack.
When you tighten the cams initially, you should be using a nut-driver type tool... nothing with any leverage. If you can't install it with a nutdriver, something is bound up. Start over.
Before doing any of this, make sure all of the oil is out of the cap screw holes. Excess oil will contribute to stripping the threads due to hydrostatic locking. Same goes for the valve cover screws. Make sure there is absolutely no sealer in them either.
Sealer and oil don't compress, but they make the screw feel easy to turn. That leads to cleanly stripped threads.
You can go slightly lower on the torque than the manual specifies and be safe,
1981 KZ550 D1 gpz.
Kz550 valve train warning.
Other links.
Kz550 valve train warning.
Other links.
Last edit: 10 May 2016 08:46 by loudhvx.
Please Log in or Create an account to join the conversation.
- kayodash
-
Topic Author
- Offline
- User
- Posts: 103
- Thanks: 0
Re: cam install
10 May 2016 09:08
loud, are you saying to put the cams on. line them up. then attach chain?
1984 Kawasaki KZ550 LTD F2
1981 Kawasaki KZ750 LTD
1981 Kawasaki KZ750 LTD
Please Log in or Create an account to join the conversation.