
- Posts: 6650
- Thank you received: 540
KZ750 LTD H2 1981 NEW BUILD FIRST ENGINE START
- MFolks
-

- Offline
- User
Less
More
16 Aug 2010 18:55 #391518
by MFolks
1982 GPZ1100 B2
General Dynamics/Convair 1983-1993
GLCM BGM-109 Tomahawk, AGM-129A Advanced Cruise Missile (ACM)
Replied by MFolks on topic KZ750 LTD H2 1981 PROJECT BIKE - ENGINE START
Do not use the hex headed bolt to turn the engine over, rather the "Nut" underneath. It seems if the hex bolt is used and snaps off inside the crankshaft, more than a "Bother" to get it out will ensue.
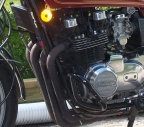
Your picture shows the mechanical igniton advancer that will retard/advance the timing as the rpm changes.The "Pulsing" or pickup coils will be on both side of the advancer mounted with the screws shown.
Here's a test procedure I wrote up about checking those pick up coils:
Ohm Checking Pickup(Pulsing) Coils
The pickup coils on the Kawasaki’s with the factory supplied electronic ignition can sometimes fail or become intermittent due to heat and vibration.
1.Trace back from where the pick up coils are mounted,(under a right side CD sized cover) locate and disconnect a small 4 pin connector. Using a multi-meter set on OHMS and range of 2K, check between the BLUE and BLACK wires(#1 and #4 sparkplug wires) for between 360- 540 OHMS.
2.For #2 and #3 sparkplugs the wire colors will be YELLOW and RED, again 360-540 OHMS.
3.If the pickup coils are suspect of failing due to heat, they can be stressed using a hair dryer without the need of the engine running.
4.A replacement set of pickup coils might be obtained from a dealer who serviced the police Kawasaki’s.
5. If replacement pickup coils are not available, your next choice would be to order a Dyna “S†electronic ignition system from www.z1enterprises.com It replaces the IC igniter with a smaller module located where the mechanical ignition advancer was mounted.
6. Checking with Kawasaki.com website has determined that the Pick up(pulsing) coils are available . The pulsing coil # is 59026-1133 and replaces the older # 1002, 1012 which were used from the MKII motors until the 2005 P24.
7.Check the small 4 pin connector that the pickup coils connect to for corrosion/loose pins too.
And the popular ignition coil wiring and ohm testing:
Ignition Coil Primary And Secondary Wiring
Ignition coils on the 80’s Kz1000,Kz1100’s and Gpz1100’s are wired the same, that is as you sit on the bike, the LEFT ignition coil primary(small wires) are two wires, RED and BLACK. The secondary (or sparkplug wires) go to #1 and #4 sparkplugs.
The cylinders are numbered left to right as you sit on the seat; #1,#2,#3, and #4.
For the RIGHT ignition coil, the primary wires, again are two wires, RED and GREEN, with the secondary going to #2 and #3.
The RED wire gets it’s voltage from the run/stop switch on the right handlebar switch pod.
The BLACK and GREEN wires connect to the IC Igniter(if the bike has the Kawasaki supplied electronic ignition) it actually gives the coils their grounds to fire the sparkplugs.
Primary(small wires) side of the coils will read between 1.8 to 3.0 ohms.
Secondary(sparkplug wire ports)side of the coil will read between 10.4K to 15.6K ohms.
To stress the ignition coils, take a hair dryer, heat the coils and see if the ohm readings change from cold to hot . If they do, it’s time to buy new coils.
Keep in mind, the wiring is reversed for the 550’s 650‘s and 750‘s, that is the RIGHT coil primary will be two wires, RED and BLACK with the secondary(sparkplugs) going to #1 and #4.
The LEFT coils primary wiring would be again two wires, RED and GREEN, with the secondary(sparkplugs) going to #2 and #3.
These engines have what is known as a “Wasted Spark†that is, a sparkplug will fire during an exhaust stroke. It does no damage and many other motorcycle engines have this design.
1982 GPZ1100 B2
General Dynamics/Convair 1983-1993
GLCM BGM-109 Tomahawk, AGM-129A Advanced Cruise Missile (ACM)
Please Log in or Create an account to join the conversation.
- MFolks
-
- Offline
- User
Less
More
- Posts: 6650
- Thank you received: 540
16 Aug 2010 19:14 #391524
by MFolks
1982 GPZ1100 B2
General Dynamics/Convair 1983-1993
GLCM BGM-109 Tomahawk, AGM-129A Advanced Cruise Missile (ACM)
Replied by MFolks on topic KZ750 LTD H2 1981 PROJECT BIKE - ENGINE START
I forgot: The bolt head marking may sometimes indicate who made it, Being this is an older bike, If it were me I'd get a proper Kawasaki bolt as I'm suspect of unknown fasteners.
Here in the U.S.,Imperial(American) bolts have their hexheads stamped with markings:
No markings: probably grade 3, relatively soft bolts, not something I use for fasteners.
3 marks 120 degrees apart: grade 5, used for medium strength fastening work.
6 marks,grade 8 higher strength fastener, used in structural,and machine assemblies.
www.unified-eng.com/scitech/bolt/boltmarks.html
www.nutsandbolts.com/v1-bolt-grade-markings.html
Then you have socket head cap screws(sometimes called "Allen Screws or Bolts) and yet another level of strength.
And for most people the MIL-SPEC, or NAS(National Aerospace) fasterner is about as strong as they need unless you're building fighter aircraft or missiles.
Confused?
1982 GPZ1100 B2
General Dynamics/Convair 1983-1993
GLCM BGM-109 Tomahawk, AGM-129A Advanced Cruise Missile (ACM)
Please Log in or Create an account to join the conversation.
- JR
-
- Offline
- Sustaining Member
Less
More
- Posts: 2939
- Thank you received: 448
17 Aug 2010 04:54 #391581
by JR
1980 kz750E1, Delkevic exhaust
Replied by JR on topic KZ750 LTD H2 1981 PROJECT BIKE - ENGINE START
Pickup coils.
The advancer unit in the pic above is behind this plate

The advancer unit in the pic above is behind this plate
1980 kz750E1, Delkevic exhaust
Attachments:
Please Log in or Create an account to join the conversation.
- angel_uk
-
 Topic Author
- Offline
- User
- Wildlife Artist and adventurer by any means!
Less
More
- Posts: 111
- Thank you received: 0
17 Aug 2010 07:13 #391612
by angel_uk
Replied by angel_uk on topic KZ750 LTD H2 1981 PROJECT BIKE - ENGINE START
hi j
thanks for your message. i'm confused about what we need to remove to get at the 17mm nut, the electronic ignition itself?
many thanks
angel in the uk!
thanks for your message. i'm confused about what we need to remove to get at the 17mm nut, the electronic ignition itself?
many thanks
angel in the uk!
Please Log in or Create an account to join the conversation.
- RsvBruno
-
- Offline
- User
Less
More
- Posts: 20
- Thank you received: 0
17 Aug 2010 08:15 #391637
by RsvBruno
1981 KZ1000K
1977 KZ650C1
1976 KZ750B
1980 KZ440LTD
Replied by RsvBruno on topic KZ750 LTD H2 1981 PROJECT BIKE - ENGINE START
You shouldn't have to remove anything. Just the cover that is on the points/electronic pickups. All you are doing is "rotating the engine by hand" so that the oil you just put into the cylinders can be dispersed throughout the cylinder walls to give that added lubrication/protection. Again, all you need to do is remove the cover (two bolts,or philips head screws) then use your 17mm wrench and turn the engine clockwise a few times..(maybe 10?) to get that oil in the cylinders to lubricate the cylinders.
1981 KZ1000K
1977 KZ650C1
1976 KZ750B
1980 KZ440LTD
Please Log in or Create an account to join the conversation.
- JR
-
- Offline
- Sustaining Member
Less
More
- Posts: 2939
- Thank you received: 448
17 Aug 2010 08:35 - 17 Aug 2010 08:37 #391647
by JR
1980 kz750E1, Delkevic exhaust
Replied by JR on topic KZ750 LTD H2 1981 PROJECT BIKE - ENGINE START
Exactly like RsvBruno says
Just remove the outer cover ( noty shown in any pic). The BOLT is the smaller thingy with the "L" on it the centre in your picture. Dont try to turn the engine with that one or you may snap it off. The 17mm NUT is the bigger thingy behind it. Use that to turn the engine over. Put a wrench on it and turn it.
I was surprised at your picture and wondered first why you had taken the pickup coil (electronic ignition)plate off. Then I wondered if your picture showed what you saw when you took off the cover and if indeed your plate with the pickup coils might be missing.... especially since you were calling the advancer the pickup coils.")
Did'nt mean to cause any confusion
Sorry
Just remove the outer cover ( noty shown in any pic). The BOLT is the smaller thingy with the "L" on it the centre in your picture. Dont try to turn the engine with that one or you may snap it off. The 17mm NUT is the bigger thingy behind it. Use that to turn the engine over. Put a wrench on it and turn it.
I was surprised at your picture and wondered first why you had taken the pickup coil (electronic ignition)plate off. Then I wondered if your picture showed what you saw when you took off the cover and if indeed your plate with the pickup coils might be missing.... especially since you were calling the advancer the pickup coils.
Did'nt mean to cause any confusion
Sorry
1980 kz750E1, Delkevic exhaust
Last edit: 17 Aug 2010 08:37 by JR.
Please Log in or Create an account to join the conversation.
- angel_uk
-
Topic Author
- Offline
- User
- Wildlife Artist and adventurer by any means!
Less
More
- Posts: 111
- Thank you received: 0
17 Aug 2010 10:27 #391674
by angel_uk
Replied by angel_uk on topic KZ750 LTD H2 1981 PROJECT BIKE - ENGINE START
hi riders
thank you for your inforation.
please let me explain about this project.
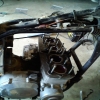
the original engine had 28,000 on the clock. we found a dealer who was selling mint condition parts for a kz750 H2. the photos he sent us were likr new parts. we asked about the engine (just 6,600 miles only) and he said it was parted also and we then had it imported from the USA to the UK. the original engine, minus the electronic ignition, the starter motor was sold on ebay. the photo that we posted on KZR's showes the the empty chamber. you can't buy these electronic ignitions over here. this is now a spare. we also bought the 6,600 engine electronic ignition separetly and just put it back into the newer engine. the dealer sold all the parts one at a time, not a job lot!..
This is the first time that we've stripped, powder coated, chromed, rewired the whole bike etc. it has been a massive learning curve to learn what all the parts are.
i don't even know how to do the bikes timing yet. if the parts that have been parted and then reasembled, would the timing me the same before it was running? the only thing that has happened is the long flight across the pond to the uk!..
the photo we posted is from the older engine, we don't have that now. it's in scotland!...
i hope that by the time the bike is built i will know every parts externally. the harry potter magic that's inside (gears, cogs etc) is left to the experts for tweaking later on!..
i just want to hear this baby start up and roar it's dinosaur head off, like one of the stars from jurrasic park!")
please see the attached photo of the USA imported engine!
what a find! $200 plus $500 shipping etc!. i sold my older engine for $600, it was unbelievable! it made my day finding a better engine and selling my oder one!..
just a one off!
many thanks
angel

thank you for your inforation.
please let me explain about this project.
the original engine had 28,000 on the clock. we found a dealer who was selling mint condition parts for a kz750 H2. the photos he sent us were likr new parts. we asked about the engine (just 6,600 miles only) and he said it was parted also and we then had it imported from the USA to the UK. the original engine, minus the electronic ignition, the starter motor was sold on ebay. the photo that we posted on KZR's showes the the empty chamber. you can't buy these electronic ignitions over here. this is now a spare. we also bought the 6,600 engine electronic ignition separetly and just put it back into the newer engine. the dealer sold all the parts one at a time, not a job lot!..
This is the first time that we've stripped, powder coated, chromed, rewired the whole bike etc. it has been a massive learning curve to learn what all the parts are.
i don't even know how to do the bikes timing yet. if the parts that have been parted and then reasembled, would the timing me the same before it was running? the only thing that has happened is the long flight across the pond to the uk!..
the photo we posted is from the older engine, we don't have that now. it's in scotland!...
i hope that by the time the bike is built i will know every parts externally. the harry potter magic that's inside (gears, cogs etc) is left to the experts for tweaking later on!..
i just want to hear this baby start up and roar it's dinosaur head off, like one of the stars from jurrasic park!
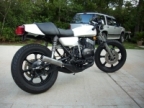
please see the attached photo of the USA imported engine!
what a find! $200 plus $500 shipping etc!. i sold my older engine for $600, it was unbelievable! it made my day finding a better engine and selling my oder one!..
just a one off!
many thanks
angel
Attachments:
Please Log in or Create an account to join the conversation.
- angel_uk
-
Topic Author
- Offline
- User
- Wildlife Artist and adventurer by any means!
Less
More
- Posts: 111
- Thank you received: 0
17 Aug 2010 10:30 #391676
by angel_uk
Replied by angel_uk on topic KZ750 LTD H2 1981 PROJECT BIKE - ENGINE START
hi kzr's
oops this was the wrong photo! sorry! the filename was similer to the one i wanted you to see!
here is the low mileage engine.
best wishes
Angel

oops this was the wrong photo! sorry! the filename was similer to the one i wanted you to see!
here is the low mileage engine.
best wishes
Angel
Attachments:
Please Log in or Create an account to join the conversation.
- Kawickrice
-
- Offline
- User
- After Monday & Tuesday, even the calendar says WTF
Less
More
- Posts: 2496
- Thank you received: 18
17 Aug 2010 10:40 #391678
by Kawickrice
73 Kawasaki Z1
07 HD CVO Ultra Classic
82 Suzuki GS 1100
74 Yamaha RD 350 (My two stroke toy)
77 Kawasaki KZ 650B-1 (My putt around bike)
80 Indian Moped (My American Iron)
1
Long Gone
75 Suzuki GT550
74 GT 380
79 RD 400 Daytona Special
72 Honda CL 175
74 Honda QA 50
Tampa FL
Replied by Kawickrice on topic KZ750 LTD H2 1981 PROJECT BIKE - ENGINE START
That sure is a clean engine you got there. You will have alot of fun on that bike when your done
73 Kawasaki Z1
07 HD CVO Ultra Classic
82 Suzuki GS 1100
74 Yamaha RD 350 (My two stroke toy)
77 Kawasaki KZ 650B-1 (My putt around bike)
80 Indian Moped (My American Iron)
1
Long Gone
75 Suzuki GT550
74 GT 380
79 RD 400 Daytona Special
72 Honda CL 175
74 Honda QA 50
Tampa FL
Please Log in or Create an account to join the conversation.
- Patton
-

- Offline
- KZr Legend
Less
More
- Posts: 18640
- Thank you received: 2098
17 Aug 2010 13:08 #391704
by Patton
1973 Z1
KZ900 LTD
Replied by Patton on topic KZ750 LTD H2 1981 PROJECT BIKE - ENGINE START
angel_uk wrote:
Would expect either Dyna-S or Kawasaki.
Dyna-S ignition is commonly paired with Dyna green 3 ohm coils, but might have 4 ohm or even 5 ohm coils.
And the Dyna-S signal wires connect directly to the coils without going through a "black box."
Kawasaki electronic ignition uses lower ohm ignition coils, and also requires an i.c. igniter (black box).
Both Dyna-S and Kawasaki electronic ignitions use the typical advancer unit (centrifugal force on weights against springs) with timing marks for showing the ignition timing.
Dyna-S allows for manual adjustment of ignition timing.
Kawasaki usually allows inspection only -- not adjustment -- of the ignition timing. Inspection alone is valuable for assuring the advancer is properly functioning.
Dyna also has a more elaborate electronic ignition that uses a black box for ignition timing, and which doesn't use the ordinary springs/weights advancer unit.
Here's a comparison of Dyna-S vs Kawasaki.
Maybe yours looks like one or the other of these.
Good Fortune!
[Click on image to enlarge view.]

...bought the 6,600 engine electronic ignition separately and just put it back into the newer engine....
Would expect either Dyna-S or Kawasaki.
Dyna-S ignition is commonly paired with Dyna green 3 ohm coils, but might have 4 ohm or even 5 ohm coils.
And the Dyna-S signal wires connect directly to the coils without going through a "black box."
Kawasaki electronic ignition uses lower ohm ignition coils, and also requires an i.c. igniter (black box).
Both Dyna-S and Kawasaki electronic ignitions use the typical advancer unit (centrifugal force on weights against springs) with timing marks for showing the ignition timing.
Dyna-S allows for manual adjustment of ignition timing.
Kawasaki usually allows inspection only -- not adjustment -- of the ignition timing. Inspection alone is valuable for assuring the advancer is properly functioning.
Dyna also has a more elaborate electronic ignition that uses a black box for ignition timing, and which doesn't use the ordinary springs/weights advancer unit.
Here's a comparison of Dyna-S vs Kawasaki.
Maybe yours looks like one or the other of these.
Good Fortune!
[Click on image to enlarge view.]
1973 Z1
KZ900 LTD
Attachments:
Please Log in or Create an account to join the conversation.
- angel_uk
-
Topic Author
- Offline
- User
- Wildlife Artist and adventurer by any means!
Less
More
- Posts: 111
- Thank you received: 0
17 Aug 2010 13:17 #391706
by angel_uk
Replied by angel_uk on topic KZ750 LTD H2 1981 PROJECT BIKE - ENGINE START
hi patton
thanks for your message!
it's great chatting to like minded bikers.
all of my mates thought i was crazy to import an engine.
it was a lot of official paperwork. i've always said that to do a job properly you do it to the best of standards.
it has cost me loads of $ for one of your bikes. they're really rare over here. i've imported 3/4 of the bike from the states. the frame, swing arm and other parts have all been chemically stripped and coated!.. new seats. stebal nautilus air horn fitted with a custom (home made) alu bracket that blends nicely with the bike. those horns are a lifesaver. in the uk, the drivers don't see bikers, you've to aware and scan every 5 secs!..
keep in touch buddy!
regards
angel
Please Log in or Create an account to join the conversation.
- Patton
-
- Offline
- KZr Legend
Less
More
- Posts: 18640
- Thank you received: 2098
17 Aug 2010 14:05 - 17 Aug 2010 19:06 #391723
by Patton
1973 Z1
KZ900 LTD
Replied by Patton on topic KZ750 LTD H2 1981 PROJECT BIKE - ENGINE START
angel_uk wrote:
That's the rotor part of Kawasaki electronic ignition which ignition functions in connection with an i.c.igniter (separate black box usually located underneath a side cover).
If needed, good wiring diagrams are available for download here on KZR (see Filebase under KZ Information).
Let us know if any trouble finding the diagram.
Good Fortune!
[Click on image to enlarge view.]

...here is a photo of the pickup coils

That's the rotor part of Kawasaki electronic ignition which ignition functions in connection with an i.c.igniter (separate black box usually located underneath a side cover).
If needed, good wiring diagrams are available for download here on KZR (see Filebase under KZ Information).
Let us know if any trouble finding the diagram.
Good Fortune!
[Click on image to enlarge view.]
1973 Z1
KZ900 LTD
Attachments:
Last edit: 17 Aug 2010 19:06 by Patton.
Please Log in or Create an account to join the conversation.