
1981 KZ1000 J-to-K build
- SWest
-

- Offline
- Sustaining Member
-

Registered
- 10 22 2014
- Posts: 23734
- Thanks: 3016
Re: 1981 KZ1000 J-to-K build
07 Jul 2017 21:02
I meant pumping it while closed. You should see tiny bubbles. Once they're gone it should be as normal.
Steve
Steve
Z1b1000 1975 Z1b
kzrider.com/forum/11-projects/598262-kz-...-will-it-live#672882
kzrider.com/forum/2-engine/597654-poser?start=240#704229
kzrider.com/forum/11-projects/598262-kz-...-will-it-live#672882
kzrider.com/forum/2-engine/597654-poser?start=240#704229
Please Log in or Create an account to join the conversation.
- Shdwdrgn
-
 Topic Author
- Offline
- User
-

Registered
- Posts: 614
- Thanks: 24
Re: 1981 KZ1000 J-to-K build
07 Jul 2017 21:15
Ah... yes I did pump the front brake, it tries to spray a stream of fluid if the lid isn't on, but the bubbles are long gone.
1981 KZ1000-JK1
She's a beautiful mess, and I've made her all mine
She's a beautiful mess, and I've made her all mine
Please Log in or Create an account to join the conversation.
- Shimmy
-
- Offline
- User
-
Registered
- Posts: 121
- Thanks: 15
Re: 1981 KZ1000 J-to-K build
08 Jul 2017 06:44
If the rear brake dragging doesn't go away, might be worth cleaning the return passage on the rear master cylinder. Mine had trouble fully letting go until I gave it a cleaning. Didn't seem clogged but the return passage is a tiny little pinhole so I imagine any little bit of gunk can cause issues.
1980 KZ750 LTD
Edmonton, Alberta
Edmonton, Alberta
The following user(s) said Thank You: GPz550D1
Please Log in or Create an account to join the conversation.
- Shdwdrgn
-
Topic Author
- Offline
- User
-
Registered
- Posts: 614
- Thanks: 24
Re: 1981 KZ1000 J-to-K build
09 Jul 2017 16:28 - 09 Jul 2017 17:06
I've been working the rear brakes through the weekend, just pumping the pedal whenever I walk by, and when I had to move the bike today it felt like the brakes are working properly now. As you said, probably something in the system clogging it, but it feels good now, Haven't had a chance to bleed the fronts again but I did get a couple new bottles of fluid.
Well the engine is about 99.999% done. I have 3 quarts of oil in and not seeing any drips. I'll top it off once I can crank it over and work some oil into the passages. The carbs are back in place, but there are three unused vacuum lines on top -- were these supposed to just be capped? The coils are hooked up, the throttle is adjusted towards almost fully closed until I can start it. I dunno, I think once I can put some gas in the tank I'm ready to test it... except...
So I hooked up the battery today. Looking good so far, the brake light works, blinkers work (need a new blinker module for the hazards through). The problem is I can't seem to get the starter to work. Since I don't have the key, I took the switch assembly off the bottom of the key unit. It has indents you can feel for each position, so the lights come up when I turn it to run, but going fully to the starting position, the brake light comes on bright but the starter does nothing. I tried checking for power at the relay, but between ground there is no juice on any of the wires. So I'm pulling out the wiring diagram to see what I can find. Keep in mind NONE of the dials are hooked up (there's quite a bundle of unconnected wires hanging out of the headlight), but I do have all the connectors from the handlerbar switches plugged in under the tank, and I connected everything else to the wiring harness as I found matches. Besides what's in the headlight, the only large plastic connector not plugged in is for the gas tank. I also have a red wire with blue stripe in front of the battery box, and a solid red wire behind the battery box that are unconnected (small gauge). I also re-checked the fuses and they're good. I must be missing something still...
But damn, it really looks like a bike now! Oh yeah, and I finally got the foot pegs on so I can sit on it now. Hmm a little tight for my long legs, but we'll see how it rides.
Oh, I also got the headers on. The mufflers come straight back, but I have an idea that I've like to tip them up so they follow the angle of the board that the foot pegs are on. So do this right it looks like I need to take about 1.5" off the header pipes, then somehow bend and angle into them that will allow the mufflers to still be attached. That may be a Winter project though.
[EDIT] Yeah ok, you can tell it's been awhile since I've ridden. So I'm looking at the schematic and I find the ignition switch, and right next to it is a starter switch. Starter switch??? I go back out and look at the handlebars, wipe the dust off the 'run' switch... oh yeah, push to start! Too bad it wasn't that easy. Turned the ignition switch full clockwise, hit the button, still nothing. The brake light didn't even dim. I reconnected the red plastic connector from that switch a couple times to make sure it had a good connection, but still got nothing.
[LAST EDIT] OK I think I may have figured it out... I plugged in the dials and noticed there's an indicator for neutral... except it's not coming on despite the transmission definitely being in neutral. I'm guessing that has something to do with the green wire I hooked up under the chain cover, but even when I pulled in the clutch the light still didn't come on. Erg that doesn't sound good. Any thoughts as to what I'm missing here? If I pull off that cover, should I be able to ground out that wire and make the neutral light come on? The schematic also shows a 3-position connector going to a starter cutoff switch (two black and one blue/orange wire) but I can't find anything like that along the wiring harness. Now I'm really lost!
1981 KZ1000-JK1
She's a beautiful mess, and I've made her all mine
She's a beautiful mess, and I've made her all mine
Last edit: 09 Jul 2017 17:06 by Shdwdrgn.
Please Log in or Create an account to join the conversation.
- SWest
-
- Offline
- Sustaining Member
-
Registered
- 10 22 2014
- Posts: 23734
- Thanks: 3016
Re: 1981 KZ1000 J-to-K build
09 Jul 2017 17:45
Full clockwise the parking light comes on. (tail light) The kill switch must be on run and you may have a lockout or two. (clutch/kickstand) The green wire completes the ground to the light.
Steve
Steve
Z1b1000 1975 Z1b
kzrider.com/forum/11-projects/598262-kz-...-will-it-live#672882
kzrider.com/forum/2-engine/597654-poser?start=240#704229
kzrider.com/forum/11-projects/598262-kz-...-will-it-live#672882
kzrider.com/forum/2-engine/597654-poser?start=240#704229
Please Log in or Create an account to join the conversation.
- Shdwdrgn
-
Topic Author
- Offline
- User
-
Registered
- Posts: 614
- Thanks: 24
Re: 1981 KZ1000 J-to-K build
09 Jul 2017 19:55
Yeah I did some more googling and found some discussions regarding the kill switch and found that it is the switch on the clutch lever. Tracking THAT harness back I finally found the black/black/blue-orange wire connector. Apparently the positioning of the switch can be somewhat sensitive, so I'll have to disconnect it and throw a meter across it to check for correct operation. Unfortunately it's too dark to work outside now, so I'll check it again tomorrow.
So after tracing through the wiring diagram, there is a small 2-pin connector going to the starter solenoid with a black wire and a black/yellow wire. It looks like the solid black wire supplies +12v to the solenoid when you press the starter switch, and the black/yellow wire is the return ground. If I'm reading that correctly, I should be able to clip a wire between +12v and the solid black wire, and activate the solenoid, which should kick over the starter motor? I gave it a brief try but nothing happened, however I noted I have at least three or four solenoids in my boxes of parts, so it is very likely that one of the previous owners at some point saw a failure here and picked up replacements. Right now though I would really like to get in a position when I can actually measure power attempting to be applied to the solenoid -- once that is successful then I can start swapping in different solenoids to find one that works.
So after tracing through the wiring diagram, there is a small 2-pin connector going to the starter solenoid with a black wire and a black/yellow wire. It looks like the solid black wire supplies +12v to the solenoid when you press the starter switch, and the black/yellow wire is the return ground. If I'm reading that correctly, I should be able to clip a wire between +12v and the solid black wire, and activate the solenoid, which should kick over the starter motor? I gave it a brief try but nothing happened, however I noted I have at least three or four solenoids in my boxes of parts, so it is very likely that one of the previous owners at some point saw a failure here and picked up replacements. Right now though I would really like to get in a position when I can actually measure power attempting to be applied to the solenoid -- once that is successful then I can start swapping in different solenoids to find one that works.
1981 KZ1000-JK1
She's a beautiful mess, and I've made her all mine
She's a beautiful mess, and I've made her all mine
Please Log in or Create an account to join the conversation.
- Shdwdrgn
-
Topic Author
- Offline
- User
-
Registered
- Posts: 614
- Thanks: 24
Re: 1981 KZ1000 J-to-K build
10 Jul 2017 17:43
All right, so lots more WTF tonight. Checking through the wiring diagram and trying to get readings, apparently I have no clue how to operate this vehicle. If I turn the key clockwise to the first notch, I get power to the whole fuse block and a very faint sound from the starter solenoid when I hit the switch. Turning the key all the way clockwise (as I was doing) and I lose power to three of the five fuses. Well then...
So the solenoid appears to be very weak. Hooking up another one, I get a strong click when I hit the starter button, so I'll hook that one up tomorrow. Now the next problem... I assumed that connecting the positive battery charger cable directly to the wire from the starter (and the other side to ground), the starter should spin. Right? Wrong! Nada. Well doesn't that figure, I have three starters and solenoids here and I picked the dead ones. So I guess I'll do similar testing on the other two starter motors and see which one of those looks promising.
I'm taking Wednesday off from work to get more time on the bike. Should be no problem swapping starters once I have some parts that work.
1981 KZ1000-JK1
She's a beautiful mess, and I've made her all mine
She's a beautiful mess, and I've made her all mine
Please Log in or Create an account to join the conversation.
- Shdwdrgn
-
Topic Author
- Offline
- User
-
Registered
- Posts: 614
- Thanks: 24
Re: 1981 KZ1000 J-to-K build
11 Jul 2017 19:37
Amazing how all these things I intended to get around to never actually materialized... So I have this problem with locks. I have quite a few. Two of them even take the same key. The rest? Who knows... Oh yeah, and did I mention I'm still having trouble finding that key?
All right, so running under the assumption that if I keep digging long enough I'll actually find the key that works with my ignition and tank, I still need to re-key the other locks. The right-side helmet lock is a piece of cake. I took that one apart today, completely straightforward assembly with screws and spring clips holding it together, although I was surprised to see slots for six wafers but only four of them being used. The other one is the seat lock. I have two of these to work with, and one of them likely matches the helmet lock. How do these guys come apart??? My best guess is I see a small pin on the underside. It's just a shiny spot, like a cut off wire, but there's no other indication of what might be holding the lock barrel in place. I'll try putting it under the drill press tomorrow and see if I can remove the pin -- hopefully it's a much softer metal than the case..
From the helmet lock I have three different wafer cuts, and hopefully I'll find more in the seat lock. I figure there should be at least four different wafers, and if I have at least one of each I can match them to a key. Then it's just a matter of reassembling the locks with the right wafers so I have a full matched set.
Now then... where is that $%& key?
1981 KZ1000-JK1
She's a beautiful mess, and I've made her all mine
She's a beautiful mess, and I've made her all mine
Please Log in or Create an account to join the conversation.
- Shdwdrgn
-
Topic Author
- Offline
- User
-
Registered
- Posts: 614
- Thanks: 24
Re: 1981 KZ1000 J-to-K build
12 Jul 2017 10:41
Success!!! I've had my jump-start battery pack charging the last couple days and tried the starter motor again, and this time it spun up just fine. So I replaced the solenoid, put the pack across the battery, and the starter spun up the engine without a problem. I'm still short about 3/4 quart of oil, will get that topped off now (still no sign of leaks), but I think I'm ready to move forward on starting the engine. Since I'm still painting the new tank, I'm going to screw all the pieces back on the original tank so I have a source for gas. Time to start researching how to adjust the timing chain and the carbs...
Drilling those locks won't be as easy as I thought. My drill press won't hold a #58 bit.") I'll probably have to get a collet for my dremmel.
I'll probably have to get a collet for my dremmel.
The new mirrors came in yesterday. OK They're definitely cheap chinese quality, but they were only $13 so I expected it. However they might just hold up and I'm pretty happy with the look. Still waiting on the grips. I guess since I don't need to replace the starter motor today,I'll try getting the handlebars drilled. It's been raining all night though and more rain coming today, so it's hard to tell how much time I can spend outside. Guess I better get back at it though...
Drilling those locks won't be as easy as I thought. My drill press won't hold a #58 bit.
I'll probably have to get a collet for my dremmel.The new mirrors came in yesterday. OK They're definitely cheap chinese quality, but they were only $13 so I expected it. However they might just hold up and I'm pretty happy with the look. Still waiting on the grips. I guess since I don't need to replace the starter motor today,I'll try getting the handlebars drilled. It's been raining all night though and more rain coming today, so it's hard to tell how much time I can spend outside. Guess I better get back at it though...
1981 KZ1000-JK1
She's a beautiful mess, and I've made her all mine
She's a beautiful mess, and I've made her all mine
Please Log in or Create an account to join the conversation.
- Shdwdrgn
-
Topic Author
- Offline
- User
-
Registered
- Posts: 614
- Thanks: 24
Re: 1981 KZ1000 J-to-K build
12 Jul 2017 16:14
Been a long afternoon, but I'm done for the day. Got the handlebars drilled, made slight adjustments to the holes with the dremmel, got everything in good positions now. One big problem though... the left switch cluster broke around one of the screw holes. Not quite sure what happened but the whole inset nut came loose. I'm going to have to get some epoxy to patch it back together, I doubt anything else is going to hold well enough when I try to screw it back together.
While I was working on the handlebars, the postman delivered the new grips, so once everything was ready I went ahead and put them on. Now my hands are killing me, that's always a pain to get them on and off. Got some quick pics of how the bike is setting now...
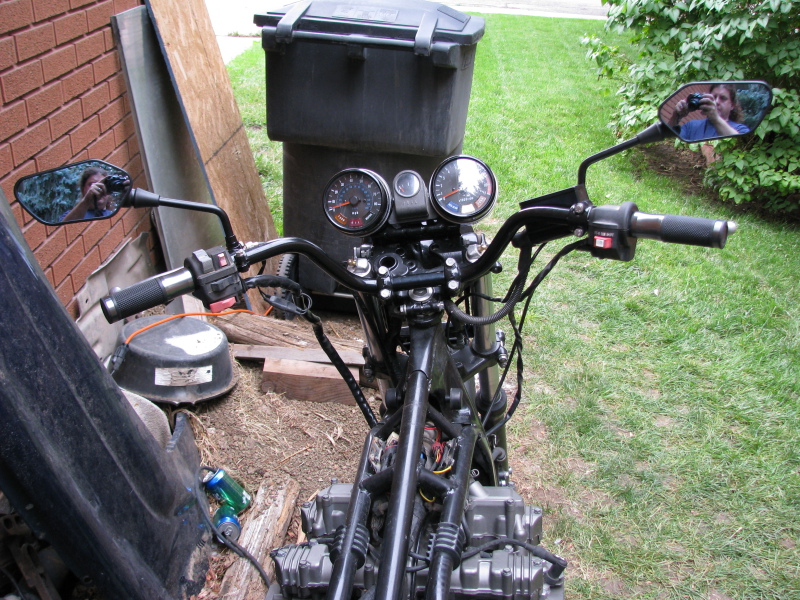

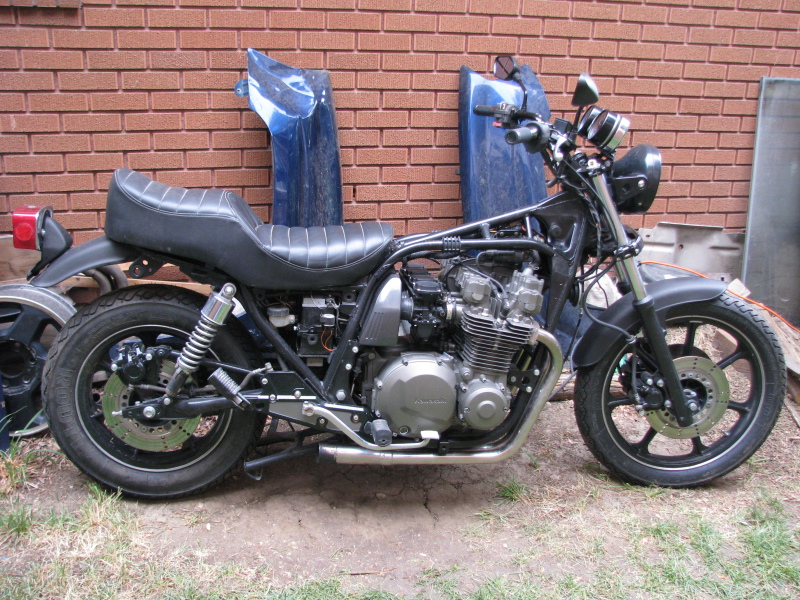
Again, not too bad for some cheap bits off ebay. So then I went looking around again, trying to figure out this mystery of the carb fuel inlet. Finally grab the extra set of carbs and hey what do you know, there's a rubber line there I forgot to put back on the good carbs! And of course it's right in the middle of everything, impossible to get to with the carbs sitting on the bike. OK I'm getting way too much practice at getting the carbs on and off. Only took about 10 minutes to finish up the whole process, so now I have a fuel line. Still gotta get some caps for the extra three vacuum lines though.
Still can't find that key. I did find a spare for the old Yamaha though. And I looked into batteries, but I think that's going to have to wait until the money situation improves. The old battery is holding enough of a charge to smooth out the alternator when it's running, it just won't be enough to to actually start the bike with. Right now I'm still focused on getting the engine running so I can get everything adjusted and make sure there's no hidden problems.
While I was working on the handlebars, the postman delivered the new grips, so once everything was ready I went ahead and put them on. Now my hands are killing me, that's always a pain to get them on and off. Got some quick pics of how the bike is setting now...
Again, not too bad for some cheap bits off ebay. So then I went looking around again, trying to figure out this mystery of the carb fuel inlet. Finally grab the extra set of carbs and hey what do you know, there's a rubber line there I forgot to put back on the good carbs! And of course it's right in the middle of everything, impossible to get to with the carbs sitting on the bike. OK I'm getting way too much practice at getting the carbs on and off. Only took about 10 minutes to finish up the whole process, so now I have a fuel line. Still gotta get some caps for the extra three vacuum lines though.
Still can't find that key. I did find a spare for the old Yamaha though.
And I looked into batteries, but I think that's going to have to wait until the money situation improves. The old battery is holding enough of a charge to smooth out the alternator when it's running, it just won't be enough to to actually start the bike with. Right now I'm still focused on getting the engine running so I can get everything adjusted and make sure there's no hidden problems.
1981 KZ1000-JK1
She's a beautiful mess, and I've made her all mine
She's a beautiful mess, and I've made her all mine
Please Log in or Create an account to join the conversation.
- Shdwdrgn
-
Topic Author
- Offline
- User
-
Registered
- Posts: 614
- Thanks: 24
Re: 1981 KZ1000 J-to-K build
13 Jul 2017 19:49 - 13 Jul 2017 19:59
For those who are following along, be aware that on the models with an automatic cam chain tensioner, you MUST pull the cap and pull out the wedge before bolting down the head cover, or more than likely will stretch your chain. Guess what I didn't know about before today?
Regardless, I'm forging ahead. Picked up some new vacuum line caps and got the other lines run to some kind of emissions thing between the coils. Parts are bolted back on the original gas tank after blowing it out with the air hose, should be good enough to hold gas for the run test. And I double-checked my wiring to the coils and plugs this morning. Yeah I think I'm ready to fire it up!
So regarding that emissions thing... I have two of these units, but neither bike had them hooked properly when I got them. I'm almost there, however I'm missing the tube that goes between the back side of the unit to the front side of the air box. To borrow an image from another member, it's the part marked in red here (air hose #3):
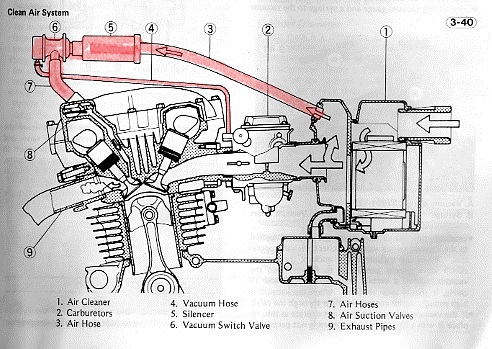
So is that just literally any hose that fits? It looks like that hose just shoves into the back side of the emissions unit, I don't see any way to clamp it at either end. Any suggestions here, or do I have the right idea?
Regardless, I'm forging ahead. Picked up some new vacuum line caps and got the other lines run to some kind of emissions thing between the coils. Parts are bolted back on the original gas tank after blowing it out with the air hose, should be good enough to hold gas for the run test. And I double-checked my wiring to the coils and plugs this morning. Yeah I think I'm ready to fire it up!
So regarding that emissions thing... I have two of these units, but neither bike had them hooked properly when I got them. I'm almost there, however I'm missing the tube that goes between the back side of the unit to the front side of the air box. To borrow an image from another member, it's the part marked in red here (air hose #3):
So is that just literally any hose that fits? It looks like that hose just shoves into the back side of the emissions unit, I don't see any way to clamp it at either end. Any suggestions here, or do I have the right idea?
1981 KZ1000-JK1
She's a beautiful mess, and I've made her all mine
She's a beautiful mess, and I've made her all mine
Last edit: 13 Jul 2017 19:59 by Shdwdrgn.
Please Log in or Create an account to join the conversation.
- loudhvx
-

- Offline
- KZr Legend
-

Registered
- Posts: 10863
- Thanks: 1622
Re: 1981 KZ1000 J-to-K build
13 Jul 2017 19:55 - 13 Jul 2017 19:58
I posted in your other thread. Since you didn't run it, and have since released it, you will probably be fine.
And yes, nothing special about that hose. It's just a source of clean air. For that matter, you might just get away with a filter on the air valve. But it's also possible the vacuum inside the air box may be a factor.
And yes, nothing special about that hose. It's just a source of clean air. For that matter, you might just get away with a filter on the air valve. But it's also possible the vacuum inside the air box may be a factor.
1981 KZ550 D1 gpz.
Kz550 valve train warning.
Other links.
Kz550 valve train warning.
Other links.
Last edit: 13 Jul 2017 19:58 by loudhvx.
Please Log in or Create an account to join the conversation.
Moderators: Street Fighter LTD