
1981 KZ1000 J-to-K build
- 531blackbanshee
-
- Offline
- Vendor
-

Vendors
- Posts: 7442
- Thanks: 796
Re: 1981 KZ1000 J-to-K build
19 Jun 2017 06:58
congrats on getting your paint laid down.
leon
leon
skiatook,oklahoma 1980 z1r,1978 kz 1000 z1r x 3,
1976 kz 900 x 3
i make what i can,and save the rest!
billybiltit.blogspot.com/
www.kzrider.com/forum/5-chassis/325862-triple-tree-custom-work
kzrider.com/forum/5-chassis/294594-frame-bracing?limitstart=0
1976 kz 900 x 3
i make what i can,and save the rest!
billybiltit.blogspot.com/
www.kzrider.com/forum/5-chassis/325862-triple-tree-custom-work
kzrider.com/forum/5-chassis/294594-frame-bracing?limitstart=0
The following user(s) said Thank You: GPz550D1
Please Log in or Create an account to join the conversation.
- Shdwdrgn
-
 Topic Author
- Offline
- User
-

Registered
- Posts: 614
- Thanks: 24
Re: 1981 KZ1000 J-to-K build
19 Jun 2017 09:26
Thanks... A little bit here, a little bit there... Looks like the airbrush is working correctly now so I need to practice a bit with the enamel, then finalize exactly how I want to lay down the scales and stripes on the tank. Should be ready to go by the time the last coat of color is in place though.
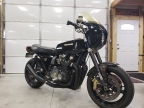
1981 KZ1000-JK1
She's a beautiful mess, and I've made her all mine
She's a beautiful mess, and I've made her all mine
Please Log in or Create an account to join the conversation.
- Shdwdrgn
-
Topic Author
- Offline
- User
-
Registered
- Posts: 614
- Thanks: 24
Re: 1981 KZ1000 J-to-K build
22 Jun 2017 12:59
I gave myself a little sneak peak today of the color scheme with the tank on the bike... and yeah I'm excited. Seeing it come together is giving me some more ideas for detailing the scales, but I'm still having trouble with the air brush.
I got the first coat of primer on the side covers, ugh that's not looking good. One side still had some pretty deep marks that didn't sand out, so we'll see how a bit of primer filling works. The other side is where I'm filling the emblem holes, but it looks like they sanded off counter-sunk. Odd, I thought the whole point of using a sanding block was to prevent that. Oh well, should be able to get them both smoothed out over the weekend.
I got the first coat of primer on the side covers, ugh that's not looking good. One side still had some pretty deep marks that didn't sand out, so we'll see how a bit of primer filling works. The other side is where I'm filling the emblem holes, but it looks like they sanded off counter-sunk. Odd, I thought the whole point of using a sanding block was to prevent that. Oh well, should be able to get them both smoothed out over the weekend.
1981 KZ1000-JK1
She's a beautiful mess, and I've made her all mine
She's a beautiful mess, and I've made her all mine
The following user(s) said Thank You: GPz550D1
Please Log in or Create an account to join the conversation.
- Shdwdrgn
-
Topic Author
- Offline
- User
-
Registered
- Posts: 614
- Thanks: 24
Re: 1981 KZ1000 J-to-K build
25 Jun 2017 20:07
I didn't have a lot of time to work on the bike this weekend, but did make some progress. First off, got the tank wet-sanded and was real happy with the initial coat. No sign of sanding through the paint anywhere, so I ended up with the dull even color everywhere. This morning started out overcast and cool, I wasn't sure if I would be able to get the next coat of paint on, but after lunch the sun came out and we got up to about 70 degrees and the humidity dropped. I hung up the tank and wiped it down once more, then fired another can of paint over it. I think the bulge up front and the top rear where the seat rests are likely to see the most wear so I hit those areas a little heavier. So far so good, next weekend I'll try to lay down a lighter final coat.
It took a bit of time through the week and this weekend, but I finally got the side covers smoothed down nicely, and the last coat of primer shows no signs of the original deep gouges and paint cracks. However since I sprayed the primer earlier in the day when it was still humid, it didn't feel ready yet for wet-sanding. I'll give it a day or two to finish drying, then I should be ready to get a coat of color on them.
I've also changed my mind on one of the trim items. That last cover missing from the engine has an L-shaped offset in it which I had planned on spraying a couple rows of small scales. However because of the likely wear that cover will see, I've decided to skip the detail and just leave it the solid cast-iron color. Instead I want to spray some rows of fading scales across the top of both of the side covers. Essentially I will lay down several rows, then when the paint dries I'll come back with the copper color and spray over the bottom rows to make them fade out. It should be a really easy technique to accomplish, and the covers are small enough that if I mess it up, I can easily sand them out and try again. If this works, the plan for the tank is to lay down rows of scales in the center, down the full length of the tank, then again fade the edges of the scales along the sides. Then I have the choice of leaving it like that, or finishing it with black stripes on either side of the scales. The stripes will be the likely choice since I don't have a way to leave a clean line along the edges where I fade the scales, while the stripes will provide a finished edge and can cover any problems at the sides.
After all this practice with the scales, hopefully I'll be ready to do the fenders, which will be slightly harder. With those, I'll carry the scales across the entire surface, then I want to use the air brush to fade the sides of the fenders to a solid black. I think to do this properly I need to really thin out my black, then build up the darkness in multiple layers. Problem is, if I mess up this part then I just about have to start all over again, but I think the fade to black on the sides will be worth the effort.
I've also been debating the issue of the exhaust pipes. From what all I've read, even when you use the high-temp header paint it still gets soft while riding, and tends to get pitted from road debris. I can't really afford getting the pipes ceramic-coated, so I was thinking of wrapping the first part of the pipes where they are still individual. I started another thread to ask some questions but never got any replies, however from reading old threads here I believe the best course is to sandblast and paint the pipes, lay down the fiberglass wrap, then paint the wrap with the same header paint. Not only does it get color-matched that way, but the paint seals the wrap against moisture so it doesn't rust out your pipes. Sounds promising to me, so I will likely go that route... And then I'll finally be done with all the painting!
1981 KZ1000-JK1
She's a beautiful mess, and I've made her all mine
She's a beautiful mess, and I've made her all mine
Please Log in or Create an account to join the conversation.
- Shdwdrgn
-
Topic Author
- Offline
- User
-
Registered
- Posts: 614
- Thanks: 24
Re: 1981 KZ1000 J-to-K build
26 Jun 2017 21:08
Well damn. Looking through pics last night I realized I mis-routed one of the large bundles of the wiring harness. I looked at it today, and there's no room to pull it back up around the air box, which means I have to pull the carbs back out again. This is the one down the right side that fishes past the battery box and feeds the tail lights, plus I think it might hook to some other pieces behind the battery box? Anyway, guess I'll leave the carbs and air box off again until I finish hooking up the wires.
1981 KZ1000-JK1
She's a beautiful mess, and I've made her all mine
She's a beautiful mess, and I've made her all mine
Please Log in or Create an account to join the conversation.
- Shdwdrgn
-
Topic Author
- Offline
- User
-
Registered
- Posts: 614
- Thanks: 24
Re: 1981 KZ1000 J-to-K build
28 Jun 2017 20:17
YES!!!! After looking at pics last night, I sorted through the cluster of wires that come around the right side and sit behind the battery box. Nearly all of the wires are accounted for (I'll be asking about some specifics when I can get a pic) and the wiring is finally starting to tuck into place nice and neat, and make sense now. That's a huge bit of stress off of me!
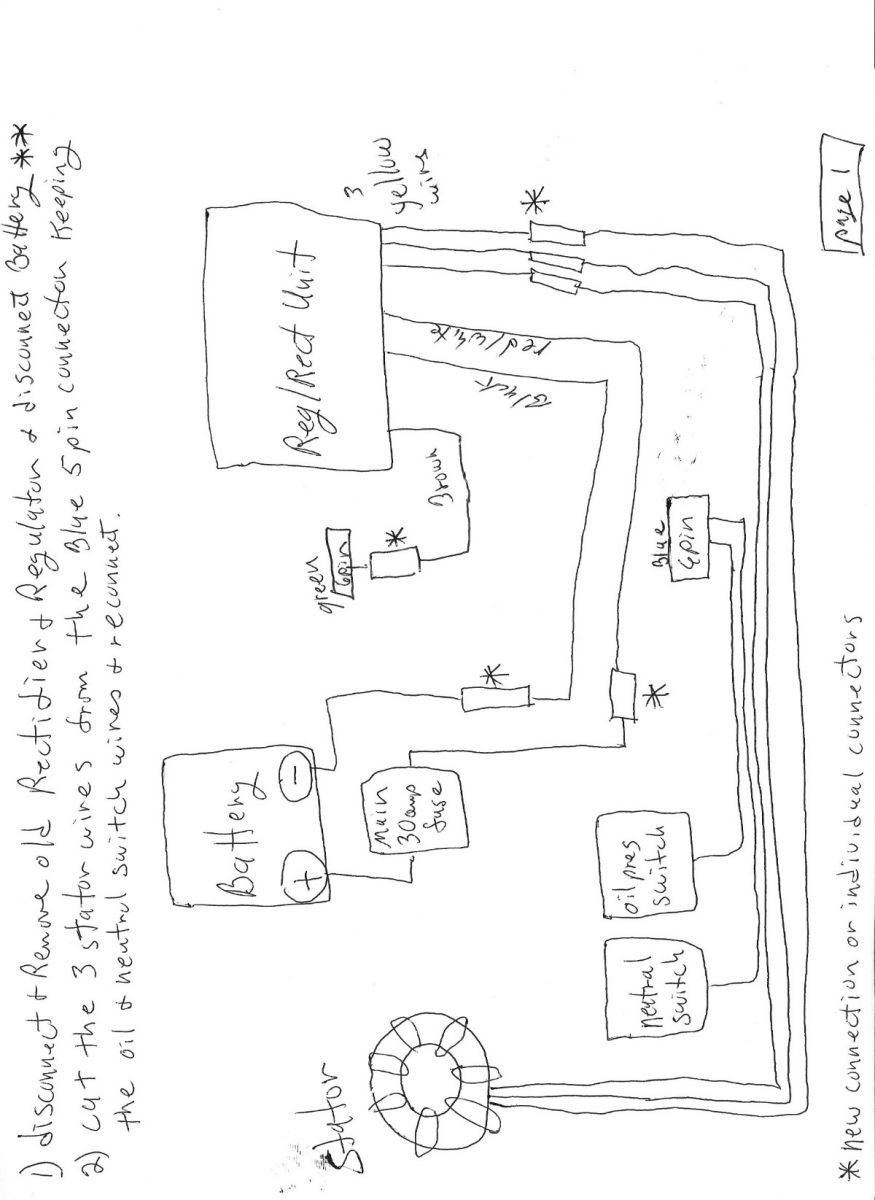
One question I do have though, if anyone is still following... The ground strap that connects directly to the battery -- is there a specific spot or bolt where that attaches to the frame? I know it should route to the front of the battery box because of the black/yellow wire that also connects there, but the bend in the wire seems to suggest it was previously connected via one of the regulator bolts under the battery box, and I don't see that as a good ground point.
If all goes well then I plan to move the bike away from the garage this weekend so I can get to the left side, and start hooking up all the wires to the motor -- or at least I *think* I am? It doesn't look like I got any pics at all of the wiring that goes in under the sprocket cover. Guess I'll see what I have to work with once I get over to that side.
1981 KZ1000-JK1
She's a beautiful mess, and I've made her all mine
She's a beautiful mess, and I've made her all mine
Please Log in or Create an account to join the conversation.
- SWest
-

- Offline
- Sustaining Member
-
Registered
- 10 22 2014
- Posts: 23733
- Thanks: 3016
Re: 1981 KZ1000 J-to-K build
28 Jun 2017 20:59
The battery cable and the ground attaches the the #6 bolt on the engine.
Steve
Steve
Z1b1000 1975 Z1b
kzrider.com/forum/11-projects/598262-kz-...-will-it-live#672882
kzrider.com/forum/2-engine/597654-poser?start=240#704229
kzrider.com/forum/11-projects/598262-kz-...-will-it-live#672882
kzrider.com/forum/2-engine/597654-poser?start=240#704229
Please Log in or Create an account to join the conversation.
- Shdwdrgn
-
Topic Author
- Offline
- User
-
Registered
- Posts: 614
- Thanks: 24
Re: 1981 KZ1000 J-to-K build
29 Jun 2017 06:25
...On the engine? Hmm...
Had to go out and take a look. OH! THAT'S what that mysterious screw was for! OK makes a lot more sense now, thanks for that. I'll just sand away a bit of paint from the case to make sure it gets good contact.
Had to go out and take a look. OH! THAT'S what that mysterious screw was for! OK makes a lot more sense now, thanks for that. I'll just sand away a bit of paint from the case to make sure it gets good contact.
1981 KZ1000-JK1
She's a beautiful mess, and I've made her all mine
She's a beautiful mess, and I've made her all mine
The following user(s) said Thank You: SWest
Please Log in or Create an account to join the conversation.
- Shdwdrgn
-
Topic Author
- Offline
- User
-
Registered
- Posts: 614
- Thanks: 24
Re: 1981 KZ1000 J-to-K build
29 Jun 2017 17:06
OK making good progress now, I think I have the right side of the bike finished up, including the last cover on the engine. Turned it around so I could start working on the left side now, and got two more questions already. First...
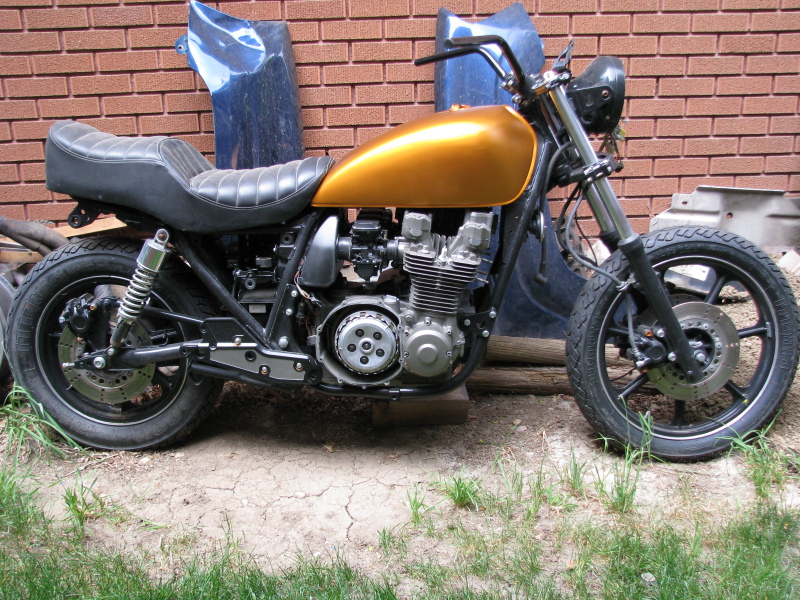
There is a large black wire coming from the starter with an O-ring lug on it. Is that supposed to attach to the open stud here opposite of the red wire (which goes directly to the battery)?
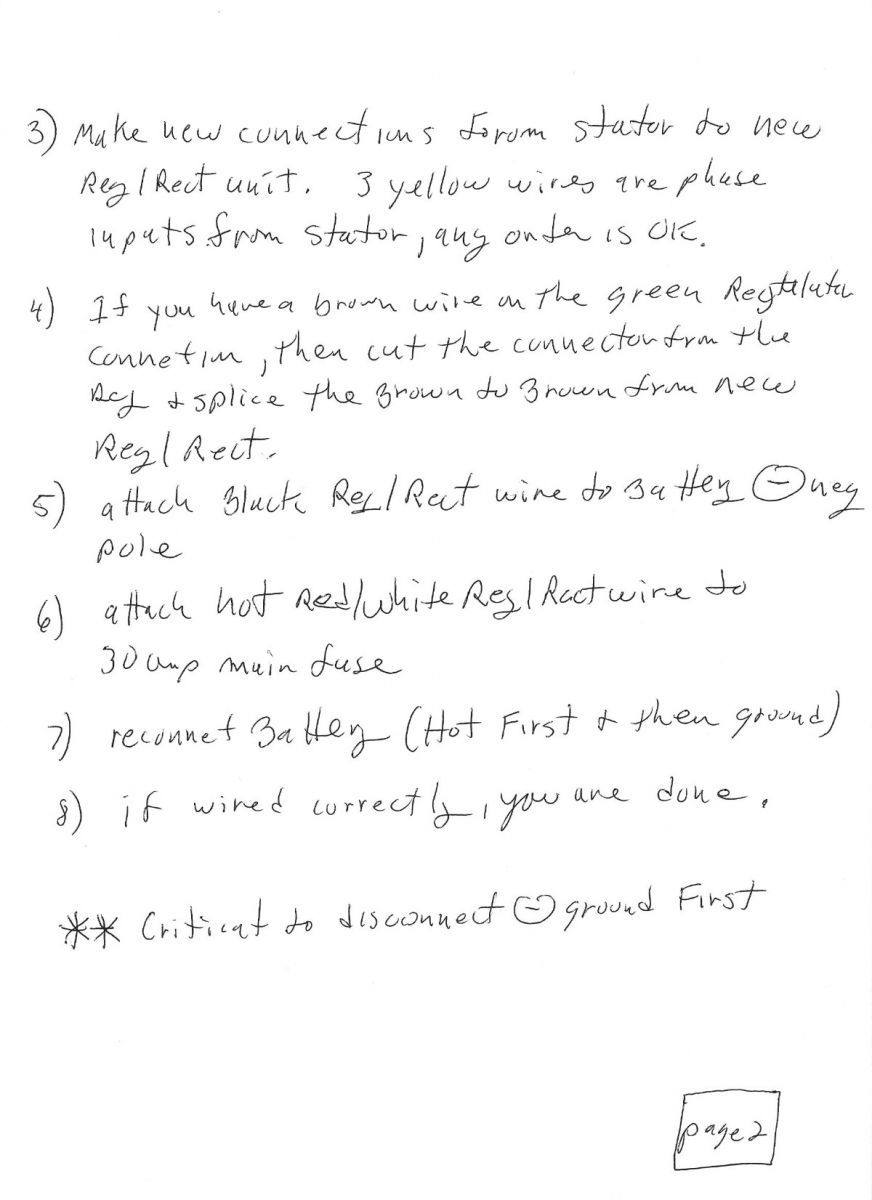
And for the three yellow wires going to the alternator (generator?)... does it matter which wire connects to which? Since all three are plain yellow wires I assume there is no right or wrong way to hook them up, but just wanted to be sure. The wiring harness had the male round plugs all stripped from the wires so I picked up some new ones that seem to fit the female jacks. I just have to clean up the wires so I can solder on the new plugs and throw some heat shrink around them.
As quick as the wiring is going I'm thinking this weekend I can get the chain on and start mounting things back on the handlebars again. Since the carbs are still off the bike it may make it easier to hook up the throttle cable. And I still have to find some mirrors and grips to fit back on it. Hopefully not too many more of the little detail parts left to go. My goal is to start her up in July, and hopefully I can take a ride before it gets cold out.
There is a large black wire coming from the starter with an O-ring lug on it. Is that supposed to attach to the open stud here opposite of the red wire (which goes directly to the battery)?
And for the three yellow wires going to the alternator (generator?)... does it matter which wire connects to which? Since all three are plain yellow wires I assume there is no right or wrong way to hook them up, but just wanted to be sure. The wiring harness had the male round plugs all stripped from the wires so I picked up some new ones that seem to fit the female jacks. I just have to clean up the wires so I can solder on the new plugs and throw some heat shrink around them.
As quick as the wiring is going I'm thinking this weekend I can get the chain on and start mounting things back on the handlebars again. Since the carbs are still off the bike it may make it easier to hook up the throttle cable. And I still have to find some mirrors and grips to fit back on it. Hopefully not too many more of the little detail parts left to go. My goal is to start her up in July, and hopefully I can take a ride before it gets cold out.
1981 KZ1000-JK1
She's a beautiful mess, and I've made her all mine
She's a beautiful mess, and I've made her all mine
Please Log in or Create an account to join the conversation.
- SWest
-
- Offline
- Sustaining Member
-
Registered
- 10 22 2014
- Posts: 23733
- Thanks: 3016
Re: 1981 KZ1000 J-to-K build
29 Jun 2017 17:54
The cable with the red cover goes to the + on the battery. Any yellow combination will work.
Steve
Steve
Z1b1000 1975 Z1b
kzrider.com/forum/11-projects/598262-kz-...-will-it-live#672882
kzrider.com/forum/2-engine/597654-poser?start=240#704229
kzrider.com/forum/11-projects/598262-kz-...-will-it-live#672882
kzrider.com/forum/2-engine/597654-poser?start=240#704229
Please Log in or Create an account to join the conversation.
- Shdwdrgn
-
Topic Author
- Offline
- User
-
Registered
- Posts: 614
- Thanks: 24
Re: 1981 KZ1000 J-to-K build
29 Jun 2017 19:41
OK good to know about the three yellow wires. I think everything else is on regular plugs.
What about the black wire from the starter though? In my previous pic, I wasn't asking about the red wire (I know that goes to the battery), I was asking if the black wire from the starter is supposed to connect to the OTHER lug shown at the front of the picture?
What about the black wire from the starter though? In my previous pic, I wasn't asking about the red wire (I know that goes to the battery), I was asking if the black wire from the starter is supposed to connect to the OTHER lug shown at the front of the picture?
1981 KZ1000-JK1
She's a beautiful mess, and I've made her all mine
She's a beautiful mess, and I've made her all mine
Please Log in or Create an account to join the conversation.
- SWest
-
- Offline
- Sustaining Member
-
Registered
- 10 22 2014
- Posts: 23733
- Thanks: 3016
Re: 1981 KZ1000 J-to-K build
29 Jun 2017 20:00
Yes.
Z1b1000 1975 Z1b
kzrider.com/forum/11-projects/598262-kz-...-will-it-live#672882
kzrider.com/forum/2-engine/597654-poser?start=240#704229
kzrider.com/forum/11-projects/598262-kz-...-will-it-live#672882
kzrider.com/forum/2-engine/597654-poser?start=240#704229
Please Log in or Create an account to join the conversation.
Moderators: Street Fighter LTD