
1981 KZ1000 J-to-K build
- Shdwdrgn
-
 Topic Author
- Offline
- User
-

Registered
- Posts: 611
- Thanks: 24
Re: 1981 KZ1000 J-to-K build
01 Jul 2017 17:51
HINT: You can spray glossy paint over flat. You can NOT spray flat over glossy until the glossy has dried completely.
Busy afternoon. I got the new male lugs soldered on the yellow alternator wires, then heat-shrinked. Routed the two cables over the top of the chain sprocket and got all of the connections to the motor hooked up. The starter motor is also connected now. I think the battery that came with the bike is completely dead now -- not too surprising considering it's been sitting in the garage for almost four years with only intermittent connections to the charger. Oh well, I'll get a new one when it's time.
I sandblasted the chrome panels that screw to the side of the air box. I'm going to try something different here, a hammer-finish paint. Considering the metallic nature of the other paint colors, I think a few spots with the hammer coat will make a new detail, but we'll see. I also shifted the location of the wiring harness around the left side of the air box, as it looks like it should sit over the top, right beside where the air filter cover slides in. Certainly makes more room for when I slide the carbs back in again.
The side covers have been wet-sanded and received their first coat of the burnt copper. The tank gets its last coat of paint tomorrow.
The fenders and pipes really need a larger sandblaster to take down the chrome, but in the meantime I'll leave the pipes alone. I'm hand-sanding the fenders with 60-grit. Not perfect, but it roughs it up enough to take some temporary paint. I did the back fender today, then hit it with a black primer. Thought I'd hit it with some gloss to dress up the temporary paint a little, but after it dried for a bit I decided the flat black looked better so I did another light coat of primer. Oops... the gloss must have still not been totally dry, it caused the flat paint to crack in spots. Ah well, I'll wet-sand it tomorrow then hit it with another coat of the flat to finish it off.
I also have the read brake light bracket nearly ready for paint. That and the front fender will get done tomorrow, then at least all the body pieces will be in place to ride it. In addition to finishing the tank, I also plan to try and slip on the handlebar fittings, and put on the new chain. Then if I still have the energy (it's supposed to be 95 degrees tomorrow), there is a final engine cover that fits around the chain sprocket... that piece has never been touched and needs to be fully sandblasted and painted. All of the wires are tucked into place, so once the chain is on the bike that cover can be bolted down at any time, but it will take at least a couple weeks for sandblasting, painting, and baking in the oven before it's done.
I guess I'd better get busy on the instrument cluster as well. I've still never put the speedo back together, and haven't even started on the tach. Nearly all of the big stuff is about finished, but there's a ton of little things still laying around. You know, all that shit I kept saying I was going to do during the Winters... Yeah that worked out well...
1981 KZ1000-JK1
She's a beautiful mess, and I've made her all mine
She's a beautiful mess, and I've made her all mine
Please Log in or Create an account to join the conversation.
- Shdwdrgn
-
Topic Author
- Offline
- User
-
Registered
- Posts: 611
- Thanks: 24
Re: 1981 KZ1000 J-to-K build
02 Jul 2017 20:13
Spent most of the day on my feet, I'm exhausted. Today I took apart, cleaned, sandblasted, and painted the clutch bracket, the front brake cylinder, and the sprocket cover, and I finished cleaning and painted the front fender and rear taillight bracket. The airbox metal covers have been screwed in place, but I did not get to the chain or finishing the tank.
Lots of cleaning for all the parts. On the clutch bracket, the clamp that goes around the handlebars was hosed. I had to force the bolt out, turns out it was bent. I re-tapped the threads, we'll see if they hold up, otherwise since I have the kit maybe I'll just helicoil it. The master cylinder was a bit more involved, getting all the pieces off and cleaned up. Both of these got the last of my brake paint. I need to get some new stainless bolts for each since these will be very visible.
The chain cover took the longest simply because it was the largest and dirtiest piece. Once ready, I also used the last of the cast-iron engine paint on this piece. It occurred to me to save an empty can of each color so I know exactly what I was using when I need to do tough-ups. So now that's hanging up for the week, and I can bake it in the oven next weekend before slapping it on the bike.
I've got Tuesday and Wednesday off work this week. Taking my truck in for some work on Wednesday, but I plan to finish the tank on Tuesday, get the chain on, and try to get the handlebar pieces in place. Once I have the throttle on then I can finally get the carbs back in there. Hmm it's probably about time to bolt the pipes on as well. They are going to take some work because they're from a kz900 and I don't think the hangers match up to anything on my bike, so I'll have to fabricate something. I also need to get the various brake line pieces in place for the rear and then check both brakes for operation and leaks.
Erg, and I still need to finish filling the front forks with oil. Anyone happen to know the method for filling these when there's already an unknown quantity of fluid in them? I put in some last year so they wouldn't seize over the Winter. I need to figure out how full to fill them so that's done before I get all the handlebar lines in the way.
1981 KZ1000-JK1
She's a beautiful mess, and I've made her all mine
She's a beautiful mess, and I've made her all mine
Please Log in or Create an account to join the conversation.
- 650ed
-

- Offline
- User
-
Registered
- Posts: 15334
- Thanks: 2830
Re: 1981 KZ1000 J-to-K build
02 Jul 2017 20:49
It really is not worth trying to save the old fork oil. Flush the existing fork oil out and use fresh Bel Ray fork oil. Use the instructions in the Kawasaki Service Manual to make sure they are filled to the correct level with the correct weight fork oil. Ed
1977 KZ650-C1 Original Owner - Stock (with additional invisible FIAMM horn)
Please Log in or Create an account to join the conversation.
- Shdwdrgn
-
Topic Author
- Offline
- User
-
Registered
- Posts: 611
- Thanks: 24
Re: 1981 KZ1000 J-to-K build
02 Jul 2017 21:19
It's not 'old' fork oil. The forks were pulled apart and fully cleaned and flushed before I repainted them, then new oil was put in when I reassembled the forks.
1981 KZ1000-JK1
She's a beautiful mess, and I've made her all mine
She's a beautiful mess, and I've made her all mine
Please Log in or Create an account to join the conversation.
- Shdwdrgn
-
Topic Author
- Offline
- User
-
Registered
- Posts: 611
- Thanks: 24
Re: 1981 KZ1000 J-to-K build
03 Jul 2017 08:27
Ah I *thought* I had found this information before... Springs out, forks compressed, the oil should be 184mm +-2 from the top. That's quite a gap but I suppose it gives a lot of space to adjust the air pressure between cushy and stiff. I'll check to see if my Clymer has any info on it and go from there. Guess I should pick up a bicycle air pump next weekend. How does one actually measure 7psi anyway? Seems that would need a pretty sensitive gauge.
1981 KZ1000-JK1
She's a beautiful mess, and I've made her all mine
She's a beautiful mess, and I've made her all mine
Please Log in or Create an account to join the conversation.
- TexasKZ
-

- Offline
- Platinum Member
-

Registered
- Posts: 8158
- Thanks: 2659
Re: 1981 KZ1000 J-to-K build
03 Jul 2017 13:43
I picked up a low pressure air guage ay Auto Zone a while back. It was fairly inexpensive and I think it tops out at 20 psi.
1982 KZ1000 LTD parts donor
1981 KZ1000 LTD awaiting resurrection
2000 ZRX1100 not ridden enough
www.kzrider.com/11-projects/620336-anoth...uild-thread?start=24
1981 KZ1000 LTD awaiting resurrection
2000 ZRX1100 not ridden enough
www.kzrider.com/11-projects/620336-anoth...uild-thread?start=24
Please Log in or Create an account to join the conversation.
- Shdwdrgn
-
Topic Author
- Offline
- User
-
Registered
- Posts: 611
- Thanks: 24
Re: 1981 KZ1000 J-to-K build
03 Jul 2017 20:40
@TexasKZ -- thanks for that, we have an AutoZone just down the street and they do always seem to have a good selection of those oddball tools.
All right, so I checked the Clymer manual, wow talk about broken up information. The instructions for the air pressure are in chapter three, but checking the oil level doesn't come until chapter 11. So the deal is that a *proper* KZ1000J should have the forks filled to 110mm from the top. However since my bike has forks from either a K or M (and god help me if they're from an earlier year!), the measurement will be 184mm. And the J gets 4.3psi of air while the K/M forks get 7.1psi. So with such a difference in measurements it should be pretty obvious if I chose incorrectly and really do have J forks that are disguised as K/M forks (yeah right, I don't see that happening).
Whew!
I got the front and rear fenders on the bike today, but need to get some different length bolts for the rear. Also I only had two and needed four -- oops. And I'll have to grab some bolts for the tail light mounting bracket, which look to be needing the same length. I swear I'm going to have a hundred dollars in stainless bolts into this bike by the time I'm done. While tightening the front fender bolts I was afraid one of the holes was stripped, but it was just a lot deeper than it looked and they all seated tightly.
Oh, I forgot to mention I had an idea for replacing the rubber seal around the meters. I found some large O-rings with a 7mm thickness and 90mm inside diameter. Two of those rolled on to the meter will take up the gap and be slightly squished. I found a 5-pack for $8 on ebay, just waiting for them to arrive. Of course the problem here is that most rubber O-rings aren't made for direct sunlight exposure, but they should give me a couple years of service and if they work out then I can search for a better material. I think I also solved the old problem of the speedo face being warped -- since it and the backing plate are plastic, I used some plastic cement I have for models that has the consistency of water... brush it between the faces, clamp it down for a few minutes, and it's all nice and flat now. I just need to throw some loctite on the center screws and then crimp the ring back down again. I washed down the glass with alcohol but there seems to be some staining around the edges that won't go away. Still looks a lot better than when I took it apart.
All right, so tomorrow I'm baking some parts (I could see my wife biting her tongue when I mentioned that), getting the chain and chain cover in place, getting stuff onto the handlebars, picking up another pile of stainless bolts, and getting a final coat of paint on the tank. And if there's time, turn the bike around again so I can try to get the rear master brake cylinder and other parts back on the bike. I'm thinking it might be nice to have working brakes *before* I get the engine running... you know, just in case?
1981 KZ1000-JK1
She's a beautiful mess, and I've made her all mine
She's a beautiful mess, and I've made her all mine
Please Log in or Create an account to join the conversation.
- Shdwdrgn
-
Topic Author
- Offline
- User
-
Registered
- Posts: 611
- Thanks: 24
Re: 1981 KZ1000 J-to-K build
05 Jul 2017 16:13
Well yesterday being the 4th, things got a little hectic and I didn't have time to post, but I DID get a lot done. Unfortunately also had a setback. Got the tank wet-sanded, let it hang to dry for about an hour, then started spraying the final coat of paint. Oh no, not so fast! A couple minutes in to the process and the wind kicks up from a storm that had been brewing, blowing a fuzzy floating seed pod right into a spot I'd just sprayed across. Of course! Not much else I could do but stop right there, wait another week for the paint to dry, and sand out the spot...
Meanwhile, I got the chain cover baked, then had to grab the other one which had the clutch cable on it. Oh no! The clutch mechanism is not the same between them. The one that I prepared uses three ball bearings in machined slots, while the one that was apparently originally on the bike has a machined spiral groove. And they're not interchangeable. I went ahead and put the finished one on the bike, will have to give the clutch a test and see if I get enough movement to let if free-wheel while in 1st gear, but the one with the spiral groove obviously has a greater range of motion to it so I'm guessing I will have to use that one instead. Strike two!
At least everything else went well. The pieces are on the handlebars and the chain has been mounted and adjusted. The front brake is ready for fluid and bleeding. I also made a few trips to Ace for stainless bolts, not only for the handlebar pieces but also to replace the rusted bolts on the headlight and brakes. Certainly looks a lot better now! Finally, I finished mounting the rear fender and tail light.
Today I was off work to do some front-end repairs on my truck. Got that taken care of and came back home to work on the bike again. I made myself a nice little dipstick for the forks and got the new fluid in them... whew a 4mm range in not much to work with! But I got both sides just about dead on at 184mm, then jacked up the front end so I could drop the forks down fully extended while fitting the springs back in. Nothing left but to get an air pump and add a little pressure to them.
By then it was getting really hot out (I'm working between two brick houses in full sun) so I came in to grab lunch and take a break. Unfortunately had an ear ache hit me about that time, so I haven't gotten anything else done today. Ah well, when I can I'm ready to mount the rear brake assembly, then get the foot pegs in place and start working on the pipes.
Oh yeah, I also found a likely candidate for the O-rings to use on the dials... I found some made of nitrile, which is supposed to be both oil- and UV-resistant. Sounds like a winner, but I'll wait for the others to arrive first so I can check the fit, see if the concept works, and make a final choice on the ring diameter to order.
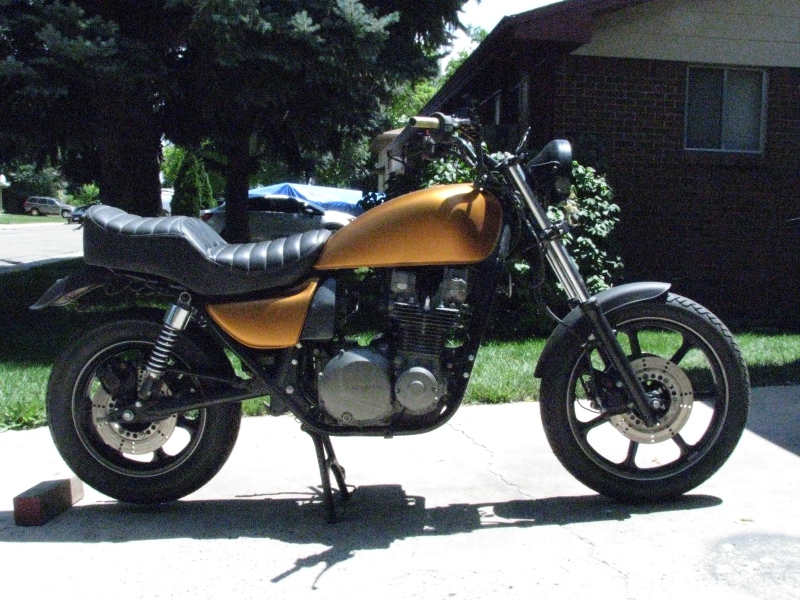
In the meantime, one crappy photo... (I forgot to change the camera settings). Seeing the colors together, I'm really debating leaving the fenders black.
Meanwhile, I got the chain cover baked, then had to grab the other one which had the clutch cable on it. Oh no! The clutch mechanism is not the same between them. The one that I prepared uses three ball bearings in machined slots, while the one that was apparently originally on the bike has a machined spiral groove. And they're not interchangeable. I went ahead and put the finished one on the bike, will have to give the clutch a test and see if I get enough movement to let if free-wheel while in 1st gear, but the one with the spiral groove obviously has a greater range of motion to it so I'm guessing I will have to use that one instead. Strike two!
At least everything else went well. The pieces are on the handlebars and the chain has been mounted and adjusted. The front brake is ready for fluid and bleeding. I also made a few trips to Ace for stainless bolts, not only for the handlebar pieces but also to replace the rusted bolts on the headlight and brakes. Certainly looks a lot better now! Finally, I finished mounting the rear fender and tail light.
Today I was off work to do some front-end repairs on my truck. Got that taken care of and came back home to work on the bike again. I made myself a nice little dipstick for the forks and got the new fluid in them... whew a 4mm range in not much to work with! But I got both sides just about dead on at 184mm, then jacked up the front end so I could drop the forks down fully extended while fitting the springs back in. Nothing left but to get an air pump and add a little pressure to them.
By then it was getting really hot out (I'm working between two brick houses in full sun) so I came in to grab lunch and take a break. Unfortunately had an ear ache hit me about that time, so I haven't gotten anything else done today. Ah well, when I can I'm ready to mount the rear brake assembly, then get the foot pegs in place and start working on the pipes.
Oh yeah, I also found a likely candidate for the O-rings to use on the dials... I found some made of nitrile, which is supposed to be both oil- and UV-resistant. Sounds like a winner, but I'll wait for the others to arrive first so I can check the fit, see if the concept works, and make a final choice on the ring diameter to order.
In the meantime, one crappy photo... (I forgot to change the camera settings). Seeing the colors together, I'm really debating leaving the fenders black.
1981 KZ1000-JK1
She's a beautiful mess, and I've made her all mine
She's a beautiful mess, and I've made her all mine
The following user(s) said Thank You: GPz550D1
Please Log in or Create an account to join the conversation.
- SWest
-

- Offline
- Sustaining Member
-
Registered
- 10 22 2014
- Posts: 23666
- Thanks: 2993
Re: 1981 KZ1000 J-to-K build
05 Jul 2017 18:40
Gettin there.")
Steve
Steve
Z1b1000 1975 Z1b
kzrider.com/forum/11-projects/598262-kz-...-will-it-live#672882
kzrider.com/forum/2-engine/597654-poser?start=240#704229
kzrider.com/forum/11-projects/598262-kz-...-will-it-live#672882
kzrider.com/forum/2-engine/597654-poser?start=240#704229
Please Log in or Create an account to join the conversation.
- Shdwdrgn
-
Topic Author
- Offline
- User
-
Registered
- Posts: 611
- Thanks: 24
Re: 1981 KZ1000 J-to-K build
07 Jul 2017 20:11
Got the front and rear brake filled and bled. The rear seems too stiff, like it won't quite let go, while the fronts I have to pull the lever almost all the way in before I get resistance. I dunno. I worked both of them until the fluid ran clean, the rear was actually a bit stiff but seems to work smoothly now, maybe it just needs to freewheel a bit to seat in the pads. As for the front, I had fluid squirting from both sides. Open one side, squeeze the lever, close it up and release the lever, then do the other side, back & forth until it was running clear. Maybe the Kaw brakes grab before you start feeling the tension on the lever? It sure wasn't that way on the Yamaha. Ah well, maybe the fronts need to be moved around a bit as well to get everything in place...
Tomorrow I'm getting oil for the engine. I don't know if the battery took enough charge, but I have one of those battery starter packs to work with, and I'll pick up the new battery when it's actually time to start the engine.. At the very least I'm hoping to get the ignition switch in place and crank over the engine with the oil in it. I still have some more wiring to wrap up before I can get a spark to it though, but it's getting closer.
Tomorrow I'm getting oil for the engine. I don't know if the battery took enough charge, but I have one of those battery starter packs to work with, and I'll pick up the new battery when it's actually time to start the engine.. At the very least I'm hoping to get the ignition switch in place and crank over the engine with the oil in it. I still have some more wiring to wrap up before I can get a spark to it though, but it's getting closer.
1981 KZ1000-JK1
She's a beautiful mess, and I've made her all mine
She's a beautiful mess, and I've made her all mine
Please Log in or Create an account to join the conversation.
- SWest
-
- Offline
- Sustaining Member
-
Registered
- 10 22 2014
- Posts: 23666
- Thanks: 2993
Re: 1981 KZ1000 J-to-K build
07 Jul 2017 20:21
Did you pump the lever?
Steve
Steve
Z1b1000 1975 Z1b
kzrider.com/forum/11-projects/598262-kz-...-will-it-live#672882
kzrider.com/forum/2-engine/597654-poser?start=240#704229
kzrider.com/forum/11-projects/598262-kz-...-will-it-live#672882
kzrider.com/forum/2-engine/597654-poser?start=240#704229
Please Log in or Create an account to join the conversation.
- Shdwdrgn
-
Topic Author
- Offline
- User
-
Registered
- Posts: 611
- Thanks: 24
Re: 1981 KZ1000 J-to-K build
07 Jul 2017 20:42
Not sure if you're talking about the front or rear, but yes... that's how I got the fluid through the lines and pumped out the impurities. Note these lines have been sitting out exposed for at least a couple years. Everything was bone dry to begin with.
1981 KZ1000-JK1
She's a beautiful mess, and I've made her all mine
She's a beautiful mess, and I've made her all mine
Please Log in or Create an account to join the conversation.
Moderators: Street Fighter LTD