
A Newbies Adventures in Maintenanceland!
- 9am53
-
 Topic Author
- Offline
- User
-

Registered
- homebrew, and some bbq
- Posts: 1787
- Thanks: 3
A Newbies Adventures in Maintenanceland!
04 Oct 2009 17:10 - 04 Oct 2009 17:17
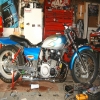
Howdy folks! I have been on here for a few months now and have basically asked a million questions, and provided few answers. I have taken all I have gathered from all y'all and am doing some work on my 1982 kz1000 LTD. I needed to do a valve adjustment, and I had some leaky gaskets that needed replacing, among other things so I decided to make it my winter project to do this much needed maintenance, and make my bike into more of what I am looking for.
I thought that since I am doing this for the first time, and that there are surely some other newbs out there needing to do this kind of thing I would kill 2 birds and get the assistance I need and possibly provide some sort of reference material for other green mechanics.
I suck at posting pics and for some reason can't figure out how to resize my pics, so for the first few posts I will link some photobucket links. Here goes!
this is my bike
i289.photobucket.com/albums/ll231/9am53/101_0260.jpg
here is some yummy gasket goo and some of the gross burnt on oil staining
i289.photobucket.com/albums/ll231/9am53/101_0262.jpg
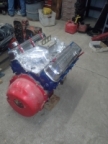
i took the motor out
i289.photobucket.com/albums/ll231/9am53/project014.jpg
i289.photobucket.com/albums/ll231/9am53/project015.jpg
i289.photobucket.com/albums/ll231/9am53/project017.jpg
i289.photobucket.com/albums/ll231/9am53/project018.jpg
Taking out the motor was not so hard, I thought it would be worse, but it was fine. Make sure that if you are not experienced with doing this that you label every wire or connection that you might forget, I am doing this for the first time so I labeled everything shamelessly, I would hate to put it all back and forget a wire and not know where it goes. One thing that I will point out for newbs pulling out a motor (J motor, maybe the older ones are different) is to remove the brackets on the right side that hold the motor mount. This is obvious, but when we did it we pulled out the motor mount bolts and couldnt figure out how to fit the motor out, then we realized that the triangle brackets were welded to the left side and bolted to the right for easy removal.
i threw on some drag bars and realized that the m/c won't fit...so eBay it is!
i289.photobucket.com/albums/ll231/9am53/project016.jpg
anyways, that was my first couple days...taking it slow and steady.
I thought that since I am doing this for the first time, and that there are surely some other newbs out there needing to do this kind of thing I would kill 2 birds and get the assistance I need and possibly provide some sort of reference material for other green mechanics.
I suck at posting pics and for some reason can't figure out how to resize my pics, so for the first few posts I will link some photobucket links. Here goes!
this is my bike
i289.photobucket.com/albums/ll231/9am53/101_0260.jpg
here is some yummy gasket goo and some of the gross burnt on oil staining
i289.photobucket.com/albums/ll231/9am53/101_0262.jpg
i took the motor out
i289.photobucket.com/albums/ll231/9am53/project014.jpg
i289.photobucket.com/albums/ll231/9am53/project015.jpg
i289.photobucket.com/albums/ll231/9am53/project017.jpg
i289.photobucket.com/albums/ll231/9am53/project018.jpg
Taking out the motor was not so hard, I thought it would be worse, but it was fine. Make sure that if you are not experienced with doing this that you label every wire or connection that you might forget, I am doing this for the first time so I labeled everything shamelessly, I would hate to put it all back and forget a wire and not know where it goes. One thing that I will point out for newbs pulling out a motor (J motor, maybe the older ones are different) is to remove the brackets on the right side that hold the motor mount. This is obvious, but when we did it we pulled out the motor mount bolts and couldnt figure out how to fit the motor out, then we realized that the triangle brackets were welded to the left side and bolted to the right for easy removal.
i threw on some drag bars and realized that the m/c won't fit...so eBay it is!
i289.photobucket.com/albums/ll231/9am53/project016.jpg
anyways, that was my first couple days...taking it slow and steady.
'84 GPz900r
'71 CB350
s289.photobucket.com/albums/ll231/9am53/
'71 CB350
s289.photobucket.com/albums/ll231/9am53/
Last edit: 04 Oct 2009 17:17 by 9am53.
Please Log in or Create an account to join the conversation.
- 9am53
-
Topic Author
- Offline
- User
-
Registered
- homebrew, and some bbq
- Posts: 1787
- Thanks: 3
Re: A Newbies Adventures in Maintenanceland!
04 Oct 2009 18:07
so I built a table for the motor and now have it at a perfect height to work on, and did some work on it tonight.
i289.photobucket.com/albums/ll231/9am53/project022.jpg
i289.photobucket.com/albums/ll231/9am53/project023.jpg
i289.photobucket.com/albums/ll231/9am53/project021.jpg
i289.photobucket.com/albums/ll231/9am53/project025.jpg
i289.photobucket.com/albums/ll231/9am53/project026.jpg
Looks like the #1 cylinder has some oily goo...bad rings? I never got any smoke to indicate bad rings.
from these views I decided that to properly clean the motor, and to properly clean the pistons (the manual said NOT to clean the pistons while engine is assembled) I should remove the middle section of the engine. Here is another nube moment...is this middle section just called the cylinders? I have heard jugs, and other than boobs I can only assume this is referring to this cylinder section.
i289.photobucket.com/albums/ll231/9am53/project027.jpg
this is basically where I stand at the moment, I took one of the pistons out, and removed the rings out of sheer curiosity...now I am wondering if I should have just waited? is doing a ring job because I am in there good logic? I need to change at least one pistons rings, so I figure I should do them all right?
what is the best way to remove the carbon on my piston tops? can I turn them upside down in a bath of solvent and then kind of scrub them off? Are those combustion chambers okay looking? I don't have much to compare to but those valves look pretty nasty. What is the best way to clean out carbon-y combustion chambers? (love the alliteration!)
'84 GPz900r
'71 CB350
s289.photobucket.com/albums/ll231/9am53/
'71 CB350
s289.photobucket.com/albums/ll231/9am53/
Please Log in or Create an account to join the conversation.
- chance
-

- Offline
- User
-
Registered
- Life long biker/
- Posts: 578
- Thanks: 0
Re: A Newbies Adventures in Maintenanceland!
04 Oct 2009 18:24
Carb cleaner or has you say soak in solvent use a scotch brite pad so not to scratch the piston other probley know other ways . You took em off at the rist pin from the connection rod right ? Carb cleaner works on cleaning that carbon from your valves chambers but it will take a few cans I would guess.You should check your valve guides for wear /slack in em ..Good Luck Bro.
Please Log in or Create an account to join the conversation.
- chance
-
- Offline
- User
-
Registered
- Life long biker/
- Posts: 578
- Thanks: 0
Re: A Newbies Adventures in Maintenanceland!
04 Oct 2009 18:38
The jugs are a refrence to the piston Clys.which you should check the bore They will at least need honeing when replacing the rings..Maybe you might want to resurface the head also.Check the ring gaps too before installing the pistons
Please Log in or Create an account to join the conversation.
- timebomb33
-
- Offline
- User
-
Registered
- Posts: 4284
- Thanks: 10
Re: A Newbies Adventures in Maintenanceland!
04 Oct 2009 20:04
there is alot of blowby on the skirts of the pistons which is a sure sign you will at least need rings possibly a complete bore job.
1973 z1 2-1974z1-a,2-1975z1-b dragbikes1015cc+1393cc, 1977kz1000,1978kz1000,1981kz1000j, 1997 zx-11, 2000 z12r,1428turbo nitrous pro-mod and a shit load of parts thats all for now leader sask.,CANADA
I THINK MY POWERBAND BROKE
I THINK MY POWERBAND BROKE
Please Log in or Create an account to join the conversation.
- PLUMMEN
-
- Offline
- User
-
Registered
- Posts: 7986
- Thanks: 104
Re: A Newbies Adventures in Maintenanceland!
04 Oct 2009 20:16
clean it up really good and measure the bores and pistons before spending money on rings.might as well tear down the head while youre at it and do a valve job and check guides ")
Still recovering,some days are better than others.
Please Log in or Create an account to join the conversation.
- racer54
-

- Offline
- Sustaining Member
-

Registered
- Posts: 1903
- Thanks: 114
Re: A Newbies Adventures in Maintenanceland!
04 Oct 2009 20:25
I use a chisel and a 5# sledge on that stuff in the combustion chamber. Cleans it out real quick! Other times, I careful scrap off the bigger stuff and then either use a scotchbrite pad and some solvent, if it isn't too bad, or a wire wheel or brush to get the heavy stuff off and then the pad to finish it off. Same for the top of the pistons. Just take it easy and figure it will take some time and elbow grease. You can take stuff off but it lots harder to put metal back on if you cut too much off.
1980 LTD (changed over the years), 1979 LTD (being rebuilt), 1977 KZ turbo and various KZ's in various states of build. KLX110
Please Log in or Create an account to join the conversation.
- 9am53
-
Topic Author
- Offline
- User
-
Registered
- homebrew, and some bbq
- Posts: 1787
- Thanks: 3
Re: A Newbies Adventures in Maintenanceland!
05 Oct 2009 04:32 - 05 Oct 2009 04:39
PLUMMEN wrote:
How would I measure the pistons? would I just measure the diameter of the slots that the rings sit in? or would I measure the pistons themselves? Would honing the cylinders be a hard thing to do myself? Does it take long? I figure paying my local shop a half an hour to do it is not too expensive, but if it takes longer I don't want to pay someone. I don't mind paying 80 bones for a set of rings if they would help, I mean the ones in there are almost 30 years old!
If I take the head apart and check valve seals etc. I can soak the valves and head in solvent to loosen up the carbon and clean it up so I may end up doing this too. I hope I am not getting in over my head! I am trying to keep things organized so I don't get overwhelmed with a pile of parts that I don't recognize.
EDIT: I read the service manual about measuring piston wear
clean it up really good and measure the bores and pistons before spending money on rings.might as well tear down the head while youre at it and do a valve job and check guides
How would I measure the pistons? would I just measure the diameter of the slots that the rings sit in? or would I measure the pistons themselves? Would honing the cylinders be a hard thing to do myself? Does it take long? I figure paying my local shop a half an hour to do it is not too expensive, but if it takes longer I don't want to pay someone. I don't mind paying 80 bones for a set of rings if they would help, I mean the ones in there are almost 30 years old!
If I take the head apart and check valve seals etc. I can soak the valves and head in solvent to loosen up the carbon and clean it up so I may end up doing this too. I hope I am not getting in over my head! I am trying to keep things organized so I don't get overwhelmed with a pile of parts that I don't recognize.
EDIT: I read the service manual about measuring piston wear
'84 GPz900r
'71 CB350
s289.photobucket.com/albums/ll231/9am53/
'71 CB350
s289.photobucket.com/albums/ll231/9am53/
Last edit: 05 Oct 2009 04:39 by 9am53.
Please Log in or Create an account to join the conversation.
- PLUMMEN
-
- Offline
- User
-
Registered
- Posts: 7986
- Thanks: 104
Re: A Newbies Adventures in Maintenanceland!
05 Oct 2009 04:41 - 05 Oct 2009 04:49
look in your shop manual,2-3 places pistons need to be measures.id clean up and take them to machine shop to have them checked with right tools B)i dont know how to post pages frommanual,lets see ifomr is around! :laugh:
Still recovering,some days are better than others.
Last edit: 05 Oct 2009 04:49 by PLUMMEN.
Please Log in or Create an account to join the conversation.
- PLUMMEN
-
- Offline
- User
-
Registered
- Posts: 7986
- Thanks: 104
Re: A Newbies Adventures in Maintenanceland!
05 Oct 2009 05:04
bench grinder with wire wheel is easy way to clean up valves once you remove them ,put the valves and retainers /keepers in an empty milk carton if youre worried.easier to keep things in order that way
Still recovering,some days are better than others.
Please Log in or Create an account to join the conversation.
- 9am53
-
Topic Author
- Offline
- User
-
Registered
- homebrew, and some bbq
- Posts: 1787
- Thanks: 3
Re: A Newbies Adventures in Maintenanceland!
05 Oct 2009 05:04 - 05 Oct 2009 05:05
haha, I just spent the last few mins looking at it. I think it says to measure the bores in 3 places and the pistons just 5 mm up from the bottom perpendicular to the pin...I looked at removing the valves and it looks much scarier than removing the pistons! If I make one of those PVC valve removers that are in the TOOLS forum I can remove the valves right? Do I need to heat the head and remove the valve guides to remove the valves, or can the guides stay in there? Is putting the valves back in difficult? I assume it's just rtevers of removing them, but I am worried about compressing the springs etc.
I am glad I am not doing this alone!
I am glad I am not doing this alone!
'84 GPz900r
'71 CB350
s289.photobucket.com/albums/ll231/9am53/
'71 CB350
s289.photobucket.com/albums/ll231/9am53/
Last edit: 05 Oct 2009 05:05 by 9am53.
Please Log in or Create an account to join the conversation.
- CoreyClough
-

- Offline
- User
-
Registered
- GPz550 Addiction
- Posts: 1094
- Thanks: 82
Re: A Newbies Adventures in Maintenanceland!
05 Oct 2009 05:04
You'll get some good advice from members here.
You have the head off, so I'd send it out to have it rebuilt, with new valve stem seals. APE in CA rebuilt a head of mine, and it's working excellent. I'd highly recommend them.
Depending if there not are any grooves in the cylinders, you could do with a good cleaning up of them(ball hone), and new piston rings.
Rust on the rods I see there? :blink:
How many miles on this engine?
'85 GPz550(ZX550-A2)
GPz550 Base Manual --> tinyurl.com/ze5b3qo
GPz550 Supplement Manual --> tinyurl.com/h34d2o6
GPz550.com --> www.nwsca.com/scripts/gpz_forum_2005/default.asp
First Race Win GPz550 --> tinyurl.com/o5y3ftp
GPz550 Base Manual --> tinyurl.com/ze5b3qo
GPz550 Supplement Manual --> tinyurl.com/h34d2o6
GPz550.com --> www.nwsca.com/scripts/gpz_forum_2005/default.asp
First Race Win GPz550 --> tinyurl.com/o5y3ftp
Please Log in or Create an account to join the conversation.
Moderators: Street Fighter LTD