
Search Results (Searched for: gs swing arm)
Replied by axel on topic crooked swing arm from factory?
09 Apr 2018 20:58if i understand you correctly, that was one of the first things i looked at.loudhvx wrote:That's what I did.531blackbanshee wrote: a rod through the pivot set in some v-blocks and a rod through the axle slot in set in v-blocks will tell the tale on the swingarm.
leon
I think I also used some blocks and a big square to make sure the swingarm axle mounts were equally offset from the ends of the pivot tube. (In other words making sure the axle is centered between the swingarm bosses on the frame, and thus the axle is centered on the frame.)
by axle you’re referring to the actual rear axle and not the swing arm pivot bolt?
the axle seems fine as long as the markings are to be trusted. but i’ll be remeasuring everything when i take the wheel off for tire mounting.
Thanks for all the replies!
I guess my question could have been simpler.
My current rim is a 2.15 18”, Is there a wider KZ rear 18” wheel that would easily swap its place?(or, which one would require least modification). I do weld and can move some things around but would like to avoid modifying the swing arm.
Like a 2.50 or 3.00?
Modernization of my 77 KZ900 was created by BOOM_FIST
22 Mar 2018 09:01
Hey KZR,
Thought I'd bring you all along with the progression of my fun project. A little back story...
Starting off, I had a 88' Suzuki Katana 600 for my first bike back in 2001 when I joined the military. Learned and owned that for about a year. Planned on getting a newer GSX-R 600 when I felt comfortable enough, but found out I was having a baby girl at the young age of 19. Fast forward to 2005 after I got out of the military, I wanted another motorcycle. Found a decent 92' Yamaha FZR 600 for $900. Tinkered with that and enjoyed it for about a year and a half and was planning on upgrading again, like before. Nope, found out I was having a boy! I love kids and especially my own, so don't think I was upset with having to sell my bikes! I have the mindset that I will always get another bike...maybe not exactly when I want it, but it'll happen in due time.
So, after 2 more kids and about 10 years later, I was in the market for another bike. My taste had changed, but I still wanted something sporty'ish. I'm not getting any younger so a new sport bike wasn't an option, plus my wife wanted to be able to enjoy riding with me too. A buddy of mine has a nice 74 900 that was his Dad's and I always loved his bike every time he rode it around. I could hear him before I could see him and that's what I fell in love with first...the sound! All black with that classic style look and it is fast. Everything that I liked. My wife even commented on how cool his bike was and that I should get one of those. After searching for a few months I came across one right up the street from me in amazing condition. It was perfect. I love it. My wife loves it. Win/Win.
After riding it about 1500 miles in stock form, I've come to realize, like many of you have as well, that it's 70's era handling/braking technology was in dire need of modernization! Anyways, that's what I'm in the middle of as we speak.
After researching and asking many questions, I sourced out a set of forks and swing arm off of a 97 Suzuki Katana 600. Wheels, brakes, tires, triples, shock, and a bunch of other misc pieces. So far, it's been fairly easy to mock up and test fit pieces. It's scary how easy these pieces are coming together like it was made for it.
Ask any questions you may have if you're going through this same stage of your build and I will be more than happy to assist in any way I can!
Enjoy...
-Tom
I got all the things fixed that I was worried about. The shock post with a stainless nylock nut and cheap tap and die set did the trick. I am going to swap the right leg to the left and put the caliper on the rear of the rotor instead on top of the rotor. I have matching levers so now I have parts from 4 different bikes on it also I got the clutch pull on the lever from about 25 pound pull down to a 10 pound pull by cleaning up the worm gear and greasing it .. I got the swing arm rear wheel and front wheel looking good with a new set up rubber and some elbow grease. Now I just have to get the forks back together with fresh fork seals and oil then I decided that I am going to paint them black. For some reason I am having a hell of a time getting the bead to seat of the front tire but I will get it figured out ..
Replied by menace on topic 1977 1000A?
08 Mar 2018 22:31
So I just found some not so good things on this bike.. The left rear shock post is stripped because the idiot over tightened or had the wrong spacing when he tightened down his shocks. I tried to run die over it but there just wasn't enough meat left. So I ran a course thread over it and it seems like it will be ok but it's going to bother the hell out of me knowing it's two different sizes. I got the forks pulled and it looks like the left lower has been welded on and sanded down right on one caliper mounts so that sucks. Does any one out there have a left lower fork tube that they don't need? I got my rear brake on cleaned up the chain and installed the freshly powder coated swing arm. Looks pretty good so far. Man that sucks about the fork tune i hope there is no more surprises.
Replied by menace on topic 1977 1000A?
01 Mar 2018 22:37
I have no idea why they would do something like that. I think sometimes they just fill the spaces on the title with random stuff that applies but is not accurate. I got some work done on the old girl. I put super bike bars on it they look to be about a 4 inch rise and 2 inch pull back they are aluminum i like them. I got the rear tire on the wheel i put duros in the stock size on it. I cleaned up the rear wheel and hub and re greased everything. I took off the swing arm it is in pretty rough shape as far as paint. The shaft was properly greased so it didnt take much at all to get the bolt and the sleeve out i am going to get it sand blasted and powder coated quick. The frame for the most part is in amazing shape so it would seem kind dumb to have a rusty beat up swing arm when everything else will be so nice. I cleaned out the tank it was a little bit rusty and now it is in amazing shape I used METAL SAVER its pretty expensive but it man it works. I got my head light and bucket, battery, handle bars, grips, and a few other things. I drained the oil a few nights ago and i went to put the drain plug back in the motor and i found the front cam chain guide hanging out of the drain plug hole so my carb clean and battery tune up turned into re ring and a valve job. Atleast i know it will be fresh when i get it going. Im going to media blast the swing arm and go through the rear caliper tomorrow so i can get the rear wheel back on. Then Saturday night i will start pulling the top end I am worried that the cam chain guide is fixed and they just forgot the old piece in the motor because the previous owner said he was riding it and he just parked it. I wish there was a way to inspect the cam chain guide before i tear off the top end i was thinking of pulling the sump first and sticking my head in there to see if i can see where the guide is broke or if its been replaced. thanks for the help guys
Replied by DoctoRot on topic Anybody ever substitute a KZ400 early 40-spoke rear drum for KZ650-750-900 drum?
15 Feb 2018 15:53 - 15 Feb 2018 15:54
IIRC the bigger diameter axle has more to do with the width it is spanning. Most vintage bikes are spanning 9-10 inches at the axles while most modern bikes are spanning 12+ inches. this requires a larger diameter bolt to retain rigidity, also larger diameter bolts allow the axle to be hollow allowing for weight savings.
I put a '78 kz650 rear drum (17mm axle) on my '80 kz750twin (20mm). I have a modified GS1100E swingarm and because it is much wider I kept the 20mm axle. I found appropriate sized bearings for the hub to retain the 20mm axle. Then had the brake plate, and sprocket carrier spacer to bored out to 20mm. I also made a new internal spacer for the hub. Worked great.
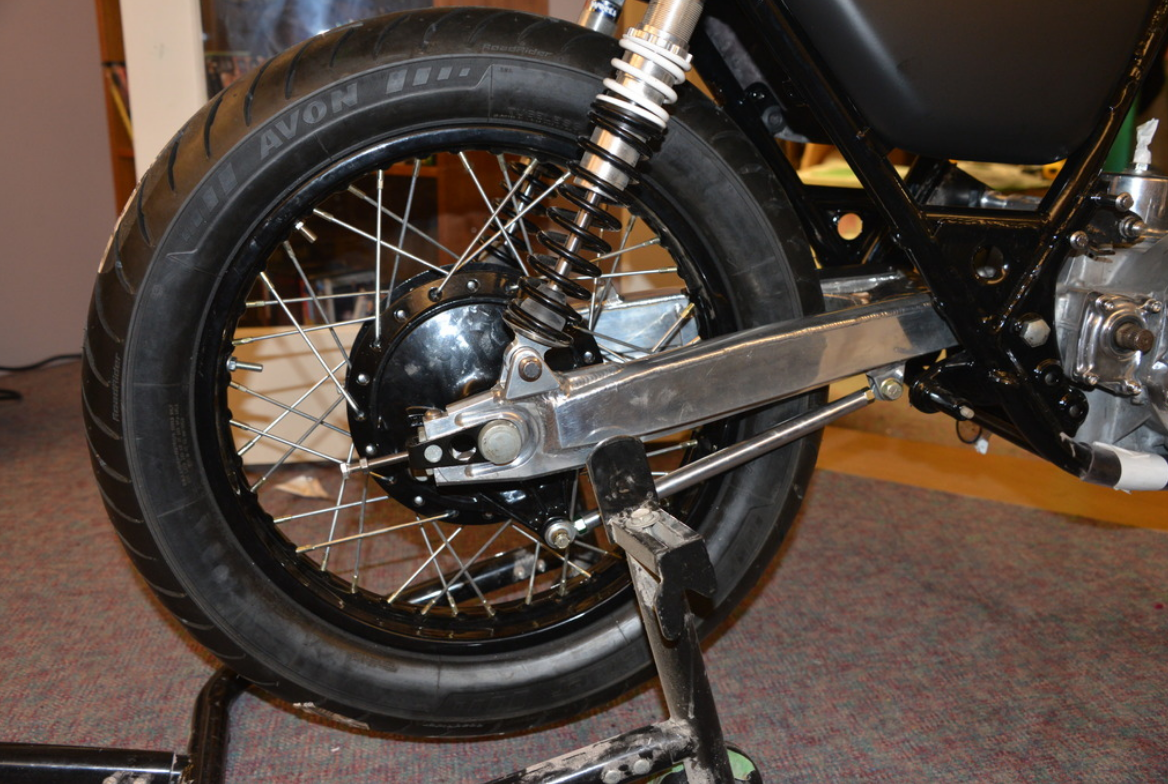
I put a '78 kz650 rear drum (17mm axle) on my '80 kz750twin (20mm). I have a modified GS1100E swingarm and because it is much wider I kept the 20mm axle. I found appropriate sized bearings for the hub to retain the 20mm axle. Then had the brake plate, and sprocket carrier spacer to bored out to 20mm. I also made a new internal spacer for the hub. Worked great.
Anybody ever substitute a KZ400 early 40-spoke rear drum for KZ650-750-900 drum? was created by SoyBoySigh
14 Feb 2018 18:28
Hi - I'm thinking I'd like to use a 40-spoke early type KZ400 rear drum on a 750 build.
Any thoughts on pitfalls? I'm mainly concerned with the downsized bearings in bumping the axle size from 17mm to 20mm, whether this would affect bearing life, load capacity & speed rating etc. Should ask ALL BALLS RACING 'cause they're the ball-bearing experts.....
I suppose there are always later-era swing-arms where the axle has been scaled down from 20mm to 17mm or even 16mm, while the 20mm axle has been bumped up front where it always belonged! But I don't want to ruin the PERIOD-CORRECT thing, the TIME TRAVEL factor.
So yeah - if anybody has TRIED this? In HONDA circles, it's quite common for the CB500/CB550 rear drum to be used on up to 836cc CB750K's and they race 'em with even smaller drums. Lucky for the KZ crowd, the KZ400 drum's actually got a proper CUSH-DRIVE on it with a 3rd wheel bearing installed. PERSONALLY speaking, the CB500/CB550 is something I'd never consider using due to the cush-drive design alone. The KZ400 hub SEEMS promising. S'pose I should look at the bearing size. It's surprising how many more modern bikes where the front axle size has been bumped up from 15mm to 20mm, use a bearing with the same diameter of outer race. Thing is, those front bearings are often placed further apart so surely that's gotta have a big effect on bearing life vs lateral forces etc.
But I'm sure there are OTHER considerations as well. IMHO the shoes being 30mmx180mm vs 40mmx180mm in the 650/750/900 drums ISN'T a set-back. Neither is the fact that the drum lining is substantially thinner, as I'd only ever wind up using my rear brake in the occasional PANIC stop. My front brakes are substantially beefed up already. So it seems to follow that despite being a retro-fried build with all early '70s running-gear components, the modern RIDING STYLE is what relates most directly to the rear brake - the lighter use of which and less frequently at that, is what supports this idea imho. And as for any question of the drum overheating, it'll be ventilated quite a bit so I expect it to cool far far better than the stock configuration.
Nevertheless - I'm curious to hear what all YA'LL have got to say on the subject. I'm gonna lace it to a 3.50x18" Super-Akront rim which was originally laced to a ZED rear drum. From what I gather from other wheels where I've employed used pre-drilled & RE-drilled rims, (like my "KZ440LOL" project with the Suzuki 4LS in 3.0x16" Borrani rims with 110/70-16 & 140/70-16 Maxi-Scooter tires & all-NOS belt-drive, etc etc) it would SEEM like there should be zero issue with pairing this pre-drilled rim with this hub, given that the spoke-flange is only slightly smaller diameter and width than the original hub fitment. The spoke holes might even require a reaming but I doubt it, as the 4LS in the "KZ440LOL" took the heavy-duty Harley spec spoke gauge - which I think is a swaged 7-6 gauge - (They're like Navy-Cut cigarettes, they're so damn short!) The bent heads were a bit of a fidget but they squeezed through. The 40-spoke KZ400 drum should be just fine. After all, I'm using the same heavy-duty spokes on the 36-spoke 160mm drum for the KZ440LOL rear wheel, which I'm FINALLY getting around to building.....
The bigger bike will be the 'featherweight' and it's for my daughter to use on the highway, single-seat-only, really tricked out with beefed up yet lighter-weight front brakes, just a whole bunch of cool stuff has been set aside for this project. I'd feel like it were incomplete if I didn't ditch a substantial chunk of un-sprung mass from that rear wheel, to go along with the top-shelf lightweight RIM it'll be laced to - And such a low mass hard charging JOCKEY in the saddle, I should think this 750 will be a serious challenge for by big-bore rebuilt 900.....
Surely all of these OTHER considerations only bear out my argument that this drum SHOULD be adequate. If I absolutely have to, I suppose I'll bump the rear axle diameter down to 17mm, even if I've gotta use sleeves on the ends for a 20mm-spec swing-arm. I'm sure THAT'S been done before as well ... ???
-Sigh.
Thank You Steve, I kind of thought as such but It doesn't hurt to ask a dumb question. I'm waiting on Brown Santa to bring a new stator. I don't want to have to do this twice, when It comes to electrical its good to know whats between my legs. It doesn't appear to be able to fit under the battery, it looks the swing arm would take it out.
Replied by Dr. Gamma on topic Better Than Nothing---The rebirth of a Superbike.
06 Feb 2018 17:19Dr. Gamma wrote: Here is a short summary of whats all been done in the building of my Kz1000 Superbike road racer.
All major frame modifications done by Rob North and Pierre DesRoche back in 1979. This chassis is basically a copy of the bike that Reg Pridmore won the 1977 and 1978 AMA Superbike Championship on. Chuck Parme used basically the same bike to finish the highest placed privateer in the 1980 AMA Superbike Championship.
An oversize steering neck with TZ750 roller bearings is used, and has been relocated to put the front and rear wheels in alignment. Neck has also been repositioned rearward to put more weight on the front wheel, and it has about 2 more degrees of fork angle. KZ650 triple trees that have less trail are used to quicken up the steering. Double fork tube clamp bolts have been added to lower tree to increase fork rigidity.
Swing arm has been modified by DesRoche by cutting open, and welding in some internal bracing. An extra tubular 4130 moly hoop has also been added to bottom of swing arm. An oversize swing arm pivit bolt with matching swing arm inner sleeve are used, and mated to a honed to size mounting bosses on frame.
Frame has extra tubular bracing added through out the whole frame. This triangular bracing along with the DesRoche aluminum motor mount plates with ream-fit oversize bolts ties the motor to the frame making it one strong non-flexing structure. All worthless brackets, and tabs have been removed from frame for extra weight savings.
Yoshimura/Kayaba road race forks are used along with a 2.50X19 inch magnesium Morris mag. Brakes are 13 inch Kosman full-floating rotors with a pair of reworked Lockheed dual piston calipers mated to a KZ1000S1 master cylinder with a 11/16 piston. Earl's Supply -3 braided steel lines tie the whole brake system together.
Rear rim is a 3.50X18 inch magnesium Morris mag. Along with a Hunt plasma-coated aluminum brake rotor, and a KZ1000A brake caliper.
Light weight rearsets are fabricated using KZ1000S1 components. Mark II fuel tank has been reworked to use dual Z1R petcocks. This setup will allow the very last ounce of fuel to be picked up from tank!!! Custom fabricated gauge bracket with a rare KZ1000S1 road race tach. Vintage Yoshimura 1/8 turn Superbike throttle is used to open up the Keihin CR33 carbs. Custom fabricated Bassani Superbike pipe for the ultimate in cornering clearance is used.
Bike can be made street-legal with very little effort. All the provisions are there to add lights and charging system for street use. A under 440 pound street-legal KZ1000 makes a pretty nice street bike!!!
Current motor in bike;
KZ900 cases and covers are used for their lighter weight over similar KZ1000 parts.
KZ1000 cylinder block and head are used for this motor.
Lighten and polished KZ900 Falicon Supercrank with polished stock rods.
Moriwaki Engineering 73mm two ring cast pistons.
Cylinder head work by Yoshimura R&D with 37.5mm intake valves.
Yoshimura Super Bonneville cams running on Yoshumura KZ650 style shim buckets with lighten Yoshimura valve spring retainers.
Lighten and balanced Falicon clutch basket with O.E.M. clutch plates, H/D springs, and a needle bearing clutch pusher.
Transmission is a factory Kawasaki close ratio road race item. It comes from the factory fully undercut.
Andrews Products kickstart gear is fitted so the stock kickstarter can still be used with the close ratio box.
Motor has no provisions for electric start. Even the starter motor mounts have been removed for weight savings!!!
Stock diameter M.T.C. H/D Golden Studs are used so not to impede oil flow to the head.
Modified oil pump to eliminate any chance of oil aeration.
Earl's Supply 10 row oil cooler and plumbed with Earl's Supply AN8 braided steel lines and fittings.
Keihin CR33 carbs with the AMA mandated 31mm restrictors still installed are used.
Kal Gaurd Gun Kote coating has been applied to the complete motor, and covers to aid in the reduction of engine temperature.
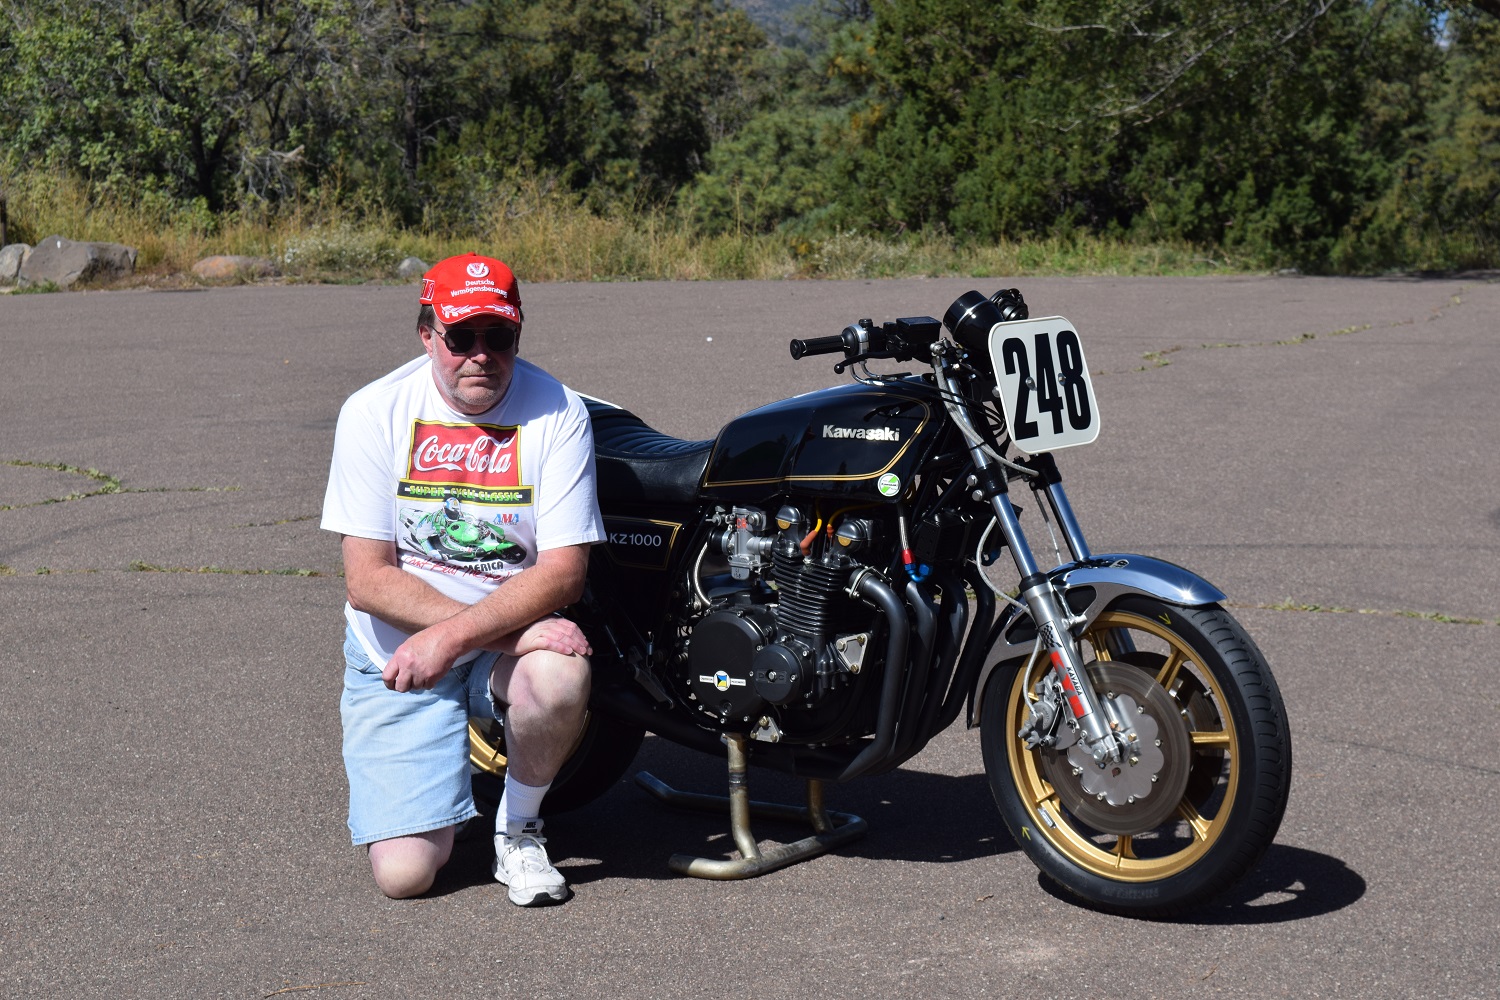
If anybody wants to know exactly what makes up or what has been done to my KZ1000 MK. II Superbike, here is a short list. I restored this as close as I could to the very last time I raced it. This bike has 5 seasons of racing on it in its past. Its now back to its original 1979 factory blue paint job too!!!
Displaying 691 - 700 out of 7254 results.