
Search Results (Searched for: gs swing arm)
Replied by DoctoRot on topic 1978 KZ650 Bike Build
30 Mar 2021 09:57Complete package would be changing fork offset, wheel size, forks, rake, wheelbase, swingarm angle, shock angle, ride height, etc...it all adds upDoctoRot post=845781The KZ650 has great stock geometry i wouldn't stray too far from it, unless your are doing the complete package.
What do you mean by "doing the complete package"?
Comparing the stock 650 to the 900 for discussion purposes.
Rake 27 deg vs 26 deg
Trail 108 mm vs 90 mm.
I have both triple trees but wanted to use the Z1 because I have pretty much an entire front end that I could use. If I go back to stock 650 I need to buy the front end...forks, gauges, gauge mount, brakes, etc.
I'm not very familiar with the Z1 stuff but IIRC they use 36mm forks so that will fit the KZ650 triples so you can use the forks, wheel, and brakes. The only things that wouldn't fit are the gauges. You could have the Z1 gauge mounts welded on the KZ triple. Or you could just try the z1 triples out since you already have the parts in hand. 90mm is very little trail by modern standards, probably why the z1s were prone to tank slappers. What is the fork offset on both the triples? you can easily do a little calculation to see if its going to the realm of unsafe.
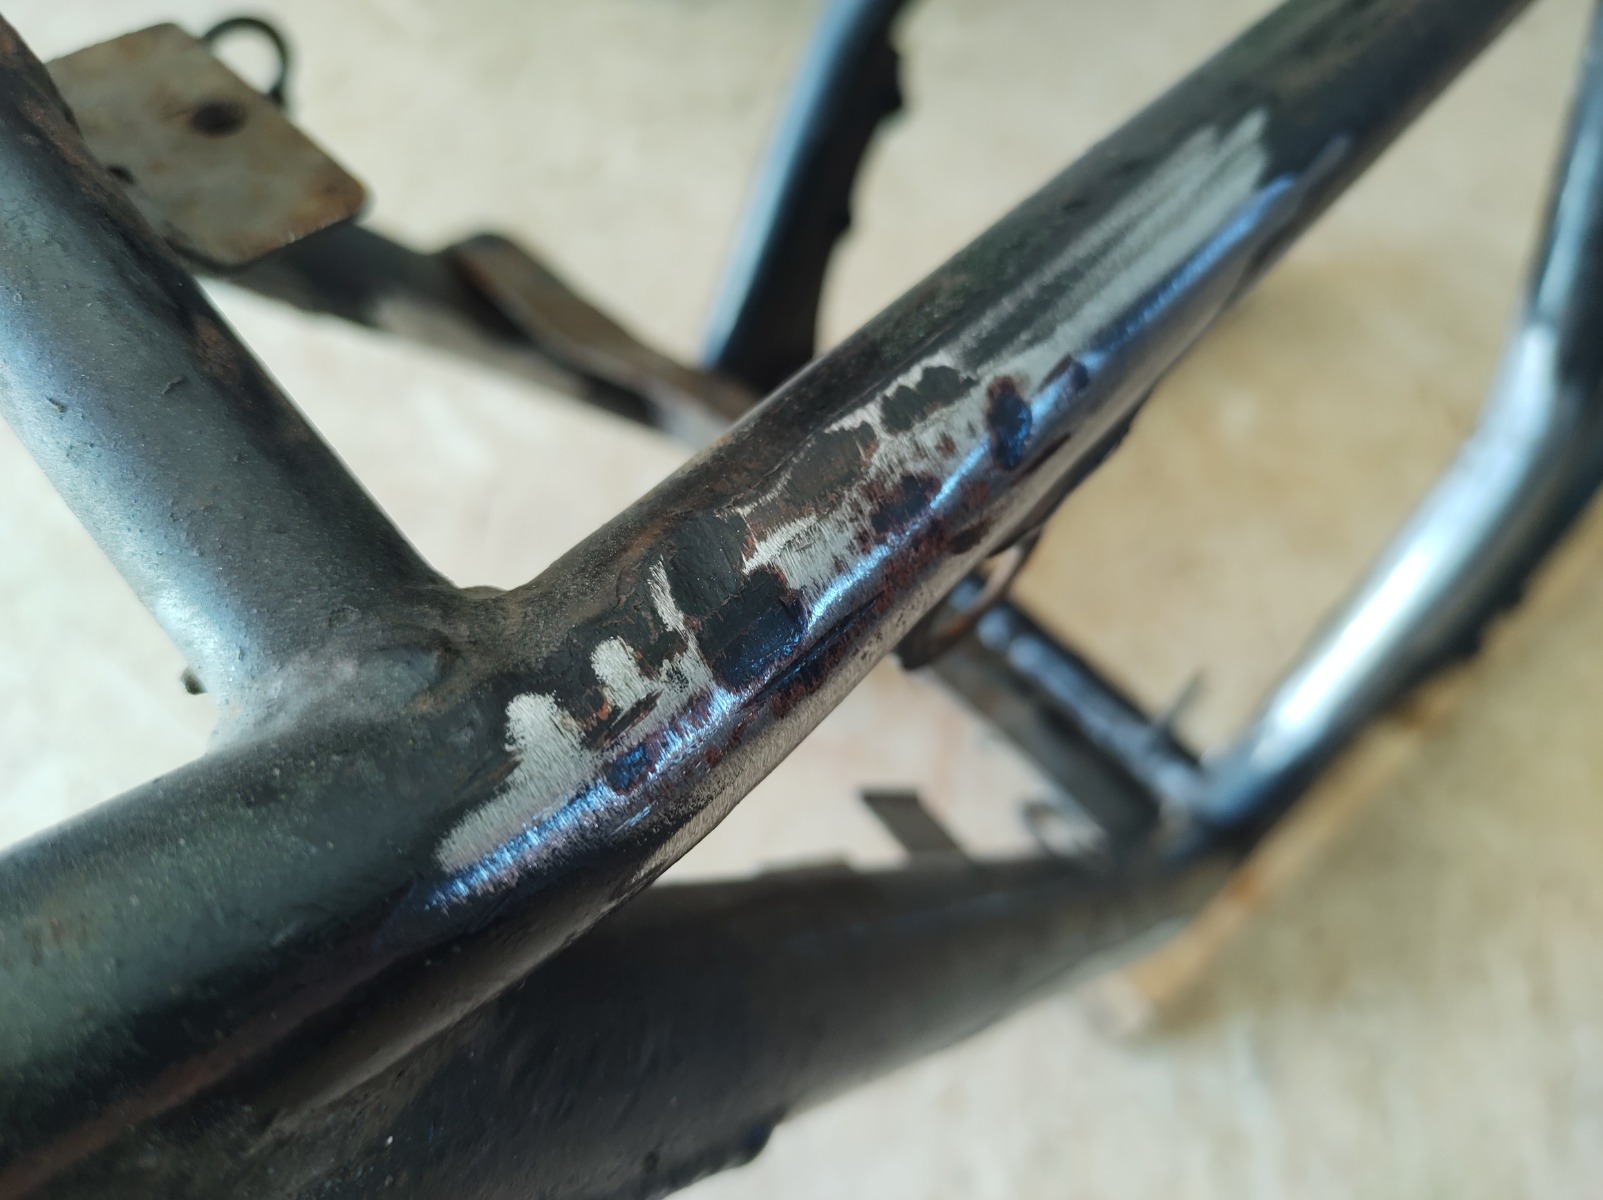
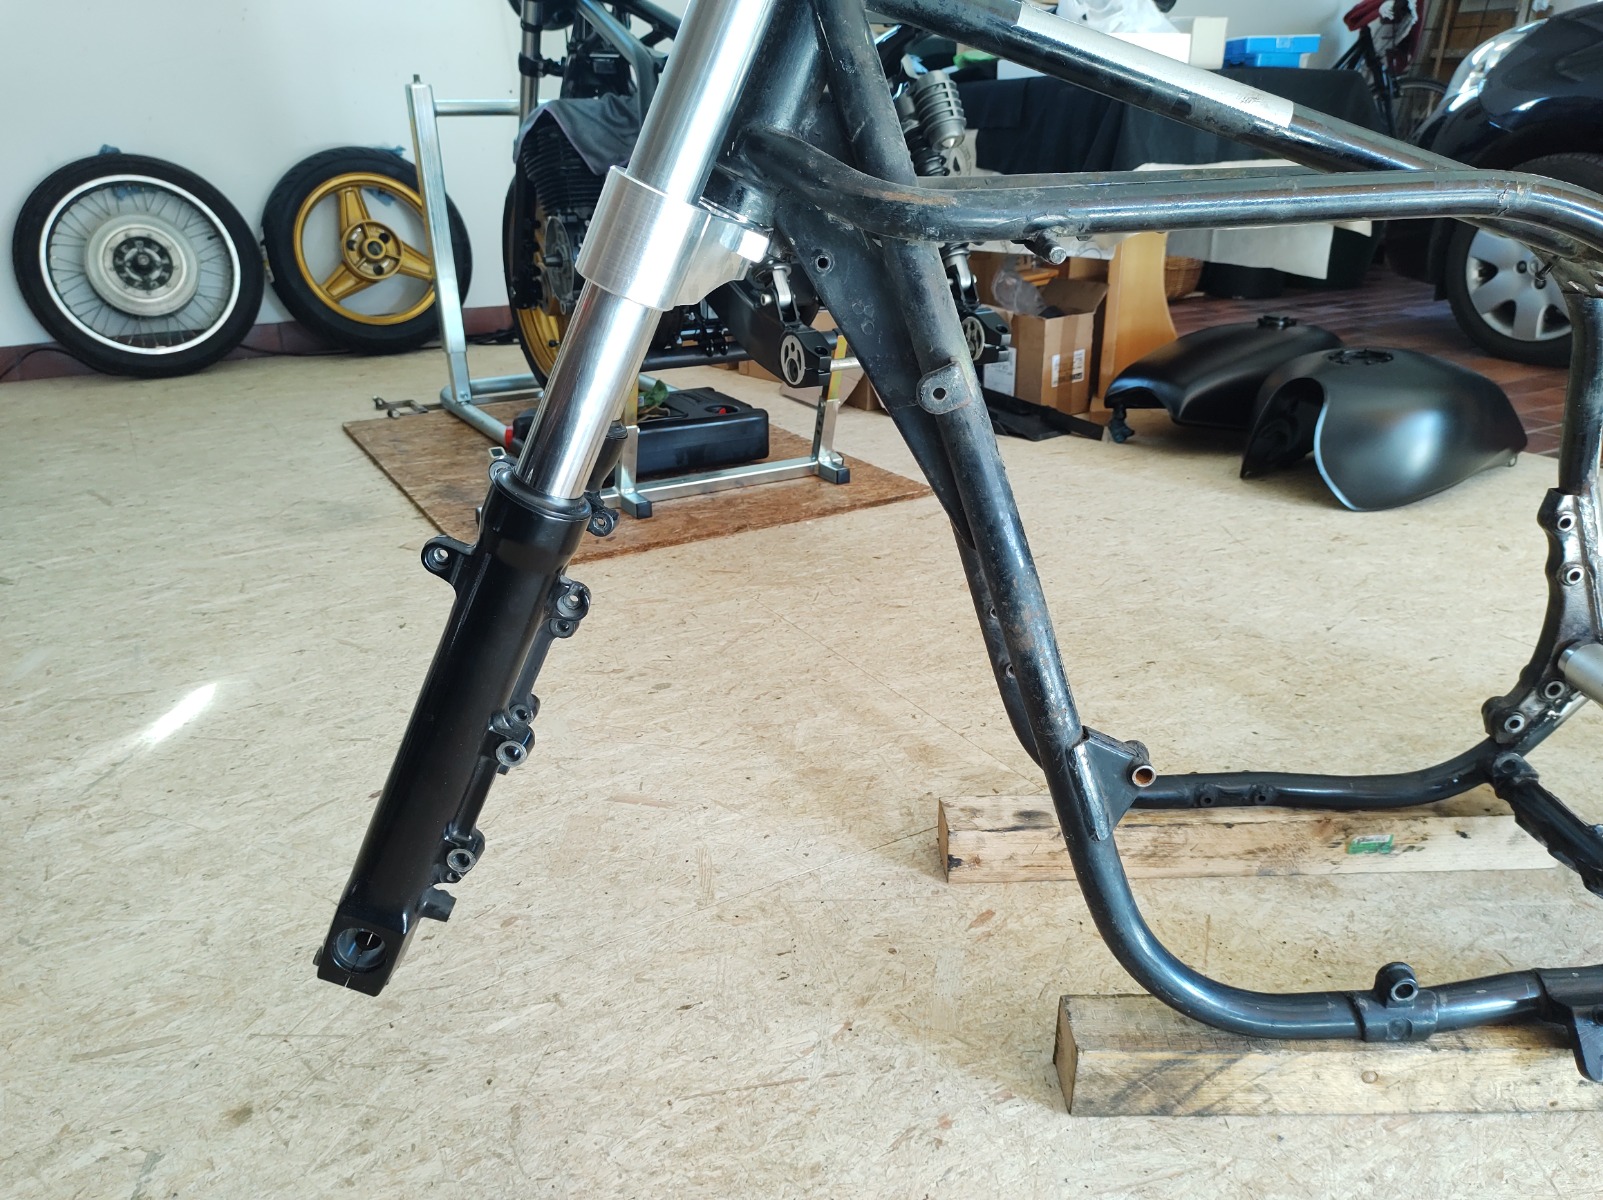
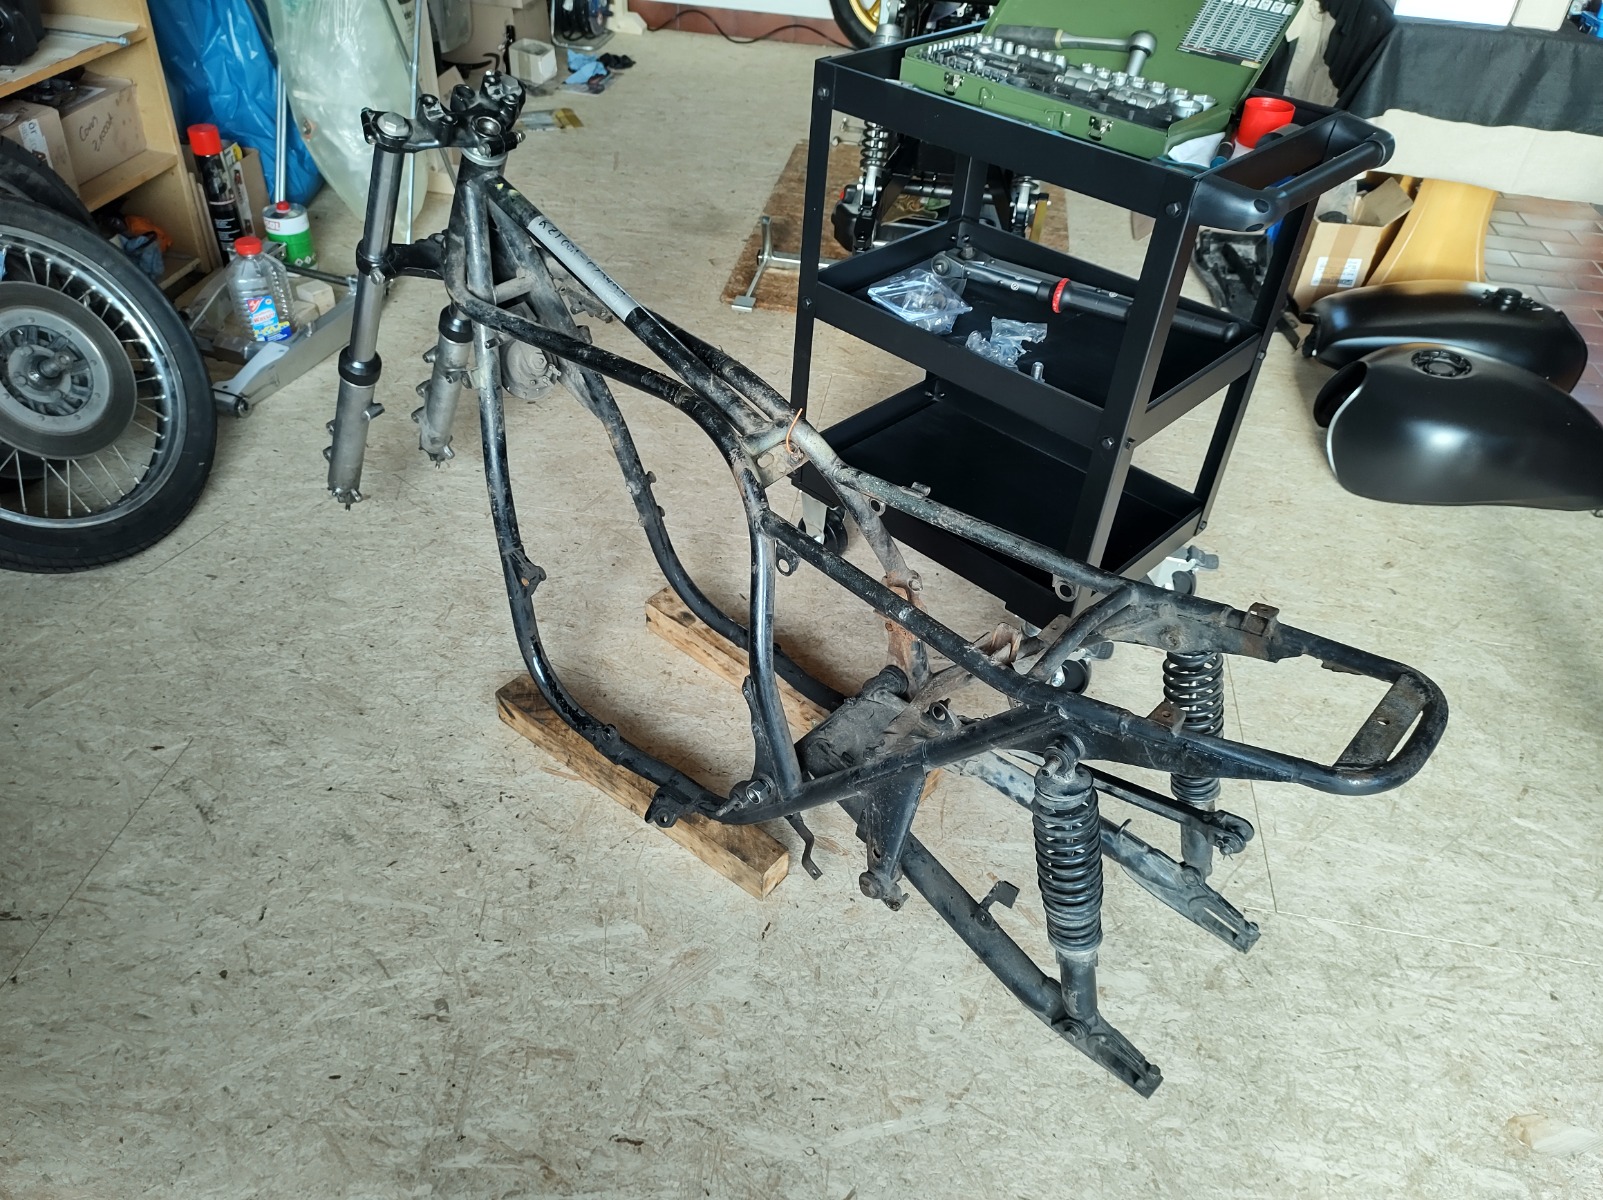
A bit more work done today. Chopped a few unnecessary things of the frame (rusted out pillion footpeg brackets, brake lever brackets seat brackets.
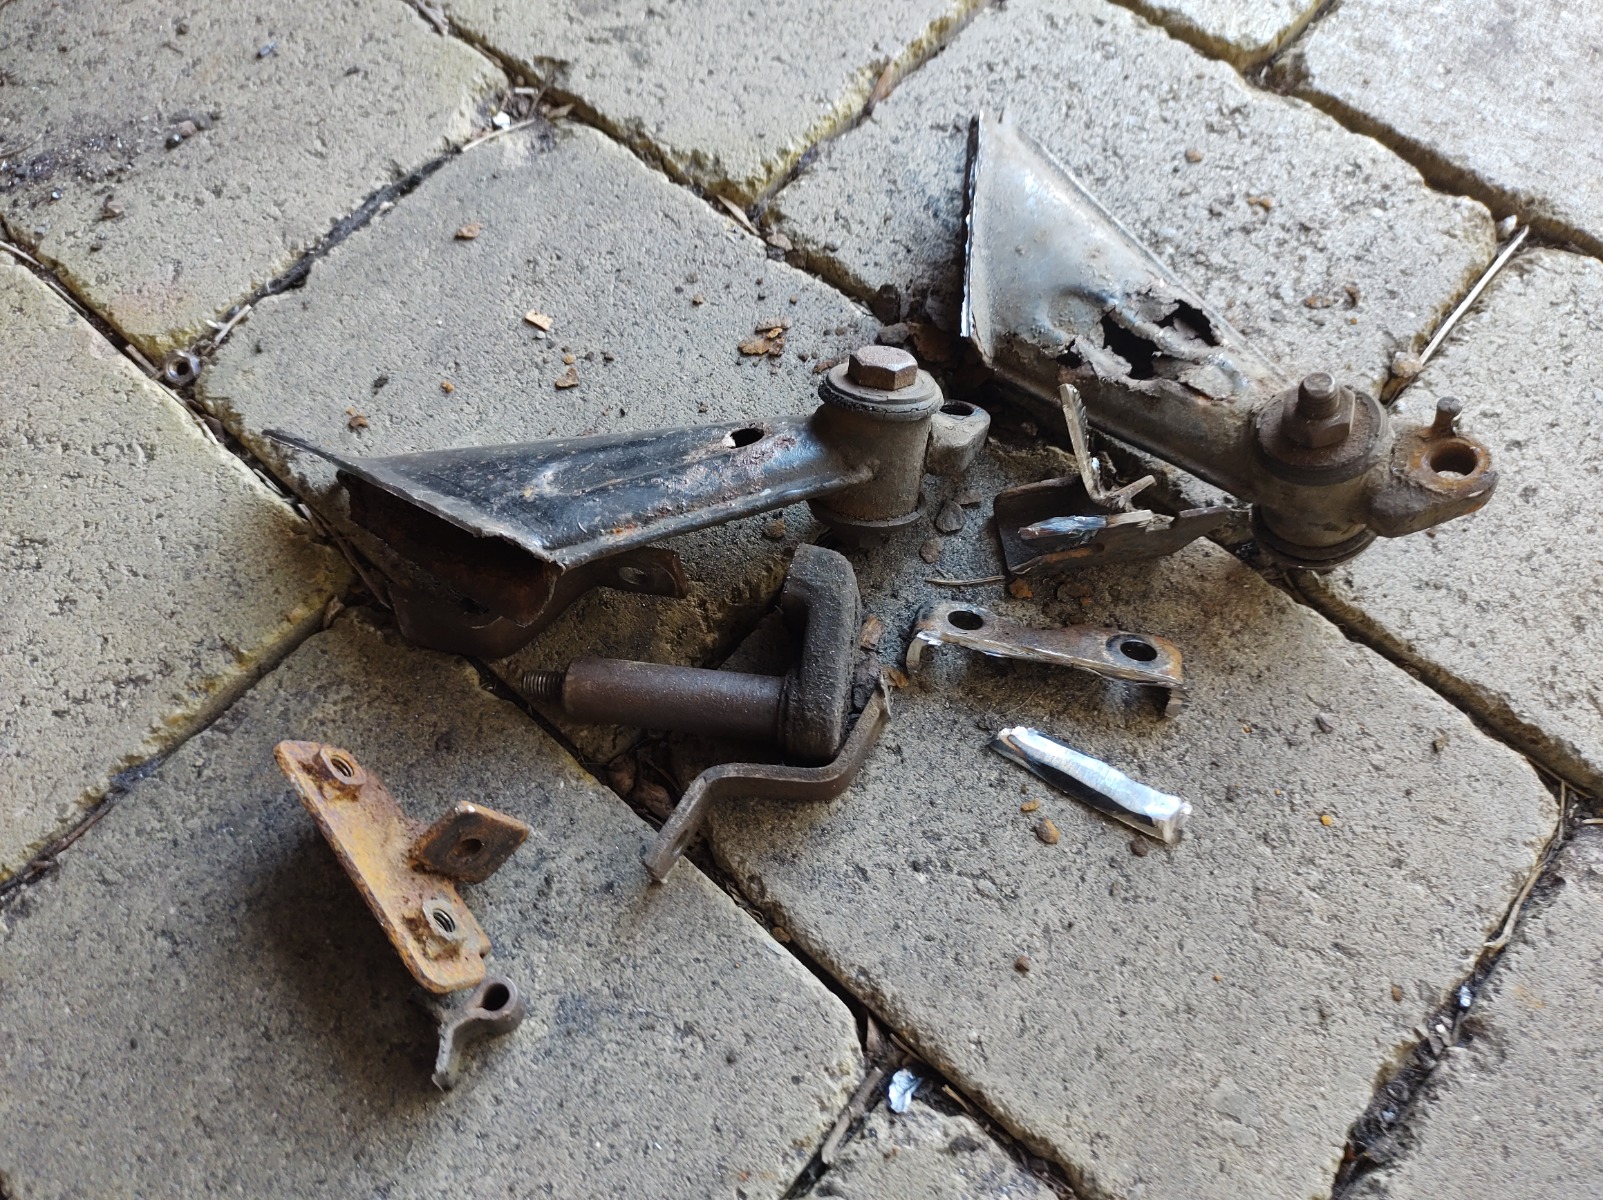

One of the seat hinges had already been removed - someone was pretty heavy handed with the grinder.
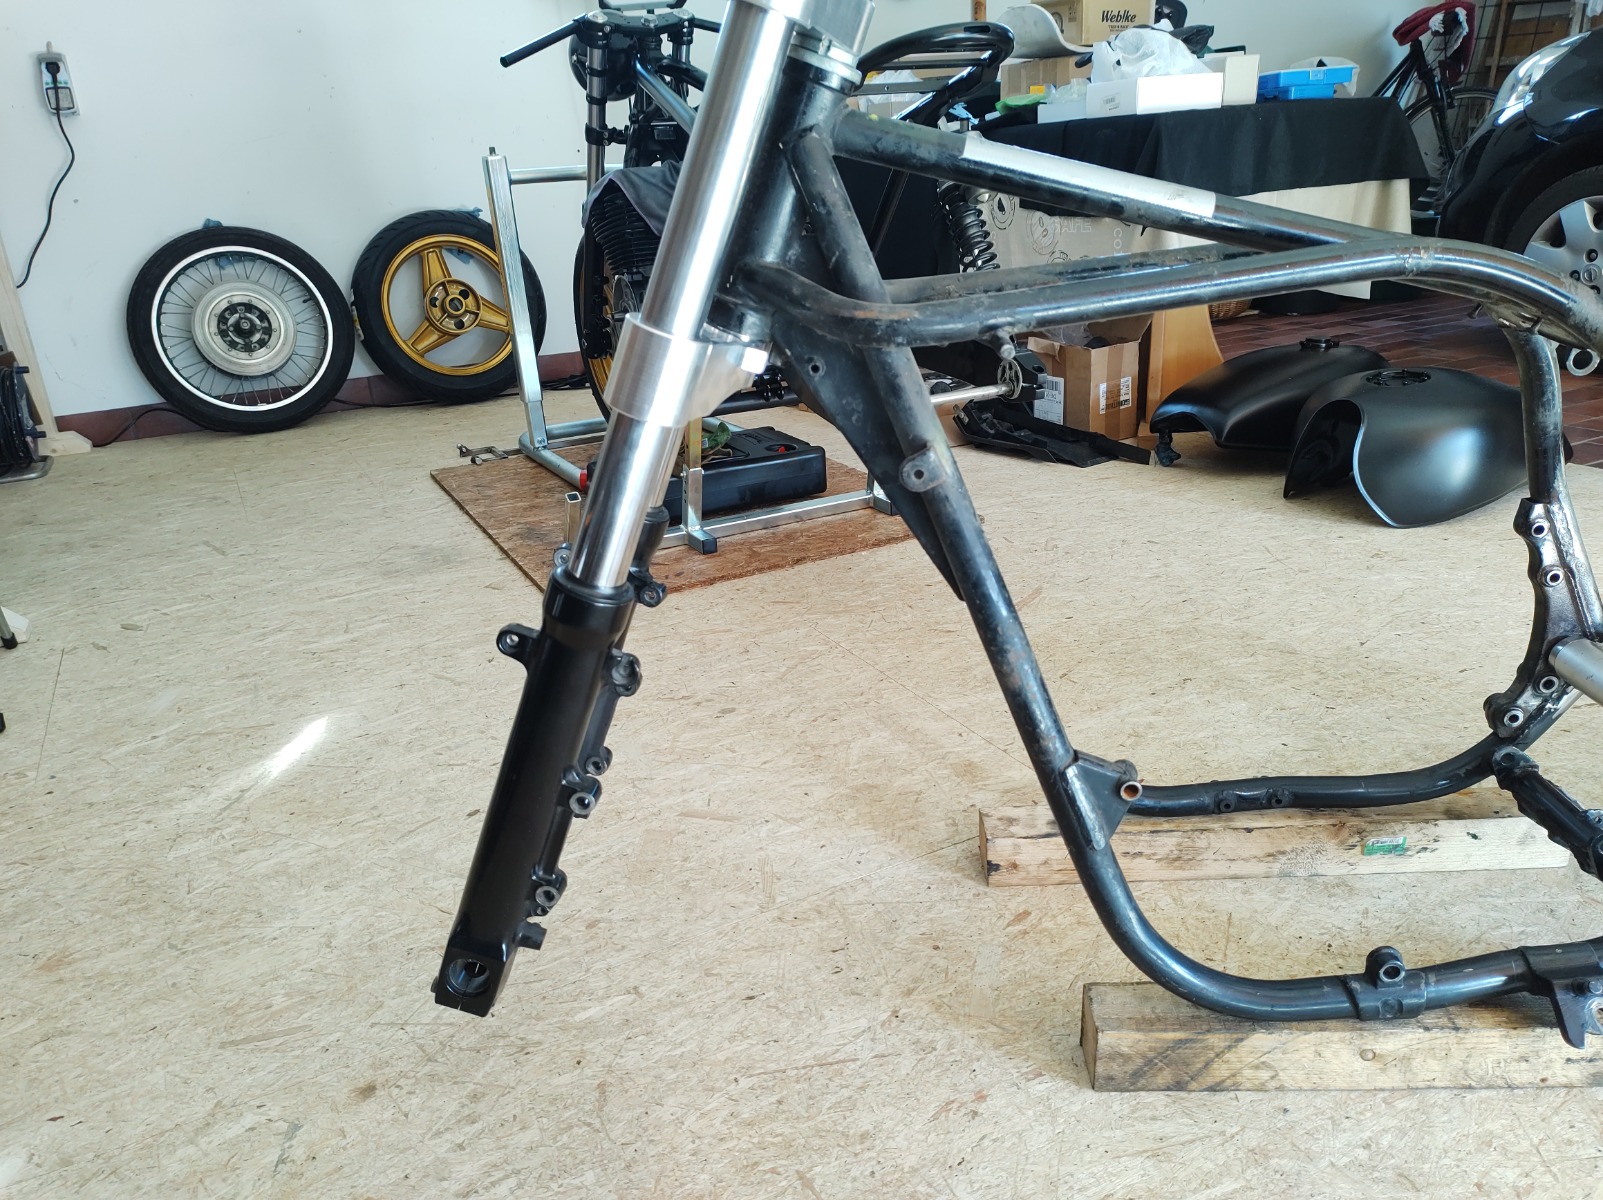
Got the GSX-R swingarm and the forks on.
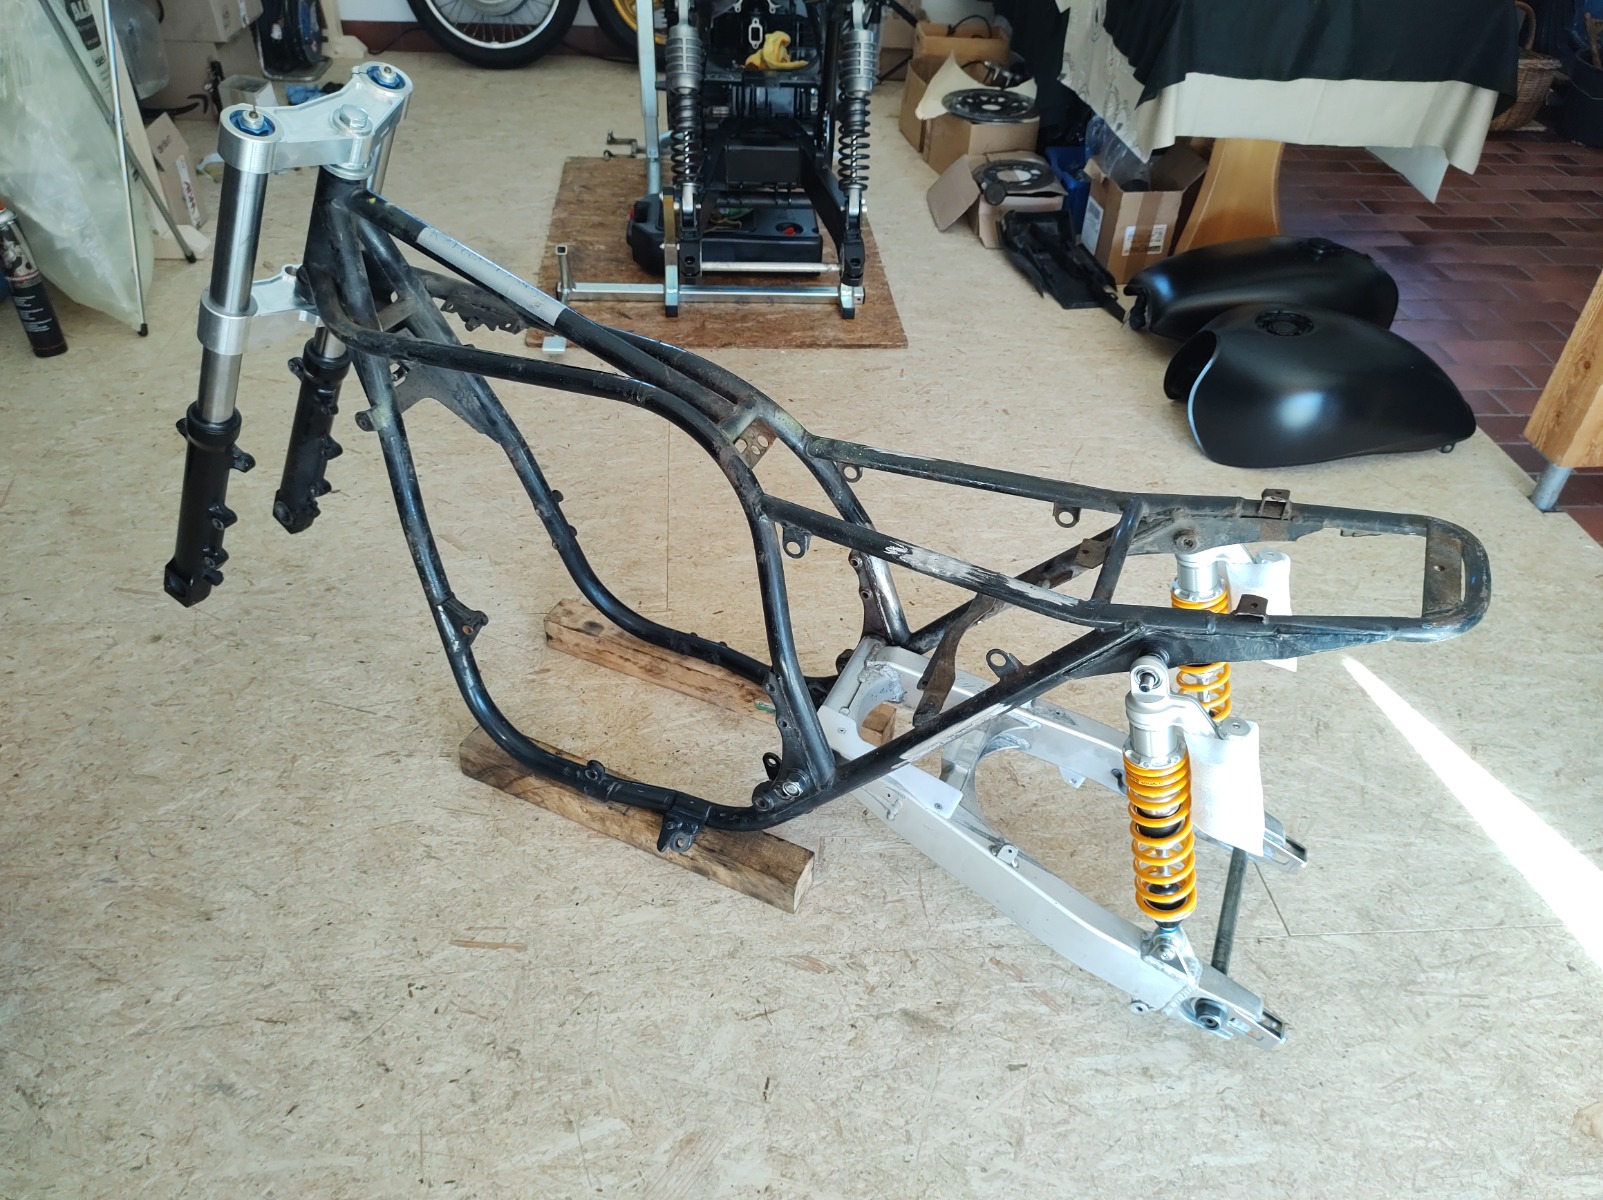

Checked the axle height against the stock setup. Ground clearance was 130mm/145mm (front/rear) on the stock setup, putting the frame pretty much level when the wheels are on. New clearance is 145mm/80mm. This reduces rake a bit (the two photos below show the difference between stock rake and the new rake (I propped up the swingarm until both axles were at the same height). I can drop the forks down about another 10-20mm, but the major difference is the swingarm and shock length (both are a bit longer than stock). I can shorten the shocks by about 8mm but there isn't much else I can do at the back short of moving the shock mounts.
I realise that the rake will change due to tire profile and sag, the idea here was to get a comparison to the stock setup, not to actually figure out the exact numbers.
I would appreciate some opinions on how this will ride. Do I need to mess around with things, or do I just see how it goes and get a stepped top yoke if it doesn't feel right?
EDIT: Just did some maths and the rake will be reduced by about 3°, so should be about 23°.
One of the seat hinges had already been removed - someone was pretty heavy handed with the grinder.
Got the GSX-R swingarm and the forks on.
Checked the axle height against the stock setup. Ground clearance was 130mm/145mm (front/rear) on the stock setup, putting the frame pretty much level when the wheels are on. New clearance is 145mm/80mm. This reduces rake a bit (the two photos below show the difference between stock rake and the new rake (I propped up the swingarm until both axles were at the same height). I can drop the forks down about another 10-20mm, but the major difference is the swingarm and shock length (both are a bit longer than stock). I can shorten the shocks by about 8mm but there isn't much else I can do at the back short of moving the shock mounts.
I realise that the rake will change due to tire profile and sag, the idea here was to get a comparison to the stock setup, not to actually figure out the exact numbers.
I would appreciate some opinions on how this will ride. Do I need to mess around with things, or do I just see how it goes and get a stepped top yoke if it doesn't feel right?
EDIT: Just did some maths and the rake will be reduced by about 3°, so should be about 23°.
Getting back into things again. Put the stock forks and swingarm on today to check th height. Raised the frame of the floor and measured from the floor to the centre of the wheel axles. Will make it easier to check if the nose is dipped with the new triples and ZRX forks. One problem though: the shocks that were on the bike don't look stock. Can anybody tell me the length of the stock shocks on the KZ1000A1? Just want to make sure my starting point for the frame angle is stock.
The modified GSX-R swingarm and Öhlins shocks arrived yesterday. I'll be chopping a few things off the frame tomorrow so I can get the swingarm mounted (brake pedal bracket needs to go). Once that's done I can get the ZRX forks back in and check the height of the front and back axles. If I'm lucky the bike will be level at the middle of the height adjustment range on the shocks.
The modified GSX-R swingarm and Öhlins shocks arrived yesterday. I'll be chopping a few things off the frame tomorrow so I can get the swingarm mounted (brake pedal bracket needs to go). Once that's done I can get the ZRX forks back in and check the height of the front and back axles. If I'm lucky the bike will be level at the middle of the height adjustment range on the shocks.
Replied by hardrockminer on topic Aftermarket upgrades that are actual upgrades.
26 Mar 2021 17:00
Lots of upgrades occur after as a result of failures during initial bike runs. Heads were prone to leaking oil on Z1's with single gasket. Later models had a two piece gasket and an O ring. Kawasaki eventually went to needle bearings in the swingarm but I bet a lot of people converted their bikes long before the factory did. O ring chains are an other improvement over the old oil systems.
Some others off the top of my head...sealed batteries vs open cell, wheel balance weights glued to the rim vs lead weight on the spokes, etc.
Some others off the top of my head...sealed batteries vs open cell, wheel balance weights glued to the rim vs lead weight on the spokes, etc.
Replied by Mark Podeyn on topic KZ900 - updated suspension
21 Mar 2021 11:45
I am a big fan of your build! I am doing a very similar build on a 76KZ900 LTD. I am curious as to what rear wheel, hub and brake set up you went with. I am also using the same GS1100E swing arm. Thank you for any help that you can provide me.
Replied by Street Fighter LTD on topic Wobble and weave
19 Mar 2021 13:28
Here's my solution.
Me and my buds were going way to fast to allow any wobbles.
I experienced wobble on my 750 Triple H2 and didnt want to ever go thru that again
So we all gusseted our frames, Roller bearings in steering head, , steering dampners ( 2 on mine ) and tight bearings in the swing arms, all back in the day
Since then I added the fork brace and then had Les Holt @ PDM build me these trick triple trees
My Bike Dont Wobble and I feel the effort was worth it. No worries at speed
Dave
Replied by SWest on topic Wobble and weave
19 Mar 2021 09:15
The worst wobbles I had was in the 70's with the bike naked in stock trim. The Z1's were well known to have high speed wobbles due to weak frames and swing arms. The brace under the steering head always had cracks in the same spots at the cooler bolt holes. There was a cheesy fix for that I figured to be just plain stupid. A small bolt on bracket.
 They were offering new bronze swing arm bushings and if you REALLY wanted to be cool you could install a needle bearing kit for $250. Should have been there anyway.
 First thing I did was to beef up the steering head bracket covering the cracks, gusset the backbones and installed the new bushings It was better but it was still prone to wobbles. With the new KZ's they quietly beefed up the frames and added a gusset under the steering head the Z1's didn't have and went on to business as usual. It's obvious they knew of the problems but decided to ignore it. Early KZP's brought the issues to light but they did as little as possible, they just redesigned the swing arms along with a few other things. To this day aftermarket has been addressing these issues with gusset kits, custom swing arms, etc. The biggest improvement is the late model KZP swing arm that is 1 1/2" longer and modern pivot bearings. It now shows how weak the front end is. That I'll be addressing next.
Steve
Steve
 Rick H.
Wobbles are strange events and one must determine what the wobble is being caused by which in some cases is quite difficult. A wobble on a bike can be caused by many things not the least of which is how the bike is loaded. Want to make life interesting? Start adding weight behind the rear axle and see what happens to your ride. A steering damper is a great add-on that many swear by but you have to use them wisely. A steering damper can cover up other problems though such as worn bearings, defective tires or wheels, loose swingarm etc. One of the most interesting bits of motorcycling history was with the early Police Model Kawasaki's that had a real issue with high speed stability. Everyone that was using those bikes knew there was an issue but no one had a real good idea how to fix it at the time, so Kawasaki issued a directive not to operate a police model over 55 mph, until they found a fix. My old agency was using a couple of early police Kawasaki's at the time and somewhere I my pile of stuff I have a copy of the warning notice. I could be wrong on the speed limit imposed but it was close to that. These were the old windshield only bikes and weren't fairing equipped yet. The wobble usually took place when you hit a bump or set of railroad tracks and unloaded the front end and quickly hit the throttle before the front end settled down. As a result Kawasaki started using their swinging radio carrier which I never quite understood, but I only rode part time back then and didn't spend enough time in the saddle to get familiar with the so called fix. I experienced something very similar riding Harley FL police models later on. I discovered that when these wobbles or more appropriately oscillations started the easiest quickest way to calm things down was to get more weight on the front wheel by moving as far forward as I could. This usually helped but it wasn't the end all cure.
Looking back on it years after the fact while training new police riders it became pretty obvious that one of the root causes was improper loading of the motorcycle especially adding weight on or behind the rear axle, or excess weight to one side of the bike. Remember it's a fine line when you put weight near or beyond the rear axle as weight starts coming off the front. There was a point in time where police departments joined the motorcycle bandwagon in haste because gasoline was really expensive and administrators thought purchasing and using motorcycles would be a great way to save money which it was. Unfortunately they didn't have a clue about using motors and made up their own rules about outfitting their motors without consulting those in the know. In essence they were trying to make a car out of a motorcycle and it didn't work. The end result was police motorcycles soon lost their attraction and were relegated to the back of the police garage or sold off at auctions for pennies on the dollar. I also saw a lot of misinformation put out about how to handle wobbles and such and this only added to the problem and I think led to several crashes that didn't need to happen. Anyone remember the old "just power through the wobble" cure? Or "just quickly roll of the throttle"? How about "damn the torpedoes, straight ahead" philosophy?
Things are different today and much about motorcycle dynamics has been studied and learned. Not all motorcycles are equal and certain bikes are used in ways never envisioned by their designers. Show me one motorcycle company that designs their authority motorcycles to do an honest 16' turn and I will be shocked, yet police riders do them all the time. Just remember there usually isn't one absolute cure for a wobble or oscillation on a motorcycle and one must use caution not to mask it with a band-aid.
Rick H.
Replied by 750 R1 on topic Help....can anyone identify the forks/rear swingarm on this Kawasaki streetfight
17 Mar 2021 14:06 - 17 Mar 2021 14:08Wheels and swingarm im sure are off a 1986 gsx-r750 the rest are off a gpz 1000rx like 750r1 said. Buy it sell all the other parts to collectors who would appreciate them and start afresh. Has the shock mounts been cut off? ps. its been a while since iv posted, what happened to the spell check feature? im dead in the water without it....
Check the profile of the tyre's KZ, the large profile gives them away, they are 16 inch wheels, very similar looking to early GSXR but they are definitely GPZ1000rx wheels {gixxer are 18's} , the OP has also used the 1000rx forks as well as the 1000rx front and rear brakes. The hydraulic clutch is a common mod , looks like he maybe using a GSXR hydraulic unit, its a relatively easy conversion, I have one of those GSXR units laying around in my shop somewhere, I was going to use it on a 750 honda but sold the bike......
Replied by MotorCityMN on topic Help....can anyone identify the forks/rear swingarm on this Kawasaki streetfight
17 Mar 2021 09:29
MotorCityMN
If you like the direction the previous owner took with the modifications, then he may have saved you a good bit of money. Still, since it has been off the road so long, you will be facing all of the routine maintenance, rebuilding the carbs, a new battery and new tires at the very least. It may also need new drive chain and sprockets, the hydraulics may need rebuilding, and unless you can closely inspect it, you will be gambling that the engine is ok. How much are you willing to gamble?
***
yea, thats what I'm evaluating in my head...I have been wanting to build a resto-mod KZ, and this bike does have some "upgraded" componentry, relative to the 1976 KZ900....I wish the forks/swingar/shocks were off a newer model, and I realize upgrading with those parts are not cheap...for the donor parts, and fab work....if I had my druthers, I would have liked at least mid-90s GSXR parts, or early 2000-mid 2000 ZX kawaski forks/swingarm/wheels. I also realize there is risk in buying a bike that isnt running...yea, the purple paint is hideoous to me too...I would have painted the bike black....so I'm on a fence.....I'm thinking $2000.00 offering him...he is asking $2900.00, which I think is high... Otherwise, I know someone with a resto-mod nicely done, and the price tag is almost $9000.00, and the bike has been done right....
Displaying 321 - 330 out of 7254 results.