
Search Results (Searched for: gs swing arm)
Replied by KZB2 650 on topic Drag strip trip.
21 Jan 2015 08:22 KZB2 650
kawi810 wrote: was she good looking?
She was in a pink and blue full leather racing suit .... how could she not be. :laugh:
Also Zukdave think about buying the 1984 July Hot Bike magazine on ebay ...... it has a article about the Philadelphia Flash ( In 81 the NMRA started a Junior pro stock class) and the flash is a guy named Frank Giordano driving a 1982 KZ GPZ 750.
Bored to 770, lightened Falicon crank, alum rods, 4 speed Murdoch auto trans, STOCK Kawasaki plates lock up pusher and springs by Murdoc, Web cams, (no size given) APE valve springs, tit valves, Jardine sidewinder pipe, 33mm smoothbores, MTC Cyl studs,tit retainers, cyl head done by Giordano Performance racing ...... 8 inch over swingarm, alum rims 6 by 18 out back, etc etc...........
Ran a best of 10.06 and he then got it down to 9.97 then 9.80 and won the 83 championship.
Replied by davido on topic CSR1000 Project Build
18 Jan 2015 02:50
Good idea boys,I hadnt thought of that.Looks a lot cleaner than welding a plate on and I held the rearsets up to get a better idea and with this method I should be able to get them further forward. I cant sit on the bike yet (to get a good position) as I still dont have the shock mounts yet. I took one of the original shocks over to the bike shop on thursday and hes going to machine some mounts up for me,then I can take them to the aluminium shop with the swing arm to get them welded on.Hopefully this time next week,I should have a rolling chassis.
So other than that,all Ive managed to do lately is re-thread and shorten the sprocket mounting bolts and get that mounted.
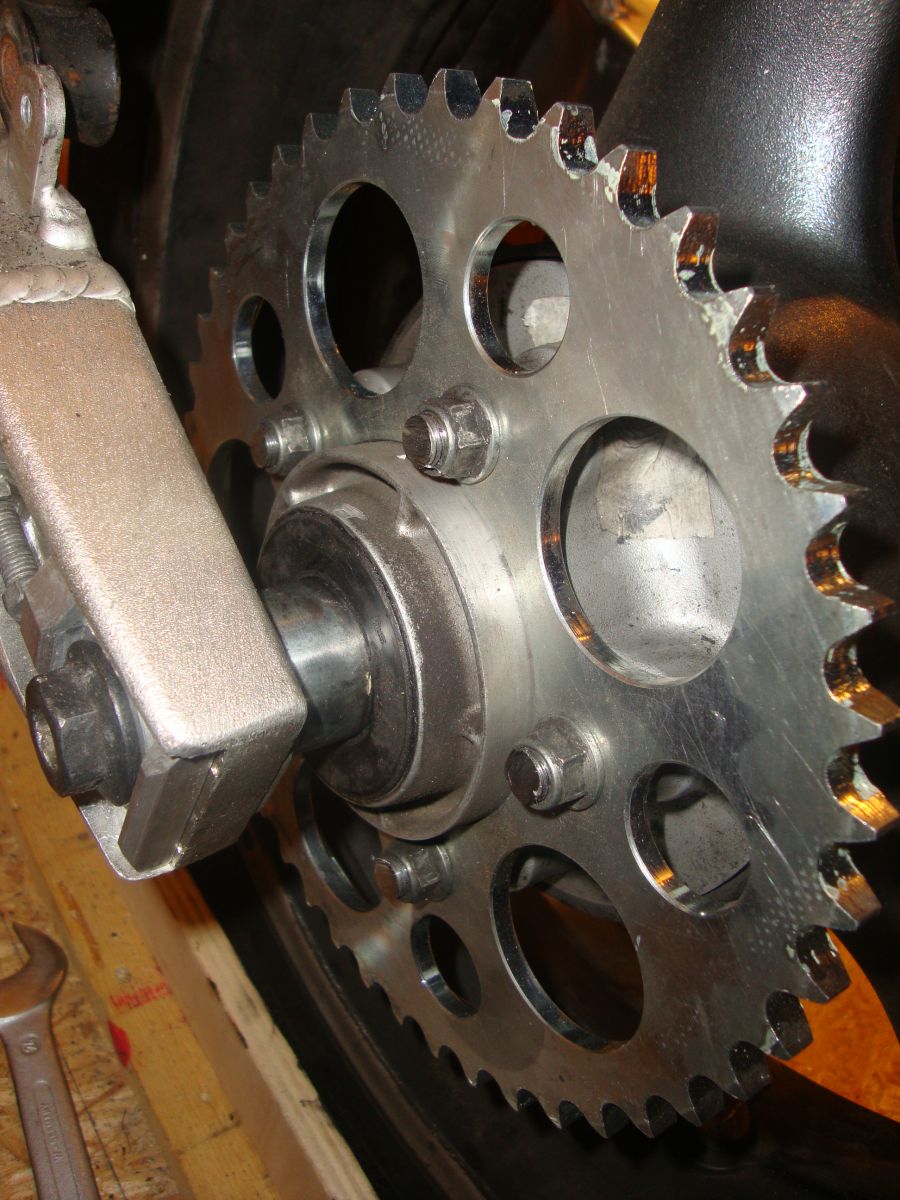
Not sure if itsthe right way around though theres a recess on tother side.This way brings it closer to the tyre.Other way brings it closer to the frame.Ah well,Ill sort it out when The motor is in.

So other than that,all Ive managed to do lately is re-thread and shorten the sprocket mounting bolts and get that mounted.
Not sure if itsthe right way around though theres a recess on tother side.This way brings it closer to the tyre.Other way brings it closer to the frame.Ah well,Ill sort it out when The motor is in.
My late birthday present came ") 1.75" over stock to even out the geometry and gain ride height. They are much nicer than the Works shocks I previously was planning on using. They are beefier everywhere and 6oz lighter per shock.
1.75" over stock to even out the geometry and gain ride height. They are much nicer than the Works shocks I previously was planning on using. They are beefier everywhere and 6oz lighter per shock.

Because of the over length shocks I need a chain slider on the swingarm. Eric turned up this chunk of derelin and I fish-mouthed it so It uses no fasteners, as it is entrapped when the swingarm is mounted. I may need more sliders, but that can be addressed later if need be.


All the remaining tabs needed are welded on. The bungs for the exhaust hanger are welded in. A couple nasty welds have been cleaned up. The kickstand has been moved up to the bottom engine mount, the detent spring peg had to be relocated so the engine bolt could fit. The kickstand was shorted because it is now farther out from the center. I have plans for something trick to replace the stock solid one.

I then turned my attention to the rear sets. These Tarrozis were meant to be bolt-ons so they had to compromise a bit, like using the huge stock brake pivot. I also wanted to retain the use of my kickstart and the brake pedal was solidly blocking it.

I saw on a XS650 forum where people had cut a channel in the pivot to allow the pedal to be brought back out of the way temporarily. To do this you had to leave everything a bit loose to allow the pedal and pivot not to bind. I didn't want any slop in my footpegs so Eric and I came up with a solution i am very proud of. I cut a piece of 1"tube with .065" wall thickness and it made a perfect bushing for the footpeg and pivot. As a safety feature a spring loaded pin was added on the pedal so that the brake lever cannot be accidentally kicked up when riding. You simply compress the spring and pull the pedal up. Eric turned most of the parts, while grumbling about his "clapped out" lathe, and did the amazing welding as usual. I'm nearly done finishing the parts, I just need to clean up some if the holes I drilled. I also cut the threads off the footpeg mounting studs and drilled and tapped them to use some stainless countersunk washers. I also had to file down the Tarrozi bracket mounts to remove the counter sunk flange on the casting. I also took the opportunity to remove the casting marks. I have ordered folding footpegs from Fast from the Past, so I should have plenty of clearance for the kicker.


1.75" over stock to even out the geometry and gain ride height. They are much nicer than the Works shocks I previously was planning on using. They are beefier everywhere and 6oz lighter per shock.
Because of the over length shocks I need a chain slider on the swingarm. Eric turned up this chunk of derelin and I fish-mouthed it so It uses no fasteners, as it is entrapped when the swingarm is mounted. I may need more sliders, but that can be addressed later if need be.
All the remaining tabs needed are welded on. The bungs for the exhaust hanger are welded in. A couple nasty welds have been cleaned up. The kickstand has been moved up to the bottom engine mount, the detent spring peg had to be relocated so the engine bolt could fit. The kickstand was shorted because it is now farther out from the center. I have plans for something trick to replace the stock solid one.
I then turned my attention to the rear sets. These Tarrozis were meant to be bolt-ons so they had to compromise a bit, like using the huge stock brake pivot. I also wanted to retain the use of my kickstart and the brake pedal was solidly blocking it.
I saw on a XS650 forum where people had cut a channel in the pivot to allow the pedal to be brought back out of the way temporarily. To do this you had to leave everything a bit loose to allow the pedal and pivot not to bind. I didn't want any slop in my footpegs so Eric and I came up with a solution i am very proud of. I cut a piece of 1"tube with .065" wall thickness and it made a perfect bushing for the footpeg and pivot. As a safety feature a spring loaded pin was added on the pedal so that the brake lever cannot be accidentally kicked up when riding. You simply compress the spring and pull the pedal up. Eric turned most of the parts, while grumbling about his "clapped out" lathe, and did the amazing welding as usual. I'm nearly done finishing the parts, I just need to clean up some if the holes I drilled. I also cut the threads off the footpeg mounting studs and drilled and tapped them to use some stainless countersunk washers. I also had to file down the Tarrozi bracket mounts to remove the counter sunk flange on the casting. I also took the opportunity to remove the casting marks. I have ordered folding footpegs from Fast from the Past, so I should have plenty of clearance for the kicker.
Replied by spdygon on topic 1975 KZ 900 , ZRX Swingarm, 89 GSXR front end
15 Jan 2015 16:14
Beauty it is........Sr.
Congrats
Congrats
Replied by KZJOE900 on topic RE: NFG from Miami
15 Jan 2015 10:15
Welcome Gaucho, I'm bit north of you in central florida. Bike looks really nice. Looks to be a survivor. Down here we are in the right part of year for riding. Gets too hot to ride after April. I usually only ride in the evenings or early mornings in the summertime. But I like to be suited up with proper gear when I ride. Check all the safety components before you go for any length of ride. Tires (age, condition), inspect front and rear brakes, chain, etc. I make it a habit of checking the torque on bolts and nuts for safety related items as well (rear axle castle nut and cotter pin, front fork tube nuts, handlebar nuts, shock absorber nuts, swing arm and triple tree nuts). Takes about 15 min to check them all. You might be surprised what on what you find.
Replied by 650ed on topic RE: NFG from Miami
15 Jan 2015 10:03
Welcome aboard! I agree with Mcdroid 100%! There aren't many nice survivors left out there, and they always attract attention. If the bike is the one in the avatar you have a gem!
Here are some tips that you may find helpful:
Many newbies and not so newbies run into or issues with their bikes which could be easily avoided with a little preparation or information. Here are a couple recommendations that I hope you will find useful.
Before riding your KZ you should take a little time to become familiar with it. Simple things like checking the oil, tire pressures, etc. are explained in the Kawasaki Owner's Manual. If you bike didn't come with one (they normally are in a little holder on the bottom of the seat) you can usually find one on eBay - be sure to get one for your exact year/model.
MANUAL
You really should consider buying the Kawasaki Factory Service Manual for your bike. The factory service manual provides instructions on the various maintenance procedures and schedules for your bike, procedures for diagnosing problems, proper torque values for the various fasteners (VERY IMPORTANT), and insight into how each system on your bike works even if you are not repairing that system. Studying the manual before you attempt performing service on your bike will impart an understanding of the system you are working on which will increase the odds of success.
The manuals usually are readily available for most models on eBay and other sources; but be sure to get one that has your specific year and model in it as there are differences between the various KZ650 models. I do not recommend Clymers, Haynes, or other aftermarket manuals as I have seen instances where they provide inaccurate advice. You may decide to use those to supplement the factory manual, but in my opinion they are not a suitable substitute. If you have trouble finding one for your model ask us to help.
TOOLS
WARNING! Do not even try to use Phillips screwdrivers on the Kawasaki cross head screws. Despite their appearance they are not Phillips screws. They are Japanese Industrial Standard (JIS) screws. The tips of Phillips screwdrivers are too long & pointed to allow the 4 blades of the screwdriver to properly engage the screws, so when you apply force the screw head slots will deform and look like crap. The fact is that Phillips screws were deliberately designed to have the screwdriver bit "cam out." This was done to prevent production line assembly from over-tightening, stripping, or breaking the screws. JIS screws do not have this problem. A proper fitting JIS bit can tighten a JIS screw to and beyond the torque spec without camming out. Here's the good news - you can easily modify standard Phillips screwdriver tips to fit the JIS screws.
I have ground down the tips of DeWalt #2 and DeWalt #3 Phillips to make them fit JIS screws. The large crosshead screws on the cases take modified #3 bits (or genuine #3 JIS bits). To modify the DeWalt bits you need to grind the very tip a little, then test fit, then grind a little more and test fit, etc. until the bit no longer "rocks" back and forth in the screwhead. Picture 1 below shows how a DeWalt #3 bit fits the case screws of my KZ650 after being ground properly. The #2 DeWalt bits can be modified the same way to fit smaller JIS screws. Pictures 2 and 3 below shows DeWalt #2 and #3 modified bits.
I did find a place that sells authentic JIS bits. They don't list the #3 bit, but if you contact them they can provide the #3 JIS bits even though they are not listed on the website. These folks were very easy to work with, and the authentic bits do work great. Here's their site:
www.rjrcooltools.com/shop_item_detail.cfm?subcat_ID=89
Pictures 4 & 5 below show a comparison between my home made modified bits with the authentic JIS bits.
PICTURE 1

PICTURE 2

PICTURE 3

PICTURE 4

PICTURE 5

Before reaching for that wrench or ratchet consider the following. The bolts are steel, but your engine and front forks are aluminum. The bolts are much tougher than the aluminum and if over tightened will strip the aluminum threads. Although these can be repaired, preventing damage by applying proper torque will save you grief, time, and money. Tightening fasteners properly requires torque wrenches. Various vendors, including Snap-on, CDI, Sears, etc., market torque wrenches. The two most popular types are the bar type and micrometer type. Either will work, but the micrometer type is a bit easier to use, especially if you are tightening several fasteners with the same torque - such as cylinder head covers. You will need a torque wrench calibrated in INCH POUNDS for many of the bolts. You will also need a torque wrench calibrated in FOOT POUNDS for the larger bolts. Don't try to use the foot pounds wrench on the smaller bolts as it will not be sensitive enough at low torque settings to provide accurate torque. There are many fasteners that require low torque. These include such things as 6mm oil pan bolts, cylinder head cover bolts, etc. for which the torque in 61-78 inch pounds. These low torque bolts require a wrench that is accurate at low settings and this wrench should be graduated in inch pounds. In addition, there are numerous high torque fasteners such as the front axle nuts (51 - 65 foot pounds) or swing arm pivot shaft nuts (58 - 87 foot pounds). These require a wrench that is accurate at higher settings; this wrench should be graduated in foot pounds. Using the proper torque wrenches to correctly tighten fasteners will help prevent damage and contribute to a safe bike. The Kawasaki Service Manual will list the various torque specs for the bolts. I suggest you get the manual before buying the torque wrenches so you can decide which wrenches best meet the torque specs.
Consider buying a can of Kroil penetrating oil and use it to soak stubborn fasteners for a couple days before trying to loosen them. Remember, the original screws and bolts were installed on your bike when Jimmy Carter was President, so many of them may be hard to remove. Kroil can be bought online, at guns shows, and at some other venues.
MOTOR OIL
The ingredients in oils have changed over the years. For example, today's Castrol GTX oil (and pretty much all other AUTOMOBILE oil) is not the same as it was in the 1980's. Back then it worked great in KZ bikes. But, things have changed. Early AUTOMOBILE oils contained zinc phosphorus compounds (ZDDP) to protect engine components from metal to metal contact. This was good for engines, but it was found to be destructive to catalytic converters. Consequently, in AUTOMOBILE oils ZDDP was virtually eliminated and replaced with different chemistry generically referred to as "Friction Modifiers." These work fine and offer good protection for normal AUTOMOBILE engines. However, today's AUTOMOBILE oil "Friction Modifiers" are destructive to wet clutches. KZ bikes (and many other brands) have wet clutches. As a result of these oil chemistry changes a distinction needed to be made between those oils which are suitable for wet clutches and those which are not. That distinction was documented by the Japanese Engine Oil Standards Implementation Panel (JASO). JASO developed a number of different oil specifications for different applications. The specifications that apply to 4 stroke motorcycles fall under the "4T Specifications." Within the 4T specifications the JASO MA class oils are specifically formulated for 4 stroke motorcycles with wet clutches.
There are synthetic, semi-synthetic, and non-synthetic oils that meet the JASO-MA standard and any of them will work ok. However, using oils that are not designated as meeting the JASO-MA standard is destructive to KZ clutches.
Good luck with your "new" bike. Ed
Here are some tips that you may find helpful:
Many newbies and not so newbies run into or issues with their bikes which could be easily avoided with a little preparation or information. Here are a couple recommendations that I hope you will find useful.
Before riding your KZ you should take a little time to become familiar with it. Simple things like checking the oil, tire pressures, etc. are explained in the Kawasaki Owner's Manual. If you bike didn't come with one (they normally are in a little holder on the bottom of the seat) you can usually find one on eBay - be sure to get one for your exact year/model.
MANUAL
You really should consider buying the Kawasaki Factory Service Manual for your bike. The factory service manual provides instructions on the various maintenance procedures and schedules for your bike, procedures for diagnosing problems, proper torque values for the various fasteners (VERY IMPORTANT), and insight into how each system on your bike works even if you are not repairing that system. Studying the manual before you attempt performing service on your bike will impart an understanding of the system you are working on which will increase the odds of success.
The manuals usually are readily available for most models on eBay and other sources; but be sure to get one that has your specific year and model in it as there are differences between the various KZ650 models. I do not recommend Clymers, Haynes, or other aftermarket manuals as I have seen instances where they provide inaccurate advice. You may decide to use those to supplement the factory manual, but in my opinion they are not a suitable substitute. If you have trouble finding one for your model ask us to help.
TOOLS
WARNING! Do not even try to use Phillips screwdrivers on the Kawasaki cross head screws. Despite their appearance they are not Phillips screws. They are Japanese Industrial Standard (JIS) screws. The tips of Phillips screwdrivers are too long & pointed to allow the 4 blades of the screwdriver to properly engage the screws, so when you apply force the screw head slots will deform and look like crap. The fact is that Phillips screws were deliberately designed to have the screwdriver bit "cam out." This was done to prevent production line assembly from over-tightening, stripping, or breaking the screws. JIS screws do not have this problem. A proper fitting JIS bit can tighten a JIS screw to and beyond the torque spec without camming out. Here's the good news - you can easily modify standard Phillips screwdriver tips to fit the JIS screws.
I have ground down the tips of DeWalt #2 and DeWalt #3 Phillips to make them fit JIS screws. The large crosshead screws on the cases take modified #3 bits (or genuine #3 JIS bits). To modify the DeWalt bits you need to grind the very tip a little, then test fit, then grind a little more and test fit, etc. until the bit no longer "rocks" back and forth in the screwhead. Picture 1 below shows how a DeWalt #3 bit fits the case screws of my KZ650 after being ground properly. The #2 DeWalt bits can be modified the same way to fit smaller JIS screws. Pictures 2 and 3 below shows DeWalt #2 and #3 modified bits.
I did find a place that sells authentic JIS bits. They don't list the #3 bit, but if you contact them they can provide the #3 JIS bits even though they are not listed on the website. These folks were very easy to work with, and the authentic bits do work great. Here's their site:
www.rjrcooltools.com/shop_item_detail.cfm?subcat_ID=89
Pictures 4 & 5 below show a comparison between my home made modified bits with the authentic JIS bits.
PICTURE 1
PICTURE 2
PICTURE 3
PICTURE 4
PICTURE 5
Before reaching for that wrench or ratchet consider the following. The bolts are steel, but your engine and front forks are aluminum. The bolts are much tougher than the aluminum and if over tightened will strip the aluminum threads. Although these can be repaired, preventing damage by applying proper torque will save you grief, time, and money. Tightening fasteners properly requires torque wrenches. Various vendors, including Snap-on, CDI, Sears, etc., market torque wrenches. The two most popular types are the bar type and micrometer type. Either will work, but the micrometer type is a bit easier to use, especially if you are tightening several fasteners with the same torque - such as cylinder head covers. You will need a torque wrench calibrated in INCH POUNDS for many of the bolts. You will also need a torque wrench calibrated in FOOT POUNDS for the larger bolts. Don't try to use the foot pounds wrench on the smaller bolts as it will not be sensitive enough at low torque settings to provide accurate torque. There are many fasteners that require low torque. These include such things as 6mm oil pan bolts, cylinder head cover bolts, etc. for which the torque in 61-78 inch pounds. These low torque bolts require a wrench that is accurate at low settings and this wrench should be graduated in inch pounds. In addition, there are numerous high torque fasteners such as the front axle nuts (51 - 65 foot pounds) or swing arm pivot shaft nuts (58 - 87 foot pounds). These require a wrench that is accurate at higher settings; this wrench should be graduated in foot pounds. Using the proper torque wrenches to correctly tighten fasteners will help prevent damage and contribute to a safe bike. The Kawasaki Service Manual will list the various torque specs for the bolts. I suggest you get the manual before buying the torque wrenches so you can decide which wrenches best meet the torque specs.
Consider buying a can of Kroil penetrating oil and use it to soak stubborn fasteners for a couple days before trying to loosen them. Remember, the original screws and bolts were installed on your bike when Jimmy Carter was President, so many of them may be hard to remove. Kroil can be bought online, at guns shows, and at some other venues.
MOTOR OIL
The ingredients in oils have changed over the years. For example, today's Castrol GTX oil (and pretty much all other AUTOMOBILE oil) is not the same as it was in the 1980's. Back then it worked great in KZ bikes. But, things have changed. Early AUTOMOBILE oils contained zinc phosphorus compounds (ZDDP) to protect engine components from metal to metal contact. This was good for engines, but it was found to be destructive to catalytic converters. Consequently, in AUTOMOBILE oils ZDDP was virtually eliminated and replaced with different chemistry generically referred to as "Friction Modifiers." These work fine and offer good protection for normal AUTOMOBILE engines. However, today's AUTOMOBILE oil "Friction Modifiers" are destructive to wet clutches. KZ bikes (and many other brands) have wet clutches. As a result of these oil chemistry changes a distinction needed to be made between those oils which are suitable for wet clutches and those which are not. That distinction was documented by the Japanese Engine Oil Standards Implementation Panel (JASO). JASO developed a number of different oil specifications for different applications. The specifications that apply to 4 stroke motorcycles fall under the "4T Specifications." Within the 4T specifications the JASO MA class oils are specifically formulated for 4 stroke motorcycles with wet clutches.
There are synthetic, semi-synthetic, and non-synthetic oils that meet the JASO-MA standard and any of them will work ok. However, using oils that are not designated as meeting the JASO-MA standard is destructive to KZ clutches.
Good luck with your "new" bike. Ed
Replied by Street Fighter LTD on topic 1975 KZ 900 , ZRX Swingarm, 89 GSXR front end
15 Jan 2015 06:49
It Is Beautiful !!!!!!!!!
Now get out and ride it like you stole it :evil:
Now get out and ride it like you stole it :evil:
Replied by tk11b40 on topic 1975 KZ 900 , ZRX Swingarm, 89 GSXR front end
14 Jan 2015 23:37
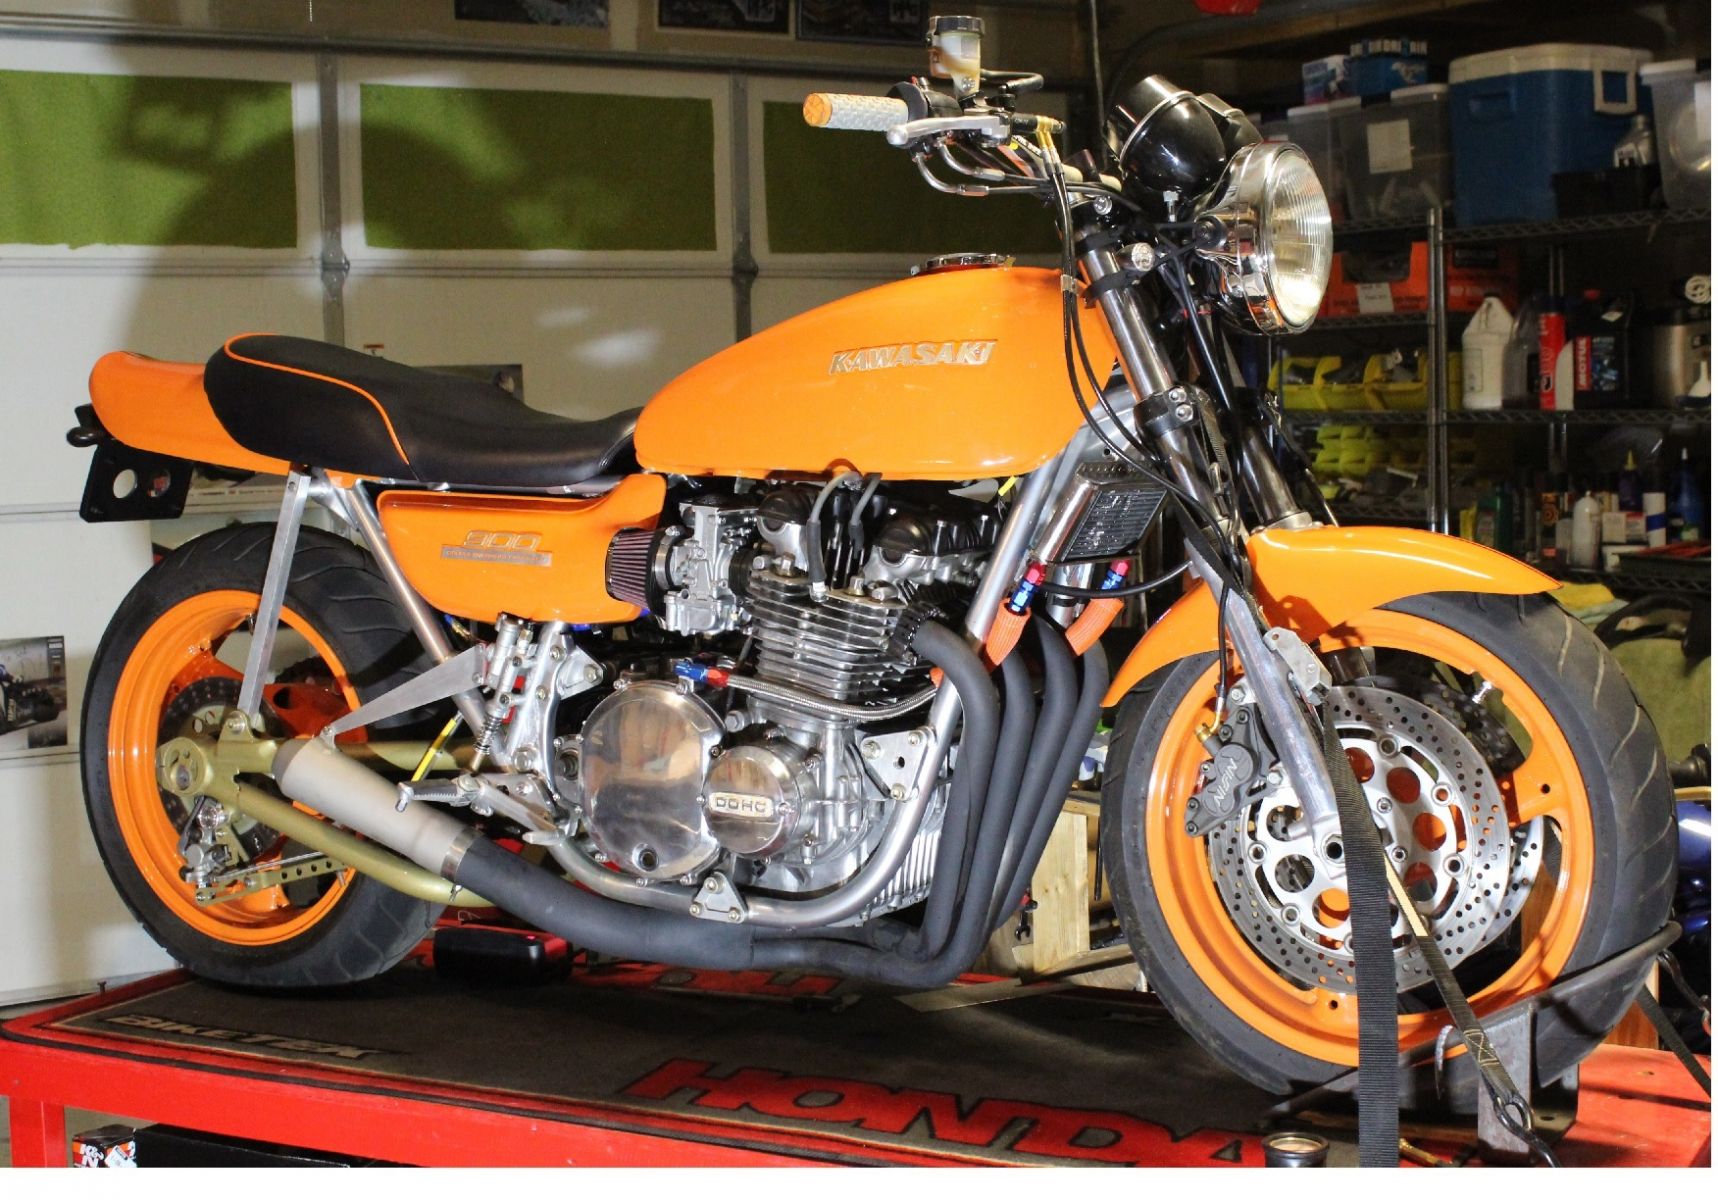
This is the view from the opposite side. normally it is so close to the work bench that I cannot get a photo. The Ohlins shocks are out getting rebuilt, so never mind the aluminum strut. It is just supporting the bike while I wait for the shocks.
78 Kz650sr11 street fighter build. was created by barrys95flt
12 Jan 2015 11:31
barrys95flt
Hi, I'm new here and have never submitted to a forum before, I am not new to motorcycles tho, I own a 1995 Harley Flt, also a 1980 cb650 cafe project, but this past fall I picked up a sweet 78 Kz650 sr with only 10,000mis on it, originally I was going to leave it stock but thoughts of a street fighterwere creeping into my head, I had a front end from a 1990 Suzuki gsxr750also the rear wheel. I still wasn't sure I wanted to cut up a nice stock bike so I carefully removed the stock front end and just installed the gxsr one(no bearings or spindle mod yet)just to see if it would work, it did and I liked the way it looked. The beefy front end really changed the bikes attitude, I also didn't want to keep the stock rear suspension and have decided to go with a mono-shock I got a 1988 Suzuki 600 steel swing arm from e-bay, cleaned of all the unwanted brackets, trimmed 5mm from each end of the pivot tube, the stock Suzuki needle bearings would then be too long, but with a little research I found that they make them in various lengths so I ordered a set from All Balls along with neck bearings. I want to keep the same wheelbase so I will have to shorten the swing arm by 3" I pan to take it out from in between the cross brace and the pivot tube, also I plan on using a non linkage shock so I will have to fabricate an angled brace from just in front of the axle up to where the bottom of the shock will be located. I still need to find a suitable shock, any ideas on what to use?
Ok I took some pics, and I am going to attach them to this thread, I'm not sure if I'm doing it right so here goes....................
Ok I took some pics, and I am going to attach them to this thread, I'm not sure if I'm doing it right so here goes....................
Replied by 650ed on topic 81 kz440 restoration.
09 Jan 2015 08:19
I cannot imagine why you believe you need to rip the engine apart, but I definitely would NOT do that unless you discover some problem after running it for a while. At 2300 miles it is not even broken in, so all should be good inside the engine unless it was stored under water. Here's some general info that should help.
Many newbies and not so newbies run into or issues with their bikes which could be easily avoided with a little preparation or information. Here are a couple recommendations that I hope you will find useful.
Before riding your KZ you should take a little time to become familiar with it. Simple things like checking the oil, tire pressures, etc. are explained in the Kawasaki Owner's Manual. If you bike didn't come with one (they normally are in a little holder on the bottom of the seat) you can usually find one on eBay - be sure to get one for your exact year/model.
MANUAL
You really should consider buying the Kawasaki Factory Service Manual for your bike. The factory service manual provides instructions on the various maintenance procedures and schedules for your bike, procedures for diagnosing problems, proper torque values for the various fasteners (VERY IMPORTANT), and insight into how each system on your bike works even if you are not repairing that system. Studying the manual before you attempt performing service on your bike will impart an understanding of the system you are working on which will increase the odds of success.
The manuals usually are readily available for most models on eBay and other sources; but be sure to get one that has your specific year and model in it as there are differences between the various KZ650 models. I do not recommend Clymers, Haynes, or other aftermarket manuals as I have seen instances where they provide inaccurate advice. You may decide to use those to supplement the factory manual, but in my opinion they are not a suitable substitute. If you have trouble finding one for your model ask us to help.
TOOLS
WARNING! Do not even try to use Phillips screwdrivers on the Kawasaki cross head screws. Despite their appearance they are not Phillips screws. They are Japanese Industrial Standard (JIS) screws. The tips of Phillips screwdrivers are too long & pointed to allow the 4 blades of the screwdriver to properly engage the screws, so when you apply force the screw head slots will deform and look like crap. The fact is that Phillips screws were deliberately designed to have the screwdriver bit "cam out." This was done to prevent production line assembly from over-tightening, stripping, or breaking the screws. JIS screws do not have this problem. A proper fitting JIS bit can tighten a JIS screw to and beyond the torque spec without camming out. Here's the good news - you can easily modify standard Phillips screwdriver tips to fit the JIS screws.
I have ground down the tips of DeWalt #2 and DeWalt #3 Phillips to make them fit JIS screws. The large crosshead screws on the cases take modified #3 bits (or genuine #3 JIS bits). To modify the DeWalt bits you need to grind the very tip a little, then test fit, then grind a little more and test fit, etc. until the bit no longer "rocks" back and forth in the screwhead. Picture 1 below shows how a DeWalt #3 bit fits the case screws of my KZ650 after being ground properly. The #2 DeWalt bits can be modified the same way to fit smaller JIS screws. Pictures 2 and 3 below shows DeWalt #2 and #3 modified bits.
I did find a place that sells authentic JIS bits. They don't list the #3 bit, but if you contact them they can provide the #3 JIS bits even though they are not listed on the website. These folks were very easy to work with, and the authentic bits do work great. Here's their site:
www.rjrcooltools.com/shop_item_detail.cfm?subcat_ID=89
Pictures 4 & 5 below show a comparison between my home made modified bits with the authentic JIS bits.
PICTURE 1
PICTURE 2
PICTURE 3
PICTURE 4
PICTURE 5
Before reaching for that wrench or ratchet consider the following. The bolts are steel, but your engine and front forks are aluminum. The bolts are much tougher than the aluminum and if over tightened will strip the aluminum threads. Although these can be repaired, preventing damage by applying proper torque will save you grief, time, and money. Tightening fasteners properly requires torque wrenches. Various vendors, including Snap-on, CDI, Sears, etc., market torque wrenches. The two most popular types are the bar type and micrometer type. Either will work, but the micrometer type is a bit easier to use, especially if you are tightening several fasteners with the same torque - such as cylinder head covers. You will need a torque wrench calibrated in INCH POUNDS for many of the bolts. You will also need a torque wrench calibrated in FOOT POUNDS for the larger bolts. Don't try to use the foot pounds wrench on the smaller bolts as it will not be sensitive enough at low torque settings to provide accurate torque. There are many fasteners that require low torque. These include such things as 6mm oil pan bolts, cylinder head cover bolts, etc. for which the torque in 61-78 inch pounds. These low torque bolts require a wrench that is accurate at low settings and this wrench should be graduated in inch pounds. In addition, there are numerous high torque fasteners such as the front axle nuts (51 - 65 foot pounds) or swing arm pivot shaft nuts (58 - 87 foot pounds). These require a wrench that is accurate at higher settings; this wrench should be graduated in foot pounds. Using the proper torque wrenches to correctly tighten fasteners will help prevent damage and contribute to a safe bike. The Kawasaki Service Manual will list the various torque specs for the bolts. I suggest you get the manual before buying the torque wrenches so you can decide which wrenches best meet the torque specs.
Consider buying a can of Kroil penetrating oil and use it to soak stubborn fasteners for a couple days before trying to loosen them. Remember, the original screws and bolts were installed on your bike when Jimmy Carter was President, so many of them may be hard to remove. Kroil can be bought online, at guns shows, and at some other venues.
MOTOR OIL
The ingredients in oils have changed over the years. For example, today's Castrol GTX oil (and pretty much all other AUTOMOBILE oil) is not the same as it was in the 1980's. Back then it worked great in KZ bikes. But, things have changed. Early AUTOMOBILE oils contained zinc phosphorus compounds (ZDDP) to protect engine components from metal to metal contact. This was good for engines, but it was found to be destructive to catalytic converters. Consequently, in AUTOMOBILE oils ZDDP was virtually eliminated and replaced with different chemistry generically referred to as "Friction Modifiers." These work fine and offer good protection for normal AUTOMOBILE engines. However, today's AUTOMOBILE oil "Friction Modifiers" are destructive to wet clutches. KZ bikes (and many other brands) have wet clutches. As a result of these oil chemistry changes a distinction needed to be made between those oils which are suitable for wet clutches and those which are not. That distinction was documented by the Japanese Engine Oil Standards Implementation Panel (JASO). JASO developed a number of different oil specifications for different applications. The specifications that apply to 4 stroke motorcycles fall under the "4T Specifications." Within the 4T specifications the JASO MA class oils are specifically formulated for 4 stroke motorcycles with wet clutches.
There are synthetic, semi-synthetic, and non-synthetic oils that meet the JASO-MA standard and any of them will work ok. However, using oils that are not designated as meeting the JASO-MA standard is destructive to KZ clutches.
Good luck with your bike. Ed
Displaying 1591 - 1600 out of 7257 results.