
Clear Coat
- Pterosaur
-

- User
-

Public
- Thanks: 0
Re: Clear Coat
03 Apr 2007 23:32
Mark Wing wrote:
Mark's exactly right - and it bears repition - sanding and polishing/buffing paint/clear is a process that requires a *gentle* touch - you're just as liable to screw it up once or twice before you get the hang of it.
If you do notice a break, stop immediately, let the piece dry and re-shoot. A break in the clear will appear as a shadow under the clear; the smaller the break, the less noticeable it'll be.
There is a flip side though - and it's worth considering:
With a little practice, a little talent and a little technique, it's entirely possible to shoot spray can clear nice enough that no amount of polish or buffing will ever match the gloss of a job that lays right as it's shot.
This is a tank I shot last year, the guy handed me a set of decals and a spray can of something along the lines of WiredOOd's famous Farm Equipment Red (tm) and said, "Do sumpthin' neat."
The trick isn't the color, it's in the clear:

PJ1 Epoxy rattlecan clear over that junk red.
NEVER sanded, polished, waxed or anything - that's the way it laid out.
The big tricks are to shoot when it's cool and windless - I prefer about a half-hour before sunrise - enough light to see what you're doing, the bugs are still in the sack and nobody's around to finger the fresh shoot.
You want it cool - 60-ish - to allow a little extra set time - any shot material - paint or clear, "melts together" before it sets. The longer it has to melt, the smoother it gets.
You want to shoot heavier on the horizontal flats - the top - and lighter somewhat on the sides.
You want to WATCH the clear going on - and this takes a sense of what you're looking at - to see the spray contact the surface and grab the previous coat; too wet, it'll droop, too dry, it'll form peel.
You can practice it several times on the job - don't like the results, sand it down and re-shoot. No biggie - to an extent, more clear adds depth to the color perception of the job.
Don't be in a hurry, and practice. You'll get it.")
Go light whrn wet sanding the clear. The spray can clear isn't very thick and you don't want to break through. Just scuff it up and re-clear.
Mark
Mark's exactly right - and it bears repition - sanding and polishing/buffing paint/clear is a process that requires a *gentle* touch - you're just as liable to screw it up once or twice before you get the hang of it.
If you do notice a break, stop immediately, let the piece dry and re-shoot. A break in the clear will appear as a shadow under the clear; the smaller the break, the less noticeable it'll be.
There is a flip side though - and it's worth considering:
With a little practice, a little talent and a little technique, it's entirely possible to shoot spray can clear nice enough that no amount of polish or buffing will ever match the gloss of a job that lays right as it's shot.
This is a tank I shot last year, the guy handed me a set of decals and a spray can of something along the lines of WiredOOd's famous Farm Equipment Red (tm) and said, "Do sumpthin' neat."
The trick isn't the color, it's in the clear:
PJ1 Epoxy rattlecan clear over that junk red.
NEVER sanded, polished, waxed or anything - that's the way it laid out.
The big tricks are to shoot when it's cool and windless - I prefer about a half-hour before sunrise - enough light to see what you're doing, the bugs are still in the sack and nobody's around to finger the fresh shoot.
You want it cool - 60-ish - to allow a little extra set time - any shot material - paint or clear, "melts together" before it sets. The longer it has to melt, the smoother it gets.
You want to shoot heavier on the horizontal flats - the top - and lighter somewhat on the sides.
You want to WATCH the clear going on - and this takes a sense of what you're looking at - to see the spray contact the surface and grab the previous coat; too wet, it'll droop, too dry, it'll form peel.
You can practice it several times on the job - don't like the results, sand it down and re-shoot. No biggie - to an extent, more clear adds depth to the color perception of the job.
Don't be in a hurry, and practice. You'll get it.
Please Log in or Create an account to join the conversation.
- Pterosaur
-
- User
-
Public
- Thanks: 0
Re: Clear Coat
04 Apr 2007 00:05
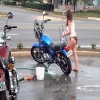
For comparison purposes, here's one shot with DuPont Centari blue and some oddball brand-x auto parts store urethane clear with a fairly cheap Chinese made DeVilbis gravity feed gun:

Not the best picture, but it'll do.
Neither was sanded, rubbed or anything other than just shot.
The red has every bit as much gloss as the blue, but the blue laid out better because I could control the mix and the gun pattern to suit.
The red may not last as long as the blue because it's junk paint - but you can still do some amazing things with a little knowledge and a little practice,
Please Log in or Create an account to join the conversation.
- ronjones
-
 Topic Author
- Offline
- User
-
Registered
- Posts: 565
- Thanks: 4
Re: Clear Coat
04 Apr 2007 06:44
Again, thanks for the replies, guys ") . I'm gonna try to address each of you in this response
. I'm gonna try to address each of you in this response
PT those are some pretty looking tanks. I don't think I can expect nearly those results. From you comments I gather the orange peel texture is an artifact of spraying too far away. I kinda thought so but I've gotten so paranoid about spraying too close and sanding globs and drools, I guess I've backed up too far. On my next coats I'll try to bring it in a bit closer and try not to worry about the globs and drools and consign myself to more sanding or be happy w/the orange peel. I've always been a big believer in learning by hands on experience, but that is just the way I learn. I always tended to struggle w/the class/book learning but breezed through the labs. Early morning paint shoots are not gonna be my forte, I'm just not a morning person Right now I'm using Duplicolor's Van,SUV and Truck clearcoat. Is clear epoxy paint better?
Mark, I do expect to go very light on the clear sanding, but I'll probably take PT's advice, also, and spray it on a bit thicker, also. I was thinking of using a sponge to wrap the sandpaper around just so I won't use too much pressure.
AR-Ron, I'm also a believer of "good enough is good enough" and I also feel that "the enemy of the very good is the perfect" and try not to sweat the small stuff. If I can get a perfect gloss on my next set of coats that would be fine. If on the other hand, I end up w/an orange peel texture, that's fine also and I may even like the textured better than the gloss. The imperfect, to me, shows humanity. (the following is not an advocacy for any religeo/ethnic phylosophy: As I understand the Muslims say "only God can create perfection"...end disclaimer:)To tell the truth I'd rather have the texture than the globs.
I hope and believe, I've adderssed everyone's commnent.
Thanks
RonJ
. I'm gonna try to address each of you in this response PT those are some pretty looking tanks. I don't think I can expect nearly those results. From you comments I gather the orange peel texture is an artifact of spraying too far away. I kinda thought so but I've gotten so paranoid about spraying too close and sanding globs and drools, I guess I've backed up too far. On my next coats I'll try to bring it in a bit closer and try not to worry about the globs and drools and consign myself to more sanding or be happy w/the orange peel. I've always been a big believer in learning by hands on experience, but that is just the way I learn. I always tended to struggle w/the class/book learning but breezed through the labs. Early morning paint shoots are not gonna be my forte, I'm just not a morning person
Right now I'm using Duplicolor's Van,SUV and Truck clearcoat. Is clear epoxy paint better?Mark, I do expect to go very light on the clear sanding, but I'll probably take PT's advice, also, and spray it on a bit thicker, also. I was thinking of using a sponge to wrap the sandpaper around just so I won't use too much pressure.
AR-Ron, I'm also a believer of "good enough is good enough" and I also feel that "the enemy of the very good is the perfect" and try not to sweat the small stuff. If I can get a perfect gloss on my next set of coats that would be fine. If on the other hand, I end up w/an orange peel texture, that's fine also and I may even like the textured better than the gloss. The imperfect, to me, shows humanity. (the following is not an advocacy for any religeo/ethnic phylosophy: As I understand the Muslims say "only God can create perfection"...end disclaimer:)To tell the truth I'd rather have the texture than the globs.
I hope and believe, I've adderssed everyone's commnent.
Thanks
RonJ
'82 KZ750 CSR, M1 twin. Mac 2-1 exhaust, K&N pods, 17tooth drive sprocket, Mikuni BS-34 carbs w/#47.5 pilot jet and #125 main jet, Canadian XS650 needlejetjet needle, Wired George's coil mod.
Barrak, Nancy and Harry says: Welcome to the United Soviet States of America, Comrades
Barrak, Nancy and Harry says: Welcome to the United Soviet States of America, Comrades
Please Log in or Create an account to join the conversation.
- Pterosaur
-
- User
-
Public
- Thanks: 0
Re: Clear Coat
04 Apr 2007 07:06
ronjones wrote:
Thanks - they're just examples of what's attainable with a bit of "labwork".
Essentially correct; there's more to it like a rattlecan's $.0003 nozzle vs. a gun's multiple adjustments, but that's a fair way to look at it.
EDIT:
Temperature is a contributing factor; paint sets at a varying rate based on temp; hence various "speed" reducers and thinners. So, too far away AND too warm, the bigger the peel issue becomes - re: the "melt" comments above.
There really isn't a "correct" distance to shoot from - each can - and each gun for that matter is gonna be different. The trick to figuring out where to hold the nozzle isn't using a yardstick, it's the above-mentioned *watching* the spray fan contact the piece - and that takes the practice - I could write a page on that and still not nail it - you just *know* when it's right.
Sure - play with it. Get loose; have a beer - don't sweat the petty things, as Scrapper sez - the biggest enemy of a decent paint job is you. If you're uptight and shooting paranoid because you're afraid of it, you're much more likely to screw it up. Just *DO IT*.
We're all pullin' for ya....

Post edited by: Pterosaur, at: 2007/04/04 10:13
...PT those are some pretty looking tanks.
Thanks - they're just examples of what's attainable with a bit of "labwork".
I don't think I can expect nearly those results. From you comments I gather the orange peel texture is an artifact of spraying too far away.
Essentially correct; there's more to it like a rattlecan's $.0003 nozzle vs. a gun's multiple adjustments, but that's a fair way to look at it.
EDIT:
Temperature is a contributing factor; paint sets at a varying rate based on temp; hence various "speed" reducers and thinners. So, too far away AND too warm, the bigger the peel issue becomes - re: the "melt" comments above.
There really isn't a "correct" distance to shoot from - each can - and each gun for that matter is gonna be different. The trick to figuring out where to hold the nozzle isn't using a yardstick, it's the above-mentioned *watching* the spray fan contact the piece - and that takes the practice - I could write a page on that and still not nail it - you just *know* when it's right.
I kinda thought so but I've gotten so paranoid about spraying too close and sanding globs and drools, I guess I've backed up too far. On my next coats I'll try to bring it in a bit closer and try not to worry about the globs and drools and consign myself to more sanding or be happy w/the orange peel.
Sure - play with it. Get loose; have a beer - don't sweat the petty things, as Scrapper sez - the biggest enemy of a decent paint job is you. If you're uptight and shooting paranoid because you're afraid of it, you're much more likely to screw it up. Just *DO IT*.
We're all pullin' for ya....
Post edited by: Pterosaur, at: 2007/04/04 10:13
Please Log in or Create an account to join the conversation.
- Pterosaur
-
- User
-
Public
- Thanks: 0
Re: Clear Coat
04 Apr 2007 07:25
Oh - and one more thing:
(...this is why I don't get involved in paint threads every day... )
)
In refering to "spits and globs" from a rattlecan nozzle - if it ain't a junk can from the get-go the nozzle is the likely culprit.
A bit of wailing and gnashing can be avoided by pulling the tip and soaking it in a little mineral spirits or whatever's handy, then taking a set of oxy-torch tip cleaners - or a bit of guitar string - or a strand from an old, frayed throttle cable and carefully roto-rooting the tip. Find the right size wire and keep it around; you'll be doing it again.
Soaking the nozzle and doing likewise immediately after shooting if you intend to use the can again ain't a bad idea either....
(...this is why I don't get involved in paint threads every day...
)In refering to "spits and globs" from a rattlecan nozzle - if it ain't a junk can from the get-go the nozzle is the likely culprit.
A bit of wailing and gnashing can be avoided by pulling the tip and soaking it in a little mineral spirits or whatever's handy, then taking a set of oxy-torch tip cleaners - or a bit of guitar string - or a strand from an old, frayed throttle cable and carefully roto-rooting the tip. Find the right size wire and keep it around; you'll be doing it again.
Soaking the nozzle and doing likewise immediately after shooting if you intend to use the can again ain't a bad idea either....
Please Log in or Create an account to join the conversation.
- H1Vindicator
-
- Offline
- User
-
Registered
- Posts: 813
- Thanks: 138
Last edit: 20 Feb 2013 18:25 by H1Vindicator.
Please Log in or Create an account to join the conversation.
- ronjones
-
Topic Author
- Offline
- User
-
Registered
- Posts: 565
- Thanks: 4
Re: Clear Coat
04 Apr 2007 07:42
Pterosaur wrote:
We're all pullin' for ya....
Thanks, appriciate it
AR-Ron ya want pics at this point or when I've finished?
RonJ
We're all pullin' for ya....
Thanks, appriciate it
AR-Ron ya want pics at this point or when I've finished?
RonJ
'82 KZ750 CSR, M1 twin. Mac 2-1 exhaust, K&N pods, 17tooth drive sprocket, Mikuni BS-34 carbs w/#47.5 pilot jet and #125 main jet, Canadian XS650 needlejetjet needle, Wired George's coil mod.
Barrak, Nancy and Harry says: Welcome to the United Soviet States of America, Comrades
Barrak, Nancy and Harry says: Welcome to the United Soviet States of America, Comrades
Please Log in or Create an account to join the conversation.
- ronjones
-
Topic Author
- Offline
- User
-
Registered
- Posts: 565
- Thanks: 4
Re: Clear Coat
04 Apr 2007 07:58
Pterosaur wrote:
Tips, that probably most of us know, but ignore and can't be repeated enough.
Thanks
Oh - and one more thing:
(...this is why I don't get involved in paint threads every day...
In refering to "spits and globs" from a rattlecan nozzle - if it ain't a junk can from the get-go the nozzle is the likely culprit.
A bit of wailing and gnashing can be avoided by pulling the tip and soaking it in a little mineral spirits or whatever's handy, then taking a set of oxy-torch tip cleaners - or a bit of guitar string - or a strand from an old, frayed throttle cable and carefully roto-rooting the tip. Find the right size wire and keep it around; you'll be doing it again.
Soaking the nozzle and doing likewise immediately after shooting if you intend to use the can again ain't a bad idea either....
Tips, that probably most of us know, but ignore and can't be repeated enough.
Thanks
'82 KZ750 CSR, M1 twin. Mac 2-1 exhaust, K&N pods, 17tooth drive sprocket, Mikuni BS-34 carbs w/#47.5 pilot jet and #125 main jet, Canadian XS650 needlejetjet needle, Wired George's coil mod.
Barrak, Nancy and Harry says: Welcome to the United Soviet States of America, Comrades
Barrak, Nancy and Harry says: Welcome to the United Soviet States of America, Comrades
Please Log in or Create an account to join the conversation.
- ronjones
-
Topic Author
- Offline
- User
-
Registered
- Posts: 565
- Thanks: 4
Re: Clear Coat
04 Apr 2007 08:02
H1Vindicator wrote:
Cool, thanks for the tip and link, Vindicator.
Since the paint won't be fuel resistant, this product may be worth a try. Crystal-Glo polish .
The green tank was done using ChuckHawks.com's Harley Paintin' for the Underfunded & Underskilled arlticle. The blue one was done at a Ford dealer body shop. JMK.<br><br>Post edited by: H1Vindicator, at: 2007/04/04 10:56
Cool, thanks for the tip and link, Vindicator.
'82 KZ750 CSR, M1 twin. Mac 2-1 exhaust, K&N pods, 17tooth drive sprocket, Mikuni BS-34 carbs w/#47.5 pilot jet and #125 main jet, Canadian XS650 needlejetjet needle, Wired George's coil mod.
Barrak, Nancy and Harry says: Welcome to the United Soviet States of America, Comrades
Barrak, Nancy and Harry says: Welcome to the United Soviet States of America, Comrades
Please Log in or Create an account to join the conversation.
- Pterosaur
-
- User
-
Public
- Thanks: 0
Re: Clear Coat
04 Apr 2007 08:08
H1Vindicator wrote:
Sure - why not? Looks to do the job alright. :woohoo:
Fuel resistance is why I prefer epoxy clears for rattle-canning - but it never hurts to give it all the protection you can.
Cute advertising.
Juxtaposed with:
Technically, they're just a wee-bit off base here.
It's physically impossible to "Safely remove oxidation and rejuvenate color richness of faded surfaces" without an abrasive process. Just don't happen, folks.
What's going on here is that they have "acryllic" particles in suspension in the polish that pull double duty - as you're doing the wax-on-wax-off routine, the particles act a a fine abrasive, taking off the oxydized layer. Then, when you're done rubbing it, the acryllic particles, which are clear, fill the surface imperfections and up the refractive index (gloss).
Then it sets up like a wax, but with the improved toughness of the acyllic.
A minor nit, perhaps, but an important one.
Since the paint won't be fuel resistant, this product may be worth a try.
Crystal-Glo polish .
Sure - why not? Looks to do the job alright. :woohoo:
Fuel resistance is why I prefer epoxy clears for rattle-canning - but it never hurts to give it all the protection you can.
Cute advertising.
Revitalizes and protects in one. Reduces the appearance of swirls and fine scratches. Safely removes oxidation and rejuvenates color richness of faded surfaces and prevents it from coming back.
Juxtaposed with:
Contains no silicone or abrasives. Non-yellowing, peel-proof and crystal-clear. Leaves no wax dust or powdery residue.
Technically, they're just a wee-bit off base here.
It's physically impossible to "Safely remove oxidation and rejuvenate color richness of faded surfaces" without an abrasive process. Just don't happen, folks.
What's going on here is that they have "acryllic" particles in suspension in the polish that pull double duty - as you're doing the wax-on-wax-off routine, the particles act a a fine abrasive, taking off the oxydized layer. Then, when you're done rubbing it, the acryllic particles, which are clear, fill the surface imperfections and up the refractive index (gloss).
Then it sets up like a wax, but with the improved toughness of the acyllic.
A minor nit, perhaps, but an important one.
Please Log in or Create an account to join the conversation.
- H1Vindicator
-
- Offline
- User
-
Registered
- Posts: 813
- Thanks: 138
Last edit: 20 Feb 2013 18:49 by H1Vindicator.
Please Log in or Create an account to join the conversation.
- Pterosaur
-
- User
-
Public
- Thanks: 0
Re: Clear Coat
04 Apr 2007 08:26
Ah, and since tips are the hot topic, here's another one that'll save buckets of tears when it comes to what RonKZ earlier referred to as that *Bad gas! Bad! Bad! Nasty 'ole gas!* and what it'll do to paint:
Check out this filler neck:

Aside from getting on paint, gas 'll do even worse things when it gets UNDER it.
Trick here is to mask the paint line down some appropiate distance, depending on what's visible under your cap, then masking your clear line *almost* but not quite to the horizontal seal where the gasket meets the neck.
ADDENDUM:
When shooting your clear, make sure to get good coverage on this area. A decent, gas-resistant clear will form a seal between the metal of the filler neck and the paint job beneath.
The idea here is that if you paint/clear all the way up to and include the top of the neck, the repetitive wear of the cap being screwed on to the seal will wear away the paint/clear, "break" that surface, then gas is off to the races to seep *under* the paint.
*Bad gas! Bad! Bad! Nasty 'ole gas!*
Helps head this one off at the neck.
Addendum, Part Deux:
Despite RonKZ's all-too-true concerns about the "useful life" of a paint job, once removed, THIS is the reason why it's worth trading off a week or two of that life to let the job set, and if possible, give the raw paint a week in the sun to set up right - then apre' clear, do the same.
Paint SETS by the evaporation of what'r called volatiles within the paint/clear - thinners, reducers, what-have-you. As this happens, a paint job will actually SHRINK to some noticable degree. Letting the paint set before sanding/clearing gives it an opportunity to assume its final shape before going to the next stage - and same goes for the clear.
This is also why giving a new job a couple of weeks before waxing is a good idea.
Post edited by: Pterosaur, at: 2007/04/04 12:20
Check out this filler neck:
Aside from getting on paint, gas 'll do even worse things when it gets UNDER it.
Trick here is to mask the paint line down some appropiate distance, depending on what's visible under your cap, then masking your clear line *almost* but not quite to the horizontal seal where the gasket meets the neck.
ADDENDUM:
When shooting your clear, make sure to get good coverage on this area. A decent, gas-resistant clear will form a seal between the metal of the filler neck and the paint job beneath.
The idea here is that if you paint/clear all the way up to and include the top of the neck, the repetitive wear of the cap being screwed on to the seal will wear away the paint/clear, "break" that surface, then gas is off to the races to seep *under* the paint.
*Bad gas! Bad! Bad! Nasty 'ole gas!*
Helps head this one off at the neck.
Addendum, Part Deux:
Despite RonKZ's all-too-true concerns about the "useful life" of a paint job, once removed, THIS is the reason why it's worth trading off a week or two of that life to let the job set, and if possible, give the raw paint a week in the sun to set up right - then apre' clear, do the same.
Paint SETS by the evaporation of what'r called volatiles within the paint/clear - thinners, reducers, what-have-you. As this happens, a paint job will actually SHRINK to some noticable degree. Letting the paint set before sanding/clearing gives it an opportunity to assume its final shape before going to the next stage - and same goes for the clear.
This is also why giving a new job a couple of weeks before waxing is a good idea.
Post edited by: Pterosaur, at: 2007/04/04 12:20
Please Log in or Create an account to join the conversation.
Moderators: Street Fighter LTD