
82 KZ750H Keihin Carbs leaking after cleaning
- zero10
-
 Topic Author
- Offline
- User
-

Registered
- Posts: 71
- Thanks: 6
Re: 82 KZ750H Keihin Carbs leaking after cleaning
12 Sep 2014 08:30
Ah!! Roll them back! D'oh! Thanks for the tip, that is so obvious now but didn't occur to me at all. I was stuck in the mindset of unbolting parts to get access to things and had run out of options so I sort of folded them down and pried them around the openings and things like that. I tried pushing them back into the air box but that made them very hard to get back out and I decided I wouldn't be able to pull them out and seat the boots on the carb inlet with the carbs in place.
Mine are somewhat pliable but definitely not what I would call soft. If I can get them to roll over easily I'll adjust the float levels on the bench, if not I'll just pull the bowls in place. There really is quite a lot of room underneath the carbs to work.
I agree the low float level is the cause of the no start condition, I only found 2-3mm of fuel in each bowl when I drained them on the bike so I doubt any could get up into the intake path. I'll be working on it again tonight - eventually I will prevail (just in time to store it for the winter...)
-
Please Log in or Create an account to join the conversation.
- WABBMW
-

- Offline
- User
-
Registered
- Let The Good Times Roll !
- Posts: 341
- Thanks: 16
Re: 82 KZ750H Keihin Carbs leaking after cleaning
12 Sep 2014 09:45 - 12 Sep 2014 09:49
Some float needles have a small amount of travel built into them to protect the needle from being heavily pressed into the seat. The needle has a tiny spring that keeps the little plunger extended. The problem is that the needles should shut off the fuel flow - when they are very lightly touching the seat, and not when they are fully compressed. So they may be stopping the fuel flow way sooner or lower than you think. The method of using a clear tube to "see" the fuel level is probably the most accurate, but requires a trial and error removel of the bowls; adjustment; re-install; check level; repeat; repeat.
Do you know what the correct fuel level is, relative to the float bowl seam line? Is that what the 4 mm is all about? I presume 4 mm below the seam line? The non-starting issue - I would guess is due to the low fuel level.
What was the story on the bike before you removed and cleaned the carbs? Did it run well at some time in the past while you owned the bike? Or is it possible that a previous owner could have mal-adjusted the float levels?
Bill Baker
Houston, Texas
1982 KZ650 CSR
2008 Yamaha FZ1
2006 Yamaha FZ1
1977 Honda Supersport 750 four (sold)
1984 Honda Nighthawk 650 (sold)
Houston, Texas
1982 KZ650 CSR
2008 Yamaha FZ1
2006 Yamaha FZ1
1977 Honda Supersport 750 four (sold)
1984 Honda Nighthawk 650 (sold)
Last edit: 12 Sep 2014 09:49 by WABBMW. Reason: removed an unnecessary step; misspelled words.
Please Log in or Create an account to join the conversation.
- JR
-
- Offline
- Sustaining Member
-

Registered
- Posts: 2961
- Thanks: 477
Re: 82 KZ750H Keihin Carbs leaking after cleaning
12 Sep 2014 09:51 - 12 Sep 2014 09:53
If you end up doing them on the bench then the following might help.
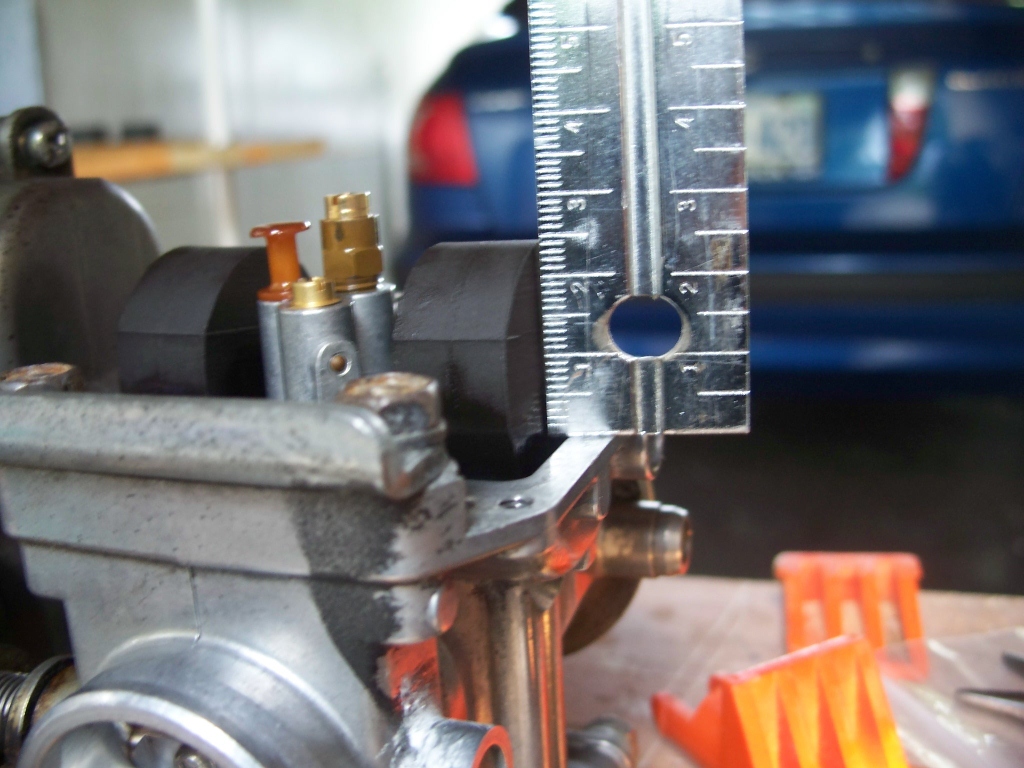
Here's my crude set up with the lawnmower gas tank balanced on my tin mug. I can hold the clear tube against the seam of either #1 or #4 carb since all is level. I use a ruler held beside the tube and some people mark the tube.
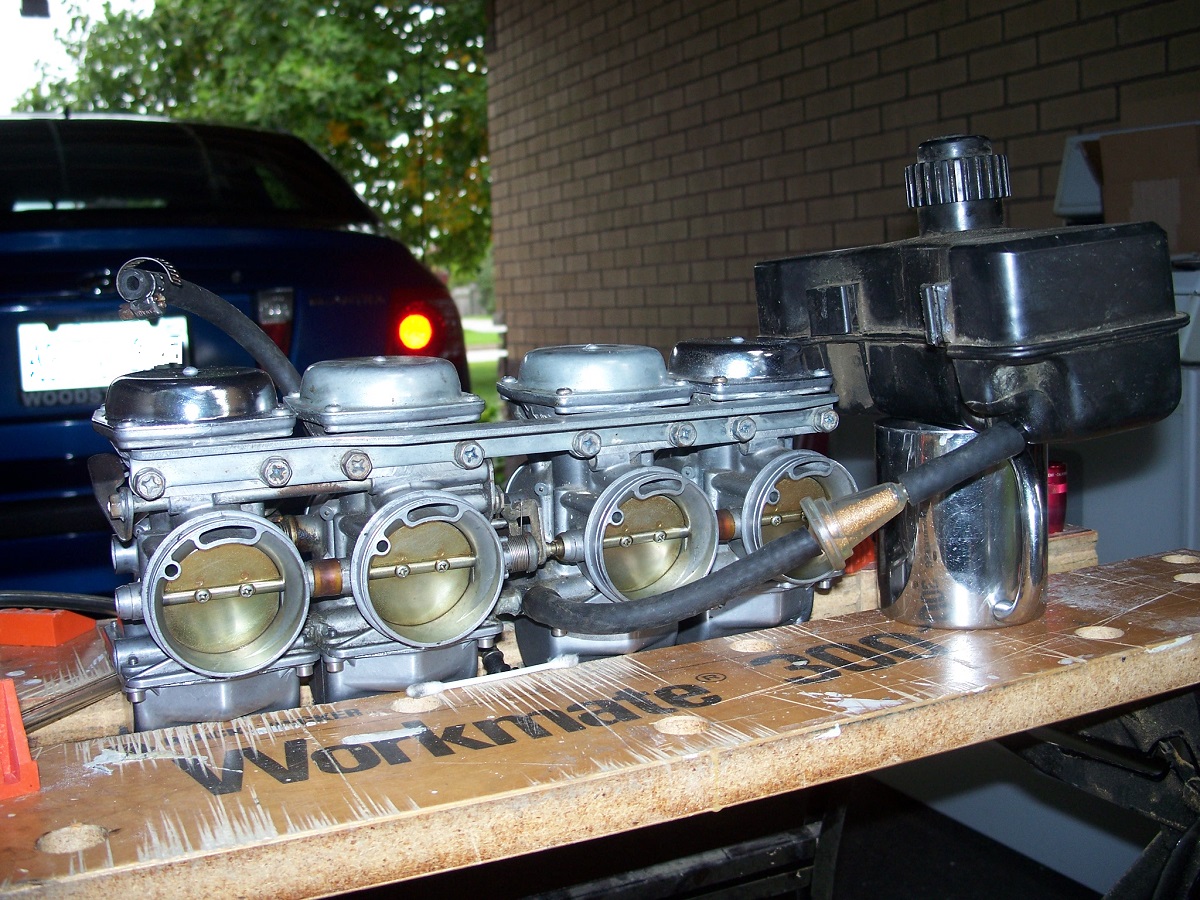
If all levels are at specification then you're done. If not then take the bowls off and measure float height. From measurement of the service fuel level you will know how many mm you need to adjust the float height and in what direction. Bend the tang, make the adjustment and you will have the correct fuel level when you re assemble. I found this method - which was posted a few years ago by Tek9ine - mch less frustrating than trial and error.
I have found that getting the fuel service level correct made a huge difference in how my bike started and ran/
Whatever method you use - best of luck
Here's my crude set up with the lawnmower gas tank balanced on my tin mug. I can hold the clear tube against the seam of either #1 or #4 carb since all is level. I use a ruler held beside the tube and some people mark the tube.
If all levels are at specification then you're done. If not then take the bowls off and measure float height. From measurement of the service fuel level you will know how many mm you need to adjust the float height and in what direction. Bend the tang, make the adjustment and you will have the correct fuel level when you re assemble. I found this method - which was posted a few years ago by Tek9ine - mch less frustrating than trial and error.
I have found that getting the fuel service level correct made a huge difference in how my bike started and ran/
Whatever method you use - best of luck
1980 kz750E1, Delkevic exhaust
Attachments:
Last edit: 12 Sep 2014 09:53 by JR.
Please Log in or Create an account to join the conversation.
- koloj
-

- Offline
- User
-
Registered
- Posts: 223
- Thanks: 5
Re: Re:82 KZ750H Keihin Carbs leaking after cleaning
12 Sep 2014 15:20
I have same carbs had problems upside down floats too also make sure idle screw is engaged I set mine at the line were carb body and bowl meet and working good make sure your the screws on the top if visible are taken out and cleaned also some times oring gets jammed in their... I have 1980 kz750 pods jetted make sure lines on the floats face toward carb body
Please Log in or Create an account to join the conversation.
- koloj
-
- Offline
- User
-
Registered
- Posts: 223
- Thanks: 5
Re: Re:82 KZ750H Keihin Carbs leaking after cleaning
12 Sep 2014 15:25
Checking for leaks best way spray with windex carbs upright either blow into the gas inlet or aircompressor how I found the leak on the tubes between the two carbs if u have one orings metric from auto one work good and to pull the apart just remove the screws on the butterfly's carefully no strip choke ones they come apart real easy
Please Log in or Create an account to join the conversation.
- zero10
-
Topic Author
- Offline
- User
-
Registered
- Posts: 71
- Thanks: 6
Re: 82 KZ750H Keihin Carbs leaking after cleaning
12 Sep 2014 22:16
I spent some time fiddling with the carbs again tonight. Thanks so much for the advice on rolling back the intake boots, only 2 of them were soft enough to do this with but it worked great on these 2, made the re-install about half as hard as it was last time.
I adjusted the float level and after 2 tries it is now sitting at 3-3.5mm below the seam on all 4. I think that's close enough. Also I found the cause of the occasional overflow from the carbs, it looks like something has come apart and put some debris into the fuel distribution pipe. I cleaned the floats and needles and everything as best I could, but after my second test #4 overflowed badly. I pulled the float needle and found a chunk of black rubber wedged in the needle seat on that carb. Removing it caused the fuel level to stay in the right place.
After re-installing the carbs and filling them I tried starting the bike with the choke on (as it's about 3 degrees in my garage right now) and much to my surprise it fired up nearly instantly, although it didn't idle well. I shut it down to move it outside so I wouldn't wake the kids and it just wouldn't run right after that, stumbling, only starting with the choke off and throttle wide open, occasional loud violent backfires (which I might add, are scary as hell when you're sitting on the engine). After way too much time looking things over I suspected that 2 of the plug wires may be swapped. I haven't touched the plug wires since I bought the bike and I was told it was running when parked, but it seems somebody decided to get funny and swapped #1 and #2 wires. This matches my observation that only the #3 exhaust pipe was hot, #4 was warm and #1/#2 were completely cold with very wet spark plugs.
Unfortuntely I didn't discover this until it was far too late to try starting the bike again so I have to wait until morning to try starting it up again. How can I sleep now knowing that this thing is almost running?! :woohoo:
-
Please Log in or Create an account to join the conversation.
- zero10
-
Topic Author
- Offline
- User
-
Registered
- Posts: 71
- Thanks: 6
Re: 82 KZ750H Keihin Carbs leaking after cleaning
12 Sep 2014 22:26WABBMW wrote: Some float needles have a small amount of travel built into them to protect the needle from being heavily pressed into the seat. The needle has a tiny spring that keeps the little plunger extended. The problem is that the needles should shut off the fuel flow - when they are very lightly touching the seat, and not when they are fully compressed. So they may be stopping the fuel flow way sooner or lower than you think. The method of using a clear tube to "see" the fuel level is probably the most accurate, but requires a trial and error removel of the bowls; adjustment; re-install; check level; repeat; repeat.
Do you know what the correct fuel level is, relative to the float bowl seam line? Is that what the 4 mm is all about? I presume 4 mm below the seam line? The non-starting issue - I would guess is due to the low fuel level.
What was the story on the bike before you removed and cleaned the carbs? Did it run well at some time in the past while you owned the bike? Or is it possible that a previous owner could have mal-adjusted the float levels?
Sorry I managed to totally miss your post, thanks for the reply!
I bought the bike not running but was told that it had run "perfectly" before being parked (by a trustworthy friend of the family). Upon getting the bike home I found the fuel tank had quite a lot of sediment and varnish in it so I flushed it out and pulled the carbs to clean them out before trying to start the bike. At that point I found that the bowl o-rings were well past their prime and had been leaking for a while. I put in new bowl o-rings then had the overflowing problem. The factory service manual specifies the service fuel level as being 4mm below the bowl-body seam so that's where I got that number from. The clear tube method isn't so arduous, I simply measured the fuel level, removed the bowls and measured where the floats first contacted the spring pin, then adjusted the tab until I had made up the difference. In my case on my first check tonight I was 12mm below the body-bowl seam with the fuel level and this put the line on the floats 19mm above the bottom of the carb body when the tab first contacted the spring pin. I adjusted this to be 11mm and the fuel level was nearly spot on at 3-3.5mm below the seam. Really it was pretty easy once I stopped being so scared of the carbs
")
My float needles do have the spring pin inside of them, one of the pins was completely seized solid but I was able to soak it free by twisting it and pressing on it while spraying some carb cleaner into it, now it works like new.
-
Please Log in or Create an account to join the conversation.
- zero10
-
Topic Author
- Offline
- User
-
Registered
- Posts: 71
- Thanks: 6
Re: 82 KZ750H Keihin Carbs leaking after cleaning
13 Sep 2014 22:37
I just wanted to share my success. After another round of pulling debris from the float needle I finally have a set of carbs with a good float level that doesn't suddenly overflow. I had the fuel tap on for about 5 hours today while doing various things on the bike and the floats worked properly without a single issue. Looks like they're fixed!
Also, after swapping the plug wires around to be proper I finally got the bike running on all 4 cylinders. I've never heard it run before and I'm really impressed! What a fantastic noise! Especially when the advancer comes up as you pass 3000rpm. I don't think my neighbours like me any more but I really like this bike
Thanks for all the help, now I've got to get on with fixing the suspension and electrics so I can ride it.
-
Please Log in or Create an account to join the conversation.
- piecrazy4
-
- Offline
- User
-
Registered
- Posts: 26
- Thanks: 0
Re: 82 KZ750H Keihin Carbs leaking after cleaning
13 Sep 2014 23:28
Good for you these bikes do sound great
1984 ZN 700 ltd current project
Please Log in or Create an account to join the conversation.
- JR
-
- Offline
- Sustaining Member
-
Registered
- Posts: 2961
- Thanks: 477
Re: 82 KZ750H Keihin Carbs leaking after cleaning
14 Sep 2014 05:55 - 14 Sep 2014 08:06
Thanks for the update. A lot of times people don't bother to report back.
If you don't have a fuel filter it might be a good time to get one. Not one designed for an automobile though
Good luck
If you don't have a fuel filter it might be a good time to get one. Not one designed for an automobile though
Good luck
1980 kz750E1, Delkevic exhaust
Last edit: 14 Sep 2014 08:06 by JR.
Please Log in or Create an account to join the conversation.
- CoreyClough
-

- Offline
- User
-
Registered
- GPz550 Addiction
- Posts: 1094
- Thanks: 82
Re: 82 KZ750H Keihin Carbs leaking after cleaning
14 Sep 2014 07:42
I have found that the fuel pipe o-rings need replacing if they never been. It has happened to me once, and never again. There should be 12 (4 per pipe) of them, but check the carb diagram just in case.
'85 GPz550(ZX550-A2)
GPz550 Base Manual --> tinyurl.com/ze5b3qo
GPz550 Supplement Manual --> tinyurl.com/h34d2o6
GPz550.com --> www.nwsca.com/scripts/gpz_forum_2005/default.asp
First Race Win GPz550 --> tinyurl.com/o5y3ftp
GPz550 Base Manual --> tinyurl.com/ze5b3qo
GPz550 Supplement Manual --> tinyurl.com/h34d2o6
GPz550.com --> www.nwsca.com/scripts/gpz_forum_2005/default.asp
First Race Win GPz550 --> tinyurl.com/o5y3ftp
Please Log in or Create an account to join the conversation.
Moderators: Street Fighter LTD