
- Posts: 25
- Thank you received: 0
timing adjustment using test light
- ZoomsJr
- Topic Author
- Offline
- User
Less
More
24 Aug 2017 18:30 #769690
by ZoomsJr
1978 KZ650 B2A
timing adjustment using test light was created by ZoomsJr
Hi everyone,
Im trying to set my timing using a test light rather than a multi meter set to test continuity. I'm hooking the aligator clip to the 1&4 leaf spring and grounding the other side to the case, however the test light never comes on when I rotate the shaft. I already made sure the battery was connected and the ignition is on. What am I doing wrong? The same thing happens when I try to test 2&3 as well.
Im trying to set my timing using a test light rather than a multi meter set to test continuity. I'm hooking the aligator clip to the 1&4 leaf spring and grounding the other side to the case, however the test light never comes on when I rotate the shaft. I already made sure the battery was connected and the ignition is on. What am I doing wrong? The same thing happens when I try to test 2&3 as well.
1978 KZ650 B2A
Please Log in or Create an account to join the conversation.
- SWest
-

- Offline
- Sustaining Member
- 10 22 2014
Less
More
- Posts: 22969
- Thank you received: 2749
24 Aug 2017 20:32 #769698
by SWest
Replied by SWest on topic timing adjustment using test light
Set the gap per the FSM. Be sure the points are clean. A folded matchbook is good for that. Are they pitted?
Steve
Steve
Please Log in or Create an account to join the conversation.
- 650ed
-

- Offline
- User
Less
More
- Posts: 15344
- Thank you received: 2829
24 Aug 2017 20:43 #769699
by 650ed
Is this a Chevy, Ford, Honda, Yamaha, or what? In other words you need to specify which year and model machine you are trying to tune since not all machines use exactly the same stuff. If you simply add the year and exact model in your signature line you won't need to remember to type it in again. Ed
1977 KZ650-C1 Original Owner - Stock (with additional invisible FIAMM horn)
Replied by 650ed on topic timing adjustment using test light
ZoomsJr wrote: Hi everyone,
Im trying to set my timing using a test light rather than a multi meter set to test continuity. I'm hooking the aligator clip to the 1&4 leaf spring and grounding the other side to the case, however the test light never comes on when I rotate the shaft. I already made sure the battery was connected and the ignition is on. What am I doing wrong? The same thing happens when I try to test 2&3 as well.
Is this a Chevy, Ford, Honda, Yamaha, or what? In other words you need to specify which year and model machine you are trying to tune since not all machines use exactly the same stuff. If you simply add the year and exact model in your signature line you won't need to remember to type it in again. Ed
1977 KZ650-C1 Original Owner - Stock (with additional invisible FIAMM horn)
Please Log in or Create an account to join the conversation.
- ZoomsJr
- Topic Author
- Offline
- User
Less
More
- Posts: 25
- Thank you received: 0
24 Aug 2017 21:00 #769701
by ZoomsJr
1978 KZ650 B2A
Replied by ZoomsJr on topic timing adjustment using test light
The points are adjusted but pitted and a little burnt, I plan on replacing them soon but I'd like to get this figured out as well. Also, the bike is a 78 kz650 b2a. Thanks for the tip Ed, I'll do that!
1978 KZ650 B2A
Please Log in or Create an account to join the conversation.
- SWest
-
- Offline
- Sustaining Member
- 10 22 2014
Less
More
- Posts: 22969
- Thank you received: 2749
24 Aug 2017 21:04 #769702
by SWest
Replied by SWest on topic timing adjustment using test light
You can use a points file. A fingernail file will work. Just use the matchbook trick to clean them.
Steve
Steve
Please Log in or Create an account to join the conversation.
- 650ed
-
- Offline
- User
Less
More
- Posts: 15344
- Thank you received: 2829
25 Aug 2017 05:29 #769715
by 650ed
1977 KZ650-C1 Original Owner - Stock (with additional invisible FIAMM horn)
Replied by 650ed on topic timing adjustment using test light
The manual has several pages of instructions, pictures, etc. on how to set the timing using the static method plus timing light, plus dwell meter. I can give you a fairly easy way that will get you in a pretty close ballpark without a timing light or dwell meter, but you will need a 0.35 mm feeler gauge and a multi-meter or other device to test continuity. To be very precise, the timing light and dwell meter will be needed.
Before attempting to replace or adjust the points the following is important to understand; timing is comprised of two separate components, and BOTH of these components MUST be set properly if the engine is to run well:
--- The GAP - this is the distance the points spread apart when fully open. The GAP is the element that determines the DWELL. In essence, the DWELL is the number of degrees of points cam rotation that the points are closed and this controls the amount of time the coils receive a charge before firing the spark plugs.
--- The TIMING of the initial opening of the points (the point at which the continuity across the points breaks). This controls the precise instant that the coils receive the signal to fire the spark plugs.
Remove the points cover on the right side of engine. Under it you will see 2 sets of points. The set on the left fires cylinders 1 & 4; the set on the right fires 2 & 3. When replacing points observe carefully how the little bits and pieces are arranged where the wires attach. Some of those pieces are actually insulators and if you leave any of them out or put them back in the wrong place the points will be grounded and won't work. Take a very close look at the contact surfaces of the points. If they are pitted you really should replace them. You can sand down pitted points, but they will quickly pit again. Replace one set of points at a time so you can look at the other set in case you get the little bits confused.
Use a 17 mm wrench to turn the nut NEAR the end of the crankshaft clockwise while looking in the hole above that nut. (Do NOT use a wrench on the smaller bolt on the very end of the crankshaft to turn the engine.) Inside that hole you will see a vertical pointer cast into the casing. As you turn the 17 mm nut you will see a 1 & 4 and F and T roll by and then you'll see a 2 & 3 and F and T roll by. Each F and T has a line next to it.
Here's the method I use for static timing. I turn OFF the ignition. I disconnect the green wire near one coil and the black wire near the other coil. (This is not in the book, but it makes checking continuity much easier for me.) After installing the new points or cleaning up the old ones, turn the 17 mm nut while watching the points. When points set 1&4 are at their widest gap adjust them (by loosening the 2 screws that hold the points to the backplate) so the gap equals 0.35 mm. Turn the 17 mm nut clockwise through a full revolution again and double check this gap. Then repeat this for points set 2&3. Now set your meter to test continuity and clip one wire to the leaf spring on points set 1&4 and clip the other wire to ground. Turn the 17 mm nut clockwise until the 1&4 "F" mark aligns with the pointer mentioned above. You want the continuity across point set 1&4 to just break when the F mark aligns with the pointer. The idea is that when the continuity just fails is when the points will fire their respective coil and cylinders. In order to adjust the point at which continuity fails you loosen the 3 screws that hold the backplate to the engine and slightly turn the backplate until the meter shows a break in continuity. Once you have the 1&4 set timed properly you can check the 2&3 set to make sure they break when the 2&3 F mark aligns with the pointer (they should or something is not right). Don't forget to plug in the green and black coil wires when you are done, and put a little grease on the rubbing block felt. Assuming you are using new points of the correct type this should enable you to get the timing very close. Trying this with old points may give poor results, especially if the points are pitted and/or the rubbing blocks are worn.
After you have set the gap (which in effect sets the dwell) and the timing using the method above you can use a dwell meter and timing light to fine tune dwell and timing. If you have followed the above procedure carefully, very little if any fine tuning will be needed.
Sorry this is so long. It's not as difficult as it sounds. Ed
1977 KZ650-C1 Original Owner - Stock (with additional invisible FIAMM horn)
The following user(s) said Thank You: ZoomsJr, Zedsded
Please Log in or Create an account to join the conversation.
- ZoomsJr
- Topic Author
- Offline
- User
Less
More
- Posts: 25
- Thank you received: 0
31 Aug 2017 17:20 #770107
by ZoomsJr
1978 KZ650 B2A
Replied by ZoomsJr on topic timing adjustment using test light
So I got my new point but I cant seem to get the gap within spec. It looks to be about double what its supposed to be and I'm out of adjustments. Is it okay to sand down the lacquered arm where it rides the cam or is there another solution?
1978 KZ650 B2A
Please Log in or Create an account to join the conversation.
- SWest
-
- Offline
- Sustaining Member
- 10 22 2014
Less
More
- Posts: 22969
- Thank you received: 2749
31 Aug 2017 19:01 #770112
by SWest
Replied by SWest on topic timing adjustment using test light
Don't sand. The issue must be elsewhere. Pic?
Steve
Steve
Please Log in or Create an account to join the conversation.
- 650ed
-
- Offline
- User
Less
More
- Posts: 15344
- Thank you received: 2829
31 Aug 2017 19:59 - 31 Aug 2017 19:59 #770116
by 650ed
1977 KZ650-C1 Original Owner - Stock (with additional invisible FIAMM horn)
Replied by 650ed on topic timing adjustment using test light
DO NOT SAND !!!!!! Doing that will only ruin the points; it will NOT solve the problem!
Start over. Use the instructions I posted. Ed
Start over. Use the instructions I posted. Ed
1977 KZ650-C1 Original Owner - Stock (with additional invisible FIAMM horn)
Last edit: 31 Aug 2017 19:59 by 650ed.
Please Log in or Create an account to join the conversation.
- ZoomsJr
- Topic Author
- Offline
- User
Less
More
- Posts: 25
- Thank you received: 0
31 Aug 2017 21:27 #770124
by ZoomsJr
1978 KZ650 B2A
Replied by ZoomsJr on topic timing adjustment using test light
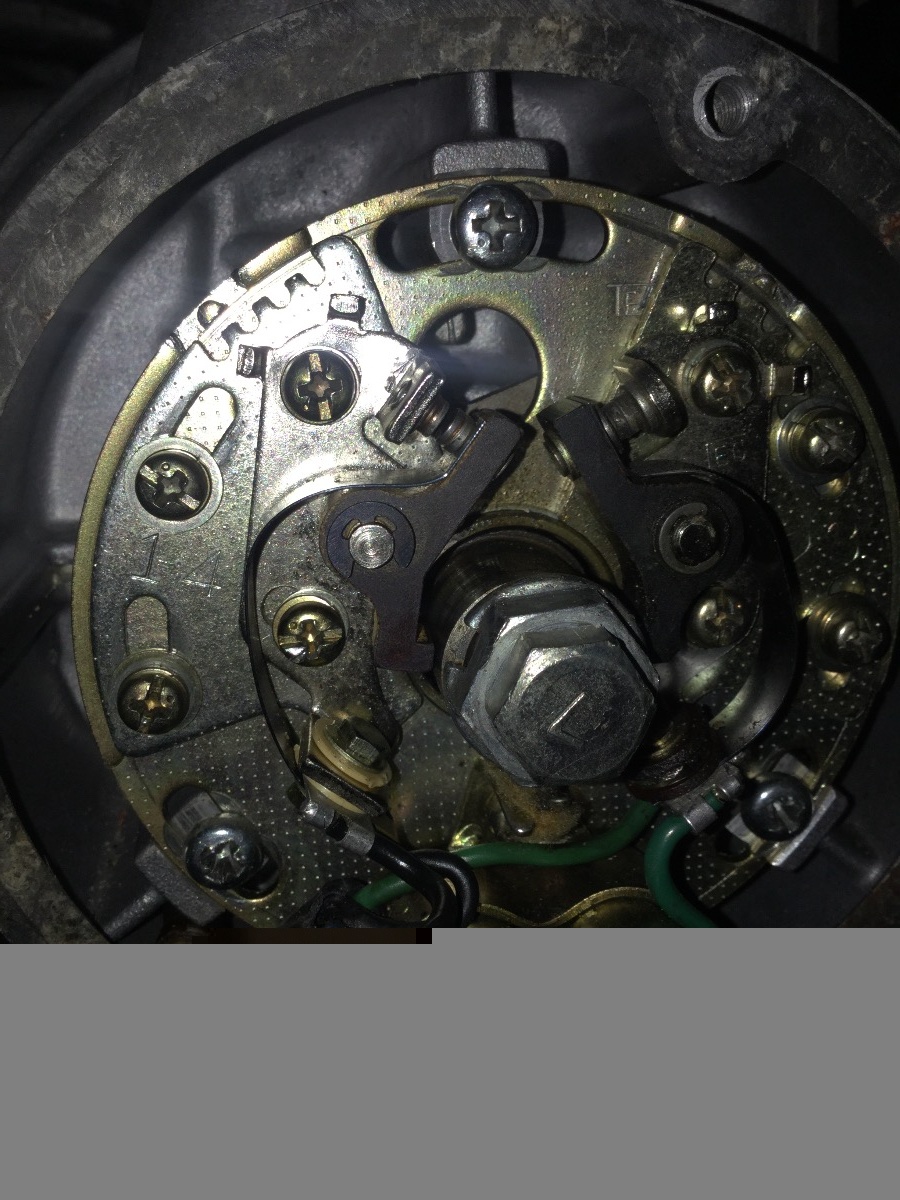
Steve, here's some pics of the points at their widest. If you look closely you can see that only the corner of the rocker makes contact with the cam. I think this may be where the issue lies
1978 KZ650 B2A
Please Log in or Create an account to join the conversation.
- SWest
-
- Offline
- Sustaining Member
- 10 22 2014
Less
More
- Posts: 22969
- Thank you received: 2749
01 Sep 2017 05:08 #770132
by SWest
Replied by SWest on topic timing adjustment using test light
Set them to when the light goes out at the F mark and see what happens.
Steve
Steve
Please Log in or Create an account to join the conversation.
- 650ed
-
- Offline
- User
Less
More
- Posts: 15344
- Thank you received: 2829
01 Sep 2017 05:14 - 01 Sep 2017 05:14 #770135
by 650ed
1977 KZ650-C1 Original Owner - Stock (with additional invisible FIAMM horn)
Replied by 650ed on topic timing adjustment using test light
It looks to me like there is no problem other than the fact that you need to adjust them. They look like the gap is greater than spec - use a feeler gauge to set them. It looks like you will need to may need to turn the backplate counter clockwise to get the points plates adjusted properly - no biggie. Ed
1977 KZ650-C1 Original Owner - Stock (with additional invisible FIAMM horn)
Last edit: 01 Sep 2017 05:14 by 650ed.
Please Log in or Create an account to join the conversation.