
- Posts: 11
- Thank you received: 0
Tach seal leak
- Dwadley
- Topic Author
- Offline
- User
Less
More
09 Sep 2013 00:31 #605630
by Dwadley
Tach seal leak was created by Dwadley
Hello, I have an 80 KZ750 LTD with a leaking tach cable. I have read through the forum on fixing this, and I understand it is a common problem. I am going to go the quick fix route by using a 10mm o-ring or a card stock gasket first, before I replace the seal or tach drive. My question is where, specifically, does one place the o-ring? Does it go in between the flange of the cable and the tach drive, or does it go in between the flange and the knurled nut? If it just sits in between the flange and the drive, how do i ensure that it makes proper contact as i tighten the knurled nut? I understand I can use a cereal box to make a paper gasket, and I assume that it would go in between the flange and the tach drive housing as well, yes? Thank you.
Please Log in or Create an account to join the conversation.
- 650ed
-

- Offline
- User
Less
More
- Posts: 15344
- Thank you received: 2829
09 Sep 2013 01:14 #605638
by 650ed
1977 KZ650-C1 Original Owner - Stock (with additional invisible FIAMM horn)
Replied by 650ed on topic Tach seal leak
Do yourself a HUGE favor and replace the oil seal, o-ring, and gasket all at the same time. All together the cost of the parts is only $10, so it really is not worth fiddling around doing a piece-meal job when you can solve the problem for so little $$$. Ed
1977 KZ650-C1 Original Owner - Stock (with additional invisible FIAMM horn)
Please Log in or Create an account to join the conversation.
- Dwadley
- Topic Author
- Offline
- User
Less
More
- Posts: 11
- Thank you received: 0
09 Sep 2013 08:16 #605658
by Dwadley
Replied by Dwadley on topic Tach seal leak
Thank you, Ed. I do plan on replacing those parts at some point during the winter, but right now I really just want to try a quick fix to make the tach stop leaking all over my exhaust. My time to work on the bike is very limited and it is a daily driver. I understand that to take the tach drive out it has to be tapped out from the inside, and that is not something I have time to mess with right now.
Please Log in or Create an account to join the conversation.
- 650ed
-
- Offline
- User
Less
More
- Posts: 15344
- Thank you received: 2829
09 Sep 2013 09:17 #605662
by 650ed
1977 KZ650-C1 Original Owner - Stock (with additional invisible FIAMM horn)
Replied by 650ed on topic Tach seal leak
I guess the confusion is on my part. You asked where the 10mm o-ring goes. It goes on the tach gear guide (the o-ring is the part labeled "13" in diagram below). So I don't see any way of replacing it without pulling the guide; that's why it seemed logical to me just to replace the other pieces at the same time since you will already have it apart. Clearly, I'm missing something. Ed
Attachment 00001_2013-09-09.jpg not found
1977 KZ650-C1 Original Owner - Stock (with additional invisible FIAMM horn)
Attachments:
Please Log in or Create an account to join the conversation.
- Dwadley
- Topic Author
- Offline
- User
Less
More
- Posts: 11
- Thank you received: 0
09 Sep 2013 10:04 #605669
by Dwadley
Replied by Dwadley on topic Tach seal leak
www.kzrider.com/forum/4-electrical/5974-tach-cable-leak
Look at your reply about halfway down.
www.armbell.com/forum/viewtopic.php?t=76...27d90dd&mforum=kz400
Here is another thread. There are other alternative fix threads out there as well.
Look at your reply about halfway down.
www.armbell.com/forum/viewtopic.php?t=76...27d90dd&mforum=kz400
Here is another thread. There are other alternative fix threads out there as well.
Please Log in or Create an account to join the conversation.
- 650ed
-
- Offline
- User
Less
More
- Posts: 15344
- Thank you received: 2829
09 Sep 2013 10:28 #605671
by 650ed
1977 KZ650-C1 Original Owner - Stock (with additional invisible FIAMM horn)
Replied by 650ed on topic Tach seal leak
Now I understand your o-ring question. I cannot speak to the second link you gave, but I can tell you about the first link because that was my posting.
I put a small o-ring under the tach cable knurled collar. I thought that was a pretty slick fix. Unfortunately, it didn't hold up well. It temporarily appeared to stop the problem, but what actually happened was the oil continued to leak from the engine but rather than dripping out it crept up inside the tach cable between the inner cable and the outer sheath. This didn't really hurt anything as the oil never went all the way up to the tach. However, once it accumulated to a certain level it did begin leaking out around the knurled collar again. I ended up pulling that o-ring out and replacing the appropriate parts (about 11-12,000 miles ago) and it has not leaked since.
If you are looking for a temporary fix that approach should be helpful; just keep in mind it is temporary. Ed
1977 KZ650-C1 Original Owner - Stock (with additional invisible FIAMM horn)
Please Log in or Create an account to join the conversation.
- koolaid_kid
-
- Offline
- User
Less
More
- Posts: 783
- Thank you received: 99
09 Sep 2013 10:34 #605672
by koolaid_kid
1983 GPz 750
810 Wiseco, Kerker, K&N, DynoJet S3, Accel, Progressive, etc.
Replied by koolaid_kid on topic Tach seal leak
I have done this repair (correctly) and the entire process, from start to popping the top on a malt beverage, takes 2-3 hours for the uninitiated. I see no reason to do it any other way, since doing it correctly means another 20-30 years of leak-free riding.
But that's just me, I'd rather do it correctly the first time and ride for the rest of the time.
But that's just me, I'd rather do it correctly the first time and ride for the rest of the time.
1983 GPz 750
810 Wiseco, Kerker, K&N, DynoJet S3, Accel, Progressive, etc.
Please Log in or Create an account to join the conversation.
- 650ed
-
- Offline
- User
Less
More
- Posts: 15344
- Thank you received: 2829
09 Sep 2013 10:48 #605677
by 650ed
+1 That's the lesson I learned after trying my home remedy. :laugh: :laugh:
1977 KZ650-C1 Original Owner - Stock (with additional invisible FIAMM horn)
Replied by 650ed on topic Tach seal leak
koolaid_kid wrote: I have done this repair (correctly) and the entire process, from start to popping the top on a malt beverage, takes 2-3 hours for the uninitiated. I see no reason to do it any other way, since doing it correctly means another 20-30 years of leak-free riding.
But that's just me, I'd rather do it correctly the first time and ride for the rest of the time.
+1 That's the lesson I learned after trying my home remedy. :laugh: :laugh:
1977 KZ650-C1 Original Owner - Stock (with additional invisible FIAMM horn)
Please Log in or Create an account to join the conversation.
- Dwadley
- Topic Author
- Offline
- User
Less
More
- Posts: 11
- Thank you received: 0
09 Sep 2013 14:39 #605711
by Dwadley
Replied by Dwadley on topic Tach seal leak
So, to replace the o-ring and seal I have to pull the drive assembly, part 14 in the diagram above. Do I have to take the valve cover off to tap it out from inside, or can I pull it out from the outside once I remove the hex screw? Also, if I just replace the seal, I can do that with the drive still in the head, correct? Just remove the old seal and replace. Thanks, you guys are great!
Please Log in or Create an account to join the conversation.
- koolaid_kid
-
- Offline
- User
Less
More
- Posts: 783
- Thank you received: 99
09 Sep 2013 15:06 - 09 Sep 2013 15:07 #605717
by koolaid_kid
1983 GPz 750
810 Wiseco, Kerker, K&N, DynoJet S3, Accel, Progressive, etc.
Replied by koolaid_kid on topic Tach seal leak
Remove the cable (duh).
Remove screw 20.
Part 19 holds the drive assembly in the head, it comes off when you remove screw 20.
You will want to remove part 14 (not sure of its name). Just tug on it, it will come out, but may protest due to sleeping there for the last 30 or so years.
Replace o-ring 13 and seal 15. I don't remember whether 16 needs to be replaced or not (did it in 1998, so I have slept since then).
You are now ready to reassemble and go riding again.
Notes: 12 may come out with 14, but that is O.K.
Head and valve cover stay on the engine.
Best of luck.
1983 GPz 750
810 Wiseco, Kerker, K&N, DynoJet S3, Accel, Progressive, etc.
Last edit: 09 Sep 2013 15:07 by koolaid_kid.
The following user(s) said Thank You: jeffwerner
Please Log in or Create an account to join the conversation.
- 650ed
-
- Offline
- User
Less
More
- Posts: 15344
- Thank you received: 2829
09 Sep 2013 15:53 #605723
by 650ed
1977 KZ650-C1 Original Owner - Stock (with additional invisible FIAMM horn)
Replied by 650ed on topic Tach seal leak
When I did mine I had the valve cover off to check the valve clearances, so I don't know if removing the cover is absolutely necessary or not.
The screw (part #20) can be VERY stubborn! You can make removing is MUCH easier if you soak it with Kroil or some other high quality penetrating oil for 2 or 3 days before attempting to remove it.
If the screw on your bike (part #20) is a cross head screw (they are actually JIS not Phillips even though they look like Phillips) take a look at the link below. It describes how to deal with that and other crosshead screws on the KZ. A regular Phillips screwdriver will deform the head and may prevent you from removing the screw, but the link shows how to prevent that. Ed
kzrider.com/forum/21-tools/532335-budget...ewdriver-tips#532335
1977 KZ650-C1 Original Owner - Stock (with additional invisible FIAMM horn)
Please Log in or Create an account to join the conversation.
- 74ullc
-
- Offline
- User
Less
More
- Posts: 325
- Thank you received: 23
09 Sep 2013 17:28 #605732
by 74ullc
Gulf Coast, Texas
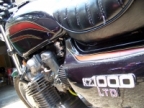
1977 KZ1000LTD
1984 VF700F
Replied by 74ullc on topic Tach seal leak
I just did the one on my bike. I was confused about what seal was what also so I took pics knowing they would come in handy to post here. I have a different model bike but same seal setup.
Z1Enterprises has all the three seals you need. You will have to call them for the fiber washer (red) part. They don't show it on their site but can get it. Also, all these parts are still available from Kawasaki.
Here is the tach drive still in the bike.
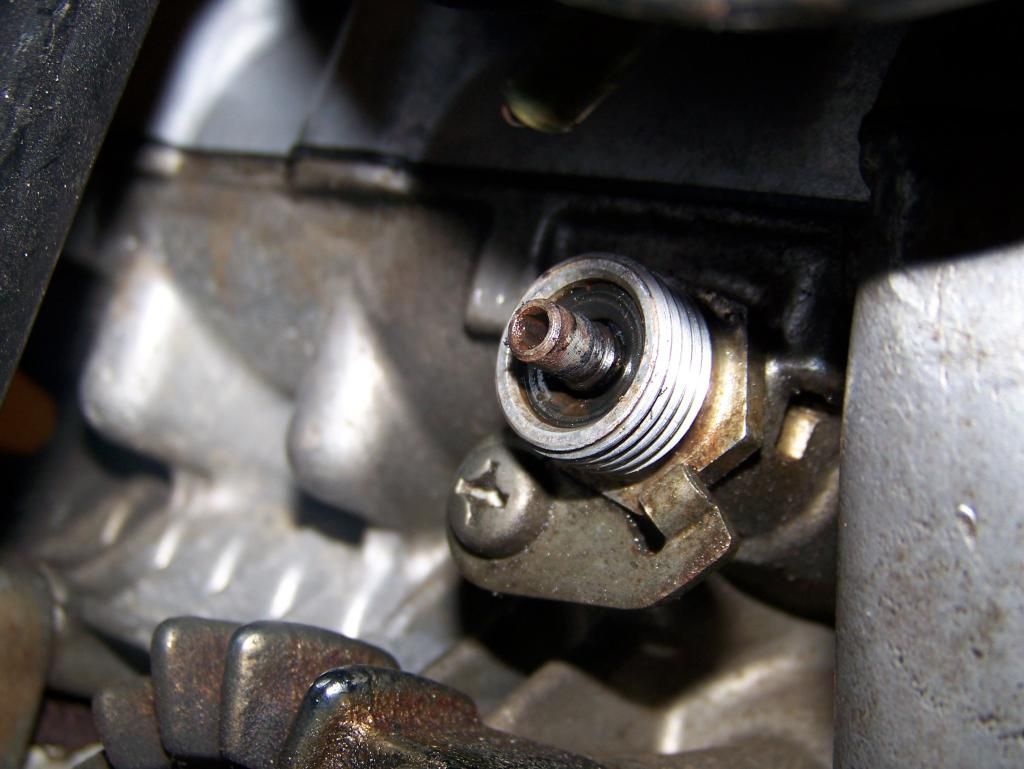
Remove the JIS screw, mine was tight so I used a 1/4" ratchet with a 1/4" socket to hold a Phillips bit that I modified like 650ed posted. Works great. That screw was darn tight so be sure to not strip it. That why I use the ratchet on really tight screws, you can apply a LOT of inward force while turning it. Once the screw is out the retaining plate comes off. Then to get the tach drive body out I used a 21MM socket (I think it was 21) to turn it a little to get it moving, then just worked it out. Took some tugging and turning but it comes out. You do not have to pull the valve cover. Not on my bike anyways.
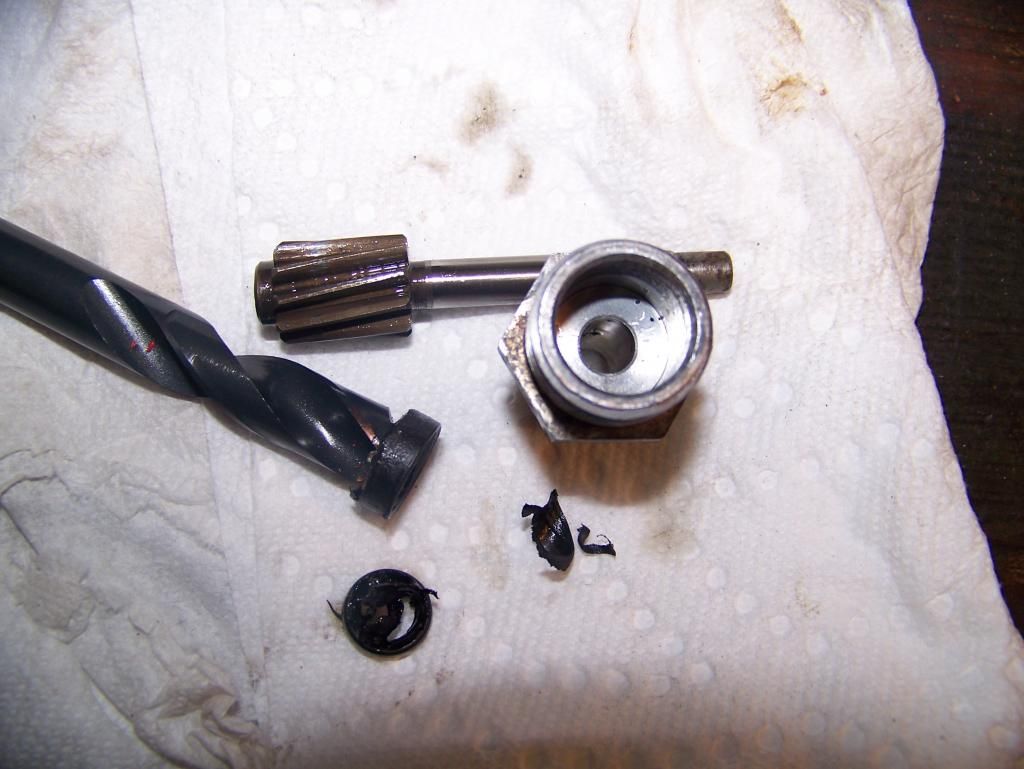
Once out the tach drive gear slides out the back. On mine the old seal was STUCK in the body so I put it lightly in a vise and used a drill to grab the old seal and pull it out. Be careful to not damage the inside bore of the tach drive!
These are the three new parts you need. The 0-ring for the body, the lip seal for the tach gear shaft itself, and a fiber washer that sits inside the end of the tach cable.
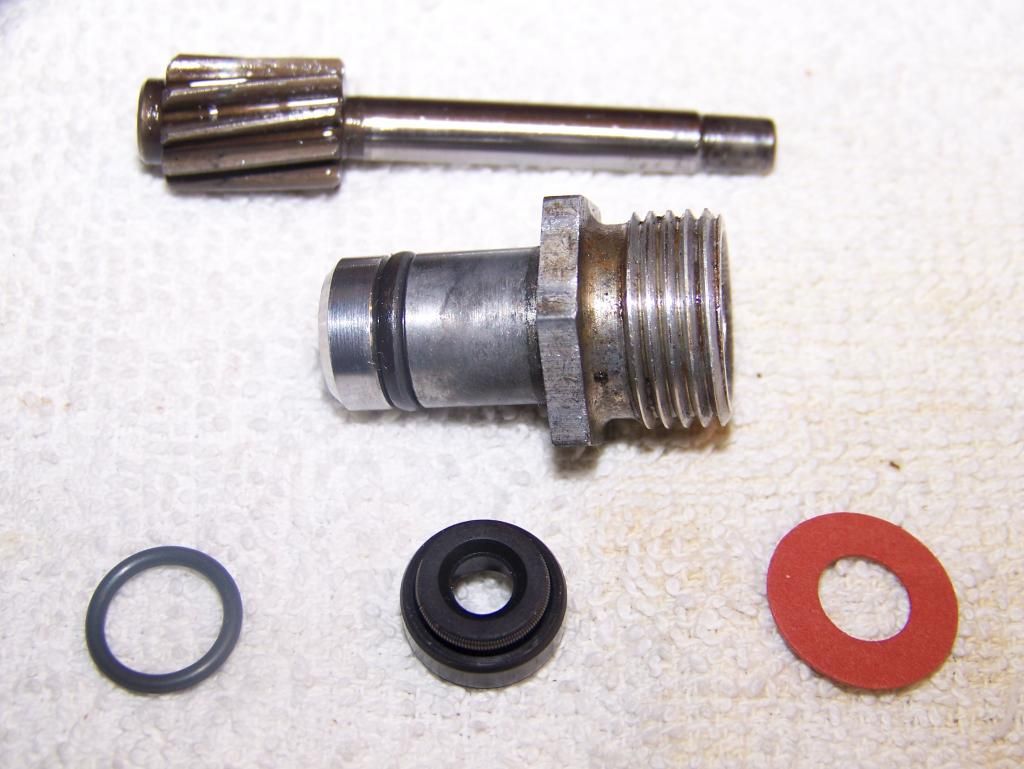
The lip seal goes with the spring end IN toward the motor. Do not drive it in too deep or you will crush the lip/spring section and ruin the seal. Check the shaft of you tach gear and if there is a worn spot (groove) where the old lip seal was riding on it, you can either clean it up, or, press the new seal in to a shallower/deeper depth so the new lip will ride on a new section of the shaft. Luckily the body is quite deep so there is plenty of room to put it in a different position/depth than where it was. Remember, not too deep or you will ruin the seal!
Put some oil on the shaft and 0-ring before putting it all back together. Should seal up just fine. With it done correctly it will not leak even without a tach cable hooked up.
Z1Enterprises has all the three seals you need. You will have to call them for the fiber washer (red) part. They don't show it on their site but can get it. Also, all these parts are still available from Kawasaki.
Here is the tach drive still in the bike.
Remove the JIS screw, mine was tight so I used a 1/4" ratchet with a 1/4" socket to hold a Phillips bit that I modified like 650ed posted. Works great. That screw was darn tight so be sure to not strip it. That why I use the ratchet on really tight screws, you can apply a LOT of inward force while turning it. Once the screw is out the retaining plate comes off. Then to get the tach drive body out I used a 21MM socket (I think it was 21) to turn it a little to get it moving, then just worked it out. Took some tugging and turning but it comes out. You do not have to pull the valve cover. Not on my bike anyways.
Once out the tach drive gear slides out the back. On mine the old seal was STUCK in the body so I put it lightly in a vise and used a drill to grab the old seal and pull it out. Be careful to not damage the inside bore of the tach drive!
These are the three new parts you need. The 0-ring for the body, the lip seal for the tach gear shaft itself, and a fiber washer that sits inside the end of the tach cable.
The lip seal goes with the spring end IN toward the motor. Do not drive it in too deep or you will crush the lip/spring section and ruin the seal. Check the shaft of you tach gear and if there is a worn spot (groove) where the old lip seal was riding on it, you can either clean it up, or, press the new seal in to a shallower/deeper depth so the new lip will ride on a new section of the shaft. Luckily the body is quite deep so there is plenty of room to put it in a different position/depth than where it was. Remember, not too deep or you will ruin the seal!
Put some oil on the shaft and 0-ring before putting it all back together. Should seal up just fine. With it done correctly it will not leak even without a tach cable hooked up.
Gulf Coast, Texas
1977 KZ1000LTD
1984 VF700F
The following user(s) said Thank You: jeffwerner
Please Log in or Create an account to join the conversation.