
83 KZ1100ltd Rebuild
- CCrosswait
-
 Topic Author
- Offline
- Sustaining Member
-

Registered
- Posts: 89
- Thanks: 22
Re: 83 KZ1100ltd Rebuild
17 Feb 2019 18:11
Fit the oil pump next. The manual says to prime the pump by filling it with oil but a good bit of the priming oil seems to have wound up on the floor. Is that typical?
Popped on a new oil pan gasket and o-ring along with a new oil filter and the original drain plug and the bottom's all buttoned up.
I've read that greasing the gaskets can help. Has anyone heard or practiced this? I rub the grease into the gaskets, if nothing else it seems to help them stick in place on the engine when I'm installing the covers.
Flipped the engine over and installed the shifter mechanism and greased up bevel drive gears. The clutch went on simply enough. The existing plates and springs looked good so I reused everything.
The starter motor, gears, and clutch also went on without much issue. Everything torqued to spec.
More to come.
2019 Indian FTR1200S
2018 Triumph Rocket 3
1981 Kawasaki KZ1100A1
1977 Yamaha RD400
1980 Honda Express II
2018 Triumph Rocket 3
1981 Kawasaki KZ1100A1
1977 Yamaha RD400
1980 Honda Express II
Please Log in or Create an account to join the conversation.
- CCrosswait
-
Topic Author
- Offline
- Sustaining Member
-
Registered
- Posts: 89
- Thanks: 22
Re: 83 KZ1100ltd Rebuild
17 Feb 2019 18:28
I had been spending some time over the last few weeks cleaning and polishing the engine covers. The covers which came with the bike have some damage but I'm going to use them anyway. I've got 'em looking decent and I don't mind the look of covers with a bit-o-damage. Makes it look like the bike was well used and well loved.
All the covers, save the small round ignition cover, are back on the engine. Need to access the crank bolt to spin the crank so no sense in installing the cover only to have to take it off again.
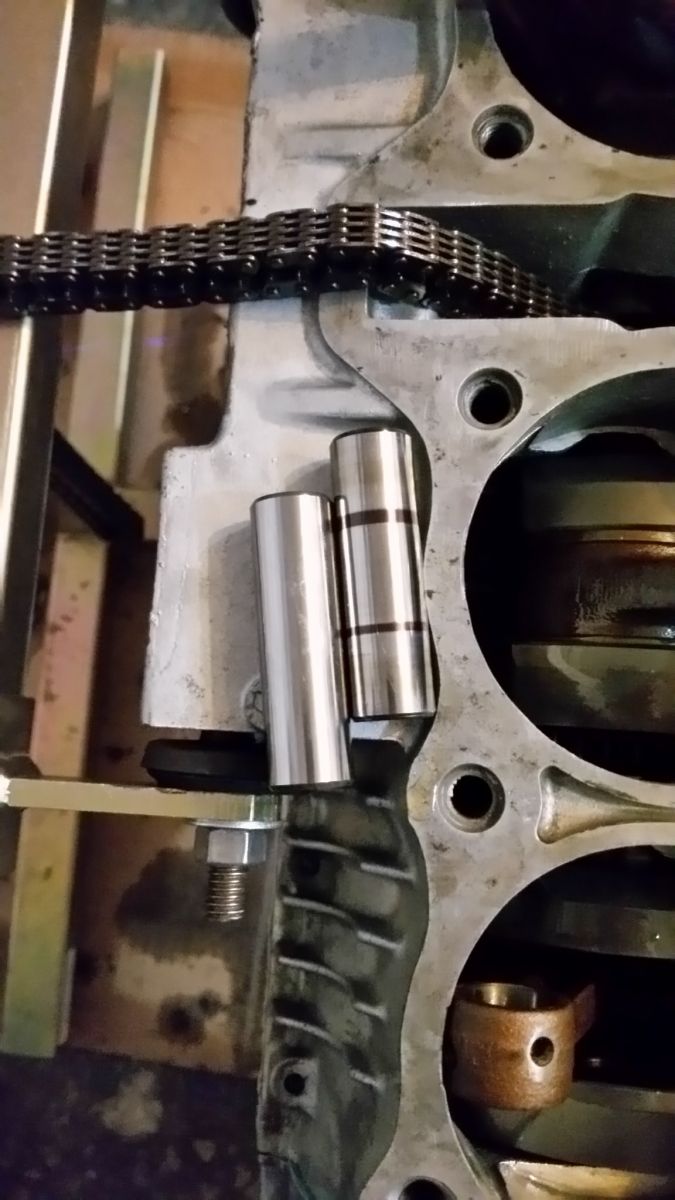
Next I put the pistons back on. The piston pins looked a bit worn so I ordered new ones.
Always make sure the openings to the engine are covered to prevent parts from falling into the assembled engine.
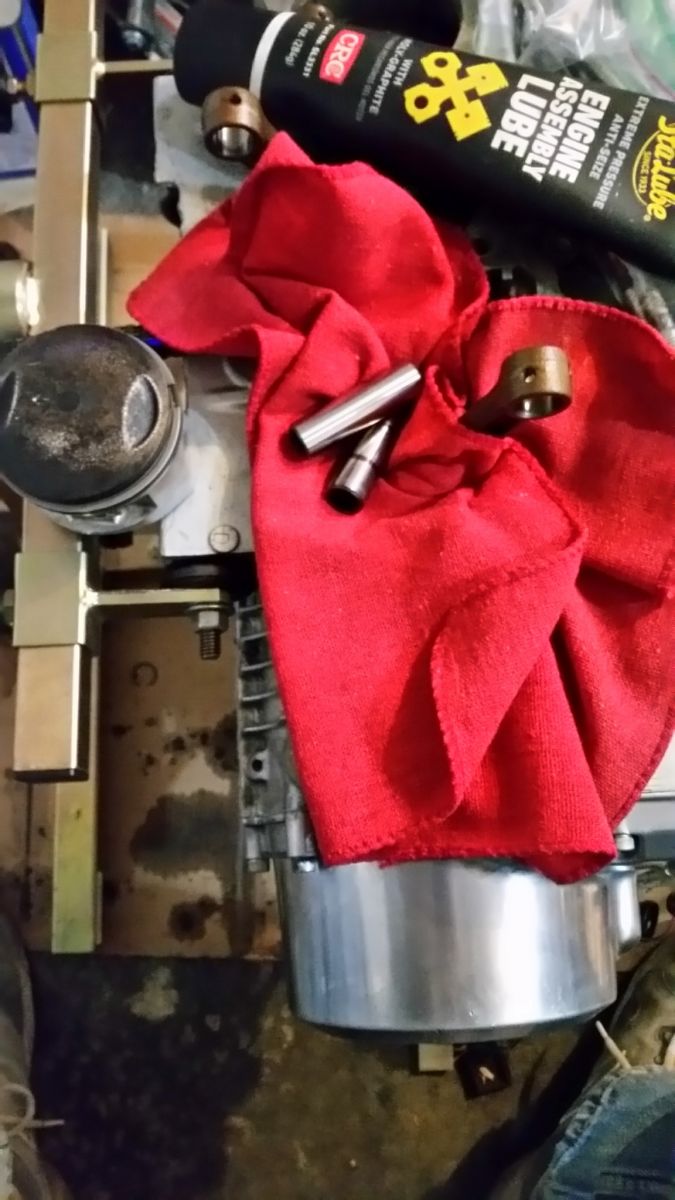
A little engine assembly grease on the pins and everything slid into place. Installed new snap rings and only had one ring pop off and fly away. Small victories!
The rings and cylinders looked good so I'm going to reuse the rings and leave the cylinders as they are. Only cleaned some buildup from the top of the pistons.
Next to the cylinder head studs. I cleaned up the threads of the studs and chased the case threads, M10x1.5 for reference. The studs threaded in by hand just fine. Should I attempt to torque them down, like a reverse double nut method? Or just leave them hand tight?
Now I need to clean up the old gasket from the bottom of the cylinder and it'll go on next.
Thanks for reading so far.
All the covers, save the small round ignition cover, are back on the engine. Need to access the crank bolt to spin the crank so no sense in installing the cover only to have to take it off again.
Next I put the pistons back on. The piston pins looked a bit worn so I ordered new ones.
Always make sure the openings to the engine are covered to prevent parts from falling into the assembled engine.
A little engine assembly grease on the pins and everything slid into place. Installed new snap rings and only had one ring pop off and fly away. Small victories!
The rings and cylinders looked good so I'm going to reuse the rings and leave the cylinders as they are. Only cleaned some buildup from the top of the pistons.
Next to the cylinder head studs. I cleaned up the threads of the studs and chased the case threads, M10x1.5 for reference. The studs threaded in by hand just fine. Should I attempt to torque them down, like a reverse double nut method? Or just leave them hand tight?
Now I need to clean up the old gasket from the bottom of the cylinder and it'll go on next.
Thanks for reading so far.
2019 Indian FTR1200S
2018 Triumph Rocket 3
1981 Kawasaki KZ1100A1
1977 Yamaha RD400
1980 Honda Express II
2018 Triumph Rocket 3
1981 Kawasaki KZ1100A1
1977 Yamaha RD400
1980 Honda Express II
Please Log in or Create an account to join the conversation.
- M_a_t_t
-
- Offline
- Sustaining Member
-
Registered
- Posts: 254
- Thanks: 41
Re: 83 KZ1100ltd Rebuild
17 Feb 2019 18:56
I've never done head studs before, but I don't think it should matter. When you tighten down the head nuts it should turn the studs as well if they aren't bottomed out, just whatever is loosest.
83 KZ1100A (shaft)
17 Versys X 300 abs
81 kz650h1
81 kz750e2
90 Honda CBR600F (brother's)
17 Versys X 300 abs
81 kz650h1
81 kz750e2
90 Honda CBR600F (brother's)
Please Log in or Create an account to join the conversation.
- SWest
-

- Offline
- Sustaining Member
-
Registered
- 10 22 2014
- Posts: 23663
- Thanks: 2993
Re: 83 KZ1100ltd Rebuild
17 Feb 2019 19:00
Tighten them down good and snug.
Steve
Steve
Z1b1000 1975 Z1b
kzrider.com/forum/11-projects/598262-kz-...-will-it-live#672882
kzrider.com/forum/2-engine/597654-poser?start=240#704229
kzrider.com/forum/11-projects/598262-kz-...-will-it-live#672882
kzrider.com/forum/2-engine/597654-poser?start=240#704229
Please Log in or Create an account to join the conversation.
- CCrosswait
-
Topic Author
- Offline
- Sustaining Member
-
Registered
- Posts: 89
- Thanks: 22
Re: 83 KZ1100ltd Rebuild
17 Feb 2019 19:06SWest wrote: Tighten them down good and snug.
Steve
Double nut method work? Have a recommended torque or just feel it?
2019 Indian FTR1200S
2018 Triumph Rocket 3
1981 Kawasaki KZ1100A1
1977 Yamaha RD400
1980 Honda Express II
2018 Triumph Rocket 3
1981 Kawasaki KZ1100A1
1977 Yamaha RD400
1980 Honda Express II
Please Log in or Create an account to join the conversation.
- SWest
-
- Offline
- Sustaining Member
-
Registered
- 10 22 2014
- Posts: 23663
- Thanks: 2993
Re: 83 KZ1100ltd Rebuild
17 Feb 2019 20:11
Tight enough so they won't back out when you take the head nuts off.
Steve
Steve
Z1b1000 1975 Z1b
kzrider.com/forum/11-projects/598262-kz-...-will-it-live#672882
kzrider.com/forum/2-engine/597654-poser?start=240#704229
kzrider.com/forum/11-projects/598262-kz-...-will-it-live#672882
kzrider.com/forum/2-engine/597654-poser?start=240#704229
Please Log in or Create an account to join the conversation.
- CCrosswait
-
Topic Author
- Offline
- Sustaining Member
-
Registered
- Posts: 89
- Thanks: 22
Re: 83 KZ1100ltd Rebuild
23 Feb 2019 10:23
This is what relief looks like...
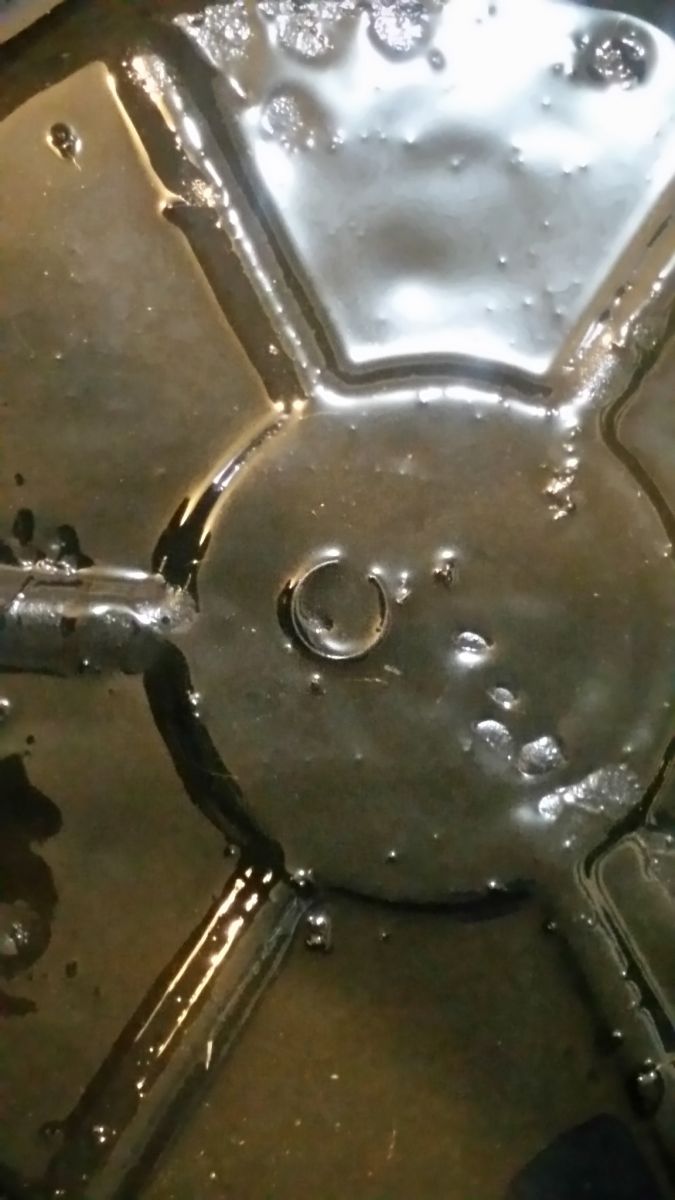
While installing new piston clips to replace the clips removed during disassembly, one of the clips flew out and I couldn't tell where it landed. Fearing the worst, I spent a fair bit of time searching for the part around the crank and inside the engine.
Very close to deciding to remove the oil pan I walked away from the problem to take care of some housekeeping around the garage. I needed to pour out old oil from a drain pan in order to make room for when I get the frame back.
Imagine my relief when the outline of a clip started to become visible in the oil drain pan. Thank God I didn't have to tear into the just assembled engine.
2019 Indian FTR1200S
2018 Triumph Rocket 3
1981 Kawasaki KZ1100A1
1977 Yamaha RD400
1980 Honda Express II
2018 Triumph Rocket 3
1981 Kawasaki KZ1100A1
1977 Yamaha RD400
1980 Honda Express II
The following user(s) said Thank You: Street Fighter LTD, SWest, gordone, M_a_t_t
Please Log in or Create an account to join the conversation.
- CCrosswait
-
Topic Author
- Offline
- Sustaining Member
-
Registered
- Posts: 89
- Thanks: 22
Re: 83 KZ1100ltd Rebuild
09 Mar 2019 07:24
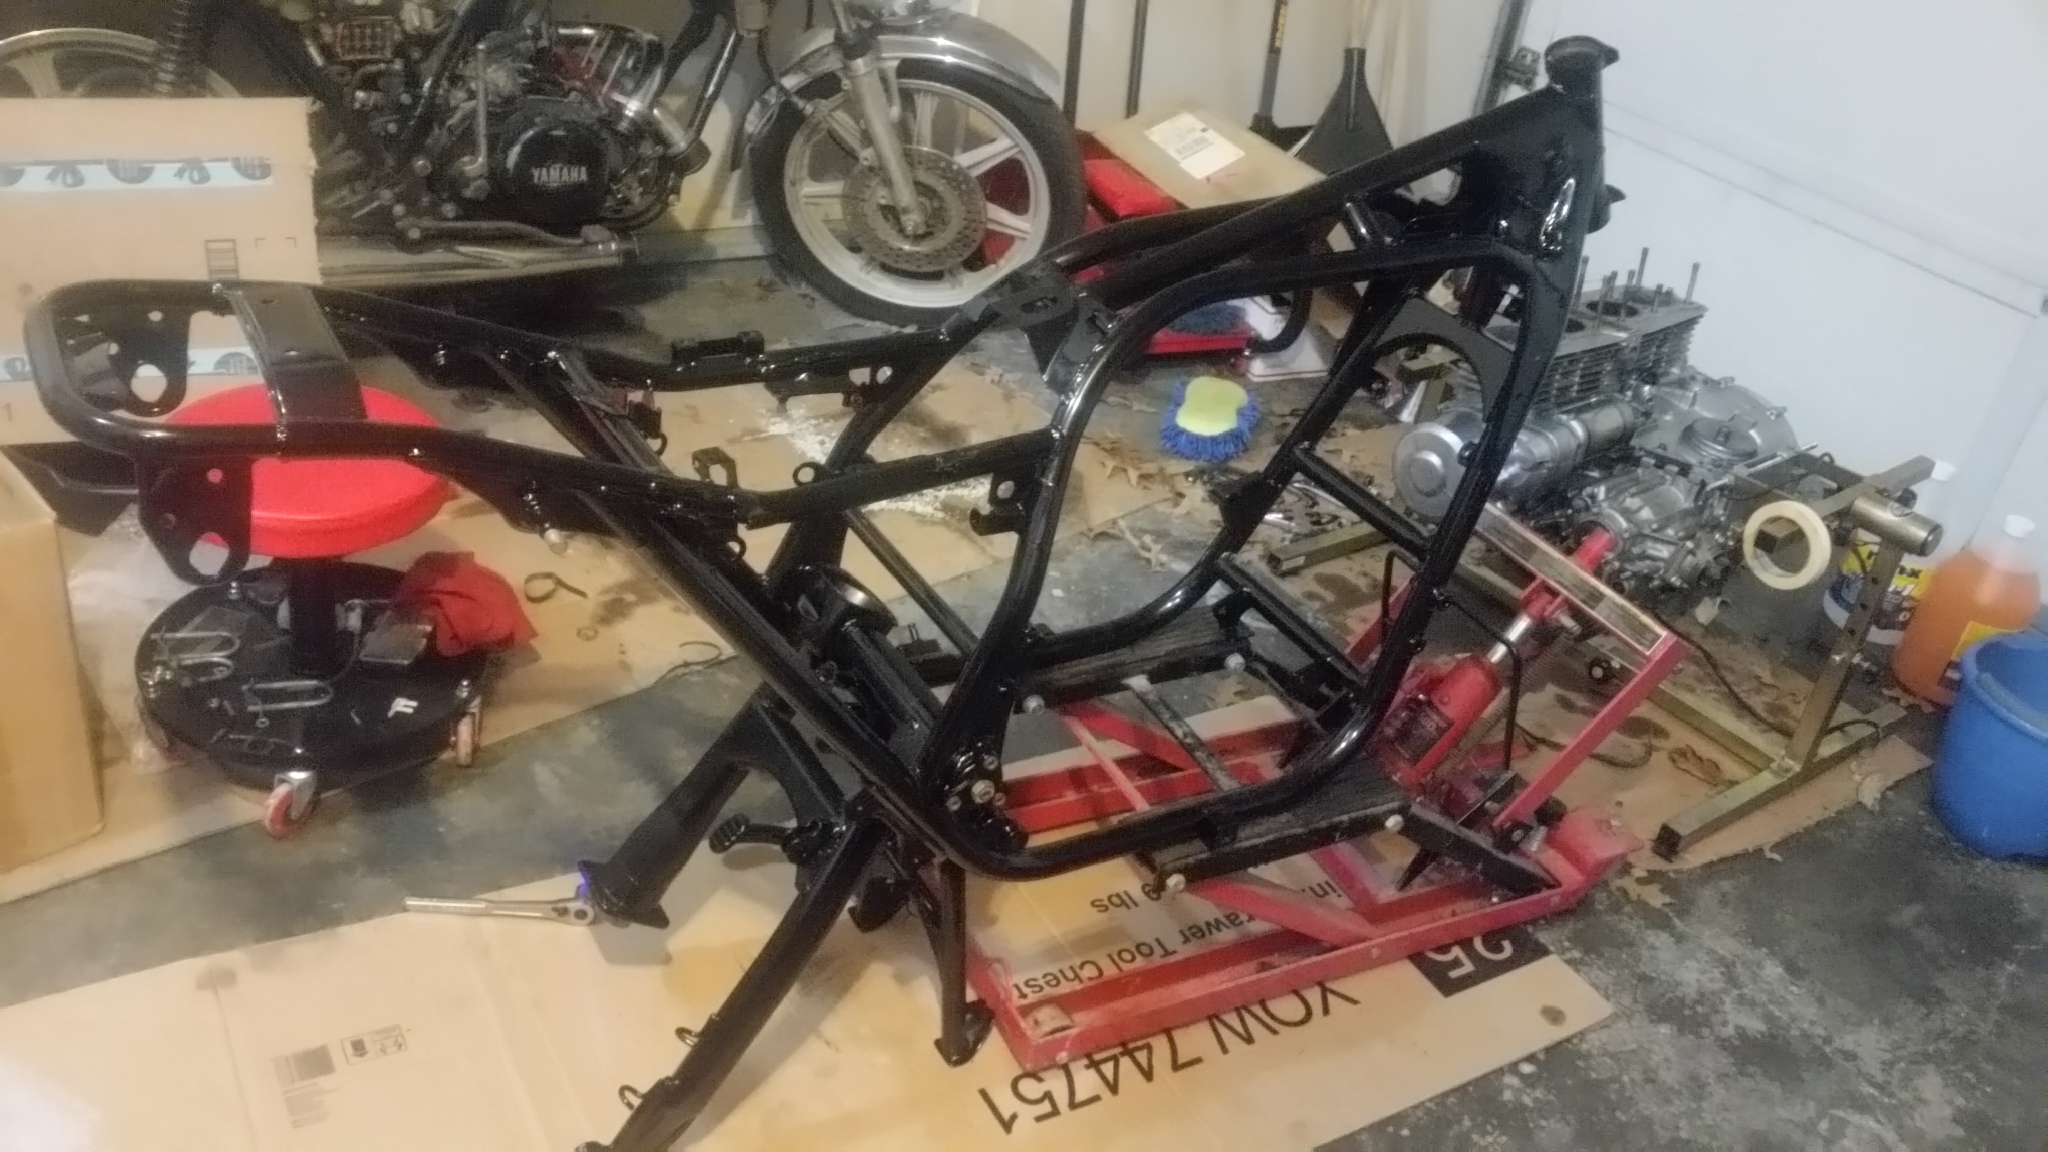
After a bit of a delay, the powder coater came through and everything looks great.
Set off straight away after work yesterday and installed the new swing arm bearings from All Balls.
Packed the rollers full of grease and pushed the seals into place. Next to install the pivots. Had a bit of overspray in the holes which required some dremel work to remove but they went in easy enough.
Positioned the swing arm and installed the center stand. Then it was time to call it a night.
Popped the stearing bearing races into the freezer before dinner. Will get back to the build after MotoGP qualifying is done this morning.
2019 Indian FTR1200S
2018 Triumph Rocket 3
1981 Kawasaki KZ1100A1
1977 Yamaha RD400
1980 Honda Express II
2018 Triumph Rocket 3
1981 Kawasaki KZ1100A1
1977 Yamaha RD400
1980 Honda Express II
Please Log in or Create an account to join the conversation.
- ajsfirehawk
-
- Offline
- Sustaining Member
-
Registered
- Posts: 513
- Thanks: 90
Re: 83 KZ1100ltd Rebuild
09 Mar 2019 08:13
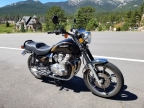
Looking really good. I too have an 83 KZ1100 LTD and I love the way it rides. I ride quickly but rarely aggressively and it is just a ball. Watching your progress with interest.
80 KZ1000 Z1 Classic
83 KZ1100 LTD
18 Z900RS
23 Mach 1
83 KZ1100 LTD
18 Z900RS
23 Mach 1
Please Log in or Create an account to join the conversation.
- CCrosswait
-
Topic Author
- Offline
- Sustaining Member
-
Registered
- Posts: 89
- Thanks: 22
Re: 83 KZ1100ltd Rebuild
09 Mar 2019 19:40
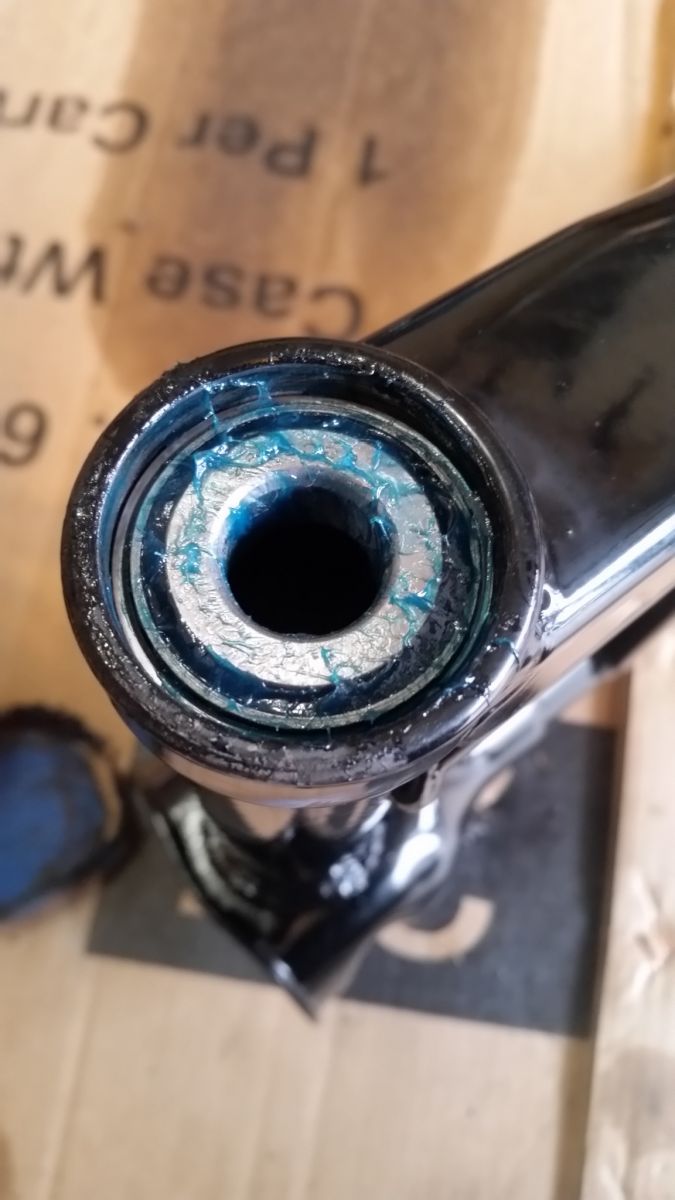
Good progress today. Got the front end installed with new stearing bearings and fork seals, slid the motor in the frame (with help), assembled some of the battery box and popped that in (less of a struggle with empty frame), and removed the valves from the head for cleaning.
The neck bearings went in okay but the stem roller was less straightforward. How to press the inner race onto the stem?

On advice from a post, I kept the old inner race and tapped on it with a punch and a hammer. Working one side down a couple taps then moving to the other.
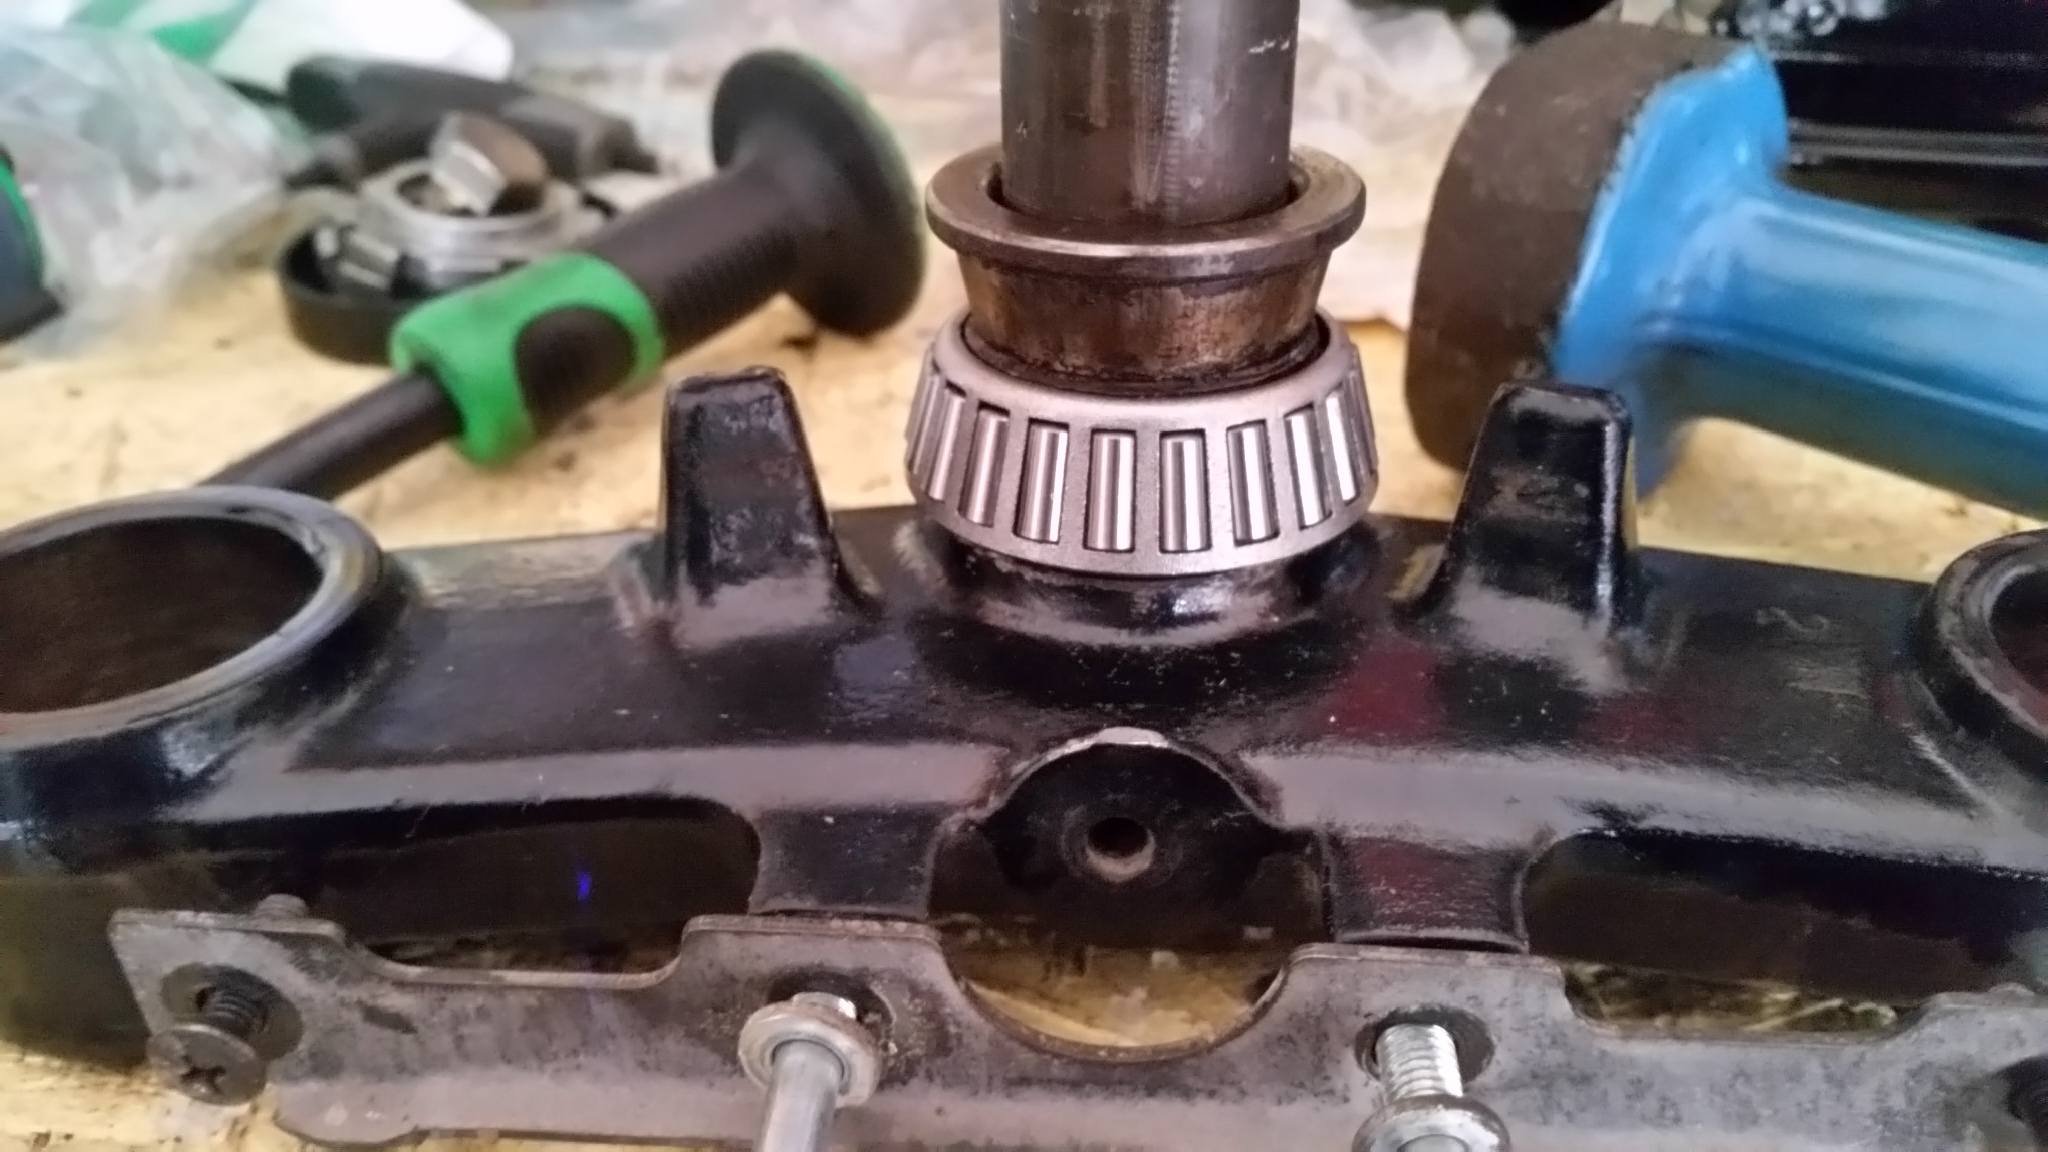
Then packed it with grease and installed the stearing neck.
More to come...
The neck bearings went in okay but the stem roller was less straightforward. How to press the inner race onto the stem?
On advice from a post, I kept the old inner race and tapped on it with a punch and a hammer. Working one side down a couple taps then moving to the other.
Then packed it with grease and installed the stearing neck.
More to come...
2019 Indian FTR1200S
2018 Triumph Rocket 3
1981 Kawasaki KZ1100A1
1977 Yamaha RD400
1980 Honda Express II
2018 Triumph Rocket 3
1981 Kawasaki KZ1100A1
1977 Yamaha RD400
1980 Honda Express II
Please Log in or Create an account to join the conversation.
- CCrosswait
-
Topic Author
- Offline
- Sustaining Member
-
Registered
- Posts: 89
- Thanks: 22
Re: 83 KZ1100ltd Rebuild
09 Mar 2019 19:47
I've got the wheels on for stability when installing the engine. They are coming back off to be cleaned and for new wheel bearings.
I wanted to protect the new finish so I wrapped the frame with bubble wrap and laid a towel down.
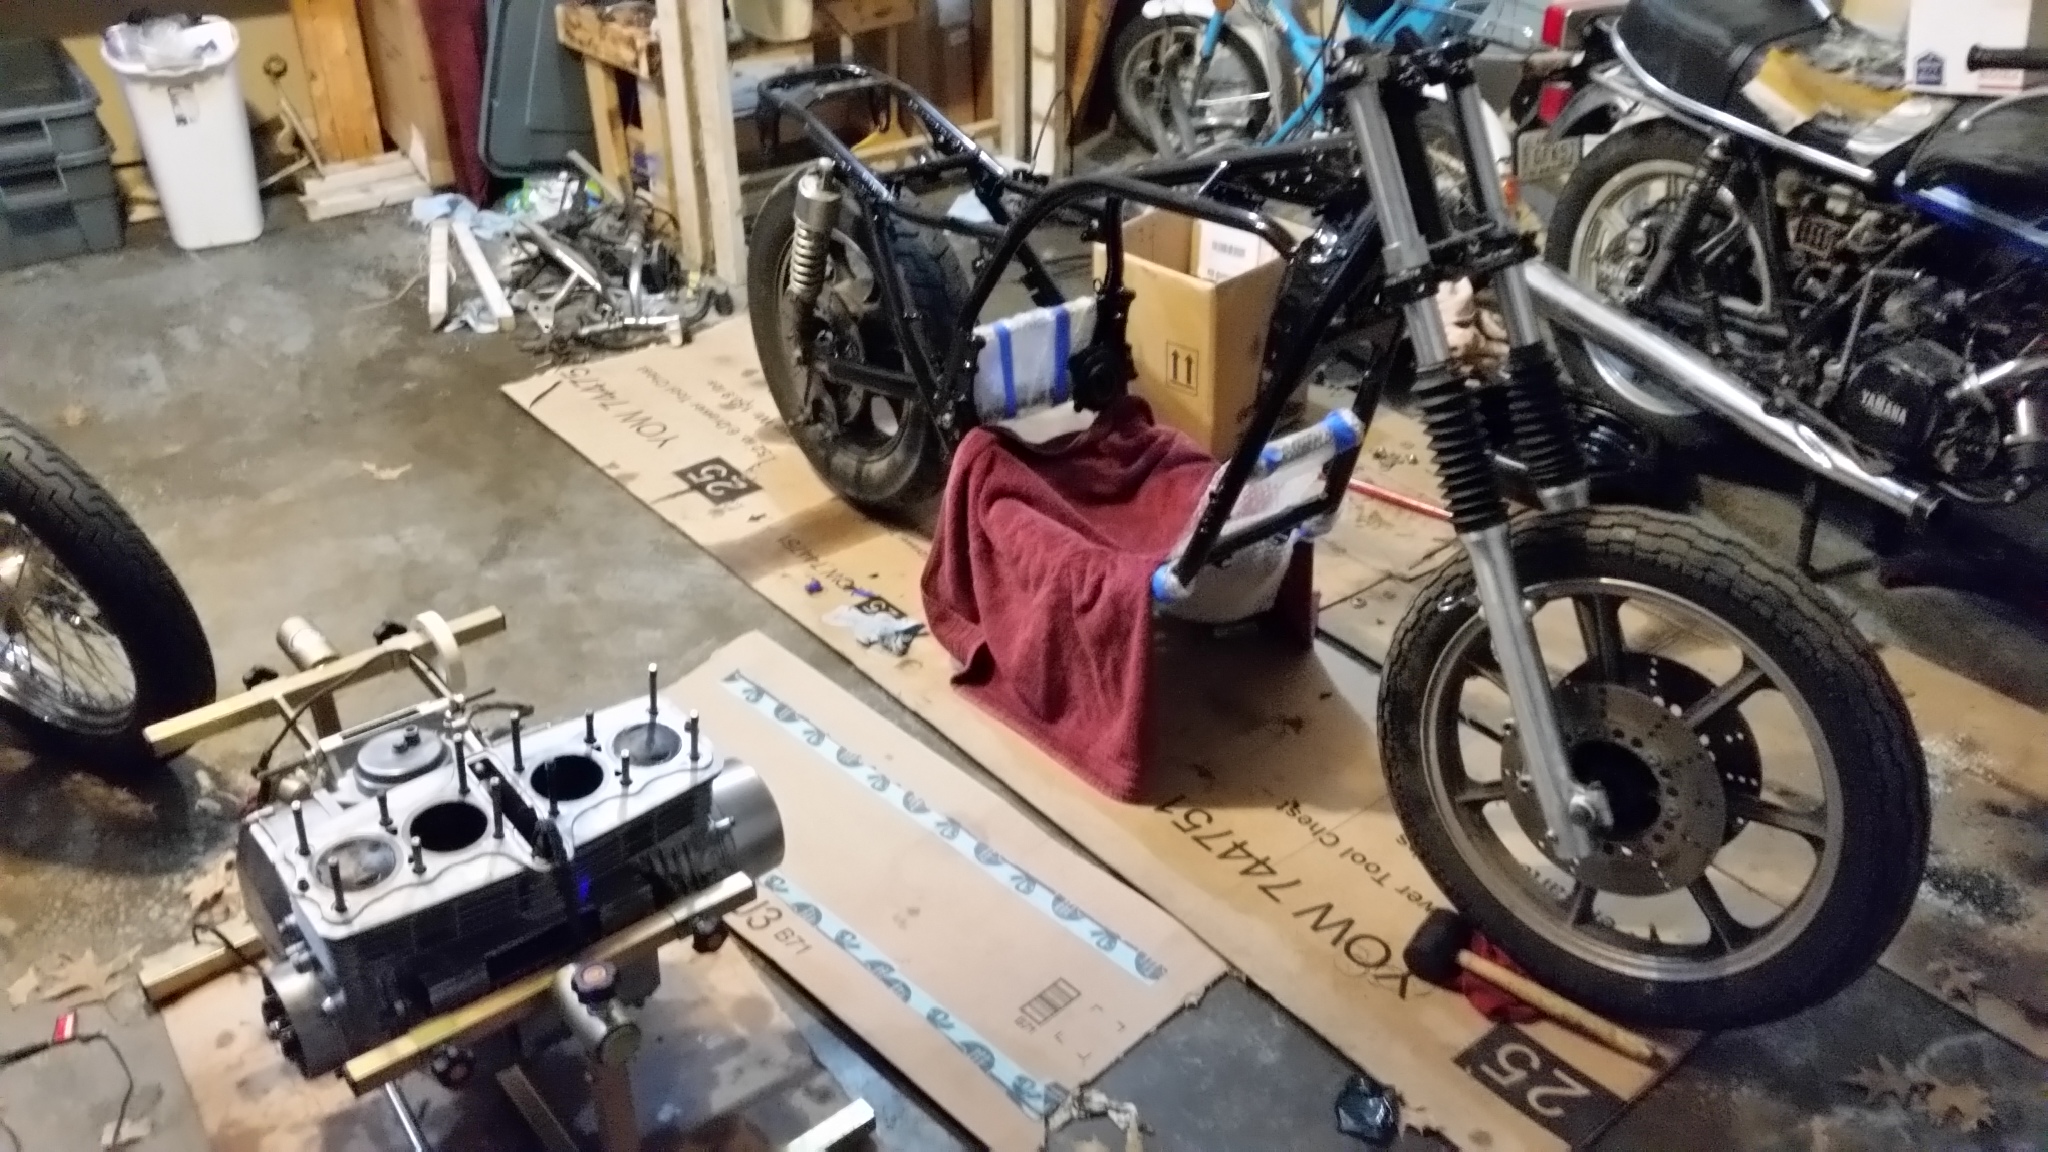
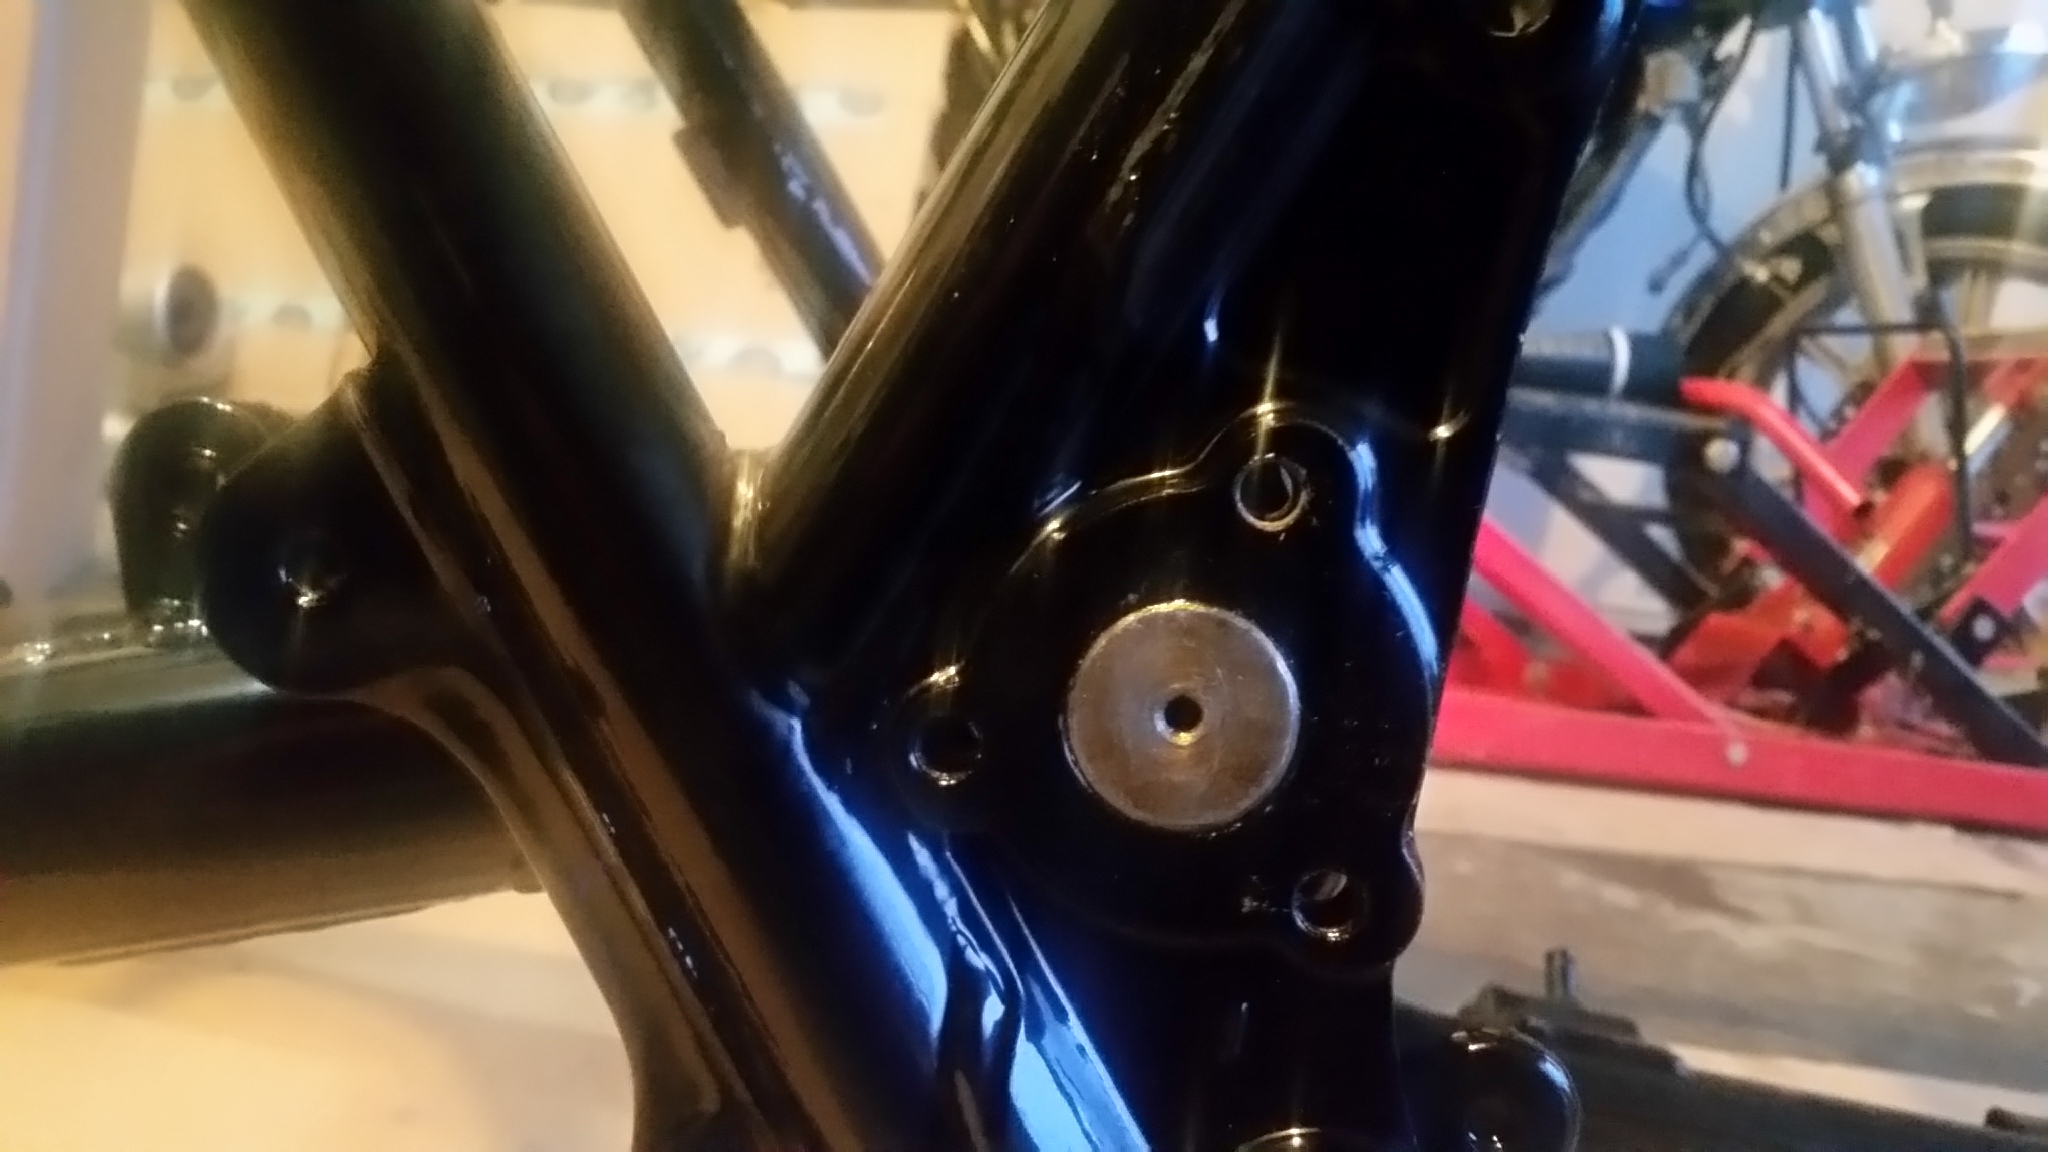
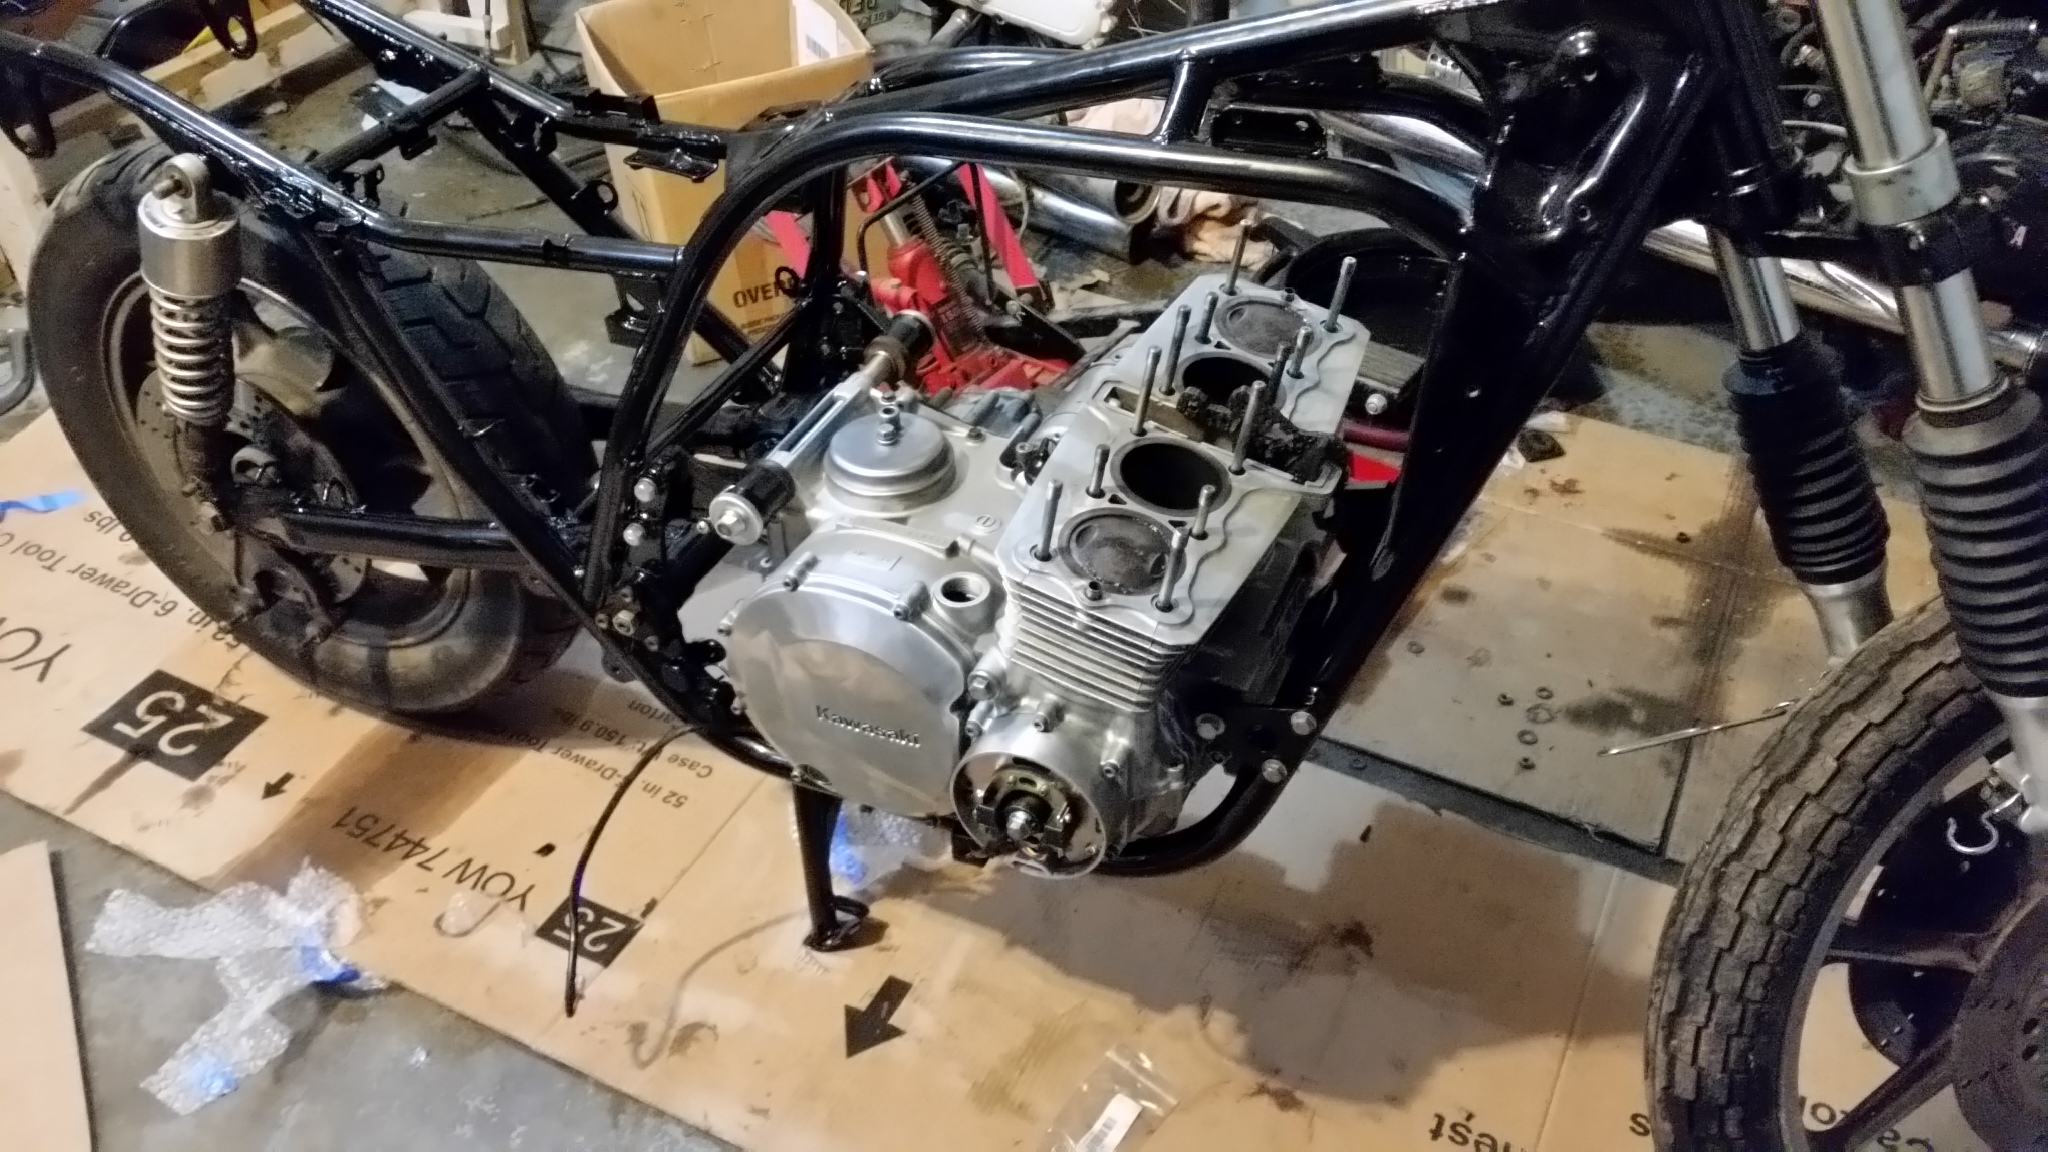
Moving the engine is a two man lift for me. Called a buddy and he helped get the motor in the frame. Took some wiggling and the use of a motorcycle jack but got the motor mount bolts in place.
More to come...
I wanted to protect the new finish so I wrapped the frame with bubble wrap and laid a towel down.
Moving the engine is a two man lift for me. Called a buddy and he helped get the motor in the frame. Took some wiggling and the use of a motorcycle jack but got the motor mount bolts in place.
More to come...
2019 Indian FTR1200S
2018 Triumph Rocket 3
1981 Kawasaki KZ1100A1
1977 Yamaha RD400
1980 Honda Express II
2018 Triumph Rocket 3
1981 Kawasaki KZ1100A1
1977 Yamaha RD400
1980 Honda Express II
Please Log in or Create an account to join the conversation.
- CCrosswait
-
Topic Author
- Offline
- Sustaining Member
-
Registered
- Posts: 89
- Thanks: 22
Re: 83 KZ1100ltd Rebuild
09 Mar 2019 20:01
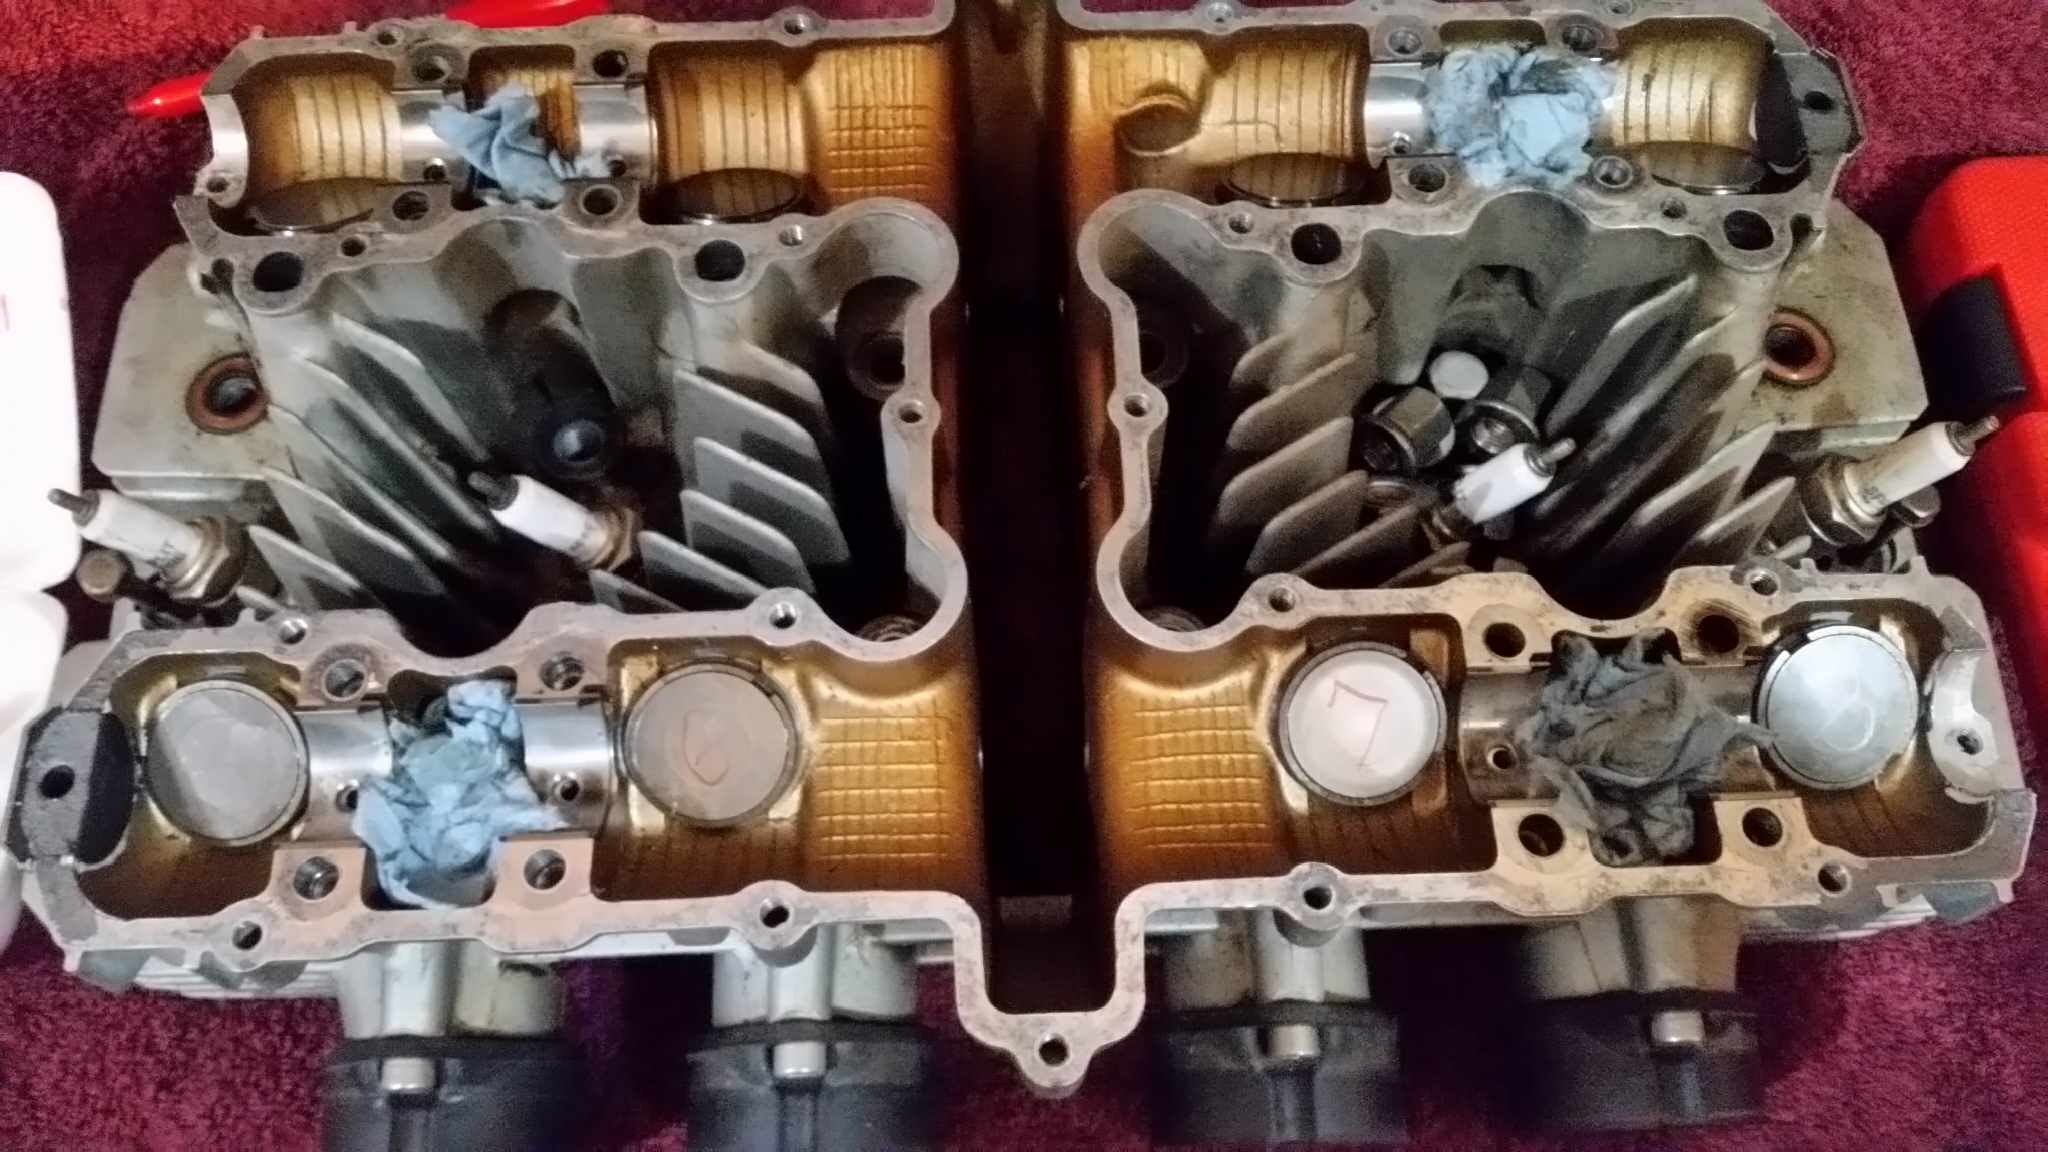
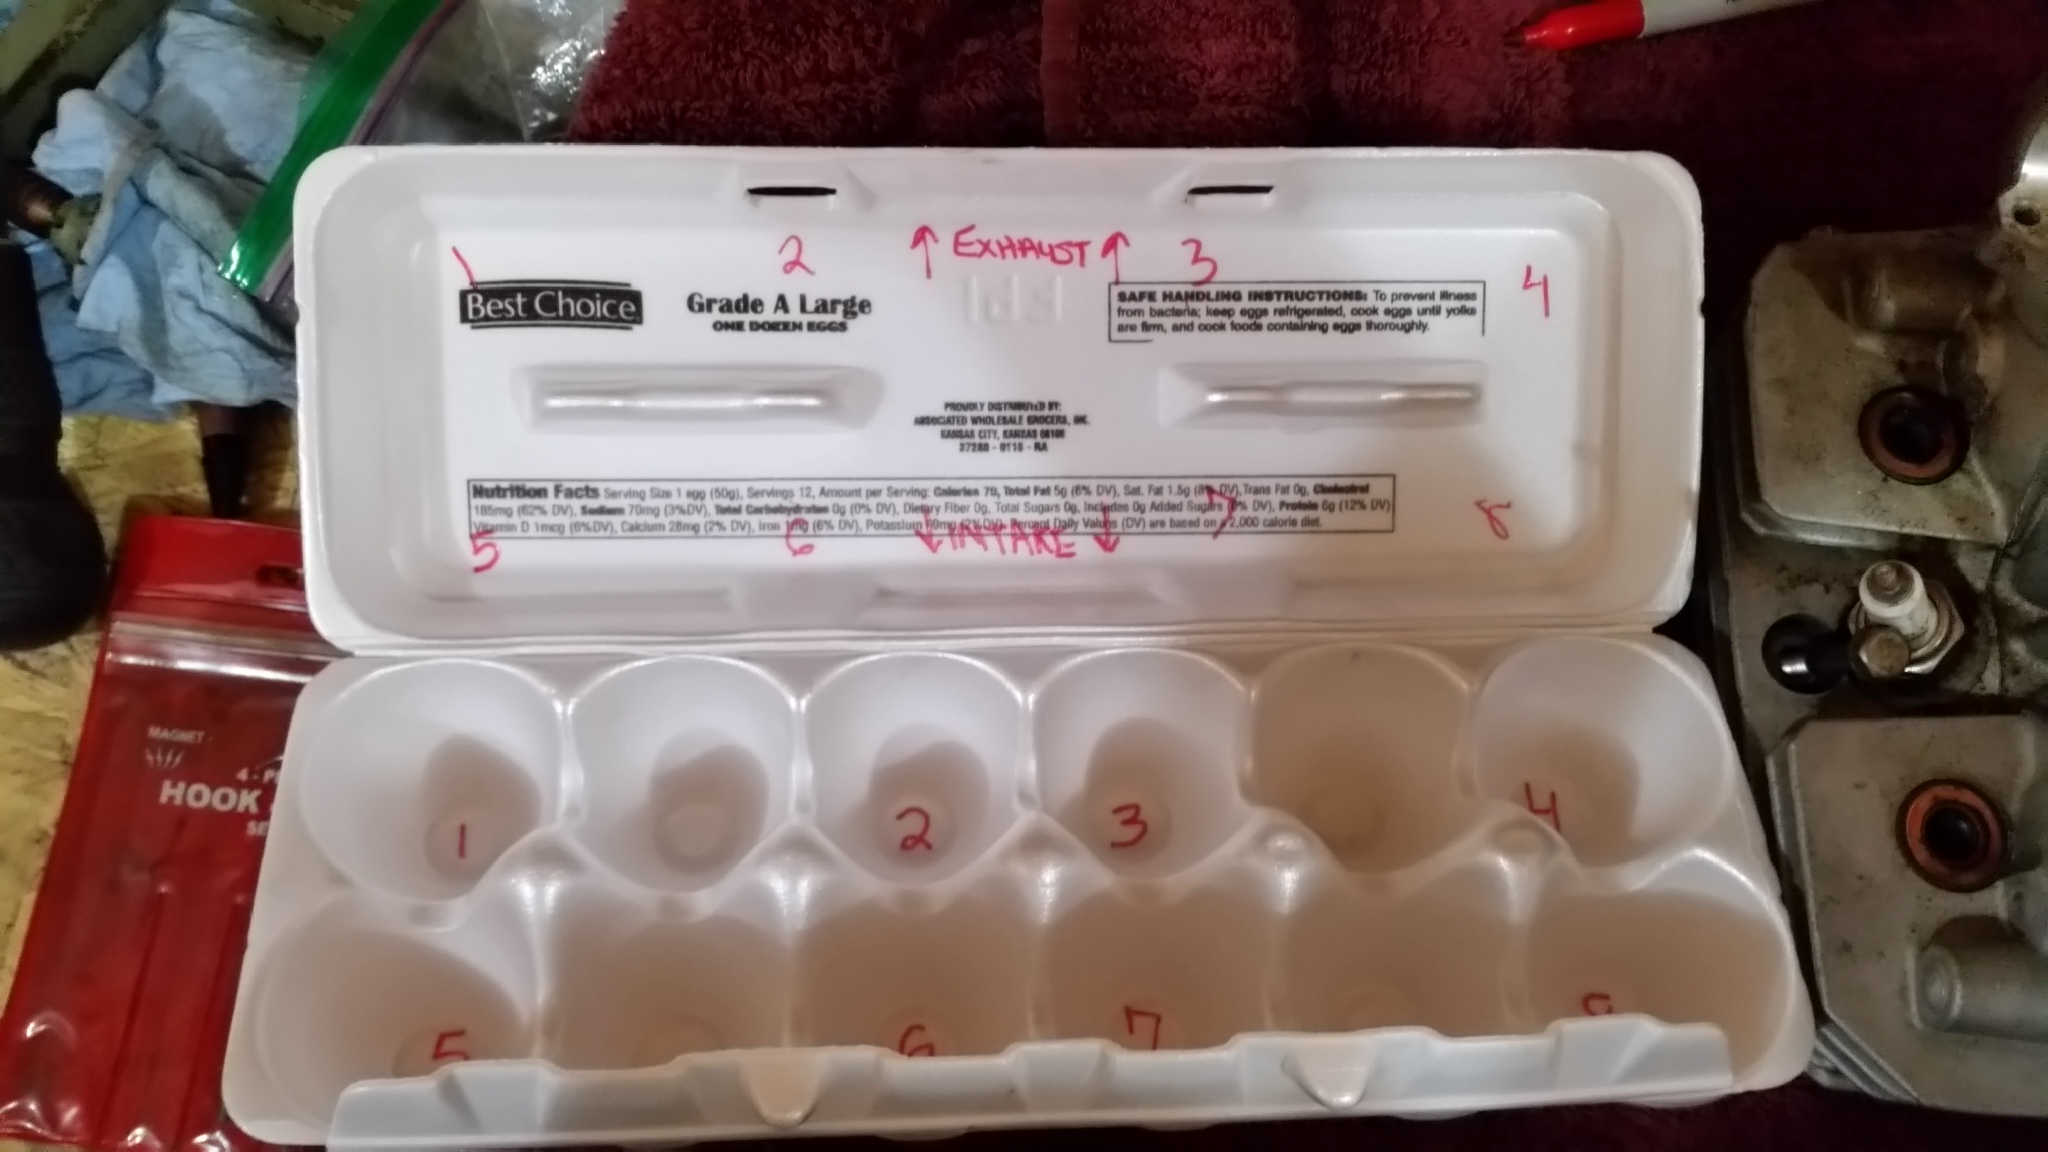
With the motor in the frame the head can be installed...after I disassemble, clean, and reassemble it. Wanted to capture the disassembly process incase it'll be useful for someone.
Working on a towel gather the head, spring compressor, old egg carton, a sharpy pen, and a magnet or two would be useful.
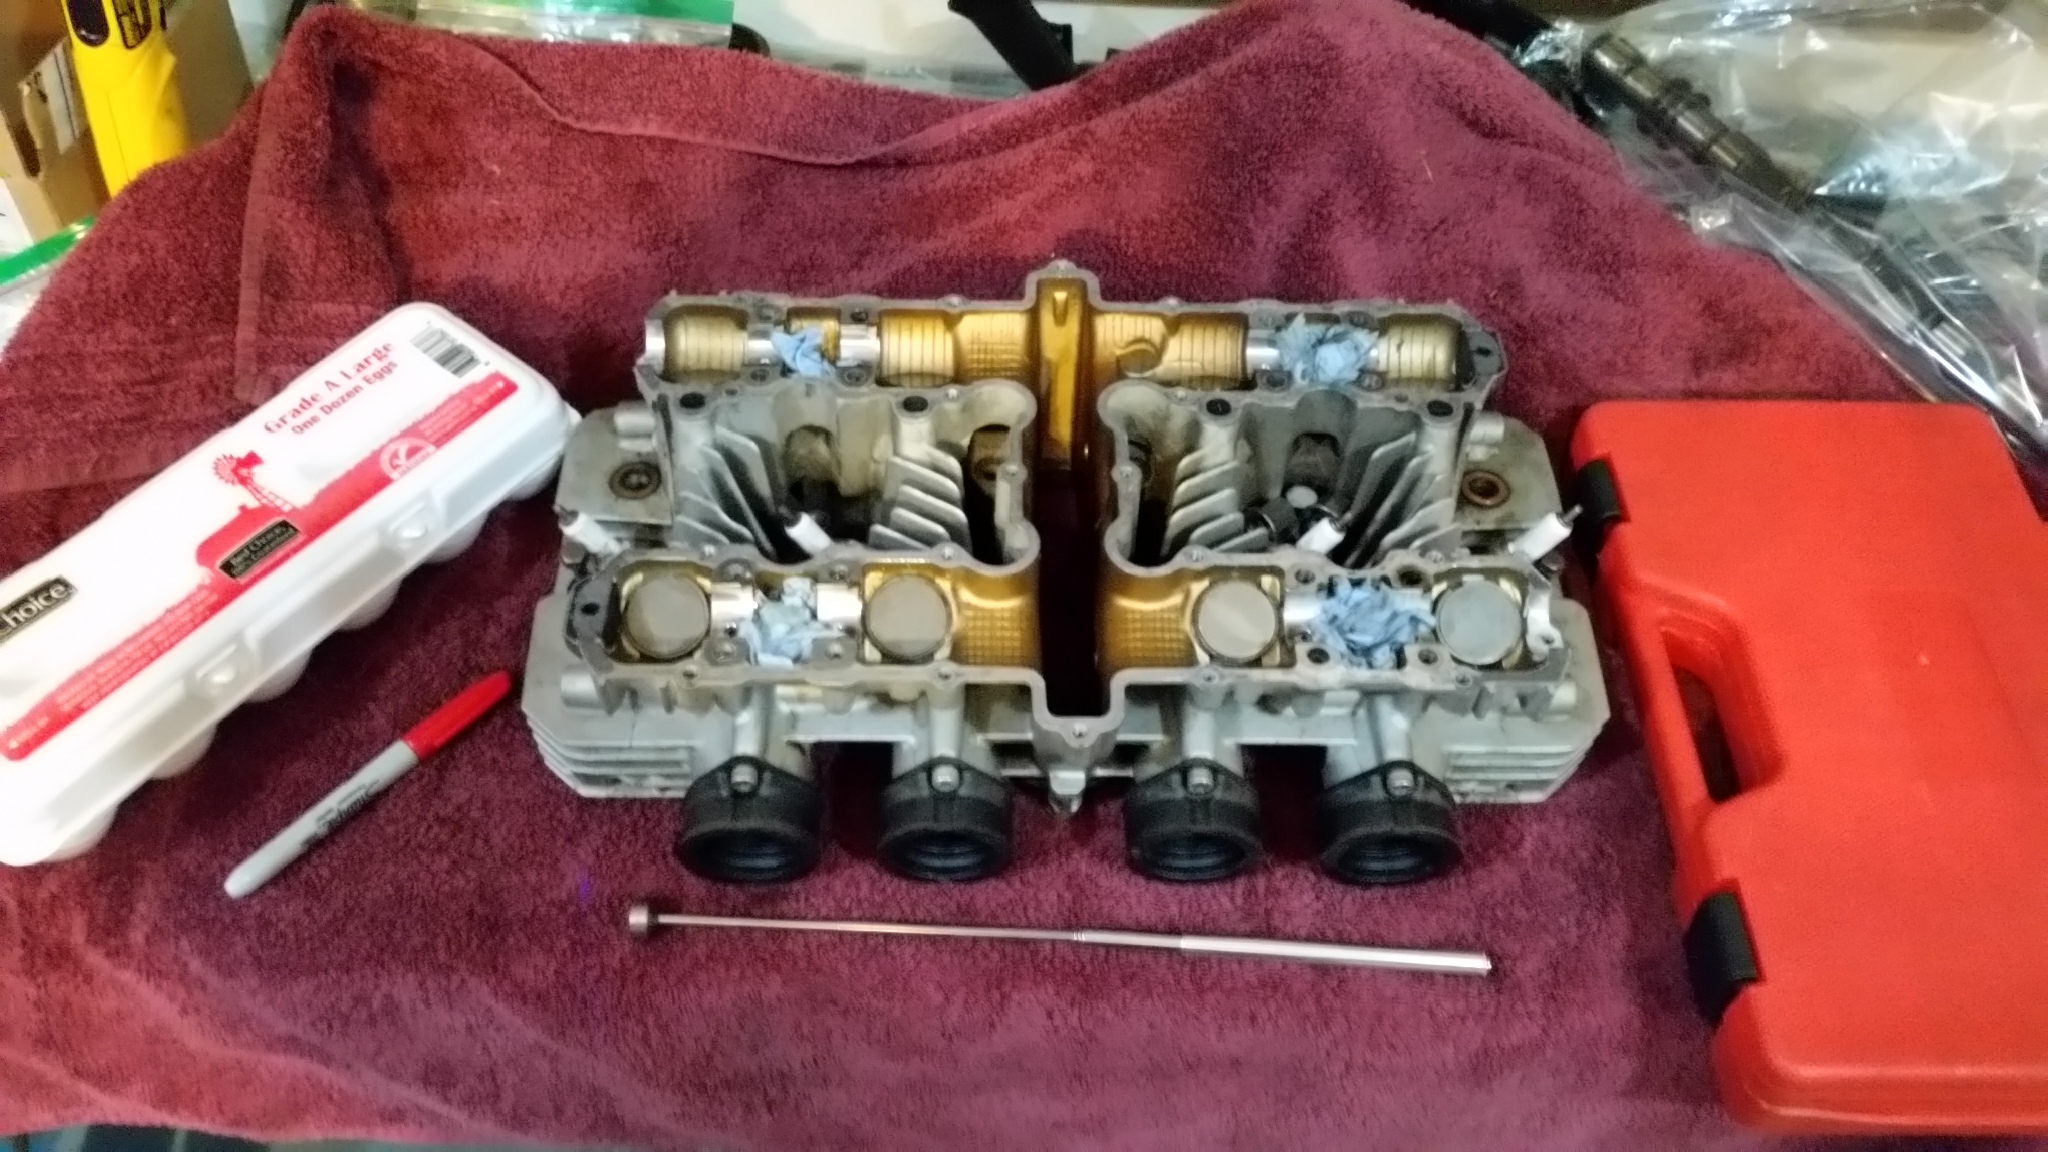
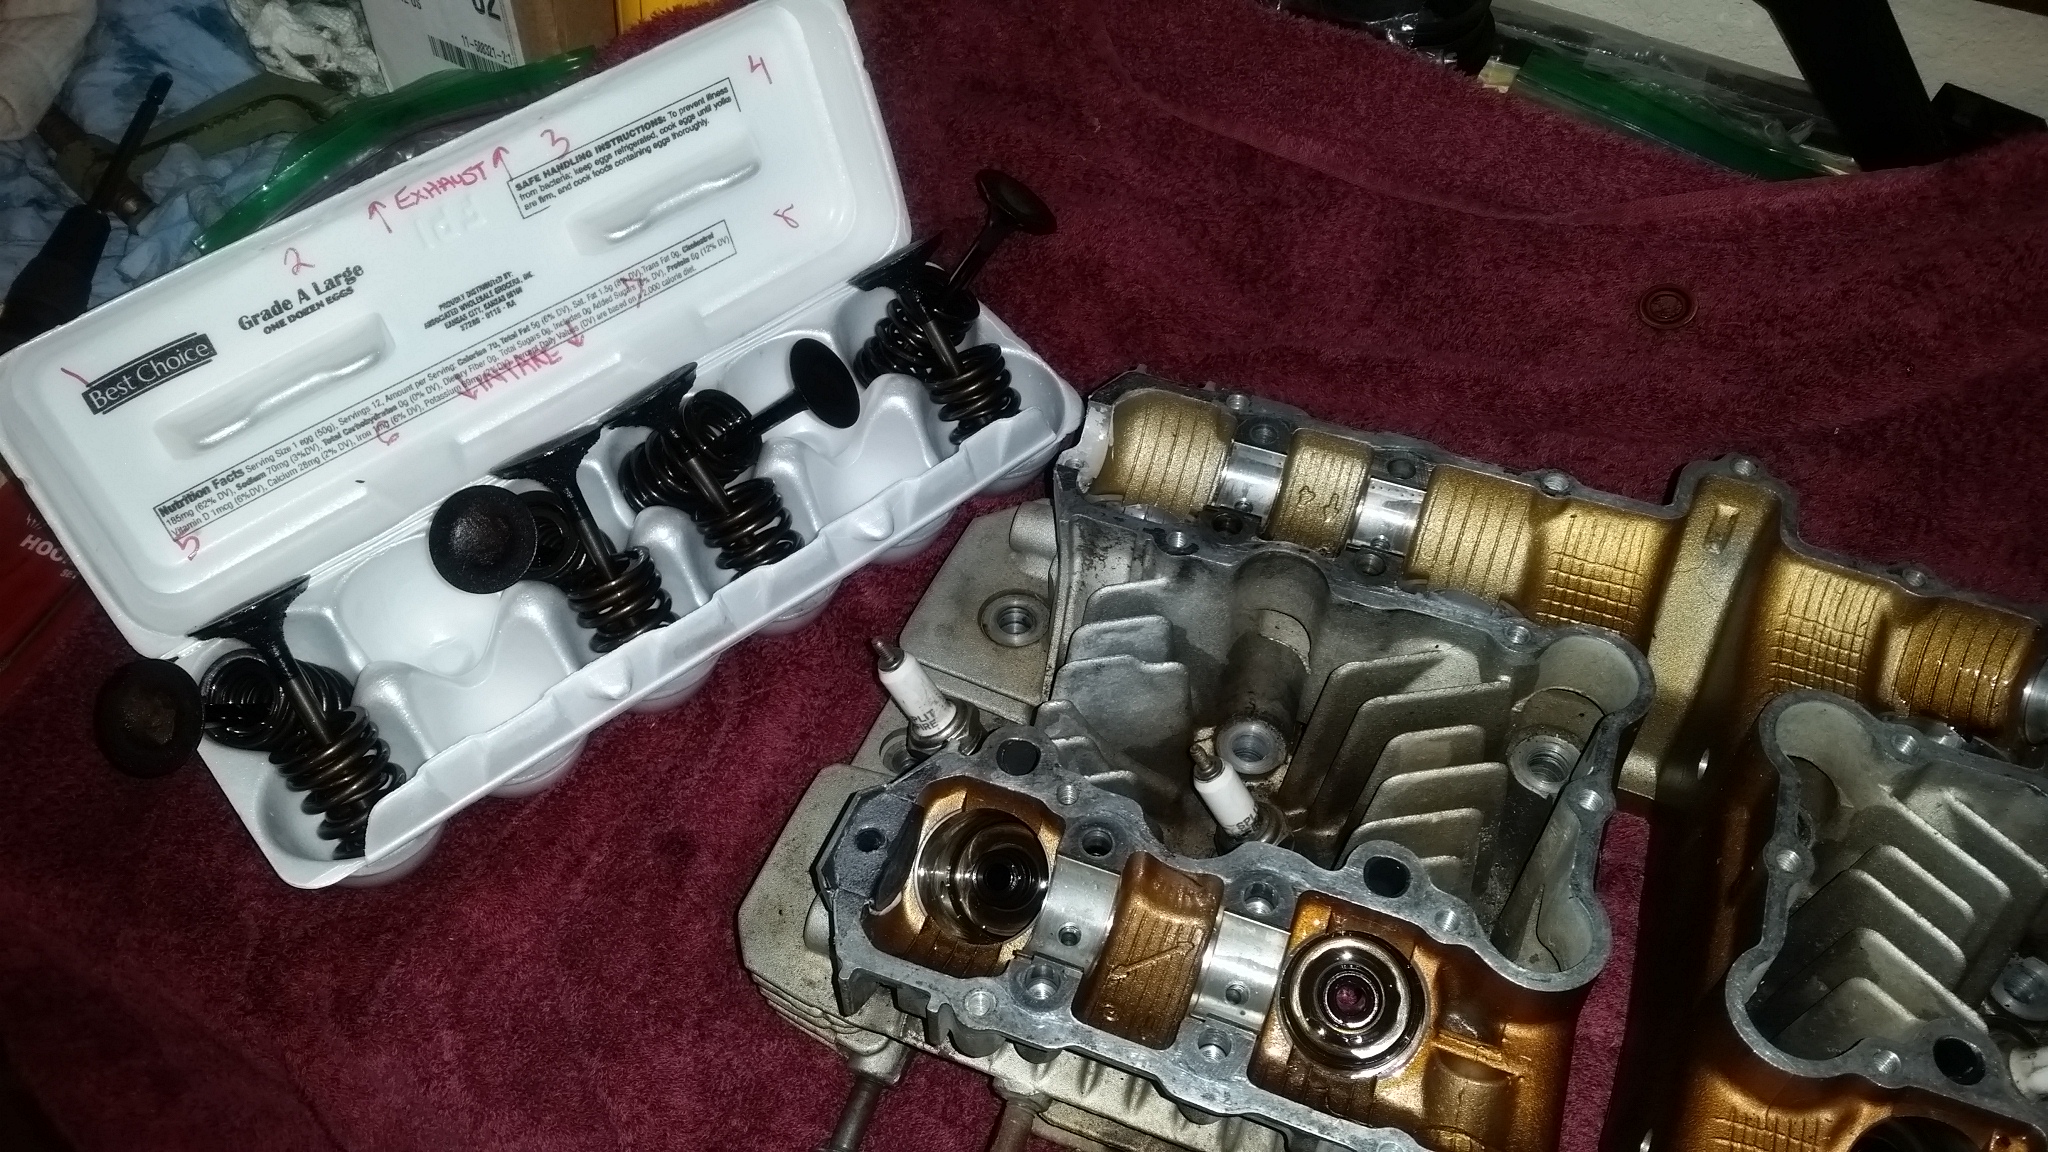
Use the marker to number the valve tappets and transcribe those numbers onto the egg carton. This helps ensure everything goes back where it came from.
Use the spring compressor to...well compress the springs. When the keepers are loose, use a small magnet to remove them from the valve stem.
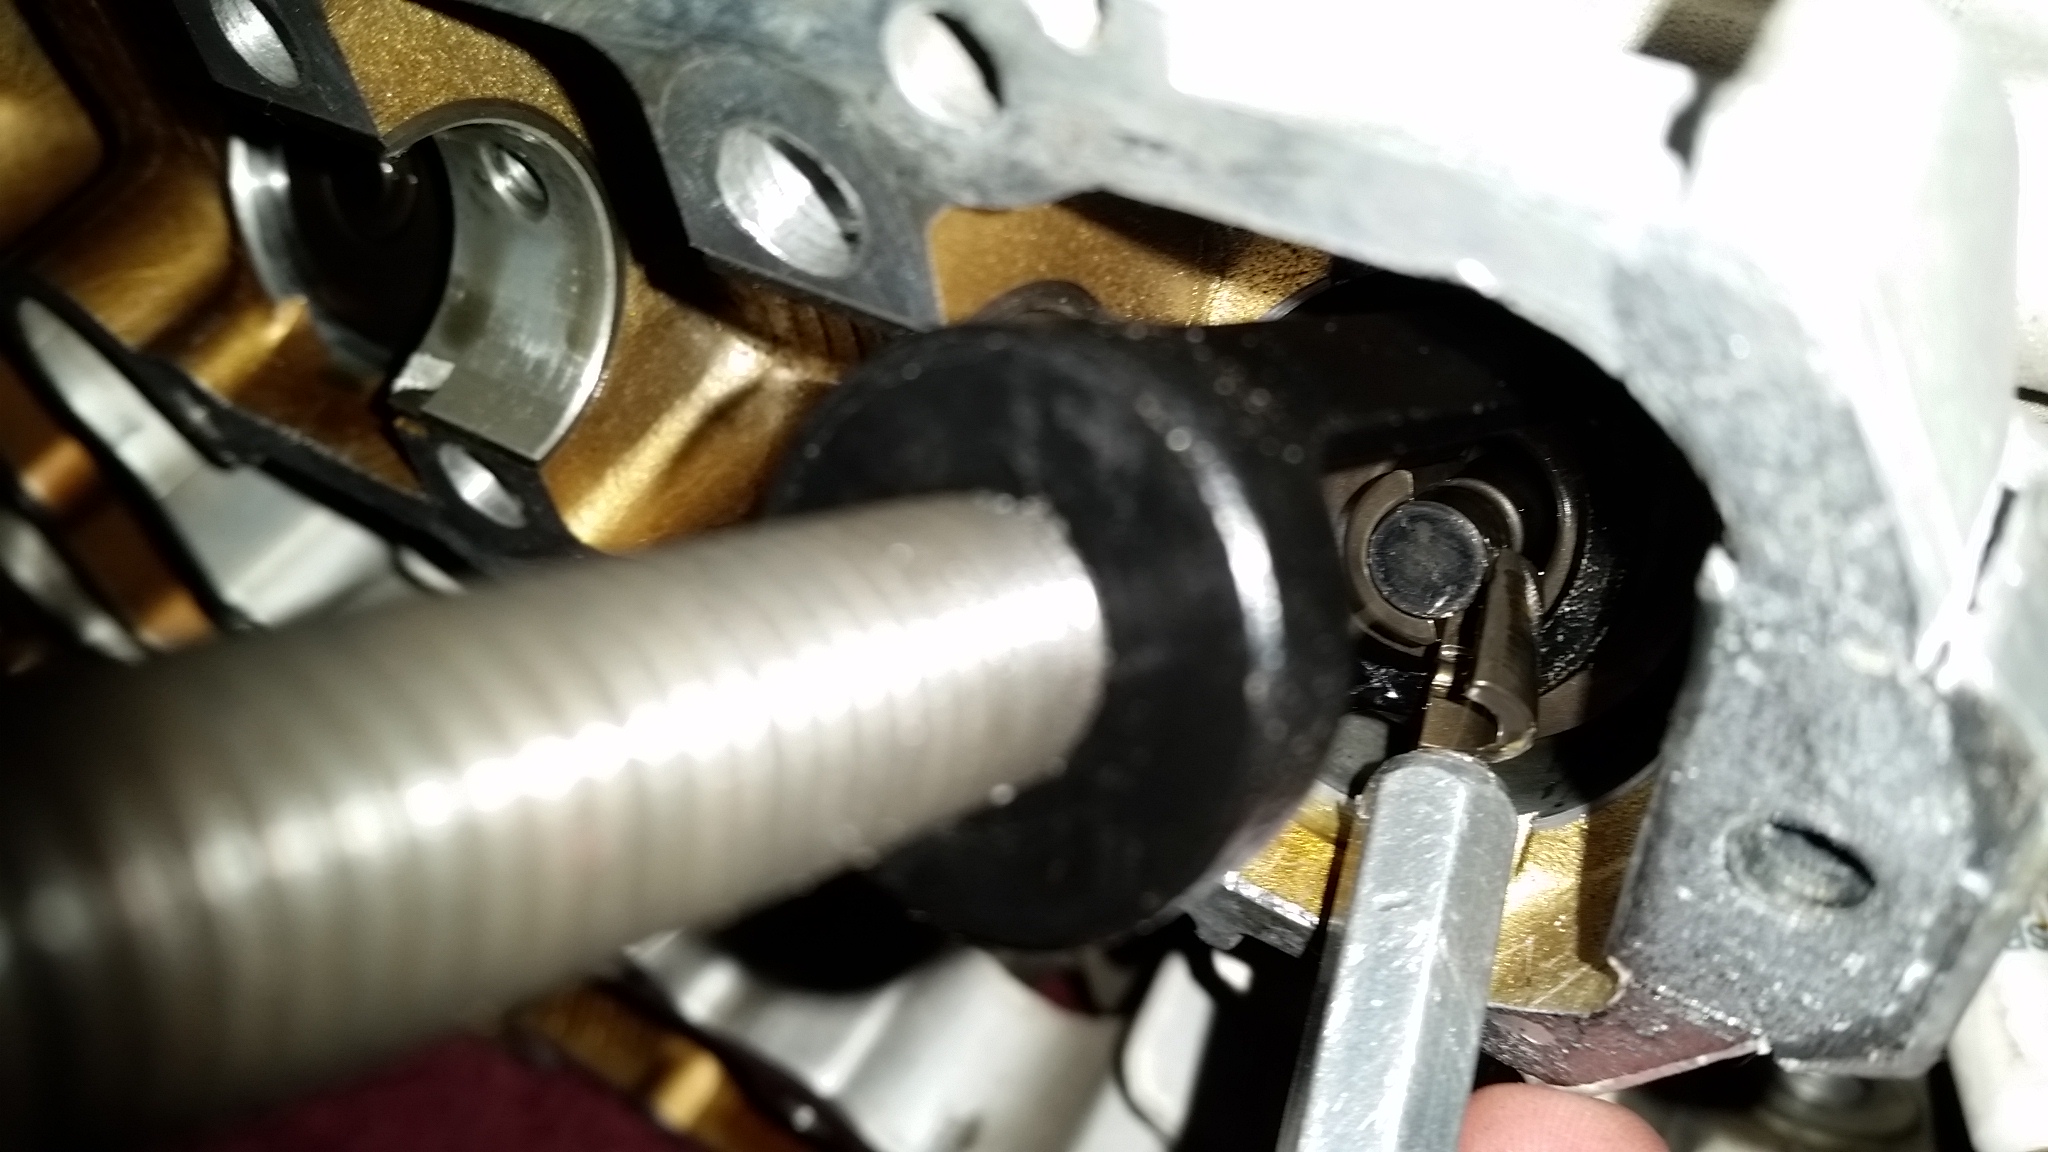
Loosen the spring compressor and remove the top retainer and both springs. Keep track of the spring orientation. Push out the valve, slip on the springs, retainer, and keepers.
Rinse and repeat for the rest of the valves.
Working on a towel gather the head, spring compressor, old egg carton, a sharpy pen, and a magnet or two would be useful.
Use the marker to number the valve tappets and transcribe those numbers onto the egg carton. This helps ensure everything goes back where it came from.
Use the spring compressor to...well compress the springs. When the keepers are loose, use a small magnet to remove them from the valve stem.
Loosen the spring compressor and remove the top retainer and both springs. Keep track of the spring orientation. Push out the valve, slip on the springs, retainer, and keepers.
Rinse and repeat for the rest of the valves.
2019 Indian FTR1200S
2018 Triumph Rocket 3
1981 Kawasaki KZ1100A1
1977 Yamaha RD400
1980 Honda Express II
2018 Triumph Rocket 3
1981 Kawasaki KZ1100A1
1977 Yamaha RD400
1980 Honda Express II
The following user(s) said Thank You: Greybeard, Inline88
Please Log in or Create an account to join the conversation.
Moderators: Street Fighter LTD