
KZ1100A Top End Refresh
- old_kaw
-

- Offline
- User
-

Registered
- Posts: 929
- Thanks: 270
Re: KZ1100A Top End Refresh
24 Sep 2017 19:22 - 24 Sep 2017 19:25CCrosswait wrote:
Anyone have a good was of removing gunk from the head and block? I've been using a pick and in all the nooks and crannies and between the fins. Once I have scrapped at all the grime in an area I used Purple Power to lift the grease. I have to wipe all the nooks and crannies after rinsing the Purple Power to remove everything from the surface.
This process is generally effective but it takes forever! I usually have to do the entire process twice.
Well, my friend I just went through the agony of scraping off a bunch of dried and baked hard 36 year old gunk and gaskets. What a freakin nightmare. BUT.. as far as cleaning the head and pistons (aluminum parts) of carbon.. easy off oven cleaner worked pretty good. The carbon on the valves and steel parts, not so much. I think I used every cleaning tool in my arsenal, including my pressure washer, mineral spirits, wire brushes, you name it. I cleaned the valves up with my fine wire brush on my bench grinder.
The cylinder base gasket originated in he!! to drive us crazy.
")
Be careful not to gouge the cases / aluminum parts..
This is the source of your main oil leak..
1981 Kawasaki Kz1000K1
Located in the Saint Louis, Missouri Area.
Located in the Saint Louis, Missouri Area.
Last edit: 24 Sep 2017 19:25 by old_kaw.
Please Log in or Create an account to join the conversation.
- CCrosswait
-
 Topic Author
- Offline
- Sustaining Member
-

Registered
- Posts: 89
- Thanks: 22
Re: KZ1100A Top End Refresh
24 Sep 2017 19:57
Those are the o-ring culprits!
I'll keep the oven cleaner in mind for next time. Thanks for the tip.
I'll keep the oven cleaner in mind for next time. Thanks for the tip.
2019 Indian FTR1200S
2018 Triumph Rocket 3
1981 Kawasaki KZ1100A1
1977 Yamaha RD400
1980 Honda Express II
2018 Triumph Rocket 3
1981 Kawasaki KZ1100A1
1977 Yamaha RD400
1980 Honda Express II
Please Log in or Create an account to join the conversation.
- 650ed
-

- Offline
- User
-
Registered
- Posts: 15334
- Thanks: 2830
Re: KZ1100A Top End Refresh
24 Sep 2017 20:34
YIKES! Do NOT use oven cleaner on aluminum! It can permanently ruin the surface as it etches it! If in doubt do a Google search and see the many complaints about it. Even the Oven-Off instructions say not to use it on aluminum (see link below). Ed
www.easyoff.us/easy-off-fume-free-oven-cleaner/
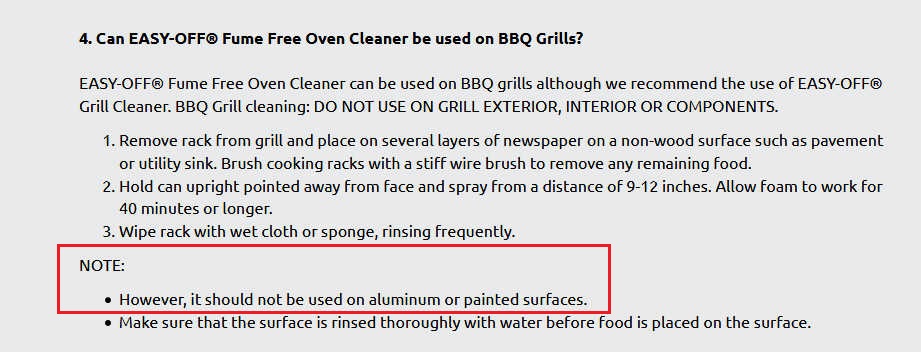
www.easyoff.us/easy-off-fume-free-oven-cleaner/
1977 KZ650-C1 Original Owner - Stock (with additional invisible FIAMM horn)
Please Log in or Create an account to join the conversation.
- old_kaw
-
- Offline
- User
-
Registered
- Posts: 929
- Thanks: 270
Re: KZ1100A Top End Refresh
24 Sep 2017 21:08650ed wrote: YIKES! Do NOT use oven cleaner on aluminum! It can permanently ruin the surface as it etches it! If in doubt do a Google search and see the many complaints about it. Even the Oven-Off instructions say not to use it on aluminum (see link below). Ed
www.easyoff.us/easy-off-fume-free-oven-cleaner/
Ooops.. screwed up again. Easy off is exactly what I used to clean up these pistons and the head. Of course they need to include a disclaimer, since some folks don't seem to read into any postings or specific chemicals to use at your own risk.
Naturally the easy off was the preliminary cleaning, prior to the usual time and time again cleaning and scrubbing until everything is clean enough to eat off of. I also pressure washed the disassembled head after the chemical use.
1981 Kawasaki Kz1000K1
Located in the Saint Louis, Missouri Area.
Located in the Saint Louis, Missouri Area.
Please Log in or Create an account to join the conversation.
- CCrosswait
-
Topic Author
- Offline
- Sustaining Member
-
Registered
- Posts: 89
- Thanks: 22
Re: KZ1100A Top End Refresh
02 Oct 2017 19:01
Back working on the 1100. Got the replacement O-rings in the mail. They have a unique cross section. More of a tall oval than a typical circle cross section. IMO needing to use a custom o-ring is a sure sign of lazy design work but that's neither here nor there.
The o-rings, head gaskets, and cam chain seal instalation was straight forward. I used a little assembly grease to hold the o-rings and cam chain seal in place.
I was able to keep tension on the cam chain and install the cylinder head all by me onesie.
Slide the exhaust cam in place and the intake cam. Counted 44 pins from the intake arrow to the exhaust arrow. All good there.
Then I double checked the timing position to see if I was at TDC and I wasn't :pinch:. I was at the fire mark. So I had to rotate the cam a little and remove and reposition the cam shafts. Counted 44 pins forwards and backwards so I think I've got the timing all set.
When I was snugging up the cam holder bolts I could not get the two back bolts on the #1 (front left) to tighten. The bolts just spin and spin. I was able to snug all the other bolts but not those two. Any ideas? I hope the threads aren't stripped.
2019 Indian FTR1200S
2018 Triumph Rocket 3
1981 Kawasaki KZ1100A1
1977 Yamaha RD400
1980 Honda Express II
2018 Triumph Rocket 3
1981 Kawasaki KZ1100A1
1977 Yamaha RD400
1980 Honda Express II
Please Log in or Create an account to join the conversation.
- Scirocco
-

- Offline
- Premium Member
-

Registered
- Never change a running system
- Posts: 4397
- Thanks: 2260
Re: KZ1100A Top End Refresh
02 Oct 2017 19:19 - 02 Oct 2017 19:27
...and they are be stripped, trust me and welcome to the club of the lost threats. Go for some some Helicoil or Time-Sert M6
You are not the only one that make this experience, sadly to say.
You are not the only one that make this experience, sadly to say.
My 1975 Z 1 B 900 Project
www.kzrider.com/forum/11-projects/605133...ears-deep-sleep-mode
www.kzrider.com/forum/11-projects/605133...ears-deep-sleep-mode
Last edit: 02 Oct 2017 19:27 by Scirocco.
Please Log in or Create an account to join the conversation.
- daveo
-

- Offline
- Premium Member
-
Registered
- Posts: 3118
- Thanks: 876
Re: KZ1100A Top End Refresh
02 Oct 2017 20:37
Never happened again after doing this...


1982 KZ1100-A2 Sleeper 😎
The following user(s) said Thank You: DoctoRot
Please Log in or Create an account to join the conversation.
- CCrosswait
-
Topic Author
- Offline
- Sustaining Member
-
Registered
- Posts: 89
- Thanks: 22
Re: KZ1100A Top End Refresh
03 Oct 2017 04:18 - 03 Oct 2017 04:20
Scirocco...This sounds like something for which I'll have to remove and disassemble the head to complete. Or can I do this with the head in place?
2019 Indian FTR1200S
2018 Triumph Rocket 3
1981 Kawasaki KZ1100A1
1977 Yamaha RD400
1980 Honda Express II
2018 Triumph Rocket 3
1981 Kawasaki KZ1100A1
1977 Yamaha RD400
1980 Honda Express II
Last edit: 03 Oct 2017 04:20 by CCrosswait. Reason: Add name for specificity
Please Log in or Create an account to join the conversation.
- M_a_t_t
-
- Offline
- Sustaining Member
-
Registered
- Posts: 254
- Thanks: 41
Re: KZ1100A Top End Refresh
03 Oct 2017 05:37 - 03 Oct 2017 05:37
To use the helicoil or Time-sert you just drill a hole, tap it and thread in the insert. Time-sert cost more, but are better quality.
Summary of this article:
www.baggersmag.com/time-sert-vs-helicoil
Assuming you can get a drill in position you should be able to do it with the head on.
Summary of this article:
www.baggersmag.com/time-sert-vs-helicoil
Assuming you can get a drill in position you should be able to do it with the head on.
83 KZ1100A (shaft)
17 Versys X 300 abs
81 kz650h1
81 kz750e2
90 Honda CBR600F (brother's)
17 Versys X 300 abs
81 kz650h1
81 kz750e2
90 Honda CBR600F (brother's)
Last edit: 03 Oct 2017 05:37 by M_a_t_t.
Please Log in or Create an account to join the conversation.
- SWest
-

- Offline
- Sustaining Member
-
Registered
- 10 22 2014
- Posts: 23687
- Thanks: 3000
Re: KZ1100A Top End Refresh
03 Oct 2017 08:25CCrosswait wrote: Scirocco...This sounds like something for which I'll have to remove and disassemble the head to complete. Or can I do this with the head in place?
kzrider.com/forum/2-engine/602970-kz1100...eeds-helicoil#731978
Steve
Z1b1000 1975 Z1b
kzrider.com/forum/11-projects/598262-kz-...-will-it-live#672882
kzrider.com/forum/2-engine/597654-poser?start=240#704229
kzrider.com/forum/11-projects/598262-kz-...-will-it-live#672882
kzrider.com/forum/2-engine/597654-poser?start=240#704229
Please Log in or Create an account to join the conversation.
- CCrosswait
-
Topic Author
- Offline
- Sustaining Member
-
Registered
- Posts: 89
- Thanks: 22
Re: KZ1100A Top End Refresh
03 Oct 2017 19:07
Not that you need confirmation but there were 0 threads in the two back holes. Tried to take a decent photo but couldn't get it to focus well.
I decided to go with helicoil replacement kit because it was more readily available and about half the cost. Lucky I could daisy chain some drill bit holders and get access to the inside hole.
I kept a shop vacuum running next to the bit to remove debris. Also found that flushing the hole with WD40 while using the shop vacuum worked well to clean shavings. I did my best to clean up any metal shavings on the head before tapping the holes.
Tapped the holes to bottom, twice. Cleared shavings between first and second tapping. Flush and vacuum. Again the picture didn't turn out to well.
I could screw in the coil by hand most of the way. Used some assembly grease to help with the slippage. Had to use pliers to grip the tool the last full turn or so.
Hand threaded a bolt into the repaired hole and a good hole and using some very near calipers made sure the head heights were close. Got them to within .015 inch. Call that a win. First try") .
.
All 16 bolts were able to be torqued to spec following the tighten pattern in the shop manual. I torqued the bolts in two stages. Stage one being half the final torque value.
Thank you all for your help. I thought I was going to have to tear down the head and have it machined. Boo that . But now it's right as rain.
Next thing is to double check the valve clearances, torque down the head, put on the cam cover, and install the tensioner and the engine is complete. Then all that's left are the carbs, exhaust, starter clutch, and return to bike to factory air intake. :blink:
I decided to go with helicoil replacement kit because it was more readily available and about half the cost. Lucky I could daisy chain some drill bit holders and get access to the inside hole.
I kept a shop vacuum running next to the bit to remove debris. Also found that flushing the hole with WD40 while using the shop vacuum worked well to clean shavings. I did my best to clean up any metal shavings on the head before tapping the holes.
Tapped the holes to bottom, twice. Cleared shavings between first and second tapping. Flush and vacuum. Again the picture didn't turn out to well.
I could screw in the coil by hand most of the way. Used some assembly grease to help with the slippage. Had to use pliers to grip the tool the last full turn or so.
Hand threaded a bolt into the repaired hole and a good hole and using some very near calipers made sure the head heights were close. Got them to within .015 inch. Call that a win. First try
.All 16 bolts were able to be torqued to spec following the tighten pattern in the shop manual. I torqued the bolts in two stages. Stage one being half the final torque value.
Thank you all for your help. I thought I was going to have to tear down the head and have it machined. Boo that
. But now it's right as rain.Next thing is to double check the valve clearances, torque down the head, put on the cam cover, and install the tensioner and the engine is complete. Then all that's left are the carbs, exhaust, starter clutch, and return to bike to factory air intake. :blink:
2019 Indian FTR1200S
2018 Triumph Rocket 3
1981 Kawasaki KZ1100A1
1977 Yamaha RD400
1980 Honda Express II
2018 Triumph Rocket 3
1981 Kawasaki KZ1100A1
1977 Yamaha RD400
1980 Honda Express II
Please Log in or Create an account to join the conversation.
- CCrosswait
-
Topic Author
- Offline
- Sustaining Member
-
Registered
- Posts: 89
- Thanks: 22
Re: KZ1100A Top End Refresh
05 Oct 2017 19:16
Now that I've got the cams torqued down I have a chance to recheck the valve clearances. As I was in the middle of checking the clearances it occurs to me that I could have just swapped the shims while I had the buckets out and saved myself a bit of time and frustration :pinch:
But had I had that much foresight I would've had the opportunity to learn how to change the shim. So it all worked out.
Placing the wedge between the cam shaft and shim took a little persuasion. I had to use a soft mallet and tap the wedge in place.
After having the spacer pop out several times I learned how to wedge it in place to just catch the edge of the bucket.
While applying the wedging pressure to the spacer I pulled the wedge out from under the cam shaft. The feeling I had when that little spacer stayed in place is idescribable :laugh:
Then I used a pick to lift the valve and removed the shim.
Success!
Used the table in my manual to pick a new shim. Popped it in place with the numbers facing away from the cam lobe. Slid the wedge in removed the shim. Removed the wedge. Recheck the gap. No-go at 0.15 and go at 0.05. So the world is at peace once more.
But had I had that much foresight I would've had the opportunity to learn how to change the shim. So it all worked out.
Placing the wedge between the cam shaft and shim took a little persuasion. I had to use a soft mallet and tap the wedge in place.
Attachment not found
After having the spacer pop out several times I learned how to wedge it in place to just catch the edge of the bucket.
Attachment not found
While applying the wedging pressure to the spacer I pulled the wedge out from under the cam shaft. The feeling I had when that little spacer stayed in place is idescribable :laugh:
Attachment not found
Then I used a pick to lift the valve and removed the shim.
Attachment not found
Attachment not found
Success!
Attachment not found
Used the table in my manual to pick a new shim. Popped it in place with the numbers facing away from the cam lobe. Slid the wedge in removed the shim. Removed the wedge. Recheck the gap. No-go at 0.15 and go at 0.05. So the world is at peace once more.
2019 Indian FTR1200S
2018 Triumph Rocket 3
1981 Kawasaki KZ1100A1
1977 Yamaha RD400
1980 Honda Express II
2018 Triumph Rocket 3
1981 Kawasaki KZ1100A1
1977 Yamaha RD400
1980 Honda Express II
Please Log in or Create an account to join the conversation.
Moderators: Street Fighter LTD