
'78 KZ 650 Refreshing/Upgrade Project
- Jonny
-
 Topic Author
- Offline
- User
-

Registered
- woot!
- Posts: 210
- Thanks: 22
Re: '78 KZ 650 Refreshing/Upgrade Project
30 Jan 2014 10:24
ARG! My desire to use a long list of expletives is only just being overwhelmed by respect for decency and forum rules.
Why? Well.....
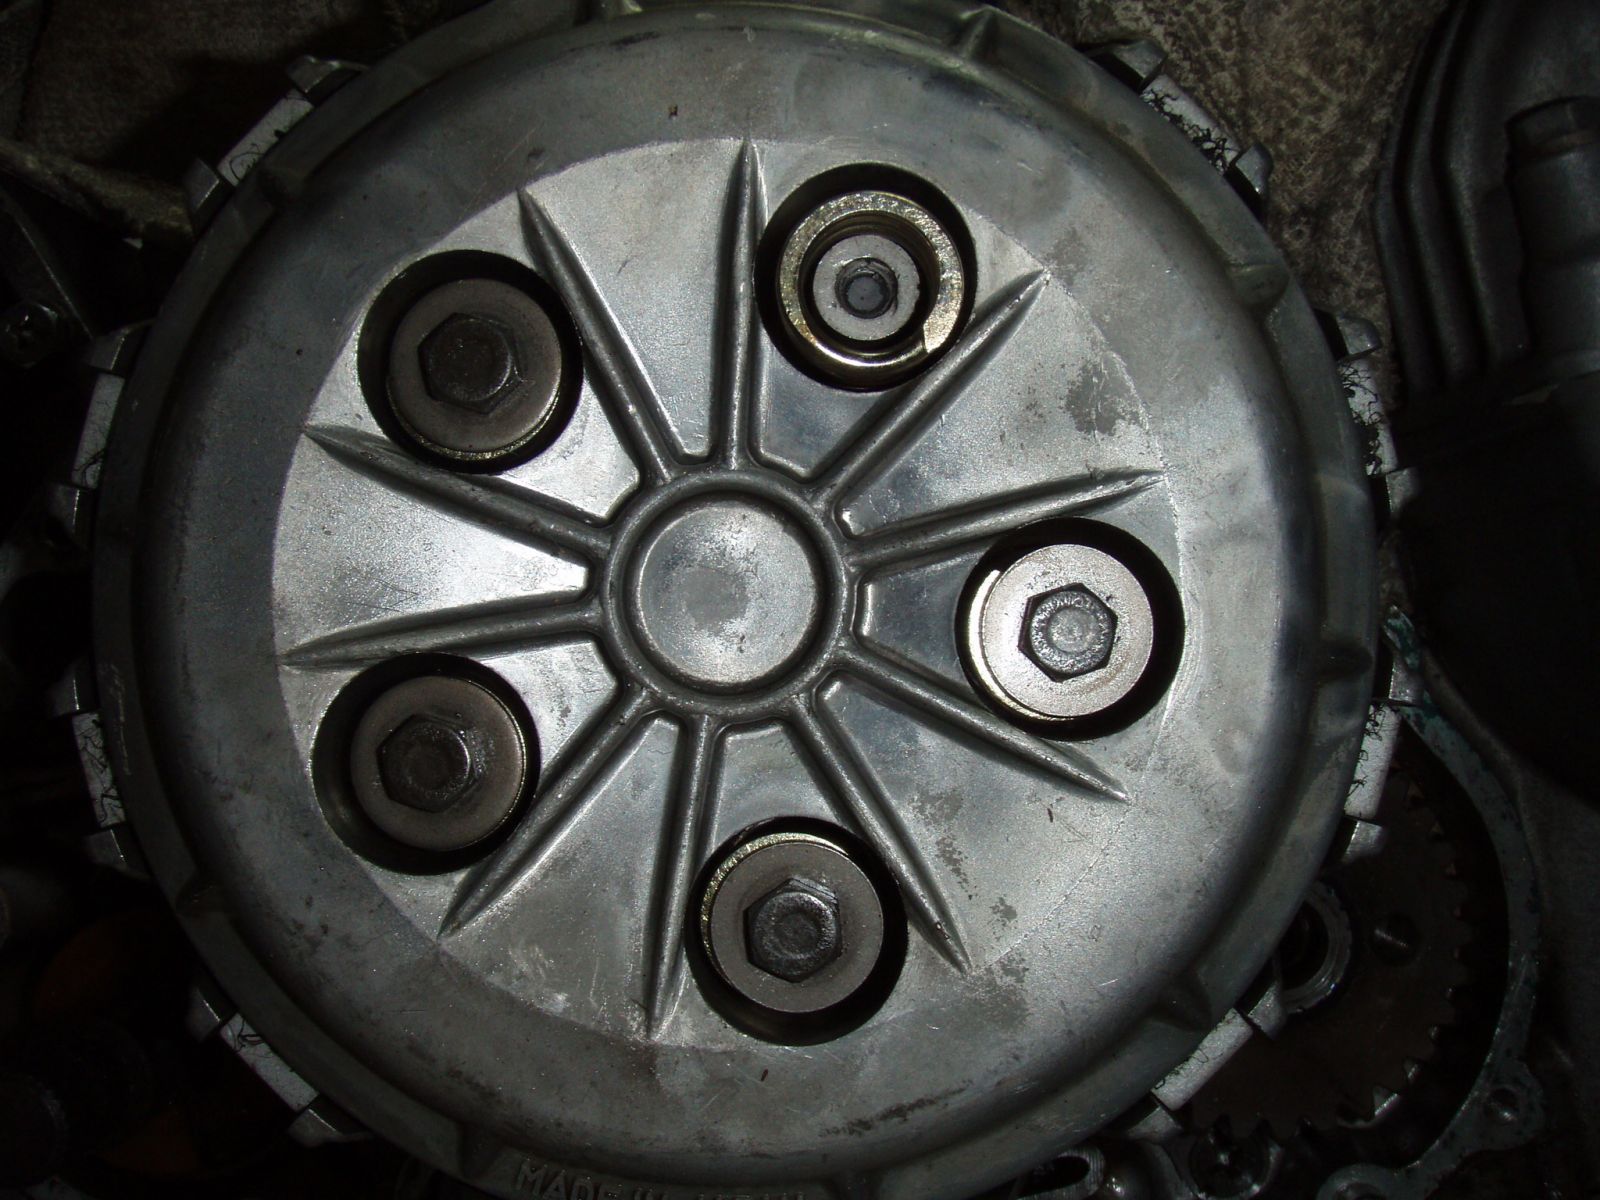
and
Ta Daaa! :pinch:
All that despite carefully using a well adjusted torque wrench at the correct torque setting ~85 INCH pounds. Crapola. Maybe the fact I am working in a semi heated basement has something to do with it? Tho I find that sort of unlikely. Maybe the clutch cage bolts were just tightened a bit too much, once to many times? Who knows, and it doesn't much matter now. First thing: get it out. Second, try to find a new bolt/bolts to get it back together. Why is it the little jobs you don't ever think will cause a headache that really mess things up?
Adding insult to injury, the broken bit is JUST beyond the reach of my screw/bolt extractor set. Great. Off to see about finding some left handed drill bits, and hoping for the best. As always, advice is welcome.
Cheers!
Jon
Why? Well.....
and
Ta Daaa! :pinch:
All that despite carefully using a well adjusted torque wrench at the correct torque setting ~85 INCH pounds. Crapola. Maybe the fact I am working in a semi heated basement has something to do with it? Tho I find that sort of unlikely. Maybe the clutch cage bolts were just tightened a bit too much, once to many times? Who knows, and it doesn't much matter now. First thing: get it out. Second, try to find a new bolt/bolts to get it back together. Why is it the little jobs you don't ever think will cause a headache that really mess things up?
Adding insult to injury, the broken bit is JUST beyond the reach of my screw/bolt extractor set. Great. Off to see about finding some left handed drill bits, and hoping for the best. As always, advice is welcome.
Cheers!
Jon
'78 KZ 650C2 'Lila'
'71 Norton Commando 750 'Eadie'
St. Catharines, ON (Mostly, anyway...)
'71 Norton Commando 750 'Eadie'
St. Catharines, ON (Mostly, anyway...)
Please Log in or Create an account to join the conversation.
- 80B4
-

- Offline
- User
-
Registered
- Posts: 447
- Thanks: 105
Re: '78 KZ 650 Refreshing/Upgrade Project
30 Jan 2014 11:16
Jon,
Use a lefthand bit to spin that broken bolt out. I would replace all 5 of those bolts with OEM or better .
Factory Pro tunning had a great how-to for tunning CV carbs, it is worth a look if you can find it.
Use a lefthand bit to spin that broken bolt out. I would replace all 5 of those bolts with OEM or better .
Factory Pro tunning had a great how-to for tunning CV carbs, it is worth a look if you can find it.
1980B4 1000
1978 Z1R
1978 B3 750
1978 Z1R
1978 B3 750
Please Log in or Create an account to join the conversation.
- Jonny
-
Topic Author
- Offline
- User
-
Registered
- woot!
- Posts: 210
- Thanks: 22
Re: '78 KZ 650 Refreshing/Upgrade Project
30 Jan 2014 13:51
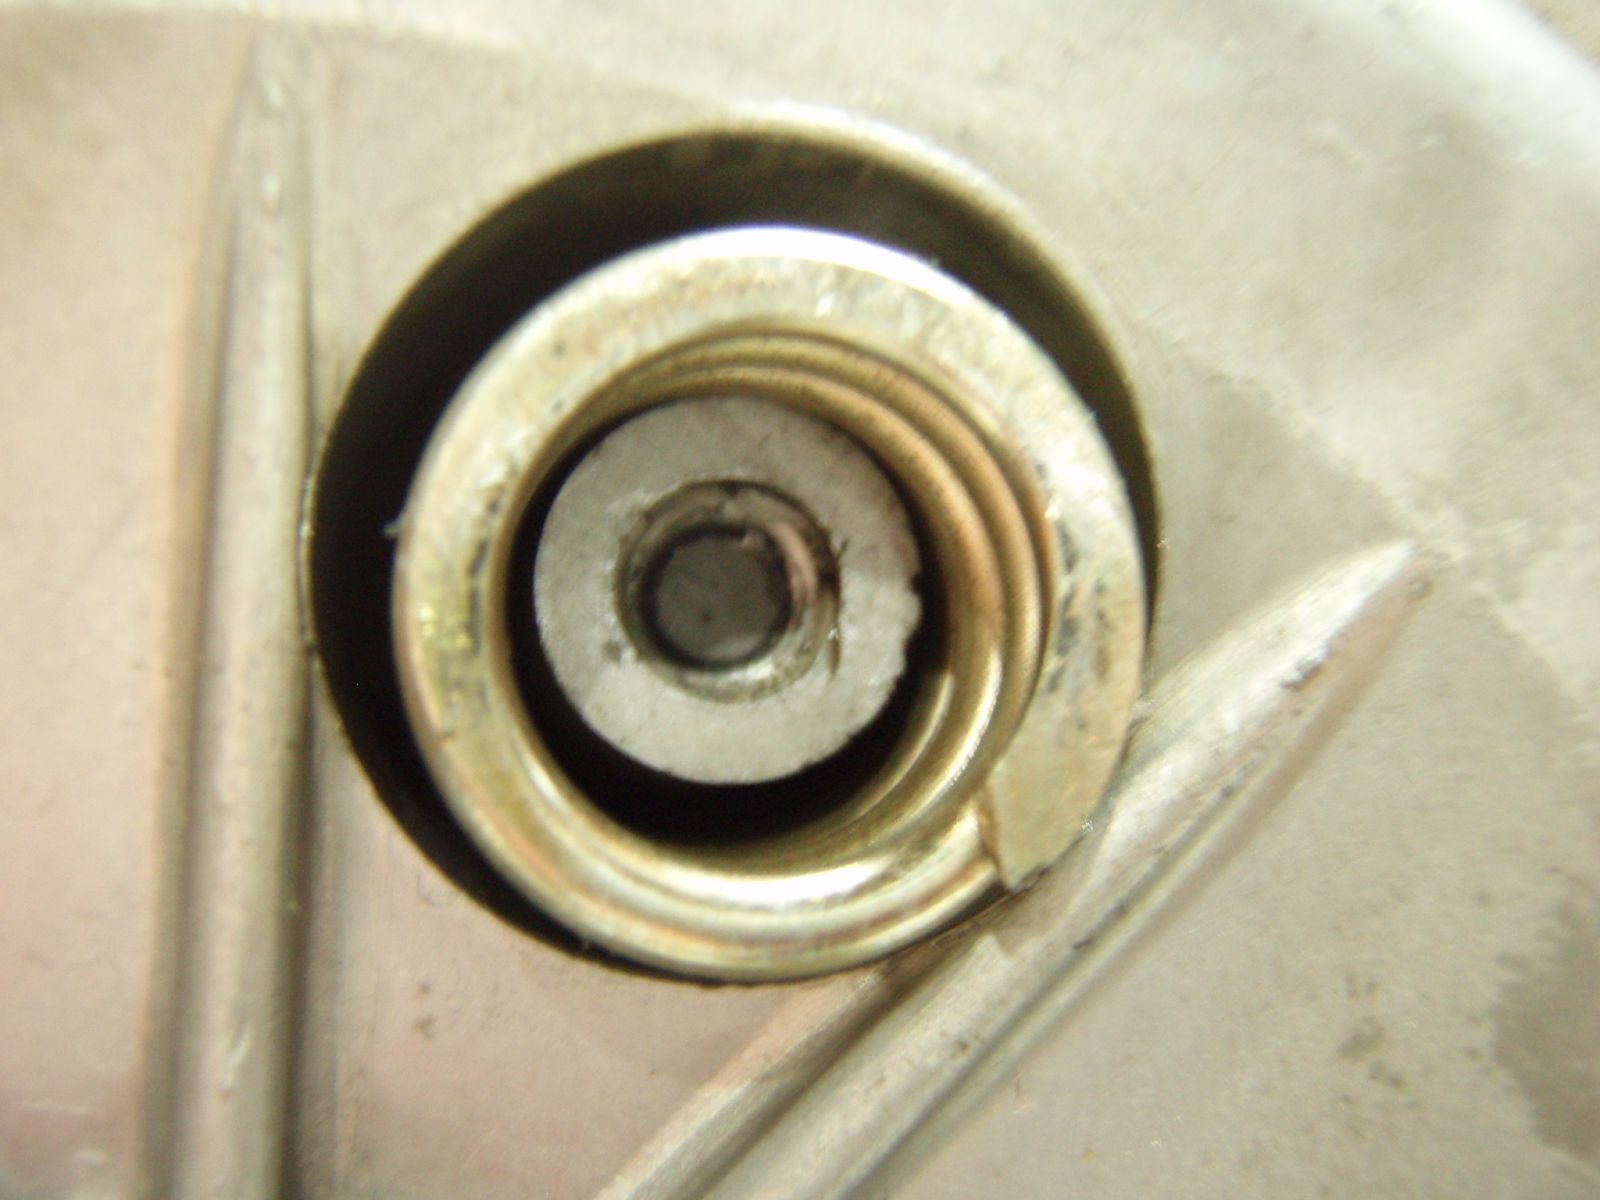
Phew. Yup, the left hand damaged bolt extractor did the trick. Pulled it out neat as you please. Now, having done that, and having gotten over the worry of whether or not it will work, i can safely move on to being pissed off that I have to source and replace the bolts.
Ah well. Something like that pretty much had to happen eventually.
Ah well. Something like that pretty much had to happen eventually.
'78 KZ 650C2 'Lila'
'71 Norton Commando 750 'Eadie'
St. Catharines, ON (Mostly, anyway...)
'71 Norton Commando 750 'Eadie'
St. Catharines, ON (Mostly, anyway...)
Please Log in or Create an account to join the conversation.
- 650ed
-

- Offline
- User
-
Registered
- Posts: 15334
- Thanks: 2830
Re: '78 KZ 650 Refreshing/Upgrade Project
30 Jan 2014 13:55
I would be VERY careful about drilling it out, using an "Easy-out", etc. because one slip and you'll wreck the clutch housing ($$$). Instead, check machine shops in your area to see if there is one that does ELECTRIC DISCHARGE MACHINING (EDM). If they do, they can remove that without causing any damage to the threads in the clutch housing. If you have never heard of EDM you may find the link below interesting. Ed
www.brokentap.com/services.html
www.brokentap.com/services.html
1977 KZ650-C1 Original Owner - Stock (with additional invisible FIAMM horn)
Please Log in or Create an account to join the conversation.
- DoctoRot
-
- Offline
- Sustaining Member
-

Registered
- Oh, the usual... I bowl, I drive around...
- Posts: 2607
- Thanks: 773
Re: '78 KZ 650 Refreshing/Upgrade Project
30 Jan 2014 23:11 - 30 Jan 2014 23:13Jonny wrote: Well, DoctoRot,
Thanks for the advice. Couldn't find a place locally that specialized in Motocross, but there is a custom exhaust business not too far from where I live, and they were able to pull the dent with a torch and slide hammer, or at least something like that. Pipes look great, and at least should have dealt with any potential exhaust gas flow restrictions. The exhaust system is indeed a Kerker like you had, and I was pretty happy to be able to just pay to get it fixed rather that find a new system. (I looked around at one point, and they were in the $600+ neighbourhood! :ohmy: ) While it was a little more than $60 to get this fix, it really wasn't that bad, and the manifold looks a whole lot better now. Cheers!
(As always, I will post some photos soon, I just have to get through the next most pressing thing.... the valve spring/shim swap.)
Jon
glad that worked out for you. keep up the progress.
")
Last edit: 30 Jan 2014 23:13 by DoctoRot.
Please Log in or Create an account to join the conversation.
- Nessism
-

- Offline
- Sustaining Member
-
Registered
- Posts: 8047
- Thanks: 3428
Re: '78 KZ 650 Refreshing/Upgrade Project
31 Jan 2014 05:10
Looks like you are doing a lovely job! Keep up the good work and keep the photos flowing! ")
Saw the mention about APE valve springs and will caution against this unless you are using aftermarket cams as well. The extra valve seat pressure will lead to extra wear. We always want the lowest valve seat pressure possible, without allowing valve float at high rpms.
Good luck,
Saw the mention about APE valve springs and will caution against this unless you are using aftermarket cams as well. The extra valve seat pressure will lead to extra wear. We always want the lowest valve seat pressure possible, without allowing valve float at high rpms.
Good luck,
Ed
Carb O-ring Kits : www.kzrider.com/forum/14-vendor-forum/62...rburetor-o-ring-kits
www.kzrider.com/forum/faq-wiki/618026-new-owner-things-to-know
1981 KZ750E2
www.kzrider.com/forum/11-projects/604901...z750e-project-thread
Carb O-ring Kits : www.kzrider.com/forum/14-vendor-forum/62...rburetor-o-ring-kits
www.kzrider.com/forum/faq-wiki/618026-new-owner-things-to-know
1981 KZ750E2
www.kzrider.com/forum/11-projects/604901...z750e-project-thread
Please Log in or Create an account to join the conversation.
- KZB2 650
-
- Offline
- User
-
Registered
- Posts: 1472
- Thanks: 264
Re: '78 KZ 650 Refreshing/Upgrade Project
31 Jan 2014 08:40Nessism wrote: Looks like you are doing a lovely job! Keep up the good work and keep the photos flowing!
Saw the mention about APE valve springs and will caution against this unless you are using aftermarket cams as well. The extra valve seat pressure will lead to extra wear. We always want the lowest valve seat pressure possible, without allowing valve float at high rpms.
Good luck,
I went with the APE springs still but instead of the normal 90 lbs Jay recommended 80 lbs since I'm only running the mild 750 cams on my 650 and will see mostly street miles.
Also since I didn't split the case I am still running the stock cam chain so wanted to be easy on that too.
")
1978 KZ650 b-2
700cc Wiseco kit 10 to 1.
1980 KZ750 cam, ape springs, stock clutch/ Barnett springs.
Vance and Hines Header w/ comp baffle and Ape pods, Dyna S and green coils, copper wires.
29MM smooth bores W/ 17.5 pilots, 0-6s and 117.5 main
16/42 gearing X ring chain and alum rear JT sprocket.
700cc Wiseco kit 10 to 1.
1980 KZ750 cam, ape springs, stock clutch/ Barnett springs.
Vance and Hines Header w/ comp baffle and Ape pods, Dyna S and green coils, copper wires.
29MM smooth bores W/ 17.5 pilots, 0-6s and 117.5 main
16/42 gearing X ring chain and alum rear JT sprocket.
Please Log in or Create an account to join the conversation.
- Jonny
-
Topic Author
- Offline
- User
-
Registered
- woot!
- Posts: 210
- Thanks: 22
Re: '78 KZ 650 Refreshing/Upgrade Project
31 Jan 2014 12:58
Well, work on the engine at the home front will slow down a little for the moment. The head is out being a steam clean. being checked for tolerance if required, a valve seat job and levelling. Thankfully there is a machine shop nearby with guys who do great work, and who bring prices down a little if you are willing to wait. Might be a few weeks tho, and I hope I can beat the race against time, since I am off to New Zealand again for work in a little over a month. I hate the though of leaving too much work until I get back, but I'd rather have it done thoroughly and lose some riding season that just slap it all back together when i am already this far into it.
Ed: Thanks for the concern and advice. It if were a more serious situation, I would have looked around for a place that does EDM. I have never gone that route before, but I came across it on another one of your posts and did some reading. Cool stuff, and your right; when it can lead to more damage trying to remove a bolt, then it looks like a great way of doing it. Thankfully I have a very good drill press and was able to keep things nice and controlled, Just the tiniest bit of drilling into the bolt, I was able to get a good bite on it with the extractor, and spin it out by hand. No clutch baskets were harmed in the proceedure! :laugh:
Nessism/KZB2: All good advice. I had never though too much about the excess force being placed on the valve seats. However, I have to balance that against 35 year old springs and what I have read up on, in that valve float is on of the few drawbacks that these motors have at higher RPM's and wanting to mitigate that a little. I too will be mostly street miles and plan finding some 750 cams to drop in as well. I assume by 80lbs you meant spring tension? I double checked at the APE website, and it seems that the springs I have the 'entry' level upgrade, 'heavy duty' not any kind of real high performance jobbies. (Good for up to .440 lift) Are those what you went with? VS900k's. Ring bells KZB2, or perhaps I should write APE and see what I have/should swap for....
In the meantime, while waiting on the head, I figure I might as well pull the jugs and check the bores and piston tolerances. There seems to be a pretty good glaze on the bores, so as long as everything else looks good, it might just be a quick hone with a ball hone, and then reassembly one the head is finished. We shall see, Probably photos of paint projects while the engine is on temporary hold pattern.
Cheers all. The feedback and advice keeps me motivated and moving on this.
Jon
'78 KZ 650C2 'Lila'
'71 Norton Commando 750 'Eadie'
St. Catharines, ON (Mostly, anyway...)
'71 Norton Commando 750 'Eadie'
St. Catharines, ON (Mostly, anyway...)
Please Log in or Create an account to join the conversation.
- KZB2 650
-
- Offline
- User
-
Registered
- Posts: 1472
- Thanks: 264
Re: '78 KZ 650 Refreshing/Upgrade Project
01 Feb 2014 07:26
Yes those were the springs. They did the complete head for me so I had them set the pressure and the spring height so it be all set up when I got it back. Write them before you buy and make sure you have someone that knows how to set em up or maybe the guys here could help with that ?
1978 KZ650 b-2
700cc Wiseco kit 10 to 1.
1980 KZ750 cam, ape springs, stock clutch/ Barnett springs.
Vance and Hines Header w/ comp baffle and Ape pods, Dyna S and green coils, copper wires.
29MM smooth bores W/ 17.5 pilots, 0-6s and 117.5 main
16/42 gearing X ring chain and alum rear JT sprocket.
700cc Wiseco kit 10 to 1.
1980 KZ750 cam, ape springs, stock clutch/ Barnett springs.
Vance and Hines Header w/ comp baffle and Ape pods, Dyna S and green coils, copper wires.
29MM smooth bores W/ 17.5 pilots, 0-6s and 117.5 main
16/42 gearing X ring chain and alum rear JT sprocket.
Please Log in or Create an account to join the conversation.
- Jonny
-
Topic Author
- Offline
- User
-
Registered
- woot!
- Posts: 210
- Thanks: 22
Re: '78 KZ 650 Refreshing/Upgrade Project
03 Feb 2014 19:00
Well, the head is off at the machine shop for a check up, steam clean and blasting of the combustion chamber and ports. There are a few things that worth shopping out to other people to do. Until I can assemble the necessary bits to put together a soda blaster, I am a little hamstrung when it comes to removing that kind of garbage. On the plus side, they will be able to far more accurately measure the valve seats than I can, and are going to call before doing more work beyond that, so I can choose from the options and how far down the rabbit hole I feel like going in terms of money spent and performance head work. (probly not too far, I think I will stick with the standard 3 angle cut on the seats and the better springs....)
So, that is kind of good news. On the other hand, the machinist and Teknine both figured that the degree of oil residue on the piston heads was indicative of oil getting past the rings. So, the potential for block work has now raised it's ugly head. I did some quick measurements with my verniers and both the pistons and cylinders are within spec for a standard bore piston, tho I was a little to bummed to be super scientific, and didn't write it all down to check against the FSM. That will be a job for tomorrow. I did order up a ball hone, thinking that (hopefully!) all it needs is to break the glazing on the cylinder walls and more attention paid to proper break-in period when reassembled. Once I get the pistons all cleaned up I will check ring clearance and decide if I need to replace the rings while I am in there as well. *sigh* I love Z1 and all, but I had though I was pretty close to having everything I need. Guess not.
On a somewhat better note, I wasn't going to waste the day, so since the engine is at a temporary standstill, I decided it would be just the time to tear apart the forks for new seals, installation of Progressive springs, and a general cleanup.
Man, I love Autosol. I mean, the Germans just do things right sometimes.
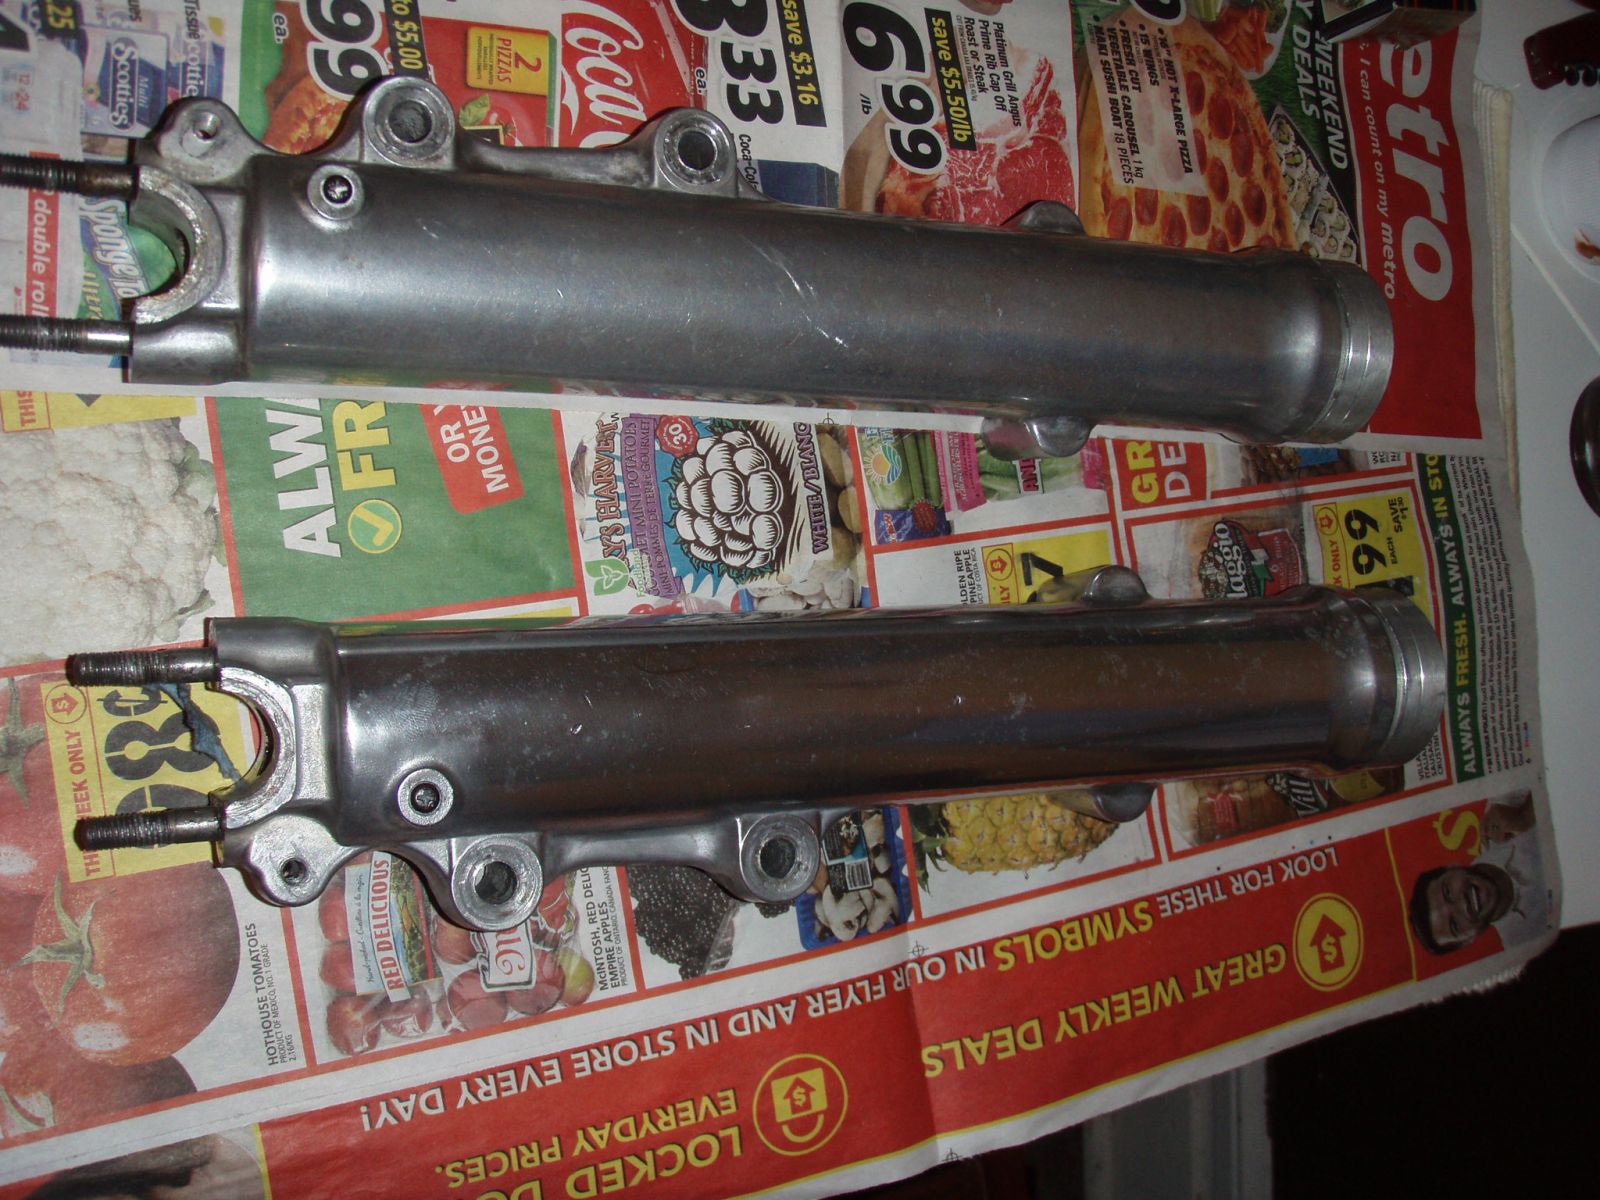
More fun tho was cleaning up the inner stays. There is/was a bit of rust on them , and tho it is out of the range of travel of the forks (I think/hope!). I still wanted to clean everything up a bit. So a couple hours later, they are a bunch better. Before and after:
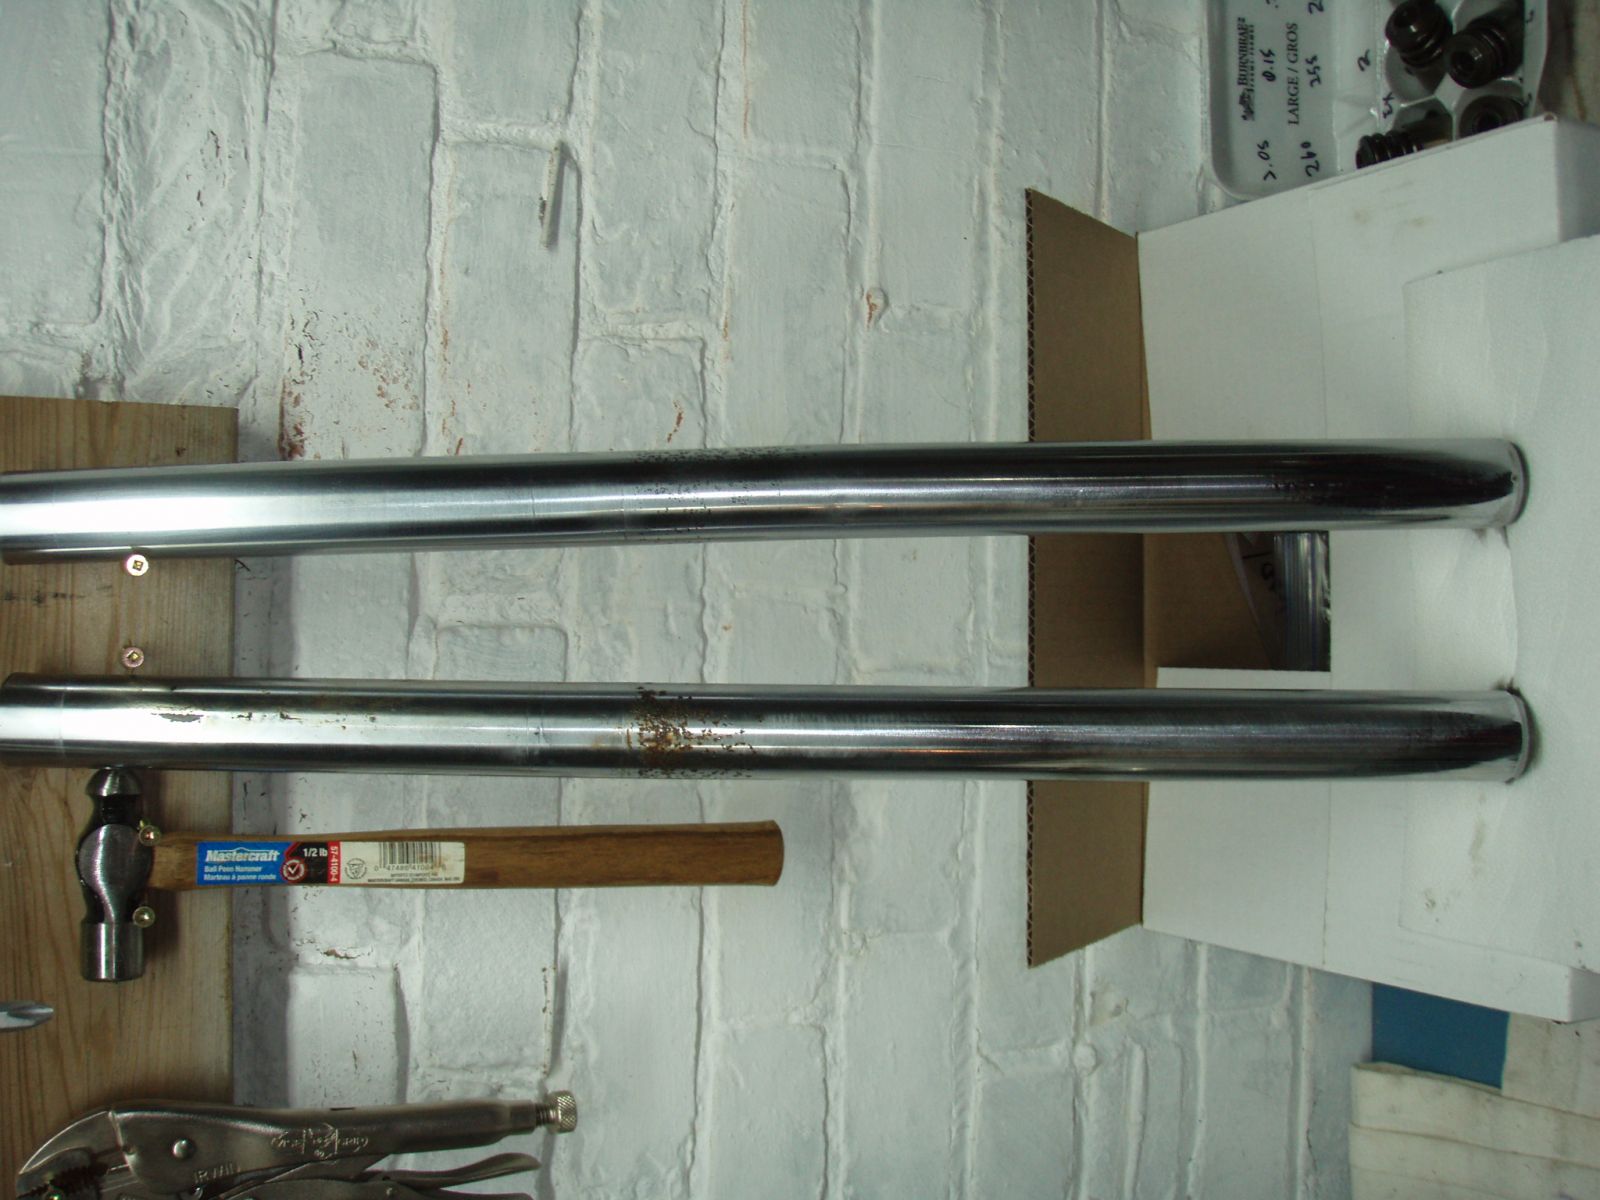
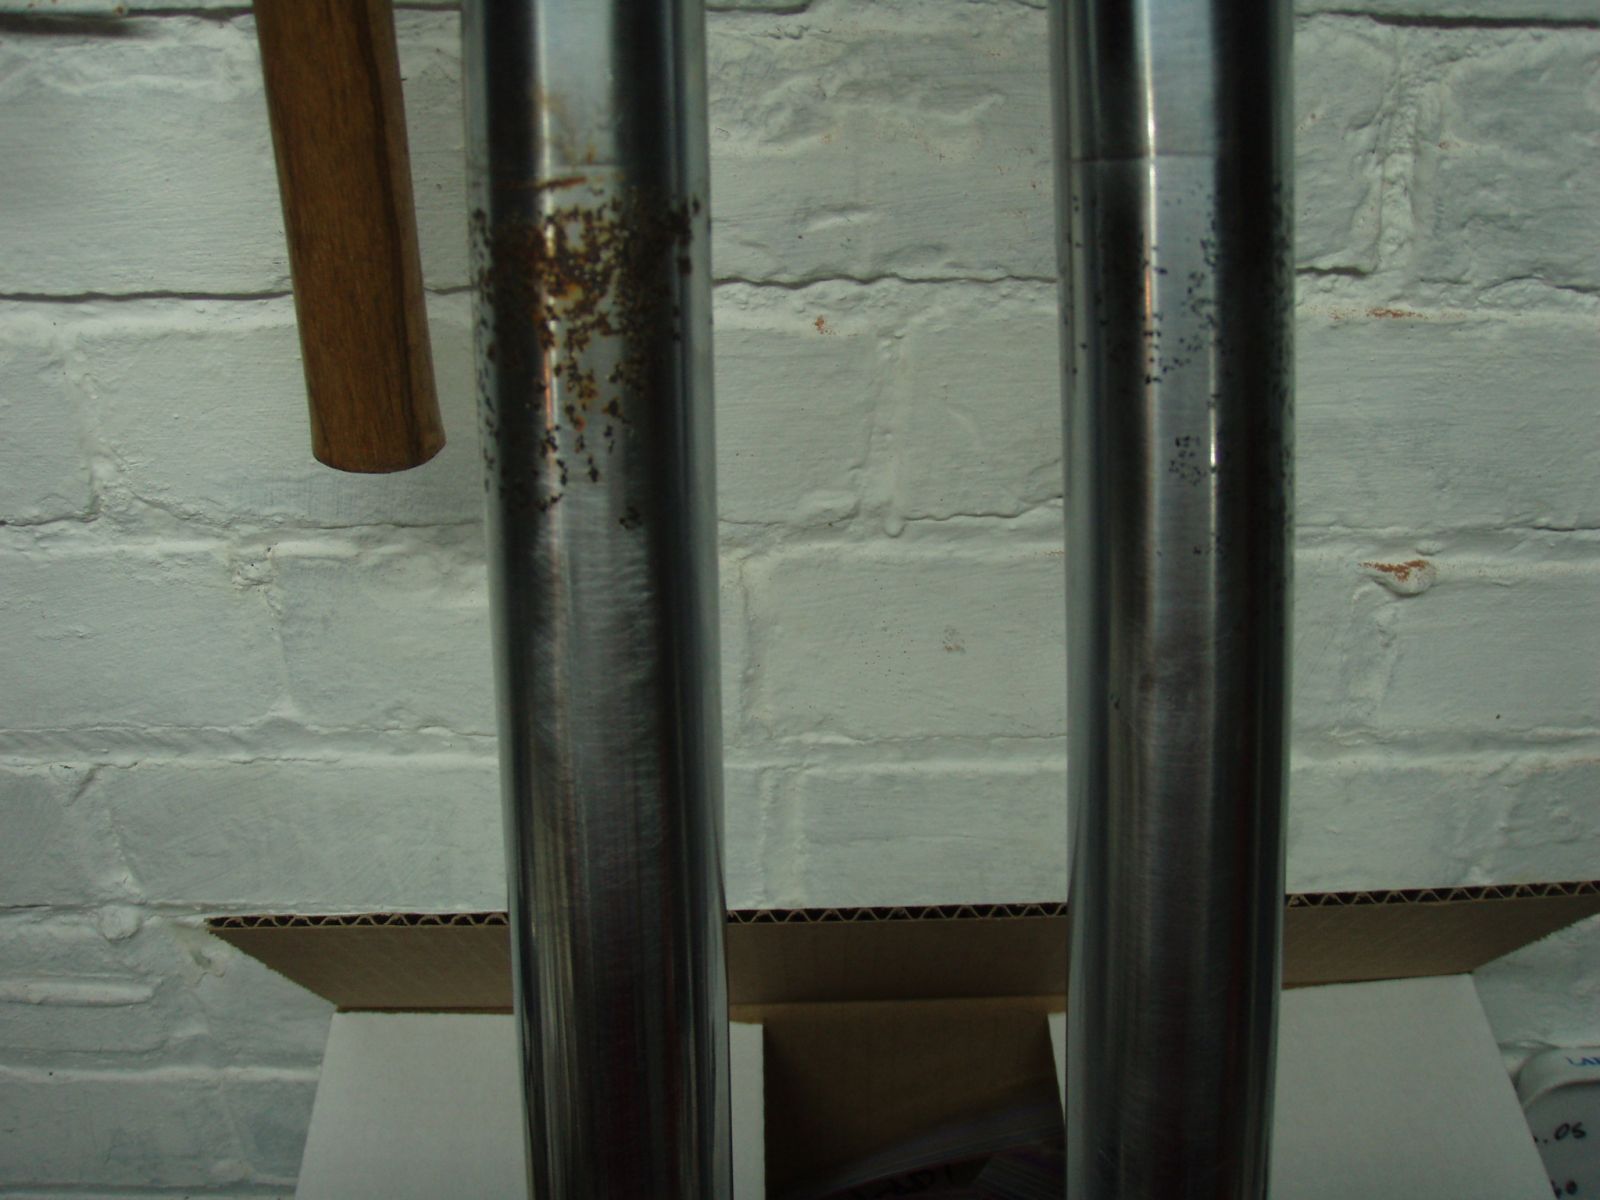
I did the initial cleaning with a green scotch pad and Simple Green. It took off a surprising amount of the rust right there. I wanted the tubes to be as close to perfectly smooth as I could make them, in case the oil seal does ever get that high up, I realize that a pit isn't good not matter how you cut it, but better than the raised bubble of rust, which are sure to destroy the new seals pronto. So, anyway, gave them a nice sanding with 400, 600 and 800. Followed up by applying a little rust converter to the pits when all was done in the hopes of retarding any further rusting in the future. I guess I will see. (btw - it is a phophoric acid based solution which make an iron phosphate out of the remaining rust. Much harder than rust, and supposedly resistant to further oxidation...)
I hope to finish that up tomorrow morning and start reassembling everything. It feels good to do a job that doesn't run into major hiccoughs every now and again. Also, photos of the pistons/cylinder as well, but I was just on too much of a high to spend much time thinking about that tonight.
Cheers!
Jon
So, that is kind of good news. On the other hand, the machinist and Teknine both figured that the degree of oil residue on the piston heads was indicative of oil getting past the rings. So, the potential for block work has now raised it's ugly head. I did some quick measurements with my verniers and both the pistons and cylinders are within spec for a standard bore piston, tho I was a little to bummed to be super scientific, and didn't write it all down to check against the FSM. That will be a job for tomorrow. I did order up a ball hone, thinking that (hopefully!) all it needs is to break the glazing on the cylinder walls and more attention paid to proper break-in period when reassembled. Once I get the pistons all cleaned up I will check ring clearance and decide if I need to replace the rings while I am in there as well. *sigh* I love Z1 and all, but I had though I was pretty close to having everything I need. Guess not.
On a somewhat better note, I wasn't going to waste the day, so since the engine is at a temporary standstill, I decided it would be just the time to tear apart the forks for new seals, installation of Progressive springs, and a general cleanup.
Man, I love Autosol. I mean, the Germans just do things right sometimes.
More fun tho was cleaning up the inner stays. There is/was a bit of rust on them , and tho it is out of the range of travel of the forks (I think/hope!). I still wanted to clean everything up a bit. So a couple hours later, they are a bunch better. Before and after:
I did the initial cleaning with a green scotch pad and Simple Green. It took off a surprising amount of the rust right there. I wanted the tubes to be as close to perfectly smooth as I could make them, in case the oil seal does ever get that high up, I realize that a pit isn't good not matter how you cut it, but better than the raised bubble of rust, which are sure to destroy the new seals pronto. So, anyway, gave them a nice sanding with 400, 600 and 800. Followed up by applying a little rust converter to the pits when all was done in the hopes of retarding any further rusting in the future. I guess I will see. (btw - it is a phophoric acid based solution which make an iron phosphate out of the remaining rust. Much harder than rust, and supposedly resistant to further oxidation...)
I hope to finish that up tomorrow morning and start reassembling everything. It feels good to do a job that doesn't run into major hiccoughs every now and again. Also, photos of the pistons/cylinder as well, but I was just on too much of a high to spend much time thinking about that tonight.
Cheers!
Jon
'78 KZ 650C2 'Lila'
'71 Norton Commando 750 'Eadie'
St. Catharines, ON (Mostly, anyway...)
'71 Norton Commando 750 'Eadie'
St. Catharines, ON (Mostly, anyway...)
Please Log in or Create an account to join the conversation.
- Jonny
-
Topic Author
- Offline
- User
-
Registered
- woot!
- Posts: 210
- Thanks: 22
Re: '78 KZ 650 Refreshing/Upgrade Project
03 Feb 2014 19:25
Ah and, I've been going over some other peoples builds in the archives, notably 5am93's Newbies Adventures in Maintenanceland, and I was wondering if anyone has a line on Permatex Copper spray a gasket in Canada? It seems like a recommended product for coating base gaskets etc... when reinstalling, but I've yet to find any at my local shops. I'd rather avoid driving across the border to get some, or order it through Amazon.com, since they won't ship to Canada, and again I have to go pick it up in New York.... Any help appreciated.
'78 KZ 650C2 'Lila'
'71 Norton Commando 750 'Eadie'
St. Catharines, ON (Mostly, anyway...)
'71 Norton Commando 750 'Eadie'
St. Catharines, ON (Mostly, anyway...)
Please Log in or Create an account to join the conversation.
- Jonny
-
Topic Author
- Offline
- User
-
Registered
- woot!
- Posts: 210
- Thanks: 22
Re: '78 KZ 650 Refreshing/Upgrade Project
04 Feb 2014 13:16 - 04 Feb 2014 13:18
Once again.... Good news, Bad news.
Forks cleaned up all nice, and for the most part assembly was a breeze. I mean the hurdles you kind of expect were there, spinning the bolt at the bottom, Figuring out that a piece of 1.5 inch ABS pipe makes and excellent seal driver when you sand down the outside a little. The usual.
EXCEPT for discovering that the progressive springs are just ever so slight fatter than the original ones. I mean, no problem right? Wrong. Again. I guess the spot where the lower triple clamps onto the inner stay was over torqued at some point, and caused a slight denting in the stay, so the inner diameter is off a bit. Now, I checked the outside of the stays, and they are about as true as they can be except for that little dent at the one spot. :pinch:
At least, the stock spring goes back into that one fine. So for the moment, I am going to wait on adding oil, and just label the one with the dented stay/stock spring. Until I can find a replacement, I can't think of any reason not to have springs with slightly different rates in each tube. I won't be as good as having both sides with matched progressive springs, but should do until I can replace the stay.... I am open to varying opinions here, as always. :dry:
Jon
I am hoping for a post that is all good news some time soon.
P.S. - And before someone jumps on it. I will add oil before I go riding!! I just want to avoid a bigger mess at present should I find another stay to replace the bad one.
'78 KZ 650C2 'Lila'
'71 Norton Commando 750 'Eadie'
St. Catharines, ON (Mostly, anyway...)
'71 Norton Commando 750 'Eadie'
St. Catharines, ON (Mostly, anyway...)
Last edit: 04 Feb 2014 13:18 by Jonny.
Please Log in or Create an account to join the conversation.
Moderators: Street Fighter LTD