Welcome, Guest
Username: Password: Remember me

TOPIC:

1974 KZ400 Cafe Racer Build 12 Sep 2015 05:01 #689710

  • KZCafeChickNJ
  • KZCafeChickNJ's Avatar Topic Author
  • Offline
  • User
  • Posts: 103
  • Thank you received: 10

swest wrote: The problem with aluminum is it will break. It has a poor memory. Bend it one way, then the other and a crack will develop. Steel is more forgiving.
Steve


Hi Steve :-)
Thank you for that. Yes, the wrong type of aluminum or using too thin of a piece, or drilling the bolt holes too large will most likely cause it to break, but I've used 6061-T6 aluminum for a good handful of brake rods and never had a problem. Even when drilled with lightening holes. As long as it's thick enough, it works great. I also always use shanked bolts with just enough clearance in the bolt hole for the rod to be able to rotate when the swingarm goes through its range of motion. Some people just use standard full-thread bolts, which I'm not a big fan of.
1974 KZ400 Cafe Racer
1978 KZ650SR

Please Log in or Create an account to join the conversation.

1974 KZ400 Cafe Racer Build 12 Sep 2015 06:52 #689728

  • SWest
  • SWest's Avatar
  • Offline
  • Sustaining Member
  • 10 22 2014
  • Posts: 22434
  • Thank you received: 2621
I made some brackets for supports out of 3/16 aluminum. Had to do a 90* bend. Kept cracking until I heated it up to do the bend. Pics later. They are carrying dead weight. I wouldn't use it for a "live" application. It may work fine but for a break stay, I'd use steel or something cast like on the disk setups. Over built.
Steve

Please Log in or Create an account to join the conversation.

1974 KZ400 Cafe Racer Build 13 Sep 2015 05:32 #689843

  • ThatGPzGuy
  • ThatGPzGuy's Avatar
  • Offline
  • Sustaining Member
  • More Sparky than Speed Racer
  • Posts: 1469
  • Thank you received: 377

KZCafeChickNJ wrote: By the way, this has been bugging me since I bought the bike, and I've seen it on all un-modded early 400 bikes; What's up with the "cracked" front of the crankcase just below the cylinder deck in the front? Is that simply because the cases were sand-cast and they just "snapped" them out of the molds when they were ready? Either way, that's definitely getting cleaned up before painting.


I've always wondered about that too. Glad to hear it is not just my bike that has that ugly section of the engine.
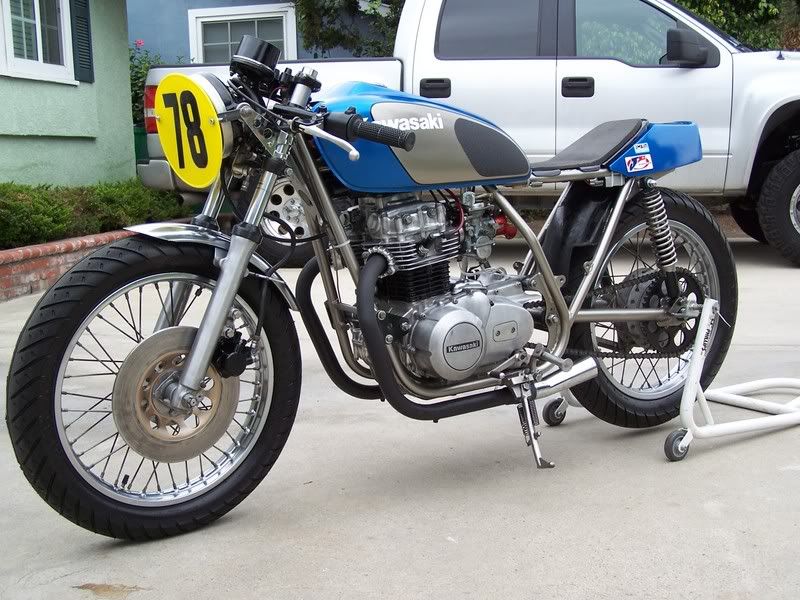
Here is some inspiration. I just love this build...

Jim
North GA
2016 Yamaha FJR1300ES
1982 GPz750 R1
1974 Kawasaki H1
1976 Kawasaki KZ400
1979 Yamaha XS650 cafe'
2001 KZ1000P
2001 Yamaha YZ426
1981 Honda XR200 stroked in an '89 CR125 chassis
1965 Mustang
1967 Triumph GT6
1976 Bronco
"If you didn't build it, it's not really yours"
The following user(s) said Thank You: Spencer440

Please Log in or Create an account to join the conversation.

1974 KZ400 Cafe Racer Build 13 Sep 2015 06:19 #689850

  • KZCafeChickNJ
  • KZCafeChickNJ's Avatar Topic Author
  • Offline
  • User
  • Posts: 103
  • Thank you received: 10

ThatGPzGuy wrote:

KZCafeChickNJ wrote: By the way, this has been bugging me since I bought the bike, and I've seen it on all un-modded early 400 bikes; What's up with the "cracked" front of the crankcase just below the cylinder deck in the front? Is that simply because the cases were sand-cast and they just "snapped" them out of the molds when they were ready? Either way, that's definitely getting cleaned up before painting.


I've always wondered about that too. Glad to hear it is not just my bike that has that ugly section of the engine.
Here is some inspiration. I just love this build...


Hi GPzGuy :-) Just about every stock KZ400 I've seen has that ragged/jagged front edge on the case. I breathed a big sigh of relief when I saw so many other bikes had it too. I pointed it out to the guy selling the bike to me and that, along with the (typical KZ) oil leak knocked a couple hundred buckaroos off the price. I'll definitely be cleaning that up all nicey nice before painting the motor and building it.

Thanks for the pic. That was one of the first photos I added to the "Project Inspiration" sub-folder in my main project folder. There's a couple things on it that I like, and a couple that I don't. The satin gray/nickel frame is very nice (I'm sooooo tired of seeing black frames on cafes. Mine will definitely not be black.) I also like that the builder appears to have trimmed off the extra aluminum that covers the front sprocket. I plan to do that on mine as well. I was thinking about keeping that part of it and putting lightening holes in it, but I don't want to overdo it with the holes and make it look cheesy (literally Swiss cheesy). To me, that's one spot that's just better to trim down, re-radius the corners and be done with it.

It's just my own personal taste, but I don't like the seat or the later model KZ tank with the offset hump for the gas cap. IMHO, the early style tank is, by far the best styling feature on a stock KZ. It's smooth, symmetrical, sleek and with just a little touch of raciness to it.

I'll be adding small, tasteful knee indents to my tank, in a shape that compliments the curves on the upper side crease and the line on the bottom. I'm a tall gal at 5'9" with very long, slim legs, and when I sat on the bike while mocking up the seat and rearsets, I found that I definitely need the knee indents to keep my legs from splaying outward. It'll only be the 3rd set of knee indents that I've done, and never before on such a small-ish tank, so I'm going to go super slow and just tap-tap-tap with the nylon teardrop hammer, smooth it with the rubber teardrop and do the fine finishing with a small metal round peen hammer. I also considered the whole cutting/swapping sides/welding method, but the previous knee indents I've done with the teardrop hammer turned out real well and hardly needed any filler at all.

I'm also still debating whether or not to trim and reuse the stock plastic splash guard, or spend a little time on the English wheel forming a nice sheet metal panel to fill in that rear upward-bend section of the triangle. I don't have a lot of time on the wheel, so that might be the one thing I'll leave to hubby. I think a sheet metal panel will be better for directing airflow up to the louvers I'll be making in the bottom of my rear battery tray to keep the electronics that are mounted inside the hump, cool, while also forming something of a "wall" that helps redirect more air to the UNI pods I plan to use. I'm not an aerodynamic engineer, though, and I don't have a wind tunnel, so who knows if that theory holds true, Sounds good in my head though.. lol
1974 KZ400 Cafe Racer
1978 KZ650SR

Please Log in or Create an account to join the conversation.

Last edit: by KZCafeChickNJ.

1974 KZ400 Cafe Racer Build 13 Sep 2015 08:13 #689862

  • DoctoRot
  • DoctoRot's Avatar
  • Offline
  • Sustaining Member
  • Oh, the usual... I bowl, I drive around...
  • Posts: 2544
  • Thank you received: 664
Looks like a fun project. I don't know what state your front caliper is in but there are no parts for it. also its a poor design which is why Kawi quickly discontinued it. Nebr_Rex came up with this brake/fork swap from a kz440 that is actually quite easy to do. I did a write up on it here >
kzrider.com/forum/5-chassis/597812-kz400...swap-tutorial#668125

Heres what i ended up using from my rear brake torque link on my 1000 project. I did the same for my 750 twin project that has a rear drum, you can use alot smaller diameter because its under tension on the drum though.

Please Log in or Create an account to join the conversation.

1974 KZ400 Cafe Racer Build 13 Sep 2015 09:35 #689871

  • KZCafeChickNJ
  • KZCafeChickNJ's Avatar Topic Author
  • Offline
  • User
  • Posts: 103
  • Thank you received: 10

DoctoRot wrote: Looks like a fun project. I don't know what state your front caliper is in but there are no parts for it. also its a poor design which is why Kawi quickly discontinued it. Nebr_Rex came up with this brake/fork swap from a kz440 that is actually quite easy to do. I did a write up on it here >
kzrider.com/forum/5-chassis/597812-kz400...swap-tutorial#668125

Heres what i ended up using from my rear brake torque link on my 1000 project. I did the same for my 750 twin project that has a rear drum, you can use alot smaller diameter because its under tension on the drum though.


Thanks, Doc! I'm having a ball with it so far. :)

Amazingly, my whole front brake system is in great condition. I barely have to breathe on the lever and the bike whoas up good and hard. The master cylinder is so buttery smooth and has a fantastic feel to it. Not at all squishy, but not at all tight either. Feels just like the brake levers on the brand new bikes at the dealership. I'm definitely going to change out the seemingly 30" long lever though. :P

Right off the bat, I found it rather odd that the caliper is mounted forward of the fork legs, but then I remembered that it's good 'ole 70s engineering; before they knew that front brakes, 99.9% of the time, work better with the caliper mounted to the rear of the forks. Since the whole system is in such good working condition, I'm just going to drill the monstrously thick rotor and resurface it to take the glaze off and ride it as is til the front cal or m/c croak, then I'll do a swap. Thank you very much for the link to the swap. We recently swapped an 01 YZ426 front end on to an 82 YZ490 and the difference was night and day. I didn't ride the bike (because I'd die lol), but by all accounts, it suspends and stops sooooo much better.

Very nice piece you made for the torque rod! I definitely like the round style with the heim joint. Gives it a real pro look and a real race-inspired style. Right now I'm leaning toward SS flat bar with lightening holes and a satin finish, but that's still up in the air. Once all the fab on the exhaust and frame is done and the motor comes out, I'm sure I'll be able to see exactly which route I want to take with the rod.

Thanks again! :cheer:
1974 KZ400 Cafe Racer
1978 KZ650SR

Please Log in or Create an account to join the conversation.

1974 KZ400 Cafe Racer Build 13 Sep 2015 09:41 #689873

  • ThatGPzGuy
  • ThatGPzGuy's Avatar
  • Offline
  • Sustaining Member
  • More Sparky than Speed Racer
  • Posts: 1469
  • Thank you received: 377
Yep no parts for the front caliper. When I rebuilt mine I had to re-use the original rubber seals. I found a set of NOS pads for it but since I rarely ride it I have not installed them yet. Mine only had 3,500 miles on it when I got it which is why I never cafe'd it. That and the fact I have never seen another even at Barber. I bought a XS650 Special to café instead. No one will miss one of those LOL
Sounds like you know what you are doing. I am looking forward to the build.
Jim
North GA
2016 Yamaha FJR1300ES
1982 GPz750 R1
1974 Kawasaki H1
1976 Kawasaki KZ400
1979 Yamaha XS650 cafe'
2001 KZ1000P
2001 Yamaha YZ426
1981 Honda XR200 stroked in an '89 CR125 chassis
1965 Mustang
1967 Triumph GT6
1976 Bronco
"If you didn't build it, it's not really yours"

Please Log in or Create an account to join the conversation.

1974 KZ400 Cafe Racer Build 13 Sep 2015 13:11 #689901

  • SWest
  • SWest's Avatar
  • Offline
  • Sustaining Member
  • 10 22 2014
  • Posts: 22434
  • Thank you received: 2621
The 70's Honda's had the caliper in front of the forks. No way to turn them around. The Z1's were different. Easy to do. Much better. I was working at a salvage/shop and grabbed these H2 calipers but had to go with a KZ 900 wheel and rotors. So much for stock. I love them.
Later I bought some late model drilled disks. Half the weight.
Steve


Attachments:

Please Log in or Create an account to join the conversation.

1974 KZ400 Cafe Racer Build 17 Sep 2015 08:07 #690490

  • KZCafeChickNJ
  • KZCafeChickNJ's Avatar Topic Author
  • Offline
  • User
  • Posts: 103
  • Thank you received: 10
Hi again everyone. :) Lots of small progress over the last few days. Nothing terribly big or exciting, but I wanted to post anyway.
Here’s an explanation of the photos:
1. Repaired ignition wiring. I’ve decided to use the stock instrument cluster, but I’m lowering it 2-1/4” for a cleaner look across the top line of the bike.
2. Template for the aluminum triangular mount plates for the rear sets.
3. Template for the steel plate that gets welded to the frame and the aluminum triangular mount plate for the rear sets bolts to this. As you can see, the rear sets will have 3-position adjustability.
4. Got the “Bonneville” seat and started fitting it. Long way to go…
5. The rims cleaned up very nicely. :) Too bad the spokes are shot. :( I’ll be getting new spokes and either polishing (satin, not shiny) or powder coating the hubs.
6. Detail work. I noticed where these two motor mount brackets come together and the fit bugged me. This is the “before”.
7. After.
8. New parts starting to arrive, along with the steel and aluminum.
9. 4 pieces of steel for the new custom 3-position upper shock mounts (still waiting for the 5/8”ID 1” OD bushings that will nest between the plates to add strength and guide the bolts through), a piece of steel for 2 rear frame cross members, and a (way too big) piece for the rearset mounting plates.
10. Aluminum rear sets.
11. M16 (5/8” +/-) 18-2 Stainless Steel Upper Shock Mount Shoulder Bolts w/18-2 stainless nylon lock nuts.
12. Aluminum shocks
13. 16 ga. Steel for the front and rear under-frame tray (To hold battery, electronics, wiring, tool set, reg papers, cigs, etc..)
14. ¼” aluminum for the rear set triangular mounts.
15. Tail light w/integrated turn signals

I'm also still waiting for up-swept rear frame hoop and slugs. They should be here tomorrow. I hope to have most of this stuff done by the end of the weekend, then I can re-run the harness, figure out what wires need to be lengthened and what wires need to be shortened, etc.. Then comes the complete tear down.

And once again, my apologies to the purists/originality guys. All I can say is that if you don't like seeing a bike being tastefully and professionally modified and vastly upgraded from a styling and performance aspect, this probably isn't the thread for you.
1974 KZ400 Cafe Racer
1978 KZ650SR

Please Log in or Create an account to join the conversation.

Last edit: by KZCafeChickNJ.

1974 KZ400 Cafe Racer Build 17 Sep 2015 08:20 #690494

  • diggerdanh
  • diggerdanh's Avatar
  • Offline
  • User
  • Posts: 242
  • Thank you received: 89
I use that same tail light. It definitely cleans up the back of the bike quite a bit. I like the aesthetics a lot but after spending more time riding and less time working on the bike I'm a little concerned that the brake and turn signals might not be as visible as I'd like them to be (well, at least the brake). I'm contemplating adding an additional brake light, maybe something as simple as an LED string, that is somewhat hidden when not lit up under the back of the seat or at the bottom of the fender or something like that.

I like the little details you've done like matching the contour of the cut down front fender to the original, the smoothing of those engine mounting plates, etc. Those are things someone may never notice but it definitely smooths out the overall look.

Looks like you've got a great start. I'm looking forward to watching your progress.
The following user(s) said Thank You: KZCafeChickNJ

Please Log in or Create an account to join the conversation.

1974 KZ400 Cafe Racer Build 17 Sep 2015 08:28 #690496

  • KZCafeChickNJ
  • KZCafeChickNJ's Avatar Topic Author
  • Offline
  • User
  • Posts: 103
  • Thank you received: 10

diggerdanh wrote: I use that same tail light. It definitely cleans up the back of the bike quite a bit. I like the aesthetics a lot but after spending more time riding and less time working on the bike I'm a little concerned that the brake and turn signals might not be as visible as I'd like them to be (well, at least the brake). I'm contemplating adding an additional brake light, maybe something as simple as an LED string, that is somewhat hidden when not lit up under the back of the seat or at the bottom of the fender or something like that.

I like the little details you've done like matching the contour of the cut down front fender to the original, the smoothing of those engine mounting plates, etc. Those are things someone may never notice but it definitely smooths out the overall look.

Looks like you've got a great start. I'm looking forward to watching your progress.


Thank you very much, Dan. I appreciate that. :-) I might also order the "strip" tail light and curve it around the hoop. I have to see how this one looks on the bike and see if it's bright enough for my liking. I'm also thinking of adding a few LEDs on the bottom of the bike. Nothing huge a gaudy, but additional light is never a bad thing on a motorcycle.

Speaking of the front fender, thank you for noticing that I kept the original profile. Just this morning I was looking at it from above and noticed something didn't look right. Turns out the left side was 3/16" longer than the right side, so I cleaned that up.

You're right about the little things. Most people won't notice each individual detail, but when all those microscopic details come together, they usually notice the details as a whole, in that it makes for a very clean overall presentation.

Hopefully by Sunday evening I'll have enough done be able to post lots of new, and this time, more exciting pics. :-)
1974 KZ400 Cafe Racer
1978 KZ650SR

Please Log in or Create an account to join the conversation.

1974 KZ400 Cafe Racer Build 17 Sep 2015 08:59 #690499

  • 1977-Z1-A1-LTD
  • 1977-Z1-A1-LTD's Avatar
  • Offline
  • User
  • Posts: 17
  • Thank you received: 3
I'm definitely digging the build. I wish I had the skill, knowledge and patience to pull off a well done custom. Keep up the good work!
1977 KZ1000 LTD
1990 FXR
1998 KTM 300 EXC
1974 CBR 350
The following user(s) said Thank You: KZCafeChickNJ

Please Log in or Create an account to join the conversation.

Powered by Kunena Forum