- Posts: 1913
- Thank you received: 243
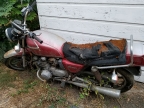
Some assembly required. 1996 Kawasaki GPz1100
- Kidkawie
-

- Offline
- User
- I bleed premix
1975 Z1 900
1994 KX250 Supermoto
2004 KX125
Please Log in or Create an account to join the conversation.
- old_kaw
-
 Topic Author
- Offline
- User
- Posts: 929
- Thank you received: 269
Kidkawie wrote: The oil schematic even shows #3 lower end not getting any oil :laugh:
There is no way an engine running 26K miles might run that long. Pretty unlikely. The crank is cross-drilled at bearing through the same passage the #3 rod is lubed from. the oil feeds. The pressure regulator valve and indicator switch (sw not pictured) are located in the lower part of the first pic.
The lubrication schematic shows main journal #1&2 being fed from the short oil galley, while the 3&4 mains being fed from the "j" tube, both of which get their pressurized lube oil out from the "I" tube (LOTS of o-rings and places to leak internally.) The I tube also feeds the #4 rod through main bearing #4 oil passage. #5 main is fed direct from the pan P/R passage. in the pan. The oil pressure indicator switch and the pressure regulator valve are both located in the oil pan. The tubes act as oil passages external to the block casting if that makes any sense. The "I" tube originates at the out put of the oil filter. (both tubes pictured.)
Only #3 has catastrophic failure. The other bearings look barely broken in. Motor is totally contaminated with all kinds of chunks and goodies. The rod nuts look like they were spun off with a socket. I am finding loose fastener all over both motors. Alternator center bolt loose was the latest find.
The manual explains the reasoning on a lot of the functions.
Attachment not found
1981 Kawasaki Kz1000K1
Located in the Saint Louis, Missouri Area.
Please Log in or Create an account to join the conversation.
- old_kaw
-
 Topic Author
- Offline
- User
- Posts: 929
- Thank you received: 269
I think I was able to capture the cause and effect in one pic. A misaligned oil passage, and a hole in the case cause by lack of lubrication. (** Note all other bearings look great)
This particular passage lubed the #3 main bearing and #3 and #4 rod bearings.
#4 rod bearing looks fine, btw.
1981 Kawasaki Kz1000K1
Located in the Saint Louis, Missouri Area.
Please Log in or Create an account to join the conversation.
- SWest
-

- Offline
- Sustaining Member
- 10 22 2014
- Posts: 23035
- Thank you received: 2759
Please Log in or Create an account to join the conversation.
- Skidmark
-

- Offline
- User
- Posts: 1069
- Thank you received: 270
Retired gearhead
'81 KZ-750 E2
'87 Suzuki Savage 650 Street Tracker (lost in the shop fire)
Please Log in or Create an account to join the conversation.
- Nessism
-
- Offline
- Sustaining Member
- Posts: 7470
- Thank you received: 2836
I was lucky when rebuilding my 750 in that a member here had a spare engine he wanted gone for cheap so that was a nice part doner. Even if you only use a few random bits it will pay you back for the purchase.
Good luck and keep going...
Please Log in or Create an account to join the conversation.
- old_kaw
-
 Topic Author
- Offline
- User
- Posts: 929
- Thank you received: 269
This is the clutch basket and 6 speed trans. There are 6 good pistons laying on the bench (taken yesterday) 3 good rods .The starter clutch is laying next to the alternator shaft.
I hit the cylinders with my craftsman 3 stone hone. Very light de-glazing. I don't plan on buying pistons or boring anything. This is the economy build. The pistons feel good sliding in their holes. My instructor in college was all about knurling pistons to make them fit worn engine bores. This piston is too short to knurl. The bores look good with no noticeable ring wear at the top or the bottom. I do not want to remove any more metal. These sleeves look good, and the pistons good also. I've seen some screwed up engine bores run great. These holes look as good as >any< running engine has.
There was a time when the top ring ridge was so deep that you could not beat the pistons out of a ford motor. Everyone remembers the crank type ring ridge cutters? LOL
The donor engine has a broken sleeve in hole #3. The starter clutch is behind the broken sleeve.
I do want to get the original crank out to see how bad it is. It would be nice to find a local shop that can fix the cranks, but it seems that the nitriding is somewhat special.
Zx1100 alternator and water pump.
.
1981 Kawasaki Kz1000K1
Located in the Saint Louis, Missouri Area.
Please Log in or Create an account to join the conversation.
- old_kaw
-
 Topic Author
- Offline
- User
- Posts: 929
- Thank you received: 269
Anyway, on with the update..
This motor either has stuff literally falling apart, OR bolts that will not come off without breaking something. I am having trouble getting the counter shaft sprocket nut off so I can disassemble the old engine. . First I tried to hold the sprocket with some 630 chain, not enough to put serious torque on so, it slipped when I added a cheater bar and some heat. Next, I moved the zx to the shed door and sat the engine behind it to try to hold the sprocket with the #50 chain that is on the bike. The largest bolt I can get through the #50 chain rollers is a 1/4" X 20 bolt with the threads ground off on 2 opposite sides to make it narrower. 1 bolt snapped with torque applied. All-thread is marginal at best, so I will buy some grade 5, 1/4" X 20 bolts alter today and try doubling and tripling up on the !/4" bolts until I get that nut off. hopefully without destroying it.
1981 Kawasaki Kz1000K1
Located in the Saint Louis, Missouri Area.
Please Log in or Create an account to join the conversation.
- SWest
-

- Offline
- Sustaining Member
- 10 22 2014
- Posts: 23035
- Thank you received: 2759
Steve
Please Log in or Create an account to join the conversation.
- KZQ
-

- Offline
- Administrator
- Walking Behind the Corn May Not Be All That!
- Posts: 4837
- Thank you received: 1398
Anita and I are working on it. Actually she's doing the work and I'm looking over her virtual shoulder. One thing I do know is that the attachments are not lost, they're just not properly attached for the time being. We will find them and if I have to do it one picture at a time I will put them all where they belong.
The issue with the upper limit has been solved and the problem is hopefully behind us. Except for the clean up, that is.
Thanks for your patience.
Bill
12/5/19 All but one image restored. Bill
www.KZ1300.com
Riders:
1968 BSA 441 Shooting Star, 1970 BSA 650 Lightning, 1974 W3, 1976 KZ900, 1979 KZ750 Twin, 1979 KZ750 Twin Trike, 1981 KZ1300, 1982 KZ1100 Spectre, 2000 Valkyrie, 2009 Yamaha Roadliner S. 1983 GL 1100
Projects:
1985 ZN1300
Please Log in or Create an account to join the conversation.
- old_kaw
-
 Topic Author
- Offline
- User
- Posts: 929
- Thank you received: 269
Anywayyyyy... Here's today's update..
I finally got the counter-shaft sprocket nut off of the original engine so disassembly can resume. I ended up removing the uni-strut shock and swing arm assembly to remove the chain so that I could use the chain to hold the sprocket for removal. My 2 wheeler had to replicate the frame to hold the engine steady enough to get the nut off.
My Craftsman 1/2: impact wrench didn't seem to have enough oooomph to remove the nut until I went and bought some (grade
In getting the counter shaft sprocket off, I removed the swing-arm to get the chain off.. THEN, while I am cleaning it all up I notice the chain has a clip type master link so the swing-arm removal was not necessary. I did clean up all of the suspension hardware and reassembled it all so I could park the roller back in the carport. Not a total loss, All of those dirty, rusty parts needed some attention anyway.
Now I can resume disassembly. I am also having trouble getting the timing plate bolt off too. I am not certain if it is a LH thread or not, and have not found it in the service manual so far. The part description does not mention LH threads so I am assuming it is standard RH threads and just stuck hard. The sprocket nut is RH threads.
Painting / cleaning the shock linkage. The little 250 watt heater aids in paint drying on chilly days while keeping the shed at somewhat tolerable temps in the winter.
I bled the rear caliper mainly to flush some fresh fluid through the rear brake hydraulics. Fast bikes (and cars) need good brakes. The Metzler rear tire looks almost new, not so much for the front tire.
1981 Kawasaki Kz1000K1
Located in the Saint Louis, Missouri Area.
Please Log in or Create an account to join the conversation.
- old_kaw
-
 Topic Author
- Offline
- User
- Posts: 929
- Thank you received: 269
Nothing much new to update.
This is the "dragger" Zx1100 in question. I picked this up off the garage floor and shoved it into my van.
If there is anything I can do to help with the attachment issue, let me know bill.
1981 Kawasaki Kz1000K1
Located in the Saint Louis, Missouri Area.
Please Log in or Create an account to join the conversation.
