
Search Results (Searched for: gs swing arm)
Replied by chonus on topic 1980 kz750 h1 hurricane matthew damage
16 Oct 2016 16:24
So i know the swingarm bearings arent sealed but arent the wheel bearings sealed? And there was zero water in the oil.
Replied by TexasKZ on topic 1980 kz750 h1 hurricane matthew damage
16 Oct 2016 14:56
Wheel and swingarm bearings. It might be prudent to disassemble and clean starter. Some fresh grease on the bushings, too.
If there was water in the crankcase, I'd be tempted to do another oil change soon.
That really bites.
If there was water in the crankcase, I'd be tempted to do another oil change soon.
That really bites.
1982 GPz750 Phase III, onward and upward. was created by GPzMOD750
16 Oct 2016 08:19 - 16 Oct 2016 08:24
OK, I'm finally going to get this thread going.
This is a continuation of my bike in these threads.
82 GPz750 keepin' it real,.. for now
1982 GPz750 Phase II Making It more Unique.
Well as you can see at the end of the last thread I had it just about where I wanted and then had a mishap. It wasn't too catastrophic but smashed up the crankcase enough to warrant the rebuilding of the engine. Therefore, I'm going to pretty much tear it down to the frame and put it together as I think it should within my own taste, budget, and skills.
Damaged-
I'm actually surprised that it wasn't damaged more than it was. I wasn't going fast but It hit the pavement hard.
I have already pretty much found and bought everything I need to get it rebuilt and just need to get down to the nitty-gritty. I'm sure I'll find little things I didn't think of or didn't know needed replacing.
I'll start off with what I'm not going to do. This isn't a criticism of those that have done these things to their KZs in general or KZ750R1s specifically, I just don't think they are right for me or the bike.
Things that I am going to do besides just repair or replace damaged items along with maintenance like bearings, brakes and such. The "style" will most likely end up being more streetfighter than anything else. Some of the things I'm going to do will be a bit different on the practical side. I'm going to try and keep the price down as much as possible and I kind of like reusing parts from other bikes, preferably Kawasaki, in the process.
Engine-
Exhaust- I'm keeping the ZR7 headers. I have a titanium Muzzy muffler that needs to be rebuilt waiting in the wings, It's off a YZF R1 so it will take some fitting, I might have to start over with a full ZR7 exhaust set that wasn't chopped off so short.
Suspension- I already have the ZRX rear shocks, they're staying. I'll service the swingarm pivot bearings/bushings etc. while I'm at it. I'm going to be putting Race Tech cartridge emulators in the forks. I have an extra set of legs that I'll use as they feel like the bushings are tighter. I have set of All Balls steering head bearings too.
The body- I have a full replacement set of body work so the original stuff is being mothballed and I'm going to have fun with the other stuff that has already been painted or came off other models. The tank, fender, and tailpiece haven't shown up yet. I bought them sight unseen but the guy gave me they impression are in the best shape anyone might hope for. I'm just excited to have been able to find the tank, they are super hard to find in good shape.
I am torn about the tread plate idea. I'm worried it would look too industrial or something. I know the typical diamond plate pattern definitely would.
I'll see if I can get some pics of the damage up later today.
This is a continuation of my bike in these threads.
82 GPz750 keepin' it real,.. for now
1982 GPz750 Phase II Making It more Unique.
Well as you can see at the end of the last thread I had it just about where I wanted and then had a mishap. It wasn't too catastrophic but smashed up the crankcase enough to warrant the rebuilding of the engine. Therefore, I'm going to pretty much tear it down to the frame and put it together as I think it should within my own taste, budget, and skills.
Damaged-
- The instrument cluster was really bashed up.This pissed me off more than anything. It was from the UK and went up to 150 mph.
- The Bikemaster drag bars were bent.
- My bar end mirrors obviously would be smashed as well. The right side anyway.
- The tank got a new dent from my switches.
- The timing cover was smashed and the upper screw boss was obliterated. The lower one was already gone. The Dyna S ignition was FUBAR'd as well. The rotor screw was sheared off.
- Miscellanius scrapes, etc.. The rear brake lever was bent.
I'm actually surprised that it wasn't damaged more than it was. I wasn't going fast but It hit the pavement hard.
I have already pretty much found and bought everything I need to get it rebuilt and just need to get down to the nitty-gritty. I'm sure I'll find little things I didn't think of or didn't know needed replacing.
I'll start off with what I'm not going to do. This isn't a criticism of those that have done these things to their KZs in general or KZ750R1s specifically, I just don't think they are right for me or the bike.
- It's not going to be a typical ELR....or cafe or tracker
- I'm not going to do a fork or swing arm swap.
- I'm not going to put on pod filters.
- I'm not going to grind anything off besides what was already buggered when I got it. and hopefully make it reversible as possible if myself or someone else wants to do a full restore
Things that I am going to do besides just repair or replace damaged items along with maintenance like bearings, brakes and such. The "style" will most likely end up being more streetfighter than anything else. Some of the things I'm going to do will be a bit different on the practical side. I'm going to try and keep the price down as much as possible and I kind of like reusing parts from other bikes, preferably Kawasaki, in the process.
Engine-
- I have a replacement crankcase with GPz numbers.
- KZ550 6 spd tranny, I think I'll maybe take the neutral finder out. I'd like to set up the sprockets so 1st is slightly lower than standard. 6th (& 5th) will end up being a very nice OD ratios.
- ZR7 oil pump and secondary shaft with starter clutch.
- KZ650 valve cover. Hey, it fits! Doesn't have the stupid save the planet spigots on it. It just needs a coat of black paint.
- MAYBE a ZX750A head or just a replacement KZ750R head, depends on what I find. I buggered up the one I have the first time I adjusted the valves. I can probably fix it but if I find a suitable replacement....
- MAYBE a 810 over bore. it depends on what the 2 cylinder sets I have look like and measure out to when I get to it. If I'm going to have to rebore and replace pistons I might as well go all the way. I'm honestly hoping it doesn't need it since this will severely strain the budget.
Exhaust- I'm keeping the ZR7 headers. I have a titanium Muzzy muffler that needs to be rebuilt waiting in the wings, It's off a YZF R1 so it will take some fitting, I might have to start over with a full ZR7 exhaust set that wasn't chopped off so short.
Suspension- I already have the ZRX rear shocks, they're staying. I'll service the swingarm pivot bearings/bushings etc. while I'm at it. I'm going to be putting Race Tech cartridge emulators in the forks. I have an extra set of legs that I'll use as they feel like the bushings are tighter. I have set of All Balls steering head bearings too.
The body- I have a full replacement set of body work so the original stuff is being mothballed and I'm going to have fun with the other stuff that has already been painted or came off other models. The tank, fender, and tailpiece haven't shown up yet. I bought them sight unseen but the guy gave me they impression are in the best shape anyone might hope for. I'm just excited to have been able to find the tank, they are super hard to find in good shape.
- I'm going to use the factory style front fender but trim it down a bit. I've seen it done and it looks good IMO.
- I'm going to build a front cowling, Just a bikini sized thing. I was already toying with the idea but is a definite must to protect the instrument cluster. The cowling is basically to clean up the looks of the front end and is going to cover a protective cage to keep cluster damage from happening again if I go down. I've been playing with how and what to make it out of and I haven't quite decided yet. I'm thinking about using aluminum tread plate. I think 5-bar style would look good. I would make it black with ceracoat since I don't think a GPz should have any polished chrome or aluminum parts on it. I think it would look unique and stand out.
- A swing arm mounted fender and chain guard. I've been running without either and it looks cool but it sure does leave a mess. Made out of the same material as the cowling to match.
- I have some factory case guards that will be going on. The only reason they weren't on earlier is because they were in need of being blasted and refinished. Maybe cowling matching skins over them. Just a thought.
- I might do something "special" with the tank and side covers Like a "toaster tank" style panels out of the same stuff I make the cowling out of.
- Seats, yes seats, I have an extra seat pan. I plan to keep one as a standard 2 up type, The cover on the one on it just started cracking just before I put it down. Idk if I'm going to get a factory style cover or just take it to an upholsterer to do whatever seems nice. The other I plan to build as a combo solo seat/tail rack. I still plan to ride this bike as often as possible which includes to work and it's always nice to carry your lunch and gear on a ready-made place for it. I'll swap seats over as needed. The rack would match the cowling as well.
I am torn about the tread plate idea. I'm worried it would look too industrial or something. I know the typical diamond plate pattern definitely would.
I'll see if I can get some pics of the damage up later today.
Replied by Dr. Gamma on topic Better Than Nothing---The rebirth of a Superbike.
13 Oct 2016 12:15 - 13 Oct 2016 13:57
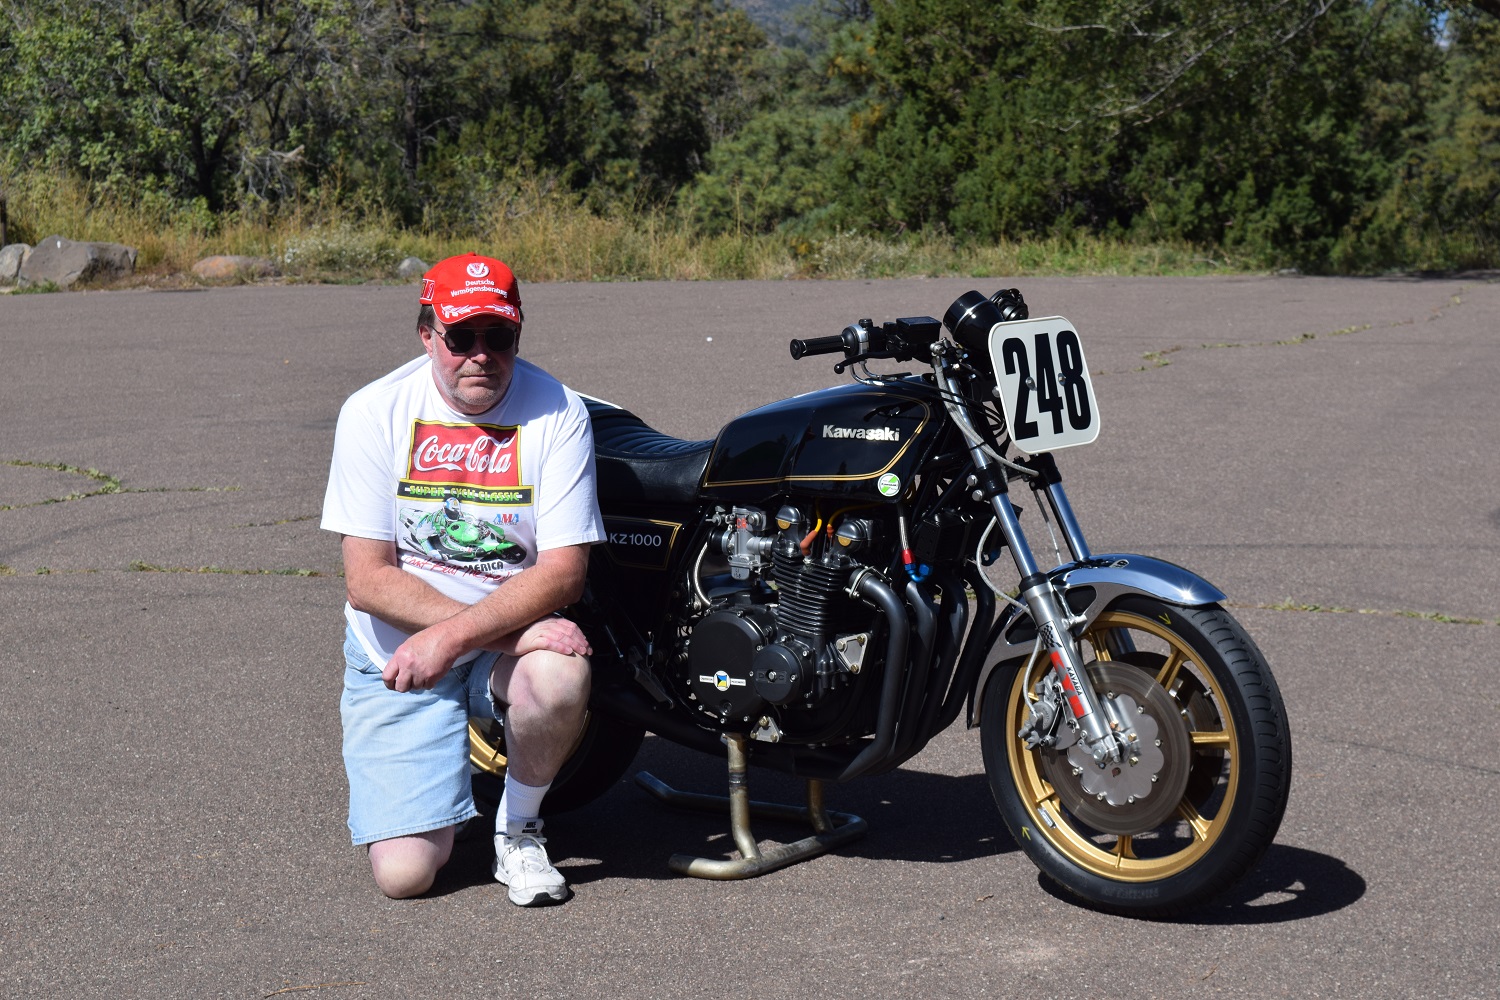
Here is a short summary of whats all been done in the building of my Kz1000 Superbike road racer.
All major frame modifications done by Rob North and Pierre DesRoche back in 1979. This chassis is basically a copy of the bike that Reg Pridmore won the 1977 and 1978 AMA Superbike Championship on. Chuck Parme used basically the same bike to finish the highest placed privateer in the 1980 AMA Superbike Championship.
An oversize steering neck with TZ750 roller bearings is used, and has been relocated to put the front and rear wheels in alignment. Neck has also been repositioned rearward to put more weight on the front wheel, and it has about 2 more degrees of fork angle. KZ650 triple trees that have less trail are used to quicken up the steering. Double fork tube clamp bolts have been added to lower tree to increase fork rigidity.
Swing arm has been modified by DesRoche by cutting open, and welding in some internal bracing. An extra tubular 4130 moly hoop has also been added to bottom of swing arm. An oversize swing arm pivit bolt with matching swing arm inner sleeve are used, and mated to a honed to size mounting bosses on frame.
Frame has extra tubular bracing added through out the whole frame. This triangular bracing along with the DesRoche aluminum motor mount plates with ream-fit oversize bolts ties the motor to the frame making it one strong non-flexing structure. All worthless brackets, and tabs have been removed from frame for extra weight savings.
Yoshimura/Kayaba road race forks are used along with a 2.50X19 inch magnesium Morris mag. Brakes are 13 inch Kosman full-floating rotors with a pair of reworked Lockheed dual piston calipers mated to a KZ1000S1 master cylinder with a 11/16 piston. Earl's Supply -3 braided steel lines tie the whole brake system together.
Rear rim is a 3.50X18 inch magnesium Morris mag. Along with a Hunt plasma-coated aluminum brake rotor, and a KZ1000A brake caliper.
Light weight rearsets are fabricated using KZ1000S1 components. Mark II fuel tank has been reworked to use dual Z1R petcocks. This setup will allow the very last ounce of fuel to be picked up from tank!!! Custom fabricated gauge bracket with a rare KZ1000S1 road race tach. Vintage Yoshimura 1/8 turn Superbike throttle is used to open up the Keihin CR33 carbs. Custom fabricated Bassani Superbike pipe for the ultimate in cornering clearance is used.
Bike can be made street-legal with very little effort. All the provisions are there to add lights and charging system for street use. A under 440 pound street-legal KZ1000 makes a pretty nice street bike!!!
Current motor in bike;
KZ900 cases and covers are used for their lighter weight over similar KZ1000 parts.
KZ1000 cylinder block and head are used for this motor.
Lighten and polished KZ900 Falicon Supercrank with polished stock rods.
Moriwaki Engineering 73mm two ring cast pistons.
Cylinder head work by Yoshimura R&D with 37.5mm intake valves.
Yoshimura Super Bonneville cams running on Yoshumura KZ650 style shim buckets with lighten Yoshimura valve spring retainers.
Lighten and balanced Falicon clutch basket with O.E.M. clutch plates, H/D springs, and a needle bearing clutch pusher.
Transmission is a factory Kawasaki close ratio road race item. It comes from the factory fully undercut.
Andrews Products kickstart gear is fitted so the stock kickstarter can still be used with the close ratio box.
Motor has no provisions for electric start. Even the starter motor mounts have been removed for weight savings!!!
Stock diameter M.T.C. H/D Golden Studs are used so not to impede oil flow to the head.
Modified oil pump to eliminate any chance of oil aeration.
Earl's Supply 10 row oil cooler and plumbed with Earl's Supply AN8 braided steel lines and fittings.
Keihin CR33 carbs with the AMA mandated 31mm restrictors still installed are used.
Kal Gaurd Gun Kote coating has been applied to the complete motor, and covers to aid in the reduction of engine temperature.
Picked up a frame for 82 kz1000
Looking to do a 04/05 zx10 front end and wheels with gs1100 swingarm
All hard parts powder coated satin black
Looking into using 03/04 z1000 engine and wiring
Hoping to have it done by spring
So far I have stem bearings and picked up a new seat cover
Bike will use stock tank and body work with aftermarket headlight and taillight
Replied by SoyBoySigh on topic 1980 KZ1000E ST project
11 Oct 2016 12:30
WOW, that's one gorgeous bike - especially for the touring bagger ... "police-STYLE" model at that. Gotta be the choice of the TANK 'cause that makes all the difference in the world - But it pulls together all of the other elements somehow, the bags and the windscreen, heck even the heavy-ass 7-spoke cast/mag wheels.
I'd love to take one of these old plexi screens and cut it down to a fly-screen style, possibly via moving the headlight hole up higher to make best use of the bends & curves - gotta be a heat moulded screen and not a bent/stressed-mounted flat panel, of course - But yeah, the end GOAL being to produce something like the little plexi screen on the Ducati Sport-Classic GT1000 Touring - It would take some cutting & sanding, then edge scraping and "flame-buffing" the edges of the plexiglas - but the main thing is cutting the damn thing down to size.
Can you visualize it?
I'm picturing an older touring UJM - this, OR my current Honda project "CB900K0 Bol Bomber"
(((That's whatcha call an '82 CB900F Bol D'Or based homage to the '65 CB450K0 Black Bomber - wire rims in some truly juicy sizes and profiles, enough to build a good 7 different pairs of wheels each a different configuration from the last, but settling for a first pair in 3.50x16" Super-Akront up front with 4.25x18" Akront rear- plus the CB1100R alloy tank polished up all "toaster-tank" style - "Duck-Tail" style seat from the CB750K0 Sand-Cast, GL1500 fork, VF1000R adjustable clip-on bars, etc etc)))
OR a KZ version of which, of course - ANY of the big UJM powerplants would be suitable for a build like this, heck even a GL1200 Gold-Wing "Naked Gold-Wings" style of course, heck all sorts of different permutations on the so-called "Universal" Japanese Motorcycle or rather, late '70s - early '80s SUPERBIKE, would be suitable for a project like I'm visualizing here:
That low Duck GT1000 shaped yet vintage period-correct PLEX FLYI-SCREEN, somewhat aerodynamic hard luggage of the 1970s variety - But with rear-sets and clip-man club-on handlebars, the throttle modified to function like the CB900F2"Sport-Kit"type throttle (CBX550F has it - check it out) but in an alloy clam-shell case that is, modified via welded lumps of alloy on the standard housings then drilled and tapped for cables etc etc - Basically everything LOOKS 1970s but functionally we're talking about 1990s SPORT-TOURING in the areas of ergonomics and running gear ie embiggened brake rotors and a late model fork - for the Kawasaki I'd suggest the GPZ1000R fattest thickest type of late-model anti-dive Ninja fork, - late model alloy swing-arm (but still twin-shock of course) etc etc etc - It would be kinda like a proper ENDURANCE RACER sort of Superbike - Godier Genoud but without the hideous lime-green day-glo paint, more like classy 70s Touring-rig paint and decals, just like we see here on THIS bike - And endurance racer with hard bags and passenger capacity, plexi-screen instead of huge bubble fairing, etc etc -
A portmanteau of all these different styles - Endurance/Superbike, '90s Sport-Touring Crotch-Rocket - AND the '70s TOURING rig "bagger".
Wire-spoke rims of course. I've got pairs like 2.50x18" with 3.50x18", 3.00x18" & 4.25x18", 3.50x16" & 4.25x18", 2.50x18" & 4.25x17", 3.50x16" & 5.00x17", 2.50x18" & 3.00x18", 2.50x16" & 3.50x16", 3.00x16" & 3.50x16" and 2.50x16" & 3.00x16" - all of 'em can be built simultaneously with this pile of rims I've got on hand here, and all alloy, about 50% of 'em NOS and 50% used but good condition - (((Plus a bunch of cool Unobtainium stuff for the COMSTAR half of my "Re-Invent The Wheel" project))) They're all either for my daughter's "KZ440LOL" and/or my "CB900K0 Bol Bomber" - But obviously a lot f this stuff could be translated over to any other bike of the same era and maybe ten years in either direction. With the "Weld-Up HUB" method, proven on the CB900C Custom shaft-drive wire-spoke chopper built by one "6pkrunner" from the www.cb750c.com four-um, it's possible to put wire-spoke rims on ANYTHING and yet to keep the OEM hub core and brakes sprockets axle spacers etc etc - So I really DO mean "ANY" bike from ten years in either direction here....
Could you picture it though? Obviously this here bike is the template for the KZ1000 version of which - mainly the tank choice the paint scheme, the seat cover style, etc - the luggage is just about dead-on perfect too.
Not to mention the luggage rack, come to think of it.
Yanno, Kawasaki had some of the most beautiful luggage racks from ANY era - the KZ400D-Deluxe had the loveliest rack of all with the H1/H2 series bringing up a close second.
Luggage racks built from all welded all tubular chromed-steel and with the little knobs welded along the undersides of the rails just perfect for bungee cords to hook onto. But yeah it's about the parallel tubular rails running lengthwise, the mount being made of integral bent tubes, very simply mounted without any adjustable parts just bespoke to the model itself. Heck gimme the right book rack and I'll mod the BIKE to bolt up to IT - Know the type that I mean?
And so I picture a luggage rack like that, maybe even a bigger one running behind a solo front seat section, with a removable pillion-pad on top of IT, just like a '60s TRAIL-bike. And then an Endurance-Racer style boxy fiberglass tail cowl covering over THAT - and the box would of course also double as a storage compartment or glove box etc - hence the bigger the tail cowl the better, such that the Godier-Genoud Endurance-Racer look is encouraged to it's very utmost extreme expressions of which....
Can you dig it? I realize that some of this stuff isn't gonna be as LIGHT-WEIGHT as you'd want on an Endurance Racer, especially the layers of rack/pillion/top-box and all ancillary hardware thereof. And the aerodynamics of the compact cut-down plexi-fairing ain't the best slipstream design out there on the market. Might even be a bit confusing, visually speaking, to relate the miniature plexi fly-screen with the huge tail-cowl style top-box.
But it would KICK friggin' BUTT on practically any other Cafe/Superbike, Sport-Touring Crotch-Rocket, AND/OR '70s Touring-Rig - and practically anything else for that matter. Even the CRUISERS if that's what you're into, 'cause the wide alloy wire-spoke rims and low-profile tires are gonna have so much vintage-ish cachet it will make the most full-dresser wire wheels off any other bike look HOKEY in comparison - It's sporty ergonomics and huge tank, uprated suspension & over-sized yet period-correct brakes are all gonna spell out how more awesome it is than all of the STARBUCKS-RACER Cafe builds out there. And it's authentic bonafide real period-correctness and "essence of it's time" distillation of all those different bike style segments or genres, plus real bonafide authentic TRACK slash ROAD-racing aka Endurance pretensions, will blow away the most "pure" of the original Cafe Racers for that matter.
The UJM is at the nexus point of the old original thumper or twin engine "Classic" or "Vintage" bikes, and the CGI carved from plastic via laser on a shark's head type CROTCH-ROCKETS - a changing of the guard if you will - and yet they've got 50% elements of each of these two schools of thought.
So why not confabulate some SYNTHESIS of all the different genres of UJM interpretation/individualism - the rock-&-roll AND the Disco, the old & the new the urban and the rural, track and street, short hopping commuting AND iron-butt distance-eating, wife hauling and/or picking up cute hitchhikers,
Heck - I can even picture this thing with a TRAILER HITCH - Just give it one of those old's-cool single-wheel trailers like you used to see on old CZ's back in the '50s - for the extra capacity yet slip-stream abiding.
And for the dashboard, I'd like to see an all analog set-up, but the dial gauges would be powered by the electric speedo and tacho clock innards, with magnetic pick-up "Hall-Effect" sensors only they're threaded down the length of a hollowed-out cable sheath into the body of a speedo drive with the worm-gear innards hacked out of it - LED bulbs inside of the OEM housings, miniature signals from brand-specific MINI-BIKE like the KR75 in the case of the Kawasaki, the "monkey" or gorilla in the case of the Honda - the dashboard would contain some type of old CB RADIO or 8-TRACK tape-deckl but just a hollowed-out housing with it's guts replaced by all of the mod-con stuff like the MP3 players or GPS mapping displays, cell-'phones & intercomms etc etc. All just to keep up the APPEARANCES of brand-specific vintage OEM period-correctness - If you get it right, you'll know 'cause Kawasaki or Honda would come up with a watered-down FACTORY CLONE sometime within the following five-ten years!
Seriously though, next time I buy a 2nd-hand bike I'm gonna be LOOKING for a plexi-screen & a bunch of hard-bagger gear....
-Sigh.
POST-SCRIPT:
Did anybody else notice that the KZ1000ST has these little alloy rear-set brackets, which have a 2nd cast un-hole shape, which you could feasibly drill-out and use as a new pivot-point for some DIY rear-sets? I just think it's interesting. SOMEBODY ought to try it out. The 2nd pivot hole kinda reminds me of the alloy rear-set brackets from the early '60s Honda CB72/CB77 Hawk/SuperHawk, where you can bump the entire foot controls fore & aft onto three pairs of mounting points. And in that truly efficient Honda style, they've got a "HIRTH" spline just like the Laverda "Jota" bars (actualy aftermarket parts made by RAASK but colloquially known as "Jota Bars" nevertheless. Well the KZ1000ST version might very well require entirely different pedals and pegs etc, But the CONCEPT remains the same!
Anybody tried a mod like that? IMHO it's what all of these Aluminum peg brackets were FOR in the first place! After all they're a fair bit heavier than the original welded-steel versions of the peg and passenger peg hangers....
-S.
Welcome aboard -
Here are some tips that you may find helpful:
Many newbies and not so newbies run into or issues with their bikes which could be easily avoided with a little preparation or information. Here are a couple recommendations that I hope you will find useful.
Before riding your KZ you should take a little time to become familiar with it. Simple things like checking the oil, tire pressures, etc. are explained in the Kawasaki Owner's Manual. If you bike didn't come with one (they normally are in a little holder on the bottom of the seat) you can usually find one on eBay - be sure to get one for your exact year/model.
MANUAL
You really should consider buying the Kawasaki Factory Service Manual for your bike. The factory service manual provides instructions on the various maintenance procedures and schedules for your bike, procedures for diagnosing problems, proper torque values for the various fasteners (VERY IMPORTANT), and insight into how each system on your bike works even if you are not repairing that system. Studying the manual before you attempt performing service on your bike will impart an understanding of the system you are working on which will increase the odds of success.
The manuals usually are readily available for most models on eBay and other sources; but be sure to get one that has your specific year and model in it as there are differences between the various KZ650 models. I do not recommend Clymers, Haynes, or other aftermarket manuals as I have seen instances where they provide inaccurate advice. You may decide to use those to supplement the factory manual, but in my opinion they are not a suitable substitute. If you have trouble finding one for your model ask us to help.
TOOLS
WARNING! Do not even try to use Phillips screwdrivers on the Kawasaki cross head screws. Despite their appearance they are not Phillips screws. They are Japanese Industrial Standard (JIS) screws. The tips of Phillips screwdrivers are too long & pointed to allow the 4 blades of the screwdriver to properly engage the screws, so when you apply force the screw head slots will deform and look like crap. The fact is that Phillips screws were deliberately designed to have the screwdriver bit "cam out." This was done to prevent production line assembly from over-tightening, stripping, or breaking the screws. JIS screws do not have this problem. A proper fitting JIS bit can tighten a JIS screw to and beyond the torque spec without camming out. Here's the good news - you can easily modify standard Phillips screwdriver tips to fit the JIS screws.
I have ground down the tips of DeWalt #2 and DeWalt #3 Phillips to make them fit JIS screws. The large crosshead screws on the cases take modified #3 bits (or genuine #3 JIS bits). To modify the DeWalt bits you need to grind the very tip a little, then test fit, then grind a little more and test fit, etc. until the bit no longer "rocks" back and forth in the screwhead. Picture 1 below shows how a DeWalt #3 bit fits the case screws of my KZ650 after being ground properly. The #2 DeWalt bits can be modified the same way to fit smaller JIS screws. Pictures 2 and 3 below shows DeWalt #2 and #3 modified bits.
I did find a place that sells authentic JIS bits. They don't list the #3 bit, but if you contact them they can provide the #3 JIS bits even though they are not listed on the website. These folks were very easy to work with, and the authentic bits do work great. Here's their site:
www.rjrcooltools.com/shop_item_detail.cfm?subcat_ID=89
Pictures 4 & 5 below show a comparison between my home made modified bits with the authentic JIS bits, and picture 6 shows a comparison between Philips and JIS bit tips.
PICTURE 1

PICTURE 2

PICTURE 3

PICTURE 4

PICTURE 5

PICTURE 6
Before reaching for that wrench or ratchet consider the following. The bolts are steel, but your engine and front forks are aluminum. The bolts are much tougher than the aluminum and if over tightened will strip the aluminum threads. Although these can be repaired, preventing damage by applying proper torque will save you grief, time, and money. Tightening fasteners properly requires torque wrenches. Various vendors, including Snap-on, CDI, Sears, etc., market torque wrenches. The two most popular types are the bar type and micrometer type. Either will work, but the micrometer type is a bit easier to use, especially if you are tightening several fasteners with the same torque - such as cylinder head covers. You will need a torque wrench calibrated in INCH POUNDS for many of the bolts. You will also need a torque wrench calibrated in FOOT POUNDS for the larger bolts. Don't try to use the foot pounds wrench on the smaller bolts as it will not be sensitive enough at low torque settings to provide accurate torque. There are many fasteners that require low torque. These include such things as 6mm oil pan bolts, cylinder head cover bolts, etc. for which the torque in 61-78 inch pounds. These low torque bolts require a wrench that is accurate at low settings and this wrench should be graduated in inch pounds. In addition, there are numerous high torque fasteners such as the front axle nuts (51 - 65 foot pounds) or swing arm pivot shaft nuts (58 - 87 foot pounds). These require a wrench that is accurate at higher settings; this wrench should be graduated in foot pounds. Using the proper torque wrenches to correctly tighten fasteners will help prevent damage and contribute to a safe bike. The Kawasaki Service Manual will list the various torque specs for the bolts. I suggest you get the manual before buying the torque wrenches so you can decide which wrenches best meet the torque specs.
Consider buying a can of Kroil penetrating oil and use it to soak stubborn fasteners for a couple days before trying to loosen them. Remember, the original screws and bolts were installed on your bike when Jimmy Carter was President, so many of them may be hard to remove. Kroil can be bought online, at guns shows, and at some other venues.
MOTOR OIL
The ingredients in oils have changed over the years. For example, today's Castrol GTX (and pretty much all AUTOMOBILE oil) is not the same as it was in the 1980's. Back then it worked great in KZ bikes, but things have changed. Zinc and phosphorus additives (ZDDP), important to protect engine components from metal to metal contact, has been reduced since it’s been found to shorten catalytic converter life. Today’s auto oils contain about ½ the ZDDP they used to and different additives have been developed as substitutes. Unfortunately, some of these newer additives, in particular molybdenum disulfide, don’t get along with the wet clutches in our bikes. Newer oils, especially those labeled “Energy Conserving” (EC), which have a high quantity of friction reducing additives, should be avoided. These oils work fine in automobiles but there are better choices for motorcycles.
KZ bikes need oil which is suitable for wet clutches. That distinction was defined by the Japanese Engine Oil Standards Implementation Panel (JASO), and can be noted by oils that meet the "4T” (4 cycle) specification, MA (wet clutch) classification. These oils, which include various synthetic, semi-synthetic, and non-synthetic oils, are sold as specific motorcycle oils. Another type of oil which works well in our bikes is diesel engine oil. These oils are governed by the API (American Petroleum Institute) CI-4/CJ-4 spec and don’t contain clutch-damaging EC additives. You can even purchase Shell Rotella oil which holds a “JASO-MA” certification assuring it will get along well with your wet clutch. All of these newer oils have a reduced ZDDP level too (about 1/3 less than before instead of ½ like the auto oils) but the substitute additives get along better with our bikes needs than automotive oil. Oils that do not hold the JASO-MA rating have either failed the wet clutch test or have not been tested for use in engines with wet clutches. Good luck with your bike! Ed
Here are some tips that you may find helpful:
Many newbies and not so newbies run into or issues with their bikes which could be easily avoided with a little preparation or information. Here are a couple recommendations that I hope you will find useful.
Before riding your KZ you should take a little time to become familiar with it. Simple things like checking the oil, tire pressures, etc. are explained in the Kawasaki Owner's Manual. If you bike didn't come with one (they normally are in a little holder on the bottom of the seat) you can usually find one on eBay - be sure to get one for your exact year/model.
MANUAL
You really should consider buying the Kawasaki Factory Service Manual for your bike. The factory service manual provides instructions on the various maintenance procedures and schedules for your bike, procedures for diagnosing problems, proper torque values for the various fasteners (VERY IMPORTANT), and insight into how each system on your bike works even if you are not repairing that system. Studying the manual before you attempt performing service on your bike will impart an understanding of the system you are working on which will increase the odds of success.
The manuals usually are readily available for most models on eBay and other sources; but be sure to get one that has your specific year and model in it as there are differences between the various KZ650 models. I do not recommend Clymers, Haynes, or other aftermarket manuals as I have seen instances where they provide inaccurate advice. You may decide to use those to supplement the factory manual, but in my opinion they are not a suitable substitute. If you have trouble finding one for your model ask us to help.
TOOLS
WARNING! Do not even try to use Phillips screwdrivers on the Kawasaki cross head screws. Despite their appearance they are not Phillips screws. They are Japanese Industrial Standard (JIS) screws. The tips of Phillips screwdrivers are too long & pointed to allow the 4 blades of the screwdriver to properly engage the screws, so when you apply force the screw head slots will deform and look like crap. The fact is that Phillips screws were deliberately designed to have the screwdriver bit "cam out." This was done to prevent production line assembly from over-tightening, stripping, or breaking the screws. JIS screws do not have this problem. A proper fitting JIS bit can tighten a JIS screw to and beyond the torque spec without camming out. Here's the good news - you can easily modify standard Phillips screwdriver tips to fit the JIS screws.
I have ground down the tips of DeWalt #2 and DeWalt #3 Phillips to make them fit JIS screws. The large crosshead screws on the cases take modified #3 bits (or genuine #3 JIS bits). To modify the DeWalt bits you need to grind the very tip a little, then test fit, then grind a little more and test fit, etc. until the bit no longer "rocks" back and forth in the screwhead. Picture 1 below shows how a DeWalt #3 bit fits the case screws of my KZ650 after being ground properly. The #2 DeWalt bits can be modified the same way to fit smaller JIS screws. Pictures 2 and 3 below shows DeWalt #2 and #3 modified bits.
I did find a place that sells authentic JIS bits. They don't list the #3 bit, but if you contact them they can provide the #3 JIS bits even though they are not listed on the website. These folks were very easy to work with, and the authentic bits do work great. Here's their site:
www.rjrcooltools.com/shop_item_detail.cfm?subcat_ID=89
Pictures 4 & 5 below show a comparison between my home made modified bits with the authentic JIS bits, and picture 6 shows a comparison between Philips and JIS bit tips.
PICTURE 1
PICTURE 2
PICTURE 3
PICTURE 4
PICTURE 5
PICTURE 6
Attachment JISvs.PhillipsAngles-2-3-4-5-6-7-8-9-10-11.jpg not found
Before reaching for that wrench or ratchet consider the following. The bolts are steel, but your engine and front forks are aluminum. The bolts are much tougher than the aluminum and if over tightened will strip the aluminum threads. Although these can be repaired, preventing damage by applying proper torque will save you grief, time, and money. Tightening fasteners properly requires torque wrenches. Various vendors, including Snap-on, CDI, Sears, etc., market torque wrenches. The two most popular types are the bar type and micrometer type. Either will work, but the micrometer type is a bit easier to use, especially if you are tightening several fasteners with the same torque - such as cylinder head covers. You will need a torque wrench calibrated in INCH POUNDS for many of the bolts. You will also need a torque wrench calibrated in FOOT POUNDS for the larger bolts. Don't try to use the foot pounds wrench on the smaller bolts as it will not be sensitive enough at low torque settings to provide accurate torque. There are many fasteners that require low torque. These include such things as 6mm oil pan bolts, cylinder head cover bolts, etc. for which the torque in 61-78 inch pounds. These low torque bolts require a wrench that is accurate at low settings and this wrench should be graduated in inch pounds. In addition, there are numerous high torque fasteners such as the front axle nuts (51 - 65 foot pounds) or swing arm pivot shaft nuts (58 - 87 foot pounds). These require a wrench that is accurate at higher settings; this wrench should be graduated in foot pounds. Using the proper torque wrenches to correctly tighten fasteners will help prevent damage and contribute to a safe bike. The Kawasaki Service Manual will list the various torque specs for the bolts. I suggest you get the manual before buying the torque wrenches so you can decide which wrenches best meet the torque specs.
Consider buying a can of Kroil penetrating oil and use it to soak stubborn fasteners for a couple days before trying to loosen them. Remember, the original screws and bolts were installed on your bike when Jimmy Carter was President, so many of them may be hard to remove. Kroil can be bought online, at guns shows, and at some other venues.
MOTOR OIL
The ingredients in oils have changed over the years. For example, today's Castrol GTX (and pretty much all AUTOMOBILE oil) is not the same as it was in the 1980's. Back then it worked great in KZ bikes, but things have changed. Zinc and phosphorus additives (ZDDP), important to protect engine components from metal to metal contact, has been reduced since it’s been found to shorten catalytic converter life. Today’s auto oils contain about ½ the ZDDP they used to and different additives have been developed as substitutes. Unfortunately, some of these newer additives, in particular molybdenum disulfide, don’t get along with the wet clutches in our bikes. Newer oils, especially those labeled “Energy Conserving” (EC), which have a high quantity of friction reducing additives, should be avoided. These oils work fine in automobiles but there are better choices for motorcycles.
KZ bikes need oil which is suitable for wet clutches. That distinction was defined by the Japanese Engine Oil Standards Implementation Panel (JASO), and can be noted by oils that meet the "4T” (4 cycle) specification, MA (wet clutch) classification. These oils, which include various synthetic, semi-synthetic, and non-synthetic oils, are sold as specific motorcycle oils. Another type of oil which works well in our bikes is diesel engine oil. These oils are governed by the API (American Petroleum Institute) CI-4/CJ-4 spec and don’t contain clutch-damaging EC additives. You can even purchase Shell Rotella oil which holds a “JASO-MA” certification assuring it will get along well with your wet clutch. All of these newer oils have a reduced ZDDP level too (about 1/3 less than before instead of ½ like the auto oils) but the substitute additives get along better with our bikes needs than automotive oil. Oils that do not hold the JASO-MA rating have either failed the wet clutch test or have not been tested for use in engines with wet clutches. Good luck with your bike! Ed
Replied by Kray-Z on topic Spectre shaft to chain, just a thought?
24 Sep 2016 13:44 - 24 Sep 2016 13:47
Kosman Racing in the USA used to do this - and they still might do that. (widening your stock wheels, I mean...)
I was thinking of having a couple of '79 CBX wheels (stock they are bicycle tire like 2.15" wide) widened a few years back, to keep stock looks yet have a 4.5" rear wheel, but I don't have any intentions of street racing CBX's anymore....too slow, WAhaYYYYYY too expensive....
JoHNY,
Do what I did and start comparing part numbers on-line at Partzilla between the shaft and chain bikes....also any compatibility listings that might come up while checking the part numbers....
Converting the engine will likely prove to be the easy part. Getting a normal chain drive swing arm into the shaft's chassis is going to be much more difficult, unless you can fabricate and weld....
I was thinking of having a couple of '79 CBX wheels (stock they are bicycle tire like 2.15" wide) widened a few years back, to keep stock looks yet have a 4.5" rear wheel, but I don't have any intentions of street racing CBX's anymore....too slow, WAhaYYYYYY too expensive....
Attachment DOC.JPG not found
JoHNY,
Do what I did and start comparing part numbers on-line at Partzilla between the shaft and chain bikes....also any compatibility listings that might come up while checking the part numbers....
Converting the engine will likely prove to be the easy part. Getting a normal chain drive swing arm into the shaft's chassis is going to be much more difficult, unless you can fabricate and weld....
Replied by 650ed on topic 82 KZ750 Carb/Vacuum ID
24 Sep 2016 06:16
Welcome aboard -
Here are some tips that you may find helpful:
Many newbies and not so newbies run into or issues with their bikes which could be easily avoided with a little preparation or information. Here are a couple recommendations that I hope you will find useful.
Before riding your KZ you should take a little time to become familiar with it. Simple things like checking the oil, tire pressures, etc. are explained in the Kawasaki Owner's Manual. If you bike didn't come with one (they normally are in a little holder on the bottom of the seat) you can usually find one on eBay - be sure to get one for your exact year/model.
MANUAL
You really should consider buying the Kawasaki Factory Service Manual for your bike. The factory service manual provides instructions on the various maintenance procedures and schedules for your bike, procedures for diagnosing problems, proper torque values for the various fasteners (VERY IMPORTANT), and insight into how each system on your bike works even if you are not repairing that system. Studying the manual before you attempt performing service on your bike will impart an understanding of the system you are working on which will increase the odds of success.
The manuals usually are readily available for most models on eBay and other sources; but be sure to get one that has your specific year and model in it as there are differences between the various KZ650 models. I do not recommend Clymers, Haynes, or other aftermarket manuals as I have seen instances where they provide inaccurate advice. You may decide to use those to supplement the factory manual, but in my opinion they are not a suitable substitute. If you have trouble finding one for your model ask us to help.
TOOLS
WARNING! Do not even try to use Phillips screwdrivers on the Kawasaki cross head screws. Despite their appearance they are not Phillips screws. They are Japanese Industrial Standard (JIS) screws. The tips of Phillips screwdrivers are too long & pointed to allow the 4 blades of the screwdriver to properly engage the screws, so when you apply force the screw head slots will deform and look like crap. The fact is that Phillips screws were deliberately designed to have the screwdriver bit "cam out." This was done to prevent production line assembly from over-tightening, stripping, or breaking the screws. JIS screws do not have this problem. A proper fitting JIS bit can tighten a JIS screw to and beyond the torque spec without camming out. Here's the good news - you can easily modify standard Phillips screwdriver tips to fit the JIS screws.
I have ground down the tips of DeWalt #2 and DeWalt #3 Phillips to make them fit JIS screws. The large crosshead screws on the cases take modified #3 bits (or genuine #3 JIS bits). To modify the DeWalt bits you need to grind the very tip a little, then test fit, then grind a little more and test fit, etc. until the bit no longer "rocks" back and forth in the screwhead. Picture 1 below shows how a DeWalt #3 bit fits the case screws of my KZ650 after being ground properly. The #2 DeWalt bits can be modified the same way to fit smaller JIS screws. Pictures 2 and 3 below shows DeWalt #2 and #3 modified bits.
I did find a place that sells authentic JIS bits. They don't list the #3 bit, but if you contact them they can provide the #3 JIS bits even though they are not listed on the website. These folks were very easy to work with, and the authentic bits do work great. Here's their site:
www.rjrcooltools.com/shop_item_detail.cfm?subcat_ID=89
Pictures 4 & 5 below show a comparison between my home made modified bits with the authentic JIS bits, and picture 6 shows a comparison between Philips and JIS bit tips.
PICTURE 1
PICTURE 2
PICTURE 3
PICTURE 4
PICTURE 5
PICTURE 6
Before reaching for that wrench or ratchet consider the following. The bolts are steel, but your engine and front forks are aluminum. The bolts are much tougher than the aluminum and if over tightened will strip the aluminum threads. Although these can be repaired, preventing damage by applying proper torque will save you grief, time, and money. Tightening fasteners properly requires torque wrenches. Various vendors, including Snap-on, CDI, Sears, etc., market torque wrenches. The two most popular types are the bar type and micrometer type. Either will work, but the micrometer type is a bit easier to use, especially if you are tightening several fasteners with the same torque - such as cylinder head covers. You will need a torque wrench calibrated in INCH POUNDS for many of the bolts. You will also need a torque wrench calibrated in FOOT POUNDS for the larger bolts. Don't try to use the foot pounds wrench on the smaller bolts as it will not be sensitive enough at low torque settings to provide accurate torque. There are many fasteners that require low torque. These include such things as 6mm oil pan bolts, cylinder head cover bolts, etc. for which the torque in 61-78 inch pounds. These low torque bolts require a wrench that is accurate at low settings and this wrench should be graduated in inch pounds. In addition, there are numerous high torque fasteners such as the front axle nuts (51 - 65 foot pounds) or swing arm pivot shaft nuts (58 - 87 foot pounds). These require a wrench that is accurate at higher settings; this wrench should be graduated in foot pounds. Using the proper torque wrenches to correctly tighten fasteners will help prevent damage and contribute to a safe bike. The Kawasaki Service Manual will list the various torque specs for the bolts. I suggest you get the manual before buying the torque wrenches so you can decide which wrenches best meet the torque specs.
Consider buying a can of Kroil penetrating oil and use it to soak stubborn fasteners for a couple days before trying to loosen them. Remember, the original screws and bolts were installed on your bike when Jimmy Carter was President, so many of them may be hard to remove. Kroil can be bought online, at guns shows, and at some other venues.
MOTOR OIL
The ingredients in oils have changed over the years. For example, today's Castrol GTX (and pretty much all AUTOMOBILE oil) is not the same as it was in the 1980's. Back then it worked great in KZ bikes, but things have changed. Zinc and phosphorus additives (ZDDP), important to protect engine components from metal to metal contact, has been reduced since it’s been found to shorten catalytic converter life. Today’s auto oils contain about ½ the ZDDP they used to and different additives have been developed as substitutes. Unfortunately, some of these newer additives, in particular molybdenum disulfide, don’t get along with the wet clutches in our bikes. Newer oils, especially those labeled “Energy Conserving” (EC), which have a high quantity of friction reducing additives, should be avoided. These oils work fine in automobiles but there are better choices for motorcycles.
KZ bikes need oil which is suitable for wet clutches. That distinction was defined by the Japanese Engine Oil Standards Implementation Panel (JASO), and can be noted by oils that meet the "4T” (4 cycle) specification, MA (wet clutch) classification. These oils, which include various synthetic, semi-synthetic, and non-synthetic oils, are sold as specific motorcycle oils. Another type of oil which works well in our bikes is diesel engine oil. These oils are governed by the API (American Petroleum Institute) CI-4/CJ-4 spec and don’t contain clutch-damaging EC additives. You can even purchase Shell Rotella oil which holds a “JASO-MA” certification assuring it will get along well with your wet clutch. All of these newer oils have a reduced ZDDP level too (about 1/3 less than before instead of ½ like the auto oils) but the substitute additives get along better with our bikes needs than automotive oil. Oils that do not hold the JASO-MA rating have either failed the wet clutch test or have not been tested for use in engines with wet clutches. Good luck with your bike! Ed
Here are some tips that you may find helpful:
Many newbies and not so newbies run into or issues with their bikes which could be easily avoided with a little preparation or information. Here are a couple recommendations that I hope you will find useful.
Before riding your KZ you should take a little time to become familiar with it. Simple things like checking the oil, tire pressures, etc. are explained in the Kawasaki Owner's Manual. If you bike didn't come with one (they normally are in a little holder on the bottom of the seat) you can usually find one on eBay - be sure to get one for your exact year/model.
MANUAL
You really should consider buying the Kawasaki Factory Service Manual for your bike. The factory service manual provides instructions on the various maintenance procedures and schedules for your bike, procedures for diagnosing problems, proper torque values for the various fasteners (VERY IMPORTANT), and insight into how each system on your bike works even if you are not repairing that system. Studying the manual before you attempt performing service on your bike will impart an understanding of the system you are working on which will increase the odds of success.
The manuals usually are readily available for most models on eBay and other sources; but be sure to get one that has your specific year and model in it as there are differences between the various KZ650 models. I do not recommend Clymers, Haynes, or other aftermarket manuals as I have seen instances where they provide inaccurate advice. You may decide to use those to supplement the factory manual, but in my opinion they are not a suitable substitute. If you have trouble finding one for your model ask us to help.
TOOLS
WARNING! Do not even try to use Phillips screwdrivers on the Kawasaki cross head screws. Despite their appearance they are not Phillips screws. They are Japanese Industrial Standard (JIS) screws. The tips of Phillips screwdrivers are too long & pointed to allow the 4 blades of the screwdriver to properly engage the screws, so when you apply force the screw head slots will deform and look like crap. The fact is that Phillips screws were deliberately designed to have the screwdriver bit "cam out." This was done to prevent production line assembly from over-tightening, stripping, or breaking the screws. JIS screws do not have this problem. A proper fitting JIS bit can tighten a JIS screw to and beyond the torque spec without camming out. Here's the good news - you can easily modify standard Phillips screwdriver tips to fit the JIS screws.
I have ground down the tips of DeWalt #2 and DeWalt #3 Phillips to make them fit JIS screws. The large crosshead screws on the cases take modified #3 bits (or genuine #3 JIS bits). To modify the DeWalt bits you need to grind the very tip a little, then test fit, then grind a little more and test fit, etc. until the bit no longer "rocks" back and forth in the screwhead. Picture 1 below shows how a DeWalt #3 bit fits the case screws of my KZ650 after being ground properly. The #2 DeWalt bits can be modified the same way to fit smaller JIS screws. Pictures 2 and 3 below shows DeWalt #2 and #3 modified bits.
I did find a place that sells authentic JIS bits. They don't list the #3 bit, but if you contact them they can provide the #3 JIS bits even though they are not listed on the website. These folks were very easy to work with, and the authentic bits do work great. Here's their site:
www.rjrcooltools.com/shop_item_detail.cfm?subcat_ID=89
Pictures 4 & 5 below show a comparison between my home made modified bits with the authentic JIS bits, and picture 6 shows a comparison between Philips and JIS bit tips.
PICTURE 1
PICTURE 2
PICTURE 3
PICTURE 4
PICTURE 5
PICTURE 6
Attachment JISvs.PhillipsAngles-2-3-4-5-6-7-8-9-10.jpg not found
Before reaching for that wrench or ratchet consider the following. The bolts are steel, but your engine and front forks are aluminum. The bolts are much tougher than the aluminum and if over tightened will strip the aluminum threads. Although these can be repaired, preventing damage by applying proper torque will save you grief, time, and money. Tightening fasteners properly requires torque wrenches. Various vendors, including Snap-on, CDI, Sears, etc., market torque wrenches. The two most popular types are the bar type and micrometer type. Either will work, but the micrometer type is a bit easier to use, especially if you are tightening several fasteners with the same torque - such as cylinder head covers. You will need a torque wrench calibrated in INCH POUNDS for many of the bolts. You will also need a torque wrench calibrated in FOOT POUNDS for the larger bolts. Don't try to use the foot pounds wrench on the smaller bolts as it will not be sensitive enough at low torque settings to provide accurate torque. There are many fasteners that require low torque. These include such things as 6mm oil pan bolts, cylinder head cover bolts, etc. for which the torque in 61-78 inch pounds. These low torque bolts require a wrench that is accurate at low settings and this wrench should be graduated in inch pounds. In addition, there are numerous high torque fasteners such as the front axle nuts (51 - 65 foot pounds) or swing arm pivot shaft nuts (58 - 87 foot pounds). These require a wrench that is accurate at higher settings; this wrench should be graduated in foot pounds. Using the proper torque wrenches to correctly tighten fasteners will help prevent damage and contribute to a safe bike. The Kawasaki Service Manual will list the various torque specs for the bolts. I suggest you get the manual before buying the torque wrenches so you can decide which wrenches best meet the torque specs.
Consider buying a can of Kroil penetrating oil and use it to soak stubborn fasteners for a couple days before trying to loosen them. Remember, the original screws and bolts were installed on your bike when Jimmy Carter was President, so many of them may be hard to remove. Kroil can be bought online, at guns shows, and at some other venues.
MOTOR OIL
The ingredients in oils have changed over the years. For example, today's Castrol GTX (and pretty much all AUTOMOBILE oil) is not the same as it was in the 1980's. Back then it worked great in KZ bikes, but things have changed. Zinc and phosphorus additives (ZDDP), important to protect engine components from metal to metal contact, has been reduced since it’s been found to shorten catalytic converter life. Today’s auto oils contain about ½ the ZDDP they used to and different additives have been developed as substitutes. Unfortunately, some of these newer additives, in particular molybdenum disulfide, don’t get along with the wet clutches in our bikes. Newer oils, especially those labeled “Energy Conserving” (EC), which have a high quantity of friction reducing additives, should be avoided. These oils work fine in automobiles but there are better choices for motorcycles.
KZ bikes need oil which is suitable for wet clutches. That distinction was defined by the Japanese Engine Oil Standards Implementation Panel (JASO), and can be noted by oils that meet the "4T” (4 cycle) specification, MA (wet clutch) classification. These oils, which include various synthetic, semi-synthetic, and non-synthetic oils, are sold as specific motorcycle oils. Another type of oil which works well in our bikes is diesel engine oil. These oils are governed by the API (American Petroleum Institute) CI-4/CJ-4 spec and don’t contain clutch-damaging EC additives. You can even purchase Shell Rotella oil which holds a “JASO-MA” certification assuring it will get along well with your wet clutch. All of these newer oils have a reduced ZDDP level too (about 1/3 less than before instead of ½ like the auto oils) but the substitute additives get along better with our bikes needs than automotive oil. Oils that do not hold the JASO-MA rating have either failed the wet clutch test or have not been tested for use in engines with wet clutches. Good luck with your bike! Ed
GPzRX, Meet Ginger was created by ajsfirehawk
18 Sep 2016 20:39
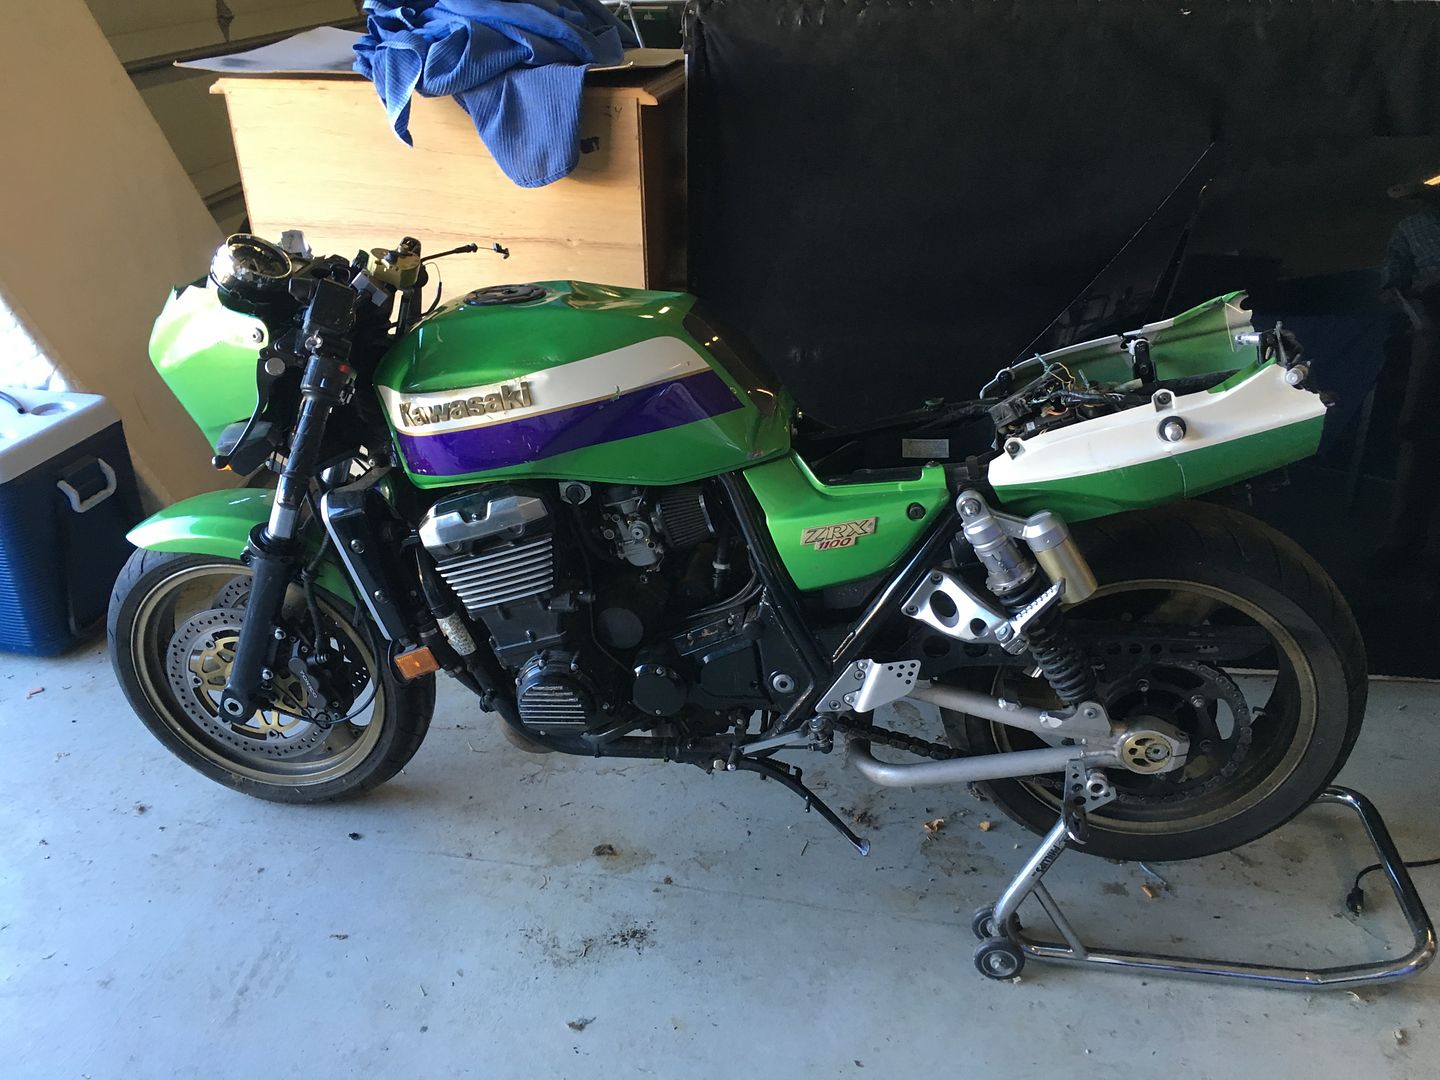
A cafe build I'm doing is approaching it's end so naturally I must dress myself in a grass skirt and rush to the edge of the volcano to fling myself into a new project. I'm doing a build commissioned by my brother, The base is an 82 GPz750 which will get an 810 kit and cams/springs. We want to swap in a more modern front end and a beefier swingarm along with upgraded brakes. Enter a salvage ZRX1100. It runs like a dream, but the motor will be sold. We are going to move the front end over wholesale and then swap in the rear swingarm, brakes and shocks. It will be a couple weeks before I can get started on it as I wrap up the cafe build. Anyone know off the top about the difference between the OD diameter of the upper and lower steering bearing between the 82 GPz and the ZRX1100?


Displaying 901 - 910 out of 7255 results.