
Search Results (Searched for: gs swing arm)
Replied by 79MKII on topic 1978 KZ1000 A, Mild Mods
02 Dec 2013 05:03
The swingarm has all new bearings, spacers and end caps. I know I don't want any slop in the pivot area...had bad bearings on my 650 before and that wasn't fun at all. The aftermarket swingarm I bought for my MKII was super tight and hard to get it, so I was thinking extra tight should be fine. I might try some of the thinner washers to see if the swingarm loosens up. As long as there is no slop then thinner might be better.
Replied by 650ed on topic 1978 KZ1000 A, Mild Mods
01 Dec 2013 20:0579MKII wrote: Yes, I meant tight between the swingarm and the frame. The swingarm pivots nicely but it is pretty tight. How freely should it swing?
If yours is riding on bearings rather than bushings it should move quite freely. Normally the sleeve is a little bit wider than the swingarm so the caps tighten against the sleeve when the pivot bolt is tightened. This leaves a little bit (but not too much) of play between the ends of the swing arm and the frame so it isn't pinched and prevented from moving freely. At least that what I noticed on my KZ650 when I replaced my bushings. Maybe someone on this site can provide the correct difference in width of the sleeve vs the swing arm. If you can get that measurement you can probably adjust things by using spacers with a smaller outside diameter than the inside diameter of the swingarm. Hopefully someone will chime in with that info. Ed
When you say you got the swing arm to be a very tight fit, are you talking about the swing arm sleeve and caps and not the swing arm itself? The sleeve and caps should be tight between the frame members, but the swing arm should rotate up and down freely on the bearings (or bushings if so equipped). Ed
Got the GS1100 swingarm all mounted. It took about 10mm of spacers to provide a very tight fit. I had to lightly tap the last washer into place....should be really good with no slop. I used regular 5/8" washers, two on each side. They fit the 16mm pivot axle very well. I bought a handful and sorted them by thickness. They range from 2mm to 2.5mm, so I picked out four of the 2.5mm washers to use.
Replied by tk11b40 on topic 1975 KZ 900 , ZRX Swingarm, 89 GSXR front end
01 Dec 2013 06:21
Well my good buddy Dunnell has talked me into putting exhaust on my Ducati, this will EAT the flatslide carb money for the KZ. Ducati does not make it easy, you have to re-flash ECU, add a power commander, and Dyno the bike to get the most out of a header.
This should kill track days on the R6 and the KZ project for a few months.
I am betting this is the longest running KZ project in history. I have refurbished at least three other bikes while the KZ project has been going on. Not to mention basically resto-modding the S2 Gixxer.
Looks like I will be pulling the stock KZ carbs and taking a second look at why the number 4 carb is jacked up.
Here is an interesting site if you love the KZ:
sbkfactory.com/
Replied by tommyboah on topic '83 KZ1000R2 Swing arm bearings not there?
30 Nov 2013 04:03Bozo wrote: Looks like the bearings were replaced with bronze bushes, interesting?. if you use a rod to belt them out they might (depending on how tight they are) go out of shape. What are you thinking of doing - refitting original bearings??
Yes, I have new bearings and sleeves to refit after powder coating. Just need to figure out the best way of removing the bronze bushings. I will try to find a rod to put in from the opposite direction av try knocking them out.
.T
Replied by Bozo on topic '83 KZ1000R2 Swing arm bearings not there?
30 Nov 2013 02:24
Looks like the bearings were replaced with bronze bushes, interesting?. if you use a rod to belt them out they might (depending on how tight they are) go out of shape. What are you thinking of doing - refitting original bearings??
Replied by zukdave on topic '83 KZ1000R2 Swing arm bearings not there?
29 Nov 2013 16:20
You can NOT drive them through the arm.
Long rod in one side and drive the other side out.
Long rod in one side and drive the other side out.
'83 KZ1000R2 Swing arm bearings not there? was created by tommyboah
29 Nov 2013 14:05
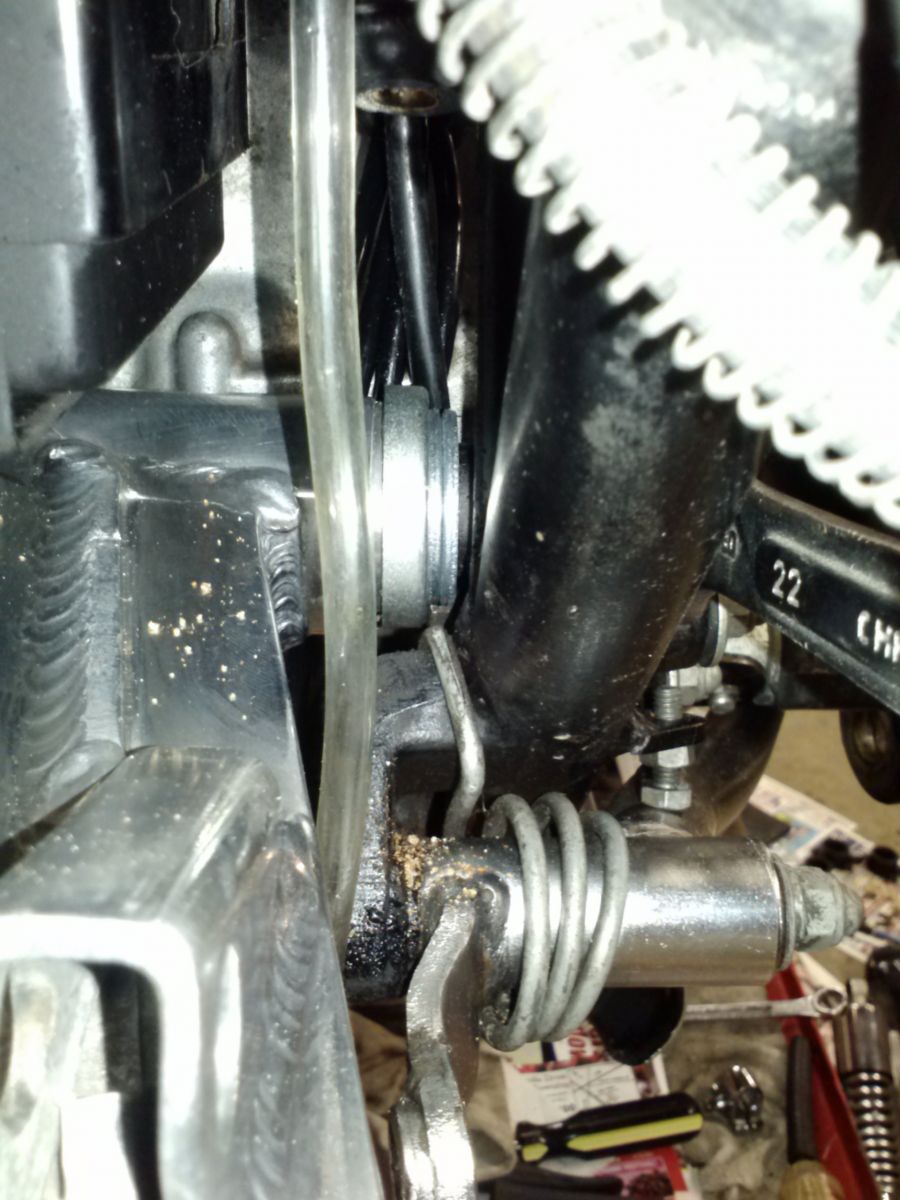
I am having the frame and swing arm on my '83 KZ1000R2 powder coated. Since I'm powder coating the swing arm I need to remove the needle bearings (I've already bought new ones along with sleeves). When removing the grease seal I find to my big surprise, no bearings??? It seems as there are only bushings there from the looks of it, no bearings. Kind of looks like a bronze bushing?. Dunno how to remove this, because I'm not sure what it is?
I've attached a photo of the pivot. Any advices on what this is and how to remove it. Can I just knock on one end and knock everything out on the opposite end? There is supposed to be a collar of some sort in there seperating the two sides, and this should be possible to remove?
Help!!!
.T
I've attached a photo of the pivot. Any advices on what this is and how to remove it. Can I just knock on one end and knock everything out on the opposite end? There is supposed to be a collar of some sort in there seperating the two sides, and this should be possible to remove?
Help!!!
.T
Attachment bilde.JPG not found
Replied by DoubleZed on topic KZ900 Streetfighter
28 Nov 2013 10:28
For the top end, other than fresh pistons ( and I still need to weigh them! ") ) I am kinda OCD about head gasket leaks, so one of the first things I consider on every engine I have built to date, is heavy duty head studs. Some might say its overkill on a stock motor, but if I ever decide to go bigger I will already have them and for the time being I know that I can torque it down without flinching, so APE studs and nuts for the win!! For anyone who has thought about doing this to their engine, a word of caution: The original studs in my engine were tight as a ticks @$$ and took a LOT of heat and torque to remove!!! :woohoo: I spent about 2 solid hours twisting them out. Doubling up some nuts? Forgettaboutit! The only thing that I could clamp onto the studs tight enough was a bench-top vice with a length of pipe... and turning a little ata time between applications of heat, penetrating oil, and then mechanics best friend (wax) over and over. I had my work cut out for me :laugh:
) I am kinda OCD about head gasket leaks, so one of the first things I consider on every engine I have built to date, is heavy duty head studs. Some might say its overkill on a stock motor, but if I ever decide to go bigger I will already have them and for the time being I know that I can torque it down without flinching, so APE studs and nuts for the win!! For anyone who has thought about doing this to their engine, a word of caution: The original studs in my engine were tight as a ticks @$$ and took a LOT of heat and torque to remove!!! :woohoo: I spent about 2 solid hours twisting them out. Doubling up some nuts? Forgettaboutit! The only thing that I could clamp onto the studs tight enough was a bench-top vice with a length of pipe... and turning a little ata time between applications of heat, penetrating oil, and then mechanics best friend (wax) over and over. I had my work cut out for me :laugh:
But with the new APE's in, I followed a little bit of advice I read a while back and put heat shrink over the 8 exposed studs. Apparently that will make removing the jugs in the future "easier", but I thought it would do better just to prevent them from crusting in the distant future. So I wiped them down with heavy oil before slipping the shrink on.
I also rewired the dynamo, per a few suggestions I read on here. Unfortunately, I missed the part where I should have bought a new grommet from Z1E when I placed the order with the pistons :blush: So I put it together with a copious amount of RTV.....
Since I am only one man, I found it easier to move the engine without the top end. I slipped the frame over it without a hitch (or scratch) and the heart was once again mated with the body")
And the rear end installed with a couple temporary bolts. The swinger was repainted with a rattle can paint I brought back from my old job. It looked to be some custom mix from a local shop called "brilliant black" by SEM, black with metallic flake. It matched the original swingarm paint almost perfectly, had I not put clear over it. I will have to see if I can find a place that will mix and fill rattle cans and get some more.... I also repainted the yellow shock spring and upper mount gloss black.
For the upper mount, I made a couple steel inserts on the mini lathe (all I got ) to press in with a bit of red lock-tite.
) I am kinda OCD about head gasket leaks, so one of the first things I consider on every engine I have built to date, is heavy duty head studs. Some might say its overkill on a stock motor, but if I ever decide to go bigger I will already have them and for the time being I know that I can torque it down without flinching, so APE studs and nuts for the win!! For anyone who has thought about doing this to their engine, a word of caution: The original studs in my engine were tight as a ticks @$$ and took a LOT of heat and torque to remove!!! :woohoo: I spent about 2 solid hours twisting them out. Doubling up some nuts? Forgettaboutit! The only thing that I could clamp onto the studs tight enough was a bench-top vice with a length of pipe... and turning a little ata time between applications of heat, penetrating oil, and then mechanics best friend (wax) over and over. I had my work cut out for me :laugh:But with the new APE's in, I followed a little bit of advice I read a while back and put heat shrink over the 8 exposed studs. Apparently that will make removing the jugs in the future "easier", but I thought it would do better just to prevent them from crusting in the distant future. So I wiped them down with heavy oil before slipping the shrink on.
Attachment 143.JPG not found
Attachment 145.JPG not found
I also rewired the dynamo, per a few suggestions I read on here. Unfortunately, I missed the part where I should have bought a new grommet from Z1E when I placed the order with the pistons :blush: So I put it together with a copious amount of RTV.....
Attachment 150.JPG not found
Since I am only one man, I found it easier to move the engine without the top end. I slipped the frame over it without a hitch (or scratch) and the heart was once again mated with the body
Attachment 152.JPG not found
Attachment 151.JPG not found
And the rear end installed with a couple temporary bolts. The swinger was repainted with a rattle can paint I brought back from my old job. It looked to be some custom mix from a local shop called "brilliant black" by SEM, black with metallic flake. It matched the original swingarm paint almost perfectly, had I not put clear over it. I will have to see if I can find a place that will mix and fill rattle cans and get some more.... I also repainted the yellow shock spring and upper mount gloss black.
Attachment 165.JPG not found
Attachment 155.JPG not found
For the upper mount, I made a couple steel inserts on the mini lathe (all I got
) to press in with a bit of red lock-tite. Displaying 2051 - 2060 out of 7258 results.