
Search Results (Searched for: gs swing arm)
Replied by JimB on topic Swing Arm Bearing replacement question
10 Jul 2015 21:05
OK,...so here is an update. I finally got back to working on the bike and finishing replacement of the 4 swing arm bearings, 3 rear wheel bearings and a rear wheel tire change. I took it for a quick ride and all appears to be fine.
So getting the 3 wheel bearings out were no problem using the blind hole bearing puller from Harbour Freight. And three of the 4 swing arm bearings came out pretty easily. But the 4 one was a bear. I had to punch it out from the other side and then the outer shell of the bearing stayed in the swing arm so I had to grind it out with a dremel,...very carefully.
I did take some pictures of the tool I made to get the bearings back into the swing arm,..it was well worth the trip to Lowes to get a 5/16ths threaded bar, nuts and washers.
This first one shows how i used the threaded bar and washers to pull the needle bearings into the swing arm. And don't worry,...they were straight prior to pulling them,...the pic show it crooked.
This second pic shows how I used a socket to push the needle bearing into the swing are deep enough to make room for the second one. There is a little lip where it bottoms out and stops the first bearing from going to far in.
This method worked great,... the needle bearings were pulled in very easy. I also froze them over night and greased them.
A couple of other items,....
Don't use the swing arm bolt to punch out the bearings. It mangled the threads on the end and I had to get a new one,.... A $40 dollar lesson.
Also,...when I removed the sleeve I noticed that the old needle bearings made indents in it. I think this is why one of the bearings was so hard to get out. So I used my dremel again to to even out the low spots caused by the needle bearings being embedded into the sleeve. No pic sorry. I sanded off a minimal amount of metal and checked it in the bearings to make sure the sleeve was not loose. I evened out the low spots to make sure the new bearings could roll easily and not get stuck in the old ruts in the sleeve.
OK,...so it basically took two night to complete this work.
I started the bearing replacements due to needing and new rear tire. For the rear tire I did this myself. Not too hard actually. I highly recommend using the zip tie method to get the tire back on the rim. You Tube it. It made getting the tire back on the rim very easy. Basically you use multiple zip ties around the tire and it goes on a lot easier.
Jim
So getting the 3 wheel bearings out were no problem using the blind hole bearing puller from Harbour Freight. And three of the 4 swing arm bearings came out pretty easily. But the 4 one was a bear. I had to punch it out from the other side and then the outer shell of the bearing stayed in the swing arm so I had to grind it out with a dremel,...very carefully.
I did take some pictures of the tool I made to get the bearings back into the swing arm,..it was well worth the trip to Lowes to get a 5/16ths threaded bar, nuts and washers.
Attachment bikeswingarm.jpg not found
This first one shows how i used the threaded bar and washers to pull the needle bearings into the swing arm. And don't worry,...they were straight prior to pulling them,...the pic show it crooked.
Attachment bikeswingaem1.jpg not found
This second pic shows how I used a socket to push the needle bearing into the swing are deep enough to make room for the second one. There is a little lip where it bottoms out and stops the first bearing from going to far in.
This method worked great,... the needle bearings were pulled in very easy. I also froze them over night and greased them.
A couple of other items,....
Don't use the swing arm bolt to punch out the bearings. It mangled the threads on the end and I had to get a new one,.... A $40 dollar lesson.
Also,...when I removed the sleeve I noticed that the old needle bearings made indents in it. I think this is why one of the bearings was so hard to get out. So I used my dremel again to to even out the low spots caused by the needle bearings being embedded into the sleeve. No pic sorry. I sanded off a minimal amount of metal and checked it in the bearings to make sure the sleeve was not loose. I evened out the low spots to make sure the new bearings could roll easily and not get stuck in the old ruts in the sleeve.
OK,...so it basically took two night to complete this work.
I started the bearing replacements due to needing and new rear tire. For the rear tire I did this myself. Not too hard actually. I highly recommend using the zip tie method to get the tire back on the rim. You Tube it. It made getting the tire back on the rim very easy. Basically you use multiple zip ties around the tire and it goes on a lot easier.
Jim
Replied by z1kzonly on topic Swing Arm Bearing replacement question
06 Jul 2015 11:09
Yes, numbers out. Are they IKO from Japan? Hope you got the good priced ones off of Amazon! $9.99 piece. X 2. Plus $9.9 t ship. I just put a set in a GS 1100 Suzuki Aluminum swingarm. They are the same bearings. Freeze the bearings. I used a nice tight fitting 1/2" drive socket to put them in. Clean the opening up with a air grinder and a smooth scotch or whatever. deburr it.
And don't forget to put the collar in the inside before you put 2nd bearing in.
Here is a picture of my frozen ones with condensation frost on them, I was taking pics for ebay, I sold the swing arm. Just take your time. Have a 2nd set of hands to help if be needed.
And don't forget to put the collar in the inside before you put 2nd bearing in.
Here is a picture of my frozen ones with condensation frost on them, I was taking pics for ebay, I sold the swing arm. Just take your time. Have a 2nd set of hands to help if be needed.
Replied by 531blackbanshee on topic Swing Arm Bearing replacement question
06 Jul 2015 08:14 - 06 Jul 2015 08:15
bearings are made to be installed with the face that has the writing on it up.
always press/drive on the writing.
hth,
leon
always press/drive on the writing.
hth,
leon
Replied by Tyrell Corp on topic Swing Arm Bearing replacement question
06 Jul 2015 07:05
Is the bearing code different? are these NOS Kawasaki or just off the shelf new bearings?
Sorry not sure the answer, but good question as I have to do this myself soon. My concern is that the curved face might flatten down when the swing arm axle is torqued tight...
Driving them in is easy enough, the removal can be more difficult.
Sorry not sure the answer, but good question as I have to do this myself soon. My concern is that the curved face might flatten down when the swing arm axle is torqued tight...
Driving them in is easy enough, the removal can be more difficult.
Swing Arm Bearing replacement question was created by JimB
05 Jul 2015 19:07
Hello KZ'ers
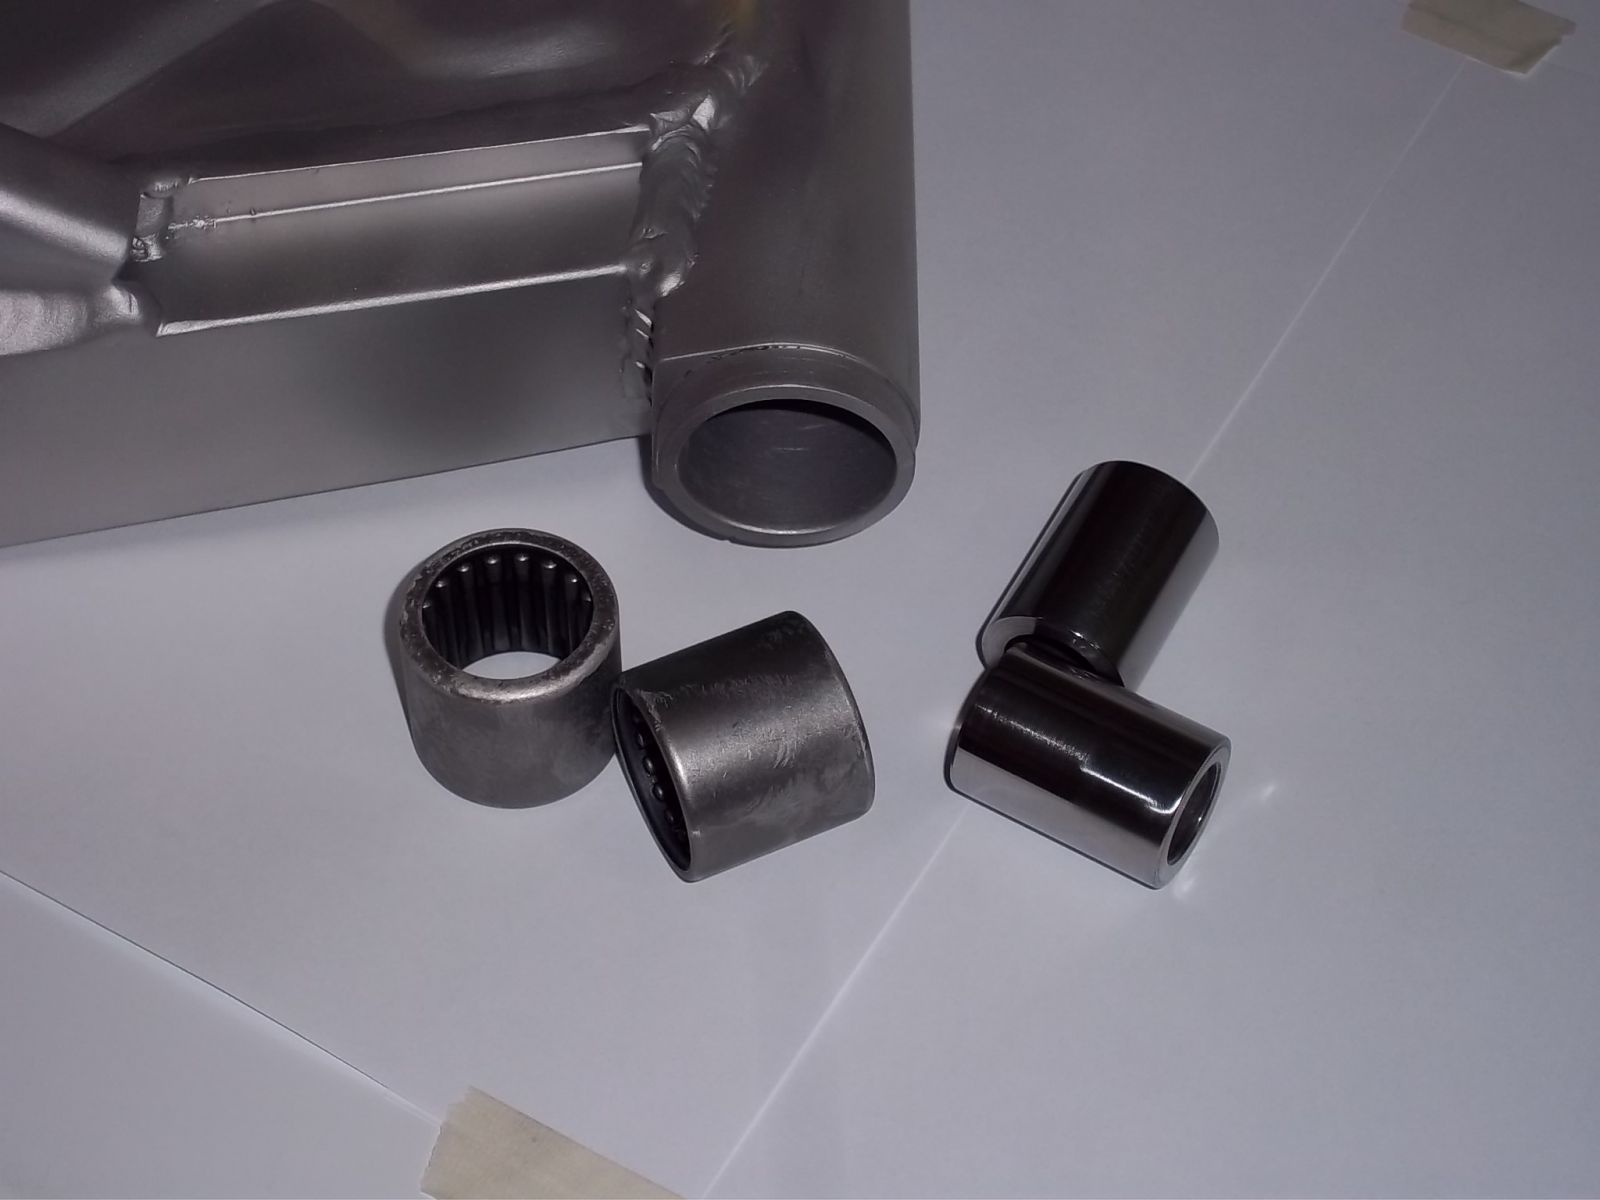
OK so I am in the process of changing out my swing arm bearings on my 1978 KZ1000 A2 and looking at the new bearings the one end of the bearing appears to be flatter than the other (see pic, the top one appears to be flat on the one side versus the other one). If so then ,...Does the rounded end go in first or not, Is there a difference in how they are inserted into the swing arm? I know two bearings go in each side. other than the fact that the lip where the first bearing would bottom out is very small,...are there any other tips to getting these in?
Any tricks to getting these in or help would be appreciated.
Jim
Attachment swingarmbearing.jpg not found
I haven't figured out the rear shock bushing issue yet but the old motorcycle shop here in Calgary has been really good for advice and ideas as well. I'll be seeing what they have on hand this upcoming week for a few things.
Took some time this morning to do the second coat of gloss black on the rims. Fairly happy with them! I ran out of paint right at the very end so I have coverage but I am after the right finish. Might have to do a light wet sand and do a third coat. See we shall. As I took a step back, I suddenly thought of the white LED ring on my headlight and wondered what a fine gloss white line around the outside edge of the rims would do? Hmmm...
A few asked about the seat. Here is after adding another full length layer of yoga mat on top of some contouring and raising on the back end, I am content with it though my thought after I sat on it as a test was, "shoot this is narrow!" Hahaha but it's exactly how I want it.
The tank got some attention today. I haven't used proform spray primer before and I'll admit I am not cool with the chunkiness of its finish! However, quality wise, after a light wet sand, this will be what is needed to make the tank hopefully gleam. I think the knee wells have turned out alright! Might do one more skim coat of bondo.
Tomorrow afternoon is when I'll setup for a second coat on the auxilary parts (engine mounts, speedo buckets, to rear swing arm). The frame may get its second and really good coat at the same time but this is all time dependant") .
.
As much as I know this is riding weather, man do I love having a project to work on in the garage! With a coffee in hand this morning, it was just right.
Took some time this morning to do the second coat of gloss black on the rims. Fairly happy with them! I ran out of paint right at the very end so I have coverage but I am after the right finish. Might have to do a light wet sand and do a third coat. See we shall. As I took a step back, I suddenly thought of the white LED ring on my headlight and wondered what a fine gloss white line around the outside edge of the rims would do? Hmmm...
Attachment image-26.jpg not found
A few asked about the seat. Here is after adding another full length layer of yoga mat on top of some contouring and raising on the back end, I am content with it though my thought after I sat on it as a test was, "shoot this is narrow!" Hahaha but it's exactly how I want it.
Attachment image-27.jpg not found
The tank got some attention today. I haven't used proform spray primer before and I'll admit I am not cool with the chunkiness of its finish! However, quality wise, after a light wet sand, this will be what is needed to make the tank hopefully gleam. I think the knee wells have turned out alright! Might do one more skim coat of bondo.
Attachment image-28.jpg not found
Tomorrow afternoon is when I'll setup for a second coat on the auxilary parts (engine mounts, speedo buckets, to rear swing arm). The frame may get its second and really good coat at the same time but this is all time dependant
.As much as I know this is riding weather, man do I love having a project to work on in the garage! With a coffee in hand this morning, it was just right.
Replied by scubaanders on topic 82 GPz750 keepin' it real,.. for now
04 Jul 2015 04:05
:woohoo: Sweet find! :woohoo:
I am all for the black looker!
All the classic twin shock Gpz has a very specific look about them, it doesn’t matter if it’s the 550, 750 or the 1100. It’s like Cycle magazine wrote after their test-drive back in 1982.
It the kind of bike that could give you a speeding ticket even if your parked curb side. I guess they share it with bikes like the Suzuki GS1000S and E’s.
Tyrell gave a couple of very poetic lines in my project tread
That black rod keeps what’s so nice about the design chopping of the rear frame and replace the end with a 50/60’th Norton tail just doesn’t make sense.
Go for swing arm, rims and a 41 mm fork and I think you will become a completely new person, the one you always wanted to be.
I will keep you posted on my progress and my Zephyr 750 swing arm looks like the easiest fit, its 235 over the pivot just like the Gpz, it might take just a little machining to make room for dust caps for the swing bearings, it’s already twin shock and just a tiny bit longer.
Because bikes are meant to be ridden.
I am all for the black looker!
All the classic twin shock Gpz has a very specific look about them, it doesn’t matter if it’s the 550, 750 or the 1100. It’s like Cycle magazine wrote after their test-drive back in 1982.
It the kind of bike that could give you a speeding ticket even if your parked curb side. I guess they share it with bikes like the Suzuki GS1000S and E’s.
Tyrell gave a couple of very poetic lines in my project tread
Tyrell Corp wrote: LOVE early GpZ's
Keep em' coming.
Origami paperfold swage line bodywork and loud graphiics over bright colours not to everyone's taste i know, but it works for me.
The King is dead, long live the King! * Nicked from Dave Mardsen, z power uk, great writer and kawasaki expert. ( referring to the English tradition of mourning the death of the deceased King, but celebrating his succesor, a metaphor for the kz to Gpz lineage )
That black rod keeps what’s so nice about the design chopping of the rear frame and replace the end with a 50/60’th Norton tail just doesn’t make sense.
Go for swing arm, rims and a 41 mm fork and I think you will become a completely new person, the one you always wanted to be.
I will keep you posted on my progress and my Zephyr 750 swing arm looks like the easiest fit, its 235 over the pivot just like the Gpz, it might take just a little machining to make room for dust caps for the swing bearings, it’s already twin shock and just a tiny bit longer.
Because bikes are meant to be ridden.
Replied by NobleHops on topic The Friendship Bike - NobleHops restores a 75 Z1
03 Jul 2015 16:46 - 03 Jul 2015 16:50
OK, on to the swingarm.
Recall I had rebuilt it prior, but found it binding. More careful sleuthing uncovered a bent pivot bolt, but not before I trashed my new bronze bushings in a vain attempt to seat them a bit better in the swingarm. Faced with $60 for another set of bushings, or $100 for this tasty set of roller bearings plus a new pivot pin and trick radial end bearings, I went with door #2.
Z1 Enterprises sells these, a Japanese part, with German instructions. Go figure!
Short version: I will use this setup every time moving forward, if it is available. Suggest you do too.
Long version:
Kit (does NOT include the new swingarm pivot pictured, but that was cheap and readily available elsewhere):


Linky: www.z1enterprises.com/ItemDetails.aspx?item=KL31-6924
Cool radial bearing/caps, used instead of the stock dust caps, fit a lot easier:

Needle/roller bearings furnished, two per side.

Took the stock bushing, cut two kerfs in it with a cutoff wheel and used is as a bearing driver. This worked perfectly and easily.


These things are a skosh over 15mm wide, and the full diameter of the furnished collar is a tad inset when installed and centered in the swingarm, so I drove them in till there was ~17mm of space for the second one. You DON'T want to try to drive one with the other - they are only designed to be driven on one end, the end with the markings. Measure your driver, mark it, only drive it till you hit your mark, A bit of space between them is perfectly fine, they are snug in there, they aren't going anywhere.


No getting around it, you're going to have to bonk on them to start them off, as straight as possible. Use a plastic or hard rubber hammer:

Grease the daylights out of everything, with good waterproof grease, You cannot over-grease these bearings in this application.

I could not resist cramming as much grease as I could force into the radial bearings, to lube and waterproof them

Install the spacers:

A little piece of plywood over the rear frame stays made the installation of this SOOO much less fumbly for me, and less prone to nicking things up.

Likewise a bit of tape around the pivot bosses prevented me marking up the fresh powdercoat.

5 swipes with a file on the bosses to remove powdercoat insured a snug fit with no binding. Torque it to 25 lb/ft, check for play and stiction, found absolutely none of either. Silky smooth, best one I've done so far. I'm converted.


Recall I had rebuilt it prior, but found it binding. More careful sleuthing uncovered a bent pivot bolt, but not before I trashed my new bronze bushings in a vain attempt to seat them a bit better in the swingarm. Faced with $60 for another set of bushings, or $100 for this tasty set of roller bearings plus a new pivot pin and trick radial end bearings, I went with door #2.
Z1 Enterprises sells these, a Japanese part, with German instructions. Go figure!
Short version: I will use this setup every time moving forward, if it is available. Suggest you do too.
Long version:
Kit (does NOT include the new swingarm pivot pictured, but that was cheap and readily available elsewhere):
Linky: www.z1enterprises.com/ItemDetails.aspx?item=KL31-6924
Cool radial bearing/caps, used instead of the stock dust caps, fit a lot easier:
Needle/roller bearings furnished, two per side.
Took the stock bushing, cut two kerfs in it with a cutoff wheel and used is as a bearing driver. This worked perfectly and easily.
These things are a skosh over 15mm wide, and the full diameter of the furnished collar is a tad inset when installed and centered in the swingarm, so I drove them in till there was ~17mm of space for the second one. You DON'T want to try to drive one with the other - they are only designed to be driven on one end, the end with the markings. Measure your driver, mark it, only drive it till you hit your mark, A bit of space between them is perfectly fine, they are snug in there, they aren't going anywhere.
No getting around it, you're going to have to bonk on them to start them off, as straight as possible. Use a plastic or hard rubber hammer:
Grease the daylights out of everything, with good waterproof grease, You cannot over-grease these bearings in this application.
I could not resist cramming as much grease as I could force into the radial bearings, to lube and waterproof them
Install the spacers:
A little piece of plywood over the rear frame stays made the installation of this SOOO much less fumbly for me, and less prone to nicking things up.
Likewise a bit of tape around the pivot bosses prevented me marking up the fresh powdercoat.
5 swipes with a file on the bosses to remove powdercoat insured a snug fit with no binding. Torque it to 25 lb/ft, check for play and stiction, found absolutely none of either. Silky smooth, best one I've done so far. I'm converted.
Replied by tk11b40 on topic 1975 KZ 900 , ZRX Swingarm, 89 GSXR front end
02 Jul 2015 21:28
We'll I have been trying to find the bike show that is normally held at the Santa Clara county fairgrounds. No luck.
Not sure when the next show is.
How many KZR folks live in the West of Yankee Murica?
If you do, do you know of any shows?
Not sure when the next show is.
How many KZR folks live in the West of Yankee Murica?
If you do, do you know of any shows?
Replied by 531blackbanshee on topic Pre-Project Advice needed-
01 Jul 2015 07:27
here is some front end swap info.
www.kzrider.com/forum/5-chassis/325862-triple-tree-custom-work
for swingarms you are gonna want to stay with the 600cc and under stuff to keep the pivot narrow enough to be made to work in your bike.
lots of folks have used the zx6/636 stuff ,as well as 600/750 gsxr stuff.
17" wheels and tires lose you some overall ride height,but gain you some tires choices.
what header do you plan to run????
sportbike suspension conversions run out of ground clearance pretty quick.
leon
Displaying 1421 - 1430 out of 7257 results.