Welcome, Guest
Username: Password: Remember me

TOPIC:

1982 KZ750 E3 makeover--Complete--NEW PHOTOS! 27 Oct 2011 15:56 #485643

  • gwolever
  • gwolever's Avatar
  • Offline
  • User
  • Posts: 237
  • Thank you received: 8
What a great looking bike! Very nice work! Definitely something to be proud of.

I like the idea of blacking the forks too.

But if you end up polishing, spend the $30 and get a bench buffer (Harbor Freight) and some aluminum polishing compound. Take those things off and polish the hell out of them rather than trying to do the job with a dremel polishing kit. Bench buffering large parts takes no time at all.

I would start with stripping any leftover clearcoat first though (paint stripper) and some fine wet sanding before buffer.
1982 KZ1000 CSR

Please Log in or Create an account to join the conversation.

1982 KZ750 E3 makeover--Complete--NEW PHOTOS! 27 Oct 2011 18:38 #485667

  • clutch
  • clutch's Avatar Topic Author
  • Offline
  • User
  • I wish I had a tad more patience to do it better!
  • Posts: 1051
  • Thank you received: 12
Thanks guys. I really like the way it looks. I'm going to clean up the forks and then paint them black to go with the style. I just need to figure out that darn gas leak at the petcock first! :unsure:
Southern Maryland, USA

1980 KZ250 LTD (traded, but still missed)
1982 KZ750 E3 (Cafe Project) (Dyna-S, Dyna Coils, V&H 4-1, K&N Pods, 6 Sigma Jet Kit, Acewell Computer, Woodcraft Clip-ons, Custom Rewire)
1966 A1 Samurai (Restoration Project)

Wish List:
KZ1000 P (For a "touring" bike)
Z1 (need I...

Please Log in or Create an account to join the conversation.

1982 KZ750 E3 makeover--Complete--NEW PHOTOS! 27 Oct 2011 18:55 #485672

  • Godfrey
  • Godfrey's Avatar
  • Offline
  • User
  • Posts: 210
  • Thank you received: 10
Black them out , as with the other thing I mentioned , the more contrast in the bike the more it'll pop, sorry no experience with the petcock.
1981 650CSR frame

1980 KZ750E engine

Please Log in or Create an account to join the conversation.

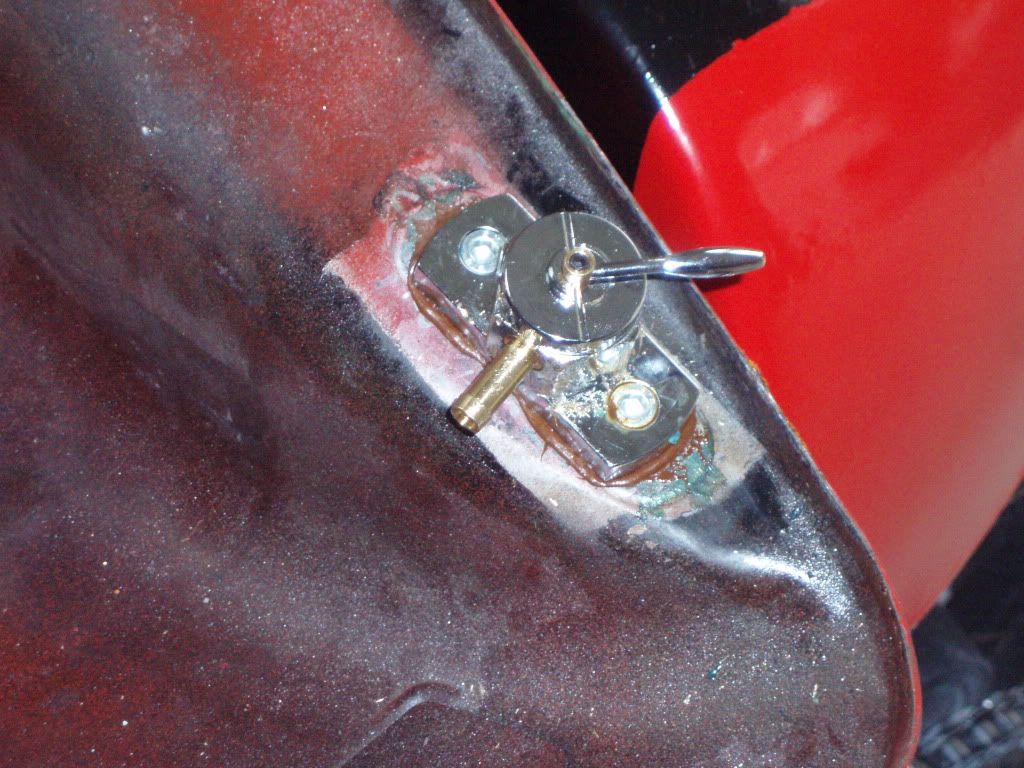
1982 KZ750 E3-LEAK- Petcock adapter plate 28 Oct 2011 16:06 #485789

  • clutch
  • clutch's Avatar Topic Author
  • Offline
  • User
  • I wish I had a tad more patience to do it better!
  • Posts: 1051
  • Thank you received: 12
So I decided to give Permatex No 1 gasket maker a try. It is one of the very few that is specified as gasoline resistant. I applied a little more than "necessary", but I wanted to ensure a good seal for a proper test. They list this product as fully curing in 24 hours, but I am going to give it until Monday before I put any gas back in it, since it is a little on the cold side today, and I'm working all weekend anyway. I will let you all know how it turns out!


P.S.: I am going to just use this thread for any posts on my 750, so I don't keep adding more and more threads about it. LOL!
Southern Maryland, USA

1980 KZ250 LTD (traded, but still missed)
1982 KZ750 E3 (Cafe Project) (Dyna-S, Dyna Coils, V&H 4-1, K&N Pods, 6 Sigma Jet Kit, Acewell Computer, Woodcraft Clip-ons, Custom Rewire)
1966 A1 Samurai (Restoration Project)

Wish List:
KZ1000 P (For a "touring" bike)
Z1 (need I...

Please Log in or Create an account to join the conversation.

Last edit: by clutch.

1982 KZ750 E3-LEAK- Petcock adapter plate 29 Oct 2011 14:32 #485916

  • clutch
  • clutch's Avatar Topic Author
  • Offline
  • User
  • I wish I had a tad more patience to do it better!
  • Posts: 1051
  • Thank you received: 12
A little update on the gasket stuff. So far it hasn't set completely, though I am just looking at the squeeze out. It is still a little on the pasty side, but it has been cold here. I think leaving it until Monday will be a good idea, but I will check on it again tomorrow to see if it looks to be curing.
Southern Maryland, USA

1980 KZ250 LTD (traded, but still missed)
1982 KZ750 E3 (Cafe Project) (Dyna-S, Dyna Coils, V&H 4-1, K&N Pods, 6 Sigma Jet Kit, Acewell Computer, Woodcraft Clip-ons, Custom Rewire)
1966 A1 Samurai (Restoration Project)

Wish List:
KZ1000 P (For a "touring" bike)
Z1 (need I...

Please Log in or Create an account to join the conversation.

Clutch's 1982 KZ750 E3 Cafe 29 Oct 2011 15:25 #485924

  • clutch
  • clutch's Avatar Topic Author
  • Offline
  • User
  • I wish I had a tad more patience to do it better!
  • Posts: 1051
  • Thank you received: 12
SO, I'm thinking that I prematurely removed the warning light self checker from my 750. It appears that the low fuel light won't function properly without it. While examining the WD to try to figure out how I would wire it back in, I realized that my clymer's wd for my bike has the wiring for the oil pressure sensor and low fuel sensor circuits mixed up. Check it out!

750 E3 WD

And, while looking, if any of you electrical gurus can confirm that I would just hook up the brown to switched power, the middle y/b to the low fuel circuit, and the other y/b to ground. Is that correct? I got a little turned around because of the whole mixed up wd thing lol!


EDIT: Or do I really not need it? I'm not sure how much gas was actually in the tank when it came on.... :/


EDIT #2: Or maybe I wired it backwards and that makes it stay on all the time? Not sure why that would make a difference though. When the gasket stuff on my petcock adapter dries, I will put some gas in, and go for a ride to fill it up. If the Light stays on, I will try switching them first to see if it makes a difference...
Southern Maryland, USA

1980 KZ250 LTD (traded, but still missed)
1982 KZ750 E3 (Cafe Project) (Dyna-S, Dyna Coils, V&H 4-1, K&N Pods, 6 Sigma Jet Kit, Acewell Computer, Woodcraft Clip-ons, Custom Rewire)
1966 A1 Samurai (Restoration Project)

Wish List:
KZ1000 P (For a "touring" bike)
Z1 (need I...

Please Log in or Create an account to join the conversation.

Last edit: by clutch.

Clutch's 1982 KZ750 E3 Cafe 30 Oct 2011 03:51 #486030

  • clutch
  • clutch's Avatar Topic Author
  • Offline
  • User
  • I wish I had a tad more patience to do it better!
  • Posts: 1051
  • Thank you received: 12

clutch wrote: A little update on the gasket stuff. So far it hasn't set completely, though I am just looking at the squeeze out. It is still a little on the pasty side, but it has been cold here. I think leaving it until Monday will be a good idea, but I will check on it again tomorrow to see if it looks to be curing.


I just went out to the garage and tried to torque the adapter plate bolts down a little more. They are as tight as they will go, so I'm hoping that means the gasket material has set. If I have a little time before work tomorrow, I will put some gas in it to see how it holds up...if not, I will do it on Monday. Either way, I will update on how well the stuff sealed the tank for me.
Southern Maryland, USA

1980 KZ250 LTD (traded, but still missed)
1982 KZ750 E3 (Cafe Project) (Dyna-S, Dyna Coils, V&H 4-1, K&N Pods, 6 Sigma Jet Kit, Acewell Computer, Woodcraft Clip-ons, Custom Rewire)
1966 A1 Samurai (Restoration Project)

Wish List:
KZ1000 P (For a "touring" bike)
Z1 (need I...

Please Log in or Create an account to join the conversation.

Last edit: by clutch.

Clutch's 1982 KZ750 E3 Cafe 30 Oct 2011 11:42 #486061

  • Motor Head
  • Motor Head's Avatar
  • Offline
  • User
  • FIX UP YOUR BIKE RIGHT AND CHEAP
  • Posts: 5138
  • Thank you received: 391
Did you get your Low Fuel Light straightened out?
The reason for the err in the Clymer is it is that way from Kawasaki. here is the Kaw version in Filebase: www.kzrider.com/filebase/doc_download/311-z750e3
Same mixed up diagram.
Brown is Ignition switched 12v, the two Black/ yellows from the sensor in the tank, one to ground ie chassis, and the other to the bulb. So the bulb has switched 12v to the center, and the Black/ yellow from the tank to the outer case.
1982 KZ1000LTD K2 Vance & Hines 4-1 ACCEL COILS Added Vetter fairing & Bags. FOX Racing rear Shocks, Braced Swing-arm, Fork Brace, Progressive Fork Springs RT Gold Emulators, APE Valve Springs, 1166 Big Bore kit, RS34's, GPZ cams.
1980 KZ550LTD C1 Stock SOLD Miss it
1979 MAZDA RX7 in the works, 13B...

Please Log in or Create an account to join the conversation.

Clutch's 1982 KZ750 E3 Cafe 30 Oct 2011 14:17 #486076

  • clutch
  • clutch's Avatar Topic Author
  • Offline
  • User
  • I wish I had a tad more patience to do it better!
  • Posts: 1051
  • Thank you received: 12

Motor Head wrote: Did you get your Low Fuel Light straightened out?
The reason for the err in the Clymer is it is that way from Kawasaki. here is the Kaw version in Filebase: www.kzrider.com/filebase/doc_download/311-z750e3
Same mixed up diagram.
Brown is Ignition switched 12v, the two Black/ yellows from the sensor in the tank, one to ground ie chassis, and the other to the bulb. So the bulb has switched 12v to the center, and the Black/ yellow from the tank to the outer case.


Not quite yet (still need to put some gas in the tank), but after thinking about it for a while, I wonder if it has something to do with using an LED indicator instead of the standard type bulb? My understanding is that it somehow works off of resistance, and resistance is very low with the LED's. I know the wiring is correct, as I did it custom..just not sure if it makes a difference which one off the sensor comes from the indicator, and which goes to ground.
Southern Maryland, USA

1980 KZ250 LTD (traded, but still missed)
1982 KZ750 E3 (Cafe Project) (Dyna-S, Dyna Coils, V&H 4-1, K&N Pods, 6 Sigma Jet Kit, Acewell Computer, Woodcraft Clip-ons, Custom Rewire)
1966 A1 Samurai (Restoration Project)

Wish List:
KZ1000 P (For a "touring" bike)
Z1 (need I...

Please Log in or Create an account to join the conversation.

Clutch's 1982 KZ750 E3 Cafe 30 Oct 2011 15:05 #486082

  • Motor Head
  • Motor Head's Avatar
  • Offline
  • User
  • FIX UP YOUR BIKE RIGHT AND CHEAP
  • Posts: 5138
  • Thank you received: 391
You may already know this, but LED is Light Emitting Diode, so it makes a difference which way the current flows through the LED bulb. It will only work in one direction.
Like I said you probably know this. :whistle:
1982 KZ1000LTD K2 Vance & Hines 4-1 ACCEL COILS Added Vetter fairing & Bags. FOX Racing rear Shocks, Braced Swing-arm, Fork Brace, Progressive Fork Springs RT Gold Emulators, APE Valve Springs, 1166 Big Bore kit, RS34's, GPZ cams.
1980 KZ550LTD C1 Stock SOLD Miss it
1979 MAZDA RX7 in the works, 13B...

Please Log in or Create an account to join the conversation.

Clutch's 1982 KZ750 E3 Cafe 30 Oct 2011 15:07 #486084

  • clutch
  • clutch's Avatar Topic Author
  • Offline
  • User
  • I wish I had a tad more patience to do it better!
  • Posts: 1051
  • Thank you received: 12

Motor Head wrote: You may already know this, but LED is Light Emitting Diode, so it makes a difference which way the current flows through the LED bulb. It will only work in one direction.
Like I said you probably know this. :whistle:


Right. I know that part is wired correctly, because the indicator comes on. I'm just not 100% sure that it is going off when it should (not low on fuel).
Southern Maryland, USA

1980 KZ250 LTD (traded, but still missed)
1982 KZ750 E3 (Cafe Project) (Dyna-S, Dyna Coils, V&H 4-1, K&N Pods, 6 Sigma Jet Kit, Acewell Computer, Woodcraft Clip-ons, Custom Rewire)
1966 A1 Samurai (Restoration Project)

Wish List:
KZ1000 P (For a "touring" bike)
Z1 (need I...

Please Log in or Create an account to join the conversation.

Clutch's 1982 KZ750 E3 Cafe 30 Oct 2011 15:27 #486089

  • Motor Head
  • Motor Head's Avatar
  • Offline
  • User
  • FIX UP YOUR BIKE RIGHT AND CHEAP
  • Posts: 5138
  • Thank you received: 391
So it is staying ON? That might be because of the small resistance still in the Thermistor. Maybe wire it up to either a relay or a transistor to switch it, on/ off.
1982 KZ1000LTD K2 Vance & Hines 4-1 ACCEL COILS Added Vetter fairing & Bags. FOX Racing rear Shocks, Braced Swing-arm, Fork Brace, Progressive Fork Springs RT Gold Emulators, APE Valve Springs, 1166 Big Bore kit, RS34's, GPZ cams.
1980 KZ550LTD C1 Stock SOLD Miss it
1979 MAZDA RX7 in the works, 13B...

Please Log in or Create an account to join the conversation.

Powered by Kunena Forum