
Need some sanding help
- pollocksn
-
 Topic Author
- Offline
- User
-

Registered
- Posts: 68
- Thanks: 1
Need some sanding help
10 May 2007 01:18
Ok fellas I am about ready to sand down all of my body pieces and get them ready for paint. I have never done anything like this before so I dont know how to even start. I am going to have my brother shoot it for me (he cusomizes private jets) He lives about three hours away so I need to get all this done by myself before he comes up. What grit do I start with do you have any tips? All of the pieces are good with no cracks so I will not need to do any filler or dent work. Do I just sand it down to the bare metal? Any help will be appreciated!!!
Please Log in or Create an account to join the conversation.
- JMKZHI
-

- Offline
- Platinum Member
-

Registered
- Posts: 2428
- Thanks: 48
Last edit: 03 Dec 2008 11:03 by JMKZHI.
Please Log in or Create an account to join the conversation.
- KZErider
-
- Offline
- User
-
Registered
- Posts: 353
- Thanks: 12
Re: Need some sanding help
10 May 2007 06:42
Go to the thread at the top of the Paint&Bodywork forum list -- How to: paint you bike. It'll probably answer most of your questions.
Good luck on your paint job!")
Good luck on your paint job!
81 KZ750E2(project), 81 KZ750E2(parts donor), 87 BMW K 75C - got it runnin, didn't care for it, holding for family member, 79 CB650(project) Nomad 1700, VStar 950
Please Log in or Create an account to join the conversation.
- Pterosaur
-
- User
-
Public
- Thanks: 0
Re: Need some sanding help
10 May 2007 06:45
Depends on how trick you want to get.
Sanding to achieve what would otherwise be known as *quality* results - especially over previous paint is literally an art form in itself. The reason is that breaking through a paint edge automatically forms a low spot that requires a technique known as "feathering" to prevent low spots, ripples and washboarding from appearing in any primer/paint layers that are applied over it.
Without some previous experience, it's doubtful that short of sanding a tank to bare metal will produce satisfactory results. And trying to sand original paint to bare metal is gonna take awhile, regardless.
A much quicker solution is to hunt down an amiable radiator shop - one that boils truck cores - and pay them $5 or $10 to have them put it in their lye tank for awhile. Comes out bare metal and clean as a whistle. Scuff with #400 paper an prime away.
Sidecovers and 'tails are more problematic - same paint, more fragile substrate. Taking them down to raw plastic can be done with chemical strippers and a great deal of care, but I don't think that's an option here. Likewise - for the above-mentioned problems associated with arriving at an even surface, it's pretty easy to wind up with a wavy-gravy set of plastic.
The quickest and probably cleanest solution in your case would be to remove all badges/emblems and sand the covers/tail *carefully* with #400 wet until you achieve a uniform, totally sanded appearance. Apply a couple of *DRY* shot coats of primer, re-sand with #400 wet, then re-prime and let your brother take it from there.
JMK has a point, however - if your brother's experienced, it might save headaches and heartaches to have him handle the job from the get-go.")
Sanding to achieve what would otherwise be known as *quality* results - especially over previous paint is literally an art form in itself. The reason is that breaking through a paint edge automatically forms a low spot that requires a technique known as "feathering" to prevent low spots, ripples and washboarding from appearing in any primer/paint layers that are applied over it.
Without some previous experience, it's doubtful that short of sanding a tank to bare metal will produce satisfactory results. And trying to sand original paint to bare metal is gonna take awhile, regardless.
A much quicker solution is to hunt down an amiable radiator shop - one that boils truck cores - and pay them $5 or $10 to have them put it in their lye tank for awhile. Comes out bare metal and clean as a whistle. Scuff with #400 paper an prime away.
Sidecovers and 'tails are more problematic - same paint, more fragile substrate. Taking them down to raw plastic can be done with chemical strippers and a great deal of care, but I don't think that's an option here. Likewise - for the above-mentioned problems associated with arriving at an even surface, it's pretty easy to wind up with a wavy-gravy set of plastic.
The quickest and probably cleanest solution in your case would be to remove all badges/emblems and sand the covers/tail *carefully* with #400 wet until you achieve a uniform, totally sanded appearance. Apply a couple of *DRY* shot coats of primer, re-sand with #400 wet, then re-prime and let your brother take it from there.
JMK has a point, however - if your brother's experienced, it might save headaches and heartaches to have him handle the job from the get-go.
Please Log in or Create an account to join the conversation.
- pollocksn
-
Topic Author
- Offline
- User
-
Registered
- Posts: 68
- Thanks: 1
Re: Need some sanding help
10 May 2007 10:52
Well I really wanted to do it myself so I could learn something. I knew I could ask him but his schedule and mine are opposite so it is hard to get ahold of him. Plus, he lives in another state. I already have a tracy body on the bike and I dont like it so im going to go back to the stock body. I is not a big deal if this takes me awhile. I have a feeling this going to take me a lot longer than I thought and give me some headaches along the way. Oh well this is why I bought the bike, to play around and try to learn stuff. Thanks for the tips
Please Log in or Create an account to join the conversation.
- Pterosaur
-
- User
-
Public
- Thanks: 0
Re: Need some sanding help
10 May 2007 11:17
pollocksn wrote:
A noble enough goal, however...
To be sure.
The purpose here is not not be outright discouraging, but rather realistic; there's a reason why it often takes years to become a decent - and skilled - paint/body combo guy - there's a *LOT* to know and it's the type of knowledge that isn't easily discernable by text alone - as regards paint and bodywork, there's no substitute for experience - and gaining experience dictates learning from mistakes.
Stick around - there *might* ve a series in the works on the topic.
Well I really wanted to do it myself so I could learn something.
A noble enough goal, however...
I have a feeling this going to take me a lot longer than I thought and give me some headaches along the way...
To be sure.
The purpose here is not not be outright discouraging, but rather realistic; there's a reason why it often takes years to become a decent - and skilled - paint/body combo guy - there's a *LOT* to know and it's the type of knowledge that isn't easily discernable by text alone - as regards paint and bodywork, there's no substitute for experience - and gaining experience dictates learning from mistakes.
Oh well this is why I bought the bike, to play around and try to learn stuff. Thanks for the tips
Stick around - there *might* ve a series in the works on the topic.
Please Log in or Create an account to join the conversation.
- pollocksn
-
Topic Author
- Offline
- User
-
Registered
- Posts: 68
- Thanks: 1
Re: Need some sanding help
10 May 2007 13:27
Well I had been waiting on the tank to get here and it got here today. I was really surprised with how it looks. It is almost flawless just one tiny nick on it. I was wondering if there is anyway that you guys know of as to match the paint that is already on the tank? If I could just repaint the side covers and tailpiece to match that might be easier. If not oh well. Also any paint choice tips? I know that black will show every little imperfection in the paint. Is there any colors that tend to not highlight little blemishes?
Please Log in or Create an account to join the conversation.
- Pterosaur
-
- User
-
Public
- Thanks: 0
Re: Need some sanding help
10 May 2007 13:39
pollocksn wrote:
Some pics of the tank would definitely help.
Not sure exactly what color(s) are needed - some are less difficult to *wing it* on than others. Older Kaw paint codes are problematic, because they're not readily available in either pre-mixed or as mixing formulas. Some specialty shops - such as Paintworkz - a member here have gone to some trouble to match older Kaw colors as closely as possible - but I'm not sure about availability.
Definitely, if the original paint is in even *good* condition, it's worth saving...
Wait a minute! Wait! Do I hear the patter
 of RonKZ dancing a jig somewhere?
For hiding multitudes of sins, lighter, non-metallic shades are best - white, yellow, arrest-me-reds, some lighter blues. As you go darker, contrast becomes an issue.
Well I had been waiting on the tank to get here and it got here today. I was really surprised with how it looks. It is almost flawless just one tiny nick on it....
Some pics of the tank would definitely help.
Not sure exactly what color(s) are needed - some are less difficult to *wing it* on than others. Older Kaw paint codes are problematic, because they're not readily available in either pre-mixed or as mixing formulas. Some specialty shops - such as Paintworkz - a member here have gone to some trouble to match older Kaw colors as closely as possible - but I'm not sure about availability.
Definitely, if the original paint is in even *good* condition, it's worth saving...
Wait a minute! Wait! Do I hear the patter
Also any paint choice tips? I know that black will show every little imperfection in the paint. Is there any colors that tend to not highlight little blemishes?
For hiding multitudes of sins, lighter, non-metallic shades are best - white, yellow, arrest-me-reds, some lighter blues. As you go darker, contrast becomes an issue.
Attachments:
Please Log in or Create an account to join the conversation.
- pollocksn
-
Topic Author
- Offline
- User
-
Registered
- Posts: 68
- Thanks: 1
Please Log in or Create an account to join the conversation.
- pollocksn
-
Topic Author
- Offline
- User
-
Registered
- Posts: 68
- Thanks: 1
Re: Need some sanding help
10 May 2007 20:52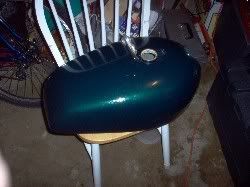
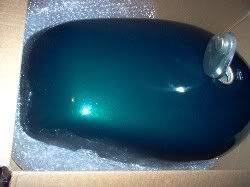
Here are some pics of the tank. It looks almost blue in the pics but it is actually dark green. I am not sure if it is the original paint or not.
Please Log in or Create an account to join the conversation.
- RetroRiceRocketRider
-

- Offline
- User
-
Registered
- ...bring in the machine that goes PING!
- Posts: 1641
- Thanks: 29
Re: Need some sanding help
10 May 2007 21:05
I don't ever recall seeing that shade of green on a 650 before.
And there isn't any pin stripping on it, which IIRC all the 650's came with.
Still, it's not a bad looking paint job or color.")
And there isn't any pin stripping on it, which IIRC all the 650's came with.
Still, it's not a bad looking paint job or color.

78 KZ650-B2 = SOLD
84 ZN700 LTD = SOLD
84 ZX750 GPz = SOLD
89 GSX1100F Katana = SLEEPING

20 VN1700 Vulcan Vaquero (the Blue Cowboy)
Looking for my next project KZ
Please Log in or Create an account to join the conversation.
- pollocksn
-
Topic Author
- Offline
- User
-
Registered
- Posts: 68
- Thanks: 1
Re: Need some sanding help
11 May 2007 15:24
yeah I really dont think that it is stock. There are not any emblems on it either. So far I have the tail piece and the side covers sanded down. The side covers have been primed. I was going to get to the tailpiece then it started raining. I had to bring all the stuff that I put outside back inside. Maybe when this rain stops I can get to it.
Please Log in or Create an account to join the conversation.
Moderators: Street Fighter LTD