
1974 Z1 Master Cylinder Reassembly
- DOHC
-
 Topic Author
- Offline
- Sustaining Member
-

Registered
- Those Doe-Hawks really go!
- Posts: 1271
- Thanks: 600
1974 Z1 Master Cylinder Reassembly
17 Jun 2021 13:00 - 17 Jun 2021 13:03
I'm working on assembling a 1974 Z1 front master cylinder. I wanted to make sure I install the various retaining rings in the correct order. Also, the manual shows a special tool for this purpose. Any advice on a substitute for this tool?
I now have more appreciation for the late 70s master cylinder. They removed a bunch of parts and made the overall assembly simpler.
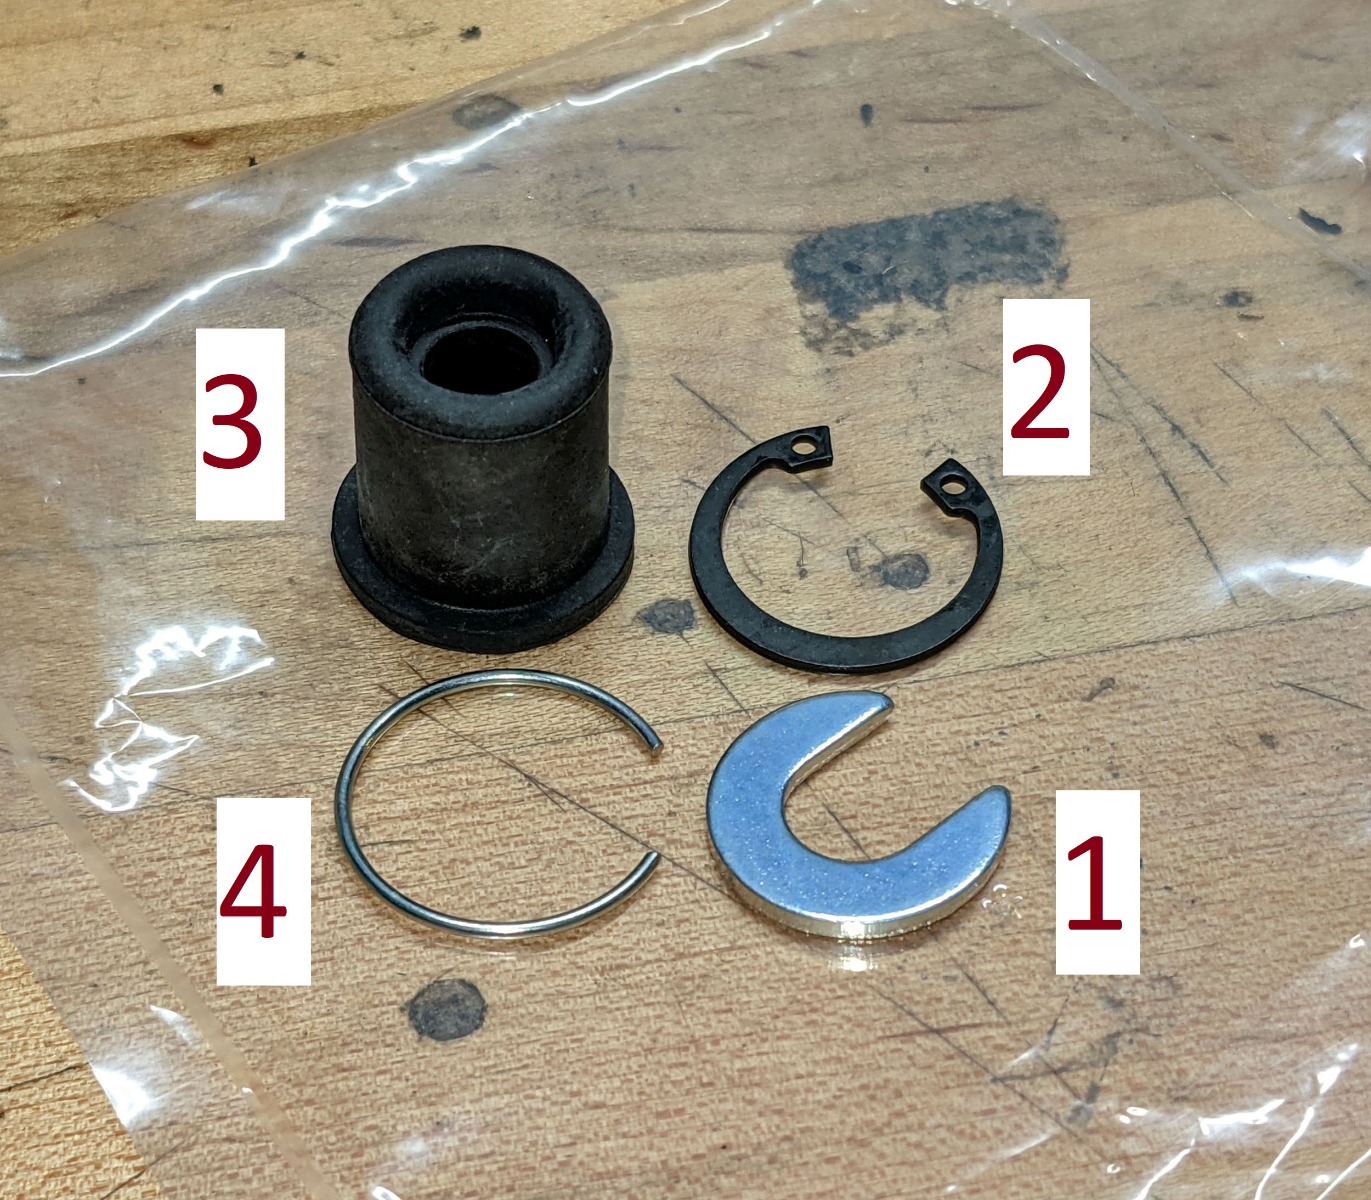
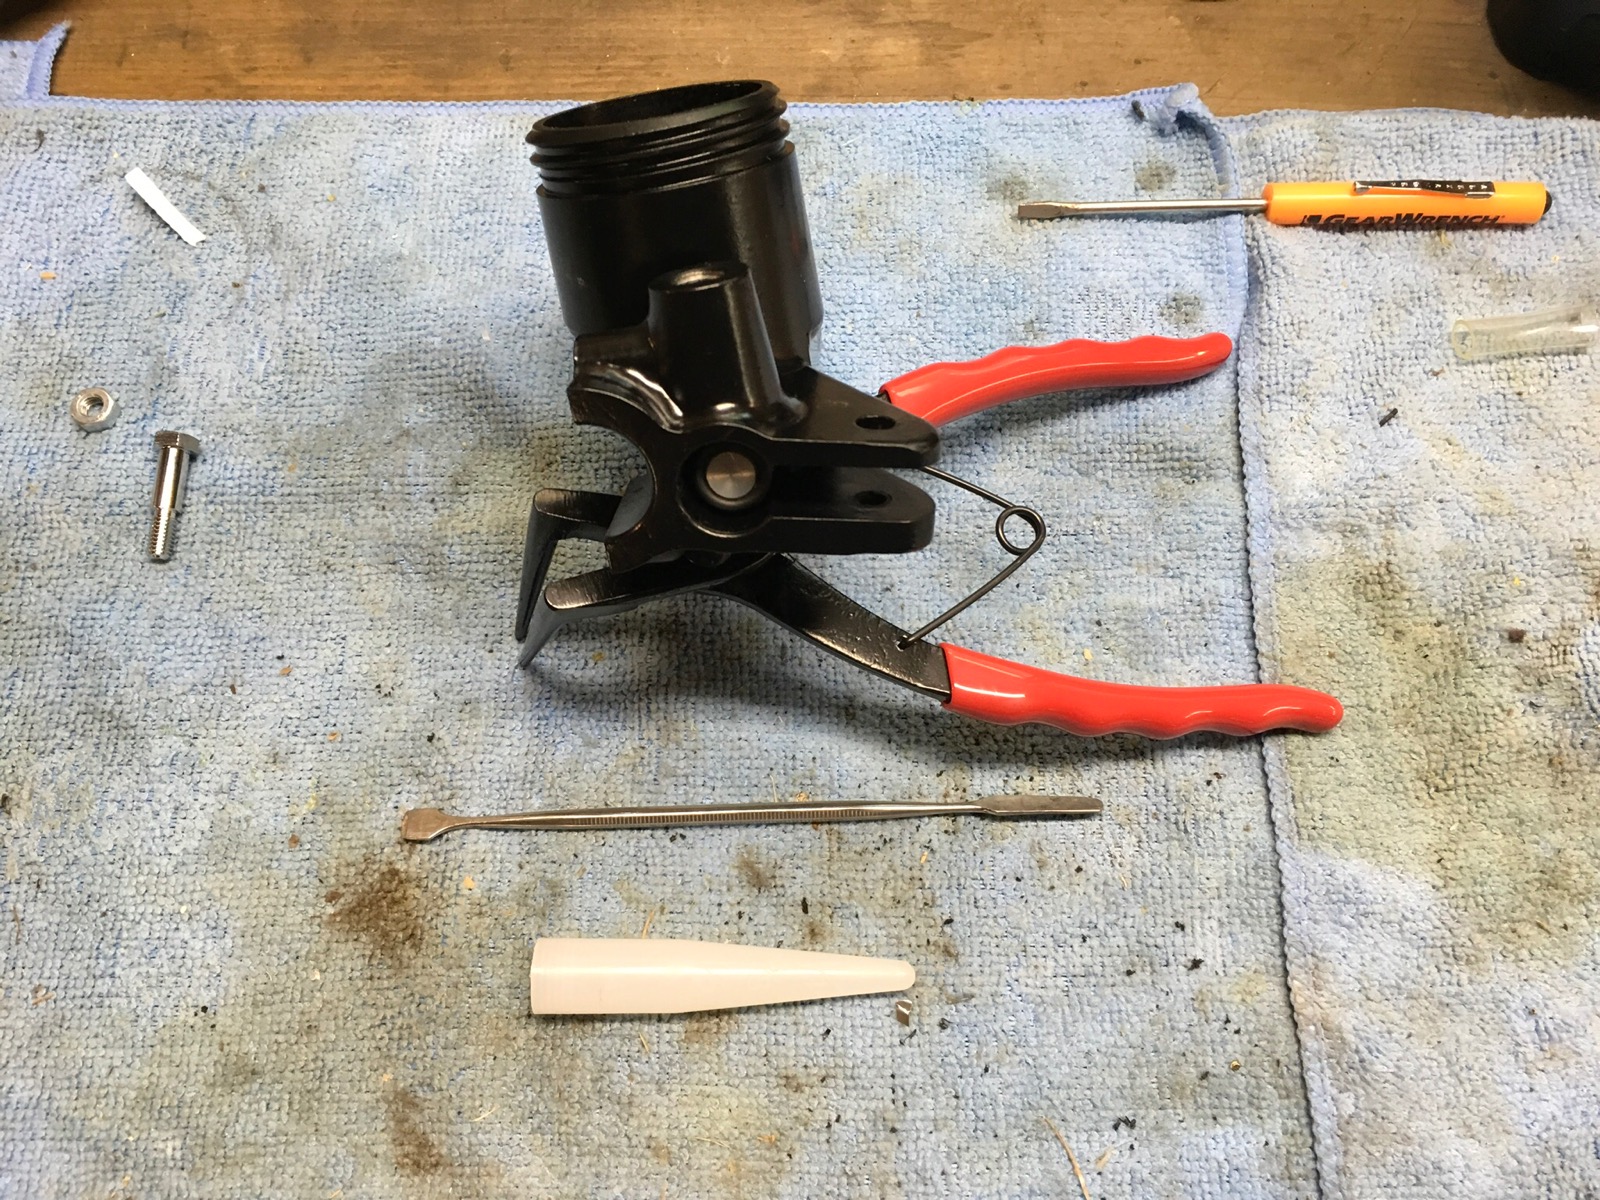
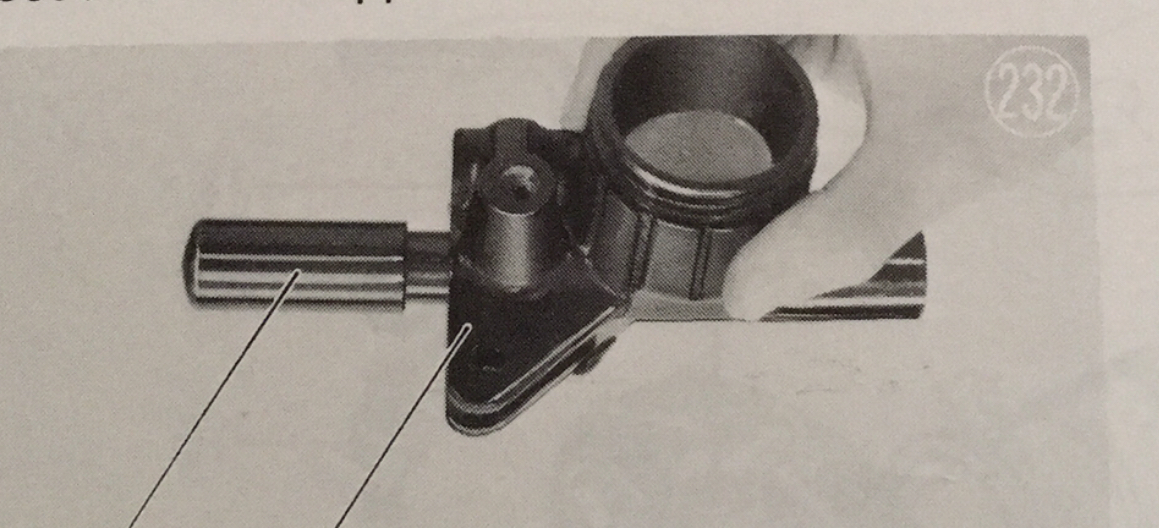
Here are the parts. I have labeled them with my best guess as to the order of assembly.
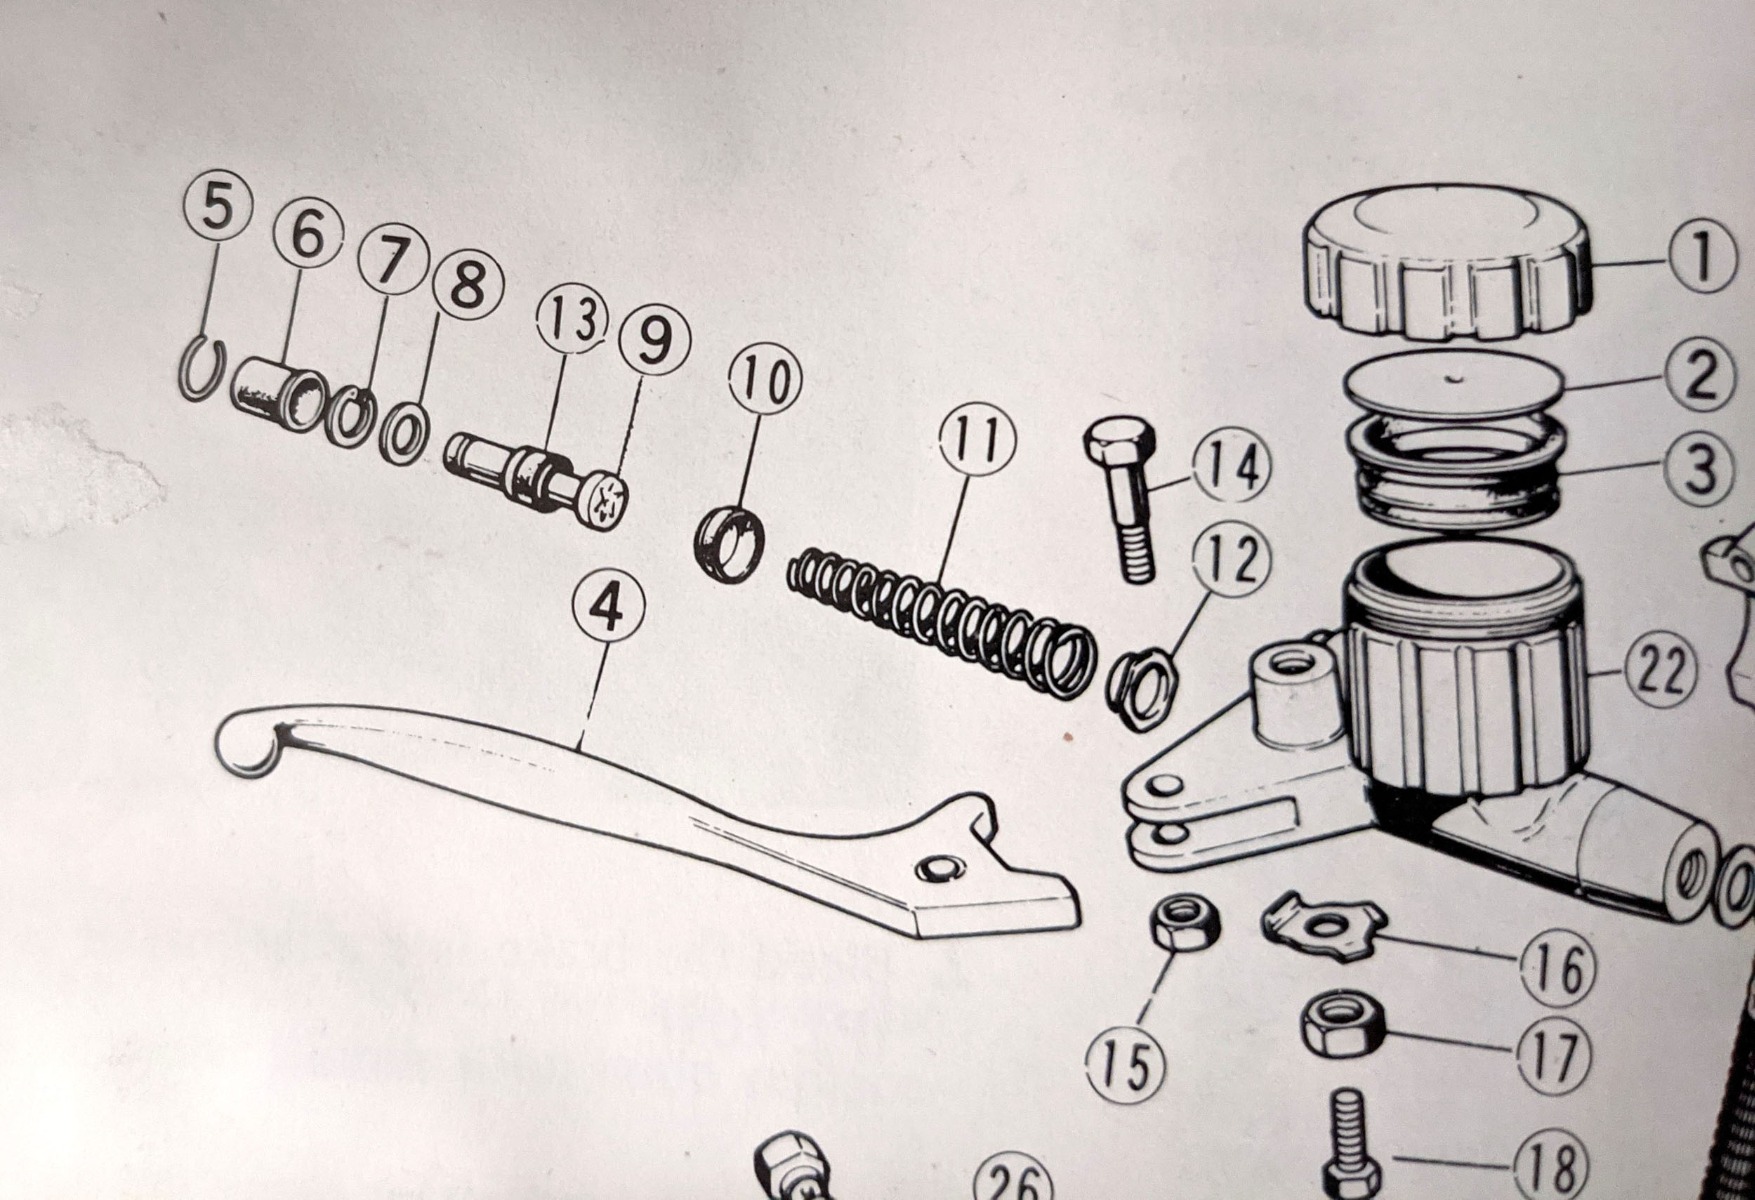
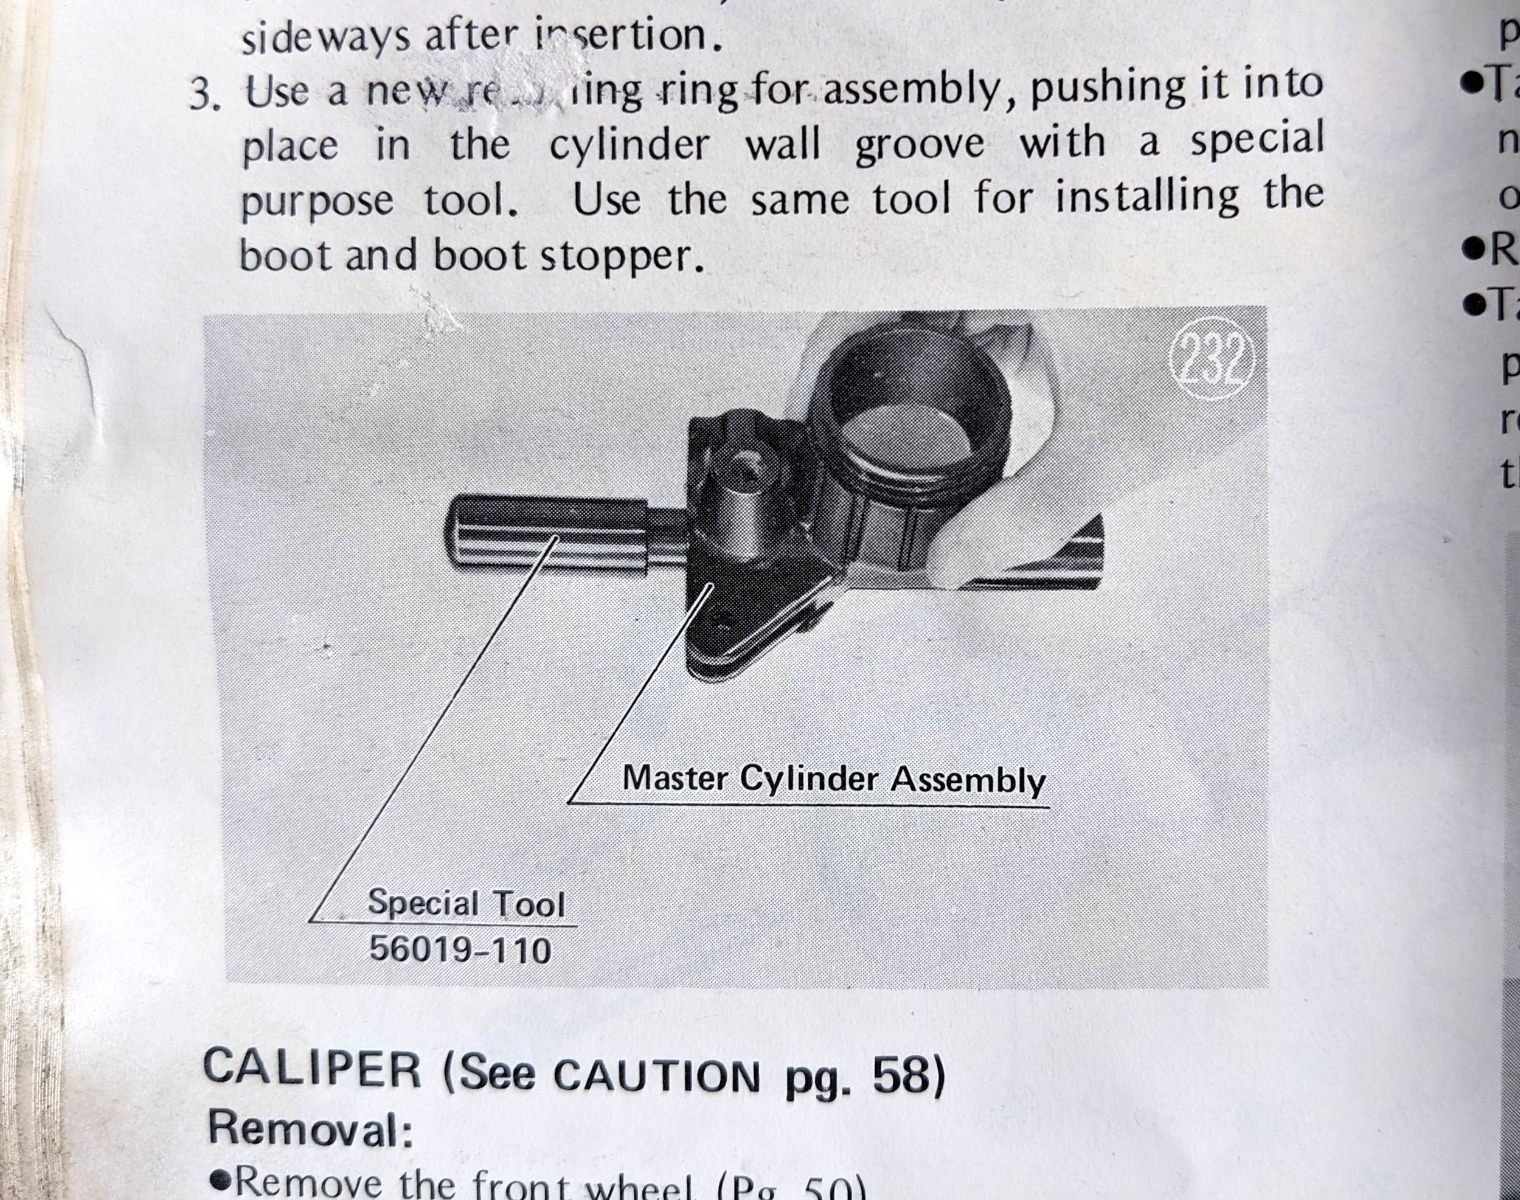
Here are the other images from the manual:
I now have more appreciation for the late 70s master cylinder. They removed a bunch of parts and made the overall assembly simpler.
Here are the parts. I have labeled them with my best guess as to the order of assembly.
Here are the other images from the manual:
'78 Z1-R in blue
, '78 Z1-R in black,
'78 Z1-R in pieces
My dad's '74 Z1
'00 ZRX1100
My dad's '74 Z1
'00 ZRX1100
Last edit: 17 Jun 2021 13:03 by DOHC.
Please Log in or Create an account to join the conversation.
- Scirocco
-

- Offline
- Premium Member
-

Registered
- Never change a running system
- Posts: 4397
- Thanks: 2260
Re: 1974 Z1 Master Cylinder Reassembly
17 Jun 2021 15:15 - 17 Jun 2021 15:16The order of assembly is correct and the tool #56019-110 is nothing more like a tube with a handle grib to push/press the snap rings into the MC bore.I'm working on assembling a 1974 Z1 front master cylinder. I wanted to make sure I install the various retaining rings in the correct order. Also, the manual shows a special tool for this purpose. Any advice on a substitute for this tool?
I now have more appreciation for the late 70s master cylinder. They removed a bunch of parts and made the overall assembly simpler.
Here are the parts. I have labeled them with my best guess as to the order of assembly.
Here are the other images from the manual:
My 1975 Z 1 B 900 Project
www.kzrider.com/forum/11-projects/605133...ears-deep-sleep-mode
www.kzrider.com/forum/11-projects/605133...ears-deep-sleep-mode
Last edit: 17 Jun 2021 15:16 by Scirocco.
The following user(s) said Thank You: DOHC
Please Log in or Create an account to join the conversation.
- Scirocco
-
- Offline
- Premium Member
-
Registered
- Never change a running system
- Posts: 4397
- Thanks: 2260
Re: 1974 Z1 Master Cylinder Reassembly
17 Jun 2021 15:28
To prevent you new MC seal for any danage during the install read here. It works like a piston ring compressor.
www.kzrider.com/forum/11-projects/605133...mode?start=24#765087
www.kzrider.com/forum/11-projects/605133...mode?start=24#765087
My 1975 Z 1 B 900 Project
www.kzrider.com/forum/11-projects/605133...ears-deep-sleep-mode
www.kzrider.com/forum/11-projects/605133...ears-deep-sleep-mode
Please Log in or Create an account to join the conversation.
- Mikaw
-
- Offline
- Sustaining Member
-
Registered
- Posts: 4825
- Thanks: 1852
Re: 1974 Z1 Master Cylinder Reassembly
17 Jun 2021 15:30 - 17 Jun 2021 15:32
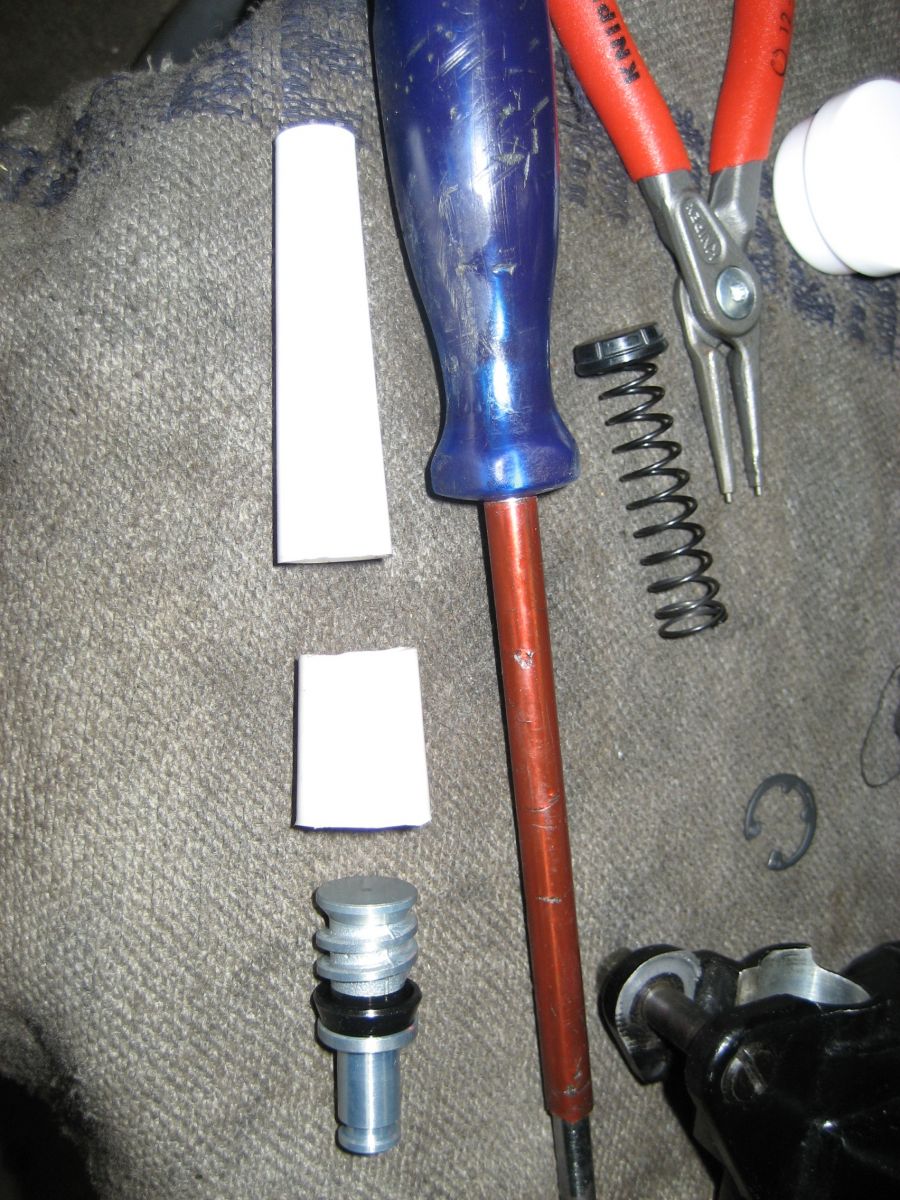
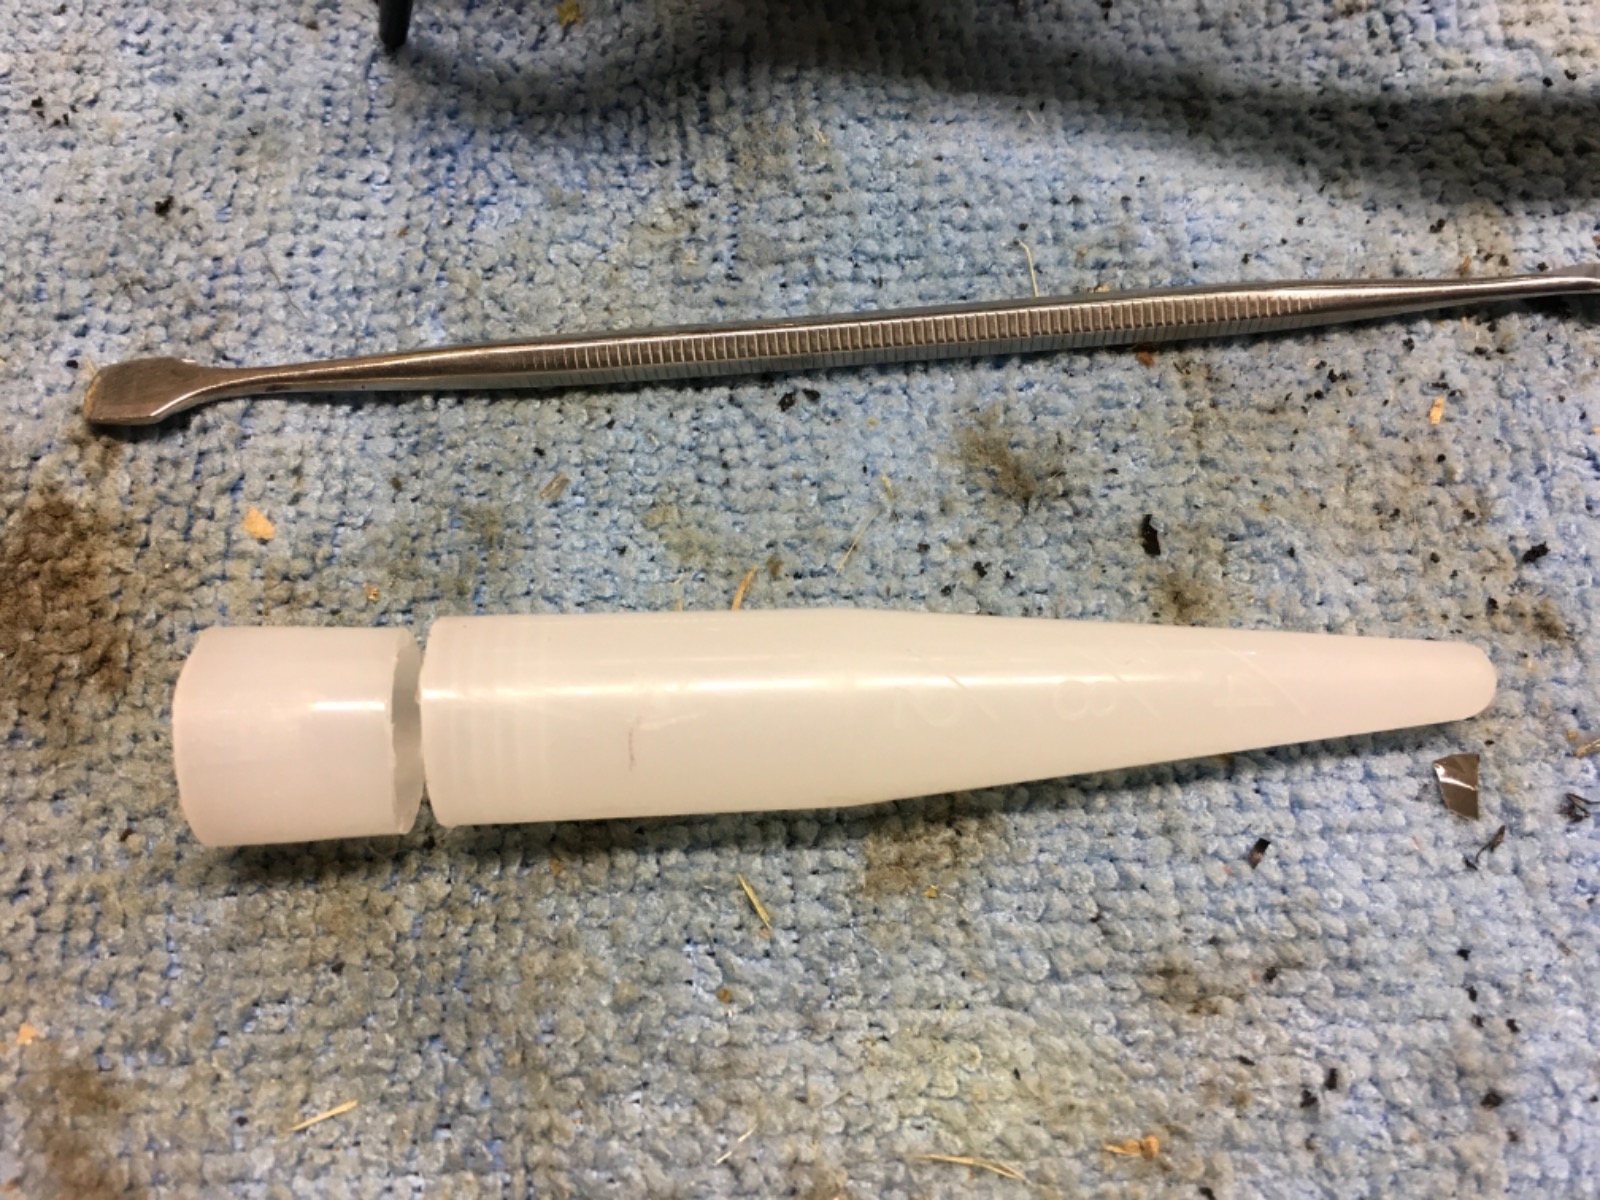
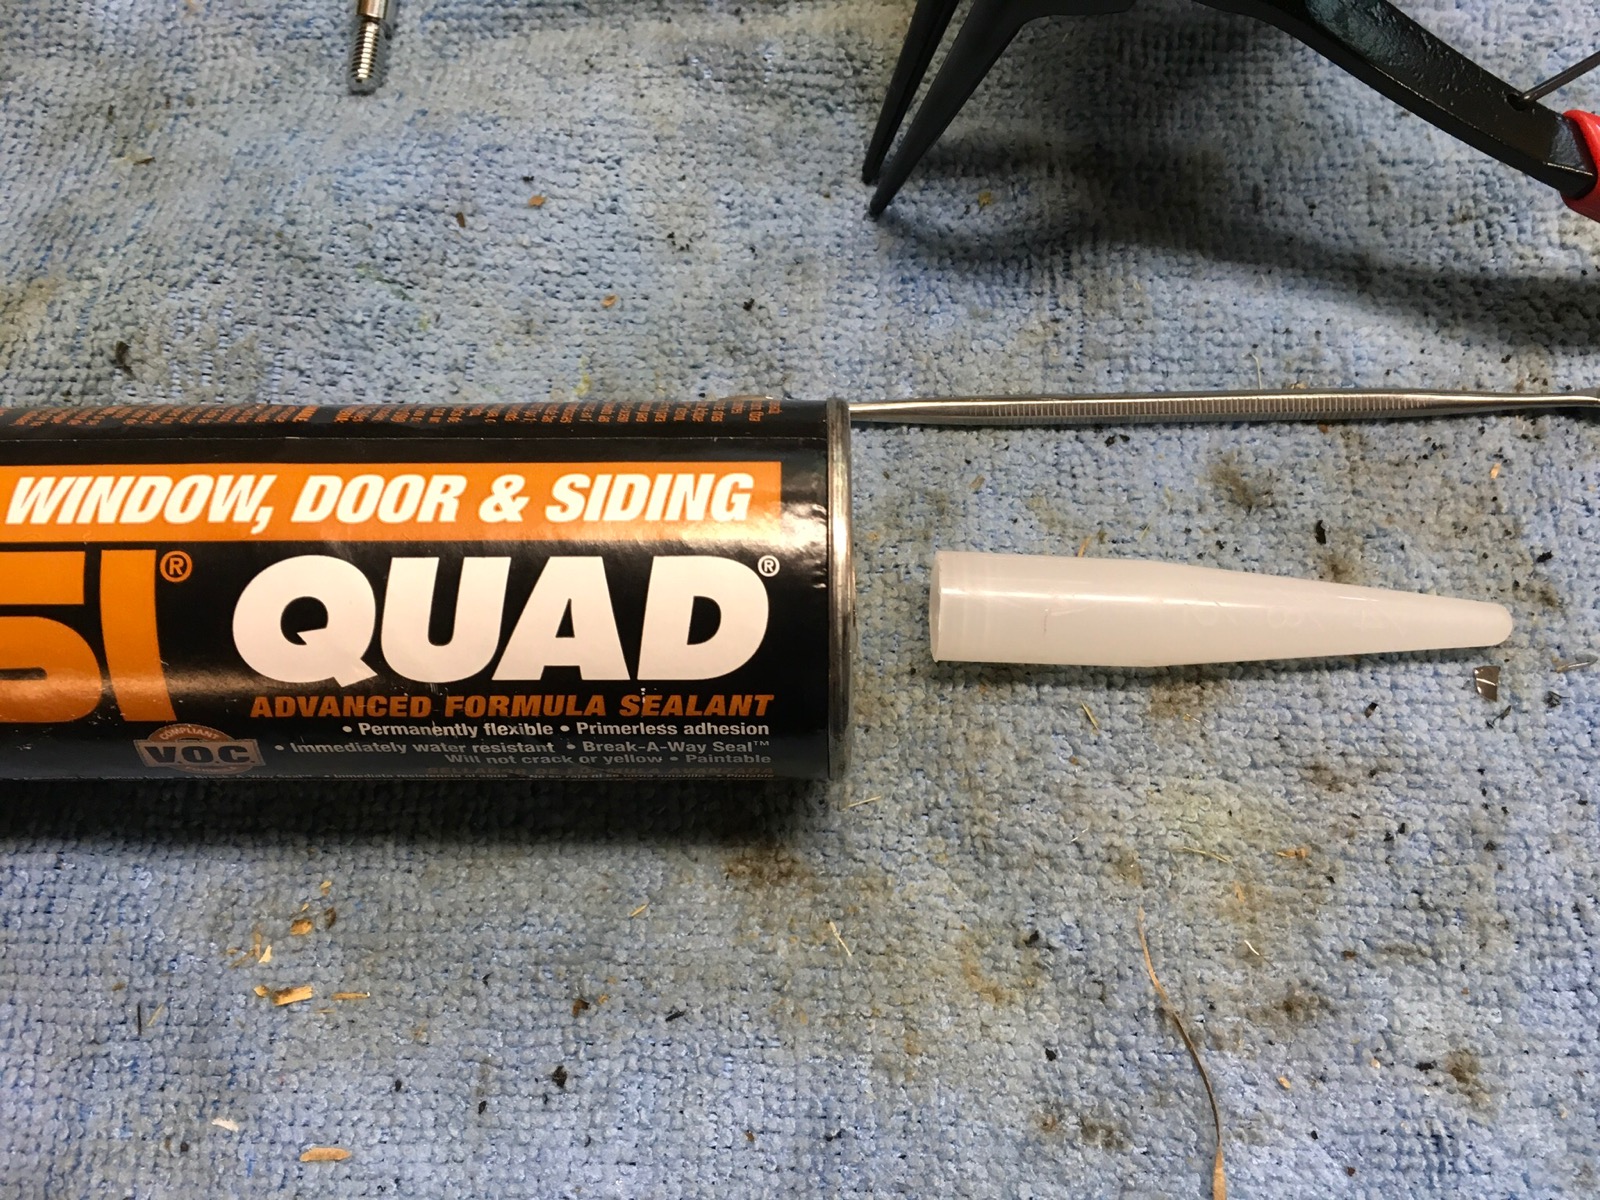
I found a nozzle of a caulk tube that fit over number 3 but inside the mc to push the circlip number 4. Motion pro sells the deep reach internal E-Clip pliers
1976 KZ 900 A4
kzrider.com/forum/11-projects/613548-1976-kz-900-a4
1976 KZ 900 B1 LTD
1978 KZ 1000 B2 LTD
1980 KZ 750 E1
Kowledge Speaks, But Wisdom Listens.
Jimi Hendrix.
1976 KZ 900 B1 LTD
1978 KZ 1000 B2 LTD
1980 KZ 750 E1
Kowledge Speaks, But Wisdom Listens.
Jimi Hendrix.
Last edit: 17 Jun 2021 15:32 by Mikaw.
Please Log in or Create an account to join the conversation.
- Mikaw
-
- Offline
- Sustaining Member
-
Registered
- Posts: 4825
- Thanks: 1852
Re: 1974 Z1 Master Cylinder Reassembly
17 Jun 2021 15:33
Here’s the caulk cartridge that I found to make the pusher out of
1976 KZ 900 A4
kzrider.com/forum/11-projects/613548-1976-kz-900-a4
1976 KZ 900 B1 LTD
1978 KZ 1000 B2 LTD
1980 KZ 750 E1
Kowledge Speaks, But Wisdom Listens.
Jimi Hendrix.
1976 KZ 900 B1 LTD
1978 KZ 1000 B2 LTD
1980 KZ 750 E1
Kowledge Speaks, But Wisdom Listens.
Jimi Hendrix.
The following user(s) said Thank You: DOHC
Please Log in or Create an account to join the conversation.
- DOHC
-
Topic Author
- Offline
- Sustaining Member
-
Registered
- Those Doe-Hawks really go!
- Posts: 1271
- Thanks: 600
Re: 1974 Z1 Master Cylinder Reassembly
17 Jun 2021 17:13Mikaw post=850321I found a nozzle of a caulk tube that fit over number 3 but inside the mc to push the circlip number 4. Motion pro sells the deep reach internal E-Clip pliers
Thanks for the tip. I'll see if I can find a tube the right size. I already had to buy the deep reach snap ring pliers to get it apart. The late 70s MC have a similar snap ring, but it's not as reassessed. I also did not realize the boot retaining ring was present until I got the whole thing apart. I think it slipped under the boot when I pulled off the boot, and was up against the snap ring hiding in all the of gunk. Once I got the snap ring off I discovered the other clip, but didn't really understand why it was there. That's why I figured I'd ask before I put it all back together.
Scirocco wrote: It works like a piston ring compressor.
Interesting. Using something like that has never occurred to me. I'll see what I can come up with.
Also, this is the first time I've had a reason to leaf through my dad's white Z1 manual. That book has seen some things. It's beat up and torn, pages are falling out, and was maybe dropped in some puddles several times. I definitely think he got his money worth from that purchase.
'78 Z1-R in blue
, '78 Z1-R in black,
'78 Z1-R in pieces
My dad's '74 Z1
'00 ZRX1100
My dad's '74 Z1
'00 ZRX1100
The following user(s) said Thank You: Mikaw
Please Log in or Create an account to join the conversation.
- Mikaw
-
- Offline
- Sustaining Member
-
Registered
- Posts: 4825
- Thanks: 1852
Re: 1974 Z1 Master Cylinder Reassembly
17 Jun 2021 19:24
Give the old manual a rightful place on the workbench shelve.
www.kzrider.com/filebase?task=download.send&id=406&catid=19&m=0
www.kzrider.com/filebase?task=download.send&id=406&catid=19&m=0
1976 KZ 900 A4
kzrider.com/forum/11-projects/613548-1976-kz-900-a4
1976 KZ 900 B1 LTD
1978 KZ 1000 B2 LTD
1980 KZ 750 E1
Kowledge Speaks, But Wisdom Listens.
Jimi Hendrix.
1976 KZ 900 B1 LTD
1978 KZ 1000 B2 LTD
1980 KZ 750 E1
Kowledge Speaks, But Wisdom Listens.
Jimi Hendrix.
The following user(s) said Thank You: DOHC
Please Log in or Create an account to join the conversation.
- slmjim+Z1BEBE
-

- Offline
- User
-

Registered
- Enjoy Life! IT HAS AN EXPIRATION DATE!
- Posts: 1416
- Thanks: 911
Re: 1974 Z1 Master Cylinder Reassembly
18 Jun 2021 05:17
Sounds like you've got it handled.
For future reference, disassembly is much, much easier if the outer end of the piston is snapped off prior to removing the snap ring (circlip).
With the piston still in the MC, use a large flat blade screwdriver gently wedged between the housing and the end of piston to force the exposed end of the piston shaft toward the slot in the MC where the brake lever lives. The aluminum piston material breaks off easily and fairly cleanly about even with where the finished bore begins. The broken end of the shaft is easily pulled out, leaving much more room to allow snap ring pliers to get into the holes of the snap ring. Once the snap ring is out, the other rings can easily be removed with probes. The remnants of the piston can then be pushed out with a brass rod inserted into the other end of the MC bore where the banjo bolt was removed.
Good Ridin'
slmjim & Z1BEBE
A biker looks at your engine and chrome.
A Rider looks at your odometer and tags.
1973 ('72 builds) Z1 x2
1974 Z1-A x2
1975 Z1-B x2
1993 CB 750 Nighthawk x2
2009 ST1300A
www.kawasaki-z-classik.com
A Forum tightly focused on all things Z1 and Z2.
A Rider looks at your odometer and tags.
1973 ('72 builds) Z1 x2
1974 Z1-A x2
1975 Z1-B x2
1993 CB 750 Nighthawk x2
2009 ST1300A
www.kawasaki-z-classik.com
A Forum tightly focused on all things Z1 and Z2.
The following user(s) said Thank You: Mikaw
Please Log in or Create an account to join the conversation.
- DOHC
-
Topic Author
- Offline
- Sustaining Member
-
Registered
- Those Doe-Hawks really go!
- Posts: 1271
- Thanks: 600
Re: 1974 Z1 Master Cylinder Reassembly
18 Jun 2021 06:40That would never have occurred to me. It certainly was a pain to the get the old piston out, even with the long nose snap ring pliers. However, it wasn't that bad putting it back together. I used those same snap ring pliers, and just pushed the piston in with a dowel to make more room for the pliers.slmjim+Z1BEBE post=850349For future reference, disassembly is much, much easier if the outer end of the piston is snapped off prior to removing the snap ring (circlip).
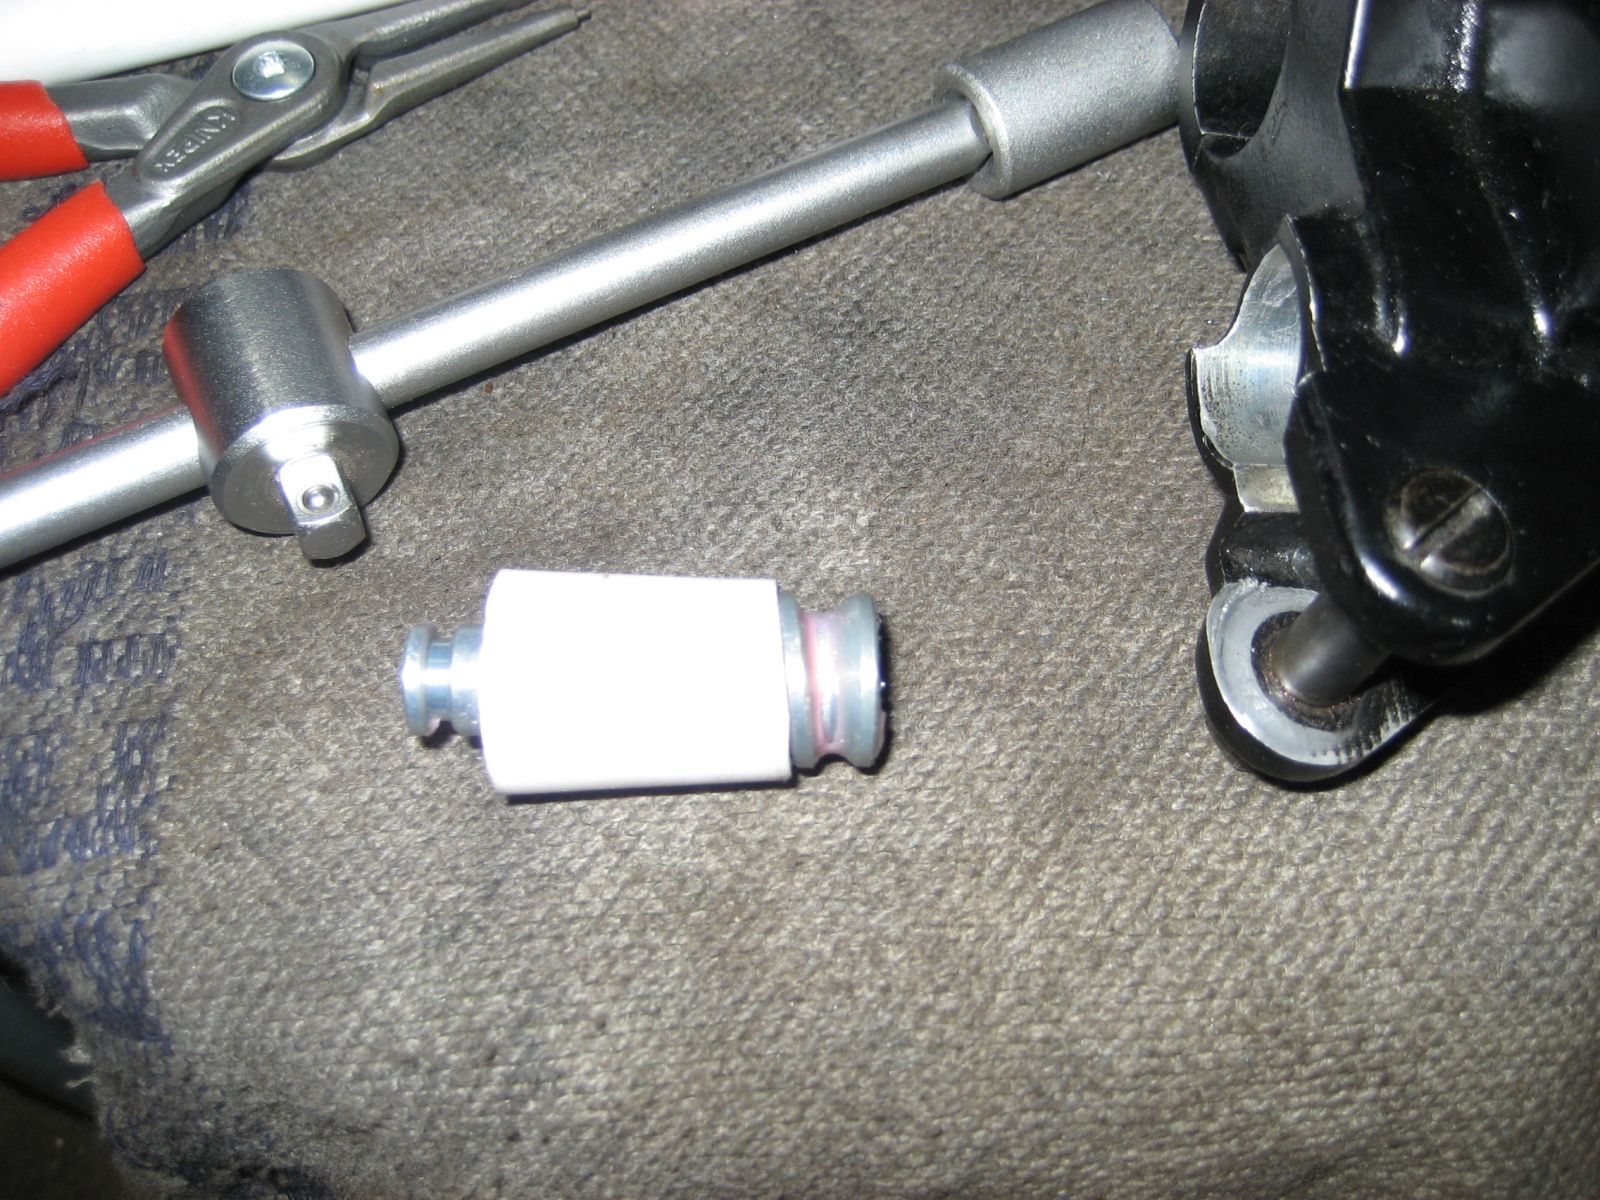
For the boot retaining ring, I tried to a few things. I tried a wrist pin, but the ID was too small. I tried 1/2" copper pipe, but that wasn't right either. Eventually I just used a rolled up piece of cardboard from a small box that was sitting on my bench. I had to poke it with a screwdriver to get it past the lip where the lever cutout is, but after that I pushed it down some more with the cardboard and it looks to be seated properly.
Another issue I had was with the lever stop eccentric adjuster. I bought an aftermarket eccentric bolt, but found an NOS rubber tube. Unfortunately when I tried to install the bolt, my fancy vintage rubber tube tore in halt. Oops. Fortunately I had been toying with an old Cox airplane engine the other day and had some silicone glow fuel line sitting on my bench. Turns out it's pretty much exactly the same size, but more compliant so it survived getting smashed around as I treaded in the eccentric bolt.
I think it's good to go now. I just hope it doesn't leak.
'78 Z1-R in blue
, '78 Z1-R in black,
'78 Z1-R in pieces
My dad's '74 Z1
'00 ZRX1100
My dad's '74 Z1
'00 ZRX1100
Please Log in or Create an account to join the conversation.
- DOHC
-
Topic Author
- Offline
- Sustaining Member
-
Registered
- Those Doe-Hawks really go!
- Posts: 1271
- Thanks: 600
Re: 1974 Z1 Master Cylinder Reassembly
18 Jun 2021 07:24 - 18 Jun 2021 07:39Thanks for the link. This must be an earlier printing than mine. Even though they have the same part number on the back cover, mine has a short supplement at page 153 between the wiring diagram and the index.Give the old manual a rightful place on the workbench shelve.
www.kzrider.com/filebase?task=download.send&id=406&catid=19&m=0
Edit: Mine says "Revision 2: February 1st, 1974" on the first page.
'78 Z1-R in blue
, '78 Z1-R in black,
'78 Z1-R in pieces
My dad's '74 Z1
'00 ZRX1100
My dad's '74 Z1
'00 ZRX1100
Last edit: 18 Jun 2021 07:39 by DOHC.
Please Log in or Create an account to join the conversation.
- DOHC
-
Topic Author
- Offline
- Sustaining Member
-
Registered
- Those Doe-Hawks really go!
- Posts: 1271
- Thanks: 600
Re: 1974 Z1 Master Cylinder Reassembly
18 Jun 2021 07:36
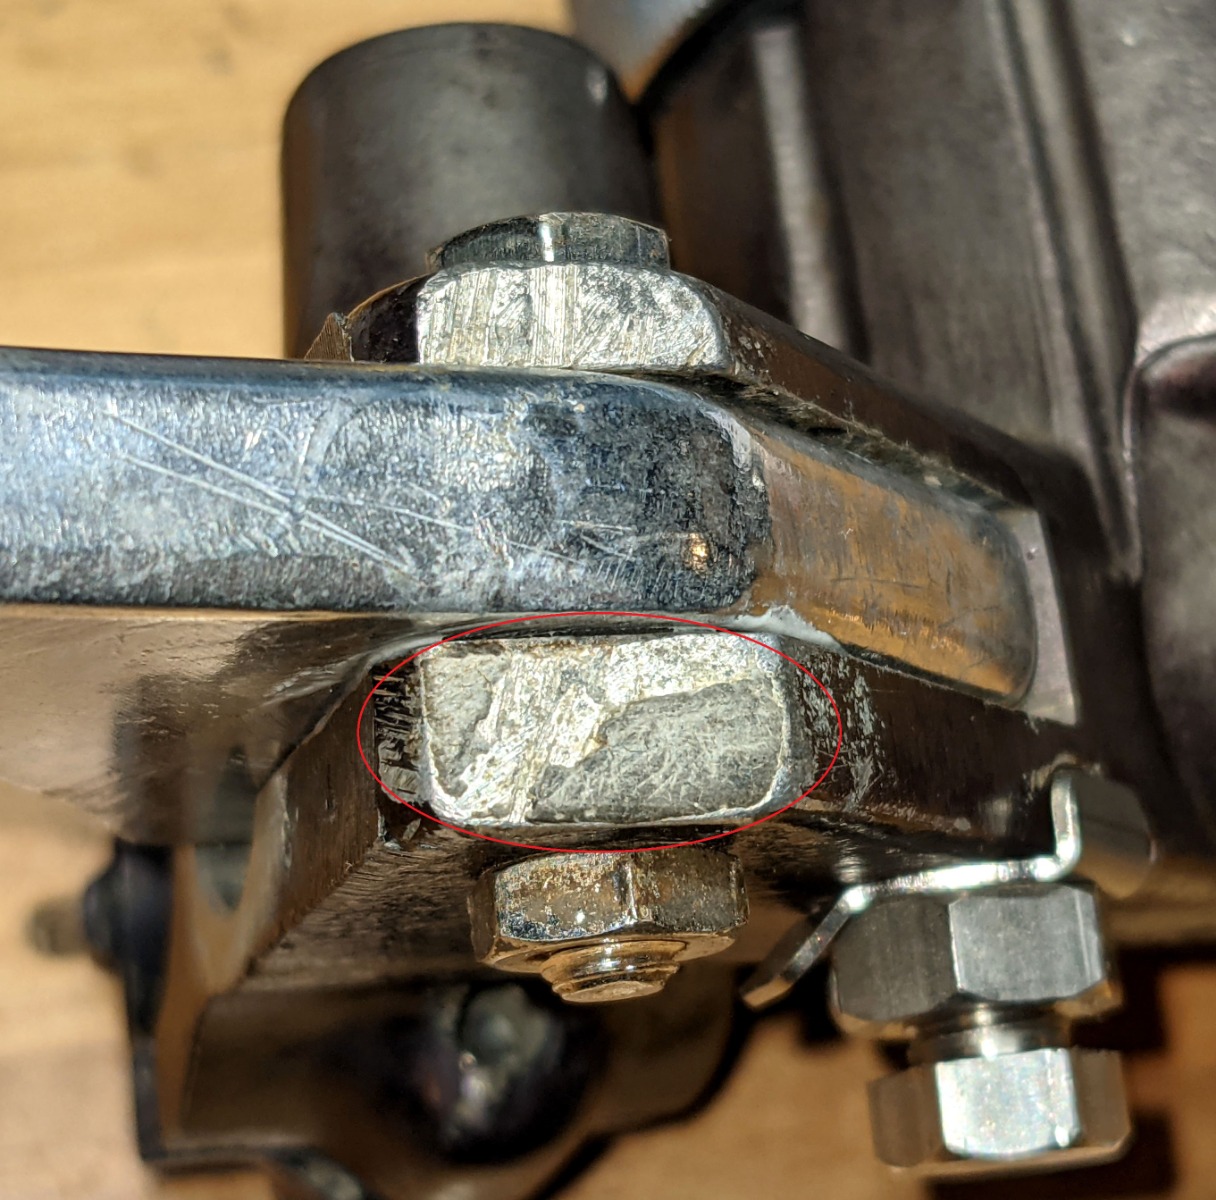
One more random question. When I was cleaning up the master cylinder, I noticed the machined ends of the lever mount ears had some kind of putty covering the surface. I removed some of it before I realized what it was, and then wasn't sure if it was supposed to be there. I left what was remaining. Is there supposed to be some kind of putty covering this surface? Did I remove some factory finishing? I can't think of how it would have come to be on mine. That would be a weird thing to add.
'78 Z1-R in blue
, '78 Z1-R in black,
'78 Z1-R in pieces
My dad's '74 Z1
'00 ZRX1100
My dad's '74 Z1
'00 ZRX1100
Please Log in or Create an account to join the conversation.
- Mikaw
-
- Offline
- Sustaining Member
-
Registered
- Posts: 4825
- Thanks: 1852
Re: 1974 Z1 Master Cylinder Reassembly
18 Jun 2021 07:58
That’s road rash. The casting should be more pointed.
1976 KZ 900 A4
kzrider.com/forum/11-projects/613548-1976-kz-900-a4
1976 KZ 900 B1 LTD
1978 KZ 1000 B2 LTD
1980 KZ 750 E1
Kowledge Speaks, But Wisdom Listens.
Jimi Hendrix.
1976 KZ 900 B1 LTD
1978 KZ 1000 B2 LTD
1980 KZ 750 E1
Kowledge Speaks, But Wisdom Listens.
Jimi Hendrix.
The following user(s) said Thank You: DOHC
Please Log in or Create an account to join the conversation.
Moderators: Street Fighter LTD