
static timing KZ305
- 82KZ305Belt
-
 Topic Author
- Offline
- User
-

Registered
- Posts: 639
- Thanks: 94
static timing KZ305
13 Aug 2021 09:02
I would imagine most people are ignoring my rebuild thread by now but I need to figure out if I'm doing this right so i can wrap this job up. Trying to set static timing with a test light, with a manual that sucks and a mechanic that sucks too.

As I described in that other thread, i gapped my points to .35mm and the manual then instructs me to watch the left intake valve go down and then up as i turn the crankshaft counterclockwise. It doesn't tell me exactly where the valve should be when I move to the next step, which is to line up the F on the rotor with the timing mark. But the first time the F for the left side appears after the valve starts going up the points are wide open and its impossible to get the light to flicker by adjusting the timing at that spot. I have to rotate the rotor until the F for the left side appears for the 2nd time. The valve is now still up, all the way. Now I can set the static timing with the test light, and have done so. If I turn the crank from here, the left valve IMMEDIATELY starts closing. Have I done this right?
I wonder because the manual then says turn the crankshaft 1/2 turn to line up the F for the right side. But if I do that, I have the same problem as before. The right side points are now wide freaking open. The right intake valve is certainly not at the wide open position then either. So I question whether I did the left side properly or not and don't want to proceed until I'm sure of what I'm doing.
81 KZ650 CSR
77 KZ650B (not in my paws yet)
82 KZ305 CSR
77 KZ650B (not in my paws yet)
82 KZ305 CSR
Please Log in or Create an account to join the conversation.
- Scirocco
-

- Offline
- Premium Member
-

Registered
- Never change a running system
- Posts: 4397
- Thanks: 2260
Re: static timing KZ305
13 Aug 2021 16:35
Half turn (180°) on the crank is a quarter turn (90°) on the cam shaft. ("F1" and "F2" are 90° offset).
One full turn (360°) on the crank is a half turn (180°) of the cam shaft.
Two turns (720°) on the crank is a full turn (360°) of the camshaft, ignition cam rotor and a engine power stroke (@ "F")
Your starting point is cylinder #1/L piston @ TDC and IN/EX valves closed, (power stroke).
The #1 breaker point gap have to set at rotor top lift first (0,35 mm) before you rotate the crank 180° next to adjust #2 points gap top lift.
Both points gaps are 90° cam rotor or 180° crank offset. If you adjust both #1 and #2 points gaps together in #1 position, #2 is now on base circle of the rotor (no or low lift).
This would explain your wide freaking open right side points because you have now double your #2/R points gap!!!
My 1975 Z 1 B 900 Project
www.kzrider.com/forum/11-projects/605133...ears-deep-sleep-mode
www.kzrider.com/forum/11-projects/605133...ears-deep-sleep-mode
The following user(s) said Thank You: 82KZ305Belt
Please Log in or Create an account to join the conversation.
- 82KZ305Belt
-
Topic Author
- Offline
- User
-
Registered
- Posts: 639
- Thanks: 94
Re: static timing KZ305
13 Aug 2021 17:31
This stuff hurts my brain and I will have to think about it. But right away this has helped me very much because after reading it I realized that I misspoke and was misunderstanding what I was looking at. I went back and read the manual, looked at the engine and reread what you wrote.
When I said the manual tells me to watch the valve go up, its actually the rocker arm I'm watching go up. So when I said its fully up when I set the static timing on the left side, the valve actually would have been fully closed. So maybe I did that correctly?
Will have to think about the rest of what you said because right now it hasn't sunk in.
81 KZ650 CSR
77 KZ650B (not in my paws yet)
82 KZ305 CSR
77 KZ650B (not in my paws yet)
82 KZ305 CSR
Please Log in or Create an account to join the conversation.
- ckahleer
-

- Away
- User
-
Registered
- Posts: 542
- Thanks: 193
Re: static timing KZ305
13 Aug 2021 17:56
Put the manual aside and get the points adjusted logically.
Turn the engine to where point gap is the largest. Adjust to spec there.
Turn the engine until piston starts moving up on compression stroke. Adjust timing plate to open points just before piston reaches TDC, (a few degrees before).
This should get the bike running good enough. Use a dwell meter and timing light for precise settings.
1997 ZL600
94 KE100
82 KZ305
74 TC185
94 KE100
82 KZ305
74 TC185
Please Log in or Create an account to join the conversation.
- 82KZ305Belt
-
Topic Author
- Offline
- User
-
Registered
- Posts: 639
- Thanks: 94
Re: static timing KZ305
13 Aug 2021 19:56 - 13 Aug 2021 19:57
I know there is a stupid-proof way of doing this because the guys on the defunct Kawasaki Twins forum got me there once, many moons ago, but I only remember fragments. And I'm at least halfway I think there so please bear with me while I get the other half.
I think i have the left one set properly. The test light switches perfectly when the rotor hits the left F mark is lined up and both I/E valves on the left are closed (rocker arms up). Is this correct?
Now can I just do the same thing on the right? Get both I/E valves closed while and the F lined up, and adjust the backing plate so the test light switches there? The manual makes this part very confusing so I'm trying to throw it out of my head.
81 KZ650 CSR
77 KZ650B (not in my paws yet)
82 KZ305 CSR
77 KZ650B (not in my paws yet)
82 KZ305 CSR
Last edit: 13 Aug 2021 19:57 by 82KZ305Belt.
Please Log in or Create an account to join the conversation.
- 82KZ305Belt
-
Topic Author
- Offline
- User
-
Registered
- Posts: 639
- Thanks: 94
Re: static timing KZ305
21 Sep 2021 11:59
OK I'm back to this again. I replaced the points with brand new ones.
As much as some have tried here to explain it in terms for dummies, I only get more confused the harder I try.
Turn the engine to where point gap is the largest. Adjust to spec there.
That much I can do. And have done.
Turn the engine until piston starts moving up on compression stroke.
I need more specifics. How do I know the piston is starting to move up on the compression stroke? This should be when both valves have closed, right, but that's what I've been doing.
Adjust timing plate to open points just before piston reaches TDC, (a few degrees before).
Do I adjust the timing plate for both sides, or only the right side?
This should get the bike running good enough. Use a dwell meter and timing light for precise settings.
Should coulda woulda. I aint there yet...
81 KZ650 CSR
77 KZ650B (not in my paws yet)
82 KZ305 CSR
77 KZ650B (not in my paws yet)
82 KZ305 CSR
Please Log in or Create an account to join the conversation.
- ckahleer
-
- Away
- User
-
Registered
- Posts: 542
- Thanks: 193
Re: static timing KZ305
21 Sep 2021 18:14
You should be able to see the piston by looking in the spark plug hole. When both intake and exhaust valves are closed, and the piston is just about to hit the top of it's stroke, this is when the points for that cylinder should open.
There is only one timing plate. Both sets of points are mounted to it. You do not adjust timing for right and left points separately. Once the point gaps are set, timing for both cylinders are adjusted together, as you rotate the plate.
There is only one timing plate. Both sets of points are mounted to it. You do not adjust timing for right and left points separately. Once the point gaps are set, timing for both cylinders are adjusted together, as you rotate the plate.
1997 ZL600
94 KE100
82 KZ305
74 TC185
94 KE100
82 KZ305
74 TC185
The following user(s) said Thank You: 82KZ305Belt
Please Log in or Create an account to join the conversation.
- 82KZ305Belt
-
Topic Author
- Offline
- User
-
Registered
- Posts: 639
- Thanks: 94
Re: static timing KZ305
22 Sep 2021 11:11
You should be able to see the piston by looking in the spark plug hole. When both intake and exhaust valves are closed, and the piston is just about to hit the top of it's stroke, this is when the points for that cylinder should open.
OK. I've now got the left side piston at this location. This is essentially what I've been doing but watching the cylinder helps me understand it a bit more.
But this is where everything seems to go haywire. What exactly is my next step? I have a test light on the left side and the points are still way too wide open.
81 KZ650 CSR
77 KZ650B (not in my paws yet)
82 KZ305 CSR
77 KZ650B (not in my paws yet)
82 KZ305 CSR
Please Log in or Create an account to join the conversation.
- ckahleer
-
- Away
- User
-
Registered
- Posts: 542
- Thanks: 193
Re: static timing KZ305
22 Sep 2021 15:08
If your points are wide open at this point, Your gap is too large or your timing is too far advanced.
Slowly rotate the engine two turns watching for a spot with the largest left points gap. Adjust left points gap to spec. at this spot. Repeat for right points.
Re-check. During two full rotations of the engine, The points should never open wider than spec.
Next adjust the timing plate so the left points just start opening as the left piston reaches TDC on power stroke.
Note: This is a ball park method of setting that should get you running. There are several timing marks on the rotor and the manual can be confusing as to which one to use, but this will get you close to the correct mark, and you can fine adjust your points to open as it hits that mark.
1997 ZL600
94 KE100
82 KZ305
74 TC185
94 KE100
82 KZ305
74 TC185
Please Log in or Create an account to join the conversation.
- 82KZ305Belt
-
Topic Author
- Offline
- User
-
Registered
- Posts: 639
- Thanks: 94
Re: static timing KZ305
22 Sep 2021 15:30
They aren't at their widest right now, they are just too wide to get them to be juuuuuust opening by rotating the backing plate in either direction.
Guess I need to start over, again. For at least the 5th time.
Guess I need to start over, again. For at least the 5th time.
81 KZ650 CSR
77 KZ650B (not in my paws yet)
82 KZ305 CSR
77 KZ650B (not in my paws yet)
82 KZ305 CSR
Please Log in or Create an account to join the conversation.
- ckahleer
-
- Away
- User
-
Registered
- Posts: 542
- Thanks: 193
Re: static timing KZ305
23 Sep 2021 09:00
Here is a pic of the points and timing plate on my KZ305. They were adjusted with a dwell meter and timing light a few month ago.
Do not try to adjust timing untill point gap is right. (.3mm - .4mm at its widest spot)
Note where the timing plate notches are in referance to places on the head cover.
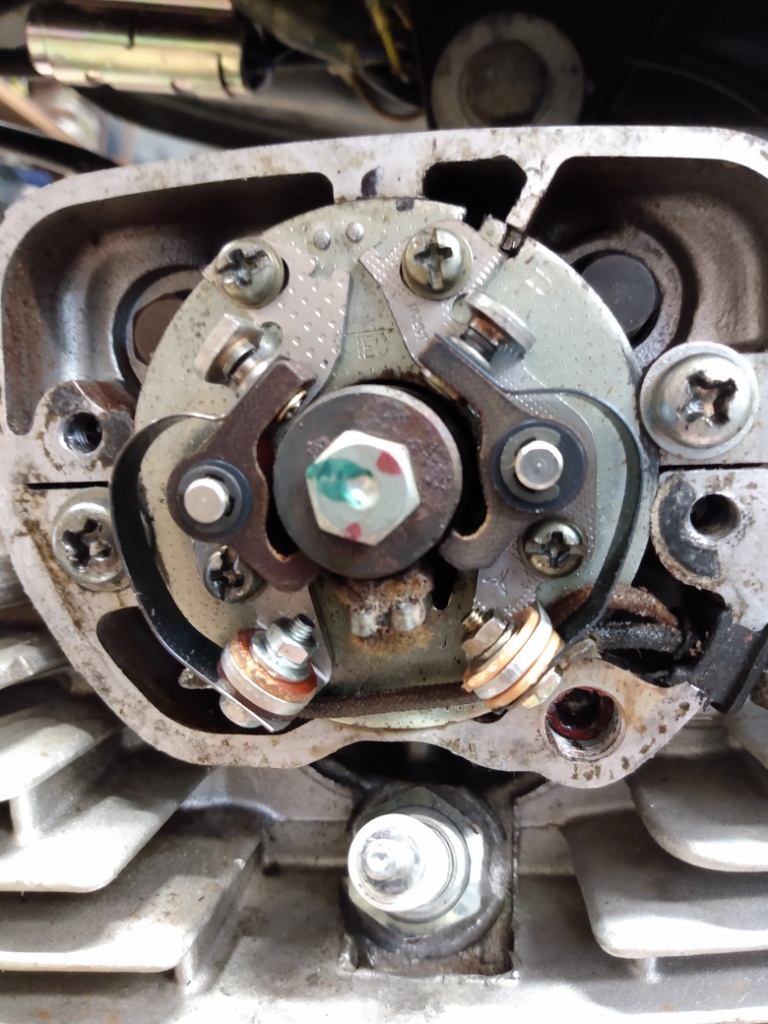
Do not try to adjust timing untill point gap is right. (.3mm - .4mm at its widest spot)
Note where the timing plate notches are in referance to places on the head cover.
1997 ZL600
94 KE100
82 KZ305
74 TC185
94 KE100
82 KZ305
74 TC185
The following user(s) said Thank You: 82KZ305Belt
Please Log in or Create an account to join the conversation.
- 82KZ305Belt
-
Topic Author
- Offline
- User
-
Registered
- Posts: 639
- Thanks: 94
Re: static timing KZ305
26 Sep 2021 08:37 - 26 Sep 2021 08:38
Thanks for the pic, its another piece of the puzzle. I checked my disassembly photos and found one of mine and it was in about the same position.
But I knew something was very wrong here, because after setting the gap the points seemed to behave exactly the opposite of how they should behave. I could not get the left side points to be anywhere near the "barely open" gap they need to be near TDC, no matter how I adjusted the timing plate. In fact it did seem, in hindsight, that they were very near the widest gap near TDC. That gave me an idea.
I took off the whole thing and removed the cammed sleeve on the governor (can't find that part's name on Partzilla). I rotated it 180 degrees.
Boom. Duh. That was apparently the problem. Now I'm in the ballpark but I gotta go to work now.
81 KZ650 CSR
77 KZ650B (not in my paws yet)
82 KZ305 CSR
77 KZ650B (not in my paws yet)
82 KZ305 CSR
Last edit: 26 Sep 2021 08:38 by 82KZ305Belt.
Please Log in or Create an account to join the conversation.
Moderators: Street Fighter LTD