
Power at Ignition Coil KZ1100
- Poopboy
-
 Topic Author
- Offline
- User
-

Registered
- Posts: 13
- Thanks: 1
Power at Ignition Coil KZ1100
07 May 2014 09:15 - 07 May 2014 09:18
I just picked up an 83 kz1100 ltd which had been sitting for years. I rebuilt the carbs, and put in the parts that someone had removed. Cranked it and found that I have no spark from the coils on the right side. I checked for voltage to the coil and there is constant voltage to the coil that is not working. I thought the CDI was supposed to open and close the ground side to make the fire work. So does this sound like a bad CDI? The other coil has no constant ground and works fine. Thanks in advance.
Last edit: 07 May 2014 09:18 by Poopboy.
Please Log in or Create an account to join the conversation.
- MFolks
-

- Offline
- User
-
Registered
- Posts: 6650
- Thanks: 541
Re: Power at Ignition Coil KZ1100
07 May 2014 11:06
These bikes have a IC Igniter, which give the ignition coils their grounds, sparking the plugs, so it's not a CDI as some people think it is. I'll give you some places to test:
Ohm Checking Pickup(Pulsing) Coils
The pickup coils on the Kawasaki’s with the factory supplied electronic ignition can sometimes fail or become intermittent due to heat and vibration.
1.Trace back from where the pick up coils are mounted,(under a right side CD sized cover) locate and disconnect a small 4 pin connector. Using a multi-meter set on OHMS and range of X 100 check between the BLUE and BLACK wires(#1 and #4 sparkplug wires) for between 360- 540 OHMS.
2.For #2 and #3 sparkplugs the wire colors will be YELLOW and RED, again 360-540 OHMS.
3.If the pickup coils are suspect of failing due to heat, they can be stressed using a hair dryer without the need of the engine running.
4.A replacement set of pickup coils might be obtained from a dealer who serviced the police Kawasaki’s.
5. If replacement pickup coils are not available, your next choice would be to order a Dyna “S” electronic ignition system from www.z1enterprises.com It replaces the IC igniter with a smaller module located where the mechanical ignition advancer was mounted.
6.Checking with Kawasaki.com website has determined that the Pick up(pulsing) coils are available . The pulsing coil # is 59026-1133 and replaces the older # 1002, 1012 which were used from the MKII motors until the 2005 P24.
1982 GPZ1100 B2
General Dynamics/Convair 1983-1993
GLCM BGM-109 Tomahawk, AGM-129A Advanced Cruise Missile (ACM)
General Dynamics/Convair 1983-1993
GLCM BGM-109 Tomahawk, AGM-129A Advanced Cruise Missile (ACM)
Please Log in or Create an account to join the conversation.
- MFolks
-
- Offline
- User
-
Registered
- Posts: 6650
- Thanks: 541
Re: Power at Ignition Coil KZ1100
07 May 2014 11:08
Cleaning Motorcycle Electrics
Get some of the De-Oxit DN5 electrical contact cleaner and figure on spending a good day going from the front of the bike to the back. It’s a plastic safe cleaner/preservative. www.deoxit.com is their website, and can be purchased at most electronic supply stores.
On the older Kawasaki's, and other makes, a majority of electrical connectors are inside the headlight housing requiring removal of the headlight, then the fun begins.
Do one set of electrical connectors at a time to avoid mixing up what connects to where. Usually disconnecting, spraying with De-Oxit DN5 and reconnecting is about all you'll need.
However, when encountering the green crud of corrosion, a brass wire brush may be needed on the pins you can reach. Some 400-600 grit wet and dry sandpaper strips rolled into a tube should reach the male and female pins in the more difficult to clean connectors.
Smoker’s pipe cleaners, cotton swabs and wooden toothpicks work as cleaning aids.
Really small electrical connectors may require the use of a welders tip cleaning tool assortment.
Most pins in the connectors are coated with a thin plating of tin, and others may be nothing more than copper or brass.
If moisture is added, the resulting corrosion lowers the voltage/current being carried causing dim lights, slow engine cranking, slow turn signal response and lower input voltage to the ignition coils resulting in weak spark.
The left and right handlebar switch pods will need attention too as they have circuit functions like turn, horn, run/stop, and start. If you discover the soldered connections at the switches are crumbling, I’ve got a repair procedure for this, just ask.
Usually a spritz or two with actuation of the switch is about all needed for these switches unless corrosion is detected and then careful disassembly is required.
The ignition switch may or may be not sealed to allow spraying the internal contacts. I urge caution if attempting to open this up as springs, and ball bearings may fly out never to be seen again!
If your bike has the older style glass tubed fuses, I suggest replacing them as vibration can cause internal failure. AGX is the type used, and most auto parts stores can get them for you.
Clean the fuse holder clips, looking for signs of overheating(discolored insulation, signs of melting). I use metal polish on a cotton swab, followed by spraying another clean swab with the De-Oxit DN5 and then rubbing the inside of the fuse clip.
All battery cables must be clean and tight for maximum current transfer. Check the cables going from the Negative(-) battery terminal/post to the engine mounting bolt
Also the one going from the Positive(+) terminal to the starter solenoid and from there to the starter motor.
If any battery cable feels ”Crunchy” when flexed, replace it as possible corrosion is inside the insulation.
Each "Bullet Connector" will have to be sprayed to ensure good connectivity, especially the ones going to the energizing coil of the starter solenoid.
The alternator output “Bullet Connectors” are usually behind the engine sprocket cover and will need inspecting and cleaning too.
The turn signal light sockets will benefit from a spritz from the contact cleaner along with the tail light/brake light socket.
Some brake light switches can be sprayed on the actuating rod, with the spray running down inside to the electrical contacts, others may be sealed requiring replacement if the switch is intermittent in operation.
Some people put the Di-Electric Grease on cleaned terminations/connectors, I don’t, as I’ve read/heard it can cause problems when it gets hot, actually insulating the connections, so the choice is yours to use or not.
I think I've covered about all of the electrical systems on the bike.........
“I spent a weekend going through every electrical connection and switch on the bike with a little scotchbrite pad and DeOxit - what a difference! Everything was brighter, gauge backlights, indicator lights, turn signals, I was getting a nicer spark, it fired up quicker, etc. Well worth my time. WELL worth it! “
From a forum member at www.kzrider.com
Re: Cleaning the many and various Motorcycle electrics.
I used the De-oxit D-5 spray on all the electrical connections of my 78 Kz1000 that had sat for twenty years .
When I parked the bike in 92 I was starting to have troubles with some of the electrical system, but after pulling everything apart and giving it a spray , reconnecting the connectors and working them back and forth a few times, then gave them another shot of spray to wash them off before the final reconnection.
Everything still works perfectly and has for over 7000 miles this year.
I am extremely happy with the results , a lot of the connectors were green when I started and after the cleaning they looked new ( shiny gold )
I found the Deoxit D-series, D-5 spray in a 4 oz can at a big electronics store called Frys in Illinois, don't get the small cans at Radio Shack , they are different and meant for computer type stuff.
store.caig.com/s.nl/sc.2/category.188/.f
Trust MFolks , the guy's a true rocket scientist and really knows what he's talking about.
JD
Use Deoxit DN5 on new or restored electrical contacts to condition them against future corrosion. Deoxit DN5 dissolves oxidation and corrosion on metal surfaces, fills in microscopic gaps and reseals surfaces for better electrical conductivity.
VOC and RoHS compliant
Nonflammable, quick-drying, non-dripping, and safe on plastics
Reduces arcing, RFI, wear and abrasion
Brand: Caig Laboratories
Model: DN5S-6N
Specifications: Net weight: 5.75 oz. (163g)
1982 GPZ1100 B2
General Dynamics/Convair 1983-1993
GLCM BGM-109 Tomahawk, AGM-129A Advanced Cruise Missile (ACM)
General Dynamics/Convair 1983-1993
GLCM BGM-109 Tomahawk, AGM-129A Advanced Cruise Missile (ACM)
Please Log in or Create an account to join the conversation.
- MFolks
-
- Offline
- User
-
Registered
- Posts: 6650
- Thanks: 541
Re: Power at Ignition Coil KZ1100
07 May 2014 11:10
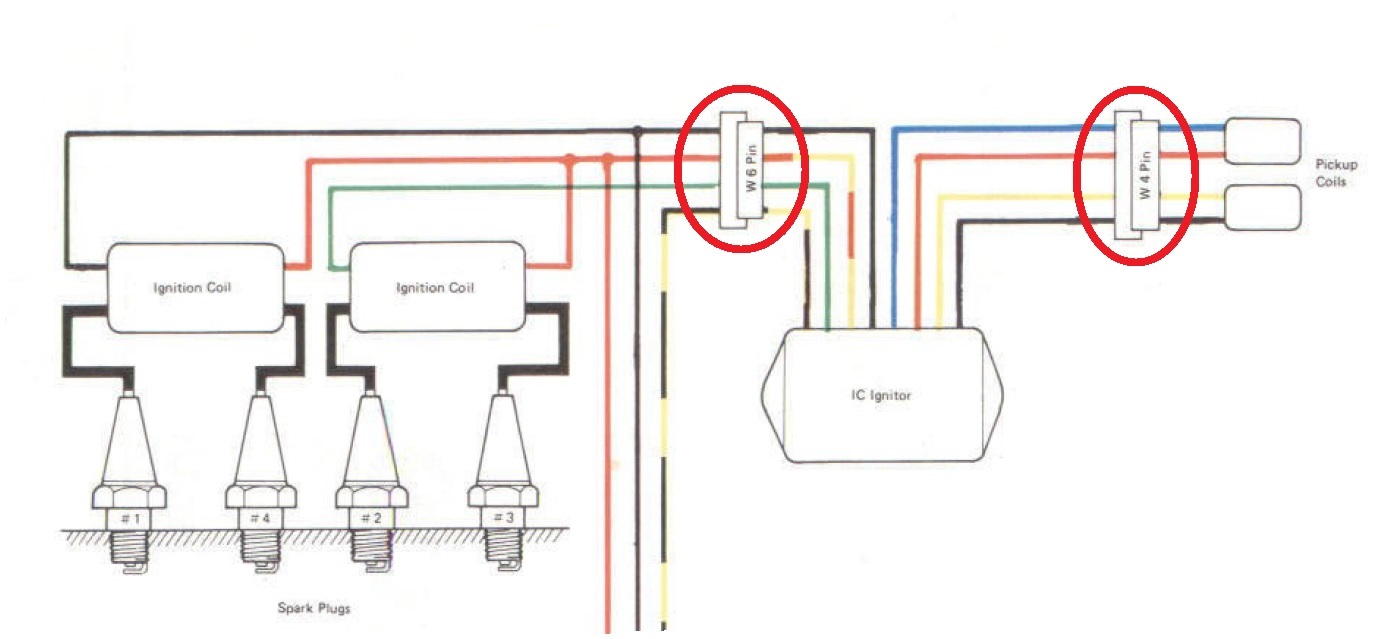
Kawasaki Ignition Coil Primary And Secondary Wiring
Ignition coils on the 80’s Kz1000,Kz1100’s and Gpz1100’s are wired the same, that is as you sit on the bike, the LEFT ignition coil primary(small wires) are two wires, RED and BLACK. The secondary (or sparkplug wires) go to #1 and #4 sparkplugs(your primary wiring may be different). NOTE, the 550’s,650’s,700’s & 750’s are backwards to what is listed for the bigger 4’s.
The cylinders are numbered left to right as you sit on the seat; #1,#2,#3, and #4.
For the RIGHT ignition coil, the primary wires, again are two wires, RED and GREEN, with the secondary going to #2 and #3.
The RED wire gets it’s voltage from the run/stop switch on the right handlebar switch pod. Your primary wiring may have a different color.
The BLACK and GREEN wires connect to the IC Igniter(if the bike has the Kawasaki supplied electronic ignition) it actually gives the coils their grounds to fire the sparkplugs.
Primary(small wires) may be 3-4 ohms, but the secondary(sparkplug wire side) could be 14 K (14000) ohms.
The sparkplug caps should read 5K OHMS(5000), any higher, or a reading of infinity means new caps should be ordered.
To stress the ignition coils, take a hair dryer, heat the coils and see if the ohm readings change from cold to hot . If they do, it’s time to buy new coils.
Keep in mind, the wiring is reversed for the 550’s, 650‘s, 700’s, and 750‘s, that is the RIGHT coil primary will be two wires, RED and BLACK with the secondary(sparkplugs) going to #1 and #4.
The LEFT coils primary wiring would be again two wires, RED and GREEN, with the secondary(sparkplugs) going to #2 and #3.
These engines have what is known as a “Wasted Spark” that is, a sparkplug will fire during an exhaust stroke. It does no damage and many other motorcycle engines have this design.
1982 GPZ1100 B2
General Dynamics/Convair 1983-1993
GLCM BGM-109 Tomahawk, AGM-129A Advanced Cruise Missile (ACM)
General Dynamics/Convair 1983-1993
GLCM BGM-109 Tomahawk, AGM-129A Advanced Cruise Missile (ACM)
Please Log in or Create an account to join the conversation.
- MFolks
-
- Offline
- User
-
Registered
- Posts: 6650
- Thanks: 541
Re: Power at Ignition Coil KZ1100
07 May 2014 11:12
Help With Igniter
Loudhvx from www.kzrider wrote:
I still have the rough HEI prototype in my bike. It's working fine after a few thousand miles. Actually it seems better than the stock ignitor. The HEI modules have a better input filter and better output characteristics. The stock ignitor sometimes gets false triggers that cause an occasional missfire at idle, nothing major, you'd probably never notice it until you directly compare it with one that doesn't misfire.
Your next step is to swap the pickup wires to determine if the loss is in the ignitor or the pickups. It's very important to swap the right wires here. Swap yellow with black. And swap red with blue. (Use jumpers so you don't lose the orientation of the connector. In other words don't actually take the wires out of the connectors.) See if this changes where the spark is. If the spark moves to the other coil, then it is the pickup (or it's wiring) that is bad. If the spark stays on the same coil, then it's the ignitor.
The black and blue pickup wires are for one pickup, and red and yellow are for another. Just ohm out the pairs. They should be around 450 ohms. Wiggle the wires and the pickups to see if you ever lose continuity on the pickups. (Obviously the pickup connector needs to be disconnected from the ignitor.)
In your case, it will be the red and yellow wire that are suspect (if it's not the ignitor). They control #2 and #3 cylinders. If you lose continuity determine if its a wire or the pickup itself. Check any point where the wiring is bent. Look for bumps in the insulation and wiggle them while the ohm meter is connected. If the ohm meter moves, pull on the wire to see if you can stretch the bump. This indicates the wire may be broken inside the insulation. When the wire breaks internally and the insulation is in tact, it creates a small bump in the wire. If the wires look fine, with no bumps, and no losses in continuity, it's most likely the pickup itself. To be sure you need to get two really small, sharp pins. Sewing needles are too think. The pins that come on new dress shirts work good. Insert them into the wire insulation right where the wires go into the pickups. One for red, and one for yellow. Then connect the ohm meter to the pins. If you have no continuity, the pickup is bad. Luckily pickups are cheap.
1982 GPZ1100 B2
General Dynamics/Convair 1983-1993
GLCM BGM-109 Tomahawk, AGM-129A Advanced Cruise Missile (ACM)
General Dynamics/Convair 1983-1993
GLCM BGM-109 Tomahawk, AGM-129A Advanced Cruise Missile (ACM)
Please Log in or Create an account to join the conversation.
- Poopboy
-
Topic Author
- Offline
- User
-
Registered
- Posts: 13
- Thanks: 1
Re: Power at Ignition Coil KZ1100
07 May 2014 15:54
Thanks, that is a lot of great help. I started off by ohming out the pick up coils. They were reading about 400 ohms each so I guess that means they are good. I put the harnesses back together and swapped the ground wires on the ignition coils and the coil that was not working made a spark so that shows that the ignition coil is good. I put everything back the way it was and still no spark. So I will try cleaning all terminals next. But not to jump the gun, so it seems the pickup coils are good, ignition coils are good, so the only thing in between would be the ICI unit right? I checked the wire going from the ICI harness to the coil and it is not shorted or grounded. I still have constant voltage at the ignition coil.
Please Log in or Create an account to join the conversation.
- MFolks
-
- Offline
- User
-
Registered
- Posts: 6650
- Thanks: 541
Re: Power at Ignition Coil KZ1100
07 May 2014 19:28
With the ignition switch on, and the run/stop switch in run, you should be able to produce a spark, by moving a thin screwdriver in front of the pick up(either one), also the sparkplug caps have 5000 ohm resistor that can go bad from heat, age & vibration. New ones can be bought at
www.z1enterprises.com
or any Japanese motorcycle shop. Before installing new caps, cut about 3/16"-1/4" off the end & install the new caps.
1982 GPZ1100 B2
General Dynamics/Convair 1983-1993
GLCM BGM-109 Tomahawk, AGM-129A Advanced Cruise Missile (ACM)
General Dynamics/Convair 1983-1993
GLCM BGM-109 Tomahawk, AGM-129A Advanced Cruise Missile (ACM)
Please Log in or Create an account to join the conversation.
- Poopboy
-
Topic Author
- Offline
- User
-
Registered
- Posts: 13
- Thanks: 1
Re: Power at Ignition Coil KZ1100
08 May 2014 04:31
I tried the wire jump on the pickup coils like mentioned and no spark to the plug on right coil. when I swap the ground wire on ignition coil I get a spark so that would indicate that the coil, cap, plug and wire is good. So that leaves the ICU right?
Please Log in or Create an account to join the conversation.
- loudhvx
-

- Offline
- KZr Legend
-

Registered
- Posts: 10864
- Thanks: 1619
Re: Power at Ignition Coil KZ1100
08 May 2014 06:57 - 08 May 2014 06:58
Your test would show that it is the igniter, (or the wiring from igniter to right coil (should be a green wire on the 1100)). It could also be the pickup with the yellow and red wires, or the connection from the pickup to the igniter.
If it is the igniter, you can make one cheap. It's in my signature.
If it is the igniter, you can make one cheap. It's in my signature.
1981 KZ550 D1 gpz.
Kz550 valve train warning.
Other links.
Kz550 valve train warning.
Other links.
Last edit: 08 May 2014 06:58 by loudhvx.
Please Log in or Create an account to join the conversation.
- Poopboy
-
Topic Author
- Offline
- User
-
Registered
- Posts: 13
- Thanks: 1
Re: Power at Ignition Coil KZ1100
08 May 2014 11:05
Your HEI looks pretty cool. I am going to wimp out and just try a used one on ebay first. If I get some spare change I may try this out. I also metered the pickup and passed a screw driver in front of it and check for resistance. It seemed to open and close as I passed a screw driver in front of it so I guess that further confirms it is good, I hope. The replacement ICU should be here Tuesday so I guess I will find out. Anyone know an easy way to replace it? Do you have to remove the battery box and wiring to remove it?
Please Log in or Create an account to join the conversation.
- Poopboy
-
Topic Author
- Offline
- User
-
Registered
- Posts: 13
- Thanks: 1
Re: Power at Ignition Coil KZ1100
08 May 2014 11:08
If I get it out I will try the smack it with a hammer trick and see if it starts working.
Please Log in or Create an account to join the conversation.
- Patton
-

- Offline
- KZr Legend
-
Registered
- Posts: 18568
- Thanks: 2102
Re: Power at Ignition Coil KZ1100
08 May 2014 15:13 - 08 May 2014 15:13
If not already done, would first confirm connectivity of each wire into and out of the connectors on either side of the igniter.
Good Fortune!")
Good Fortune!
1973 Z1
KZ900 LTD
KZ900 LTD
Attachments:
Last edit: 08 May 2014 15:13 by Patton.
Please Log in or Create an account to join the conversation.
Moderators: Street Fighter LTD